Blue Coat
®
Systems
SG
™
Appliance
Volume 4: Securing the Blue Coat SG Appliance
Volume 4: Securing the Blue Coat SG Appliance
Contact Information
Blue Coat Systems Inc.420 North Mary Ave Sunnyvale, CA 94085-4121
http://www.bluecoat.com/support/contact.html bcs.info@bluecoat.com
http://www.bluecoat.com
For concerns or feedback about the documentation: documentation@bluecoat.com
Copyright© 1999-2007 Blue Coat Systems, Inc. All rights reserved worldwide. No part of this document may be reproduced by any means nor modified, decompiled, disassembled, published or distributed, in whole or in part, or translated to any electronic medium or other means without the written consent of Blue Coat Systems, Inc. All right, title and interest in and to the Software and documentation are and shall remain the exclusive property of Blue Coat Systems, Inc. and its licensors. ProxyAV™, CacheOS™, SGOS™, SG™, Spyware Interceptor™, Scope™, RA Connector™, RA Manager™, Remote Access™ and MACH5™ are trademarks of Blue Coat Systems, Inc. and CacheFlow®, Blue Coat®, Accelerating The Internet®, ProxySG®, WinProxy®, AccessNow®, Ositis®, Powering Internet Management®, The Ultimate Internet Sharing Solution®, Cerberian®, Permeo®, Permeo Technologies, Inc.®, and the Cerberian and Permeo logos are registered trademarks of Blue Coat Systems, Inc. All other trademarks contained in this document and in the Software are the property of their respective owners.
BLUE COAT SYSTEMS, INC. DISCLAIMS ALL WARRANTIES, CONDITIONS OR OTHER TERMS, EXPRESS OR IMPLIED, STATUTORY OR OTHERWISE, ON SOFTWARE AND DOCUMENTATION FURNISHED HEREUNDER INCLUDING WITHOUT LIMITATION THE WARRANTIES OF DESIGN, MERCHANTABILITY OR FITNESS FOR A PARTICULAR PURPOSE AND NONINFRINGEMENT. IN NO EVENT SHALL BLUE COAT SYSTEMS, INC., ITS SUPPLIERS OR ITS LICENSORS BE LIABLE FOR ANY DAMAGES, WHETHER ARISING IN TORT, CONTRACT OR ANY OTHER LEGAL THEORY EVEN IF BLUE COAT SYSTEMS, INC. HAS BEEN ADVISED OF THE POSSIBILITY OF SUCH DAMAGES.
Document Number: 231-02841
Contents
Contact Information
Chapter 1: About Security
Controlling SG Appliance Access ...11
Controlling User Access with Identity-based Access Controls ...11
SSL Between the SG Appliance and the Authentication Server...12
About This Book ...12
Document Conventions...13
Chapter 2: Controlling Access to the SG Appliance Limiting Access to the SG Appliance ...15
Requiring a PIN for the Front Panel...15
Limiting Workstation Access ...16
Securing the Serial Port ...16
About Password Security...16
Limiting User Access to the SG Appliance—Overview ...17
Moderate Security: Restricting Management Console Access Through the Console Access Control List (ACL) ...19
Maximum Security: Administrative Authentication and Authorization Policy...20
Defining Administrator Authentication and Authorization Policies...20
Defining Policies Using the Visual Policy Manager ...20
Defining Policies Directly in Policy Files...21
Admin Transactions and <Admin> Layers...21
Example Policy Using CPL Syntax ...24
Chapter 3: Controlling Access to the Internet and Intranet Section A: Managing Users About User Login ...26
Viewing Logged-In Users ...26
Logging Out Users ...27
Inactivity Timeout...27
Administrator Action ...28
Policy...28
Refreshing User Data ...28
Credential Refresh Time...29
Authorization Refresh Time ...29
Surrogate Refresh Time...30
Volume 4: Securing the Blue Coat SG Appliance
Related CLI Syntax to Manage Users... 30
Section B: Using Authentication and Proxies Understanding Authentication Modes... 32
Understanding Origin-Style Redirection ... 34
Selecting an Appropriate Surrogate Credential ... 35
Configuring Transparent Proxy Authentication ... 35
Permitting Users to Login with Authentication or Authorization Failures... 37
Using Guest Authentication... 38
Using Default Groups ... 39
Section C: Using SSL with Authentication and Authorization Services Using SSL Between the Client and the SG Appliance ... 41
Section D: Creating a Proxy Layer to Manage Proxy Operations Using CPL ... 42
Chapter 4: Understanding and Managing X.509 Certificates Section A: Concepts Public Keys and Private Keys... 52
Certificates... 52
SSL Certificates... 52
CA Certificates ... 53
External Certificates... 53
Keyrings... 53
Cipher Suites Supported by SGOS Software ... 53
Server-Gated Cryptography and International Step-Up... 54
Section B: Using Keyrings and SSL Certificates Creating a Keyring... 56
Deleting an Existing Keyring and Certificate ... 58
Section C: Managing Certificates Managing Certificate Signing Requests... 59
Creating a CSR ... 59
Viewing a Certificate Signing Request ... 60
Managing SSL Certificates... 60
Creating Self-Signed SSL Certificates ... 61
Importing a Server Certificate... 62
Using Certificate Revocation Lists ... 62
Troubleshooting Certificate Problems ... 64
Section D: Using External Certificates Importing and Deleting External Certificates... 65
Deleting an External Certificate... 65
Contents
Section E: Advanced Configuration
Importing an Existing Keypair and Certificate... 67
About Certificate Chains... 69
Importing a CA Certificate ... 69
Creating CA Certificate Lists... 70
Chapter 5: Certificate Realm Authentication How Certificate Realm Works ... 73
Creating a Certificate Realm... 74
Defining a Certificate Realm ... 74
Defining Certificate Realm General Properties ... 75
Revoking User Certificates ... 76
Creating the Certificate Authorization Policy ... 77
Tips... 78
Chapter 6: Oracle COREid Authentication Understanding COREid Interaction with Blue Coat ... 79
Configuring the COREid Access System... 79
Additional COREid Configuration Notes ... 80
Configuring the SG Realm... 80
Participating in a Single Sign-On (SSO) Scheme ... 81
Avoiding SG Appliance Challenges... 81
Creating a COREid Realm ... 82
Configuring Agents ... 82
Configuring the COREid Access Server ... 83
Configuring the General COREid Settings... 84
Creating the CPL ... 86
Chapter 7: Forms-Based Authentication Section A: Understanding Authentication Forms User/Realm CPL Substitutions for Authentication Forms... 93
Tip... 94
Section B: Creating and Editing a Form Section C: Setting Storage Options Section D: Using CPL with Forms-Based Authentication Tips... 100
Chapter 8: IWA Realm Authentication and Authorization How Blue Coat Works with IWA ... 101
Creating an IWA Realm ... 101
IWA Servers ... 102
Defining IWA Realm General Properties ... 103
Creating the CPL ... 107
Volume 4: Securing the Blue Coat SG Appliance
Chapter 9: LDAP Realm Authentication and Authorization
Overview ... 109
Creating an LDAP Realm ... 110
LDAP Servers ... 111
Defining LDAP Base Distinguished Names ... 112
LDAP Search & Groups Tab (Authorization and Group Information) ... 114
Customizing LDAP Objectclass Attribute Values... 116
Defining LDAP General Realm Properties... 117
Creating the CPL ... 119
Notes ... 120
Chapter 10: Local Realm Authentication and Authorization Creating a Local Realm ... 121
Changing Local Realm Properties ... 121
Notes ... 123
Defining the Local User List ... 123
Creating a Local User List... 123
Populating a List using the .htpasswd File ... 125
Uploading the .htpasswd File ... 125
Populating a Local User List through the SG Appliance ... 126
Enhancing Security Settings for the Local User List... 128
Creating the CPL ... 129
Chapter 11: Policy Substitution Realm How Policy Substitution Realms Work ... 131
Creating a Policy Substitution Realm ... 134
Configuring User Information ... 134
Creating a List of Users to Ignore ... 136
Configuring Authorization... 137
Defining Policy Substitution Realm General Properties ... 138
Notes ... 139
Creating the Policy Substitution Policy ... 140
Using Single Sign-On Realms and Proxy Chains... 141
Chapter 12: CA eTrust SiteMinder Authentication Understanding SiteMinder Interaction with Blue Coat ... 143
Configuring the SiteMinder Policy Server ... 143
Additional SiteMinder Configuration Notes... 144
Configuring the SG Realm... 145
Participating in a Single Sign-On (SSO) Scheme ... 145
Avoiding SG Appliance Challenges... 146
Creating a SiteMinder Realm ... 146
Configuring Agents ... 146
Contents
Configuring General Settings for SiteMinder... 150
Creating the CPL ... 153
Chapter 13: RADIUS Realm Authentication and Authorization Creating a RADIUS Realm... 156
Defining RADIUS Realm Properties ... 156
Defining RADIUS Realm General Properties ... 158
Creating the Policy... 160
Fine-Tuning RADIUS Realms ... 160
Creating RADIUS Groups ... 161
CPL Example ... 162
Troubleshooting ... 162
Notes ... 162
Chapter 14: Novell Single Sign-on Authentication and Authorization How Novell SSO Realms Work ... 164
How Novell SSO Authorization Works ... 164
Creating a Novell SSO Realm ... 165
Novell SSO Agents... 165
Adding LDAP Servers to Search and Monitor ... 167
Querying the LDAP Search Realm ... 168
Configuring Authorization... 169
Defining Novell SSO Realm General Properties ... 169
Modifying the sso.ini File for Novell SSO Realms ... 171
Creating the CPL ... 172
Using Single Sign-On Realms and Proxy Chains... 172
Notes ... 173
Chapter 15: Sequence Realm Authentication Adding Realms to a Sequence Realm... 175
Creating a Sequence Realm ... 176
Adding Realms to a Sequence Realm... 176
Defining Sequence Realm General Properties ... 178
Tips... 179
Chapter 16: Windows Single Sign-on Authentication How Windows SSO Realms Work ... 181
How Windows SSO Works with BCAAA... 182
BCAAA Synchronization... 182
How Windows SSO Authorization Works ... 183
Creating a Windows SSO Realm ... 183
Windows SSO Agents... 184
Configuring Authorization... 185
Defining Windows SSO Realm General Properties ... 186
Volume 4: Securing the Blue Coat SG Appliance
Using Single Sign-On Realms and Proxy Chains... 190
Notes ... 191
Chapter 17: Using XML Realms About XML Realms ... 193
Before Creating an XML Realm ... 194
Creating an XML Realm... 194
Configuring XML Servers... 195
Configuring XML Options... 196
Configuring XML Realm Authorization... 196
Configuring XML General Realm Properties... 198
Creating the CPL ... 200
Viewing Statistics ... 200
Appendix A: Glossary Appendix B: Using the Authentication/Authorization Agent Using the BCAAA Service ... 215
Performance Notes ... 216
Installing the BCAAA Service on a Windows System... 217
Notes on SSL and Systems Running pre-Windows 2003... 222
Notes on SSL and Systems Running Windows 2003 and Later ... 222
Installing the BCAAA Service on a Solaris System... 222
Creating Service Principal Names for IWA Realms... 223
Troubleshooting Authentication Agent Problems ... 225
Common BCAAA Event Messages ... 225
Appendix C: Managing the SSL Client Understanding the SSL Client... 233
Creating an SSL Client... 233
Associating a Keyring and Protocol with the SSL Client ... 233
Changing the Cipher Suites of the SSL Client ... 234
Troubleshooting Server Certificate Verification... 237
Setting the SSL Negotiation Timeout ... 237
Appendix D: XML Protocol Section A: Authenticate Request GET Method (User Credentials in Request)... 240
GET Method (User Credentials in Headers) ... 240
POST Method (User Credentials in Request)... 240
POST Method (User Credentials in Headers)... 240
Section B: Authenticate Response Success ... 242
Contents
Section C: Authorize Request
GET Method... 244 POST Method... 244
Section D: Authorize Response
Success ... 245 Failed... 245 Appendix E: Authentication and Authorization Errors
Chapter 1: About Security
Enterprise-wide security begins with security on the SG appliance, and continues with controlling user access to the Intranet and Internet.
SSH and HTTPS are the recommended (and default) methods for managing access to the SG appliance. SSL is the recommended protocol for communication between the appliance and a realm's off-box authentication server.
Controlling SG
Appliance Access
You can control access to the SG appliance several ways: by limiting physical access to the system, by using passwords, restricting the use of console account, through per-user RSA public key authentication, and through Blue Coat Content Policy Language (CPL). How secure the system needs to be depends upon the environment.
You can limit access to the SG appliance by:
❐ Restricting physical access to the system and by requiring a PIN to access the front panel.
❐ Restricting the IP addresses that are permitted to connect to the SG appliance CLI. ❐ Requiring a password to secure the Setup Console.
These methods are in addition to the restrictions placed on the console account (a console account user password) and the Enable password. For information on using the console account, refer to Volume 1: Getting Started.
By using every possible method (physically limiting access, limiting workstation IP addresses, and using passwords), the SG appliance is very secure.
Once the SG appliance is secure, you can limit access to the Internet and intranet. It is possible to control access to the network without using authentication. You only need to use authentication if you want to use identity-based access controls.
Controlling User Access with Identity-based Access Controls
The SG appliance provides a flexible authentication architecture that supports multiple services with multiple backend servers (for example, LDAP directory servers together with NT domains with no trust relationship) within each authentication scheme with the introduction of the realm.
A realm authenticates and authorizes users for access to SG services using either explicit proxy or transparent proxy mode, discussed in Volume 2: Proxies and Proxy Services. Multiple authentication realms can be used on a single SG appliance. Multiple realms are essential if the enterprise is a managed provider or the company has merged with or acquired another company. Even for companies using only one protocol, multiple realms might be necessary, such as the case of a company using an LDAP server with multiple authentication boundaries. You can use realm sequencing to search the multiple realms all at once.
Volume 4: Securing the Blue Coat SG Appliance
A realm configuration includes: ❐ Realm name.
❐ Authentication service—(IWA, LDAP, RADIUS, Local, Certificate, Sequences, CA eTrust SiteMinder®, Oracle COREid™, Policy Substitution, Windows SSO, Novell SSO).
❐ External server configuration—Backend server configuration information, such as host, port, and other relevant information based on the selected service.
❐ Authentication schema—The definition used to authenticate users.
❐ Authorization schema—The definition used to authorize users for membership in defined groups and check for attributes that trigger evaluation against any defined policy rules.
❐ One-time passwords are supported for RADIUS realms only.
You can view the list of realms already created by clicking Configuration > Authentication > Realms. Realms are created on the home page for each realm.
SSL Between the SG
Appliance and the Authentication Server
SSL communication between the SG appliance and LDAP and IWA authentication servers is supported. In addition, you can also use SSL between the client and the SG appliance. For more information on using SSL between the client and the appliance, see “Using SSL with Authentication and Authorization Services” on page 41.
Configuring a realm to use SSL between the SG appliance and the authentication server is performed on a per-realm basis. Part of the SSL configuration is specifying whether to verify the server's certificate. If the server certificate is to be verified, then the server's certificate must be signed by a Certificate Authority that the SG appliance trusts, and the common name in the server certificate must match the server host as specified in the realm configuration.
The realms use the default SSL client defined on the SG appliance for SSL communications to the authentication servers.
About This Book
The first few chapters of Volume 4: Securing the Blue Coat SG Appliance deal with limiting access to the SG appliance . The remainder of the book discusses the various realms: ❐ Chapter 2: "Controlling Access to the SG Appliance"
❐ Chapter 3: "Controlling Access to the Internet and Intranet"
❐ Chapter 4: "Understanding and Managing X.509 Certificates"
❐ Chapter 5: "Certificate Realm Authentication"
❐ Chapter 6: "Oracle COREid Authentication"
❐ Chapter 7: "Forms-Based Authentication"
Note: If the browser is configured for on-line checking of certificate revocation, the status check must be configured to bypass authentication.
Chapter 1: About Security
❐ Chapter 10: "Local Realm Authentication and Authorization"
❐ Chapter 11: "Policy Substitution Realm"
❐ Chapter 12: "CA eTrust SiteMinder Authentication"
❐ Chapter 13: "RADIUS Realm Authentication and Authorization"
❐ Chapter 14: "Novell Single Sign-on Authentication and Authorization"
❐ Chapter 15: "Sequence Realm Authentication"
❐ Chapter 16: "Windows Single Sign-on Authentication"
❐ Chapter 17: "Using XML Realms"
❐ Appendix A: "Glossary"
❐ Appendix D: "XML Protocol"
❐ Appendix C: "Managing the SSL Client"
❐ Appendix B: "Using the Authentication/Authorization Agent"
Document Conventions
The following section lists the typographical and Command Line Interface (CLI) syntax conventions used in this manual.
Table 1-1. Document Conventions
Conventions Definition
Italics The first use of a new or Blue Coat-proprietary term.
Courier font Command line text that appears on your administrator workstation.
Courier Italics A command line variable that is to be substituted with a literal name or value pertaining to the appropriate facet of your network system.
Courier Boldface A Blue Coat literal to be entered as shown.
{ } One of the parameters enclosed within the braces must be supplied
[ ] An optional parameter or parameters.
| Either the parameter before or after the pipe character can or must be selected, but not both.
Chapter 2: Controlling Access to the SG Appliance
You can control access to the SG appliance several ways: by limiting physical access to the system, by using passwords, restricting the use of console account, through per-user RSA public key authentication, and through Blue Coat Content Policy Language (CPL). How secure the system needs to be depends upon the environment.
This section contains:
❐ “Limiting Access to the SG Appliance”
❐ “About Password Security” on page 16
❐ “Limiting User Access to the SG Appliance—Overview” on page 17
❐ “Moderate Security: Restricting Management Console Access Through the Console Access Control List (ACL)” on page 19
❐ “Maximum Security: Administrative Authentication and Authorization Policy” on page 20
Limiting Access to the SG Appliance
You can limit access to the SG appliance by:
❐ Restricting physical access to the system and by requiring a PIN to access the front panel.
❐ Restricting the IP addresses that are permitted to connect to the SG appliance CLI. ❐ Requiring a password to secure the Setup Console.
These methods are in addition to the restrictions placed on the console account (a console account user password) and the Enable password. For information on using the console account, refer to Volume 1: Getting Started.
By using every possible method (physically limiting access, limiting workstation IP addresses, and using passwords), the SG appliance is very secure.
This section discusses:
❐ “Requiring a PIN for the Front Panel”
❐ “Limiting Workstation Access” on page 16 ❐ “Securing the Serial Port” on page 16
Requiring a PIN for the Front Panel
On systems that have a front panel display, you can create a four-digit PIN to protect the system from unauthorized use. The PIN is hashed and stored. You can only create a PIN from the command line.
To create a front panel PIN, after initial configuration is complete: From the (config) prompt:
SGOS#(config) security front-panel-pin PIN where PIN is a four-digit number.
Volume 4: Securing the Blue Coat SG Appliance
To clear the front-panel PIN, enter:
SGOS#(config) security front-panel-pin 0000
Limiting Workstation Access
During initial configuration, you have the option of preventing workstations with unauthorized IP addresses from accessing the CLI. If this option is not enabled, all workstations are allowed to access the CLI. You can also add allowed workstations later to the access control list (ACL). (For more information on limiting workstation access, see
“Moderate Security: Restricting Management Console Access Through the Console Access Control List (ACL)” on page 19.)
Securing the Serial Port
If you choose to secure the serial sort, you must provide a Setup Console password that is required to access the Setup Console in the future.
Once the secure serial port is enabled:
❐ The Setup Console password is required to access the Setup Console.
❐ An authentication challenge (username and password) is issued to access the CLI through the serial port.
To recover from a lost Setup Console password, you can:
❐ Use the Front Panel display to either disable the secure serial port or enter a new Setup Console password.
❐ Use the CLI restore-defaults factory-defaults command to delete all system settings. For information on using the restore-defaults factory-defaults command, refer to Volume 9: Managing the Blue Coat SG Appliance.
❐ Use the reset button (if the appliance has a reset button) to delete all system settings. To enable the secure serial port, refer to the Installation Guide for your platform.
About Password Security
In the SG appliance, the console administrator password, the Setup Console password, and Enable (privileged-mode) password are hashed and stored. It is not possible to reverse the hash to recover the plaintext passwords.
In addition, the show config and show security CLI commands display these
passwords in their hashed form. The length of the hashed password depends on the hash algorithm used so it is not a fixed length across the board.
Passwords that the SG appliance uses to authenticate itself to outside services are encrypted using triple-DES on the appliance, and using RSA public key encryption for output with the show config CLI command. You can use a third-party encryption application to create encrypted passwords and copy them into the SG appliance using an encrypted-password command (which is available in several modes and described in those modes). If you use a third-party encryption application, verify it supports RSA encryption, OAEP padding, and Base64 encoded with no new lines.
These passwords, set up during configuration of the external service, include:
Chapter 2: Controlling Access to the SG Appliance
❐ Archive configuration FTP password—For configuration information, refer to the archive configuration information in Volume 1: Getting Started.
❐ RADIUS primary and alternate secret—For configuration information, see
Chapter 13: "RADIUS Realm Authentication and Authorization".
❐ LDAP search password—For configuration information, see “LDAP Search & Groups Tab (Authorization and Group Information)” on page 114.
❐ Content filter download passwords—For configuration information, refer to the content filtering information in Volume 7: Managing Content.
Limiting User Access to the SG Appliance—Overview
When deciding how to give other users read-only or read-write access to the SG appliance, sharing the basic console account settings is only one option. The following summarizes all available options:
❐ Console account—minimum security
The console account username and password are evaluated when the SG appliance is accessed from the Management Console through a browser and from the CLI through SSH with password authentication. The Enable (privileged-mode) password is evaluated when the console account is used through SSH with password
authentication and when the CLI is accessed through the serial console and through SSH with RSA authentication. The simplest way to give access to others is sharing this basic console account information, but it is the least secure and is not recommended. To give read-only access to the CLI, do not give out the Enable (privileged-mode) password.
❐ Console access control list—moderate security
Using the access control list (ACL) allows you to further restrict use of the console account and SSH with RSA authentication to workstations identified by their IP address and subnet mask. When the ACL is enforced, the console account can only be used by workstations defined in the console ACL. Also, SSH with RSA authentication connections are only valid from workstations specified in the console ACL (provided it is enabled).
After setting the console account username, password, and Enable (privileged-mode) password, use the CLI or the Management Console to create a console ACL. See
“Moderate Security: Restricting Management Console Access Through the Console Access Control List (ACL)” on page 19.
❐ Per-user RSA public key authentication—moderate security
Each administrator’s public keys are stored on the appliance. When connecting through SSH, the administrator logs in with no password exchange. Authentication occurs by verifying knowledge of the corresponding private key. This is secure because the passwords never go over the network.
Note: If Telnet Console access is configured, Telnet can be used to manage the SG appliance with behavior similar to SSH with password authentication.
SSL configuration is not allowed through Telnet, but is permissible through SSH.
Behavior in the following sections that applies to SSH with password authentication also applies to Telnet. Use of Telnet is not recommended because it is not a secure protocol.
Volume 4: Securing the Blue Coat SG Appliance
This is a less flexible option than CPL because you cannot control level of access with policy, but it is a better choice than sharing the console credentials.
❐ Blue Coat Content Policy Language (CPL)—maximum security
CPL allows you to control administrative access to the SG appliance through policy. If the credentials supplied are not the console account username and password, policy is evaluated when the SG appliance is accessed through SSH with password
authentication or the Management Console. Policy is never evaluated on direct serial console connections or SSH connections using RSA authentication.
• Using the CLI or the Management Console GUI, create an authentication realm to be used for authorizing administrative access. For administrative access, the realm must support BASIC credentials—for example, LDAP, RADIUS, Local, or IWA with BASIC credentials enabled.
• Using the Visual Policy Manager, or by adding CPL rules to the Local or Central policy file, specify policy rules that: (1) require administrators to log in using credentials from the previously-created administrative realm, and (2) specify the conditions under which administrators are either denied all access, given read-only access, or given read-write access. Authorization can be based on IP address, group membership, time of day, and many other conditions. For more
information, refer to Volume 6: VPM and Advanced Policy.
• To prevent anyone from using the console credentials to manage the SG
appliance, set the console ACL to deny all access (unless you plan to use SSH with RSA authentication). For more information, see “Moderate Security: Restricting Management Console Access Through the Console Access Control List (ACL)” on page 19. You can also restrict access to a single IP address that can be used as the emergency recovery workstation.
The following chart details the various ways administrators can access the SG console and the authentication and authorization methods that apply to each.
Table 2-1. SG Console Access Methods/Available Security Measures
Security Measures Available Serial Console SSH with Password Authentication SSH with RSA Authentication Management Console
Username and password evaluated
(console-level credentials)
3
3
Console Access List evaluated
3
(if console credentials are offered)3
3
(if console credentials are offered) CPL <Admin> Layer evaluated3
(see Note 1below)
3
(see Note 2 below) Enable password required to enterprivileged mode (see Note 2 below)
3
3
3
CLI line-vty timeout commandChapter 2: Controlling Access to the SG Appliance
Note 1: When using SSH (with a password) and credentials other than the console account, the enable password is actually the same as the login password. The privileged mode password set during configuration is used only in the serial console, SSH with RSA authentication, or when logging in with the console account.
Note 2: In this case, user credentials are evaluated against the policy before executing each CLI command. If you log in using the console account, user credentials are not evaluated against the policy.
Moderate Security: Restricting Management Console Access Through the
Console Access Control List (ACL)
The SG appliance allows you to limit access to the Management Console and CLI through the console ACL. An ACL, once set up, is enforced only when console credentials are used to access either the CLI or the Management Console, or when an SSH with RSA
authentication connection is attempted. The following procedure specifies an ACL that lists the IP addresses permitted access.
To create an ACL:
1. Select Configuration > Authentication > Console Access > Console Access. 2. (Optional) To add a new address to the ACL, click New.
a. In the IP/Subnet fields, enter a static IP address.
b. In the Mask fields, enter the subnet mask. To restrict access to an individual workstation, enter 255.255.255.255.
c. Click OK to add the workstation to the ACL and return to the Console Access page.
d. Repeat 2 to add other IP addresses.
3. (Optional) To remove a source address from the ACL, select the address to remove from the Console Access page and click Delete.
4. (Optional) To change a source IP address, select the IP address to revise and click Edit. See 2, above, for details.
5. To impose the ACL defined in the list box, select Enforce ACL for built-in
administration. To allow access to the CLI or Management Console using console account credentials from any workstation, deselect the checkbox. The ACL is ignored.
Important: Before you enforce the ACL, verify the IP address for the workstation you are using is included in the list. If you forget, or you find that you mistyped the IP address, you must correct the problem using the serial console.
Volume 4: Securing the Blue Coat SG Appliance
Related CLI Syntax to Create an ACL
SGOS#(config) security allowed-access add ip_address [subnet_mask] SGOS#(config) security enforce-acl enable | disable
SGOS#(config) security allowed-access remove ip_address [subnet_mask]
Maximum Security: Administrative Authentication and Authorization Policy
The SG appliance permits you to define a rule-based administrative access policy. This policy is enforced when accessing:
❐ the Management Console through http or https
❐ the CLI through SSH when using password authentication ❐ the CLI through telnet
❐ the CLI through the serial port if the secure serial port is enabled
These policy rules can be specified either by using the VPM or by editing the Local policy file. Using policy rules, you can deny access, allow access without providing credentials, or require administrators to identify themselves by entering a username and password. If access is allowed, you can specify whether read-only or read-write access is given. You can make this policy contingent on IP address, time of day, group membership (if credentials were required), and many other conditions.
Serial-console access is not controlled by policy rules. For maximum security to the serial console, physical access must be limited.
SSH with RSA authentication also is not controlled by policy rules. You can configure several settings that control access: the enable password, the console ACL, and per-user keys configured through the Configuration > Services > SSH > SSH Client page. (If you use the CLI, SSH commands are under config > services > ssh-console.)
Defining Administrator Authentication and Authorization Policies
The SG appliance uses CPL to define policies, including administrator, authentication, and authorization policies. CPL also allows you to give administrator privileges to users in any external authentication service.The following summarizes the steps required to define Administrator Authentication and Authorization policies on the SG appliance:
❐ (Optional) If you need to give administrative access to existing users or groups, create and configure the authentication realm.
❐ Define the policies in the appropriate policy file where you keep the <Admin> Layer layers and rules.
❐ Load the policy file on the SG appliance.
When you define such policies, make sure you define them in the appropriate policy file(s). For more information on policy files and how they are used, refer to Volume 6: VPM and Advanced Policy.
Defining Policies Using the Visual Policy Manager
To define policies through the Management Console, use the Visual Policy Manager. When you use the VPM, policies are configured in CPL and saved in the VPM policy file.
Chapter 2: Controlling Access to the SG Appliance
Defining Policies Directly in Policy Files
To define policies manually, type CPL rules directly in one of the two policy files, Central or Local.
Important: For specific information on creating policies within the policy files, refer to Volume 10: Blue Coat SG Appliance Content Policy Language Guide.
Following are the CPL elements that can be used to define administrator policies for the SG appliance.
To define administrator policies by editing a policy file:
1. Open the policy file in a text editor.
2. Define the policies, using the correct CPL syntax. 3. Save the file.
4. Load the policy file (refer to Volume 6: VPM and Advanced Policy).
Admin Transactions and <Admin> Layers
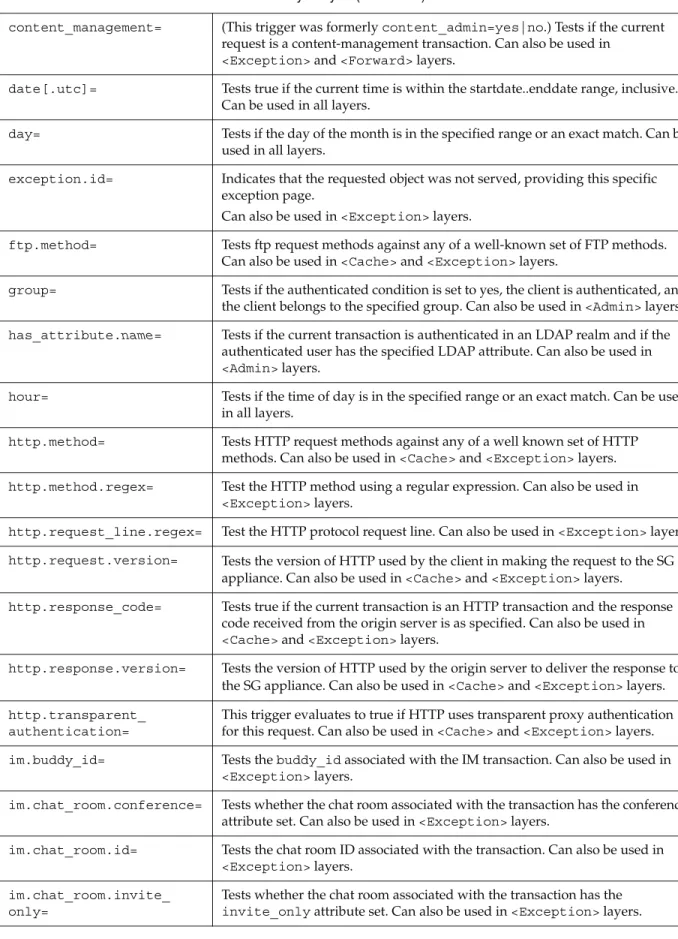
Admin transactions execute <Admin> layers. Only a restricted set of conditions, properties, and actions are permitted in <Admin> layers. The table below lists the conditions
permitted in the <Admin> layer. Table 2-2. Network Connection Conditions
<Admin> Network Connection Conditions
client_address=ip_address [.subnetmask]
Tests for a match between ip_address and the IP address of the client transaction source.
proxy.port=number Tests for a match between number and theport number for which the request is destined.
proxy.address=ip_address Tests for a match between ip_address and the IP address of the network interface card for which the request is destined.
proxy.card=number Tests for a match between number and the ordinal number associated with the network interface card for which the request is destined.
<Admin> General Conditions
condition=condition.label Tests if the specified defined condition is true.
release.id= Tests the SG release id.
<Admin> Date/Time Conditions
date[.utc]=[date | date…date] Tests for a match between date and the date timestamp associated with the source of the transaction. date specifies a single date of the form YYYY-MM-DD or an inclusive range, as in
YYYY-MM-DD…YYYY-MM-DD. By default, date is calculated based on local time. To calculate year based on the Coordinated Universal Time, include the.utc qualifier
Volume 4: Securing the Blue Coat SG Appliance
year[.utc]=[year | year…year] Tests for a match between year and the year timestamp associated with the source of the transaction. year specifies a single Gregorian calendar year of the form YYYY or an inclusive range of years, as in YYYY…YYYY. By default, year is calculated based on local time. To calculate year based on the Coordinated Universal Time, include the .utc qualifier.
month[.utc]=[month | month…month] Tests for a match between month and the month timestamp associated with the source of the transaction. month specifies a single Gregorian calendar month of the form MM or an inclusive range of months, as in MM…MM. By default, month is calculated based on local time. To calculate month based on the
Coordinated Universal Time, include the .utc qualifier.
weekday[.utc]=[number | number…number]
Tests for a match between weekday and the weekday timestamp associated with the source of the transaction. weekday specifies a single day of the week (where Monday=1, Tuesday=2, and Sunday=7) or an inclusive range of weekdays, as in
number…number. By default, weekday is calculated based on local time. To calculate weekday based on the Coordinated Universal Time, include the .utc qualifier.
day[.utc]=[day | day…day] Tests for a match between day and the day timestamp associated with the source of the transaction. day specifies a single Gregorian calendar day of the month of the form DD or an inclusive range of days, as in DD…DD. By default, day is calculated based on local time. To calculate day based on the Coordinated Universal Time, include the .utc qualifier.
hour[.utc]=[hour | hour…hour] Tests for a match between hour and the hour timestamp associated with the source of the transaction. hour specifies a single Gregorian hour of the form HH (00, 01, and so forth, through 23) or an inclusive range of hours, as in HH…HH. By default, hour is calculated based on local time. To calculate hour based on the Coordinated Universal Time, include the .utc qualifier.
minute[.utc]=[minute | minute…minute]
Tests for a match between minute and the minute timestamp associated with the source of the transaction. minute specifies a single Gregorian minute of the form MM (00, 01, and so forth, through 59) or an inclusive range of minutes, as in MM…MM. By default, minute is calculated based on local time. To calculate minute based on the Coordinated Universal Time, include the .utc qualifier.
time[.utc]=[time | time…time] Tests for a match between time and the time timestamp associated with the source of the transaction. time specifies military time of the form TTTT (0000 through 2359) or an inclusive range of times, as in TTTT…TTTT. By default, time is calculated based on local time. To calculate time based on the Coordinated Universal Time, include the .utc qualifier.
<Admin> Authorization Conditions
attribute.name =value Tests if the current transaction is authorized in a RADIUS or LDAP realm, and if the authenticated user has the specified
Chapter 2: Controlling Access to the SG Appliance
The table below lists the properties permitted in the <Admin> layer:
authenticated={yes | no} Tests if authentication was requested and the credentials could be verified.
group=group_name If authenticate=yes, the group condition tests the source of the transaction for membership in the specified groupname.
has_attribute.name=boolean Tests if the current transaction is authorized in an LDAP realm and if the authenticated user has the specified LDAP attribute.
realm=realm_name If authenticate=yes, the realm condition tests the source of the transaction for membership in the specified realm name.
user=username If authenticate=yes, the user condition tests the source of the transaction for the expected username.
user.domain=
windows_domain_name
(This condition is IWA-realm specific.) If authenticate=yes, the user_domain condition tests whether the realm type is IWA and whether the domain component of the username is the expected domain name.
<Admin> Read-only or Read-write Conditions
admin_access=read | write read tests whether the source of the transaction has read-only permission for the SG console. write tests whether the source has read-write permission.
When an Administrator logs into the CLI, the SG appliance
executes an <Admin> transaction that includes the condition
admin_access=read. If the transaction is ultimately allowed (all conditions have been met), the user will have read-only access to configuration information through the CLI. Further, when that user executes the CLI enable command, or logs into the Management Console, the SG appliance executes an
<Admin> transaction with admin_access=write. If the transaction is allowed, the user will have read-write access within the CLI or the Management Console.
Table 2-2. Network Connection Conditions (Continued)
Table 2-3. Properties in the <Admin> Layer
<Admin> Properties
deny Refuse service to the source of the transaction.
authenticate(realm_name) Requests authentication of the transaction source for the specified realm.
authenticate.force( ) If yes is specified then forces authentication even if the transaction is denied. This results in the user information being available for logging. If no, then early denial without authentication is possible.
allow Permit further service to the source of the transaction.
log.suppress.field-id ( ) Controls suppression of the specified field-id in all facilities
log.suppress.field-id[log_list]( ) Controls suppression of the specified field-id in the specified facilities.
Volume 4: Securing the Blue Coat SG Appliance
The table below lists the actions permitted in the <Admin> layer:
Example Policy Using CPL Syntax
To authenticate users against an LDAP realm, use the following syntax in the Local Policy file:
<admin>
authenticate(LDAP_Realm) <admin>
group="cn=Administrators,cn=Groups,dc=bluecoat,dc=com" allow
This authenticates users against the specified LDAP realm. If the users are successfully authenticated and belong to group Administrators, they are allowed to administer the SG appliance.
log.rewrite.field-id( ) Controls rewrites of a specific log field in all facilities.
log.rewrite.field-id[log_list] ( )
Controls rewrites of a specific log field in a specified list of log facilities.
Table 2-3. Properties in the <Admin> Layer (Continued)
Table 2-4. Actions permitted in the <Admin> Layer
<Admin> Actions
notify_email( ) Sends an e-mail notification to the list of recipients specified in the Event Log mail configuration when the transaction terminates.
Chapter 3: Controlling Access to the Internet and Intranet
After you have physically secured the SG appliance and limited access to it through passwords, you can limit users’ access to the Internet and intranet.
This chapter includes the following sections: ❐ Section A: "Managing Users" on page 26
❐ Section B: "Using Authentication and Proxies" on page 32
❐ Section C: "Using SSL with Authentication and Authorization Services" on page 41 ❐ Section D: "Creating a Proxy Layer to Manage Proxy Operations" on page 42
Chapter 3: Controlling Access to the Internet and Intranet
Section A: Managing Users
Section A: Managing Users
When a user is first authenticated to an SG appliance, a user login is created. You can view users who are logged in and configure the SG appliance to log them out and refresh their data.
This section includes the following topics: ❐ “About User Login” on page 26 ❐ “Viewing Logged-In Users” on page 26 ❐ “Logging Out Users” on page 27 ❐ “Refreshing User Data” on page 28
❐ “Related CLI Syntax to Manage Users” on page 30
About User Login
A user login is the combination of: ❐ An IP address
❐ A username ❐ A realm
For a specific realm, a user is only considered to be logged in once from a given workstation, even if using multiple user agents. However:
❐ If policy authenticates the user against multiple realms, the user is logged in once for each realm.
❐ If a user logs in from multiple workstations, the user is logged in once per workstation.
❐ If multiple users share an IP address (same server, terminal services, or are behind a NAT, which allows a local-area network to use one set of IP addresses), each user is logged in once.
❐ If a user logs in from multiple workstations behind a NAT, the user is logged in once.
Viewing Logged-In Users
You can browse all users logged into the SG appliance. You can also filter the displayed users by Glob-username pattern, by IP address subnet, and by realm.
The glob-based username pattern supports three operators: ❐ '*' : match zero or more characters
❐ '?' : match exactly one character
❐ '[x-y]': match any character in the character range from 'x' to 'y'
The IP address subnet notation is based on Classless Inter-Domain_Routing (CIDR), a way of interpreting IP addresses, as follows:
Chapter 3: Controlling Access to the Internet and Intranet
Section A: Managing Users
You can use a combination of these filters to display only the users you are interested in.
To browse users:
1. Click Statistics > Authentication.
2. Select a single realm or All realms from the Realm drop-down list.
3. (Optional) Enter a regular expression in the User pattern field to display the usernames that match the pattern.
4. (Optional) Enter an IP address or subnet in the IP prefix field to display the IP addresses that match the prefix.
5. Click Display by user to display the statistic results by user, or Display by IP to display the results by IP address.
Logging Out Users
A logged-in user can be logged out with one of three mechanisms: ❐ Inactivity timeout (see “Inactivity Timeout” on page 27)
❐ Explicit logout by the administrator (see “Administrator Action” on page 28) ❐ Policy (see “Policy” on page 28)
A logged-out user must re-authenticate with the proxy before logging back in.
❐ For single sign-on (SSO) realms (Windows SSO, Novell SSO, and IWA configured for SSO), reauthentication is transparent to the user.
❐ For non-SSO realms, the user is explicitly challenged for credentials after logout, depending on the Challenge user after logoutsetting in the SG’s realm.
Note: TheChallenge user after logoutoption only works when cookie-surrogates are used. If this setting is enabled, the user is explicitly challenged for credentials after logging out.
Inactivity Timeout
Each realm has a new inactivity-timeout setting, used in conjunction with the last activity- time value for a particular login. Each time that a login is completed, this activity time is updated. If the time since the last activity time for a specific login exceeds the inactivity-timeout value, the user is logged out.
Chapter 3: Controlling Access to the Internet and Intranet
Section A: Managing Users
Administrator Action
The administrator can explicitly log out a set of users using the Logout link at the bottom of the user login information pages. See “Viewing Logged-In Users” on page 26 for information about displaying user login information. For information about using the CLI to logout users, see “Related CLI Syntax to Manage Users” on page 30.
Policy
Policy has three properties and three conditions to manage user logouts. These properties and conditions can be used to dynamically log out users. For example, you can create a logout link for users.
For information about using policy, refer to Volume 6: VPM and Advanced Policy and
Volume 10: Blue Coat SG Appliance Content Policy Language Guide.
New Properties
Policy has three properties for logging out users. ❐ user.login.log_out(yes)
This property logs out the user referenced by the current transaction. ❐ user.login.log_out_other(yes)
If a user is logged in at more than one IP address, this property logs the user out from all IP addresses except the current IP address.
❐ client.address.login.log_out_other(yes)
If more than one user is logged in at the IP address of the current transaction, this property logs out all users from the current IP address except the current user.
New Conditions
Several conditions support different logout policies. ❐ user.login.count
This condition matches the number of times that a specific user is logged in with the current realm. You can use this condition to ensure that a user can be logged in only at one workstation. If the condition is combined with the user.login.log_out_other property, old login sessions on other workstations are automatically logged out. ❐ client.address.login.count
This condition matches the number of different users who are logged into the current IP address, and you can use it to limit the user number.
❐ user.login.time
This condition matches the number of seconds since the current login started, and you can use it to limit the length of a login session.
Refreshing User Data
Chapter 3: Controlling Access to the Internet and Intranet
Section A: Managing Users
❐ Surrogate refresh time: This option specifies how long surrogate credentials are trusted in a particular realm.
❐ Authorization refresh time: This option specifies how long authorization data, such as groups and attributes, are trusted.
While the realms have the baseline settings for the different refresh times, policy and administrator actions can override the realm settings. Using the same interface and filters as used for viewing logins, the administrator can select logins and refresh the
authorization data, the credentials, or the surrogates using the links available on the user login information page. Refreshing user data might be necessary if users are added to new groups or there is concern about the actual identity of the user on a long-lived IP
surrogate.
Credential Refresh Time
You can set the credential refresh time with realms that can cache the username and password on the SG appliance. This is limited to realms that use Basic username and password credentials, including LDAP, RADIUS, XML, IWA (with Basic credentials), SiteMinder, and COREid.
Note: The local realm uses Basic credentials but does not need to cache them since they are stored already on the appliance.
Cached Usernames and Passwords
You can use a cached username and password to verify a user's credentials without having to verify the credentials with the offbox authentication server. Essentially, this reduces the load on the authentication server. For authentication modes that do not use surrogate credentials (that is, proxy or origin modes), this can greatly reduce the traffic to the authentication server.
The credential refresh time value determines how long a cached username and password is trusted. After that time has expired, the next transaction that needs credential
authentication sends a request to the authentication server. A password different than the cached password also results in a request to the authentication server.
One-Time Passwords
One-time passwords are trusted for the credential refresh time. Only when the credential refresh time expires is the user challenged again.
Authorization Refresh Time
Realms (Local, LDAP, Windows SSO, Novell SSO, Certificate, XML, and Policy Substitution) that can do authorization and authentication separately can use the authorization refresh time value to manage the load on the authorization server. These realms determine authorization data (group membership and attribute values) separately from authentication, allowing the time the authorization data is trusted to be increased or decreased
For realms that must authenticate the user to determine authorization data, the authorization data is updated only when the user credentials are verified by the authentication server.
Chapter 3: Controlling Access to the Internet and Intranet
Section A: Managing Users
Surrogate Refresh Time
This value manages how long surrogate credentials are trusted in a particular realm. The authentication mode determines the type of surrogate that is used.
❐ Cookie surrogates are used with one of the cookie authentication modes; IP address surrogates are used with one of the IP authentications modes; and the Auto
authentication mode attempts to select the best surrogate for the current transaction. ❐ IP address surrogates work with all user agents, but require that each workstation has
a unique IP address; they do not work with users behind a NAT. An IP surrogate authenticates all transactions from a given IP address as belonging to the user who was last authenticated at that IP address.
When a user is logged out, all surrogates are discarded, along with the cached credentials and authorization data.
For more information about using cookie and IP address surrogates, see “Understanding Authentication Modes” on page 32.
Policy
Policy has three properties for setting the refresh times for individual transactions. ❐ authenticate.authorization_refresh_time(x)
where x is the number of seconds to use for the authorization refresh time during this transaction. The refresh time cannot exceed the time configured in the realm; policy can be used only to reduce the authorization refresh time. You can use this property to dynamically force the user's authorization data to be refreshed.
❐ authenticate.credential_refresh_time(x)
where x is the number of seconds to use for the credential refresh time during this transaction. The refresh time cannot exceed the time configured in the realm; policy can be used only to reduce the credential refresh time. You can use this property to dynamically force the user's credentials to be refreshed.
❐ authenticate.surrogate_refresh_time(x)
where x is the number of seconds to use for the surrogate refresh time during this transaction. The refresh time cannot exceed the time configured in the realm; policy can be used only to reduce the surrogate refresh time. You can use this property to dynamically force the user's surrogate to be refreshed.
For information about using policy, refer to Volume 6: VPM and Advanced Policy and
Volume 10: Blue Coat SG Appliance Content Policy Language Guide.
Related CLI Syntax to Manage Users
❐ To enter the manage users submode, use the following commands: SGOS#(config) security users
SGOS#(config users)
❐ The following commands are available:
Chapter 3: Controlling Access to the Internet and Intranet
Section A: Managing Users
(config users) log-out {ip-addresses prefix [realm_name] | realms [realm_name]| users glob_user_name [realm_name]}
(config users) surrogates-refresh {ip-addresses prefix [realm_name] | realms [realm_name]| users glob_user_name [realm_name]}
(config users) view {detailed {ip-addresses prefix [realm_name] | realms [realm_name]| users glob_user_name [realm_name]} | ip-addresses prefix [realm_name] | realms [realm_name] | users glob_user_name [realm_name]}
Chapter 3: Controlling Access to the Internet and Intranet
Section B: Using Authentication and Proxies
Section B: Using Authentication and Proxies
Authentication means that the SG appliance requires proof of user identity in order to make decisions based on that identity. This proof is obtained by sending the client (a browser, for example) a challenge—a request to provide credentials. Browsers can respond to different kinds of credential challenges:
❐ Proxy-style challenges—Sent from proxy servers to clients that are explicitly proxied. In HTTP, the response code is 407.
An authenticating explicit proxy server sends a proxy-style challenge (407/Proxy-Authenticate) to the browser. The browser knows it is talking to a proxy and that the proxy wants proxy credentials. The browser responds to a proxy challenge with proxy credentials (Proxy-Authorization: header). The browser must be configured for explicit proxy in order for it to respond to a proxy challenge.
❐ Origin-style challenges—Sent from origin content servers (OCS), or from proxy servers impersonating a OCS. In HTTP, the response code is 401 Unauthorized. In transparent proxy mode, the SG appliance uses the OCS authentication challenge (HTTP 401 and WWW-Authenticate)—acting as though it is the location from which the user initially requested a page. A transparent proxy, including a reverse proxy, must not use a proxy challenge, because the client might not be expecting it. Once the browser supplies the credentials, the SG appliance authenticates them.
Understanding Authentication Modes
You can control the way the SG appliance interacts with the client for authentication by controlling the authentication mode. The mode specifies the challenge type and the accepted surrogate credential.
❐ Auto: The default; the mode is automatically selected, based on the request. Auto can choose any of proxy, origin, origin-ip, or origin-cookie-redirect, depending on the kind of connection (explicit or transparent) and the transparent authentication cookie configuration.
❐ Proxy: The SG appliance uses an explicit proxy challenge. No surrogate credentials are used. This is the typical mode for an authenticating explicit proxy. In some situations proxy challenges do not work; origin challenges are then issued.
If you have many requests consulting the back-end authentication authority (such as LDAP, RADIUS, or the BCAAA service), you can configure the SG appliance (and possibly the client) to use persistent connections. This dramatically reduces load on the back-end authentication authority and improves the all-around performance of the network.
Note: Challenge type is the kind of challenge (for example, proxy or origin-ip-redirect) issued.
Chapter 3: Controlling Access to the Internet and Intranet
Section B: Using Authentication and Proxies
Important: Windows supports Kerberos authentication only to origin servers; proxy servers cannot participate. Therefore, explicit authentication modes are not
compatible with Kerberos. However, because Internet Explorer automatically selects NTLM for an explicit challenge (where the browser is configured with the proxy as a proxy server), no special processing is required for explicit authentication. An origin redirect authentication mode, such as authenticate.mode ( origin-cookie-redirect), can be used to obtain Kerberos authentication when using an explicit proxy if the browser is configured to bypass the proxy for the virtual URL.
❐ Proxy-IP: The SG appliance uses an explicit proxy challenge and the client's IP address as a surrogate credential. Proxy-IP specifies an insecure forward proxy, possibly suitable for LANs of single-user workstations. In some situations proxy challenges do not work; origin challenges are then issued.
❐ Origin: The SG appliance acts like an OCS and issues OCS challenges. The authenticated connection serves as the surrogate credential.
❐ Origin-IP: The SG appliance acts like an OCS and issues OCS challenges. The client IP address is used as a surrogate credential. Origin-IP is used to support IWA
authentication to the upstream device when the client cannot handle cookie credentials. This mode is primarily used for automatic downgrading, but it can be selected for specific situations.
❐ Origin-cookie: The SG appliance acts like an origin server and issues origin server challenges. A cookie is used as the surrogate credential. Origin-cookie is used in forward proxies to support pass-through authentication more securely than origin-ip if the client understands cookies. Only the HTTP and HTTPS protocols support cookies; other protocols are automatically downgraded to origin-ip.
This mode could also be used in reverse proxy situations if impersonation is not possible and the origin server requires authentication.
❐ Origin-cookie-redirect: The client is redirected to a virtual URL to be authenticated, and cookies are used as the surrogate credential. The SG appliance does not support origin-redirects with the CONNECT method. For forward proxies, only origin-*-redirect modes are supported for Kerberos/IWA authentication. (Any other mode uses NTLM authentication.)
❐ Origin-IP-redirect: The client is redirected to a virtual URL to be authenticated, and the client IP address is used as a surrogate credential. The SG appliance does not support origin-redirects with the CONNECT method. For forward proxies, only origin-*-redirect modes are supported for Kerberos/IWA authentication. (Any other mode uses NTLM authentication.)
❐ SG2: The mode is selected automatically, based on the request, and uses the SGOS 2.x-defined rules.
❐ Form-IP: A form is presented to collect the user's credentials. The form is presented whenever the user’s credential cache entry expires.
Note: During cookie-based authentication, the redirect to strip the authentication cookie from the URL is logged as a 307 (or 302) TCP_DENIED.
Chapter 3: Controlling Access to the Internet and Intranet
Section B: Using Authentication and Proxies
❐ Form-Cookie: A form is presented to collect the user's credentials. The cookies are set on the OCS domain only, and the user is presented with the form for each new domain. This mode is most useful in reverse proxy scenarios where there are a limited number of domains.
❐ Form-Cookie-Redirect: A form is presented to collect the user's credentials. The user is redirected to the authentication virtual URL before the form is presented. The
authentication cookie is set on both the virtual URL and the OCS domain. The user is only challenged when the credential cache entry expires.
❐ Form-IP-redirect: This is similar to form-ip except that the user is redirected to the authentication virtual URL before the form is presented.
Important: Modes that use an IP surrogate credential are insecure: After a user has authenticated from an IP address, all further requests from that IP address are treated as from that user. If the client is behind a NAT, or on a multi-user system, this can present a serious security problem.
The default value is auto.
For more information about using authentication modes, refer to Volume 10: Blue Coat SG Appliance Content Policy Language Guide.
Setting the Default Authenticate Mode Property
Setting the authentication.mode property selects a challenge type and surrogate credential combination. In auto mode, explicit IWA uses connection surrogate credentials. In sg2 mode, explicit IWA uses IP surrogate credentials.
To configure the IWA default authenticate mode settings:
SGOS#(config) security default-authenticate-mode {auto | sg2}
Understanding Origin-Style Redirection
Some authentication modes redirect the browser to a virtual authentication site before issuing the origin-style challenge. This gives the user feedback as to which credentials are required, and makes it possible to (but does not require) send the credentials over a secure connection.
Since browser requests are transparently redirected to the SG appliance, the appliance intercepts the request for the virtual authentication site and issues the appropriate credential challenge. Thus, the challenge appears to come from the virtual site, which is usually named to make it clear to the user that SG credentials are requested.
If authentication is successful, the SG appliance establishes a surrogate credential and redirects the browser back to the original request, possibly with an encoded surrogate credential attached. This allows the SG appliance to see that the request has been authenticated, and so the request proceeds. The response to that request can also carry a surrogate credential.
To provide maximum flexibility, the virtual site is defined by a URL. Requests to that URL (only) are intercepted and cause authentication challenges; other URLs on the same host are treated normally. Thus, the challenge appears to come from a host that in all other respects behaves normally.
Chapter 3: Controlling Access to the Internet and Intranet
Section B: Using Authentication and Proxies
You can configure the virtual site to something that is meaningful for your company. The default, which requires no configuration, is www.cfauth.com. See “Configuring
Transparent Proxy Authentication” on page 35 to set up a virtual URL for transparent proxy.
Tip: Using CONNECT and Origin-Style Redirection
You cannot use the CONNECT method with origin-style redirection or form redirect modes. An error message similar to the following is displayed:
Cannot use origin-redirect for CONNECT method (explicit proxy of https URL)
Instead, you can add policy to either bypass authentication on the CONNECT method, or use proxy authentication. For example:
<proxy>
allow http.method=CONNECT authenticate.mode(proxy) authenticate(ldap)
allow authenticate(cert) authenticate.mode(origin-cookie-redirect)
Selecting an Appropriate Surrogate Credential
IP surrogate credentials are less secure than cookie surrogate credentials and should be avoided if possible. If multiple clients share an IP address (such as when they are behind a NAT firewall or on a multi-user system), the IP surrogate mechanism cannot distinguish between those users.
Configuring Transparent Proxy Authentication
The following sections provide general instructions on configuring for transparent proxy authentication.
In addition to configuring transparent proxy authentication, you must also enable a transparent proxy port before the transparent proxy is functional. To enable a transparent proxy port, refer to Volume 2: Proxies and Proxy Services.
To set transparent proxy options:
1. Select Configuration > Authentication > Transparent Proxy.
Note: Sharing the virtual URL with other content on a real host requires additional configuration if the credential exchange is over SSL.
Chapter 3: Controlling Access to the Internet and Intranet
Section B: Using Authentication and Proxies
2. Select the transparent proxy method—Cookie-based or IP address-based. The default is Cookie.
If you select Cookie, the Cookie Type radio buttons are available. Click either: Session, for cookies that are deleted at the end of a session, or Persistent, for cookies that remain on a client machine until the cookie TTL (Time To Live) is reached or the credentials cache is flushed. The default is Session.
If you select Persistent Cookies, enter the Cookie TTL. If you choose IP address-based, enter the IP address TTL. The default for each is 15 minutes.
3. Select the Virtual URL. The default is www.cfauth.com. Blue Coat recommends you change the virtual hostname to something meaningful to you, preferably the IP address of the SG appliance, unless you are doing secure credentials over SSL. Using the IP address of the SG appliance enables you to be sure that the correct SG appliance is addressed in a cluster configuration.
4. Click Apply to commit the changes to the SG appliance.
Related CLI Syntax to Set Transparent Proxy Options
SGOS#(config) security transparent-proxy-auth method {cookie | ip} Note: A value of 0 (zero) for the IP address TTL re-prompts the user for credentials once the specified cache duration for the particular realm has expired.
For authentication modes that make use of IP surrogate credentials, once the IP address TTL expires the proxy re-challenges all client requests that do not contain credentials for which an IP surrogate credential cache entry previously existed. If at this point the client supplied a different set of credentials than previously used to authenticate—for which an entry in the user credential cache still exists—the proxy fails authentication. This is to prevent any another client to potentially gain network access by impersonating another user by supplying his or her credentials. However, once the user credential cache entry's TTL has expired, you can supply a different set of credentials than previously used for authentication.