Minor: Friend or Foe
B.H. van Dijk
Lecturer aviation engineering Hogeschool van Amsterdam, Weesperzijde 190, 1097 DZ Amsterdam
Tel: +31205951431, Fax: +31205951420, e-mail: (
b.h.van.dijk@hva.nl
)
Abstract
With introduction in 2005 of the Major-minor structure in higher education, a lot of universities and higher education institutes encountered time related problems for example the lack of time to develop good structured minors. Under the time squeeze they put in all the lectures which were not specific essential for their major curriculum. This resulted in poor structured minors, which were not particularly interesting for students.
This paper gives you a guideline on how to develop a good structured minor which is not only interesting for your own students, but also for students from other departments or even from other institutes.
Keywords: Minor, Curriculum design.
1.
Introduction
With the introduction of the major-minor in 2005 many universities and higher education institutes put in lectures in the minor which were not specifically essential for their major curriculum. This resulted in poor structured minors which were not interesting for students. This paper gives a guideline for designing a well structured minor. The paper consists of following parts:
• Definition of a minor? • The goal of the minor. • The entry level of knowledge. • The end level and learning goals. • The learning process.
• The evaluation and knowledge check. • Conclusion.
We will have a look at all these items separately. The paper is set up in such a way that we first have a look at a little bit of theory and thereafter we’ll have look at how we solved these problems in the new Design, Build and Fly Aviation minor.
2.
Definition of a minor.
Before we’ll have a look at designing a new curriculum for a minor let’s first have a look at the definition of a minor. A minor is defined:
A minor is a coherent study program of 30 ECTS during one semester (European Credit Transfer System), through which a student can specialize him (her) self. [1]
At most higher education institutes the minor takes place in the first or second semester during the third year of the major program.
3.
The goal of the minor.
The first thing you should do is define the goal of your minor. What would you like to teach your students during 1 semester that is worth 30 ECTS and which students do you allow to follow the minor? For instance we at aviation studies defined the following goal:
Which steps should be followed when designing and constructing a single engine model aeroplane which can lift as much weight as possible?
This subject is both interesting for other students as well as aviation students [2]. For aviation students the subject is interesting because we are an operations engineering education in stead of an aviation construction education, so aviation engineering students learn in the minor which kind of problems a construction engineer is confronted with. Other students from the University of Applied Science learn how an aeroplane flies and how it is constructed and how important weight is in the aviation industry.
Because it is a design project, project based learning was chosen as the learning process. The project is furthermore split up into two parts. The first part is the design of the aeroplane and the second part is the building and flying of the aeroplane. At the end of the year a competition will be held between the project groups and the aeroplane which can lift the most weight will be declared the winner.
4.
The entry level of knowledge.
The next task is to define the entry level of knowledge. What do students know and in particular what don’t they know. This is particulary important when students from other departments are allowed to follow the minor. A detailed survey should be held of the curricula of the other departments to know the entry level of the other students. At aviation Studies the minor is open for every student of the domain technology of the Hogeschool van Amsterdam. This means that every student is familiar with project based learning, because it used throughout the whole domain. However the method of evaluation is quite different from department to department. In the project book we made a note of how the evaluation of the project will be done at aviation studies.
Every student of the domain technology is also familiar with the generic competencies of the bachelor of engineering. Namely: Gain insight, design, plan and execute.
Furthermore students should have some basic knowledge of fluids, mechanics and electronics. Most of the engineering departments supply these entry levels except one and that is human logistics. But we are relying on them not choosing the aviation minor. If one does choose the aviation minor we will first assess him or her. To be sure there is sufficient knowledge of these subjects in a project group the groups will consist of half aviation students and half other students.
5.
The end level and learning goals.
Next what you should do is define your end level. What should the students know when they have finished the minor with good result. We’re really talking about learning objectives. Write down the learning objectives in the active way such as: “at the end the student should be able”. Don’t fall into the trap of writing down learning objectives as: “the student should have knowledge of” because this is really vague. You can ask yourself in this case: how much knowledge?
As said before the project is split-up into two parts. The first part is the design of the project and runs for a period of eight weeks. After consulting the whole aviation team of lecturers the learning objectives and competencies for the first part were defined as follows:
At the end of the design project the students will be able to:
• Breakdown the design of an airplane in the correct steps and place them in the correct order. • Understand and apply the European legislation on the wing design of the airplane.
• Make performance calculations during take-off and landing.
• Analyze and predict the stability of the airplane and guarantee sufficient static and dynamic stability. • Select and use the most suitable materials for the construction.
• Calculate the bending, shear, pull or push force in the wing root construction. • Validate the design process of the project in a written report.
The second part of the project is the construction part. In the second period of eight weeks the students are required to build their aircraft and fly it. The learning goals and competencies were defined as follows:
At the end of the construction and flying project the students will be able to: • Construct a single engine model airplane.
• To process and modify the materials chosen for the construction. • Evaluate the design and make modifications as necessary.
• Validate the strength of the airplane construction through an actual test. • Validate the stability and control of the airplane through a flight test.
• To show the modifications to the initial construction in the form of a presentation.
6.
The learning process.
Your next task is to define the learning process. According van Gelder [3] a learning process is defined as a process in which the students know more afterwards than when they started. Basically there are four types from which you can choose. These are:
• A lecture.
• A tutorial consultancy. • Problem based learning. • Project based learning.
A lecture is the best when you want to give your students a lot of structured information in a short time which is to difficult to investigate themselves. It also useful when you want to set the right scope for self study. A consultancy is the way to go when you want to supervise and help students in small groups to solve for instance mathematical problems. It is often used after a lecture in which the theory is explained. Like the word problem implies, problem-based learning is very useful when students are working on a case study. Students in small groups use knowledge they have allready gained to solve the problem. This method is often used in for instance medical educations to teach students how to diagnose a disease [4]. With project based learning the problem is the starting point of the learning process. The problems are often real life problems and are solved individually or in small groups.
Because it is a real life problem and the students have to actually build and fly their aircraft we chose project based learning as the learning process. As a problem is the starting point for the learning process, the problem is defined as follows:
Design and construct a single engine model aeroplane with a wingspan of maximum 2 meters, which can lift as much weight as possible. The aeroplane has to take-off from a runway which has a maximum length of 60 meters. The model has to be able to fly a complete circuit and land within a runway with a maximum length of 120 meters. The aeroplane has to comply with the EASA and EU-OPS specifications according take-off and landing performance and wing strength.
The best way to design the learning process, is to define how an average student should be able to follow and finish the project. At the same time define how the project tutor should check that the project group is on track or not. I personally find it very easy to make a table (see table 1) in which the role and accomplishments of the group and tutor are described. The table should look like this.
Table 1 Role of student and tutor.
Week 1 Week 2 Week 3 Week 4 Week 5 Week 6 Week 7 Week 8
Standard Student
Tutor
Plan of approach Final report
Finished finished.
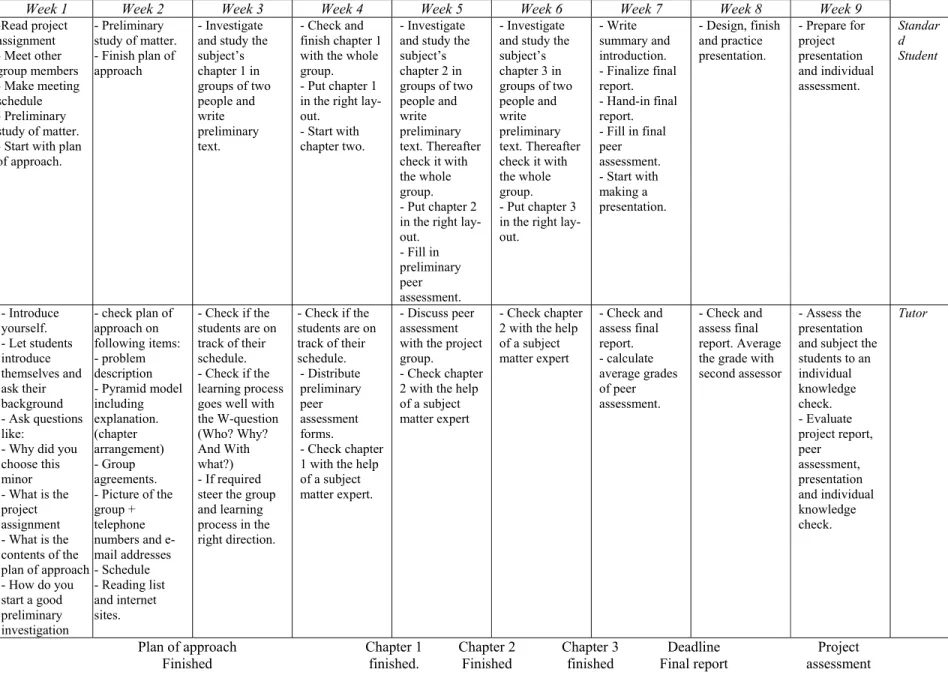
In the new aviation minor we defined the role and accomplishments as follows (see table 2). First we’ll have a look at the first period in which the design of the aeroplane takes place:
Table 2 Role of student and tutor in the design part.
Week 1 Week 2 Week 3 Week 4 Week 5 Week 6 Week 7 Week 8 Week 9
-Read project assignment - Meet other group members - Make meeting schedule - Preliminary study of matter. - Start with plan of approach. - Preliminary study of matter. - Finish plan of approach - Investigate and study the subject’s chapter 1 in groups of two people and write preliminary text. - Check and finish chapter 1 with the whole group. - Put chapter 1 in the right lay-out.
- Start with chapter two.
- Investigate and study the subject’s chapter 2 in groups of two people and write preliminary text. Thereafter check it with the whole group. - Put chapter 2 in the right lay-out. - Fill in preliminary peer assessment. - Investigate and study the subject’s chapter 3 in groups of two people and write preliminary text. Thereafter check it with the whole group. - Put chapter 3 in the right lay-out. - Write summary and introduction. - Finalize final report. - Hand-in final report. - Fill in final peer assessment. - Start with making a presentation. - Design, finish and practice presentation. - Prepare for project presentation and individual assessment. Standar d Student - Introduce yourself. - Let students introduce themselves and ask their background - Ask questions like:
- Why did you choose this minor - What is the project assignment - What is the contents of the plan of approach - How do you start a good preliminary investigation - check plan of approach on following items: - problem description - Pyramid model including explanation. (chapter arrangement) - Group agreements. - Picture of the group + telephone numbers and e-mail addresses - Schedule - Reading list and internet sites. - Check if the students are on track of their schedule. - Check if the learning process goes well with the W-question (Who? Why? And With what?) - If required steer the group and learning process in the right direction. - Check if the students are on track of their schedule. - Distribute preliminary peer assessment forms. - Check chapter 1 with the help of a subject matter expert.
- Discuss peer assessment with the project group. - Check chapter 2 with the help of a subject matter expert
- Check chapter 2 with the help of a subject matter expert - Check and assess final report. - calculate average grades of peer assessment. - Check and assess final report. Average the grade with second assessor
- Assess the presentation and subject the students to an individual knowledge check. - Evaluate project report, peer assessment, presentation and individual knowledge check. Tutor
To help the tutor to decide if the project group is on the right track it is wise to make a so called “pyramid model” [5]. A pyramid model is a general technique to structure your report. It is a table of contents which displayed in a structured way. Design projects will general follow the following steps: 1) definition phase, 2) design phase and 3) construction phase.
For the design built and fly minor the following pyramid model was constructed.
Figure 1 Pyramid model of Design Build and Fly.
Design Built and Fly
Design Built and Fly
1. Theory
1. Theory
1.1. Aerodynamics 1.1. Aerodynamics 1.2 Stability & control 1.2 Stability & control 1.3 performance 1.3 performance 1.4 Law 1.4 Law 1.5 Construction & materials 1.5 Construction & materials2. Definition
2. Definition
2.1. Profile choice 2.1. Profile choice 2.2 Wing choice 2.2 Wing choice 2.3 Configuration total aero plane2.3 Configuration total aero plane
2.4 Material choice and mechanics
2.4 Material choice and mechanics
3. Final Design
3. Final Design
3.1 Aerodynamics 3.1 Aerodynamics 3.2 Stability & control 3.2 Stability & control 3.3 performance calculations 3.3 performance calculations 3.4 Construction and strength 3.4 Construction and strength 3.6 Costs 3.6 Costs1.1.2 Parasite & in-duced drag 1.1.3 Laminar/ Turbulent boundary layer 1.1.4 Parabolic drag polar 1.1.1 Profile choice
1.2.1 Longitudonal/Lateral /Directional-stability 1.2.2 Tail size 1.2.3 Primary & Secundary flight controls
1.3.2 Climb 1.3.3 Landing 1.3.4 Noise abatement 1.3.1 Start 1.4.2 EU-ops performance class A 1.4.1 CS-25 limit load. 1.5.1 Wing loading 1.5.2 Balsa wood/ Cling film 1.5.3 Elapor/Styrodur/ fibers 2.1.2 Conventional profile 2.1.1 Laminar profile 2.2.1 Straight/Tapered/ Elliptical. 2.2.2 Swept/straight wings 2.2.3 mono plane Bi plane 2.3.2 Canard/ Conventional-tail 2.3.3 Flaps/no Flaps 2.3.1 High/Mid/Low-wing 3.2.1 Longitudonal stabili-ty & neutral point 3.2.2 Lateral stability 3.2.3 Directional stability 3.2.4 Elevator/aileron-and rudder 3.3.2 Climbgradiënt 3.3.3 required landing fieldlength 3.3.4 Maximum Noise limit 3.3.1 required take-off Field length Parabolic drag curve
3.4.2 Material choice 3.4.1 Strength calculation Wing construction
3.5 Building schedule
3.5 Building schedule
In this way the tutor can check if the students are on the right track. It is of course always possible that in case of doubt a subject matter expert can be consulted.
Of course there is also a table for the second part of the project (the building of the aeroplane) but that one is omitted for the readability of the paper.
7.
The assessment and knowledge check.
The Student’s performance in projects are mainly evaluated in two ways. A formative and a summative assessment [6]. The first is the so called formative assessment in which student assesses each other and the tutor gives feedback on the learning process. Students can also give feedback to each other. Formative assessment is done through the whole project. Technology students often find it difficult to assess each other but you can make it easier for them with the help of a form. Assessment criteria in the form would be for instance leadership, cooperation, trouble shooting, attitude etc.
The formative assessment takes place at 3 stages during the design project and at 2 stages during the actual building of the aircraft. The first formative assessment is the evaluation of the plan of approach. The plan of approach should contain the following items:
• The groups own interpretation of the aim of the project, including delimitation of the project. • A list of consulted reading material and internet sites.
• A pyramid model and an explanation how it was made. • Group agreements
• A detailed planning
• A chairman secretary schedule.
• A picture of the group, including telephone numbers and e-mail addresses.
A plan of approach is to first check of how well the group works together. All the other formative assessments during the project are done with the help of an evaluation form. The assessment criteria are: work attitude, problem and information analysis, leadership, stress management and cooperation. The students do not only assess the other group members but also themselves. At the end of the project all the grades of the group members are averaged, which results in an individual grade in a scale of 1 to 10.
Summative assessments are designed to measure student understanding following a sustained period of instruction with the focus on identifying the level of student mastery and the effectiveness of instruction. With a summative assessment you check if the students knowledge of the subject and if the learning goals are reached.
A summative knowledge check is held after the first period at the end of the design project. It consists of 2 parts. First the report of the project group is evaluated by at least two lecturers of which one is the tutor and the other is a subject matter expert. The score has to be a grade of 5.5 or higher in order earn the ECTS of this project. Also if the score is below 5.5 first the report has to be amended before the project team can do a presentation and a knowledge check. The grade of the report is the same for every group member.
When the grade of the report is a 5.5 or higher, a presentation and a knowledge check is held at the end of the period. The project team has to give a presentation of approximately 45 minutes total to at least two lecturers of which one is the tutor. This means that every team member has to present for about 5 to 7 minutes each. Each member will receive an individual score for the presentation. After the presentation an oral knowledge check will be held. Each student will be submitted to a set of questions which cover the entire report. There are about time 15 to 20 minutes for each student. After the knowledge check an individual grade will be given for the presentation and the knowledge check which are averaged.
During the second period of the minor, when the students have to actually construct and fly their aircraft, the summative assessment comprises of the following: After the aircraft is delivered as ready for testing by the project group a team of lecturers will evaluate the construction and flying qualities. The construction will be evaluated with the help of a test of the strength of the wing construction. A series of weights will be placed in the middle of the wing to test the strength. Secondly a flight test will be performed. When the aircraft passes these tests the ECTS are rewarded
8.
Conclusion.
By designing a well structured minor, students can get a lot more interested in your minor. For instance at aviation studies the evaluation of the minor increased from 4,6 to an 8! This evaluation is based on a pilot group of 8 students during the first semester of the year 2008-2009.
References.
[1] http://www.minoren.hva.nl/watisminor.htm [2] http://aircargochallenge.net/portal/
[3] Gelder, L. van (1979). “Didactische analyse I”. Groningen: Wolters-Noordhoff.
[4] Geert den Dam, Hans van der Hout, Cees, Jos Willems (2004) “Onderwijskunde in het hoger onderwijs”. Van Gorcum.
[5] M.G.M. Elling (1984) “De techniek van het schriftelijk rapporteren”. Wolters-Noordhoff