oreilly.com
Spreading the knowledge of innovators
Want to read more?
You can
buy this book
at
oreilly.com
in print and ebook format.
Buy 2 books, get the
3rd FREE!
Use discount code: OPC10
All orders over $29.95 qualify for
free shipping
within the US.
It’s also available at your favorite book retailer,
including the iBookstore, the
Android Marketplace
,
Drupal for Designers
by Dani Nordin
Copyright © 2012 Dani Nordin. All rights reserved. Printed in the United States of America.
Published by O’Reilly Media, Inc., 1005 Gravenstein Highway North, Sebastopol, CA 95472. O’Reilly books may be purchased for educational, business, or sales promotional use. Online editions are also available for most titles (http://my.safaribooksonline.com). For more information, contact our corporate/institutional sales department: 800-998-9938 or corporate@oreilly.com.
Editors: Julie Steele and Meghan Blanchette
Production Editor: Rachel Steely
Copyeditor: Audrey Doyle
Proofreader: Kiel Van Horn
Indexer: Angela Howard
Cover Designer: Karen Montgomery
Interior Designer: David Futato
Illustrators: Robert Romano and Rebecca Demarest July 2012: First Edition.
Revision History for the First Edition:
2012-07-11 First release
See http://oreilly.com/catalog/errata.csp?isbn=9781449325046 for release details.
Nutshell Handbook, the Nutshell Handbook logo, and the O’Reilly logo are registered trademarks of O’Reilly Media, Inc. Drupal for Designers, the image of a butterfly blenny, and related trade dress are trademarks of O’Reilly Media, Inc.
Many of the designations used by manufacturers and sellers to distinguish their products are claimed as trademarks. Where those designations appear in this book, and O’Reilly Media, Inc., was aware of a trademark claim, the designations have been printed in caps or initial caps.
While every precaution has been taken in the preparation of this book, the publisher and authors assume no responsibility for errors or omissions, or for damages resulting from the use of the information con-tained herein.
Table of Contents
Foreword . . . xi
Introduction . . . xiii
1. Some Things to Remember About Working with Drupal . . . 1
A Quick and Dirty Guide to DrupalSpeak 1
Discussing Drupal with Clients 5
Organizing Your Files 5
Life Cycle of a Drupal Project 6
Implementation Plans: Breaking Up Your Work 9
And Now We Are Six 10
Part I. Discovery and User Experience
2. Setting the Stage—Discovery and User Experience . . . 13
Discovery: Breaking Down the Project Goals 13
Project Discovery 14
User Experience: Framing the Design Challenge 15
Getting Your Hands Dirty with UX 15
Bringing UX Design to an Embedded Team 19
Study the Organization You’re Working With 20
It’s Not About Looks 21
The Drupal Designer’s UX and Design Toolkit 21
Balsamiq Mockups 22
Fireworks 22
Axure RP 24
3. User Experience—Techniques for Drupal . . . 27
User Personas 27
User Flows 30
Mind Mapping 31
Functional Breakdowns 31
Screen Sketches and Wireframes 36
Content Strategy Documents 37
Low-Fidelity Prototypes 37
Functional Specifications 37
Paper Prototypes 38
When to Use a Paper Prototype 39
Creating a Paper Prototype 39
Walking Through the Prototype 40
Non-HTML Digital Prototypes 43
HTML or Drupal Prototypes 44
UX Techniques and Drupal: Some Practical Issues 44
A Further Note on Documents 44
4. Putting It in Practice—A Short-Form Project Brief . . . 47
Real-World Example: The TZK Project Plan 48
Step 1: Identify the Project Goals 49
Step 2: Identify the Audience 50
Step 3: Focus on the Information Architecture and Content Strategy 51 Step 4: Identify New Features or Technologies You Want to Include 52
Step 5: Upgrade, or Start from Scratch? 53
Step 6: Figure Out Theming and CSS Issues 53
Go Deeper: User Experience and Project Management 54
Books 54
Websites 54
Part II. Sketching, Visual Design, and Layout
5. Sketch Many, Show One . . . 57
Style Tiles: A Way to Explore Multiple Design Ideas 65
Design Layout: Covering All Your Bases 68
Greyboxing: An In-Between Option 70
6. Working with Layout Grids . . . 73
Why Use a Grid? 73
Grids in Wireframing 75
Grids in Theming 76
Anatomy of a Grid Layout 78
Working with Square Grid 82
But What About All These Presentational Classes? There Must Be a Better
The New CSS Grid Layout Module: The Future Is Now 84
Going Deeper: CSS Layout and Grid Systems 86
7. Putting It in Practice—Setting Up Fireworks Templates for Drupal . . . 87
Step 1: Set Up the Grid 88
Step 2: Set Up the Header 89
Step 3: Create a Single Node Page Without a Sidebar 91
Step 4: Create Single Node Pages with One and Two Sidebars 93
Step 5: Create the Other Pages 96
Part III. Setting Up a Local Development Environment
8. The Drupal Designer’s Coding Toolkit . . . 103
Wait, What? Why? 103
A Note for Windows Users 103
The Drupal Designer’s Coding Toolkit 106
Coda 106 Less.app 107 MAMP 108 Terminal 108 Navicat 109 phpMyAdmin 109 Drush 109 Git 109 Dropbox 110
Working on the Command Line: Some Basic Commands 110
Commands 111
That Wasn’t So Bad, Was It? 112
9. Installing Drush . . . 113
Installing Drush 113
Another Option: Creating a Symbolic Link to Drush 116
Now the Fun Begins 117
10. Getting Started with Git . . . 119
Master Versus Origin 119
Setting Up Git for Your Workflow 120
Step 1: Create an SSH Key 121
Step 2: Install Git 123
Step 3: Set Up Your Git Configuration 124
Step 4: Set Up a GitHub Account 125
Step 5: Create the Remote Repository 125
Step 6: Set Up the Local Repository 126
So, What Happens on a Team? 127
First Things First: The Git Workflow 127
And There We Go 128
11. Putting It in Practice—Setting Up a Local Development Environment and Installing
Drupal . . . 129
Step 1: Install MAMP 130
Step 2: Set Up Your Local File Structure 130
Step 3: Set Up the Drupal Files 133
Step 4: Set Up the Drupal Database 134
Step 5: Install Drupal 137
Step 6: Use Drush to Install Some Modules 138
Part IV. Prototyping in Drupal
12. Prototyping in Drupal . . . 145
Working with Content and Content Types 148
Trial by Fire 149
Working with Content Types: A High-Level Overview 151
Organizing Your Content 153
Putting It All Together 156
13. Choosing Modules . . . 159
So Many Modules; How Do I Choose? 159
Go-To Modules 160 Pathauto 161 Views 161 Context 161 Webform 162 WYSIWYG 162 Mollom 162 Media 163 Block Class 163 Semantic Fields 165 Fences 165 Oh-So-Nice-to-Have Modules 165 Field Group 166 Link 166 References 166 View Reference 166 Block Reference 167
Submitagain 167
I Don’t Need This, but Ooh, It’s Purty! Modules 167
Views Slideshow 167
Colorbox 168
User Points 168
HTML5 Tools and Elements 168
@font-your-face 168
A Completely Incomplete Listing 168
14. Making Views Sing—Using Views to Enhance a Layout . . . 169
But I’m Not a Developer—What If I Don’t Want to Code? 171 Step 1: Create the “Event Categories” Taxonomy Vocabulary 172Step 2: Create the Event Content Type 173
Step 3: Create an Image Style 180
Step 4: Create the User Profile 186
Step 5: Get Profile Content into the Event Page 189
Setting Up the View 190
Step 6: Set Up the Contextual Filter 194
Step 7: Set Up the Related Events Block 196
So, What Did We Just Do Here? 200
15. Making Views Sing—Controlling Views Markup . . . 201
Step 1: Associate an Image with a Taxonomy Term 203
Step 2: Create the Event Categories View 204
Step 3: Update the Field Settings 206
Step 4: Add a Custom Class to Each Taxonomy Term: Name Field 208
Step 5: Style Away 210
So, What Did We Just Do Here? 212
16. Getting Started with Drupal Theming: Base and Child Themes . . . 215
Breaking Down a Layout for a Drupal Implementation 215
Nodes 215
Blocks 216
Views 216
Choosing a Base Theme 218
How to Choose a Base Theme 219
Other Base Themes to Try 221
Creating a Child Theme 222
Other Things You Should Know About Base Themes 225
Clear the Theme Registry! 225
Working with Regions 225
Please, Tell Me More! 226
17. Making CSS Easier with LESS . . . 227
Creating Variables 227
The Mighty Mixin 228
Nested Selectors and Styles 228
Compiling the Code 229
Working with LESS: Organizing Your Stylesheets 230
Setting Up Color Variables 230
Why LESS Is Awesome (Besides the Obvious) 233
Working with LESS on a Team 235
Part V. Making It Easier to Start Projects
18. Using Features . . . 239
Still More Awesomeness Awaits 246
19. Working with Drush Make and Installation Profiles . . . 247
Step 1: Install Drush Make 248
Why This Is Lovely 250
Getting Started with Install Profiles 250
Part VI. Working with Clients
20. Proposing and Estimating Projects . . . 255
Preproposal Discovery: What You Need to Know 255
Pricing a Project: Fixed-Bid Versus Hourly 257
Writing the Proposal 258
21. Getting Clients to Love You, Even When You Have to Tell Them “No” . . . 261
That’s Easy for You to Say ... 263
The “Professional Relationship” Clause 264
22. After the Handoff—The Project Retrospective . . . 265
Including Clients in the Retrospective 266
Documenting What You Learned 267
Documenting for the Community 269
Part VII. Sample Documents
B. Work Agreement (with Professional Relationship Clause) . . . 279
C. Project Proposal . . . 285
Index . . . 295
CHAPTER 1
Some Things to Remember About
Working with Drupal
A Quick and Dirty Guide to DrupalSpeak
If you’re just starting off with Drupal, one of the hardest things to figure out is what people are saying when they discuss Drupal terms. What is a node? What do you mean by taxonomy? The following list is a quick and dirty guide to DrupalSpeak, which is my tongue-in-cheek way of describing Drupal’s unique jargon. It includes the most common terms you’ll find people using when they talk about Drupal.
Drupal core (or core Drupal)
The actual Drupal files that you downloaded from http://drupal.org. “Drupal core” is also used to talk about any functionality that is native to Drupal, as opposed to contributed modules.
Contrib
Modules or themes that you install after you install Drupal core.
Module
A plug-in that adds functionality to your site. Out of the box, Drupal provides a strong framework, but the point of the framework is to add functionality to it using modules. The website at http://drupal.org/project/modules has a list of all the mod-ules that have been contributed by the Drupal community, sorted by most popular.
Theme
The templates that control the look and feel of a Drupal site. Drupal core comes with several themes that are very useful for site administration and prototyping; however, custom themes should always reside in your sites/all/themes folder and not in the core themes folder, located at themes among your core Drupal files.
Custom
Modules or themes that you create from scratch for a particular site or use case and that reside outside of contrib modules. Modules can be created from scratch, or they can be created using Features (a module that you’ll learn about in Chapter 18).
sites/all
A folder within your Drupal installation that contains all the files, including any contrib modules or themes, which are being used to customize your site.
Any module, theme, or other customization that you create for your site should always reside in sites/all, in a folder labeled
mod-ules or themes, depending on the nature of the customization.
Always.
Hacking core
Refers to the act of making customizations directly to Drupal core files, modules, and so on, instead of putting your customizations into sites/all. This is a bad idea for several key reasons, the most important of which is that every time you upgrade Drupal’s core files (which could be several times over the lifetime of a site), any customizations you’ve made to core Drupal files, along with any modules or themes you’ve stored in the core modules or themes folder, will be replaced with the new core files.
Node
A single piece of content. This could be a news item, event listing, simple page, blog entry—you name it. Nodes can also have custom fields, which are useful for all sorts of things. Think of a node in the same way you would a page on a website or a record in an address book.
Content type
The type of node you’re creating. One of Drupal’s best features is its support of multiple content types, each of which can be sorted out and displayed by any number of criteria. For example, in a basic corporate site you might have the fol-lowing content types: blog post, basic page, event, news item, and testimonial. Each of these content types can be sorted out and organized, using the Views module, to create the Blog section, Events page, News Room, and so on. Best of all, your client can easily update the Events page simply by adding a new event. Drupal will do all the work of sorting out the Events page and archiving old events.
View
An organized list of individual pieces of content that you create within the site, using the Views module. This allows you to display content related to taxonomy or content type, such as a “view” of blog posts versus a “view” of events.
Field
Elements of data that can be attached to a node or other Drupal entities. Fields are one of the best things about creating content in Drupal. Using fields, you can attach
images or files to content, create extra descriptors (such as a date for an event or a subheading for an article), or even reference other nodes. While in previous ver-sions of Drupal you needed to download a contrib module (Content Construction Kit or CCK) to add extra fields to a content type, Drupal core (as of Drupal 7) allows for a number of field formats, but certain formats—such as images, file uploads, or video—require you to install contrib modules. Chapter 13 provides a brief list of contrib modules that can extend the power and usefulness of fields.
Block
A small piece of reusable content such as a sidebar menu, advertising banner, or callout box. Blocks can be created by a view or other contributed modules, or they can be created by hand in Drupal’s Blocks administration menu. The beauty of blocks is the flexibility of display—you can set up blocks to display based on any criteria that you set. This is especially helpful on home pages, for example, or for displaying a menu that’s only relevant to a specific section of a website.
Taxonomy
Content categories. At its most basic level, you can think of taxonomy as tags for content (such as blog entries). The true power of taxonomy, however, lies in or-ganizing large quantities of content by terms an audience might search for. For example, a recipe site can use taxonomy to organize recipes by several criteria— type of recipe (dessert, dinner, etc.), ingredients (as tags), and custom indicators (vegetarian, vegan, gluten-free, low-carb, etc.). In building the site, you could then use Views to allow users to search by or filter recipes by any one (or several) of these criteria.
Users, roles, and permissions
People or organizations that have visited, or registered, on your site. The key to working with users lies in roles; Drupal allows you to create unique roles for any-thing that might need to happen on your site, and set permissions for each role depending on what that role might need to do. For example, if you’re creating a magazine-type site with multiple authors, you might want to create a role called “author” that gives the user permission to access, create, and edit his or her own content, but nobody else’s. You might also create a role called “editor” that gives the user access to edit, modify, and publish or unpublish any author’s content.
Base theme
A set of theme files, usually downloaded from Drupal.org and stored in sites/all/
themes, which sets the structure for your Drupal theme. Generally, a base theme
should only set up defaults, such as page structure, grids, and some very basic typography; customizations beyond those defaults should be set up in a child theme, stored in sites/all/themes/<client_name>. The purpose of the base theme is to have a consistent set of files and standards that you can use for every project; the child theme holds all the project-specific CSS, jQuery, and so on.
Child theme
A set of theme files, stored separately in sites/all/<client_name> and built off of the base theme chosen for your project, which hold all project-specific customi-zations for your site. A discussion of base themes and child themes is available in Chapter 16.
Themers
The lovely folks in the Drupal community (which may include you, dear reader) who apply design elements to Drupal theme templates. This could include simple CSS and HTML, but often also includes more complex things such as PHP, jQuery, AJAX, and other frontend development tools. It also involves choosing the right base theme for your project and building a child theme that will contain custom-izations, and may involve creating specific functions in template.php for your theme. Advanced themers may also create their own base themes or build a custom theme for every project.
Template files (*.tpl.php)
Individual PHP files that Drupal uses for template generation. Most Drupal themes will have, at the very least, a tpl.php file for blocks, nodes, and pages. Once you get the hang of working with tpl.php files, you can create custom templates for anything from a specific piece of content or specific content types to the output of a specific view. You can also adjust the major .tpl files for your theme to create lovelier, more semantic code (e.g., getting rid of extraneous <div class="container-inner"> tags).
Template.php
The PHP file, located in every theme’s project folder, that contains all theme hooks, functions, and preprocessors used by your site’s theme. In some base themes, you may need to create override functions in your child theme’s template.php file to set up key variables, such as grid sizes or menu items.
Theme hooks/preprocessors
Bits of PHP code that you can use to override specific settings in your template files, such as how code is rendered, how menus are laid out, and other customi-zations. Some Drupal themers find using theme hooks and preprocessors much more efficient for cleaning up Drupal code, particularly when they want to cus-tomize code for a number of different content types, or for specific taxonomy cat-egories. Rather than creating a custom tpl.php file for each different category or content type, you can create a function in template.php that sets up the code pa-rameters depending on which content type you’re rendering. For the most part, we won’t talk about theme hooks in this book; however, they’re quite useful to know as you move forward in Drupal. Konstantin Kafer and Emma Jane Hogbin’s
Front End Drupal (Prentice Hall) is a great resource for anything you’d want to
know about theme hooks, although the current edition (as of this writing) is still focused on Drupal 6. Check out http://www.frontenddrupal.com/ for more information on that book, and for a bunch of interesting tutorials on advanced Drupal theming. The chapter on theming written by Jacine Luisi for The Definitive
Guide to Drupal 7 (Apress) also contains a lot of great information about theme
functions. Full disclosure: I’m one of the authors of that book.
Discussing Drupal with Clients
When discussing Drupal with clients, the biggest mistake you can make is starting to talk to them about blocks and nodes and views, and other DrupalSpeak. While some clients actually do understand these concepts, in my experience the majority of them don’t, and frankly, it’s not their job to know it. I’ve had this argument with many a well-meaning Drupaller who insists that “educating” the client about Drupal termi-nology is actually useful, but I see the same result every time someone tries: start speaking to a client about taxonomy and views, and watch his or her eyes glaze over. My favorite way to talk to clients about Drupal is to start with the concept of a news page or blog home page (see Figure 1-1). Each individual post is its own piece of content, with its own fields, categories, and tags, and Drupal’s job is to organize that content on the page for you. The client’s job (or that of the client’s copywriter) is to give you those individual pieces of content, with all their various fields, categories, and tags, so that you can put them into the system and set up rules for how they’re organized.
Organizing Your Files
As noted earlier, any customizations to your site (modules, themes, etc.) should reside in your sites/all or sites/default folder. There are many reasons for this, but the most important one is for ease of upgrading your site. When upgrading Drupal core, you’re essentially replacing all the files in your Drupal installation with the newest version of the files, and updating the site’s database to reflect the new files. By keeping all your customizations in the sites folder, you lessen the risk that all your files will be replaced once you update. Another handy facet of using the sites folder to hold all your cus-tomizations is ease of editing; by keeping everything in one place, there’s less to hunt through when you’re looking to change a file.
By default, you should keep all your customizations in sites/all. If you’re dealing with a single site, it’s just as easy to keep things in sites/default, but if you ever get into creating multisite installations (which is way beyond the scope of this book), being in the habit of keeping everything in sites/all will serve you well. You also want to organize your code according to what it does; for example, themes should go into sites/all/themes, modules in sites/all/modules, and so forth. This is because Drupal actually looks for themes in a folder called “themes,” modules in a folder called “modules,” and so on. If you don’t have things stored in the appropriate folder, everything goes to heck.
Figure 1-1. A sample blog page (like this one, from a site I created for New Leaf Legal) is a great way to start explaining the concept of nodes, taxonomy, views, and blocks to your clients. Just don’t call them that.
Life Cycle of a Drupal Project
A good project plan for Drupal starts with the client. How much do they know about Drupal? Did they specifically request it, or was it something you suggested to them as you heard their list of requirements? This is surprisingly important information. For clients who are new to Drupal or just learning about it, you need to do a bit more handholding in order to get them on board with the process. Designing for content management systems is very different from designing for Flash or with straight HTML; it’s remarkably common that designers new to Drupal realize too late that the brilliant layout they designed won’t go into Drupal without a serious fight.
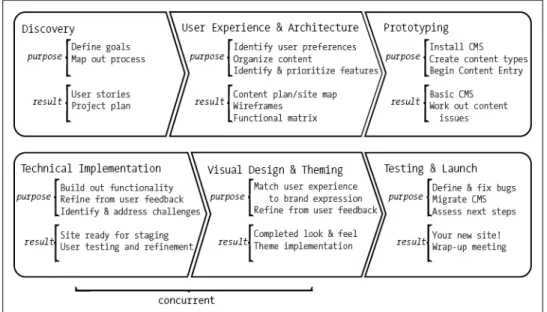
I typically divide Drupal projects into six distinct phases:
Phase 1: Discovery
During discovery, we learn as much as we can about the client, the project, and the project’s objectives. This is also where we start to create a map of the func-tionality we need to implement, any resources we’ll need to bring in, and so on.
Phase 2: User experience (UX) and architecture
This is where we take a deep dive into the lives, personalities, and other factors that define the humans who will need to deal with this project on a daily basis— both the end users who visit the site, and the clients who will end up managing the content once the project is finished. Deliverables for this phase may include wire-frames, user flows, personas, and site maps. I may hold workshops with the client to brainstorm issues of information architecture and content strategy, or conduct rounds of user interviews with individuals who fit the client’s target user base.
Phase 3: Prototyping
During prototyping, which is usually done just prior to starting the functional im-plementation phase, we start testing some of the hypotheses and user flows that came out of the user experience phase. For simple sites, the prototyping and func-tional implementation phases go together; for more complex user flows, or for projects in which you’re wrangling a ton of content, the prototyping phase is es-sential to making sure something you want to create will work the way you want it to in Drupal. The key distinction between the prototyping phase and the func-tional implementation phase is which components of the site plan you’re working on; while the functional implementation phase focuses on how the entire site will be built, the prototyping phase often focuses on one or two key pieces of the user’s journey through the site—for example, a shopping cart, or an area that requires a treatment unique from the rest of the site.
Phase 4: Functional implementation
During this phase, the focus is on creating the functionality we described in the user experience phase, and ironing out any areas where the scope of the site may need to be adjusted due to budget constraints or the results of user testing. For smaller sites, there’s a good chance that you’ll be doing this work on your own, and many solo site builders can create great things with little outside help.
However, if you’re not currently on a Drupal team, be advised: get to know some developers, and pay them to do things for you when you’re in a rut with something. A good developer is a Drupal designer’s best friend.
Phase 5: Visual design and theming
Notice, please, that visual design—here defined as the colors, fonts, images, and other branding elements that define the look and feel of a given site—comes fifth in this list. There are many reasons for this, most of which you’ll find in this book. The most important reason, however, is that bringing visual design into the picture too early in a Drupal project—or in any significant project, for that matter—is a recipe for disaster. Part of your job as a Drupal designer is to keep clients focused on what’s important—and what’s important is how this site will serve their busi-ness objectives and their brand. While visual design is an important component of the site’s value, it’s just one piece of a much larger whole. Worse yet, it’s also the piece that clients will most often fixate on, to the detriment of more important issues, such as whether a user actually needs 50 pages of content in order to make a purchasing decision. The best way to explain this to clients is that the discovery and user experience phases—which are still part of the design process, by the way— set up the experience you’re creating for the user, and establish content priorities. The visual design and theming phase makes sure the experience you design in those early phases meshes with the client’s brand and messaging.
Phase 6: Testing and launch
Always test before launch. And after launch. And again after the client has had a chance to muck around with the site. There are a few steps to the launch phase. First, you’re moving your code from a development server to a staging server (the server that holds your site before the world gets to see it), and making sure parts of it didn’t break in transit. Once everything is good, you’ll move things from staging to production (where the site will ultimately live), and test again to make sure things didn’t get lost in transit. For this process, it’s incredibly useful to have developers on your team.
For most projects, I also like to include a seventh phase that helps consolidate every-thing we’ve learned from working on the project:
Phase 7: Wrap-up meeting/documentation
In the wrap-up meeting, you sit down with the client and discuss what worked well in the project, and what could have gone better. It’s also a useful time to document the knowledge you gained through the project, either in an internal wiki for your team, or on Drupal.org, where it can benefit the Drupal community.
Figure 1-2 provides a quick visual breakdown of how a typical Drupal project works.
Implementation Plans: Breaking Up Your Work
Another important issue to consider when talking to project stakeholders, and creating project plans, is how you categorize and prioritize your workflow. Since much of what you’re doing in Drupal is managing content and/or creating specific functionality, it’s vital to think, and speak, in terms of specific chunks of content or functionality that you have to create.
For example, Figure 1-3 shows the start of a functional matrix for Urban Homesteaders Unite (UHU), a project currently in process.
By setting up your work in chunks of content instead of discrete task types, you elim-inate the confusion that comes with making a statement such as “On the week of the 14th, we’re going to be setting up content types.” While this can be perfectly fine if you
only have a couple of content types to put together, any site that’s larger than a few pages is likely to have enough complexity that each section of content or functionality will require its own content types, views, wireframes, and even custom page templates or modules—all of which will evolve during the course of the project.
By setting up the project plan with a list of very specific activities that will be done according to the tasks that must be accomplished on the site, you set a reasonable expectation with your client on what they’ll be able to see at the end of a given period of time. Breaking down the tasks in order of importance also helps the development team get an idea of what the key user priorities are.
Most importantly, setting up project plans by user tasks gives you the freedom to do whatever needs to be done to finish that specific task without having to waste time loading a bunch of milestones into Basecamp (or the project management tool of your choice) that the client doesn’t really need to see.
And Now We Are Six
Now that we have an idea of how a Drupal project will play out, it’s time to go a bit deeper into what each phase looks like. In Part I we focus on the discovery and UX phases, which help get everyone in the team (both you and the client) on the same page.
Figure 1-3. Functional matrix for Urban Homesteaders Unite. Note the specificity of tasks: create a single taxonomy vocabulary or content type, rather than “all” content types.
When you buy an ebook through oreilly.com you get lifetime access to the book, and whenever possible we provide it to you in five, DRM-free file formats—PDF, .epub, Kindle-compatible .mobi, Android .apk, and DAISY—that you can use on the devices of your choice. Our ebook files are fully searchable, and you can cut-and-paste and print them. We also alert you when we’ve updated the files with corrections and additions.