Building Websites with Drupal: Learn from the Experts
Article Series
April, 2014
Building Your First Drupal 8 Site
by Todd Tomlinson
Unicon is a Registered Trademark of Unicon, Inc. All other product or service names are the property of their respective owners. © Copyright 2014, Unicon, Inc. Some rights reserved. This work is licensed under a Creative Commons Attribution-Noncommercial-Share Alike 3.0 United States License.
Executive Summary 3
Introduction 3
Before You Get Started 4
Where to Host Your Site 4
Installing Drupal 5
Setting Up Users 10
Creating Taxonomy 11
Creating Content Types 12
Linking Content and Taxonomy 17
Menus 18
Utilizing Blocks 19
Expanding the Functionality of Your Drupal 8 Site 20
Changing the Look and Feel of Your Drupal 8 Site 22
Managing Your Site 23
Next Steps 24
Conclusion 25
This article is the first in the series, “Building Websites with Drupal: Learn from the Experts.” It is an excellent opportunity for Drupal novices to learn how to build their very first Drupal 8 website—from the Drupal expert himself, Todd Tomlinson. Through this article, Todd will walk readers down a simple path beginning with ad-vice on what to consider before getting started and wrapping up with maintenance tasks required for proper site management.
Drupal is an open source content management system (CMS) used to create sites from simple to complex. Many industries, including education technology, entertainment, government, healthcare, high technology, media/publishing, and retail, use Drupal for a wide variety of purposes.
These purposes include:
• Blogs (individuals and groups) • Internal Collaboration
• Community Sharing • Internal websites for research • Course Management • Library
• Customer Relationship Management • Online News (CRM - contact and activity management) • Online Portfolios
• eCommerce • Portals
• eRecruitment Platforms • Project Management • External-facing Websites • And More
Drupal is a flexible, cost-effective way to develop and design exceptional web experi-ences. According to Drupal.org, “Drupal is used by some of the biggest sites on the web, like The Economist, Examiner.com and The White House.”
This article will mark the start of many innovative website solutions, as Todd takes readers through milestones including installing Drupal, creating taxonomy, creating content types, and expanding Drupal. Begin reading below for Todd’s warm welcome into the process of creating a Drupal 8 website.
You’ve heard about it, read about it, looked at it, and if you’re like me, dreamt about it. It’s time to stop dreaming and start doing Drupal 8! Reading this article, and following along through the examples, will get you jump-started on your adventure and the road to creating amazing sites. What seems daunting at first is actually relatively easy. Allow me to hold your hand as we journey down the path of your first Drupal 8 site!
Executive Summary
There are several things to consider before you start installing your Drupal 8 website, with the most important one being: what is the purpose of the site that you are build-ing? You can use Drupal 8 to create virtually any type of website, but one of the bene-fits of using Drupal is that the community has created a number of Drupal
distributions that address the specific requirements of various categories of websites. What this means for you is that instead of having to start your site from scratch, the community has poured countless hours into building a solution that provides much of the functionality required to address your specific needs, minimizing the amount of time and effort required to get your site up and running.
There are distributions that address the needs of: • Corporate marketing websites
• Social community websites
• University, college, or school websites • Storefronts
• Portfolio sites
• News or magazine sites • Blog sites
• Government organization websites • Nonprofit or NGO websites
While there are dozens of Drupal distributions
(http://drupal.org/project/product_distribution), you may decide to just start with Drupal 8 core and build your own from scratch, and that works just fine.
The next step in the journey is to determine where you’re going to host your Drupal 8 site. There are a number of factors to consider when deciding where to host your site, including:
• Cost
• Scalability (Can the hosting solution I select handle the volume of visitors I anticipate?)
• Does the hosting provider allow access to the underlying platform so that I can do things like install and use drush (a command line tool that greatly simplifies the processes of installing and managing a Drupal site), create directories, set permissions, easily backup and restore a site, and FTP files? Some of the less expensive hosting options do not provide all of the
capabilities that a more expensive solution may provide. While you can live without drush and some of the other capabilities, the question is a trade-off of cost vs. capabilities
Before You Get Started
• Does the hosting provider have a track record of successfully supporting Drupal?
• Does the hosting solution provide the correct versions of MySQL (5.0.15), PHP (5.4), and Apache (2.x) to support a Drupal 8 installation?
• Does the hosting solution provide tools that make it easier to build, test, deploy, and manage your Drupal 8 site?
There are a number of hosting providers in the market that support Drupal. A good starting point is to review http://drupal.org/hosting. Unicon, Inc. (www.unicon.net), a leading provider of IT consulting, services, and support for the education technology market, provides Hosting and Managed services for Drupal. Additional services from Unicon for Drupal include Consulting, Content Strategy, Migration, Systems Integra-tion, Upgrades, and User Experience Design.
There are also free solutions that provide you with an environment to build and test your site. Pantheon (http://getpantheon.com) and Acquia (http://acquia.com) both provide free development environments as well as paid hosting solutions.
You may also decide that you want to build your site on your laptop or desktop, and at some point in the future migrate the site to a hosting provider. There are a number of packaged Drupal solutions that make it easy to install the full suite of operating sys-tem level software components, (e.g., PHP, MySQL, Apache) including Acquia’s Devel-oper Desktop (http://www.acquia.com/products-services/dev-desktop), Vagrant Drupal Development (https://drupal.org/node/2008758), or virtually any MAMP (OSX), WAMP (Windows), or LAMP (Linux) stack will do. For demonstration purposes I’ll be installing Drupal 8 on my OSX laptop running MAMP.
Once you’ve secured a hosting account the next step is to install Drupal. Installation consists of five basic steps:
1. Download the latest version of Drupal 8 from http://drupal.org/drupal
2. Extract the distribution
3. Create a database to hold the content from the site 4. Create the files directory and settings.php
5. Run the installation process
To download the latest version of Drupal 8 visit http://drupal.org/drupaland right click on the gz or zip file in the list of recommended releases. Select the appropriate option to download the file and save it to your local drive. Move the downloaded file into the root directory (typically htdocs if you are using Apache) and unzip the file using the appropriate utility for your operating system (typically double clicking on the file in the file explorer provided by your operating system will do the trick). After
Installing Drupal
unzipping the file you’ll see that there is a directory that starts with Drupal 8, fol-lowed by an indicator of the release that you downloaded. You have three options at this point, rename the directory to something meaningful, navigate into this directory and move all of the files and directories up one level, or leave the name as it is, how-ever this option will require that you type in the full directory name when visiting the site. For demonstration purposes rename the directory to “d8.”
The next step in the process is to create the files directory, the location where Drupal stores uploaded images and files. Drupal stores uploaded files in a standard directory located in the sites/default directory of your Drupal installation. Using the command line or a file browser, navigate to the sites/default directory (e.g. from the command line of the root directory of your Drupal site – use cd sites/default to navigate to the correct directory). From within the sites/default directory create a new directory named “files” and set the permissions so that the directory is writeable from the ac-count that your webserver runs as. If you don’t know the acac-count you may temporar-ily set the permissions so that anyone can write to the directory. Consult user
documentation for your operating system to determine how to set the permissions. You must also create a settings.php file in the sites/default directory as part of the in-stallation process. To do so simply copy the default.settings.php file that is located in the sites/default directory and name that copy “settings.php.” You must also change the permissions on this file so that it is writeable as the Drupal installation process updates values stored within this file. Follow the same process you did with the files directory above.
The next step in the process is to create an empty database that Drupal will use to store content, taxonomy, users, and other information. During the setup process Dru-pal will prompt you for the name of the database, the user associated with the data-base, and their password. Creating the datadata-base, creating the database user, assigning a password, and associating the user with the database is all performed either at the command line or through online tools such as phpMyAdmin. For details on how to create the database and user consult your MAMP/WAMP/LAMP user documentation. The final step in the installation process is to visit your site in a browser and step through the installation process. From any browser enter the URL of where you in-stalled your site. If you inin-stalled Drupal 8 in the root directory of your webserver on your laptop or desktop that URL would be http://localhost/d8.
The first screen in the installation process asks which language you wish to install. The default language is English, however you can install Drupal using any of the lan-guages listed in the select list (see Fig 1.1).
Figure 1.1 The Initial Installation Screen
After selecting the language, click the Save and continue button. The next step in the process is to specify the installation profile. If you’re installing standard Drupal 8 core you’ll be presented with two options, Standard and Minimal. If you are installing a Drupal distribution you will see other options, for example if you are installing the Pa-nopoly distribution you’ll see PaPa-nopoly listed as one of the options. For our first Dru-pal 8 site we’ll focus on the Standard DruDru-pal 8 distribution. Select Standard then click on the Save and continue button.
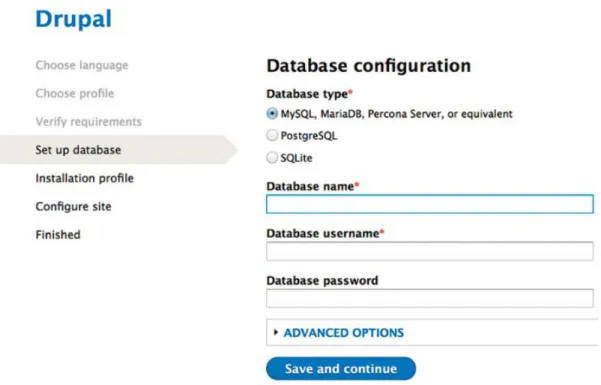
The next step in the process is to enter information about the database. Using the database name, user name, and password you used to create the empty database in the 2nd step, fill out the information requested on the form shown in Figure 1.2.
Figure 1.2 Setting the database parameters
After entering the values click Save and continue. Drupal will then create all of the ta-bles in the database.
The final configuration screen in the install process is where you specify the name of your site, the site’s email address, the administrator account details, the sites default country, and time zone (see Fig 1.3). After filling out the values click Save and con-tinue. Drupal completes the installation process and you’re ready to view your new site.
Figure 1.3 Setting the site information
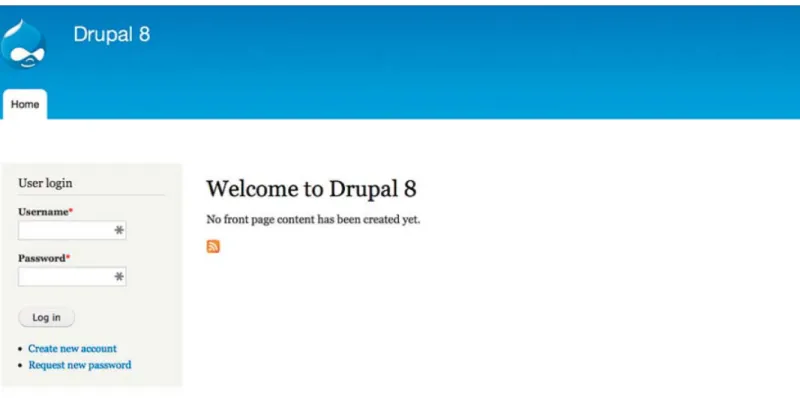
On the final screen of the installation process click on the visit your new site link. You should see your new Drupal 8 site!
Figure 1.4 Your new Drupal 8 site!
Now the real fun begins, using Drupal to create your new site.
If your site is simple and you’re the only one who will be authoring, editing, and man-aging content then the admin account you created during the installation process may be all that you need. In most situations you may want to share the content creation and management activities with others and in that case you’ll want to create accounts for those users you wish to share those activities with.
To create a new user, log in using the admin account you created when setting up the site. You may log in via the User login form on the homepage of your site. After logging in you’ll see the admin menu at to the top of the page. Click on the Manage link fol-lowed by the People link in the secondary menu that appears after clicking on the Manage link. One of the first tasks before creating a new user account is to define the user roles that you wish to have on your site. A user role represents a set of permis-sions to features and functionality on your site. You may have a single user role (e.g. author) or multiple roles. It all depends on how restrictive you wish to be with the features and functionality on your site. For demonstration purposes lets create a new user role named “author.” Click on the Roles tab at the top of the new user page and click on the Add role button. Enter author in the Role name field and click the Save button. The next step is to assign permissions to the role. To do so click on the Permis-sions tab near the top of the page. On the PermisPermis-sions page you’ll see a list of all the
Setting Up Users
permissions that are available to assign to user roles. Scroll through the list and famil-iarize yourself with the available options. For demonstration purposes we’ll keep it simple and set the ability to author, edit, and delete articles and basic pages to our new author role. Scroll down to the section title Node and check the boxes for articles and basic pages in the column titled author. Once you’ve checked the boxes click on the Save permissions button.
With the role of author ready for use let’s create our first new user and assign them to the role of author. First click on the List tab near the top of the page, followed by the Add user button. On the Add user form enter the user name, email address, temporary password, check the box for Author in the roles section, as well as notify the user of the new account. We’ll leave the rest of the values as defaults and then click the Create new account button. Congratulations you’ve created your first Drupal 8 user! You can log out of the site and log back in using your new user account to see that you have in-deed successfully created a new user account.
If you need to restrict capabilities on the site beyond that of the administrator or an author you can do so by creating new user roles, assigning permissions to each of those roles, and creating new user accounts as outlined above.
One of the most misunderstood and underutilized capabilities in Drupal is taxonomy. Reading about taxonomy may cause your eyes to glaze over and for your thoughts to drift off to warm sandy beaches and drinks with little umbrellas, but the truth of the matter is that taxonomy is a powerful capability that when used properly can make building and managing your site easier than not using taxonomy.
So what is taxonomy? Think “categorization” for a moment. What if you had the ability to categorize all of your content on your site by subject, topic, targeted audience, genre, or any other category that you can think of? Imagine that by simply assigning categories to content that you could in essence build major sections of your site auto-matically, placing content on pages where it makes logical sense without having to do anything other than assign categories—or more appropriately in Drupal terminol-ogy—taxonomy terms. It’s all possible and is part of the magic that makes Drupal so powerful.
Let’s get to the task of setting up taxonomy on our demonstration site, it’s actually easy! For demonstration purposes let’s assume that our site deals with movie reviews and we want to categorize reviews by genre and by movie rating (e.g. G, PG, PG-13, R). We’ll need two taxonomy vocabularies to store the values, one for genre and one for rating. First, if you haven’t already done so, log in to your site using the form on the front page of the site. The next step is to create the genre and ratings vocabularies. A vocabulary is just a container for terms, where a term is something like “action” as a movie genre, or “PG-13” for a movie rating. To create the vocabularies click on the Manage link in the admin menu, followed by the Structure link in the secondary menu. On the Structure page scroll down until you find the Taxonomy link and click on it. On the Taxonomy page click the Add vocabulary button. On the Edit vocabulary
Creating Taxonomy
page enter Genre in the name field and optionally enter a description, such as “A vo-cabulary used to store movie genres.” Click the Save button and you’ve created your first taxonomy vocabulary. After clicking Save, Drupal takes you to the page where you can create terms for your new vocabulary. Click on the Add term button and enter Ac-tion in the name field. You can opAc-tionally enter values for the DescripAc-tion and URL alias fields, but for demonstration purposes let’s leave those blank and move on. Enter a few additional genres to select from while authoring movie reviews by following the same steps of entering values in the Name field and pressing the Save button.
Next create the ratings vocabulary by following the same steps as above, starting with clicking on the Structure link in the secondary menu followed by the Taxonomy link on the Structure page. Click on the Add vocabulary link and follow the same steps for creating the ratings vocabulary and terms as you did with the genres.
You are now ready to unleash the power of taxonomy! Keep your arms and legs in the vehicle at all times as the ride ahead may be thrilling.
If taxonomy is “bread” then content types are the peanut butter and jelly. Together they can make “tasty” solutions that your site visitors will love. Content types in Dru-pal represent templates that content authors use to create and publish content on a Drupal site. Think of them as a form that someone fills out with all the pieces of infor-mation you want to store and show for things such as events, blog postings, locations, courses and classes, movie reviews, or any other types of information where collect-ing exactly the same informational elements, in the same format, and in the same order is important. Drupal 8 provides two basic content types, an article and a basic page. An article provides elements to capture and display a title, the body of the arti-cle, an image, and tags (using taxonomy). A basic page provides just a title and a body. Both are great starting points for lots of different types of content, but sometimes we need more control over what people enter when authoring content, and the structure that the content takes when displayed on our site. Take, for example, an event. There are common attributes or elements that describe an event:
1. The title of an event
2. The date and time the event occurs 3. The location of the event
4. A description of the event
5. A picture of the person speaking at the event
You may have additional informational elements that you wish to capture for your events, but the concept is that by providing a common framework for authors to cre-ate events, the outcomes will be a common set of elements that all authors use to de-scribe an event. Without a content type you can still author information about events using the article or basic page content types, but each author may describe an event
Creating Content Types
differently and may or may not provide all of the information you want to display for an event. It also makes it very difficult to display events in lists or on calendars as it would be hard to consistently find the date of an event within randomly authored HTML.
To demonstrate the ease and power of Drupal 8 content types lets create a new type for events, using the list of elements above. Assuming you are still logged in as an ad-ministrator, click on the Manage link on the admin menu, followed by the Structure link in the secondary menu. On the Structure page click on the Content types link. On this page you’ll see the Article and Basic page content types that are part of standard Drupal 8. Click on the Add content type button to reveal the first step in the process of creating a content type (see figure 1.5).
Figure 1.5 Creating a new content type
Enter “Event” in the Name field, a brief description of what this content type will be used for (creating and displaying events), and optionally change the name of the Title field label to something like “Event title.” On the bottom left of the page you’ll see a set of vertical tabs. You may set various options for your new content type by clicking through the list of vertical tabs. For demonstration purposes we’ll leave them all at
their default settings. Next, click the Save and manage fields button to begin adding el-ements to our event content type. Figure 1.6 shows the next step in the content type creation process, adding individual fields to our content type.
Figure 1.6 Adding fields to a content type
By default Drupal adds a body field to every new content type. There may be situa-tions where you don’t want a generalized body field and you may delete it if you wish by selecting the delete option from the operations select list for that field. We’ll leave it alone for our demonstration as we actually need a description field for our events. The first field we’ll add is the event date. To create an event date field simply enter “Event date” into the Add new field label field and from the field type select list, choose date. Next click the Save button to reveal the remaining steps in adding a new field. The next screen prompts you for how many date values do you wish to provide to the content editor, and in our example one is enough. There may be cases where you want to provide editors with the ability to enter several values for a single field and this is the option that provides that ability (e.g., a field that allows editors to list the actors in a movie). Click the Save and continue button to continue the process. The next screen in the process provides the ability to change the label we created previ-ously, as well as enter help text that will display below the field on the content author-ing form for that field, the ability to mark the field as required, and the ability to set a default value. Since we are dealing with events and events have to have a date, check the box for required and then the Save settings button (see Fig 1.7).
Figure 1.7 Field settings form
After saving the field Drupal then displays the list of fields for your content type. To add the location field to your event content type enter “Event location” in the Add new field Label field, select Long text from the Field type select list, and click the Save button. On the next screen in the process leave the Allowed number of values field set to 1 and click Save field settings. On the last screen in the field creation process enter Help text that describes the purpose of the field, optionally check the Required field, and select Filtered text from the list of Text processing options. Selecting Filtered text directs Drupal to use the WYSIWYG editor for this field – a nice option for your con-tent authors. Finally click the Save settings button.
To add the picture field follow the steps above, entering “Event picture” in the label field, and Image as the Field type option. On the second screen in the process leave the default values for the Allowed number of values, Upload destination, and Default image. Click the Save field settings button and examine the settings that are available for an image field. For demonstration purposes we’ll leave them all at their default values and click the Save settings button. Congratulations you’ve created a custom Drupal content type and your future looks so bright I had to put on my shades.
There are two other general configuration tasks that you may wish to perform on your new event content type. While still on the Manage fields screen note the two additional tabs at the top of the page: Manage form display and Manage display (see Fig 1.8).
Figure 1.8 Managing your content type
Click on the Manage form display tab to reveal the list of content type fields and the order that they will appear in when a content creator adds a new event to your site. You may rearrange the order of fields if you feel that there is a better order for editors. Simply click and drag the fields to the desired order by clicking, holding,dragging, and dropping the fields into the new order.
Clicking on the Manage display tab reveals how the content will be displayed to a site visitor. As with the Manage form, you can rearrange the order the fields will appear on the site, and hide the labels (if you wish) from the site visitor. For some field types you can also specify how that element is displayed by clicking on the gear icon to reveal a list of options (see Fig 1.9).
Figure 1.9 Field display options
If you click on the gear for a date field you are presented with a list of optional date formats. If you click on the gear for an image you can specify the image style (e.g. size) and whether the image links to something. After making any changes always remem-ber to click the Save button.
You are now ready to use your new content type, give it a test drive! Click on the Man-age link on the admin menu followed by the Content link on the submenu. On the
Con-tent page click the Add conCon-tent button and select Event from the list of conCon-tent types. Fill out the fields that you created—event title, body, event date, event location, and event picture. Click on the Save and publish button and voilà!
We created taxonomy terms earlier in this article, and we just created an event con-tent type. How do you connect taxonomy with concon-tent? It’s actually very easy to do. Let’s assume for a moment that our events are tied to movie genres. Our site focuses on groups of people who get together to discuss various movies within genres and we need the ability for site visitors to quickly find all events for their genre of
interest.
To link taxonomy terms to a content item we need to first add a new field to our event content type. Click on the Manage link on the admin menu, followed by the Structure link in the secondary menu. Click on the Content types link on the structure page and click on the Manage fields link for your Event content type. We need to add a new field to enable linking taxonomy terms to events. Enter “Movie genre” in the Add new field label field and select Term Reference from the list of Field types. Click the Save button to continue the process. This is a case where you may want to allow a content author to pick more than one value from the list of movie genres. For example you may have a group that likes to discuss both adventure and science fiction movies. To enable the ability to select more than one genre while authoring an event, change the Allowed number of values from Limited to Unlimited. Since we’re focused on genres, make sure that the vocabulary listed on this page is Genre, then click the Save field settings button. On the final field configuration screen you may enter Help text, make the field required, and select a default value. Wrap up the process by clicking the Save settings button.
To see how powerful yet simple taxonomy is, create a few additional events, selecting a genre for each event. To demonstrate the power of taxonomy, select the same genre for a few of your events. After creating several events click on the genre link on one of your events. You’ll automatically see a list of all events that were associated with the taxonomy term you clicked on (see Fig 1.10).
Figure 1.10 A list of all events tagged as Action movies
With the basics of taxonomy and content types you’re ready to venture off into the land of building an amazing Drupal site. But before you do there’s a few other things we’d like to share that will make your life easier.
A site without a menu is like a car without a steering wheel. Sometimes it’s better to provide the means for getting to where you want to go. Drupal provides a simple yet powerful system for creating menus. Right now our demonstration site has yet one link on the primary menu, a Home button. It would be great to have more options for our site visitors so let’s take the example that we just did, a list of upcoming events by genre, and add one of our list of events to our main menu. If you’re still on the page that lists your events by a genre copy the URL from your browser’s address bar start-ing with the “t” in “taxonomy”. Next click on the Manage link in the admin menu, then click the Structure link. On the Structure page, click on the Menus link. The Menus page lists all of the menus that come with a standard Drupal 8 installation. We’ll add our link to the Main navigation menu, where our lonely Home button resides. Click on the Edit menu link in the Operations column and click the Add link button on the Edit menu Main navigation page. On the Add menu link page enter a title for the menu item (e.g. Action Movies), and paste the URL you copied into the Path field. That’s all we need to do to create a new menu item! Let’s add one more link, this one will point to Drupal.org. Click on the Add link button and enter “Drupal.org” in the Menu link title field and “http://drupal.org” in the Path field, followed by the Save button. You’ll now see three links in the Main navigation menu. It probably makes sense for Home to be listed first. Click, drag, and release the Home menu item (using the “+” icon) at the top of the list. Click the Save button and return to the homepage of your site. Now try out your new menu links!
Another powerful feature of Drupal is blocks. The concept of a block is relatively sim-ple: provide a means to create a “widget” that displays something, that can then be placed on a page. On our demonstration site we already have blocks showing up on the homepage. The search form and login form are both examples of blocks. There are no hard and fast rules as to what a block can display, typically it is information or images that are not related to content, however you can display a list of content as a block.
To see the list of blocks that are part of standard Drupal 8 click on the Manage link in the admin menu, followed by the Structure link in the submenu. On the Structure page click on the Block layout link. On the Block layout page you will see a list of regions in the left column. Each theme defines a set of regions or areas on a page where you can place content, blocks, and menus. A theme may provide any number of regions, all de-pending on the design objectives of that theme. If you’re using the Bartik theme, which is the default Drupal 8 theme, you’ll see regions titled Header, Help, High-lighted, Featured, Content, and so on. You’ll also note that some of the regions already have blocks assigned to display in that region. On the Block layout page in the right column you’ll see a list of all the blocks that are defined by Drupal 8 core and that can be placed in any of the regions on your site. To assign a block to a region simply click on the block name. Drupal then displays a configuration form where you can specify the region in which that block will appear. For demonstration purposes click on the Recent content block in the Lists section of the available blocks. From the list of Re-gions, select Sidebar second and click the Save block button. If you scroll down in the left column you’ll see the Sidebar left region and the block that you just placed listed there, but highlighted in yellow, meaning yes you’ve added it to the region but you have not yet saved the configuration change. Click the Save blocks button at the bot-tom of the page to complete the process. Navigate back to the homepage and you should see a list of the content that you created in previous steps!
There are several ways to create blocks, some of them simpler than others. A core, contributed, or custom module may create a block; a view (a Drupal tool for creating lists of content) may create a block; or you may create a block through the Block lay-out page. Let’s create a custom block through the Block laylay-out page. Click on the Man-age link in the admin menu, followed by the Structure link in the secondary menu. On the Structure page click on the Block layout link, and on the Block layout page click on the Add custom block button. What demonstration would be complete without a “Hello World” example, so let’s create the block! Enter “Hello!” in the block descrip-tion field and in the block body enter “Hello World!” By changing the Text format to full HTML you can enter Javascript, allowing you to do all sorts of fun things with blocks. Click on the Save button. On the next screen you can set the title of the Block, let’s leave ours as Hello! You can optionally hide the title if you don’t want it to appear on the page, and in the Region select list pick where you would like your block to ap-pear. For demonstration purposes I’ll select Sidebar second. You may optionally spec-ify which pages you want the block to appear, for example you may want the Hello World! block to appear only on the homepage or some other page on the site. You can restrict where it appears by using the Pages functionality at the bottom of the block edit form. We won’t restrict our blocks to specific pages. Click the Save block button
Utilizing Blocks
to return to the Block layout page. If you assigned your block to the Sidebar second re-gion you should see it listed there on the Block layout page. Navigate back to the homepage of the site and you should see your new custom block listed in the right sidebar!
You’ve installed Drupal 8; created menus, content, content types, and taxonomy, but you want more. Fortunately for you there are thousands of very talented developers who have created thousands of modules that expand upon the functionality present in Drupal 8 core. Commonly called “Contributed Modules” or just plain “Contrib,” you can take the basic capabilities of Drupal 8, which in reality aren’t all that basic as you can do a whole heck of a lot with what’s just in core, and make it even more powerful. To find a contributed module the best place to look is Drupal.org, and fortunately you have a link on your site’s menu to the Drupal.org website! Navigate to the Drupal.org site and click on the Download & Extend link in the menu at the very top of the page. Find the section that says Drupal Modules and change the value for Show only mod-ules for Drupal version to 8.x and click the Search button. You’ll see an updated list right below the Search button for Most installed modules, Module Categories, New Modules, and Module Index. Click on the All Categories link under the Module Cate-gories section and you’ll see a long list of general cateCate-gories from which to choose. As an example and since we’re working with Events on our site, click on the More Event link to see a list of all the modules for Drupal 8 that are associated with Events. You’ll now see a list of all modules that developers have associated with Events (using tax-onomy to filter the list), sorted by the total number of installations. One of the likely modules you’ll see at the top of the list is the Full Calendar module. Since we would like to display events on a page that looks like a physical calendar that’s a great mod-ule to add to our site. Click on the link for the Full Calendar modmod-ule to visit its landing page on Drupal.org. You can read about how to install the module, any dependencies that module may have, and in many cases, representative screen shots of that module in action. Let’s install it on our demonstration site!
The process for installing modules on your new site is relatively straight forward. There are actually several ways to install modules but we’ll take the easy route and use the administrative interface provided in Drupal 8. First click on the Manage link in the admin menu, followed by the Extend link on the secondary menu. On the Extend page you’ll see a list of all the modules that are available on your local site to enable and use. If the box has been checked next to a module’s name then that module is cur-rently active on your site. To enable a module simply check the box next to that mod-ule and click the Save button at the bottom of the page. To add a new modmod-ule, such as the Full Calendar module, click on the Install new module button at the top of the page.
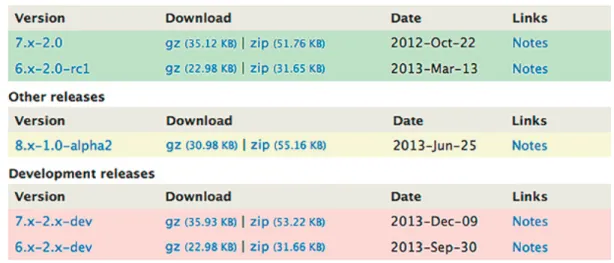
On the Install new module page you’ll see two options, to install the module from a URL and to install a module by uploading the module from your local computer. The easiest way is to install is via URL and to do so requires one simple step, copying the link to the module file you wish to install from Drupal.org (see Fig 1.11).
Figure 1.11 The Full Calendar module downloads
Using the screen shot in the figure above, you would right click on the “gz” link in the Download section for Drupal 8 (as indicated by the module version number that starts with an 8.x), and then from the browser’s list of options, select the option that allows you to copy the link. Back on your site’s Install new module page, right click in the text box for Install from a URL and paste the link to the module. Next click the in-stall button and let Drupal do its thing. Drupal 8 will download the module from Dru-pal.org, unzip the file in the appropriate directory, and list the new module on the Extend page, ready for you to enable it. Give it a try with the Full Calendar or any other module that you find that is of interest.
After downloading the module, if you are not automatically taken to the Extend page, click on the Manage link in the main menu, followed by the Extend link in the second-ary menu. Scroll down the page until you find the module you just downloaded and check the appropriate boxes next to the module(s), followed by the Save button. Con-gratulations you just expanded the functionality of your new Drupal 8 website and all you had to do was a few simple clicks. If you would like to examine the files that make up the module you installed, navigate to your sites root directory and look in the mod-ules directory. You’ll see your module listed, and within the module directory, a series of files that define the functionality provided by the module.
The visual representation of your site is controlled through Drupal’s theming system. In Drupal 8 the “engine” that drives the theming capabilities is the Twig template en-gine (http://twig.sensiolabs.org). Twig is new to Drupal 8 and it’s awesome.
You have several options when it comes to theming your site, you could create a new theme:
1. From scratch by creating all the HTML, CSS, Javascript, and Twig related configuration files. A great option for those who want ultimate control over everything theme related, or
2. Use one of the many starter themes, such as Zen. A starter theme provides the structure and in many cases a wealth of pre-built capabilities that make it easy to spin up a new theme with minimal effort, or
3. Use a pre-built theme that has the look and feel that you’re looking for. All three approaches work great, it’s all up to you as the one who is creating the site as to what approach you’re comfortable with and the approach that achieves your goals. For demonstration purposes let’s change the look and feel of our demonstration site by installing a pre-built theme from Drupal.org. Just like finding contributed modules, you can find a list of available Drupal 8 themes by visiting Drupal.org/project/themes. Remember to set the core compatibility option to 8.x as themes built for previous ver-sions of Drupal unfortunately won’t work.
Scroll through the list of themes and you’ll see that you have many themes and starter themes to select from. For demonstration purposes I’ll select the Gratis theme as its pretty close to what I want my site to look like, and it’s responsive out of the box so I can immediately begin viewing my site on a laptop, tablet, and phone. Just as we did with the contributed module, copy the URL of the theme install file from the Gratis landing page on Drupal.org (or whichever theme you chose), ensuring that you’re copying the link for the 8.x version of the theme. To install the theme, click on the Ap-pearance submenu item under Manage on the admin menu and click the Install new theme button. Paste the URL in the Install from a URL text field and click the Install button.
After installing the new theme return to the Appearance page and scroll down to the section titled Disabled Themes. If your installation was successful you should see your theme listed. Click on the Enable and set default link for your theme. You should see a message at the top of the page that your new theme is now the default theme. Keep your hands and feet inside the vehicle and return to your site’s homepage and get ready to be pleasantly surprised!
With a few clicks and a bit of configuration you’ve created your new Drupal 8 site and are ready to “open the doors” and show the world what a great site you’ve built. Like all good things there are maintenance tasks that you’ll need to perform to keep your site in tip-top shape, and as they say on the airlines—“in the unlikely event of a water landing”—you need to be prepared for those unexpected bumps in the road by proac-tively administering your new Drupal 8 site.
There are a few common tasks that you should put on your calendar, including:
1. Backing up your site. You never know when something bad may happen and having a backup may save you hours, days, weeks, or months of recreating the amazing site that you’ve built. There are several tools and approaches for backing up your site.
One of the easiest is the Backup and Migrate module
(http://drupal.org/project/backup_migrate). Alternatives include using Drush (http://drupal.org/project/drush) or tools provided by your hosting company. Remember that your site consists of both files in the directory structure on your server and the database. You’ll need backups of both in order to restore your site after a disaster.
2. Reviewing the log files. While logged in as an administrator, click on the Manage link in the admin menu followed by the Reports link in the secondary menu. On the Reports menu click on the Recent log messages link to see a list of errors and warning that have been logged by your site. Click on the Filter log messages link and select Emergency, Alert, Critical, and Error from the Severity column and click the Filter button. If there are entries that fit one of those criteria you may need to do a little investigational work.
3. Checking for updates. Back on the Reports page click on the Available updates link. If there are security fixes or updates to modules on Drupal.org they will be listed here. You may update the modules or themes directly from this page. While it’s easy to update it may not be advisable to update as the new version of the module(s) may break functionality on your site. It’s important to review the upgrade notes as well as the issue queue for those modules listed to ensure that there aren’t critical errors that will cause your site to go down. As always, back your site up before making any changes!
4. Check the status report. Back on the Reports page click on the Status link. This is a real time peek into the current state of your site. If there are any configuration errors they’ll show up on this page, as well as all the things that are correctly configured.
5. If you’re replacing an existing site with a new Drupal 8 site it’s a good idea to check the Top “page not found” errors on your new site. Click on the page not found link on the Reports page and note any URLs that are listed. That means that someone used a URL to access your site and Drupal didn’t find the page they were asking for. It may have been a typo by the visitor or it may be a legitimate case where you had a page on your old site and the URL doesn’t exist on your new site. To be visitor friendly use 404 redirects for URLs that show up frequently in this list.
6. Creating and disabling user accounts. Depending on whether you allow others to author and administer content, you may need to create new user accounts and disable accounts of people who are no longer associated with your site.
7. Clearing cache. Drupal does cache information at various layers in the architecture and there may be cases where the site worked and then it appears to be doing strange things. One of the first steps to take is to clear the sites cache to see if that remedies the problem. To clear Drupal’s cache click on the Manage link in the admin menu, followed by the Configuration link in the secondary menu. On the Configuration page click on the Performance link in the Development section and click on the Clear all caches button. In many cases this may solve your problems. 8. Setting your site into maintenance mode. You may have updates that you want to
make and you don’t want visitors on the site while you’re making changes. You can set your site into maintenance mode through a tool provided on the Configuration page. Click on the Maintenance mode link and check the box for “Put site into maintenance mode” and enter a message that will be displayed to site visitors. Click the Save configuration button and you’re site will display the message you entered to any anonymous visitors to your site.
There are other maintenance tasks that you may wish to perform. For more informa-tion about maintaining your Drupal site visit http://drupal.org/documentation.
In a few basic steps you’ve taken a leap towards creating an amazing Drupal 8 site. You are only limited by your imagination, your desire to learn, and time. Drupal 8 is a fantastic platform for developing a wide range of sites, from simple to extremely com-plex. Congratulations on taking the first few steps towards creating something amaz-ing. Don’t forget to give back to the Drupal community by sharing your discoveries and creations!
1760 East Pecos Road, Suite 432 Gilbert, AZ 85295 480.558.2400 Phone 480.558.2320 Fax info@unicon.net www.unicon.net
This concludes the first article in the series, "Building Websites with Drupal: Learn from the Experts." To view more articles in the series, please visit
www.unicon.net/about/articles.
This article is a great resource for creating Drupal websites. However, the task of creating a site might be more demanding if lack of time and resources are at play. One way to remedy this is to enlist a third-party vendor to develop and design the Drupal website.
Unicon, a third-party vendor providing services for Drupal, is there to help along the way with services including:
• Consulting • Content Strategy
• Hosting and Managed Services • Migration
• Systems Integration • Upgrades
• User Experience Design
Unicon is a proud member of the Drupal Association, and is a leading provider of IT consulting, services, and support for the education technology market.
Visit www.unicon.net/opensource/Drupalfor more information on Unicon services for Drupal.