www.clickndecide.com
Contact us:E-mail:[email protected]Tel: +33 (0)4 67 84 48 00Headquarters: Click&DECiDE 130, rue du Baptistou - 34980 St Gély du Fesc, France. To contact your nearest Click&DECiDE partner, click here.
Click&DECiDE
Business Application Intelligence
Data Sources,
Queries
& Output Formats
Manual
Last Edition February 6th
th, 2014
Click&DECiDE version 2013
T h e V e r s a t i l e
B I
S o l u t i o n !
2
www.clickndecide.com
Contact us:E-mail:[email protected]Tel: +33 (0)4 67 84 48 00Headquarters: Click&DECiDE 130, rue du Baptistou - 34980 St Gély du Fesc, France. To contact your nearest Click&DECiDE partner, click here.
Table of Contents
1. Starting with Click&DECiDE ... 5
1.1. Using the Click&DECiDE Start Menu ... 5
1.1.1. Using the Start Menu’s Business Application Intelligence Folder ... 5
1.1.2. Using the Start Menu’s Tools Folder ... 5
1.1.3. Using the Start Menu’s iSeries Tools Folder: ... 6
1.1.4. Using the Start Menu’s Documentation Folder ... 6
1.2. Defining Data Source Access (Express Edition or Builder standalone)... 6
1.2.1. Creating a New Data Source ... 6
1.2.2. Modifying an Existing Data Source ... 8
1.3. Defining Data Source Access (Enterprise Edition) ... 9
2. Using Click and DECiDE Builder ... 10
2.1. Introducing Key Concepts ... 10
2.2. Opening a Project. ... 10
2.3. Creating a Project ... 10
2.4. Creating a New Query with Only One Table ... 11
2.5. Creating a New Query with Two or More Tables ... 13
2.6. Defining the Join Condition ... 14
2.7. Selecting some Fields ... 16
2.8. Defining a Join condition including virtual field(s) ... 19
2.9. Selecting or Removing All Fields ... 19
2.10.Modifying the Column Order ... 21
2.11.Modifying the Column Header and Data Format ... 21
2.12.Deleting a Selected Column ... 24
2.13.Saving the Query ... 24
2.14.Query Information ... 25
2.14.1. Defining Query Properties to Display in the Web Portal ... 25
2.15.Removing a Query ... 26
2.16.Sorting Data in a Query ... 26
2.17.Applying a Top Value ... 28
2.18.Defining Criteria ... 29
2.18.1. Working with Criteria for Sub-Select Queries ... 33
2.18.2. Exercise 1: Defining Criteria... 34
2.18.3. Exercise 2: Using Keywords ... 36
3
www.clickndecide.com
Contact us:E-mail:[email protected]Tel: +33 (0)4 67 84 48 00Headquarters: Click&DECiDE 130, rue du Baptistou - 34980 St Gély du Fesc, France. To contact your nearest Click&DECiDE partner, click here.
2.18.5. Exercise 4. Customizing your Query Parameters ... 38
2.18.6. Exercise 5: Modifying AND Statements to OR Statements ... 39
2.18.7. Exercise 6: Using the Combine Button ... 41
2.18.8. Exercise 7: Using the Not Button ... 41
2.19.Copying a Query to Start a New Query ... 42
2.20.Using Aggregate Functions ... 43
2.21.Working with Virtual and Calculation Fields ... 46
2.21.1. Working with Data Source Formula ... 46
2.21.2. Working with Click & DECiDE Formula ... 46
2.22.Using Dynamic Criteria with Parameters ... 51
2.22.1. Defining a Parameter ... 51
2.22.2. Selecting an Existing Query Parameter ... 51
2.22.3. Creating a New Query Parameter ... 51
2.22.4. Working with Update Methods ... 53
2.22.5. Working with an ASCII File for the List of Values ... 54
2.22.6. Creating the area list.lst File ... 55
2.22.7. Updating a Parameter using a Formula ... 57
2.22.8. Updating a Parameter with the Result of a Query Column ... 58
2.22.9. Assigning a Parameter to a Field ... 58
2.22.10. Assigning a Value to a Parameter ... 60
2.22.11. Updating a Parameter with a User Property or User Group Property ... 62
2.23.Using Dynamic Top with Parameters ... 63
2.24.Using an Advanced Query Function: UNION Statement ... 65
2.24.1. Inserting a UNION ... 65
2.24.2. Changing the UNION Type ... 66
2.25.Creating Alert after running a Query ... 67
2.26.Creating a Cube from a Query ... 67
2.27.Creating a Report from a Query ... 67
2.28.Creating a Data Source’s SQL from a Query ... 67
2.29.Modifying the Application’s Look ... 67
3. Working with Project Options ... 69
3.1. Defining Project Options ... 69
3.2. Using the Click&DECiDE Command ... 71
3.3. Compact Project Command ... 71
4. Working with the Tools Options Property Sheet ... 72
4.1.1. Working with the General Tab ... 72
4
www.clickndecide.com
Contact us:E-mail:[email protected]Tel: +33 (0)4 67 84 48 00Headquarters: Click&DECiDE 130, rue du Baptistou - 34980 St Gély du Fesc, France. To contact your nearest Click&DECiDE partner, click here.
4.1.3. Working with the Cube Tab... 73
4.1.4. Working with the Event Manager Tab ... 74
4.1.5. Working with the License Tab ... 75
5. Exporting to an Output Format ... 77
5.1. Working with Customizable Output Formats ... 77
5.1.1. Working with the Excel Option Tab ... 80
5.1.2. Working with the Local SQL Server Output Format ... 83
5.1.3. Saving the Output Configuration to the Database ... 83
5.1.4. Working with the ASCII Category Format ... 88
5.1.5. Working with Atom output format ... 88
5.1.6. Working with the Google Data Table output format ... 89
5.1.7. Working with Predefined Output Formats ... 89
6. Working with Date Keywords ... 90
6.1. Invariant Predefined Functions ... 90
6.2. Standard Days and Months Functions by Language ... 92
6.3. Other Hour Functions by Language ... 93
6.4. Other Day Functions by Language ... 94
6.5. Other Week Functions by Language ... 95
6.6. Other Month Functions by Language ... 96
6.7. Other Quarter Functions by Language ... 97
5
www.clickndecide.com
Contact us:E-mail:[email protected]Tel: +33 (0)4 67 84 48 00Headquarters: Click&DECiDE 130, rue du Baptistou - 34980 St Gély du Fesc, France. To contact your nearest Click&DECiDE partner, click here.
1. Starting with Click&DECiDE
1.1. Using the Click&DECiDE Start Menu
The Click&DECiDE Start menu displays the following modules. To display the Start menu click Start> All Programs> Click and DECiDE.
Administration Manager: click Administration Manager to launch the Administration Manager. The Administration Manager enables you to define and setup each data source you want to access. In the
Professional and Enterprise Edition, the Administration Manager also enables you to define the Security when accessing data sources: User Groups, Users, Menus used in the Web Portal and the Authentication mode. In the Express and Standard Edition, this command only allows to define and setup each data source you want to access.
Web Portal: click Web Portal to access your Click&DECiDE Web Portal. The Web Portal will be launched.
1.1.1.
Using the Start Menu’s Business Application Intelligence Folder
Builder: click Builder to launch the Click&DECiDE Builder. The Builder is the main program which enables you to start the application to create queries, reports and cubes, all saved in the same project with a “.wfv” extension.
Configuration Wizard: click Configuration Wizard to launch the Click&DECiDE Configuration Wizard again. You may choose to run the Configuration Wizard again in the following cases:
If you need to change your license certificate.
If you need to change the Web Portal Authentication mode. If you need to change your Mail Server name.
If you need to change the SQL Server Authentication mode.
1.1.2.
Using the Start Menu’s Tools Folder
Dashboard: click Dashboard to launch the Click and DECiDE Dashboard program. This program enables you to easily create user-friendly end-user dashboards using Click&DECiDE queries, reports, graphs and cubes without any previous programming experience.
Model: click Model to launch the Click&DECiDE Model program (Enterprise Edition only). This program allows the Administrator to create end-user table views, with hidden fields, pre-defined joins, pre-prepared calculated fields and hidden criteria. Tables and columns can be renamed to make the names more user-friendly to the end user. A Click and DECiDE Model data source must be then created in the Administration Manager in order to make queries for a Model.
6
www.clickndecide.com
Contact us:E-mail:[email protected]Tel: +33 (0)4 67 84 48 00Headquarters: Click&DECiDE 130, rue du Baptistou - 34980 St Gély du Fesc, France. To contact your nearest Click&DECiDE partner, click here.
Web Menu: click Web Menu to launch the Click and DECiDE Web Menu program (Enterprise Edition only). This program allows the Administrator to create the Menus they want to publish via the Web Portal, according the User Groups defined in the Administration Manager.
1.1.3.
Using the Start Menu’s iSeries Tools Folder:
iSeries Help: click iSeries Help to open the Click and DECiDE iSeries Online Help.
iSeries Host Program Installation: click iSeries Host Program Installation to run the tools required to upload to the AS/400 Host Program.
iSeries Interface Batch Setup: click iSeries Interface Batch Setup to run the tools managing the rights for the Batch Facility. This is a specific feature for iSeries that must be prepared by the AS/400 Administrator.
1.1.4.
Using the Start Menu’s Documentation Folder
Products and Solution Data Sheets: click Products and Solution Data Sheets to product and solution documents on the Click&DECiDE web site.
Readme: click Readme to open the Readme file and read about the new features in the current version. Technical Documentation: click Technical Documentation to open technical documents on the Click&DECiDE web site.
1.2. Defining Data Source Access (Express Edition or Builder standalone)
Once you have installed Click&DECiDE and you want to start using the product, you first need to define the data source you want to access. If you installed the Express Edition or only Builder from Desktop or
Enterprise Edition then please follow the instructions in this section as the Administration Manager linked in the Start Menu will launch the Click&DECiDE Data Sources Configuration module which is only for the Express Edition of Click&DECiDE or Builder installed as standalone.
If you installed the Enterprise Editions, please follow the instructions in section 1.3. To define the access to your data source, please follow the steps below.
1. Click Start> All Programs> Click and DECiDE> Administration Manager. The Click and DECiDE Data Sources Configuration module appears. This program allows you to add configure the access for each data source you want to use.
1.2.1.
Creating a New Data Source
To create a new data source, please follow the steps below. 1. Right-click in the middle pane to add a new data source. 2. Click New Data Source or click File> New.
7
www.clickndecide.com
Contact us:E-mail:[email protected]Tel: +33 (0)4 67 84 48 00Headquarters: Click&DECiDE 130, rue du Baptistou - 34980 St Gély du Fesc, France. To contact your nearest Click&DECiDE partner, click here.
4. Select the data source in the Type drown-down list. In this example we will add a new iSeries TCP/IP data source.
Note: for iSeries TCP/IP source you must run the Host Program Installation first before creating this data source. Select Start> All Programs> Click and DECiDE> iSeries Tools> iSeries Host
Program Installation to run the tools required to upload to the AS/400 Host Program. 5. Click OK.
6. Enter the iSeries Name or IP address.
7. Enter the RDB Name tab:
8
www.clickndecide.com
Contact us:E-mail:[email protected]Tel: +33 (0)4 67 84 48 00Headquarters: Click&DECiDE 130, rue du Baptistou - 34980 St Gély du Fesc, France. To contact your nearest Click&DECiDE partner, click here.
9. Click Validate.
Note: Once the test connection is OK, your new iSeries data source will be ready to use with Click&DECiDE.
1.2.2.
Modifying an Existing Data Source
To modify an existing data source, please follow the steps below. 1. Right-click on the Local SQL Server icon.
2. Select Properties (or select File>Properties), the Settings dialog box appears.
3. Enter the Server Name or Server Name\Instance Name for the SQL Server you want to access. 4. Select or clear the check boxes as appropriate.
5. Click OK.
6. Right-click on the data source.
7. Click Test Connection. Note: if your SQL Server was setup with SQL Server Authentication then enter your login (User ID and Password). If your SQL Server was setup with Windows Authentication then do not enter your login.
8. Note the context menu displays the following other options: Remove: removes this data source.
Rename: or press F2 enables you to change the data source name.
Default Login: if you want to automatically use the login defined here without needing to login each time the user connects to the database.
9
www.clickndecide.com
Contact us:E-mail:[email protected]Tel: +33 (0)4 67 84 48 00Headquarters: Click&DECiDE 130, rue du Baptistou - 34980 St Gély du Fesc, France. To contact your nearest Click&DECiDE partner, click here.
9. Enter your User ID and Password if your SQL Server was setup with SQL Server Authentication. Do not enter your User ID and Password if your SQL Server was setup with Windows Authentication then do not enter your login.
10. Click OK.
1.3. Defining Data Source Access (Enterprise Edition)
If you have installed the Professional or Enterprise Edition, then if you click Administration Manager in the Click and DECiDE Start menu, the Click and DECiDE Administration Manager module will be launched. Click and DECiDE Administration Manager allows you to perform the following tasks:
Add and configure each data source you need to access
Manage Users and User Groups
Manage the Security for each data source that must be accessible according to the User Group
Grant access to User Groups to predefined Web Menus.
To learn more about the Click and DECiDE Administration Manager, please refer to the Click&DECiDE BAI Administration Manager Manual.
10
www.clickndecide.com
Contact us:E-mail:[email protected]Tel: +33 (0)4 67 84 48 00Headquarters: Click&DECiDE 130, rue du Baptistou - 34980 St Gély du Fesc, France. To contact your nearest Click&DECiDE partner, click here.
2. Using Click and DECiDE Builder
Now that the data source you need is ready, you can start using Click and DECiDE Builder. To launch Click and DECiDE Builder, please follow the steps below:
1. Select Start> All Programs> Click and DECiDE> Business Application Intelligence> Builder.
2.1. Introducing Key Concepts
Click and DECiDE Builder saves your work in a Project file with the file extension .wfv. The Project *.wfv file contains all the queries, reports and cubes you created for your project. You can create an unlimited number of projects.
Several tabs appear in a project: such as Queries, Reports and Cubes.
Queries tab: contains all the required queries used as is or used to feed a report, a graph inside a report, a sub-report, a cube or a web query for Excel. The queries can also be used to feed a Dashboard application. Reports tab: contains all the reports, based on existing queries in the same project file. Each report can include several graphs, sub-reports or cubes but also external objects such as a Microsoft Excel graph or other Active-X components.
Cross Tables: contains Cross-tables based on existing queries in the same project file.
Cubes tab: contains cubes based on existing queries in the same project file or based on an OLAP database if you are using “Analysis Services”.
Project items such as queries or reports can be exported to send data to all the output formats supported by Click and DECiDE Builder. (ASCII File, HTML, PDF, Excel DDE, Excel XLS and XLSX (native format), Google Data Table, formatted text file (RTF), Clipboard and other databases). The project items such as cubes can be exported to a file with the .cub extension that can be opened by Excel. It is possible to export a cube directly to Microsoft Excel 2007 with the data and presentation (layout) or to any other output format since version 13.
2.2. Opening a Project.
To open a project, please follow the steps below.
1. Select File> Open Project or click the Open Project icon. 2. Select the required project file with the*.wfv extension.
2.3. Creating a Project
To create a new project, please follow the steps below.
1. Select File> New Project or click the New Project icon.
2. Enter a File name for the new project. 3. Click Save.
Note: this project is now ready to store the queries, reports, cross-tables and cubes that you are going to create.
11
www.clickndecide.com
Contact us:E-mail:[email protected]Tel: +33 (0)4 67 84 48 00Headquarters: Click&DECiDE 130, rue du Baptistou - 34980 St Gély du Fesc, France. To contact your nearest Click&DECiDE partner, click here.
2.4. Creating a New Query with Only One Table
To create a query, you must first create a data source (please see section 1). If you have already created the data source you need, then you can now create your first query. To do so, please follow the steps below.
1. Click the New Query icon or select File> New> Query.
2. Click the required data source to display the available sublevels.
3. Select the table you need: (if you are not using the Windows Authentication mode you will be prompted for a login).
4. Right-click in the right pane.
12
www.clickndecide.com
Contact us:E-mail:[email protected]Tel: +33 (0)4 67 84 48 00Headquarters: Click&DECiDE 130, rue du Baptistou - 34980 St Gély du Fesc, France. To contact your nearest Click&DECiDE partner, click here.
6. Double-click a table if you only need one table for your query. The column list will automatically be displayed.
7. Click the Run icon to get the result for the Top 50 records by default for all the fields in the data grid. If no fields have been selected, all the fields will be selected by default when running a query). If you want to modify or remove this Top value, refer to the Applying a Top Value section.
13
www.clickndecide.com
Contact us:E-mail:[email protected]Tel: +33 (0)4 67 84 48 00Headquarters: Click&DECiDE 130, rue du Baptistou - 34980 St Gély du Fesc, France. To contact your nearest Click&DECiDE partner, click here.
See also:
Selecting Fields – Column Header and Data format – Sorting Data – Modifying column order – Deleting columns – Query information – Removing Query – Saving query – Aggregate fields – Virtual fields – Joining several tables.
2.5. Creating a New Query with Two or More Tables
If you need two or more tables in your query, you first need to add each table in the Table tab when selecting the tables in the list by performing a drag-and-drop operation for both the tables required. To do so, please follow the steps below:
1. Select the table you want to use for the query. 2. Drag it into the lowest pane.
3. Select the other table you want to use. 4. Drag it into the lowest pane.
14
www.clickndecide.com
Contact us:E-mail:[email protected]Tel: +33 (0)4 67 84 48 00Headquarters: Click&DECiDE 130, rue du Baptistou - 34980 St Gély du Fesc, France. To contact your nearest Click&DECiDE partner, click here.
5. Note that the default join condition is automatically proposed if the program finds two columns with same name, same type and same length. (Note: if you do not wish the join being automatic, you can disable this feature in Tools> Options> Query Tab and uncheck the “Link Tables Automatically”.
Note: if you need to remove a table from the lowest pane, select the concerned table and press the Del key.
2.6. Defining the Join Condition
To modify the join condition, please follow the steps below:
1. Double click the equal sign in the square between the two tables The Join Properties dialog box appears.
15
www.clickndecide.com
Contact us:E-mail:[email protected]Tel: +33 (0)4 67 84 48 00Headquarters: Click&DECiDE 130, rue du Baptistou - 34980 St Gély du Fesc, France. To contact your nearest Click&DECiDE partner, click here.
2. Select the required join type. Note: in the majority of cases, the Join Criteria must be set to “equal”. 3. Click OK.
Note: You can remove the join condition by pressing DEL on the square with the equal sign. To manage the join relation for several tables, please follow the steps below:
1. Click Click here to display join list. The Joins / Relations dialog box appears. This displays all the defined join relations.
2. Add or remove a join condition.
16
www.clickndecide.com
Contact us:E-mail:[email protected]Tel: +33 (0)4 67 84 48 00Headquarters: Click&DECiDE 130, rue du Baptistou - 34980 St Gély du Fesc, France. To contact your nearest Click&DECiDE partner, click here.
In the above screen; you can add a new Join condition or remove an existing join condition but you cannot change the Join Type, which can be changed in the screen explained previously.
(see “Double click the equal sign”). (See also: Join Condition with Virtual Field
2.7. Selecting some Fields
To select the columns you need in a query, please follow the steps below: 1. Click the Query tab. The tables appear.
17
www.clickndecide.com
Contact us:E-mail:[email protected]Tel: +33 (0)4 67 84 48 00Headquarters: Click&DECiDE 130, rue du Baptistou - 34980 St Gély du Fesc, France. To contact your nearest Click&DECiDE partner, click here.
2. Select the columns you need by double-clicking the left grey square near the column name. Example
1. Select Join Type = 1 (this join type only includes records from both tables where the joined field match the join criteria).
2. Create a new query using the Sales and Salesman Tables. 3. Keep the default Join Type 1.
4. Select the SALNAME and TOTAL fields. 5. Right-click on the TOTAL field.
6. Select Aggregate> Sum.
7. Click Run to run the query. The result will appear in the lower pane; only the result for salesmen with records in the Sales tables will be displayed.
18
www.clickndecide.com
Contact us:E-mail:[email protected]Tel: +33 (0)4 67 84 48 00Headquarters: Click&DECiDE 130, rue du Baptistou - 34980 St Gély du Fesc, France. To contact your nearest Click&DECiDE partner, click here.
8. Return to the Table tab. 9. Select Join Type#3.
10. Click OK.
11. Click Run to run the query again. The result will appear for all the salesmen, even if they made no sales in the Sales table.
Note: the Join type = 4 is not supported by all databases, such as ODBC Access, but supported for example by the MS SQL Server database and the iSeries, Oracle or UDB-DB2 database. This Join type will retrieve all the records from each table. (It is equivalent of type 2 + type 3 together).
19
www.clickndecide.com
Contact us:E-mail:[email protected]Tel: +33 (0)4 67 84 48 00Headquarters: Click&DECiDE 130, rue du Baptistou - 34980 St Gély du Fesc, France. To contact your nearest Click&DECiDE partner, click here.
2.8. Defining a Join condition including virtual field(s)
Note also that since Click&DECiDE version 12 you can add a Join condition between a native virtual field and another column or between 2 virtual fields. The “Use virtual fields with Data Source Formula” option must be activated in the Joins/Relations dialog box to display existing native virtual fields in the column list. Example: if we create 2 virtual fields using the Category and Sales_Details tables as follow:
Then we can define a join between these 2 virtual fields (or between one virtual field and another column): - Go to the Tables Tab and call the Joins/Relations dialog box as previously describe.
- Display the concerned virtual fields.
- Select in the left and right windows the fields to be joined. - Click Add
- Click Delete if you need to remove this join.
2.9. Selecting or Removing All Fields
20
www.clickndecide.com
Contact us:E-mail:[email protected]Tel: +33 (0)4 67 84 48 00Headquarters: Click&DECiDE 130, rue du Baptistou - 34980 St Gély du Fesc, France. To contact your nearest Click&DECiDE partner, click here.
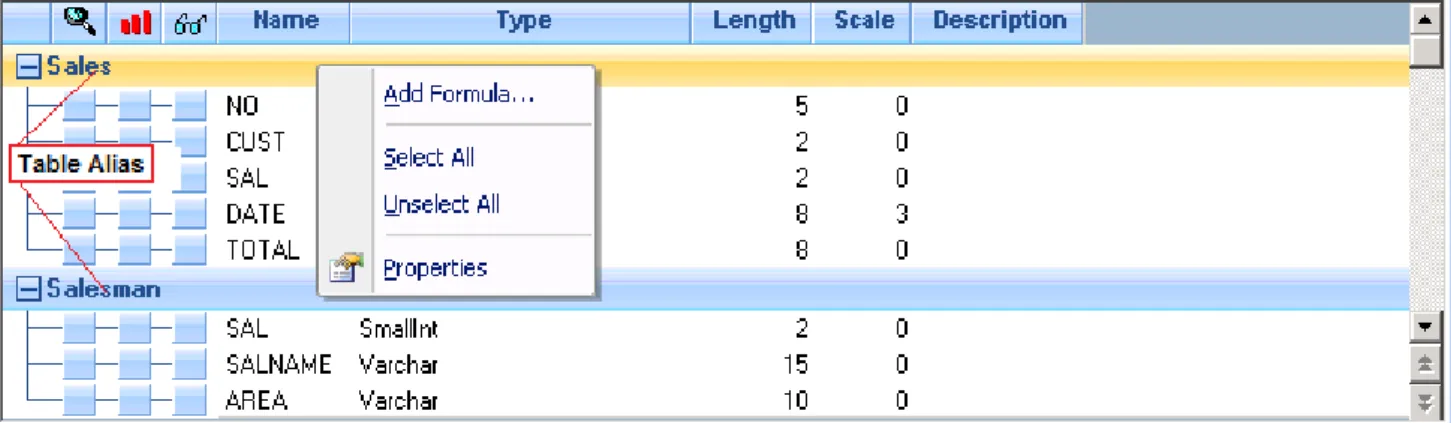
To select fields, please follow the steps below. 1. Select the table title (Table Alias). 2. Right-click to display the context menu.
3. Note the following options appear in the context menu:
Add a formula: adds a virtual field whose formula can be calculated by the data source engine or by Click&DECiDE. This option will be described later in this document.
Select All Fields: selects all the columns in this table. Note: you also can double-click directly on the Table Alias to select all fields in a table.
Clear Fields Selected: clears the selection for all the columns from this table. Properties: displays the Table Properties.
4. Click Properties to display the Table Properties.
5. Note the following properties appear:
Alias Source the name given to the data source in the Administration Manager (this cannot be modified here).
Table Name the full table name (this cannot be modified here). Alias: the visible Table Alias that can be modified here, if necessary.
6. Double-click each required column if you only want to select some columns. The columns will automatically appear from left to right in the Data Grid pane. In this example we will select AREA, SALNAME, DATE and TOTAL.
21
www.clickndecide.com
Contact us:E-mail:[email protected]Tel: +33 (0)4 67 84 48 00Headquarters: Click&DECiDE 130, rue du Baptistou - 34980 St Gély du Fesc, France. To contact your nearest Click&DECiDE partner, click here.
2.10.
Modifying the Column Order
If you want to move one or several columns from right to left or left to right, please follow the steps below. 1. Select the required column(s).
2. Press SHIFT+Click or CTRL+Click, keep the mouse cursor pressed down. 3. Move the column as necessary.
2.11.
Modifying the Column Header and Data Format
By default the column header will be the same as the field name. There are two methods of modifying the column header.
Method 1: Using the Field Description as the Column Header
To use the field description as the column header, please follow the steps below. 1. Select Tools> Options> Query> Use Field Description as heading. Method 2: Modifying the Column Header by Hand
To modify the column header by hand, please follow the steps below. 1. Select the column whose header you want to modify.
2. Right-click. 3. Click Properties.
22
www.clickndecide.com
Contact us:E-mail:[email protected]Tel: +33 (0)4 67 84 48 00Headquarters: Click&DECiDE 130, rue du Baptistou - 34980 St Gély du Fesc, France. To contact your nearest Click&DECiDE partner, click here.
4. Note the Properties pod appears.
5. Drag the floating Properties pod to the border (left, right, upper, lower) you want to dock it in the Click&DECiDE Builder and use the pin icon to pin/unpin it.
6. Drop the dialog box when the location is reached. The Properties pod will remain here until you decide to close or move it. Note: you can Auto Hide the Properties pod.
7. Modify the Header for the field you selected. In this example we will replace DATE by Purchase Date. 8. Specify a format. In this example we will select the long date format.
9. Select another column to modify its name and format if necessary. In this example, we have modified the name and format for the TOTAL column.
23
www.clickndecide.com
Contact us:E-mail:[email protected]Tel: +33 (0)4 67 84 48 00Headquarters: Click&DECiDE 130, rue du Baptistou - 34980 St Gély du Fesc, France. To contact your nearest Click&DECiDE partner, click here.
The proposed formats for numeric fields, or date, time and date time fields, are those defined in Windows according to your Regional Settings. Nevertheless, you can customize numeric formats and date formats as follows.
Numeric Format: use the # number sign with your Windows thousand and decimal separator, with zero if you need to see this value. Examples:
Value Customized format Result
1456.2 #,###.# 1,456.2 1456.2 #,###.00 1,456.20 0.3 #,###.00 .30 0.35 #,##0.00 0.35 2150 #,###.## 2,150 2150 #,###.00 2,150.00 0 #,### (not visible) 0 #,##0 0 45.1 #,##0_);[Red]-#,##0.00 45.10 -28.6 #,##0_);[Red]-#,##0.00 -28.60
Date format: use the ddmmyyy characters as follows: d=day, m=month and y=year.
Value Customized format Result
If the day 5 of a month is Wednesday
d 5
dd 05
ddd Wed
dddd Wednesday
If the month is April
m 4 mm 04 mmm Apr mmmm April If the year is 2009 yy 09 yyyy 2009
24
www.clickndecide.com
Contact us:E-mail:[email protected]Tel: +33 (0)4 67 84 48 00Headquarters: Click&DECiDE 130, rue du Baptistou - 34980 St Gély du Fesc, France. To contact your nearest Click&DECiDE partner, click here.
11/26/2009 dddd dd of mmmm, yyyy Thursday 26 November,
2009
2.12.
Deleting a Selected Column
If you no longer want to use a selected field, please follow the steps for one of the methods below. Method 1:
1. Select the column you want to stop using. 2. Press DEL.
Method 2:
1. Click the right-most column (the Select column) for the field you no longer want to display. Method 3:
1. Select the field you no longer want to display. 2. Right-click;
3. Click Select> Off.
2.13.
Saving the Query
To save your query, please follow the steps below. 1. Select File> Save or Save As.
2. Enter a name. 3. Click OK.
25
www.clickndecide.com
Contact us:E-mail:[email protected]Tel: +33 (0)4 67 84 48 00Headquarters: Click&DECiDE 130, rue du Baptistou - 34980 St Gély du Fesc, France. To contact your nearest Click&DECiDE partner, click here.
2.14.
Query Information
Once you have closed the query, you can see all queries already made in your Click&DECiDE project file. To view the properties for each query, select the query and note the properties appear in the General tab in the Properties pod.
The Properties Pod General tab displays the following properties. Name: displays the query name in your Project file.
Data Source: displays the query’s data source.
Description: enter the description you want in the Description text box. Created: the date and time the query was created. This cannot be modified.
Modified: the date and time when the query was modified for the last time. This cannot be modified. Author: who the author is. This will use the Windows User Name for the person who created the query. Note: the list of queries can be viewed in several display modes (Large Icons, Small Icons, List, Details). To view the details displayed in the Properties pod General tab click the Details icon (please see the screen shot above). This enables the user to view the query’s properties even when the Properties pod is closed.
2.14.1.
Defining Query Properties to Display in the Web Portal
It is possible to specify properties for a query that will only be visible in the Click&DECiDE Web Portal (Professional and Enterprise Editions). To do so, please follow the steps below.
1. Select the query whose properties you want to define. 2. Click the Properties tab in the Properties pod.
3. Enter the Properties you want to be visible in the Web Portal:
Name: the name that will be visible in the Web Portal if the project file is in a Shared Folder (this is not the same as the one used in your Project file).
Visible: hide the query in the Web Portal if the project file is in a Shared Folder.
Details: the Description that will be visible in the Web Portal if the project file is inside a Shared Folder (this is not the same as the one used in your Project file).
Default Destination: enter the path and/or the file name to be used when exporting to PDF format (Acrobat Reader), either from Click&DECiDE Builder, or from Click&DECiDE Web Server. This can also be a formula which generates a dynamic query name, for example, including date elements in the file name (e.g.: Path + File Name + YYMMDD + .PDF).
26
www.clickndecide.com
Contact us:E-mail:[email protected]Tel: +33 (0)4 67 84 48 00Headquarters: Click&DECiDE 130, rue du Baptistou - 34980 St Gély du Fesc, France. To contact your nearest Click&DECiDE partner, click here.
2.15.
Removing a Query
To remove a query, please follow the steps below.
Warning: before removing a query, check that the query is not used by another query (sub-select), report, graph, sub-report, or a sub-query in a report or cube. As you cannot restore a query once it has been deleted. We recommend that you regularly backup your project files.
1. Open the Click&DECiDE Builder project file which the query you want to delete is in. 2. Click the Query tab.
3. Select the query to be removed.
4. Press DEL or the Remove button. A warning message appears. 5. Click Yes to confirm.
2.16.
Sorting Data in a Query
To sort data in a query, please follow the steps below.
1. Open the query you want to sort data in. In this example, we will open the Query 2 tables query. 2. Click the rightmost column to select the field you want to sort data for. The column must be selected
as the source database cannot apply a sort on an unselected field. 3. Click the sort column to the left of the field you want to sort data for.
4. Click the black histogram Sort icon to alter the sort from an Ascending to a Descending sort and vice versa.
5. Click the Sort icon if you want to add several sort conditions. This will display all the sort conditions. In this example, the first ascending sort will apply to the Area field, then, for the same area, the second ascending sort level will apply to the Salesman Name, then, for the same salesman, the third descending sort level will apply the Total field.
27
www.clickndecide.com
Contact us:E-mail:[email protected]Tel: +33 (0)4 67 84 48 00Headquarters: Click&DECiDE 130, rue du Baptistou - 34980 St Gély du Fesc, France. To contact your nearest Click&DECiDE partner, click here.
Modify the hierarchy of the sort conditions in the Order by… dialog box by using the up and down arrows. To remove a sort condition, click the red delete icon.
Note: the position of each field in the data grid does not matter: you can apply a sort condition to any field in the data grid regardless of its position. In the following screen shot the sort is applied to the Date (field #3), but the Area and Salesman Name fields are in first and second place.
Note: Click&DECiDE Builder allows you to hide any selected fields if necessary. Right-click on the field you want to hide and click Select> Hidden.
28
www.clickndecide.com
Contact us:E-mail:[email protected]Tel: +33 (0)4 67 84 48 00Headquarters: Click&DECiDE 130, rue du Baptistou - 34980 St Gély du Fesc, France. To contact your nearest Click&DECiDE partner, click here.
2.17.
Applying a Top Value
To apply a Top value, for example to display results for the top 10 Salesmen, please follow the steps below. 1. Click the Query Properties icon to display the Query Properties pod.
2. Note the Number of Records in Data Grid value is set to 50 by default. This limits the number of records displayed in the Data Grid in the lower pane to 50. This does not apply to exports and printing. To modify this limit, select Tools> Options> Query and modify or remove the value in the Number of Records in Data Grid text box.
3. Enter a number in the First Records text box to define a Top value. For example you can ask for the TOP 10 number of records. In this case, the TOP value will apply to any export or printing from this query, cube or report based on this query. Note that the First Records box displays an asterisk by default when a new query is created.
4. Define whether you want the number to be converted as a percentage by selecting Yes in the Percentage drop-down list. For example, you can ask for the TOP 10% records. In this case, the TOP value will apply to any export or printing from this query, cube or report based on this query. 5. Make sure that you sort the query data according to the correct field to ensure that the Top Value is
treated correctly. Note that a TOP usually applies to a numeric field, with the descending sort condition if the Top applies to the Top greater values, or Ascending sort condition if the Top applies to the Top lower values.
29
www.clickndecide.com
Contact us:E-mail:[email protected]Tel: +33 (0)4 67 84 48 00Headquarters: Click&DECiDE 130, rue du Baptistou - 34980 St Gély du Fesc, France. To contact your nearest Click&DECiDE partner, click here.
Note: refer to the section explaining how to use a Parameter to define a Dynamic Top Value for a query.
2.18.
Defining Criteria
If you want to filter your data to only get the information you want, you will need to apply criteria. To do so, please follow the steps below.
Only the records matching the criteria condition you set will be displayed in the data grid, output format, report or cube.
1. Click the leftmost column of the field you want to set criteria for. The Criteria dialog box appears.
2. Select the field from the Columns drop-down list. 3. Select the Operator.
30
www.clickndecide.com
Contact us:E-mail:[email protected]Tel: +33 (0)4 67 84 48 00Headquarters: Click&DECiDE 130, rue du Baptistou - 34980 St Gély du Fesc, France. To contact your nearest Click&DECiDE partner, click here.
4. Note that you can apply the criteria with the following four possibilities: a Value, the content of another Column, an Expression (formula) or the values given by another Query.
Value tab: allows you to enter a value (text, number, date and so on) as a comparison value. However, you can also use the browse button to search for available values in the Host database in real-time or to automatically create a dynamic list of values.
Column tab allows you to use the content of another column as a criteria condition. For example you can create a criteria such as TABLE1.DEBIT >= TABLE2.CREDIT
Expression tab allows you to use a formula as a criteria condition. For example a TABLE.DATE can be compared to the formula = CurrentDate() – 7 to get all the records whose DATE contains the value from one week ago.
Query tab allows you to use the result given by another query as criteria condition. 5. Click the Value tab.
6. Click Browse…
Browse displays a warning message explaining that this action may take a while because the distinct list of value will be generated dynamically from the source database.
31
www.clickndecide.com
Contact us:E-mail:[email protected]Tel: +33 (0)4 67 84 48 00Headquarters: Click&DECiDE 130, rue du Baptistou - 34980 St Gély du Fesc, France. To contact your nearest Click&DECiDE partner, click here.
8. Select the required value(s) and click OK. The Criteria dialog box appears as in this example:
The result will be all records where the AREA field is equal to ‘CENTRAL’, but if you need to run again the query for another AREA you will need to modify the criteria each time. That is why the other option “Display List of Values” can be used to get a dynamic list of value without the need to modify the criteria.
Display List of Values: will automatically create a parameter fed by a sub-query which dynamically retrieves the distinct values found in the AREA field.
32
www.clickndecide.com
Contact us:E-mail:[email protected]Tel: +33 (0)4 67 84 48 00Headquarters: Click&DECiDE 130, rue du Baptistou - 34980 St Gély du Fesc, France. To contact your nearest Click&DECiDE partner, click here.
10. Click OK.
11. Click Run to run the query. You will be prompted to select a value for the AREA field. Note: leave IGNORE (equivalent to All Values) if you want to run the query for all the data. 12. Click the down arrow to expand the dynamic list of distinct values.
13. Select the value(s) you want.
14. Click the icon.
33
www.clickndecide.com
Contact us:E-mail:[email protected]Tel: +33 (0)4 67 84 48 00Headquarters: Click&DECiDE 130, rue du Baptistou - 34980 St Gély du Fesc, France. To contact your nearest Click&DECiDE partner, click here.
Important: note that a parameter, named P_AREA, has automatically been created and displayed in the Expression tab.
16. Click Query> Parameters to display the details about this parameter:
The above screen will be explained more in detail later in this manual, in the section concerning Parameters.
2.18.1.
Working with Criteria for Sub-Select Queries
Another query is called a "sub-select" and can be a result coming from another table. To create a sub-select query, please follow the steps below:
1. Click the Query tab in the Criteria dialog box.
2. Click the Browse button to dynamically create the sub-select.
3. Note that i you save the sub-select created, the name will be used in the criteria box, if not, the SQL will be used in the criteria box (this is not recommended if you are not familiar with SQL syntax). Note: the result given by the sub-select must be accepted by the criteria operator you have chosen. For example an equal condition can be used only if the sub-select retrieves one value. However, an In List condition can accept a list of values given by the sub-select. Usually the sub-select must always give the result of one field whose content can be compared with the field used in the Criteria dialog box. In the following example the sub-select will retrieve the values 3, 6 and 16, that is, the salesman code values for all the salesmen from the SOUTH area.
34
www.clickndecide.com
Contact us:E-mail:[email protected]Tel: +33 (0)4 67 84 48 00Headquarters: Click&DECiDE 130, rue du Baptistou - 34980 St Gély du Fesc, France. To contact your nearest Click&DECiDE partner, click here.
Each criteria added in the query will appear in the Where tab in the Criteria dialog box if the criteria concerns a host field. Please refer to the section concerning defining criteria for virtual fields or group fields further on in this document.
Note: when defining more than one criterion, a default and statement is automatically added between each criterion. It may sometimes be necessary to modify the and into an or statement, or use the not condition if necessary and combine certain criteria with each other by using parenthesis levels as you can see in the following example.
2.18.2.
Exercise 1: Defining Criteria
In this exercise we are going to create a query from the SALES DETAILS, PRODUCT and CATEGORY tables in order to get the Family, the Product Name and the Quantity (sorted by descending quantity) for the selected Family, using an automatic list of values to choose the Family. To do so, please follow the steps below.
1. Create a query from the SALES DETAILS, PRODUCT and CATEGORY tables. 2. Define the joins between the tables as follows.
35
www.clickndecide.com
Contact us:E-mail:[email protected]Tel: +33 (0)4 67 84 48 00Headquarters: Click&DECiDE 130, rue du Baptistou - 34980 St Gély du Fesc, France. To contact your nearest Click&DECiDE partner, click here.
3. Select the following columns: Sales_Details: QTY
Product: PRODUCT Category: FAMILY
4. Define an Ascending Sort for the QTY field. 5. Modify the Column Headers.
6. Configure the Number Format for the QTY column. 7. Configure the Decimal Places for the QTY column.
8. Click the leftmost column of the FAMILY field to open the Criteria dialog box for the FAMILY field. 9. Click the … Browse button.
36
www.clickndecide.com
Contact us:E-mail:[email protected]Tel: +33 (0)4 67 84 48 00Headquarters: Click&DECiDE 130, rue du Baptistou - 34980 St Gély du Fesc, France. To contact your nearest Click&DECiDE partner, click here.
11. Click OK.
12. Click Run, to run the query in the data grid to check the result. 13. Click File> Save As to save you query as Exercise 1.
2.18.3.
Exercise 2: Using Keywords
In this exercise we will create a query from the SALES table in order to get the Customer Names, the date and the total amount for the sales made during the current month. To do so, please follow the steps below.
1. Create a query from the SALES table and the CUSTOMER table. 2. Select the following columns:
Sales: DATE Sales: TOTAL
Customer: CUSTNAME
37
www.clickndecide.com
Contact us:E-mail:[email protected]Tel: +33 (0)4 67 84 48 00Headquarters: Click&DECiDE 130, rue du Baptistou - 34980 St Gély du Fesc, France. To contact your nearest Click&DECiDE partner, click here.
4. Select the equal Operator.
5. Click the arrow to display the context menu. 6. Click Display Predefined Dates:
7. Click OK. A new parameter named P_DATE has been automatically created and placed in the Expression tab.
8. Click OK.
9. Click Run to run the query. The Parameters dialog box appears.
10. Select a keyword, such as Today, Yesterday, This Month and Last Month. In this example, select This Month.
11. Click OK.
12. Note that only the data for the date corresponding to the current month is displayed.
2.18.4.
Exercise 3. Working with Two Criteria
Now we will add a new criteria condition to also get data from Last Month, so that you can compare data from two periods, This Month and Last Month. To do so, please follow the steps below.
1. Click the leftmost column of the DATE field. The Criteria dialog box appears. 2. Click New to add a new criterion for the DATE field.
3. Select the equal operator. 4. Select the Value tab.
5. Click the arrow to expand the context menu.
6. Click Display Predefined Dates. A new parameter is automatically created and placed in the Expression tab.
38
www.clickndecide.com
Contact us:E-mail:[email protected]Tel: +33 (0)4 67 84 48 00Headquarters: Click&DECiDE 130, rue du Baptistou - 34980 St Gély du Fesc, France. To contact your nearest Click&DECiDE partner, click here.
7. Note that the two criteria are separated by the and statement.
8. Click and in the middle pane, the statement is automatically replaced by the or statement. The or statement enables you to get results if you select This Month for the first criteria and Last Month for the second criteria.
9. Click OK.
10. Click Run to run the query. The Parameters dialog box appears. 11. Select This Month for the first parameter.
12. Select Last Month for the second parameter: 13. Click OK.
14. Note that you get data for both the periods you selected (Last Month and This Month) because you used the or statement. T If you used the and statement no result would have been generated, because each record has a single date - Last Month OR This Month OR another period.
2.18.5.
Exercise 4. Customizing your Query Parameters
You can easily customize the titles and default values which are displayed in the Parameters dialog box when you run a query. To do so, please follow the steps below.
1. Click the Query Parameters icon to display the Query Parameters. 2. Select the P_DATE parameter.
39
www.clickndecide.com
Contact us:E-mail:[email protected]Tel: +33 (0)4 67 84 48 00Headquarters: Click&DECiDE 130, rue du Baptistou - 34980 St Gély du Fesc, France. To contact your nearest Click&DECiDE partner, click here.
3. Modify the Title to Select First Period.
4. Modify the Default Value to 0 months ago|This Month. 5. Select the P_DATE1 parameter.
6. Modify the Title to Select Second Period.
7. Modify the Default Value to 1 months ago|Last Month. 8. Click OK.
Important: in this example we use keywords for Dates fields with the following syntax: Invariant Keyword|Language Keyword
Invariant Keyword will always work independent of your regional settings. Language Keyword: can be in the language you want.
For example 0 months ago is an invariant keyword where months is always written with an “s” and 0 can be a number between 0 and 12. For more than 12 months, you can use 1 years ago as invariant.
You also can use direct keywords in your language if your language system is: English, French, German, Spanish, Italian, Swedish or Catalan. In this case, the invariant keyword can be ignored as well as the pipe separator. Please refer to the keyword list for each language at the end of this document.
2.18.6.
Exercise 5: Modifying AND Statements to OR Statements
Now, we will add a new criteria condition to explain why you sometimes need to combine or ungroup several criteria together. To do so, please follow the steps below.
1. Click the leftmost column of the STATE field (in the Customer table). The Criteria dialog box appears. 2. Select the Customer.STATE Column.
3. Select the equal Operator. 4. Select the Value WA.
40
www.clickndecide.com
Contact us:E-mail:[email protected]Tel: +33 (0)4 67 84 48 00Headquarters: Click&DECiDE 130, rue du Baptistou - 34980 St Gély du Fesc, France. To contact your nearest Click&DECiDE partner, click here.
6. Click OK.
7. Click Run to run the query. 8. Note the following result appears.
9. Note records for states other than WA appear in the STATE column in the result. This is because the SQL was as follows:
Sales.DATE = This Month OR Sales.DATE = Last Month AND Customer.STATE = ‘WA’
The two conditions linked by the AND statement are Date = Last Month and State = ‘WA’, so for October we only got the State ‘WA’, but the first condition Date = This Month is not linked to any criteria in the State field because of the OR statement. The solution is to add the correct parenthesis using the Combine button. Please see Exercise 5 to find out how to combine criteria.
41
www.clickndecide.com
Contact us:E-mail:[email protected]Tel: +33 (0)4 67 84 48 00Headquarters: Click&DECiDE 130, rue du Baptistou - 34980 St Gély du Fesc, France. To contact your nearest Click&DECiDE partner, click here.
2.18.7.
Exercise 6: Using the Combine Button
To add parenthesis using the Combine button, please follow the steps below.
1. Click the leftmost column for the DATE field. The Criteria dialog box appears. 2. Click on the first criterion Sales.DATE = P_DATE.
3. Press CTRL+Click on the second criterion Sales.DATE = P_DATE1. 4. Click the Combine button:
5. Click OK.
6. Click Run to run the query.
7. Note that now only the data for the WA state appears for this month and last month.
2.18.8.
Exercise 7: Using the Not Button
The Not button can be used sometimes in the Criteria dialog box to modify one or several group of criteria, the Not can be applied to one row in the criteria or one group of rows between parenthesis. Please follow the steps below for more information.
1. Click the leftmost column of the DATE field. The Criteria dialog box appears. 2. Click Not.
42
www.clickndecide.com
Contact us:E-mail:[email protected]Tel: +33 (0)4 67 84 48 00Headquarters: Click&DECiDE 130, rue du Baptistou - 34980 St Gély du Fesc, France. To contact your nearest Click&DECiDE partner, click here.
3. Click OK.
4. Click Run to run the query.
2.19.
Copying a Query to Start a New Query
Sometimes you can save time by copying an existing query if you want to create a new query, this enables you to keep some features already defined, such as join conditions, sort conditions, criteria and so on. There are two possible methods of copying a query.
Method 1: Save As
1. Open the query you want to copy. 2. Select File> Save As.
3. Enter the name for the new query which will be a copy of this query. 4. Click OK.
Method 2: Copy & Paste
1. Close the query you want to copy if it is open or select File> Save. 2. Go to the Project tab.
3. Select the Query button to the left. 4. Select the query you want to copy. 5. Either:
a. Right-click> Copy. b. Right-click> Paste. 6. Or:
a. Select Edit> Copy b. Select Edit> Paste.
7. Rename the copied query from “*-copy” to the name you want. 8. Open the new query.
9. Select Edit> Clear Query if you want to remove certain features in the copied version of the query. 10. Select the appropriate check box(es).
Clear All: removes the selection of the fields, existing join conditions, sort conditions and all existing criteria.
Clear Fields: removes the selection of the fields and sort conditions because a field which has not been selected cannot be sorted
43
www.clickndecide.com
Contact us:E-mail:[email protected]Tel: +33 (0)4 67 84 48 00Headquarters: Click&DECiDE 130, rue du Baptistou - 34980 St Gély du Fesc, France. To contact your nearest Click&DECiDE partner, click here.
Clear Criteria: removes existing criteria without removing corresponding fields if they are selected. Clear Sorts: removes existing sort conditions without removing corresponding fields.
11. Click OK.
12. Select File> Save.
13. Note that existing parameters are not removed by this action, so check if your still need them and if so, you will have to assign some of them to required fields in the Criteria dialog box if necessary.
2.20.
Using Aggregate Functions
By default when selecting any field in a table, the result will be the detailed result corresponding to each existing record, according to the criteria and order defined. The aggregate fields or grouping functions allow you to get results grouped by one or several fields. The most simple aggregate field is the COUNT(*), this will return the number of records from a table. To insert a Count(*) field, please follow the steps below.
1. Create a new query using the SALES table.
2. Select Query> Insert> Count(*) to insert a Count(*) field. 3. Click Run to run the query.
4. Note the result will be the number of records in the SALES table. 5. Add only one field, for example the SAL field, (with the Salesman code). 6. Run the query again.
7. Note the number of records appears in the SALES table for each salesman code. 8. Select the SQL tab.
Note: you can see that an aggregate function will generate a GROUP BY statement for all fields that are not aggregate fields.
Note: concerning other common aggregate functions, when you right-click any field, you can select the COUNT(*) field however other function groups are provided.
Group Aggregate function Can apply to
Aggregate
Min Any field type
Max Any field type
Sum Numeric field only
Average Numeric field only
Standard Deviation
Numeric field only
Population Standard DeviationNumeric field only
Variance
Numeric field only
Population Variance
Numeric field only
44
www.clickndecide.com
Contact us:E-mail:[email protected]Tel: +33 (0)4 67 84 48 00Headquarters: Click&DECiDE 130, rue du Baptistou - 34980 St Gély du Fesc, France. To contact your nearest Click&DECiDE partner, click here.
Distinct Aggregate
Sum Numeric field only
Average Numeric field only
Standard Deviation Numeric field only Population Standard Deviation Numeric field only
Variance Numeric field only
Population Variance Numeric field only
Count Any field type
Exercise 1:
In this exercise we are going to directly obtain the sum of the total, to do so please follow the steps below. 1. Create a new query with the SALES and SALESMAN tables.
2. Join the two tables (please see the previous section). 3. Select the TOTAL field.
4. Right-click the TOTAL field.
5. Select Aggregate> Sum or select Query> Insert> Aggregate> Sum. The TOTAL field’s selection will be cleared and anew SUM(TOTAL) field will appear.
6. Click Run, to run the query only the main total will appear from all the records. Exercise 2:
In this exercise we are going to directly display the minimum value, to do so please follow the steps below. 1. Select the TOTAL field.
2. Right-click the TOTAL field.
3. Select Aggregate> Minimum or Query> Insert> Aggregate> Minimum to define the MIN(TOTAL). 4. Click Run to run the query to display the minimum value.
Exercise 3:
In this exercise we are going to directly display the maximum value, to do so please follow the steps below. 1. Select the TOTAL field.
2. Right-click the TOTAL field.
3. Select Aggregate> Maximum or Query> Insert> Aggregate> Maximum to define the MAX(TOTAL). 4. Click Run to run the query to display the minimum value.
45
www.clickndecide.com
Contact us:E-mail:[email protected]Tel: +33 (0)4 67 84 48 00Headquarters: Click&DECiDE 130, rue du Baptistou - 34980 St Gély du Fesc, France. To contact your nearest Click&DECiDE partner, click here.
6. Add another field from the SALES table or the SALESMAN table.
7. Note the same information will be displayed however it will be sorted for each different value of the new field.
8. Select the salesman name.
9. Move the SALNAME field to the leftmost position. A GROUP BY statement is automatically added in the SQL followed by all fields that do not have an aggregate function.
Note: all the aggregate functions are calculated grouped by the field that does not have an aggregate function or all the fields that do not have an aggregate function.
46
www.clickndecide.com
Contact us:E-mail:[email protected]Tel: +33 (0)4 67 84 48 00Headquarters: Click&DECiDE 130, rue du Baptistou - 34980 St Gély du Fesc, France. To contact your nearest Click&DECiDE partner, click here.
Exercise 4:
1. Add another field, such as the CUST field (customer code).
Note: the aggregate functions will apply to all the combinations between the Salesman name and the customer code. The row for Doug Castro will appear for all his customers.
2. Add a sort condition on the Salname fields to check that the total of the Count column gives 39. Or add a criteria on the Salname field = Doug Castro.
2.21.
Working with Virtual and Calculation Fields
Virtual fields are additional fields created in the query by the user and can be used in two ways.
2.21.1.
Working with Data Source Formula
The formula must be understood by the host database and will be calculated by the host database, as if it was a table field. In this case it is possible to apply a sort condition because the job is performed by the host database SQL engine before sending the result to Click&DECiDE Builder. It may take more resources to send it to the host database server.
Click&DECiDE Builder proposes a standard syntax for all the Host formula that will be translated according to the Host database syntax. Nevertheless, it is possible to use the Host database syntax written between single quotes and parenthesis and preceded by the word HOST as in the following example:
Click&DECiDE Builder will use the following formula to concatenate two or more strings:
Concat( CUSTOMER."CP" , Concat('-' , CUSTOMER."COUNTRY" )): will translate it with the following syntax if the data source is an AS400 database:
CUSTOMER."CP" concat '-' concat CUSTOMER."COUNTRY"
However,you can write and use the AS400 syntax directly by writing the following native formula: HOST('CP Concat ''-'' Concat CITY')
Note: you must write the single quote twice in the formula.
2.21.2.
Working with Click & DECiDE Formula
The formula must be understood by Click&DECiDE Builder and will be calculated by the Click&DECiDE Builder SQL Engine on the PC side only when the result rows are sent by the host database. In this case it is not possible to apply a sort condition. However, the benefit of this option is that it uses less resource to the host database server and uses the PCs power. Another benefit is that some functions provided by
Click&DECiDE Builder are not supported by the Host database, such as the “Cumul” function for example and so on.
In both cases, criteria can be applied to a virtual field. Exercise 1:
1. Create a query giving the final price for each product according to the given discount in the SALES DETAIL table linked to the PRODUCT table by the PRODREF field.
2. Select the PRODUCT fields. 3. Right-click.
4. Select Add Formula... or select Query> Insert> Formula. The Formula Editor Dialog box appears. 5. Define a name for the first virtual field.
47
www.clickndecide.com
Contact us:E-mail:[email protected]Tel: +33 (0)4 67 84 48 00Headquarters: Click&DECiDE 130, rue du Baptistou - 34980 St Gély du Fesc, France. To contact your nearest Click&DECiDE partner, click here.
6. Enter a Name for the virtual field.
7. Select the result Type if it is a Data Source formula.
Note: if you select a Click and DECiDE formula, the type will be automatically be defined by Click&DECiDE Builder.
Length: only applies to an output format to a database. Scale: only applies to an output format to a database.
Comment: this is optional but can help you to remember what the purpose of the formula is. 8. Click Generate... the Quick Expression property sheet appears. The Quick Expression property
sheet allows you to easily edit your formula.
Note: the proposed formula will depend on the option button you selected (Data Source or Click and DECiDE formula).
48
www.clickndecide.com
Contact us:E-mail:[email protected]Tel: +33 (0)4 67 84 48 00Headquarters: Click&DECiDE 130, rue du Baptistou - 34980 St Gély du Fesc, France. To contact your nearest Click&DECiDE partner, click here.
9. Edit the above formula to get the required result.
10. Select the Fields tab to select any field or virtual field already defined
11. Select the Functions tab to select any function from any group (String, Mathematic, Date Time, Aggregation, Conversion and Misc). The purpose of each function appears in the Description panel. 12. Select the Parameters tab to select any existing parameter.
Note: when working in the Expression text box, you can use the +, -, * buttons., when you use these buttons a default syntax is proposed with the §2 variable that will be replaced by your selection. The Next Variable button allows you to switch to the next §2 if it exists.
13. Click the Expression button to resize the Quick Expression property sheet. This enables you to enlarge the top or lower part of the screen.. The last size you defined for the property sheet will be saved and automatically displayed the next time you use the Quick Expression property sheet. Exercise 2: Use the Cumul Formula
Among the available Click&DECiDE Builder internal functions, the CUMUL function is specific to Click&DECiDE Builder and allows you to obtain a cumulative value from one record to another record.
1. Create a query on the SALES and SALESMAN tables.
2. Select the SALNAME field (salesman name) and the TOTAL field. 3. Apply an ascending sort to the SALNAME field.
4. Add a Click and DECiDE virtual field named Cumulated Total with the following formula: CUMUL(SALES.”TOTAL”).
5. Click Run to run the query: the Cumulated Total column will be displayed each time the TOTAL is cumulated with the value of the previous record (please see the screen shot below).
49
www.clickndecide.com
Contact us:E-mail:[email protected]Tel: +33 (0)4 67 84 48 00Headquarters: Click&DECiDE 130, rue du Baptistou - 34980 St Gély du Fesc, France. To contact your nearest Click&DECiDE partner, click here.
6. Note that when the value of the SALNAME field changes from Bill Raley to Diane Meyer, the
Cumulated Total field does not reset to zero and displays cumulated values up to the end of the data grid result. This function also provides a reset to zero option as explained in the next exercise.
Exercise 3:
1. Modify the virtual field in the query you created for Exercise 2 above. 2. Modify the virtual field with the following formula:
Cumul(Sales.TOTAL, Salesman.SALNAME )
3. Click Run to run the query again. The Cumulated Total column will be displayed each time the TOTAL is cumulated with the value of the previous record. However, when the value of the SALNAME field changes, a reset to zero is performed (please see the screen shot below).
50
www.clickndecide.com
Contact us:E-mail:[email protected]Tel: +33 (0)4 67 84 48 00Headquarters: Click&DECiDE 130, rue du Baptistou - 34980 St Gély du Fesc, France. To contact your nearest Click&DECiDE partner, click here.
Exercise 4: Use the IF Formula
Most databases now support the IF formula, however you can also run this function calculated by Click and DECiDE. To do so, please follow the steps below.
1. Create a query on the PRODUCT table. 2. Select all the fields.
3. Click Run to run the query.
4. Create a virtual field using the IF function in the Conditional group of the Functions Tab in the Quick Expression and select the following function.
If (§Cond,§RetTrue,§RetFalse) where: §Cond will be the condition to evaluate.
§RetTrue will be the result to be used if the condition is true. §RetFalse will be the result to be used if the condition is false.
In this example, §Cond must be replaced with the following formula to search if the PRODUCT field contains the word “women”: Product.PRODUCT like '%women%'
51
www.clickndecide.com
Contact us:E-mail:[email protected]Tel: +33 (0)4 67 84 48 00Headquarters: Click&DECiDE 130, rue du Baptistou - 34980 St Gély du Fesc, France. To contact your nearest Click&DECiDE partner, click here.
The §RetTrue will be replaced for example with the text ‘Woman bicycle’ The §RetFalse will be replaced for example with the text ‘Man bicycle’.
The final formula is: IF( Product.PRODUCT like '%women%','Woman bicycle','Man bicycle') Note: you can replace §RetTrue or §RetFalse with another IF function. For example:
IF( Product.PRODUCT like '%cruiser%','Cruiser bicycle', IF( Product.PRODUCT like '%racer%','Racer bicycle', IF( Product.PRODUCT like '%speed%','Speed bicycle','Other bicycle')))
2.22.
Using Dynamic Criteria with Parameters
Click&DECiDE Builder enables you to customize a query using parameters instead of fixed criteria. This saves you from having to modify the criteria each time to obtain a different result. Each criterion can be associated with a value, a list of values, an input, an input list and so on. The user can enter or sel