Installation Guide
Revision ECOPYRIGHT
Copyright © 2015 McAfee, Inc., 2821 Mission College Boulevard, Santa Clara, CA 95054, 1.888.847.8766, www.intelsecurity.com TRADEMARK ATTRIBUTIONS
Intel and the Intel logo are registered trademarks of the Intel Corporation in the US and/or other countries. McAfee and the McAfee logo, McAfee Active Protection, McAfee DeepSAFE, ePolicy Orchestrator, McAfee ePO, McAfee EMM, McAfee Evader, Foundscore, Foundstone, Global Threat Intelligence, McAfee LiveSafe, Policy Lab, McAfee QuickClean, Safe Eyes, McAfee SECURE, McAfee Shredder, SiteAdvisor, McAfee Stinger, McAfee TechMaster, McAfee Total Protection, TrustedSource, VirusScan are registered trademarks or trademarks of McAfee, Inc. or its subsidiaries in the US and other countries. Other marks and brands may be claimed as the property of others.
LICENSE INFORMATION License Agreement
NOTICE TO ALL USERS: CAREFULLY READ THE APPROPRIATE LEGAL AGREEMENT CORRESPONDING TO THE LICENSE YOU PURCHASED, WHICH SETS FORTH THE GENERAL TERMS AND CONDITIONS FOR THE USE OF THE LICENSED SOFTWARE. IF YOU DO NOT KNOW WHICH TYPE OF LICENSE YOU HAVE ACQUIRED, PLEASE CONSULT THE SALES AND OTHER RELATED LICENSE GRANT OR PURCHASE ORDER DOCUMENTS THAT ACCOMPANY YOUR SOFTWARE PACKAGING OR THAT YOU HAVE RECEIVED SEPARATELY AS PART OF THE PURCHASE (AS A BOOKLET, A FILE ON THE PRODUCT CD, OR A FILE AVAILABLE ON THE WEBSITE FROM WHICH YOU DOWNLOADED THE SOFTWARE PACKAGE). IF YOU DO NOT AGREE TO ALL OF THE TERMS SET FORTH IN THE AGREEMENT, DO NOT INSTALL THE SOFTWARE. IF APPLICABLE, YOU MAY RETURN THE PRODUCT TO MCAFEE OR THE PLACE OF PURCHASE FOR A FULL REFUND.
Contents
Preface 7
About this guide . . . 7
Audience . . . 7
Conventions . . . 7
Find product documentation . . . 8
Installing Network Security Platform
1 Network Security Platform overview 11 2 Preparation for the Manager installation 13 Prerequisites . . . 13General settings . . . 13
Other third-party applications . . . 14
Server requirements . . . 14
Manager installation with local service account privileges . . . 16
Client requirements . . . 16
Java runtime engine requirements . . . 18
Database requirements . . . 18
Recommended Manager specifications . . . 18
Determine your database requirements . . . 19
Pre-installation recommendations . . . 19
How to plan for installation . . . 19
Functional requirements . . . 20
How to use anti-virus software with the Manager . . . 22
User interface responsiveness . . . 23
Download the Manager/Central Manager executable . . . 24
3 Install the Manager/Central Manager 25 Install the Manager . . . 26
Installing the Central Manager . . . 41
Log files related to Manager installation and upgrade . . . 42
4 Starting the Manager/Central Manager 45 Shut down the Manager/Central Manager services . . . 46
Shut down the Central Manager . . . 47
Close all the client connections . . . 47
Shut down using the Network Security Platform system tray icon . . . 47
Shut down using the Control Panel . . . 48
5 Adding a Sensor 51 Before you install Sensors . . . 51
Network topology considerations . . . 51
Unpack the Sensor . . . 53
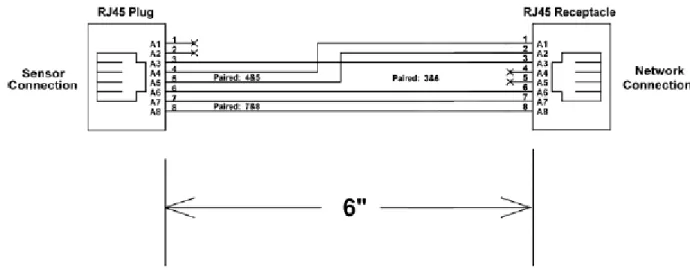
Cable specifications . . . 53
Network Security Platform fail-closed dongle specification . . . 54
Console port pin-outs . . . 54
Auxiliary port pin-outs . . . 54
Response port pin-outs . . . 55
How to monitor port pin-outs . . . 56
Configuration of a Sensor . . . 56
Configuration overview . . . 56
Establishment of a Sensor naming scheme . . . 57
Communication between the Sensor and the Manager . . . 57
Add a Sensor to the Manager . . . 57
Configure the Sensor . . . 58
Verification of successful configuration . . . 61
How to change Sensor values . . . 61
How to add a secondary Manager IP . . . 62
Remove a secondary Manager IP . . . 62
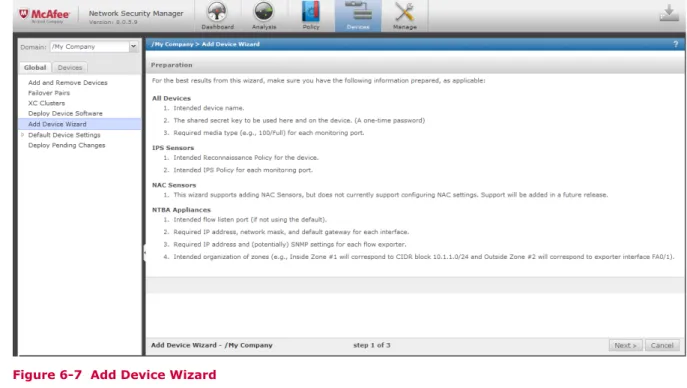
6 Configuration of devices using the Manager 63 Install Sensors using the wizard . . . 63
Add and configure Sensors . . . 64
Add and configure the XC Clusters . . . 71
Possible actions from the device list nodes . . . 71
Options available in the devices page . . . 72
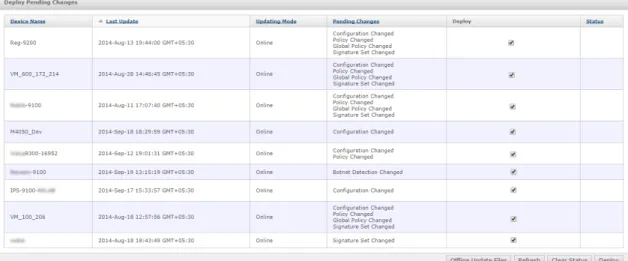
Deploy pending changes to a device . . . 79
Update the latest software images on all devices . . . 83
Download software update files for offline devices . . . 84
Malware engine updates . . . 89
Manage failover pairs . . . 93
Specify proxy server for internet connectivity . . . 95
Configure NTP server . . . 96
7 Managing configuration for each device 99 Configuration and management of devices . . . 99
Update configuration of a Sensor or an NTBA Appliance . . . 100
Update software for a Sensor or NTBA Appliance . . . 101
Shut down a Sensor or NTBA Appliance . . . 102
Troubleshooting your device configuration . . . 102
Upload diagnostics trace . . . 102
Management of device access . . . 103
Configure TACACS+ authentication . . . 103
Management of SNMPv3 users . . . 103
Management of NMS IP addresses . . . 105
8 Configuration of the Update Server 107 9 Uninstallation of the Manager/Central Manager 109 Uninstall using the Add/Remove program . . . 109
Uninstall using the script . . . 111
Upgrading Network Security Platform
10 Overview 115 Important requirements and considerations . . . 116Migration from 1024-bit to 2048-bit encryption . . . 117
Upgrade to 2048-bit encryption . . . 118 Contents
View encryption type . . . 119
Disable 2048-bit encryption . . . 122
11 Management of a heterogeneous environment 123 What are heterogeneous environments? . . . 123
When would you need a heterogeneous environment? . . . 124
Upgrade scenarios for heterogeneous environments . . . 125
Central Manager upgrade scenarios . . . 125
Manager upgrade scenarios . . . 129
Enhanced Central Manager/Manager user interface . . . 133
Feature support in a heterogeneous environment . . . 133
Heterogeneous support for NTBA devices . . . 133
Heterogeneous environment for XC Cluster . . . 134
12 How to upgrade the Central Manager? 135 Upgrade requirements for the Central Manager . . . 135
Upgrade path for the Central Manager and Manager . . . 135
Central Manager and Manager system requirements . . . 136
Preparation for the upgrade . . . 137
Review the upgrade considerations . . . 138
Backing up Network Security Platform data . . . 138
Central Manager and operating system upgrade . . . 139
MDR Central Manager upgrade . . . 139
Standalone Central Manager upgrade . . . 140
Upgrade the signature set for the Central Manager . . . 142
13 How to Upgrade the Manager? 143 Upgrade requirements for the Manager . . . 143
Upgrade path for the Central Manager and Manager . . . 143
Central Manager and Manager system requirements . . . 144
Preparation for the upgrade . . . 145
Review the upgrade considerations . . . 145
Backing up Network Security Platform data . . . 175
Operating system upgrade scenarios . . . 176
Manager and operating system upgrade . . . 176
MDR Manager upgrade . . . 178
Standalone Manager upgrade . . . 179
Resubmit Snort custom attacks for translation . . . 180
Run additional scripts . . . 181
14 How to perform signature set and Sensor software upgrade 185 Difference between an update and an upgrade . . . 185
Sensor upgrade requirements . . . 185
Review the upgrade considerations for Sensors . . . 186
Updating Sensor software image . . . 187
Sensor software upgrade — Manager versus TFTP server . . . 188
Sensor software and signature set upgrade using Manager 8.2 . . . 189
Sensor software upgrade using a TFTP or SCP server . . . 190
Update Sensor software in a failover pair . . . 191
15 Upgrade information for NTBA and XC Cluster 193 Upgrade NTBA Appliance software . . . 193
Upgrade XC Cluster . . . 194
16 Uninstalling the upgrade 197
A Frequently asked questions 199
Index 201
Preface
This guide provides the information you need to install your McAfee product.
Contents
About this guide
Find product documentation
About this guide
This information describes the guide's target audience, the typographical conventions and icons used in this guide, and how the guide is organized.
Audience
McAfee documentation is carefully researched and written for the target audience. The information in this guide is intended primarily for:
• Administrators — People who implement and enforce the company's security program.
• Users — People who use the computer where the software is running and can access some or all of its features.
Conventions
This guide uses these typographical conventions and icons.
Book title, term,
emphasis Title of a book, chapter, or topic; a new term; emphasis. Bold Text that is strongly emphasized.
User input, code,
message Commands and other text that the user types; a code sample; a displayedmessage.
Interface text Words from the product interface like options, menus, buttons, and dialog boxes.
Hypertext blue A link to a topic or to an external website.
Note: Additional information, like an alternate method of accessing an
option.
Tip: Suggestions and recommendations.
Important/Caution: Valuable advice to protect your computer system,
software installation, network, business, or data.
Warning: Critical advice to prevent bodily harm when using a hardware
Find product documentation
After a product is released, information about the product is entered into the McAfee online Knowledge Center.
Task
1 Go to the Knowledge Center tab of the McAfee ServicePortal at http://support.mcafee.com.
2 In the Knowledge Base pane, click a content source: • Product Documentation to find user documentation • Technical Articles to find KnowledgeBase articles
3 Select Do not clear my filters.
4 Enter a product, select a version, then click Search to display a list of documents.
Preface
Installing Network Security
Platform
Chapter 1
Network Security Platform overview
Chapter 2
Preparation for the Manager installation
Chapter 3
Install the Manager/Central Manager
Chapter 4
Starting the Manager/Central Manager
Chapter 5
Adding a Sensor
Chapter 6
Configuration of devices using the Manager
Chapter 7
Managing configuration for each device
Chapter 8
Configuration of the Update Server
1
Network Security Platform overview
McAfee Network Security Platform [formerly McAfee IntruShield®] is a combination of network
appliances and software built for the accurate detection and prevention of intrusions, denial of service (DoS) attacks, distributed denial of service (DDoS) attacks, malware download, and network misuse. Network Security Platform provides comprehensive network intrusion detection and can block, or prevent, attacks in real time, making it truly an intrusion prevention system (IPS).
2
Preparation for the Manager installation
This section describes the McAfee Network Security Manager (Manager) hardware and software requirements and pre-installation tasks you should perform prior to installing the software.
In this section, unless explicitly stated, Central Manager and Manager are commonly referred to as "Manager."
Contents
Prerequisites
Recommended Manager specifications Pre-installation recommendations
Download the Manager/Central Manager executable
Prerequisites
The following sections list the Manager installation and functionality requirements for your operating system, database, and browser.
We strongly recommend that you also review Network Security Platform Release Notes.
If you are installing the Manager as part of an upgrade to the latest version of Network Security Platform, also refer to Upgrading Network Security Platform on page 0 .
General settings
• McAfee recommends you use a dedicated server, hardened for security, and placed on its own subnet. This server should not be used for programs like instant messaging or other non-secure Internet functions.
• You must have Administrator/root privileges on your Windows server to properly install the Manager software, as well as the installation of an embedded MySQL database for Windows Managers during Manager installation.
• It is essential that you synchronize the time on the Manager server with the current time. To keep time from drifting, use a timeserver. If the time is changed on the Manager server, the Manager will lose connectivity with all McAfee® Network Security Sensors (Sensors) and the McAfee® Network
Security Update Server [formerly IPS Update Server] because SSL is time sensitive.
• If Manager Disaster Recovery (MDR) is configured, ensure that the time difference between the Primary and Secondary Managers is less than 60 seconds. (If the spread between the two exceeds more than two minutes, communication with the Sensors will be lost.)
For more information about setting up a time server on Windows Servers, see the following Microsoft KnowledgeBase article: http://support.microsoft.com/kb/816042/.
Once you have set your server time and installed the Manager, do not change the time on the Manager server for any reason. Changing the time may result in errors that could lead to loss of data.
Other third-party applications
Install a packet log viewing program to be used in conjunction with the Threat Analyzer interface. Your packet log viewer, also known as a protocol analyzer, must support library packet capture (libpcap) format. This viewing program must be installed on each client you intend to use to remotely log onto the Manager to view packet logs.
Wireshark (formerly known as Ethereal) is recommended for packet log viewing. WireShark is a network protocol analyzer for Windows servers that enables you to examine the data captured by your
Sensors. For information on downloading and using Ethereal, go to www.wireshark.com.
Server requirements
The following table lists the 8.2 Manager server requirements:
Minimum required Recommended
Operating
system Any of the following:
• Windows Server 2008 R2 Standard or Enterprise Edition, English operating system, SP1 (64-bit) (Full Installation) • Windows Server 2008 R2 Standard or Enterprise Edition,
Japanese operating system, SP1 (64-bit) (Full Installation)
• Windows Server 2012 R2 Standard Edition (Server with a GUI) English operating system
• Windows Server 2012 R2 Standard Edition (Server with a GUI) Japanese operating system
• Windows Server 2012 R2 Datacenter Edition (Server with a GUI) English operating system
• Windows Server 2012 R2 Datacenter Edition (Server with a GUI) Japanese operating system
Only X64 architecture is supported.
Windows Server 2012 R2 Standard Edition
operating system.
Memory 8 GB 8 GB or more
CPU Server model processor such as Intel Xeon Same
Disk space 100 GB 300 GB or more
2
Preparation for the Manager installationMinimum required Recommended
Network 100 Mbps card 1000 Mbps card
Monitor 32-bit color, 1440 x 900 display setting 1440 x 900 (or above)
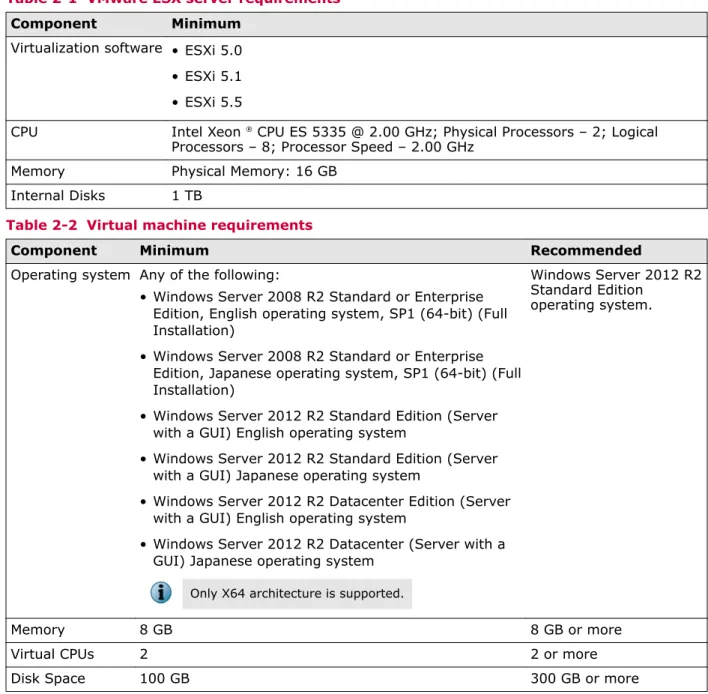
How to host the Manager on a VMware platform
The following are the system requirements for hosting Central Manager/Manager server on a VMware platform.
Table 2-1 VMware ESX server requirements
Component Minimum
Virtualization software • ESXi 5.0 • ESXi 5.1 • ESXi 5.5
CPU Intel Xeon ® CPU ES 5335 @ 2.00 GHz; Physical Processors – 2; Logical
Processors – 8; Processor Speed – 2.00 GHz Memory Physical Memory: 16 GB
Internal Disks 1 TB
Table 2-2 Virtual machine requirements
Component Minimum Recommended
Operating system Any of the following:
• Windows Server 2008 R2 Standard or Enterprise Edition, English operating system, SP1 (64-bit) (Full Installation)
• Windows Server 2008 R2 Standard or Enterprise Edition, Japanese operating system, SP1 (64-bit) (Full Installation)
• Windows Server 2012 R2 Standard Edition (Server with a GUI) English operating system
• Windows Server 2012 R2 Standard Edition (Server with a GUI) Japanese operating system
• Windows Server 2012 R2 Datacenter Edition (Server with a GUI) English operating system
• Windows Server 2012 R2 Datacenter (Server with a GUI) Japanese operating system
Only X64 architecture is supported.
Windows Server 2012 R2 Standard Edition
operating system.
Memory 8 GB 8 GB or more
Virtual CPUs 2 2 or more
Disk Space 100 GB 300 GB or more
Preparation for the Manager installation
Manager installation with local service account privileges
The Manager installs the following services as a Local Service: • McAfee® Network Security Manager
• McAfee® Network Security Manager Database
McAfee® Network Security Manager Watchdog runs as a Local System to facilitate restart of the
Manager in case of abrupt shutdown.
The Local Service account has fewer privileges on accessing directories and resources than the Local System. By default, the Manager installation directory and database directory are granted full permission to the Local Service account during installation or upgrade of Manager.
Set the permissions to a Local Service as needed in the following scenarios:
• Backup directory location: If the backup directory was different from the Manager installed directory before upgrade to the current release, full permission on these directories for a Local Service should be granted.
• Notification script execution: If a user uses a script that accesses directories or resources located in directories other than in Manager installed directories for notifications like alerts, faults etc.,full permission on these directories for a Local Service should be granted.
• Database configuration: If a user has a MySQL database configured for using a directory for temporary files other than the one provided during installation, then those directories should be given full permissions for a Local Service.
Client requirements
The following are the system requirements for client systems connecting to the Manager application.
Minimum Recommended
Operating
system • Windows 7, English or Japanese • Windows 8, English or Japanese • Windows 8.1, English or Japanese
The display language of the Manager client must be the same as that of the Manager server operating system.
RAM 2 GB 4 GB
CPU 1.5 GHz processor 1.5 GHz or faster
Browser • Internet Explorer 9, 10, or 11 • Mozilla Firefox
• Google Chrome (App mode in Windows 8 is not supported.)
To avoid the certificate mismatch error and security warning, add add the Manager web certificate to the trusted certificate list.
• Internet Explorer 11 • Mozilla Firefox 20.0 or
later
• Google Chrome 24.0 or later
2
Preparation for the Manager installationIf you are using Google Chrome 42 or later, the NPAPI plug-in is disabled by default, which means that Java applet support is disabled by default. Perform the following steps to enable NPAPI plug-in:
1 In the address bar, type chrome://flags/#enable-npapi.
2 Click the Enable link in the Enable NPAPI configuration option.
3 Click Relaunch Now at the bottom of the page to restart Google Chrome for the changes to take effect.
For the Manager client, in addition to Windows 7, Windows 8, and Windows 8.1, you can also use the operating systems mentioned for the Manager server.
If the Manager page does not load, clear the browser cache and re-launch the browser.
The following are Central Manager and Manager client requirements when using Mac:
Mac operating system Browser
• Lion
• Mountain Lion
Safari 6 or 7
Manager client display settings (Windows)
• Access the Manager through a client browser. See Client requirements for the list of supported clients and browsers.
• Set your display to 32-bit color. Right-click on the Desk Top and select Screen Resolution and go to
Advanced Settings | Monitor, and configure Colors to True Color (32bit).
• McAfee recommends setting your monitor's screen area to 1440 x 900 pixels. Right-click on the Desk Top and select Screen Resolution. Set Resolution to 1440 x 900.
• Browsers typically should check for newer versions of stored pages. For example, Internet Explorer, by default, is set to automatically check for newer stored page versions. To check this function, open your Internet Explorer browser and go to Tools | Internet Options | General. Click the Settings button under Browsing History or Temporary Internet files, and under Check for newer versions of stored pages:
select any of the four choices except for Never. Selecting Never caches Manager interface pages that require frequent updating, and not refreshing these pages might lead to system errors.
• If you are using Internet Explorer 8 or 9, then go to Tools | Compatibility View Settings and make sure
Display intranet sites in Compatibility View and Display all websites in Compatibility View checkboxes are not selected. \
Invoking Threat Analyzer in a Manager Client System
Note that the Manager has to be accessed using the server system's host name (https://
<Manager_hostname>). The.jar file downloaded for the Threat Analyzer is signed using a certificate that is generated based on the client host name. If your client is located in a different domain than that of the Manager, you must map the host name to its IP address in your client system's Windows hosts file.
Navigate to C:\WINDOWS\system32\drivers\etc on your client system and edit the hosts file. For example, if your host name is manager-host1, and its IP address is 102.54.94.97, your entry would appear as: 102.54.94.97 manager-host1
Preparation for the Manager installation
Internet Explorer settings when accessing the Manager from the server
McAfee recommends accessing the Central Manager and Manager from a client system. However, there might be occasions when you need to manage from the server itself. To do so, you must make the following changes to the server's Internet Explorer options.
Regardless of whether you use a client or the server, the following Internet Explorer settings must be enabled. On Windows client operating computers, these are typically enabled by default but disabled on server operating systems.
1 In the Internet Explorer, go to Tools | Internet Options | Security | Internet | Custom Level and enable the following:
• ActiveX controls and plug-ins: Run ActiveX controls and plug-ins.
• ActiveX controls and plug-ins: Script ActiveX controls selected safe for scripting. • Downloads: File Download.
• Miscellaneous: Allow META REFRESH. • Scripting: Active Scripting
2 In the Internet Explorer, go to Tools | Internet Options | Privacy and ensure that the setting is configured as something below Medium High. For example, do not set it at High or at Block all Cookies. If the setting is higher than Medium High, you receive an Unable to configure Systems. Permission denied error and the Manager configuration will not function.
Java runtime engine requirements
When you first log onto the Manager, a version of JRE is automatically installed on the client machine (if it is not already installed). This version of the JRE software is required for operation of various components within the Manager including Threat Analyzer and the Custom Attack Editor. The client JRE version bundled with the Manager is 1.7.0_72.
Database requirements
The Manager requires communication with MySQL database for the archiving and retrieval of data. The Manager installation set includes a MySQL database for installation (that is, embedded on the target Manager server). You must use the supported operating system listed under Server
requirements and must use the Network Security Platform-supplied version of MySQL (currently 5.6.20). The MySQL database must be a dedicated one that is installed on the Manager.
If you have a MySQL database previously installed on the Manager server, uninstall the previous version and install the Network Security Platform version.
See also
Server requirements on page 14
Recommended Manager specifications
McAfee® Network Security Manager (Manager) software runs on a dedicated Windows server.
The larger your deployment, the more high-end your Manager server should be. Many McAfee®
Network Security Platform issues result from an under-powered Manager Server. For example, to manage 40 or more McAfee® Network Security Sensors (Sensors), we recommend larger
configurations than the minimum-required specifications mentioned in Server requirements.
2
Preparation for the Manager installationThe Manager client is a Java web application, which provides a web-based user interface for centralized and remote Sensor management. The Manager contains Java applets. Because Java applets take advantage of the processor on the host from which they are being viewed, we also recommend that the client hosts used to manage the Network Security Platform solution exceed the minimum-required specifications mentioned in Client requirements.
You will experience better performance in your configuration and data-forensic tasks by connecting to the Manager from a browser on the client machine. Performance may be slow if you connect to the Manager using a browser on the server machine itself.
Determine your database requirements
The amount of space required for your database is governed by many factors, mostly unique to the deployment scenario. These factors determine the amount of data you want to retain in the database and the time for which the data has to be retained.
Things to consider while determining your database size requirements are:
• Aggregate alert and packet log volume from all Sensors — Many Sensors amount to higher alert volume and require additional storage capacity. Note that an alert is roughly 2048 bytes on average, while a packet log is approximately 1300 bytes.
• Lifetime of alert and packet log data — You need to consider the time before you archive or delete an alert. Maintaining your data for a long period of time (for example, one year) will require additional storage capacity to accommodate both old and new data.
As a best practice, McAfee recommends archiving and deleting old alert data regularly, and attempting to keep your active database size to about 60 GB.
For more information, see Capacity Planning, McAfee Network Security Platform Manager Administration Guide.
Pre-installation recommendations
These McAfee® Network Security Platform [formerly McAfee® IntruShield®
] pre-installation
recommendations are a compilation of the information gathered from individual interviews with some of the most seasoned McAfee Network Security Platform System Engineers at McAfee.
How to plan for installation
Before installation, ensure that you complete the following tasks:
• The server, on which the Manager software will be installed, should be configured and ready to be placed online.
• You must have administrator privileges for Manager server.
• This server should be dedicated, hardened for security, and placed on its own subnet. This server should not be used for programs like instant messaging or other non-secure Internet functions. • Make sure your hardware requirements meet at least the minimum requirements.
• Ensure the proper static IP address has been assigned to the Manager server. For the Manager server, McAfee strongly recommends assigning a static IP against using DHCP for IP assignment. • If applicable, configure name resolution for the Manager.
Preparation for the Manager installation
• Ensure that all parties have agreed to the solution design, including the location and mode of all McAfee® Network Security Sensor, the use of sub-interfaces or interface groups, and if and how the
Manager will be connected to the production network.
• Get the required license file and grant number. Note that you do not require a license file for using Manager/Central Manager version 6.0.7.5 or above.
• Accumulate the required number of wires and (supported) GBICs, SFPs, or XFPs. Ensure these are approved hardware from McAfee or a supported vendor. Ensure that the required number of Network Security Platform dongles, which ship with the Sensors, are available.
• Crossover cables will be required for 10/100 or 10/100/1000 monitoring ports if they are directly connected to a firewall, router, or end node. Otherwise, standard patch cables are required for the Fast Ethernet ports.
• If applicable, identify the ports to be mirrored, and someone who has the knowledge and rights to mirror them.
• Allocate the proper static IP addresses for the Sensor. For the Sensors, you cannot assign IPs using DHCP.
• Identify hosts that may cause false positives, for example, HTTP cache servers, DNS servers, mail relays, SNMP managers, and vulnerability scanners.
See also
Server requirements on page 14
Functional requirements
Following are the functional requirements to be taken care of:
• Install Wireshark (formerly known as Ethereal http://www.wireshark.com) on the client PCs. Ethereal is a network protocol analyzer for Unix and Windows servers, used to analyze the packet logs created by Sensors.
• Ensure the correct version of JRE is installed on the client system, as described in the earlier section. This can save a lot of time during deployment.
• Manager uses port 4167 as the UDP source port to bind for IPv4 and port 4166 for IPv6. If you have Sensors behind a firewall, you need to update your firewall rules accordingly such that ports 4167 and 4166 are open for the SNMP command channel to function between those Sensors and the Manager. This applies to a local firewall running on the Manager server as well.
• Determine a way in which the Manager maintains the correct time. To keep time from drifting, for example, point the Manager server to an NTP timeserver. (If the time is changed on the Manager server, the Manager will lose connectivity with all Sensors and the McAfee® Network Security
Update Server because SSL is time sensitive.)
• If Manager Disaster Recovery (MDR) is configured, ensure that the time difference between the Primary and Secondary Managers is less than 60 seconds. (If the spread between the two exceeds more than two minutes, communication with the Sensors will be lost.)
• If you are upgrading from a previous version, we recommend that you follow the instructions in the respective version's release notes or Upgrade path for the Central Manager and Manager on page 135.
Install a desktop firewall
A desktop firewall on the Manager server is recommended. Certain ports are used by the components of McAfee Network Security Platform. Some of these are required for Manager -- Sensor and Manager client-server communication. All remaining unnecessary ports should be closed.
2
Preparation for the Manager installationMcAfee strongly recommends that you configure a packet-filtering firewall to block connections to ports 8551, 8552, 3306, 8007, 8009, and 8552 of your Manager server. The firewall can either be a host-based or network-based. Set your firewall to deny connections to these ports if the connections are not initiated by the localhost. The only connections that should be allowed are those from the Manager server itself; that is, the localhost. For example, if another machine attempts to connect to port 8551, 8552, 3306, 8007 and 8009 the firewall should automatically block any packets sent. If you need assistance in blocking these, contact McAfee Technical Support.
Use a scanning tool such as Vulnerability Manager to ensure that there no ports open other than what is required.
If a firewall resides between the Sensor, Manager, or administrative client, which includes a local firewall on the Manager, the following ports must be opened:
Port # Protocol Description Direction of
communication
• 4167 (high ports) (source port on the Manager for IPv4 communication) • 4166 (source port on the
Manager for IPv6 communication)
UDP Default SNMPv3 (command
channel) Manager-->Sensor
8500 (destination port on
the Sensor) UDP Default SNMPv3 (commandchannel) Manager --> Sensor 8501 TCP Proprietary (install port) Sensor-->Manager 8502 TCP Proprietary (alert channel/
control channel) Sensor-->Manager 8503 TCP Proprietary (packet log channel) Sensor-->Manager 8504 TCP Proprietary (file transfer
channel) Sensor-->Manager 8506 TCP Proprietary (install channel for
2048-bit certificates). For information on 2048-bit certificates, see Migration from 1024-bit to 2048-bit encryption on page 117
Sensor-->Manager
8507 TCP Proprietary (alert channel/ control channel for 2048-bit certificates).
Sensor-->Manager
8508 TCP Proprietary (packet log channel
for 2048-bit certificates). Sensor-->Manager 8509 TCP Proprietary (Bulk file transfer
channel for 2048-bit certificates).
Sensor-->Manager
8510 TCP Proprietary (Bulk file transfer channel for 1024-bit
certificates).
Sensor-->Manager
8555 TCP SSL/TCP/IP (Threat Analyzer) client-->Manager
443 TCP HTTPS client-->Manager
Preparation for the Manager installation
Port # Protocol Description Direction of communication
80 TCP Web-based user interface client-->Manager (Webstart/JNLP, Console Applets)
22 TCP SSH Remote console access
If you choose to use non-default ports for the Install port, Alert port, and Log port, ensure that those ports are also open on the firewall.
• Note that 3306/TCP is used internally by the Manager to connect to the MySQL database.
• If you have Email Notification or SNMP Forwarding configured on the Manager, and there is firewall residing between the Manager and your SMTP or SNMP server, ensure the following ports are available as well.
Additional communication ports
Port # Protocol Description Direction of communication
25 TCP SMTP Manager-->SMTP server
49 TCP TACACS+ Integration Sensor-->TACACS+ server 162 UDP SNMP Forwarding Manager-->SNMP server 389 TCP LDAP Integration (without SSL) Manager-->LDAP server 443 TCP Secure communication for MDR Manager 1 -->Manager 2 443 TCP Secure communication for MDR Manager 2-->Manager 1 514 UDP Syslog forwarding (ACL logging) Manager-->Syslog server 636 TCP LDAP Integration (with SSL) Manager-->LDAP server 1812 UDP RADIUS Integration Manager-->RADIUS server
If you have McAfee ePO™ integration configured on Manager, and there is firewall between Manager
and the McAfee ePO™ Server, ensure the following port is also allowed through firewall.
Port Description Communication
8443 McAfee ePO™ communication port Manager to McAfee ePO™ server
• Close all open programs, including email, the Administrative Tools > Services window, and instant messaging before installation to avoid port conflicts. A port conflict may prevent the application from binding to the port in question because it will already be in use.
The Manager is a standalone system and should not have other applications installed.
How to use anti-virus software with the Manager
Some of the Manager's operations might conflict with the scanning processes of McAfee VirusScan or any other anti-virus software running on the Manager. For example, the anti-virus software might scan every temporary file created in the Manager installation directory, which might slow down the
2
Preparation for the Manager installationManager's performance. So, be sure to exclude the Manager installation directory and its
sub-directories from the anti-virus scanning processes. Specifically, be sure to exclude the following folders:
• <Manager installation directory>\MySQL and its sub-folders. If these folders are not excluded, Network Security Platform packet captures may result in the deletion of essential MySQL files. • <Manager installation directory>\App\temp\tftpin\malware\ and its sub-folders.
If you install McAfee VirusScan 8.5.0i on the Manager after the installation of the Manager software, the MySQL scanning exceptions will be created automatically, but the Network Security Platform exceptions will not.
McAfee VirusScan and SMTP notification
From 8.0i, VirusScan includes an option (enabled by default) to block all outbound connections over TCP port 25. This helps reduce the risk of a compromised host propagating a worm over SMTP using a homemade mail client.
VirusScan avoids blocking outbound SMTP connections from legitimate mail clients, such as Outlook and Eudora, by including the processes used by these products in an exclusion list. In other words, VirusScan ships with a list of processes it will allow to create outbound TCP port 25 connections; all other processes are denied that access.
The Manager takes advantage of the JavaMail API to send SMTP notifications. If you enable SMTP notification and also run VirusScan 8.0i or above, you must therefore add java.exe to the list of excluded processes. If you do not explicitly create the exclusion within VirusScan, you will see a Mailer Unreachable error in the Manager Operational Status to each time the Manager attempts to connect to its configured mail server.
To add the exclusion, follow these steps:
Task
1 Launch the VirusScan Console.
2 Right-click the task called Access Protection and choose Properties from the right-click menu.
3 Highlight the rule called Prevent mass mailing worms from sending mail.
4 Click Edit.
5 Append java.exe to the list of Processes to Exclude.
6 Click OK to save the changes.
User interface responsiveness
The responsiveness of the user interface, the Threat Analyzer in particular, has a lasting effect on your overall product satisfaction.
In this section we suggest some easy but essential steps, to ensure that Network Security Platform responsiveness is optimal:
• During Manager software installation, use the recommended values for memory and connection allocation.
• You will experience better performance in your configuration and data forensic tasks by connecting to the Manager from a browser on a client machine. Performance may be slow if you connect to the Manager using a browser on the server machine itself.
Preparation for the Manager installation
• Perform monthly or semi-monthly database purging and tuning. The greater the quantity of alert records stored in the database, the longer it will take the user interface to parse through those records for display in the Threat Analyzer. The default Network Security Platform settings err on the side of caution and leave alerts (and their packet logs) in the database until the user explicitly decides to remove them. However, most users can safely remove alerts after 30 days.
It is imperative that you tune the MySQL database after each purge operation. Otherwise, the purge process will fragment the database, which can lead to significant performance degradation.
• Defragment the disks on the Manager on a routine basis, with the exception of the MySQL directory. The more often you run your defragmenter, the quicker the process will be. Consider defragmenting the disks at least once a month.
Do NOT attempt to defragment the MySQL directory using the operating system's defrag utility. Any fragmentation issues in the tables are rectified when you tune the database. For more information on database tuning, see the Manager Administration Guide.
• Limit the quantity of alerts to view when launching the Threat Analyzer. This will reduce the total quantity of records the user interface must parse and therefore potentially result in a faster initial response on startup.
• When scheduling certain Manager actions (backups, file maintenance, archivals, database tuning), set a time for each that is unique and is a minimum of an hour after/before other scheduled actions. Do not run scheduled actions concurrently.
Download the Manager/Central Manager executable
You need to download the version of the Manager or Central Manager that you want to install. You need to download it from the McAfee Update Server.
Task
1 Keep the following information handy before you begin the installation process. You must have received the following from McAfee via email.
• Grant Number and Password – If you have not received your credentials, contact McAfee Technical Support [http://mysupport.mcafee.com/]
2 Close all open applications.
3 Go to McAfee Update Server [https://menshen.intruvert.com/] and log on, using the Grant Number and Password.
4 Go to Manager Software Updates | <required version number> folder and select the required Manager software version.
5 Download the zip and extract the setup file.
2
Preparation for the Manager installation3
Install the Manager/Central Manager
Before you begin
Close all open programs, including email, the Administrative Tools | Services window, and instant messaging to avoid port conflicts. A port conflict may cause the Manager program to incur a BIND error on startup, hence failing initialization.
Close any open browsers and restart your server after installation is complete. Open browsers may be caching old class files and cause conflicts.
IIS (Internet Information Server) and PWS (Personal Web Server) must be disabled or uninstalled from the target server.
This section contains installation instructions for the Central Manager and Manager software on your Windows server, including the installation of a MySQL database.
In this section, unless explicitly stated, Central Manager and Manager are commonly referred to as "Manager."
Task
1 Prepare your target server for Manager software installation. See Preparing for the Manager installation.
2 Install the Manager software. See Installing the Manager.
3 Start the Manager program. During initial client login from the Manager server or a client machine, the required Java runtime engine software must be present for proper program functionality. See Starting the Manager/Central Manager.
Tasks
• Install the Manager on page 26 See also
Starting the Manager/Central Manager on page 3
Contents
Install the Manager
Installing the Central Manager
Log files related to Manager installation and upgrade
Install the Manager
The steps presented are for installation of the Manager/ Central Manager software. The installation procedure prompts you to submit program and icon locations, including the location and access information of your database. Read each step carefully before proceeding to the next step.
Notes:
• Ensure that the prerequisites have been met and your target server has been prepared before commencing installation.
• You can exit the setup program by clicking Cancel in the setup wizard. Upon cancellation, all temporary setup files are removed, restoring your server to its same state prior to installation. • After you complete a step, click Next; click Previous to go one step back in the installation process. • Unless specified during installation, Network Security Manager is installed by default.
• The Installation Wizard creates the default folders based on the Manager Type you are installing. For example, for a first-time installation of Network Security Manager, the default location is C: \Program Files\McAfee\Network Security Manager\App. For Network Security Central Manager,
it is C:\Program Files\McAfee\Network Security Central Manager\App. Similarly, the Wizard creates default folders for the MySQL database as well. For the sake of explanation, this section mentions only the folder paths for Network Security Manager unless it is necessary to mention the path for Network Security Central Manager.
• Before you begin to install, make sure the Windows Regional and Language Options are configured accordingly. For example, if you are installing it on Windows Server 2008 R2 Standard or Enterprise Edition, Japanese Operating System, SP1 (64 bit) (Full Installation), ensure that the Windows Regional and Language Options are configured for Japanese.
• When you install the Manager for the first time, it is automatically integrated with McAfee Global Threat Intelligence to send your alert, general setup, and feature usage data to McAfee for optimized protection. If you do not wish to send these data, then disable the integration with Global Threat Intelligence. However, note that to be able to query McAfee GTI IP Reputation for information on the source or target host of an attack, you need to send at least your alert data summary to McAfee. For details, see McAfeeNetwork Security Platform Integration Guide.
3
Install the Manager/Central ManagerTask
1 Log on to your Windows server as Administrator and close all open programs.
2 Run the Manager executable file that you downloaded from the McAfee Update Server.
The Installation Wizard starts with an introduction screen. See also the Manager/Central Manager executable.
Install the Manager/Central Manager
3 Confirm your acknowledgement of the License Agreement by selecting I accept the terms of the License Agreement.
3
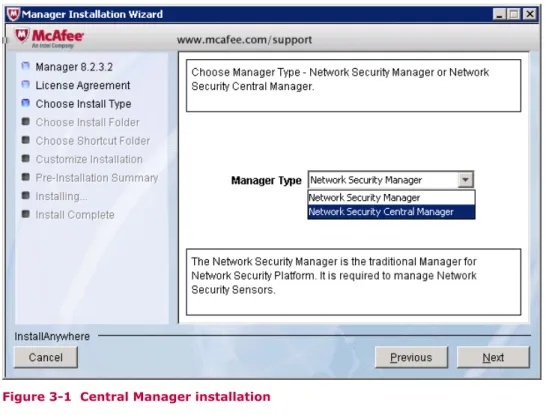
Install the Manager/Central Manager4 From the Manager Type drop-down list, select Network Security Manager or Network Security Central Manager. For an upgrade, Network Security Manager or Network Security Central Manager is displayed accordingly, which you cannot change.
Once installed, the Network Security Central Manager cannot be converted to Network Security Manager or vice versa.
5 Choose a folder where you want to install the Manager software.
Install the Manager/Central Manager
For a first-time installation, the default location is C:\Program Files\McAfee\Network Security Manager\App. For an upgrade, it is the same location as that of the earlier version.
• Restore Default Folder: Resets the installation folder to the default location. • Choose: Browse to a different location.
Installing the Manager software on a network-mapped drive may result in improper installation. The Manager software cannot be installed to a directory path containing special characters such as a comma (,), equal sign (=), or pound sign (#).
6 Choose a location for the Manager shortcut icon: • On the Start Menu
• On the Desktop
• On the Quick Launch Bar • Create Icons for All Users
You can include or remove multiple options by selecting the relevant checkboxes.
3
Install the Manager/Central Manager7 Type the password for your default user.
Use a combination of alphabets [both uppercase (A-Z) and lowercase (a-z)], numbers [0-9] and/or, special characters like "~ ` ! @ # $ % - * _ + [ ] : ; , ( ) ? { }".
Do not use null or empty characters.
Install the Manager/Central Manager
8 Set the following:
• Database Type is displayed as MySQL.
You must use only the MySQL bundled with the Manager installation file. Provide the database connection information as follows:
• Database Name: Type a name for your database. It is recommended you keep the default entry of lf
intact.
The MySQL database name can be a combination of alphabets [both uppercase (A-Z) and lowercase (a-z)], numbers [0-9] and/or, special characters like dollar and underscore [$ _]. • Database User: Type a user name for database-Manager communication; this account name is used
by the Manager. This account enables communication between the database and the Manager. When typing a user name, observe the following rules:
- The MySQL database user name can be a combination of alphabets [both uppercase (A-Z) and lowercase (a-z)], numbers [0-9] and/or, special characters like "~ ` ! @ # $ % - * _ + [ ] : ; , ( ) ? { }".
- The first character must be a letter. - Do not use null or empty characters. - Do not use more than 16 characters.
• Database Password: Type a password for the database-Manager communication account. This password relates to the Database User account.
- The MySQL database password can be a combination of alphabets [both uppercase (A-Z) and lowercase (a-z)], numbers [0-9] and/or, special characters like "~ ` ! @ # $ % - * _ + [ ] : ; , ( ) ? { }".
- Do not use null or empty characters.
This password is not the root password for database management; you will set the root password in a subsequent step.
• MySQL Installation Directory: Type or browse to the absolute location of your selected Manager database. For a first-time installation, the default location is: C:\Program Files\McAfee \Network Security Manager\MySQL. For upgrades, the default location is the previous installation directory. You can type or browse to a location different from the default. However, the database must be on the same server as the Manager.
3
Install the Manager/Central Manager9 Click Next.
If you are creating a new database, Network Security Platform a message appears asking to confirm that you really want to create a new database. Click Continue to continue with the installation.
Install the Manager/Central Manager
10 Type the root password for your database. If this is the initial installation, type a root password and then type it again to confirm.
The MySQL Root Password is required for root access configuration privileges for your MySQL database. Use a combination of alphabets [both uppercase (A-Z) and lowercase (a-z)], numbers [0-9] and/or, special characters like "~ ` ! @ # $ % - * _ + [ ] : ; , ( ) ? { }".
Do not use null or empty characters.
For security reasons, you can set a MySQL Root Password that is different from the Database Password that you set in a previous step.
11 Choose the folder in want you wish to install the Solr database.
The Manager uses Apache Solr for quick retrieval of data. Solr is an open-source search platform from the Apache Lucene project. The Manager makes use of Solr to retrieve data to be displayed in the Manager Dashboard and Analysis tabs.
For a first‑time installation, the default location is C:\Program Files\McAfee\Network Security Manager\Solr.
The following options are available in the wizard:
• Restore Default Folder: Resets the installation folder to the default location. • Choose: Click to browse to a different location.
3
Install the Manager/Central ManagerSolr is used by the Manager to enhance database access. This helps in faster data refresh in the Manager dashboard and monitors.
Verify that you have at least 20 GB of free space before you install Solr.
The Solr installation directory screen will not be displayed during the Network Security Central Manager installation.
Install the Manager/Central Manager
12 Click Next.
The 8.2 Manager installation is supported only on 64-bit OS. If you try installing in a 32-bit OS a warning message will be displayed. Click Ok on the warning message to exit the Manager installation wizard.
Enter a value to set Actual Maximum RAM Usage.
The RAM size indicated here determines the recommended amount of program memory (virtual memory) to allocate for server processes required by Network Security Platform. Since Jboss memory uses hard-disk-based memory (program memory), the total amount of both can exceed the Manager server's RAM memory size.
The Recommended Maximum RAM Usage is Physical Server Memorydivided by 2 or 1170 MB - whichever is greater. The Actual Maximum RAM Usage can be between 768 MB and three-fourth of the Physical Server Memory size.
3
Install the Manager/Central Manager13 Set the following (applicable only Network Security Manager):
• Number of Sensors: Select the numbers of McAfee® Network Security Sensors (Sensors) to be
managed by this installation of the Manager.
• Actual Maximum DB connections: Enter the maximum number of concurrent database connections allowed from the Manager. The default is 40. The recommended number indicated above is based on the Number of Sensors.
14 If the Manager server has multiple IPv4 or IPv6 addresses, you can specify a dedicated address that it should use to communicate with the Network Security Platform devices.
Install the Manager/Central Manager
To specify an IP address, select Use IPV4 Interface? or Use IPV6 Interface? and then select the address from the corresponding drop-down list.
In the Wizard, the option to specify a dedicated interface is displayed only if the Manager has more than one IPv4 or IPv6.
• When configuring the sensors, you need to configure the same IP that you selected here as the IP address used to communicate with the Network Security Platform devices.
• If the Manager has an IPv6 address, then you can add Sensors with IPv6 addresses to it. • If an IP address is not displayed in the drop-down list or if a deleted IP address is displayed,
then cancel the installation, restart the server, and re-install the Manager.
• Post-installation, if you want to change the dedicated IP address that you already specified, you need to re-install the Manager.
15 In the Manager Installation wizard, review the Pre-Installation Summary section for accurate folder locations and disk space requirements. This page lists the following information:
• Product Name: Shows product as Manager (for both Manager and Central Manager). • Install Folder: The folder you specified in Step 5.
• Shortcut Folder: The folder you specified in Step 6. • Manager type: Type of Manager being installed.
• Database: The type of database being used by Network Security Platform, which is MySQL.
3
Install the Manager/Central Manager• Database Installation location: The location on your hard drive where the database is to be located, which you specified in Step 7.
• Dedicated Interface: The IPv4 and IPv6 addresses that you specified for Manager-to-Sensor communication are displayed.
Install the Manager/Central Manager
16 Click Install.
The Manager software and the MySQL database are installed to your target server. In case of an upgrade, database information is synchronized during this process.
Post-installation, you can check the initdb.log (from <Manager install directory>\App) for any installation errors. In case of errors, contact McAfee Support with initdb.log.
17 A congratulatory message appears upon successful installation. The Manager Installation Wizard displays the following fields.
• URL for access web-based user interface. For example, if the Manager server's computer name is Callisto, then the url is https://Callisto
• Default username
• Launch the Web-based user interface on exit? checkbox (by default, the check box is selected).
3
Install the Manager/Central Manager18 Click Done.
If the installation wizard prompts for a restart, it is recommended to restart the system before logging onto the Manager.
The restart option might be displayed if there are any pending OS flags reset required by the installer, for proper removal/updates of temporary files used during installation.
19 Use the shortcut icon that you created to begin using the Manager.
The Manager program opens by default in HTTPS mode for secure communication.
All the Manager services will be started after clicking the Done button at the end of installation. 20 Type a valid login ID (default: admin) and password (default: admin123) for Network Security
Manager and login ID (default: nscmadmin) and password (default: admin123) for Network Security Central Manager.
Upon initial client logon, you are required to install Java applications. See Java installation for client systems.
21 You can use the Manager Initialization Wizard to complete the basic configuration steps.
See also
Prerequisites on page 13
Download the Manager/Central Manager executable on page 24
Installing the Central Manager
The installation of the Central Manager is similar to that of Manager. Follow the steps provided in Installing the Manager.
Install the Manager/Central Manager
During installation, you need to select the Manager type as Network Security Central Manager. By default, Network Security Manager is selected.
Figure 3-1 Central Manager installation
Sensor communication Interface is not present during Central Manager installation.
There can be only one active installation on a Windows machine. Every Central Manager and Manager installation has its own MySQL database. No centralized database exists in an Central Manager setup.
Central Manager has to be of equal or later version than the corresponding Managers. See also
Install the Manager on page 26
Log files related to Manager installation and upgrade
Two log files specifically related to Manager/Central Manager installation and upgrade are available: • mgrVersion.properties: Every fresh installation or upgrade of the Central Manager or Manager is
logged to this file. Each entry contains the version of the Central Manager or Manager that you installed or upgraded to. It also contains the date and time of when you performed this action. This can help you troubleshoot issues. For example, you can go through this log to correlate an issue with a specific Manager upgrade. This file is stored at <Central Manager or Manager install directory>\App\config.
• dbconsistency.log: When you upgrade the Central Manager or Manager, the installed database schema is compared against the actual schema of the version you are upgrading to. This
comparison is to check for any inconsistencies. The details of this comparison are logged to this file as error, warning, and informational messages. This file is stored at <Central Manager or
Manager install directory>\App. You can verify this log to check if any database inconsistency is the cause of an issue. This file is updated whenever you upgrade the Central Manager or
Manager.
3
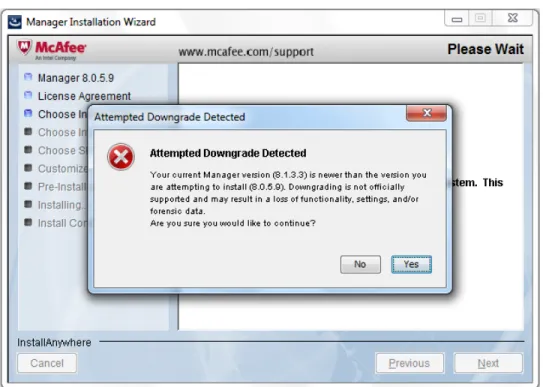
Install the Manager/Central ManagerWarning message during downgrade
Downgrade of Central Manager or Manager is not supported. To revert to an earlier version, you must uninstall your current version, install the older version, and restore the database backup from that older version. There can be instances when you may inadvertently attempt to install an older version of the Central Manager or Manager when a later version is already installed. In such cases, the Installation Wizard displays the following warning message.
Figure 3-2 Attempted Download Detected dialog
Install the Manager/Central Manager
3
Install the Manager/Central Manager4
Starting the Manager/Central Manager
This section assumes you have permissions granting you access to the software. In Network Security Platform, this translates to a Super User role at the root admin domain. Your actual view of the interface may differ, depending on the role you have been assigned within Network Security Platform. For example, certain tasks may be unavailable to you if your role denies you access. If you find you are unable to access a screen or perform a particular task, consult your Network Security Platform Super User.
For testing purposes, you can access the Manager from the server. For working with the Manager/ Central Manager, McAfee recommends that you access the server from a client machine. Running the Manager/Central Manager interface client session on the server can result in slower performance due to program dependencies, such as Java, which may consume a lot of memory.
To view the Manager/Central Manager interface, do the following:
Task
1 Make sure the following services are running on the Manager server: • McAfeeNetwork Security Manager
• McAfeeNetwork Security Manager Database
• McAfee Network Security Manager Watchdog. The default Windows Startup Type for this service is manual. So, you might have to manually start this service.
See Manager installation with Local Service account privileges section.
If you have installed the Central Manager, then make sure the following services are running on the Central Manager server:
• McAfee Network Security Central Manager
• McAfee Network Security Central Manager Database
• McAfee Network Security Central Manager Watchdog. The default Windows Startup Type for this service is manual. So, you might have to manually start this service.
Start the services using one of these methods to start the Manager, Database, and Watchdog services:
• Select Start | Settings | Control Panel. Double-click Administrative Tools, and then double-click Services. Locate the services starting with McAfee Network Security Manager.
• Right-click on the Manager icon at the bottom-right corner of your server and start the required service. The database service is not available with this option.
2 Open the Manager
• Server - Double-click the shortcut icon that you created during installation. • Client machine
-Start your browser (Internet Explorer 8.0 9.0 or 10, or Firefox 7.0) and then type the URL of the Manager server:
https://<hostname or host-IP>
3 Log on to the Manager by entering the default logon ID and password.
If pop-up blocker settings is enabled in the browser, you will not be able to type your login
credentials. In such an instance, disable the pop-up blocker settings in your browser and then try to access the Manager using your login ID and password. If the pop-up blocker is enabled, the login and password text boxes are disabled and it remains disabled till you disable the pop-up blocker and refresh the browser.
The Manager software requires Java runtime engine software for some of its components. When you first log onto the Manager from a client system, you are prompted to download and install the appropriate version of the JRE software.
You must download and install these programs for proper functioning of the Manager program. See
Java runtime engine requirements.
Tasks
• Shut down the Manager/Central Manager services on page 46
Shut down the Manager/Central Manager services
A proper shutdown of the Manager/Central Manager prevents data corruption by allowing data transfer and other processes to gracefully end prior to machine shutdown.
Shutting down the Manager
A proper shutdown of the Manager services requires the following steps be performed:
Task
1 Close all client connections. See Closing all client connections.
2 Stop the McAfee® Network Security Manager service.
3 Stop the McAfee® Network Security Manager Watchdog service.
4 Stop the McAfee® Network Security Manager MySQL service. Tasks
• Shut down the Central Manager on page 47
• Close all the client connections on page 47
• Shut down using the Network Security Platform system tray icon on page 47
• Shut down using the Control Panel on page 48 See also
Close all the client connections on page 47
4
Starting the Manager/Central ManagerShut down the Central Manager
Task
1 Close all client connections.
2 Stop the McAfee® Network Security Central Manager service.
3 Stop the McAfee® Network Security Central Manager Watchdog service.
4 Stop the McAfee® Network Security Central Manager MySQL service.
In a crash situation, the Manager/Central Manager will attempt to forcibly shut down all its services.
Close all the client connections
The following procedure details the recommended steps for determining which users are currently logged on to the Manager/Central Manager server. All client-session configuration and data review should be gracefully closed prior to server shutdown.
Task
1 Log onto the Manager/Central Manager server through a browser session.
2 In the Dashboard, view the Manager Summary to view the currently logged on users.
3 Ask the users to close all Manager windows such as Threat Analyzer and Manager Home page and log out of all open browser sessions.
Shut down using the Network Security Platform system tray
icon
Task
1 Right-click the Manager/Central Manager icon in your System Tray. The icon displays as an "M" enclosed within a shield.
Figure 4-1 Network Security Manager Service
2 Select Stop Manager or Stop Central Manager. Once this service is completely stopped, continue to the next step.
Figure 4-2 Stop Central Manager Service option 3 Go to Start | Settings | Control Panel.
Starting the Manager/Central Manager
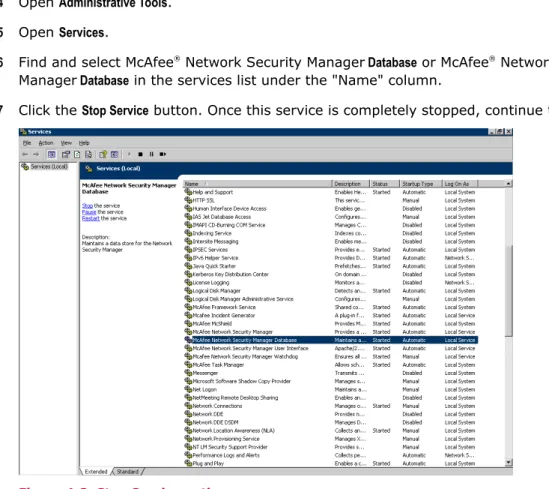
4 Open Administrative Tools.
5 Open Services.
6 Find and select McAfee® Network Security Manager Database or McAfee® Network Security Central
Manager Database in the services list under the "Name" column.
7 Click the Stop Service button. Once this service is completely stopped, continue to the next step.
Figure 4-3 Stop Service option
8 You can now safely shut down/reboot your server.
Shut down using the Control Panel
Task
1 Go to Start | Settings | Control Panel.
2 Open Administrative Tools.
3 Open Services.
4 Select Network Security Manager Service or Network Security Central Manager Service in the services list under the
Name column.
4
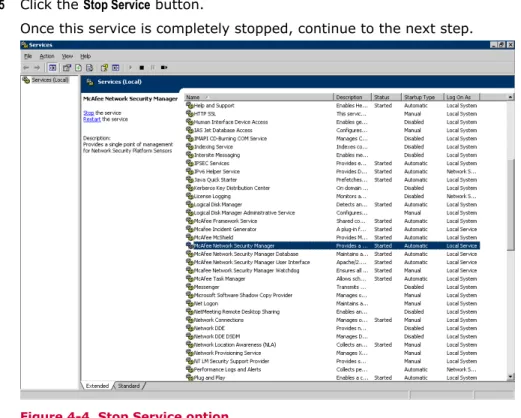
Starting the Manager/Central Manager5 Click the Stop Service button.
Once this service is completely stopped, continue to the next step.
Figure 4-4 Stop Service option
6 Find and select McAfee Network Security Manager Database or McAfee Network Security Central Manager Database in the services list under the "Name" column.
7 Click the Stop Service button. Once this service is completely stopped, continue to the next step.
Figure 4-5 Service window
8 You can now safely shut down/reboot your server.
Starting the Manager/Central Manager