ES/3xTwin
Twinax Emulation Card
and
Emulation Software
Quick Install Guide
This guide describes how to configure the 3xTwin emulation adapter and install it in your PC. It also describes how to install the Emerald Series emulation software.
Table of Contents
INTRODUCTION ... 3
3xTwin Features ... 3
PC Requirements ... 3
3xTwin Technical Specifications ... 3
INSTALLING THE ES/3xTwin ADAPTER ... 5
Verifying the I/O Address ... 5
Changing I/O Addresses ... 5
Installing the Adapter ... 7
Connecting the Pigtail and Twinax Cables ... 7
INSTALLING THE EMULATION SOFTWARE ... 9
Installing the Device Driver ... 10
Configuring a Connection ... 11
3XTwin Adapter ... 11
Configuring the Display Device ... 11
3XTwin ... 11
Connecting to the Host ... 11
RUNNING THE EMULATION ... 13
Running ES32 3xTwin ... 13
Getting Help ... 13
Troubleshooting ... 13
Connectivity Tips for 3XTwin ... 13
SALES AND TECHNICAL SUPPORT ... 14
Sales Offices ... 14
Technical Support ... 14
Web site ... 14
Chapter 1
INTRODUCTION
ES/3xTwin is a hardware/software package that connects your PC to IBM Midrange computers.The hardware component is the 3xTwin adapter, which plugs into an expansion slot in the back of your PC. The 3xTwin adapter supports standard twinax cable connections through an on-board D-connector and a T-connector, included in this package. The software portion of ES/3xTwin is the Emerald Series emulation software. The software is included on the enclosed CD Rom. This Quick Install Guide describes:
• how to configure the 3xTwin adapter
• how to install it into your PC
• how to install the emulation software
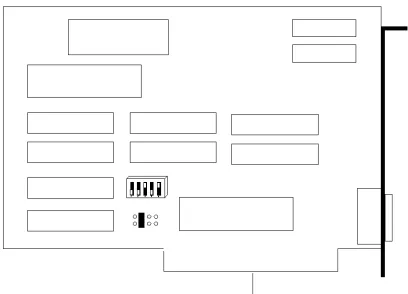
[image:3.612.62.266.317.464.2]• how to run emulation
Figure 1-1: The 3xTwin Adapter
3xTwin Features
• Supports 7 sessions and 7 addresses using Emerald Series emulation software.
• Nine display station models and thirteen printer models from which to choose to emulate. • Communicates with IBM S/36, S/38, Advanced Series 36, and AS/400.
• Configurable I/O address setting using on-board DIP switch.
• 16 and 32-bit Emulation Software are both included on the CD. Install the software in directory ES16 for Windows 3.X systems and the software in the ES32 for PC’s running Windows 95, 98, NT or 2000.
• Memory segments and IRQs are not needed.
PC Requirements
• IBM PC (or compatible) with 286, 386, 486, or Pentium processor. • One floppy disk drive.
• One ISA expansion slot.
• A minimum of 4 Mb of memory (actual memory requirements depends on emulation software). • Windows 3.x, Windows 95, or Windows NT 3.51 (or above).
Chapter 2
INSTALLING THE ES/3xTwin ADAPTER
There are three steps to successfully installing the ES/3xTwin adapter card when used together with the ES/3xTwin software from NLynx Systems:
• Verify the I/O address on the ES/3xTwin adapter card (and change it, if necessary) • Install the ES/3xTwin adapter card in your PC
• Attach the Pigtail and twinax cables to the ES/3xTwin adapter card
Each of the above steps is described below.
Note: Adapter cards are extremely sensitive to static electric charges. Be sure to discharge your body’s static electricity by touching a grounded surface before handling an adapter.
Verifying the I/O Address
I/O addresses identify the signals that pass between an adapter card and its supporting software. The I/O addresses for adapters that use them must be unique. That is, the I/O address for the ES/3xTwin adapter card cannot be the same as the I/O address for another adapter. The ES/3xTwin adapter card is preset to I/O address 340.
To verify an I/O address for other adapter cards, consult the documentation accompanying those adapter cards. If you cannot determine the addresses, keep the ES/3xTwin adapter card at the default address of 340. If you find that another adapter does conflict, change the I/O address on the ES/3xTwin adapter card.
Changing I/O Addresses
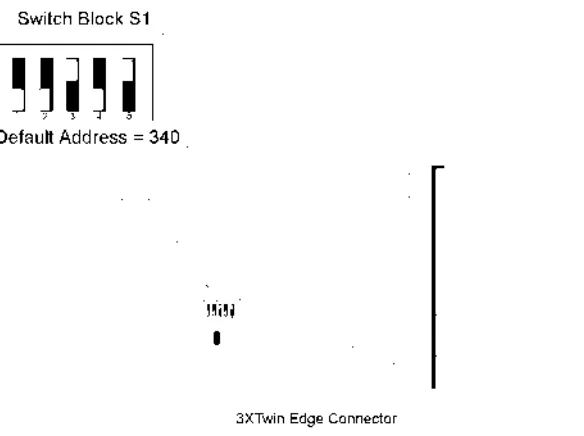
On the ES/3xTwin adapter card, I/O addresses are set with five switches on switch block S1 (Figure 2-2). The five switches correspond to binary digits as shown in Table 2-1.
To change the I/O address:
1. Locate the I/O switch on the adapter (see Figure 2-2). 2. Select a new I/O address from the table of I/O addresses. 3. Reset the switches to match the new I/O address.
Note: Adapter cards are extremely sensitive to static electric charges. Be sure to discharge your body’s static electricity by touching a grounded surface before handling an adapte
[image:6.612.70.362.67.285.2]Note: The ES/3xTwin software must be set to the same base I/O address as the adapter card. Record any changed base I/O addresses for when you configure the ES/3xTwin software (Chapter 4).
Table 2-1: Sample Base I/O Address Settings I/O Address Switches
12345 200 01111 220 01110 240 01101 260 01100 280 01011 2A0 01010 2C0 01001 2E0 01000 300 00111 320 00110 340 00101 360 00100 380 00011 3A0 00010 3C0 00001 3E0 00000
Note that for the switch settings, 0=off and 1=on.
Installing the Adapter
Once you have verified the I/O address you are ready to install the adapter card, as described below.
1. Switch off all computer system components, unplug the computer, and remove the computer cover. 2. Work in a static-free area and touch the computer chassis often to equalize static charges.
3. Insert the ES/3xTwin adapter card into a free expansion slot. The 15-pin D-connector should protrude through the rear of the PC chassis.
4. Align the adapter and retaining bracket and tighten the screws to the retaining bracket. 5. Replace the cover on the PC.
6. Connect the T-connector and twinax cables to the adapter, as described below.
Connecting the Pigtail and Twinax Cables
The following instructions assume that a twinax cable has been cabled-through from the previous terminal on the line or directly from a port on the host system.
In order to attach your PC to the host, you need two cables: an existing host twinax cable and the self-terminating pigtail cable included in your ES/3xTwin package.
The pigtail cable has two ends: the 15-pin end, called the D-connector, which connects to the adapter card, and the dual-branch end, called the T-connector, which connects to the host twinax cable.
1. Plug the 15-pin D-connector securely into the back of the ES/3xTwin adapter card.
2. Attach the host twinax cable to either of the T-connector branches.
If you are cabling-through to another terminal farther down the line, attach that next terminal to the remaining T-connector branch.
Since this is a self-terminating pigtail cable, you do not need a cap for the open end of the T-connector.
Note: If you are installing multiple ES/3xTwin adapters card, repeat steps 1 and 2 for each adapter installed.
Chapter 3
INSTALLING THE EMULATION SOFTWARE
When you install ES/32 to your PC, the ES/32 program files are, by default, copied to the c:\Program Files\ES32\ folder. During the installation procedure, you can change this path if you wish.
At the end of the installation, the ES/32 program group is created on your Windows desktop.
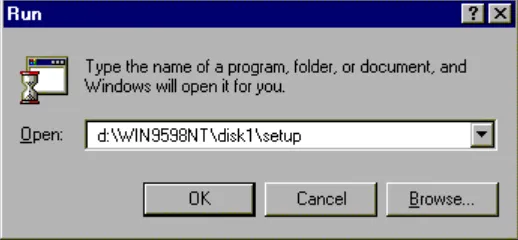
1. With your PC powered on and running Windows, insert the ES/32 CD or diskette into the appropriate drive on your PC. 2. Click the Start button and select Run.
3. At the Run command line, type:
d:\WIN9598NT\disk1\setup
[image:9.612.50.309.259.379.2]the above example assumes that d: is the drive containing the ES/32 installation media.
Figure 2-1 The Windows Run Command
5. Click OK.
6. When prompted, accept or change the location of the ES/32 program files on your hard drive.
Installing the Device Driver
The first time you start ES/32, you must configure it by defining the connection between the host and the PC. For all connection methods, you must begin the configuration process by installing the device driver for your connection method.
1. Start the ES/32 Display Emulator.
2. You will be prompted to set an Administrator’s password. Most users will want to answer “No” at this time. 3. You will now be prompted to install and configure a device driver. Click OK.
4. Click Add Driver.
5. Insert the ES/32 CD into the your PC’s drive.
6. Verify the drive letter and path for the CD-ROM (the default is E:\es32\disk1\drivers.tvi). Click OK. 7. The software will advise you that it has located the driver for the 3Xtwin. Click Yes.
8. You will be advised that the driver will require a 3Xtwin adapter. Click OK.
9. A warning will appear saying that the software waws unable to find the board’s virtual device driver. This is normal during the initial installation. Click OK.
Configuring a Connection
Configuring the connection between the host and the PC is accomplished by providing information about the connection on the Configuration Properties dialog box. The information you are asked to provide for each of the connection methods is listed below. After you have provided the necessary information, click OK on this Configuration Properties dialog box. You will then configure a display device, which is described at the end of this section.
3XTwin Adapter
IRQ Must match the setting on the board. Options are 2-5 or NONE
I/O address Must match the setting on the board.
Character set Must match the character set used on the host.
Configuring the Display Device
Once you configure the connection, you will configure a display device for the connection. The device configuration tells ES/32 the specifics about the host device you are emulating.
You provide a device name, the model of display, the keyboard type, and for some connection methods, the host address.
The information you provide when configuring a display device is listed below for each of the connection methods. When you complete the information described below, you are ready to connect to the host.
3XTwin
Device name Enter a name for the device. It can be any name you like.
Type Select Display.
Model Select the model you want to emulate. Host address Select a unique host address. If you have more
than one device configured, each must have a unique address.
Keyboard Select the keyboard type you are using.
Connecting to the Host
After you have finished configuring ES/32, you can connect to the host by opening a display session, and then connecting to the host.
To open a session:
1. Start the ES/32 Display Emulator. 2. From the File menu, click Open.
3. Click the session you want to open and click Open.
To connect to the host:
• With a display session loaded, click Connect on the Session menu.
To disconnect from the host:
1. Sign off from the host.
Chapter 4
RUNNING THE EMULATION
At this point, you have completed the setup of ES/3xTwin and are now ready to run your emulation software.
Running ES32 3xTwin
Starting a session
1. Under START, select PROGRAMS, ES32 3xTwin, Display Emulator. 2. Under File select Open.
3. Select the device you created in the Open window and press Open 4. A sign on screen should appear.
Getting Help
For help on running your emulation software, print or view the context sensitive on-line help that is built into the application.
Troubleshooting
This section includes information that will help you to ensure a successful connection between your PC running ES/32 and the IBM host. For best results, locate the section below that matches the connection method you are using and verify that you are in
compliance with all the recommendations listed.
Connectivity Tips for 3XTwin
• ES/32 does not require the use of an IRQ. If you set an IRQ in software, however, a jumper must be set on the 3XTwin board for ES/32 to work properly. Consult the 3XTwin Setup Guide for details on setting the IRQ jumper.
• ES/32 defaults to IRQ None and I/O Address 340. These defaults may conflict with existing hardware if, for example, the card is to be installed in a PC with two serial (COM) ports, or in a PC with multimedia capabilities. It is recommended that you set the 3XTwin board at IRQ equal to None.
• If upgrading to ES/32 from TwinView Elite, visually verify and note I/O address settings of the 3XTwin board. You will need these settings when configuring a connection method in ES/32.
• If, after launching a session, the cursor remains in the top left corner of the screen, it’s possible that an IRQ conflict exists
Chapter 5
SALES AND TECHNICAL SUPPORT
Sales Offices
United States Europe
NLynx Systems, Inc. NLynx Systems LTD 8313 Hwy 71 West 3rd Floor, The Graftons
Austin, TX 78735 Stamford New Road Tel: 1-800-328-2696
or 1-512-301-8000 Altrincham, Cheshire WA14 1DQ FAX: 1-512-301-8195 United Kingdom
Tel: +44 (0) 181 759 7301 FAX:+ 44 (0) 181 759 7307
Technical Support
Unites States International
Tel: 1-888-659-6967 or 512 301-8180 Fax: 512 301-8030
Tel: +44 (0) 161 928 7014 Fax: +44 (0) 161 928 7015
Web site
ES/3xTwin Limited Warranty
General Terms and Conditions
Limited Product Warranty. NLynx Systems warrants that for one year the 3xTwin Hardware Product shall be free from defects in materials and workmanship which arise under proper and normal use and service. In the event the 3xTwin Hardware Product fails to comply with the warranty set forth above, NLynx will replace or repair the Product provided the End User completes and submits the 3xTwin Warranty Registration Card provided with the product. End User must, however, return the Hardware Product, along with proof of purchase, to NLynx.
Software Warranty. NLynx Systems warrants that for a period of ninety (90) days from the date of purchase by the End User, its Software Products shall conform to its published specifications under normal usage. NLYNX DOES NOT WARRANT THAT THE OPERATION OF THE SOFTWARE WILL BE UNINTERRUPTED OR ERROR FREE, OR THAT ALL SOFTWARE DEFECTS WILL BE CORRECTED. In the event a Software Product fails to comply with the warranty set forth above, NLynx will replace the product. End User must, however, return all copies of the Software, along with proof of purchase , to NLynx within 90 days from the Software purchase date.