Insert Survey Data into a Database: Dreamweaver & Access 2007
Site Preparation
1. Open your User folder and create a folder titled InsertData_Local. Do NOT place this folder inside PUB. If you are working at home on your own computer, create a folder titled InsertData_Local on your local hard drive.
2. Inside your User folder, open your PUB folder and create another folder titled InsertData.
The names of your folders may differ from those listed here.
Important: It is critical that you do not place both folders inside PUB. Only the InsertData
folder should be in PUB. The local (InsertData_Local) folder must NOT be in PUB. You can lose data.
3. Open the InsertData_Local folder.
4. Create two folders in InsertData_Local. Name one folder Data and the other Forms.
Storing Data: Creating a Database Files
In this exercise your will have data stored in an Access database. 1. Open Microsoft Access.
2. Click the Office button and select New (see Figure 1) and in the lower right corner of the screen the Blank Database field displays (see Figure 2). You may also click Blank Database under the New Blank Database label at the top center of the screen.
Figure 2. Blank database
3. Click the Folder icon (see Figure 2) and browse to locate the Data folder that is inside your InsertData_Local folder. The File New Database box appears (see Figure 3). 4. As shown in Figure 3, in the Save as type box, select Microsoft Office Access Database
(2002-2003 form)(*mdb).
5. Type a name for the database. In this example, the database file is named clients.mdb. 6. Click the OK and the File New Database box disappears.
7. Click the Create button (see Figure 2).
Figure 3. File New Database
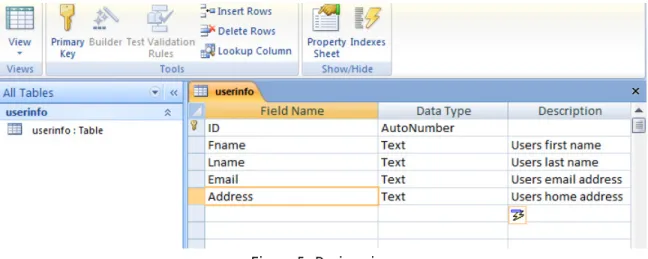
Figure 4. DB design view 10. Under Field Name enter FName (see figure 5).
11. Press the Tab key to move to the Data type column. Select Text.
12. Press the Tab key to move to the Description column. Type a description, such as the Users first name.
13. Enter additional fields by replicating figure 5. For this example, enter three additional fields named as follows: Lname, Email, and Address. When you are done, you should have a total of five fields, the four you created and an ID field (see figure 5).
Figure 5. Design view
14. Click the View button (upper left corner, Home tab) and select DataSheet View. 15. You’ll get prompted to save the table. Click Yes.
16. The Datasheet view should display (see figure 6). If your table does not open in the Datasheet view, then select View >> Datasheet view. You can toggle between the design and datasheet views using the View option.
Figure 6. Enter user information
17. Close Access. NOTE: If the database file is open when your Web page attempts to submit or read data from the table, it will not function.
Create a New site (Dreamweaver Site Definition)
1. Open Dreamweaver2. Select Site >> New Site and the Site Definition box appears. 3. Click the Advanced tab.
4. Under Category, click Local Info. Type a name in the Site Name box.
5. Click the folder icon to the right of the Local root folder box and browse to your InsertData_Local folder (see figure 7). In this example, my local folder is on my home PC and not in my User folder.
Remote Info
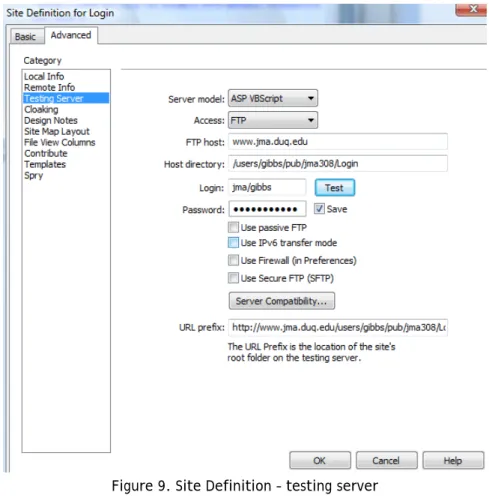
6. Click Remote Info under Category on the left side of the Site Definition box (see figure 8).
Figure 8. Site Definition – remote info 7. Under Access select FTP
Complete the text boxes with the following information:
FTP host: www.jma.duq.edu
Host directory: /users/YOURLASTNAME/PUB/JMA308/InsertData
The host directory information here assumes that you made a folder titled InsertData and placed it inside a folder titled JMA308 which is in your PUB folder. Your Host directory information may differ. For instance, you may have created a folder called InsertData_Remote and placed that folder inside your PUB folder. If so, the host directory information would read as follows:
/users/YOURLASTNAME/PUB/InsertData_Remote/
For the example shown in figure 8, the folder Login is inside a folder title JMA308, which is inside PUB.
8. Type your username and password (password is preceded by jma/) and press the Test button. You should get a confirmation that the test was successful. If so, click the OK button to dismiss the confirmation box. If the test was not successful, check to ensure that your path to the folder is correct and that you didn’t make a typo.
Testing Server
9. Click Testing Server under Category (see figure 9). 10. Select ASP VBScript for the Server model.
11. Select FTP for Access.
12. Your information should be filled out. Click the Test button.
13. When you get the confirmation that the test was successful, click OK and then click OK to close the Site Definition box.
Create the Form
1. After you create the database, folders, and make your Dreamweaver site, create a Web page that has a form.
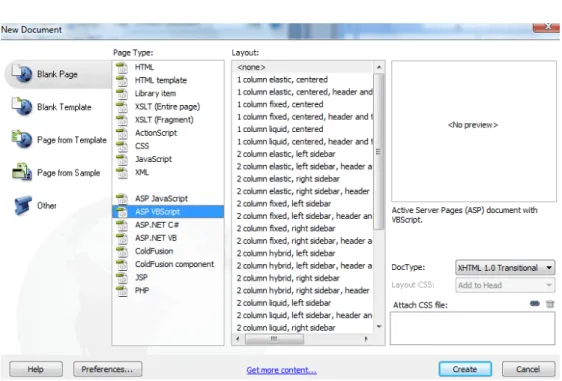
Select File >> New. From the New Document box, choose Blank Page and ASP VBScript and then click the Create button (see Figure 10).
Figure 10. New Blank ASP page
2. Save the page as Insert.asp inside the Forms folder that is inside the Local (InsertData_Local) folder. Do not need type .asp because the extension will be appended to the file name automatically.
3. Add some text to the top of the page and give the page a Title. 4. Create a form.
Select Insert >> Form >> Form. A red rectangle appears on the screen. 5. Add four text fields to the form (inside the form area – the red rectangle).
Select Insert >> Form >>Text Field or click the Text field button.
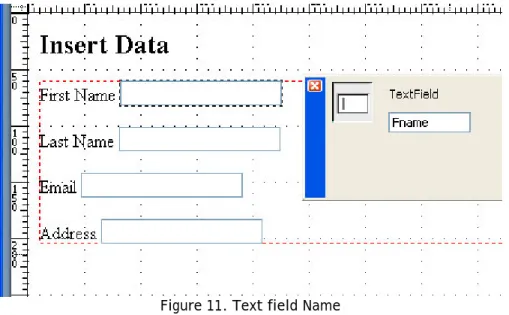
6. Give each text field a label (See figure 11). Label the first text field First Name, the second, Last Name, the third Email, and the fourth Address.
7. After you add the four fields, give each of them a name (a name is different from a label). Click on each text field and in the Property box type a corresponding name. In this example, the clients.mdb database contains four fields: Fname, Lname, Email, and Address. Figure 11 below shows the first text field as selected and the field name
(Fname) is typed in the TextField box. Name your four fields as Fname, Lname, Email, and Address.
Figure 11. Text field Name 8. Add a submit button after the text fields.
Insert >> Form >> Button.
Upload the Site
In the next several steps, you’ll make a connection between your Insert.asp page and the clients.mdb database file. Prior to doing so you need to upload your site to the InsertData folder inside your PUB folder.
1. In Dreamweaver, select Window >> Files.
In the Files window, you should see the Data and Forms folders. Make sure that the page, Insert.asp is in the Forms folder. The Access file (e.g., clients.mdb) must be inside the Data folder.
2. At the top of the Files window, click on the site name – the folder at the top of the list. To upload the site to the InsertData folder, click the blue arrow that points up (see figure 12). Alternatively, you can right-click on the site folder and select PUT. This action uploads the site.
Figure 12. Files window
3. The Background Activity box displays. You may get prompted to save your files or to put dependent files, click Yes. In some cases, if the upload procedure does not complete, make sure the Access (clients.mdb) file is closed.
The Database Connection
Now that your files are uploaded, you can make a connection to the database. 1. Go to (or open if necessary) the Insert.asp page in Dreamweaver. 2. Select Window >> Databases and the database window appears. 3. Click the
+
sign and select Custom Connection String (see figure 13).Figure 13. Databases
4. In the Connection Name box, type a name for the connection (e.g., Conn_Insert) (see figure 14).
"Data Source=" & Server.Mappath("../data/clients.mdb") & ";Provider=Microsoft.Jet.OLEDB.4.0;"
The above information assumes that you have a main folder (e.g., InsertData) in which you have two sub folders, Data and Forms. Inside Data is an Access database file titled clients.mdb. The Forms folder contains your Web pages.
Figure 14. Custom connection string
6. Check the User drivers on testing server option and then click Test. You should get a prompt that the connection was successful.
7. Click OK to close the Custom Connection String box.
8. Your database window should look like figure 15. If you need to edit the database connection, you can double-click the database icon (yellow cylinder) shown in Figure 15.
Figure 15. Database window
Creating a Survey Response page
After a user submits the form, you need a page that will let him/her know that data were submitted. In this example, we will also display the submitted records.
1. Create a new dynamic page in Dreamweaver. File >> New and then make a blank ASP page.
3. Save the page as Results.asp and save it inside the Forms folder.
4. You will finish this page after you complete the next step (Insert Records).
Insert Records
1. Open the Insert.asp page.
2. Select Window >> Server Behaviors. On the Server Behaviors panel, click the
+
sign andselect Insert Records. The Insert Records box displays (see figure 16). 3. Select the following options (see figure 16):
Connection: Conn_Insert or whatever you named the Database connection created in the previous section.
Insert into table: If you are using the clients.mdb file that you’ve created in this example, the table name will be userinfo, which corresponds to the name of the table that you made when creating the database file. In the example shown in figure 16, clients was used as the table name.
After Insert, go to: Results.asp or the page you created to display after the user submits the form.
4. Click on each item in the Form elements box to ensure they are associated with a field in the database.
5. Click OK.
Figure 16. Insert Record window
Test the Site and set Write Permissions
1. Upload the site to the InsertData folder.
2. Before data can be submitted, you must set the write permission of the Data folder. Right-click the Data folder in the remote location (the Data folder inside PUB) and select Properties. Click the Security tab. Under Group or user names click web web([email protected]) and then click Edit (see Figure 17).
3. Click web web([email protected]) again and then click the checkbox for Modify under Allow (see Figure 18). Click OK.
Figure 18. Permissions
4. Open a Web browser and type the URL to open the Insert.asp page.
5. Complete the form and click the Submit button. You should then see the Results page. In addition, if you open the clients.mdb file inside the InsertData folder, you should see the information you submitted. When you upload your files, you have two copies of each file, one in the local folder and the other in the remote folder. If after submitting data you open the database file inside the local folder, it will be empty because data were submitted to the database file in the remote folder. When the database file in the local folder is empty and its copy in the remote folder contains data and you upload the site, the local copy overwrites the remote copy (and you can lose data).
Display the Records
1. Open the Results.asp page.
2. Below the Thank you, your information has been submitted message type the following:
The following individuals have been added to the client list. 3. Click below the message and then open the Server Behaviors panel.
4. Click the
+
sign and select Recordset (Query).5. In the RecordSet box type a name for the Record set (e.g., RS_DisplayRecords). 6. Select the Conn_Insert item for the Connection, assuming you named the database
connection Conn_Insert.
7. Select userinfo (or whatever you named your table) for the table.
8. Click OK. You should see a line that reads RecordSet (RS_DisplayRecords) in the Server Behavior panel.
9. With the cursor inserted below the The following individuals have been added to the client list message, select:
Insert >> Data Objects >> Dynamic Data >> Dynamic Table.
10. In the Dynamic Table box select the Record set you made earlier (Rs_DisplayRecords). 11. Click the All records button and then click OK. A table should be inserted.
12. Upload the site. Go to the Insert.asp page, complete and submit the form. You should get the Results.asp page with all the records displayed.