Windows Server
2012 R2
Server Management and
Automation
Copyright Information
© 2013 Microsoft Corporation. All rights reserved. This document is provided "as-is." Information and views expressed in this document, including URL and other Internet Web site references, may change without notice.
Some examples depicted herein are provided for illustration only and are fictitious. No real association or connection is intended or should be inferred.
You bear the risk of using it. This document does not provide you with any legal rights to any intellectual property in any Microsoft product. You may copy and use this document for your internal, reference purposes. You may modify this document for your internal, reference purposes.
Contents
Introduction ... 4
Standards-based approach to management in Windows Server 2012 R2 ... 5
Technical description ... 5
Standard API improvements ... 5
Standard protocols ... 6
Standard management tools ... 8
Simplifying your daily routine tasks with Windows PowerShell ... 11
Technical description ... 11
Robust Session Connectivity ... 11
Disconnected Sessions ... 11
Job scheduling ... 12
Windows PowerShell ISE ... 13
Windows PowerShell Workflow ... 15
Windows PowerShell Web Access ... 22
Updatable Help ... 24
New cmdlets ... 24
Desired State Configuration ... 25
Defining a configuration ... 26
Rules for nesting node and configuration blocks... 28
Declaring configuration parameters ... 29
Summary ... 30
Multi-server management and feature deployment with Server Manager ... 31
Technical description ... 31
Multiserver experience ... 31
Efficient deployment of workloads to a remote server or offline virtual hard disk ... 32
Installing roles and features on a remote server or offline virtual hard disk ... 32
Batch deployment ... 33
Integration with other management tools ... 33
Server role management across multiple servers ... 33
Minimal performance impact ... 35
Remote Server Admin Tools ... 35
Summary ... 35
Introduction
With Windows Server 2012 R2, Microsoft brings its experience in building and operating public clouds to the server operating system, helping to make it a dynamic, highly available, and cost-effective platform for private clouds. Windows Server 2012 R2 offers businesses and hosting providers a basis for a scalable, dynamic, and multitenant-aware cloud infrastructure that more securely connects across premises and helps IT to respond to business needs faster and more efficiently.
Windows Server 2012 R2 offers excellent total cost of ownership (TCO) as an integrated platform with comprehensive, multicomputer manageability. There are three ways in which Windows Server 2012 R2 improves multicomputer management:
Standards-based management approach: The focus on industry standards used in Windows Server 2012 R2 enables greater manageability across both Windows and non-Window devices alike. Also, it stretches the manageability to hardware such as network switch and storage.
Windows PowerShell 4.0: Based on the comprehensive automation capabilities in PowerShell 3.0, Windows PowerShell 4.0 enhances its ability to automate your daily tasks in a much efficient way to a heterogeneous environment.
Server Manager: Server Manager in Windows Server 2012 R2 helps you deploy and manage roles and features on the local server and remote servers, whether physical or virtual. The following sections provide more detail about these features of Windows Server 2012 R2.
Standards-based approach to management in Windows Server 2012 R2
Technical description
Windows Server 2012 R2 continues to improve the management experience within the datacenter and cloud environment through its enhanced application of standards-based management frameworks. Microsoft Windows has long supported standards-based management and has participated in organizations such as the Distributed Management Task Force (DMTF). These efforts have led to the development of Windows Management Instrumentation (WMI) and Windows Remote Management (WinRM). WMI is the Windows implementation of a Common Information Model (CIM) object manager, and WinRM is the implementation of the Web Services Management (WS-Man) protocol. Both CIM and WS-Man are standards released by the DMTF.
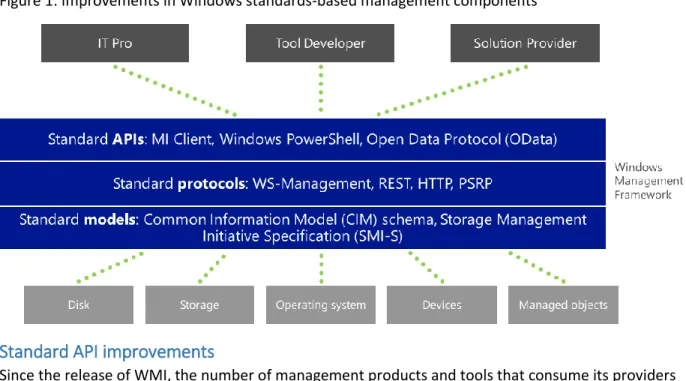
Windows Server 2012 R2 enhances the manageability of datacenters through significant improvements in the standards-based infrastructure. It does this by delivering application programming interfaces (APIs) that are easier for developers and IT Pros to use. These APIs provide support for recent standards and add new kinds of Windows PowerShell cmdlets that make it simpler and more cost-effective to connect to and manage multiple servers and devices in the datacenter.
Figure 1: Improvements in Windows standards-based management components
Standard API improvements
Since the release of WMI, the number of management products and tools that consume its providers has steadily grown, but this traditionally has not been matched by a proportional increase in providers. The challenge for developers was that writing a WMI provider required extensive knowledge of
Component Object Model (COM) coding. This made writing providers time consuming, and provided little benefit to the developer.
In Windows Server 2012 R2, Microsoft introduces the Management Infrastructure APIs for Windows (MI APIs), which greatly simplify the development of new providers and client applications. These new MI APIs are available in both native (C/C++) code and managed (.NET) code for client development, and native code for provider development. The APIs remove the need to do COM coding, and they come with tools that generate code skeletons and schema from the class definition described in a MOF file. This makes provider development much easier and allows developers to spend their time on developing
the business logic. A provider written using the new MI APIs can be called from the previous release of WMI, as well as from any non-Windows client application that uses the current DMTF WS-Man standard to connect to the Windows Server 2012 R2 system.
In addition, the new MI APIs are updated to adhere to the CIM Infrastructure standard more closely than the classic WMI APIs, and by default, they use the standard WS-Man protocol for communicating across servers. Compliance with these standards means that developers can write applications using the MI APIs, which can manage other Windows servers and any server or device that supports the current DMTF CIM and protocol standards.
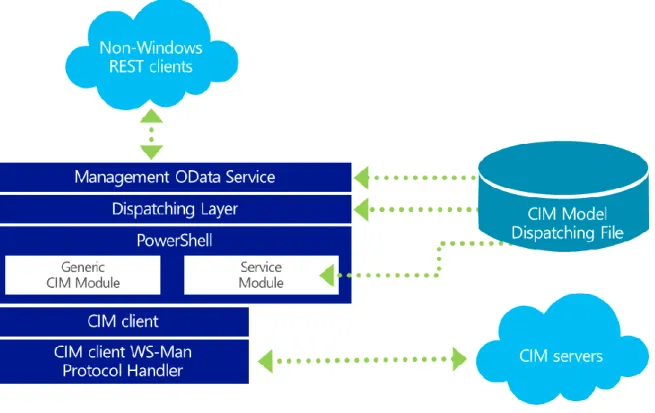
For web developers who want to manage Windows from non-Windows platforms, Windows Server 2012 R2 includes the Management OData IIS Extension. This contains tools and components that simplify building REST APIs (OData Service endpoints).
OData is a set of URI conventions, tools, components, and libraries for building REST APIs. What makes the OData services stand out is that they are based on explicit domain models, which define their data content and behavior. This allows rich client libraries (such as Windows/IoS/Android phones, browsers, Python, and Java) to be generated automatically, thus simplifying the development of solutions on a wide range of devices and platforms.
Figure 2: Standard API improvements using CIM Model and OData
Standard protocols
Another challenge in standards-based management is the definition and availability of a standard management protocol. With multiple vendors creating multiple management tools and interfaces on multiple platforms, the complexity of managing these environments continues to grow.
WMI is a standard Common Information Model Object Manager (CIMOM) that hosts many standard class providers; however, early on, there was not an interoperable management protocol, so WMI used the Distributed Component Object Model (DCOM). This made it an “island of management” for
Windows managing Windows.
This situation changed with the DMTF’s definition and approval of WS-Man, a SOAP-based, firewall- friendly protocol that allows a client on any operating system to invoke operations on a standards- compliant CIMOM running on any platform. Microsoft shipped the first partial implementation of WS- Man in Windows Server 2003 and named it Windows Remote Management (WinRM).
In Windows Server 2012, WinRM has become the default protocol for management. This provides interoperability with a number of CIMOM and WS-Man stacks available on other platforms, including Openwsman (Perl, Python, Java, and Ruby Bindings), Wiseman, and OpenPegasus.
Moving forward with Windows Server 2012 R2, Microsoft has implemented a new open source Windows Management Infrastructure server called Open Management Infrastructure or OMI. It has a new WMI provider API (MI) with extended Windows PowerShell semantics. OMI is a full implementation of WS-Man on Windows and Linux/UNIX. It also provides new MI client with integrated Windows PowerShell layer. It truly provides one management infrastructure for both Windows and Linux systems. Figure 3. Open Management Infrastructure
Compared to other management platform such as OpenPegasus, it provides a lighter and faster management features and functions.
Figure 4. Open Management Infrastructure vs. OpenPegasus
Standard management tools
The implementation of WS-Man as a standard protocol further established a foundation on which standard APIs could be used to make manageability and interoperability easier and more efficient. One of the goals for Windows Server 2012 R2 has been to help IT Pros manage as many platforms and devices as possible using Windows PowerShell, as complex datacenter environments include a wide range of systems running recent versions of Windows and non-Windows operating systems.
The core management components described in this paper—WMI, MI APIs, WinRM, and PowerShell— are included in the Windows Management Framework 4.0. It includes updates to Windows PowerShell, Windows PowerShell ISE, Windows PowerShell Web Services (Management OData IIS Extension), Windows Remote Management (WinRM), Windows Management Instrumentation (WMI), the Server Manager WMI provider, and a new feature for 4.0, Windows PowerShell Desired State Configuration (DSC). This downloadable package can be installed on Windows Server 2008, Windows Server 2008 R2, Windows 7 and Windows Server 2012 systems, and provides them with all of the updated, standards-compliant functionality in Windows Server 2012 R2.
Windows Server 2012 R2 provides a new PowerShell module called CIM cmdlets that directly
corresponds to the generic CIM operations and is built on top of the MI client .NET APIs. This enables the cmdlets in this module to manage Windows and non-Windows devices that support the current WS-Man and CIM standards. Windows Server 2012 R2 also adds support for a new type of cmdlet, known as CIM-Based cmdlets, which provides developers and scripters the ability to interact with any CIM or WMI provider over WS-Man—including both existing WMI providers on Windows devices and CIM providers on non- Windows systems.
As an example, Windows Server 2012 R2 let admins control their network switches. It allows easily deployment and operations of the network switches in standards approach.
Figure 5. Sample PowerShell script that deploys and manages network switches
Example:
$tors = "192.168.0.1", "192.168.0.2", "192.168.0.3" $so = New-CimSessionOption -UseSsl
$s = New-CimSession -CN $tors -port 7779 -Auth Basic -Credential $cred -Sessionoption $so
#enable SSH Feature
$ssh = Get-CimInstance -CimSession $s MSFT_Feature | ? FeatureName -eq 2 Set-CimInstance -CimSession $s $ssh -Property @{ IsEnabled = $true }
#Enable all ports
$ports = Get-CimInstance -CimSession $s CIM_EthernetPort
$ports | Invoke-CimMethod -Method RequestStateChange -Parameter @{ RequestedState = 2}
#Set a Port to trunk mode and specify list of VLANs
$lanep = Get-CimAssociatedInstance $ports[5] -ResultClassName Cim_LanEndpoint $vlanep = Get-CimAssociatedInstance $lanep -ResultClassName Cim_VLanEndpoint $vlanepsd = Get-CimAssociatedInstance $vlanep -ResultClassName
Cim_VLanEndpointSettingData
#Set Port Mode to Trunk
Set-CimInstance $vlanep -Property @{DesiredEndpointMode = 5} #Set list of trunk VLANs
Set-CimInstance $vlanepsd -Property @{TrunkVlanList= “2,3,4”}
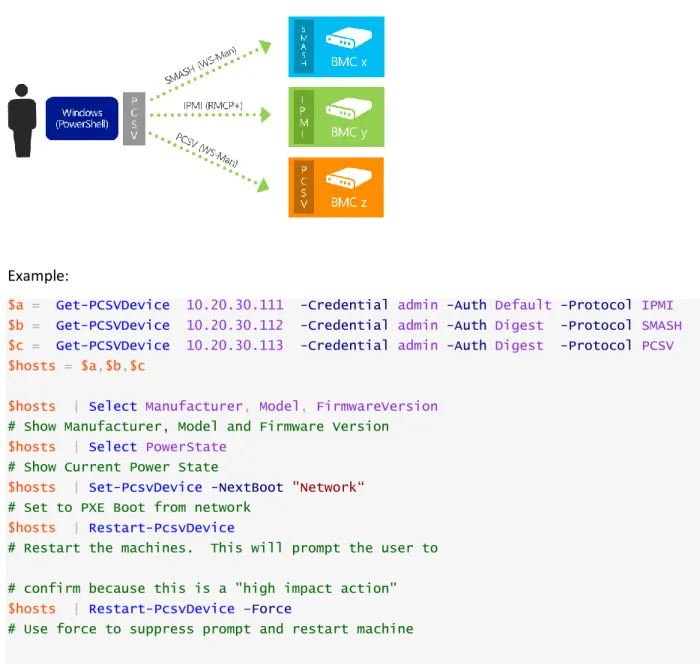
Today, different vendors support different protocols and mechanisms where their PowerShell coverage is very low. In a world as such, automating hardware management isn’t easy. Windows Server 2012 R2 allows you to manage Out-of-band hardware with a standards based protocol.
Figure 6. Sample PowerShell script that manages Out-of-band hardware
Example:
$a = Get-PCSVDevice 10.20.30.111 -Credential admin -Auth Default -Protocol IPMI
$b = Get-PCSVDevice 10.20.30.112 -Credential admin -Auth Digest -Protocol SMASH
$c = Get-PCSVDevice 10.20.30.113 -Credential admin -Auth Digest -Protocol PCSV
$hosts = $a,$b,$c
$hosts | Select Manufacturer, Model, FirmwareVersion
# Show Manufacturer, Model and Firmware Version
$hosts | Select PowerState
# Show Current Power State
$hosts | Set-PcsvDevice -NextBoot "Network“
# Set to PXE Boot from network
$hosts | Restart-PcsvDevice
# Restart the machines. This will prompt the user to
# confirm because this is a "high impact action"
$hosts | Restart-PcsvDevice –Force
# Use force to suppress prompt and restart machine
In short, the standards-based management approach in Windows Server 2012 R2 enables IT Pros to use Windows PowerShell and the new standards-compliant features of Windows to manage any device in their datacenter that supports the current CIM, WS-Man, and OData standards.
Simplifying your daily routine tasks with Windows PowerShell
Windows PowerShell provides a comprehensive platform to help you manage most server roles and aspects of the datacenter. In this newest version of Windows PowerShell, sessions to remote servers are resilient and can withstand various types of interruptions. In addition, learning Windows PowerShell is now easier than ever through improved cmdlet discovery and simplified, consistent syntax across all cmdlets.
Technical description
The following sections describe the major features of Windows PowerShell.
Robust Session Connectivity
Long-running tasks, such as deploying a service pack or backing up a database, need to continue even if the client computer that initiated the requested operation goes down or disconnects.
With Robust Session Connectivity, remote sessions can remain in a connected state for up to four minutes—even if the client stops responding or becomes inaccessible—and tasks on the managed nodes continue to run on their own, making the end-to-end system more reliable. If connectivity cannot be restored within four minutes, execution on the managed nodes is suspended with no loss of data, and remote sessions automatically transition to a disconnected state, allowing them to be reconnected after network connectivity is restored. Corruption of application and system state from premature
termination of running tasks due to unexpected client disconnection is virtually eliminated.
Disconnected Sessions
Windows PowerShell 3.0 and above, lets you disconnect and then reconnect to a session without losing state. With Disconnected Sessions, you can create a session on a remote computer, start a command or job, disconnect from the session, shut down your computer, and then reconnect to the session from a different computer at a later time to check the job status or get the results. When administrators are disconnected from the session, commands and jobs can continue to run.
The functionality of the following cmdlets demonstrates the Disconnected Sessions capability in Windows PowerShell 3.0 and above:
Disconnect-PSSession. Disconnects a session connection from a remote computer.
Connect-PSSession. Reestablishes a session connection with a remote computer.
Receive-PSSession. By default, resumes execution of a command on a remote session and retrieves the session output. Implicitly reconnects to session (without Connect-PSSession command).
Example:
# Start a remote session, disconnect from the session, and exit PowerShell.
PS C:\> $s = New-PSSession -ComputerName srv1 -Name LongSession
PS C:\> $job = Invoke-Command $s { 1..10| % {echo "Long running job - part $_"; sleep 5} } -AsJob
PS C:\> Disconnect-PSSession $s exit
# Start Windows PowerShell on a different computer.
PS C:\> $s = Get-PSSession -ComputerName srv1 -Name LongSession PS C:\> Receive-PSSession $s
Job scheduling
Windows PowerShell 3.0 and above allows administrators to schedule jobs to be run at a later time, or according to a particular schedule. To create a scheduled job, you first create a job definition, which names the job and specifies the commands that it runs, and then a job trigger, which specifies the job schedule. The Windows Task Scheduler is used to schedule and start the job and a per-user job
repository is used to store job output so that it is available later in a Windows PowerShell session on the computer.
The following cmdlets are available in the PSScheduledJob module to help you work with scheduled jobs: Add-JobTrigger Enable-ScheduledJob Disable-JobTrigger Get-ScheduledJob Get-JobTrigger Register-ScheduledJob Enable-JobTrigger Set-ScheduledJob New-JobTrigger Unregister-ScheduledJob Remove-JobTrigger Get-ScheduledJobOption Set-JobTrigger New-ScheduledJobOption Disable-ScheduledJob Set-ScheduledJobOption Jobs can be scheduled to execute based on the following job triggers:
Once Daily Weekly At startup At logon Example:
$trigger = New-JobTrigger -Daily -At 4am
Register-ScheduledJob -Name MyScheduledJob -ScriptBlock { Get-Process } -Trigger
$trigger
Get-ScheduledJob
You can start a scheduled job manually. Example:
Once the trigger has fired and the job has run, you can work with it the same way you do regular background jobs.
Example:
Import-Module PSScheduledJob
$j = Get-Job -Name MyScheduledJob
Receive-Job $j
Windows PowerShell ISE
The Windows PowerShell 3.0 Integrated Scripting Environment (ISE) includes many new features to ease beginning users into Windows PowerShell and provide advanced editing support for scripters. The following are some of these new features:
Show-Command pane lets users find and run cmdlets in a dialog box. Figure 7. Working with cmdlets in Windows PowerShell ISE
IntelliSense provides context-sensitive command completion for cmdlet and script names, parameter names and enumerated values, and property and method names. IntelliSense also supports paths, types, and variables.
Figure 8. Context-sensitive command completion with IntelliSense
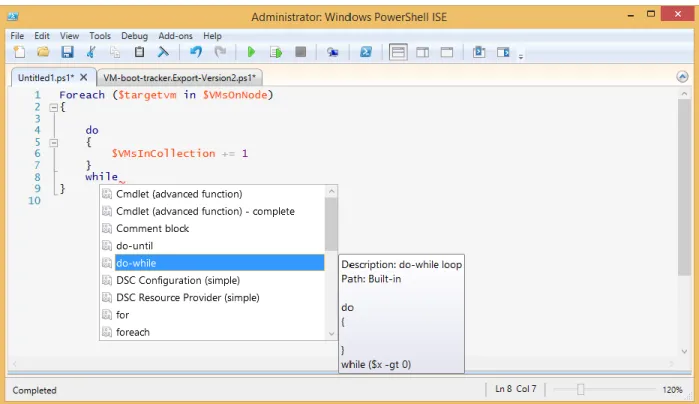
Snippets are code examples that allow the user to insert reusable text. The built-in snippets include templates for functions, workflows, and common language patterns so that users do not have to remember the syntax
Figure 9. Snippets in PowerShell ISE
Collapsible regions in scripts and XML files make navigation in long scripts easier.
Windows PowerShell Workflow
IT Pros often automate the management of their multicomputer environments by running sequences of long-running tasks or workflows that can affect multiple managed computers or devices at the same time. Windows PowerShell Workflow lets IT Pros and developers apply the benefits of workflows to the automation capabilities of Windows PowerShell.
A workflow is a sequence of automated steps or activities that execute tasks on or retrieve data from one or more managed nodes (computers or devices). These activities can include individual commands or scripts. Windows PowerShell Workflow helps IT Pros and developers to author sequences of multi- machine management activities (which usually are long-running, repeatable, frequent, parallelizable, interruptible, stoppable, or restartable) as workflows. By design, workflows can be resumed from an intentional or accidental suspension or interruption, such as a network outage, reboot, or power loss. Benefits of Windows PowerShell Workflow
Windows PowerShell Workflow manages the distribution, sequencing, and completion of multicomputer tasks, freeing users and administrators to focus on higher level tasks. The following list describes some of the benefits of Windows PowerShell Workflow:
Take advantage of the PowerShell scripting syntax. IT Pros can reuse their existing PowerShell scripting skills to author script-based workflows using the extended PowerShell language. Apart from being easy to author, PowerShell script-based workflows provide the additional benefit of sharing by simply pasting them into an email or publishing them online.
Multi-machine management. Simultaneously run long-running tasks as workflows on up to hundreds of managed nodes. Windows PowerShell Workflow includes a built-in library of common management parameters for workflows, enabling multi-machine management scenarios such as PSComputerName and PSConfigurationName.
Single task execution of complex processes. You can combine related scripts or commands that act on an entire end-to-end scenario into a single workflow. Status and progress of activities with the workflow are visible at any time.
Robustness: Automated failure recovery. Windows PowerShell Workflow survives both planned and unplanned interruption (such as machine reboots or network flakiness). You can suspend workflow execution and then resume the workflow from the last checkpoint, which is normally the point at which it was suspended.
Persistence. Workflow status and data are saved (or “checkpointed”) at specific points defined by its author, so you can resume the workflow from the last persisted task (or checkpoint), instead of restarting the workflow from the beginning.
Connection and action retries. Using workflow common parameters, workflow users can retry the connections to managed nodes in case of network connection failures. Additionally,
workflow authors can designate specific activities to run again in case of failure on one or more managed nodes (for example, if one of the computers was down at the time the activity ran).
Ability to connect and disconnect. Users can connect to and disconnect from the machine running the workflow, and the workflow will continue to run. For example, you can log off or restart the computer connected to the workflow machine, and monitor the workflow execution from another computer (such as a home computer)—all without interrupting the workflow. This is possible as long the client is running on a different computer than the workflow engine computer.
Scheduling. Workflow tasks can be scheduled just like any Windows PowerShell cmdlet or script.
Workflow and connection throttling. Workflow execution and connections to nodes can be throttled, enabling scalability and high availability scenarios.
When to use Windows PowerShell Workflow instead of a cmdlet/script
In general, you should consider using a workflow instead of a cmdlet/script when you need to meet any of the following requirements:
You need to perform a long-running task that combines multiple steps in a sequence.
You need to perform a task that runs on multiple computers.
You need to perform a task that requires checkpointing or persistence.
You need to perform a long-running task that is asynchronous, restartable, parallelizable, or interruptible.
You need the task to run at scale or in high availability environments, potentially requiring throttling and connection pooling
Writing and running workflows in Windows PowerShell: Examples
Typically, workflows are started from a client computer and are ideal for executing long-running tasks across multiple target computers. Workflows are like any other Windows PowerShell cmdlet, which means that you can use the Get-Command cmdlet to discover them, and the Get-Help cmdlet to learn
You can add a workflow to a Windows PowerShell session by defining it at the command line, defining it in a script and dot sourcing it, or using the Import-Module cmdlet to import a module with a Windows PowerShell script workflow or a XAML-based workflow. Once imported, the workflow then behaves like any other PowerShell command in that session.
Each step or command inside the workflow is called an activity. Each activity inherits the properties of the workflow, including the powerful Workflow common parameters mentioned above.
To write a workflow, you can use either the regular PowerShell console or Windows PowerShell ISE. For example, you can type the following workflow into the Windows PowerShell ISE Command pane: Workflow Verb-Noun
{
Write-Output -InputObject "Hello from Workflow!"
}
Notice the new workflow keyword, which indicates that the command is a Windows PowerShell
Workflow. The keyword adds more than 20 new common parameters to the workflow, allowing users to specify items such as:
A list of target computers for the workflow (-PSComputerName).
Credentials to use for running the workflow (-PSCredential).
Quotas to manage the workflow as the work scales (for example, -PSRunningTimeoutSec).
Ability to retry the whole workflow or specific activities in case there are connection issues (for example, PSConnectionRetryCount).
Ability to persist or checkpoint workflow activities, which will save the workflow metadata, output, and errors to disk so you can resume workflow execution at given points during the execution (-PSPersist).
To run a workflow, type the workflow name just like you would to run any other Windows PowerShell command. For example, to run the new workflow we have just created, you can type Verb-Noun at the Windows PowerShell ISE prompt.
The following is another example workflow, named “LongWorkflow,” that runs for approximately 30 seconds:
Workflow Invoke-LongWorkflow {
Write-Output -InputObject "Loading some information..."
Start-Sleep -Seconds 10
Write-Output -InputObject "Performing some action..."
Start-Sleep -Seconds 10
Write-Output -InputObject "Cleaning up..."
Start-Sleep -Seconds 10
}
This will be the result of invoking user defined LongWorkflow. Figure 10. Running a workflow through ISE.
Because this workflow defines a long task, you might want to run it as a background job. To do so, you can use the AsJob parameter, along with the JobName parameter to assign the "LongWF" name to the job.
Invoke-LongWorkflow –AsJob –JobName LongWF
The following example is a more complex workflow. This workflow, “Install-VM,” creates virtual
machines on managed nodes, starts the virtual machines, and joins them to a domain (which requires a reboot of the virtual machines).
Example:
<# This is a long running workflow that installs VMs on a Hyper-V capable host. This workflow showcases the new PowerShell Workflow feature set of
Window PowerShell 3.0 and above. In this particular example, the managed nodes must be Hyper-V capable with Hyper-V role/module installed. #>
# Workflow that installs VMs on a Hyper-V capable host
workflow Install-VM {
param (
# Full path to base Vhd for VMs
[Parameter(Mandatory=$true)] [String]$BaseVhdPath,
# Number of VMs to create
[Int]$VMCount = 3,
# Domain credential required to join the VMs to a domain
[Parameter(Mandatory=$true)]
[System.Management.Automation.PSCredential] $domainCred,
# Local credential required to connect to VMs before being joined to domain
[Parameter(Mandatory=$true)]
[System.Management.Automation.PSCredential] $localCred )
# Create VMs in parallel
foreach -parallel($i in 1..$VMCount) {
# Create the VM name
[string]$VMName = $VMNamePrefix+$i
# Full path for the differencing VHDs
[string]$VhdPath = (Split-Path $BaseVhdPath) + "\" + $VMName +".vhd"
# Create differencing VHDs
$DiffVHD = New-VHD -ParentPath $BaseVhdPath -Path $VhdPath
# Create New VM with the differencing VHD etc
$null = New-VM -MemoryStartupBytes 1GB -Name $VMName ` -VHDPath $DiffVHD.Path -SwitchName "InternalSwitch"
}
# Save the workflow state and data
Checkpoint-Workflow
# Start VMs in parallel and collect their IP addresses
$IPAddresses = foreach -parallel($i in 1..$VMCount) {
# Create the VM name
[string]$VMName = $VMNamePrefix+$i
# Start the VM
Start-VM -Name $VMName
# Wait for IP Address to be assigned to each VM.
# Use Inlinescript to check for VMs IP address
$VMIP = Inlinescript {
(Get-VM -Name $using:VMName).NetWorkAdapters.IPAddresses } -DisplayName "Get-VMIPAddress"
while($VMIP.count -lt 2) {
# Use Inlinescript to check for VMs IP address
{
(Get-VM -Name $using:VMName).NetWorkAdapters.IPAddresses } -DisplayName "Get-VMIPAddress"
# Notify user via progress stream
Write-Progress -Id $i -Activity "Get-VMIPAddress on $VMName" ` -Status "Waiting for IP Address ..."
# Wait for 5 seconds and retry
Start-Sleep -Seconds 5; }
$VMIP[0] }
# Show the IPs collected to workflow user
$IPAddresses
# Before suspending the workflow (say for checking some settings, freeing up resources),
# send mail to senior admin notifying the suspended state of workflow
Send-MailMessage -From "juniorAdmin@contoso.com" -To "seniorAdmin@contoso.com" `
-SMTPServer "your SMTP sever" -PSComputerName "" `
-Subject "Suspended workflow $jobCommandName requires attention" ` -Body `
@"
A workflow running on $hostname with name $jobCommandName requires your attention. Please use Resume-Job cmdlet to resume the workflow execution
"@
# Suspend the workflow execution
Suspend-Workflow
# Call the Join-Domain workflow to join the VMs to the domain
Join-Domain -PSComputerName $IPAddresses -PSCredential $localCred -domainCred
$domainCred
# Send mail to senior admin notifying the completion of workflow
Send-MailMessage -From "juniorAdmin@contoso.com" -To "seniorAdmin@contoso.com" `
-SMTPServer "your SMTP sever" -PSComputerName "" ` -Subject "Workflow $parentjobname with
InstanceID:$parenetjobinstanceid has completed" ` -Body ` ` @"
A workflow running on $hostname with name $jobCommandName completed successfully. Please use Receive-Job cmdlet to see the output of workflow execution
"@ }
{ param (
[string] $domainName="fourthcoffee.com", [Parameter(Mandatory=$true)]
[System.Management.Automation.PSCredential] $domainCred )
# Check that the machine is joined to WORKGROUP
Get-CimInstance -ClassName CIM_ComputerSystem
# Add the machine to domain and restart
Add-Computer -DomainName $domainName -LocalCredential $PSCredential -Credential
$domainCred
Restart-Computer -Wait -For WinRM -Force -Protocol WSMan
# Notice that now it is joined to domain!
Get-CimInstance -ClassName CIM_ComputerSystem
}
Cmdlet discovery: Get-Command and module auto-loading
Windows Server 2012 R2 includes more than 3,000 cmdlets that you can easily find and learn. Modules are easier than ever to find, explore, create, and use, and users no longer have to import modules manually to use cmdlets. Users can run a cmdlet, and Windows PowerShell will automatically import the module. In addition, the Get-Command has been updated to find all cmdlets installed on the system. For example, to find all networking cmdlets, you can run Get-Command *-Net*.
PowerShell 4.0 new features in Windows PowerShell Workflow
Support has been added for a new PipelineVariable common parameter in the context of iterative pipelines, such as those used by System Center Orchestrator; that is, pipelines that run commands simply left-to-right, as opposed to interspersed running by using streaming.
Parameter binding has been significantly enhanced to work outside of tab completion scenarios, such as with commands that do not exist in the current runspace.
Support for custom container activities has been added to Windows PowerShell Workflow. If an activity parameter is of the types Activity, Activity[]—or is a generic collection of activities—and the user has supplied a script block as an argument, then Windows PowerShell Workflow converts the script block to XAML, as with normal Windows PowerShell script-to-workflow compilation.
After a crash, Windows PowerShell Workflow automatically reconnects to managed nodes.
You can now throttle Foreach -Parallel activity statements by using the ThrottleLimit property.
The ErrorAction common parameter has a new valid value, Suspend, that is exclusively for workflows.
A workflow endpoint now automatically closes if there are no active sessions, no in-progress jobs, and no pending jobs. This feature conserves resources on the computer that is acting as the workflow server, when the automatic closure conditions have been met.
Windows PowerShell Web Access
Windows PowerShell Web Access is a new feature in Windows Server 2012 that lets you manage Windows servers by using Windows PowerShell in a web browser. The target computers to be managed can run any version of Windows that is enabled for Windows PowerShell remoting.
Figure 11. Connected to another server through PowerShell Web Access.
To manage the remote server through Windows PowerShell in a web browser, you connect to a server that is running Windows Server 2012 R2 and has the Windows PowerShell Web Access feature installed. This server acts as a gateway that serves the web pages containing a Windows PowerShell interface to the remote clients. The following illustration shows this infrastructure:
Figure 12. How PowerShell Web Access works.
PowerShell 4.0 new features in Windows PowerShell Web Access
You can disconnect from and reconnect to existing sessions in the web-based Windows PowerShell Web Access console. A Save button in the web-based console lets you disconnect from a session without deleting it and reconnect to the session another time.
Default parameters can be displayed on the sign-in page. To display default parameters, configure values for all of the settings displayed in the Optional Connection Settings area of the sign-in page in a file named web.config. You can use the web.config file to configure all optional connection settings except for a second or alternate set of credentials.
In Windows Server 2012 R2, you can remotely manage authorization rules for Windows PowerShell Web Access. The Add-PswaAuthorizationRule and Test-PswaAuthorizationRule cmdlets now include a Credential parameter that enables administrators to manage
authorization rules from a remote computer or in a Windows PowerShell Web Access session.
You can now have multiple Windows PowerShell Web Access sessions in a single browser session by using a new browser tab for each session. You no longer need to open a new browser session to connect to a new session in the web-based Windows PowerShell console.
Updatable Help
Windows PowerShell 2.0 included extensive help topics that were frequently updated online. However, because the help files were part of the Windows operating system, users could not update them, and the help topics that were displayed at the command line could soon become outdated. Third-party products had to convert online help to XML or display outdated help topics.
Starting from Windows PowerShell 3.0, new Update-Help and Save-Help cmdlets download and install the newest help files for each module. The cmdlets find the help files on the Internet, determine whether they are newer than local files, unpack them, and then install them in the correct location. The updated files are ready for immediate use in Get-Help; you do not have to restart Windows PowerShell. Help files for Windows PowerShell 3.0 and above are up to date on first use because they do not ship “in the box.” Get-Help displays auto-generated help for commands, and then prompts you to use the Update-Help cmdlet to install or update the help files for your modules.
For some environments, such as large enterprises behind Internet firewalls, it is preferable to be able to update help files from a local share instead of from the Internet. In these cases, you can use Save-Help –DestinationPath <share> to create a local share that stores the latest Windows PowerShell help files. Users within the organization can then update their help files by pointing to that share and running Update-Help –SourcePath <share>.
In PowerShell 4.0, Save-Help now lets you save help for modules that are installed on remote computers. You can use Save-Help to download module Help from an Internet-connected client (on which not all of the modules for which you want help are necessarily installed), and then copy the saved Help to a remote shared folder or a remote computer that does not have Internet access.
Updatable Help is available for all modules, including third-party modules, and includes support for multiple languages.
New cmdlets
In PowerShell 4.0, there are 16 new modules, 652 new cmdlets and 3,603 new parameters. 16 New Modules compared with PowerShell 3.0.
3,603 new parameters compared with PowerShell 3.0.
Desired State Configuration
Desired State Configuration or DSC is a new management platform in Windows PowerShell that enables deploying and managing configuration data for software services and managing the environment in which these services run.
DSC provides a set of Windows PowerShell language extensions, new Windows PowerShell cmdlets, and resources that you can use to declaratively specify how you want your software environment to be configured. It also provides a means to maintain and manage existing configurations.
Figure 13. How Desired State Configuration processes
Following are some example scenarios where you can use built-in DSC resources to configure and manage a set of computers (also known as target nodes) in an automated way:
Enabling or disabling server roles and features
Managing registry settings
Managing files and directories
Starting, stopping, and managing processes and services
Managing groups and user accounts
Deploying new software
Managing environment variables
Running Windows PowerShell scripts
Fixing a configuration that has drifted away from the desired state
Discovering the actual configuration state on a given node
In addition, you can create custom resources to configure the state of any application or system setting.
Defining a configuration
DSC introduces a new keyword called Configuration. To use DSC to configure your environment, first define a Windows PowerShell script block using the Configuration keyword, then follow it with an identifier, then with braces ({}) to delimit the block.
Inside the configuration block you can define node blocks that specify the desired configuration for each node (computer) in your environment. A node block starts with the Node keyword. Follow this keyword with the name of the target computer, which can be a variable. After the computer name, use braces {}
Inside the node block, you can define resource blocks to configure specific resources. A resource block starts with the name of the resource, followed by the identifier you want to specify for that block, then braces {} to delimit the block.
Example:
The following example uses DSC to ensure that the Web Server (IIS) role is installed on a target
computer called “Server001”, and that the “wwwroot” folder on “Server001” contains a specified set of files. This is accomplished using two built-in DSC resources: the Role resource (with the friendly type name WindowsFeature) and the File resource (with the friendly type name File).
1. Start Windows PowerShell ISE as an administrator. 2. In the View menu, select Show Script Pane.
3. In the script pane, define a variable called $WebsiteFilePath. Assign to it the path of a folder that contains website files. The content or type of files does not matter for the purpose of this example.
4. Copy the script below and paste it into the script pane below the definition of the variable. Configuration MyWebConfig
{
# A Configuration block can have zero or more Node blocks
Node "Server001"
{
# Next, specify one or more resource blocks
# WindowsFeature is one of the built-in resources you can use in a Node block
# This example ensures the Web Server (IIS) role is installed
WindowsFeature MyRoleExample {
Ensure = "Present" # To uninstall the role, set Ensure to "Absent"
Name = "Web-Server" }
# File is a built-in resource you can use to manage files and directories
# This example ensures files from the source directory are present in the destination directory
File MyFileExample {
Ensure = "Present" # You can also set Ensure to "Absent"
Type = "Directory” # Default is “File”
Recurse = $true
# This is a path that has web files
SourcePath = $WebsiteFilePath
# The path where we want to ensure the web files are present
DestinationPath = "C:\inetpub\wwwroot"
# This ensures that MyRoleExample completes successfully before this block runs
Requires = "[WindowsFeature]MyRoleExample" }
}
5. Change the name of the Node block from "Server001" to the name of a server on which you want to ensure the Windows features are installed and the "C:\inetpub\wwwroot" folder contains the appropriate content from the source directory. Alternatively, you can set the name of the node to "localhost". This will allow the configuration to be applied locally.
6. Run the example script. You will see the script appear in the console pane.
You have now defined the example configuration. Next, you will need to enact this configuration. Do so by invoking the configuration. For example:
PS C:\Scripts> MyWebConfig
Invoking the configuration creates MOF files and places them in a new directory with the same name as the configuration block. The new directory is a child of the current directory. (To specify a different directory for the MOF files, use the OutputPath parameter when invoking the configuration.) The new MOF files contain the configuration information for the target nodes. To enact the configuration, run the following command.
Start-DscConfiguration -Wait -Verbose -Path .\MyWebConfig
This cmdlet is part of the DSC system. The Wait parameter is optional and makes the cmdlet run interactively. Without this parameter, the cmdlet will create and return a job. If you use the
OutputPath parameter when invoking the configuration, you must specify the same path using the
Path parameter of the Start-DscConfiguration cmdlet.
Rules for nesting node and configuration blocks
The following nesting rules apply.
There can be zero or more node blocks inside a configuration block.
A target node can have more than one node block inside a given configuration block. In other words, the same node block identifier can appear more than once inside a given configuration block. This is functionally equivalent to grouping the contents of all the blocks for a given node inside one node block.
A given type of resource can have zero or more blocks inside the same node block. However, it is not possible to have duplicate resource identifiers. Inside a given node block, each resource block must have a unique identifier.
Declaring configuration parameters
It is possible to define a configuration block that takes parameters. Below is an example. Configuration MyParametrizedConfiguration
{
# Parameters are optional
param ($MyTargetNodeName, $MyGroupName) Node $MyTargetNodeName
{
# Group is a built-in resource that you can use to manage local Windows groups
# This example ensures the existence of a group with the name specified by $MyGroupName
Group MyGroupExample {
Ensure = "Present" # Checks whether a group by this GroupName already exists and creates it if it does not
Name = $MyGroupName }
} }
You can invoke the above configuration as follows.
Summary
The following features of Windows PowerShell 4.0 offer comprehensive, resilient, and simple automation of your Windows Servers:
Disconnected Sessions to start execution on a computer and return to it later (possibly from another computer).
Job scheduling that lets you run your scripts and workflows according to your defined schedule and stores results for later retrieval
Workflows that automate long running tasks across multiple computers in a resilient way.
More than 3,300 new cmdlets that are easy to find and execute.
Multi-server management and feature deployment with Server Manager
In Windows Server 2012 R2, the capabilities of Server Manager have expanded considerably to facilitate multiserver tasks, such as remote role and feature deployment to both physical and virtual servers, remote role and feature management, and custom server group creation.
By using Server Manager in Windows Server 2012 R2, IT Pros now can provision servers and offline virtual hard disks from their desktops without requiring either physical access to the system or Remote Desktop Protocol (RDP) connections to each server. Server Manager also helps administrators manage groups of servers collectively from a single, integrated console, allowing them respond to business-critical problems with greater speed and agility.
Technical description
Server Manager in Windows Server 2012 has evolved to include many new multiserver management features. The following sections describe some of these new capabilities.
Multiserver experience
Server Manager can manage multiple servers in a server pool, and create server groups to organize them. Groups let you organize your servers into logical views—for example, my main Host Servers or my Test Servers. By default, Server Manager groups the servers by role.
Efficient deployment of workloads to a remote server or offline virtual hard disk
In Windows Server 2008, roles and features are deployed by using the Add Roles Wizard or Add Features Wizard in Server Manager running on a local server. This requires either physical access to the server or Remote Desktop access by using RDP. Installing the Remote Server Administration Tool lets you run Server Manager on a Windows-based client computer, but adding roles and features is disabled because remote deployment is not supported.
In Windows Server 2012 R2, the deployment capabilities are extended to support robust remote deployment of roles and features. Using Server Manager in Windows Server 2012 R2, IT Pros can provision servers from their desktops without requiring either physical access to the systems or the need to enable an RDP connection to each server.
Figure 15. Add Roles and Features to a remotely managed servers
Installing roles and features on a remote server or offline virtual hard disk
Windows Server 2012 R2 with Server Manager can deploy both roles and features in a single session using the unified Add Roles and Features Wizard. The Add Roles and Features Wizard in Windows Server 2012 R2 performs validation passes on a server that you select for deployment as part of the installation process. You do not need to separately pre-verify that a server is properly configured to support a role. Administrators can deploy roles and features to remote servers and offline virtual hard disks from Server
and features to an offline virtual hard disk, allowing for faster and simpler repetition and consistency of desired configurations.
With the Add Roles and Features Wizard, the process of installing roles is familiar (and also consistent with the Add Roles Wizard in earlier Windows Server releases); however, there are some changes. To support remote deployment and installation on offline virtual hard disks, some roles have moved some initial configuration (tasks formerly performed in the Add Roles Wizard) into post-installation
configuration wizards. For some offline virtual hard disk deployments, installation tasks are scheduled to run the first time the virtual machine is started.
Batch deployment
In Windows Server 2012 R2, the Add Roles and Features Wizard lets you export configuration options to an XML file for later use with Windows PowerShell deployment cmdlets. By using the fan-out capabilities of Windows PowerShell, you can perform batch deployment of roles and features on multiple remote servers, applying configuration settings that were saved during a previous wizard-based deployment.
Integration with other management tools
Server Manager remains the key access or starting point for server management tools. Where
supported, Server Manager starts these tools in the context of the remote server that you are managing. New, modern, role-specific tools (such as File Storage Management, Remote Desktop Services, and IP Address Management) are integrated into the Server Manager console.
Server role management across multiple servers
Management of server roles is improved by shifting from a single-server, single-role model to one in which multiple server roles can be managed remotely by using a single management application.
Minimal performance impact
The Server Manager dashboard has a default 10-minute polling cycle that users can modify in the console. By using a relatively infrequent default polling cycle and returning only incremental data with each poll, the performance-load impact on individual servers is minimized. Server Manager uses new WMI providers and Windows PowerShell cmdlets to pull updated status information from servers.
Remote Server Admin Tools
The preferred deployment option for Windows Server 2012 R2 is Server Core. As Server Manager requires the server to be running either the Minimal Server Interface or Server with a GUI, Remote Server Admin Tools (RSAT) enables IT administrators to manage roles and features installed on computers running Windows Server 2012 R2 from a remote computer running Windows 8.1. RSAT is available from the Microsoft Download Center.
Summary
Windows Server 2012 R2 Server Manager helps to improve manageability in the datacenter so you can:
Manage multiple servers easily, with a clear and powerful role-centric dashboard.
Simplify the processes of configuring new servers.
Deploy roles and features even to remote servers and offline virtual hard disks.
Consult a single tool for a clear summary of multiple server states.
Conclusion
IT Pros today face the challenge of managing and maintaining an increasing number of mission-critical servers and services, all with fewer resources. Windows Server 2012 R2 addresses this problem by adopting enhanced standard models, protocols, and APIs, and by offering new and improved features in Windows PowerShell and Server Manager. Together, these enhancements help administrators manage multi-server environments more efficiently and cost effectively.