www.suse.com/documentation
Storage Administration Guide
SUSE
®Linux Enterprise Server 10 SP3/SP4
Legal Notices
Novell, Inc. makes no representations or warranties with respect to the contents or use of this documentation, and specifically
disclaims any express or implied warranties of merchantability or fitness for any particular purpose. Further, Novell, Inc.
reserves the right to revise this publication and to make changes to its content, at any time, without obligation to notify any
person or entity of such revisions or changes.
Further, Novell, Inc. makes no representations or warranties with respect to any software, and specifically disclaims any
express or implied warranties of merchantability or fitness for any particular purpose. Further, Novell, Inc. reserves the right
to make changes to any and all parts of Novell software, at any time, without any obligation to notify any person or entity of
such changes.
Any products or technical information provided under this Agreement may be subject to U.S. export controls and the trade
laws of other countries. You agree to comply with all export control regulations and to obtain any required licenses or
classification to export, re‐export or import deliverables. You agree not to export or re‐export to entities on the current U.S.
export exclusion lists or to any embargoed or terrorist countries as specified in the U.S. export laws. You agree to not use
deliverables for prohibited nuclear, missile, or chemical biological weaponry end uses. See the Novell International Trade
Services Web page (http://www.novell.com/info/exports/) for more information on exporting Novell software. Novell assumes
no responsibility for your failure to obtain any necessary export approvals.
Copyright © 2006–2012 Novell, Inc. All rights reserved. No part of this publication may be reproduced, photocopied, stored
on a retrieval system, or transmitted without the express written consent of the publisher.
Novell, Inc.
1800 South Novell Place Provo, UT 84606 U.S.A.
www.novell.com
Online Documentation: To access the latest online documentation for this and other Novell products, see the Novell
Documentation Web page (http://www.novell.com/documentation).
Novell Trademarks
For Novell trademarks, see the Novell Trademark and Service Mark list (http://www.novell.com/company/legal/trademarks/ tmlist.html).
Third-Party Materials
All third‐party trademarks and copyrights are the property of their respective owners.
Some content in this document is copied, distributed, and/or modified from the following document under the terms
specified in the document’s license.
EVMS User Guide, January 18, 2005
Copyright © 2005 IBM
License Information
This document may be reproduced or distributed in any form without prior permission provided the copyright notice is
retained on all copies. Modified versions of this document may be freely distributed provided that they are clearly
Contents
About This Guide 7
1 Overview of EVMS 9
1.1 Benefits of EVMS . . . 9
1.2 Plug-In Layers . . . 9
1.3 Supported File Systems . . . 10
1.4 Terminology . . . 11
1.5 Location of Device Nodes for EVMS Storage Objects . . . 12
2 Using EVMS to Manage Devices 13 2.1 Configuring the System Device at Install to Use EVMS . . . 13
2.1.1 Before the Install . . . 13
2.1.2 During the Server Install . . . 15
2.1.3 After the Server Install . . . 18
2.2 Configuring an Existing System Device to Use EVMS . . . 20
2.2.1 Disable the boot.lvm and boot.md Services . . . 21
2.2.2 Enable the boot.evms Service . . . 21
2.2.3 Edit the /etc/fstab File . . . 21
2.2.4 Edit the Boot Loader File . . . 22
2.2.5 Force the RAM Disk to Recognize the Root Partition . . . 24
2.2.6 Restart the Server . . . 24
2.2.7 Verify that EVMS Manages the Boot, Swap, and Root Partitions . . . 24
2.3 Configuring LVM Devices to Use EVMS . . . 25
2.4 Using EVMS with iSCSI Volumes . . . 25
2.5 Using the ELILO Loader Files (IA-64) . . . 26
2.6 Starting EVMS . . . 26
2.7 Starting the EVMS Management Tools . . . 26
3 Using UUIDs to Mount Devices 29 3.1 Naming Devices with udev . . . 29
3.2 Understanding UUIDs . . . 29
3.2.1 Using UUIDs to Assemble or Activate File System Devices . . . 30
3.2.2 Finding the UUID for a File System Device . . . 30
3.3 Using UUIDs in the Boot Loader and /etc/fstab File (x86) . . . 30
3.4 Using UUIDs in the Boot Loader and /etc/fstab File (IA64) . . . 31
3.5 Additional Information . . . 32
4 Managing EVMS Devices 33 4.1 Understanding Disk Segmentation. . . 33
4.1.1 Segment Managers . . . 33
4.1.2 Disk Segments. . . 34
4.2 Initializing Disks . . . 34
4.2.1 Before You Begin. . . 35
4.2.2 Guidelines . . . 35
4.2.3 Adding a Segment Manager . . . 35
4.4 Creating Disk Segments (or Partitions) . . . 36
4.5 Configuring Mount Options for Devices . . . 37
4.6 What’s Next . . . 39
5 Managing Multipath I/O for Devices 41 5.1 Understanding Multipathing . . . 41
5.1.1 What Is Multipathing? . . . 41
5.1.2 Benefits of Multipathing . . . 42
5.2 Planning for Multipathing . . . 42
5.2.1 Guidelines for Multipathing . . . 42
5.2.2 Using Multipathed Devices Directly or in EVMS . . . 44
5.2.3 Using LVM2 on Multipath Devices . . . 44
5.2.4 Using mdadm with Multipath Devices . . . 44
5.2.5 Using --noflush with Multipath Devices . . . 45
5.2.6 SAN Timeout Settings When the Root Device Is Multipathed . . . 45
5.2.7 Partitioning Multipath Devices . . . 45
5.2.8 Supported Architectures for Multipath I/O . . . 46
5.2.9 Supported Storage Arrays for Multipathing . . . 46
5.3 Multipath Management Tools . . . 48
5.3.1 Device Mapper Multipath Module . . . 48
5.3.2 Multipath I/O Management Tools. . . 50
5.3.3 Using mdadm for Multipathed Devices . . . 51
5.3.4 The Linux multipath(8) Command . . . 51
5.4 Configuring the System for Multipathing . . . 53
5.4.1 Preparing SAN Devices for Multipathing . . . 53
5.4.2 Partitioning Multipathed Devices . . . 54
5.4.3 Configuring the Server for Multipathing . . . 54
5.4.4 Adding multipathd to the Boot Sequence . . . 55
5.4.5 Creating and Configuring the /etc/multipath.conf File . . . 55
5.5 Enabling and Starting Multipath I/O Services. . . 62
5.6 Configuring Path Failover Policies and Priorities . . . 62
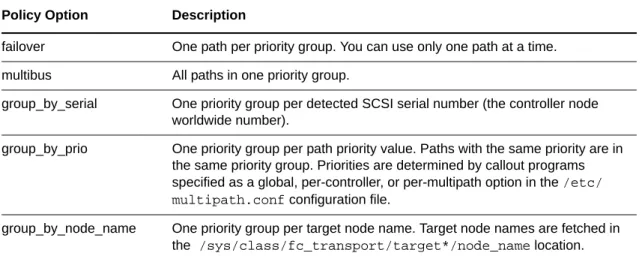
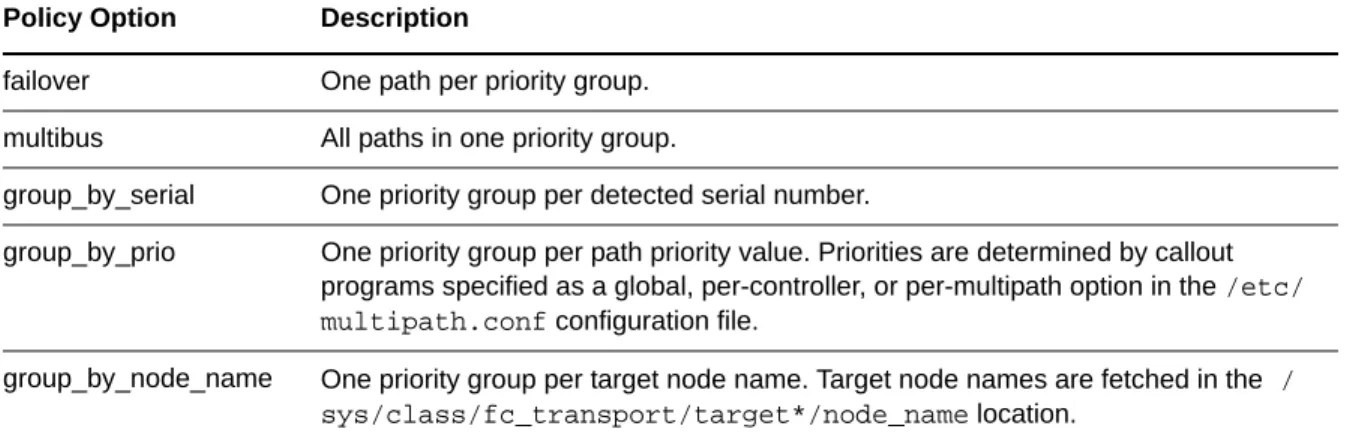
5.6.1 Configuring the Path Failover Policies . . . 62
5.6.2 Configuring Failover Priorities . . . 63
5.6.3 Using a Script to Set Path Priorities. . . 68
5.6.4 Configuring ALUA . . . 68
5.6.5 Reporting Target Path Groups. . . 70
5.7 Configuring Multipath I/O for the Root Device . . . 70
5.8 Configuring Multipath I/O for an Existing Software RAID . . . 71
5.9 Scanning for New Devices without Rebooting . . . 72
5.10 Scanning for New Partitioned Devices without Rebooting . . . 74
5.11 Viewing Multipath I/O Status . . . 75
5.12 Managing I/O in Error Situations . . . 76
5.13 Resolving Stalled I/O . . . 77
5.14 Additional Information . . . 77
5.15 What’s Next . . . 78
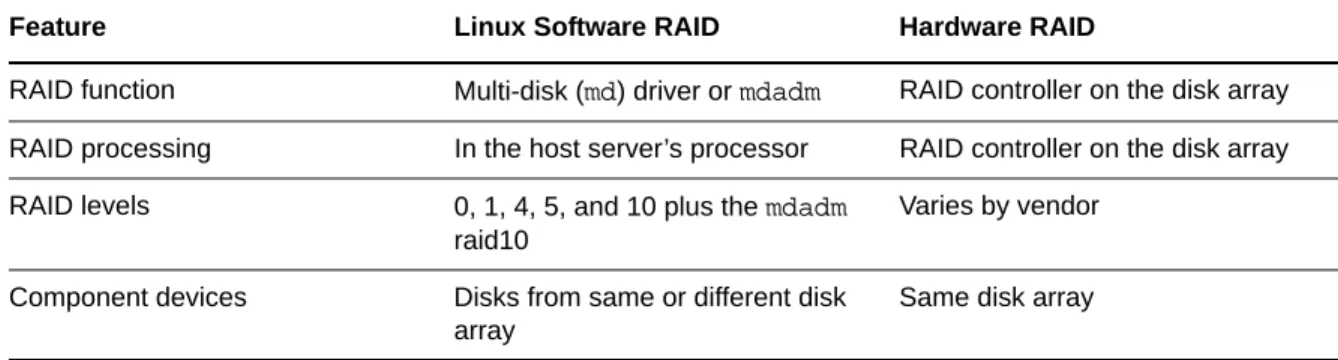
6 Managing Software RAIDs with EVMS 79 6.1 Understanding Software RAIDs on Linux . . . 79
6.1.1 What Is a Software RAID? . . . 79
6.1.2 Overview of RAID Levels . . . . 80
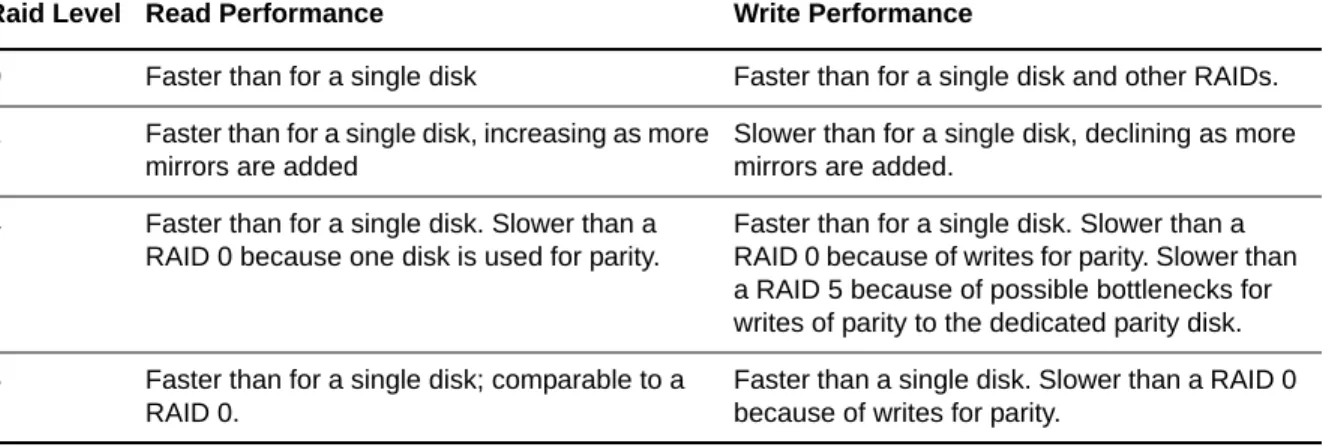
6.1.3 Comparison of RAID Performance . . . 81
6.1.4 Comparison of Disk Fault Tolerance . . . 81
6.1.5 Configuration Options for RAIDs . . . 82
6.1.8 RAID 5 Algorithms for Distributing Stripes and Parity . . . 83
6.1.9 Multi-Disk Plug-In for EVMS . . . 85
6.1.10 Device Mapper Plug-In for EVMS . . . 85
6.2 Creating and Configuring a Software RAID . . . 85
6.3 Expanding a RAID . . . 89
6.3.1 Adding Mirrors to a RAID 1 Device . . . 89
6.3.2 Adding Segments to a RAID 4 or 5 . . . 90
6.4 Adding or Removing a Spare Disk . . . 90
6.4.1 Do You Need a Spare Disk? . . . 90
6.4.2 Adding a Spare Disk When You Create the RAID . . . 91
6.4.3 Adding a Spare Disk to an Existing RAID . . . 91
6.4.4 Removing a Spare Disk from a RAID . . . 91
6.5 Managing Disk Failure and RAID Recovery. . . . 91
6.5.1 Understanding the Disk Failure and RAID Recovery. . . 91
6.5.2 Identifying the Failed Drive . . . 92
6.5.3 Replacing a Failed Device with a Spare . . . 93
6.5.4 Removing the Failed Disk . . . . 94
6.6 Monitoring Status for a RAID . . . 94
6.6.1 Monitoring Status with EVMSGUI . . . 94
6.6.2 Monitoring Status with /proc/mdstat. . . 94
6.6.3 Monitoring Status with mdadm . . . 95
6.6.4 Monitoring a Remirror or Reconstruction . . . 97
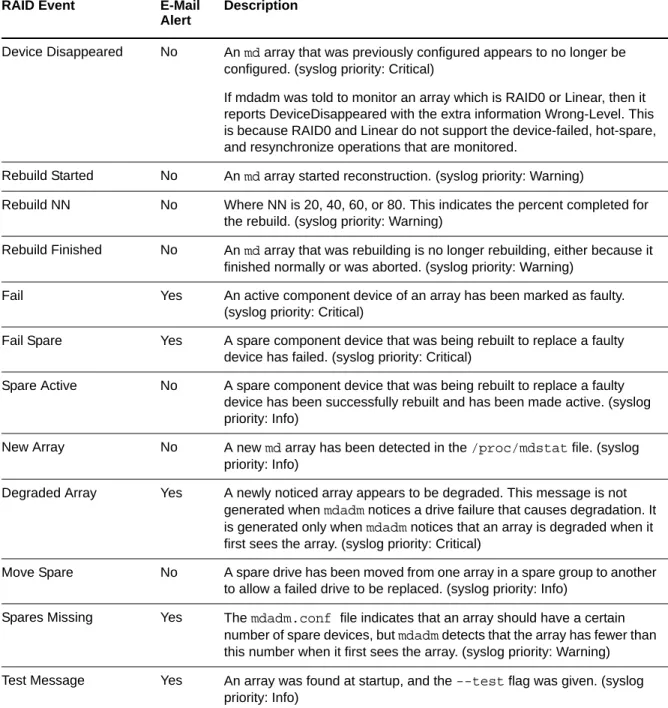
6.6.5 Configuring mdadm to Send an E-Mail Alert for RAID Events. . . 97
6.7 Deleting a Software RAID and Its Data . . . 99
7 Managing Software RAIDs 6 and 10 with mdadm 101 7.1 Creating a RAID 6 . . . 101
7.1.1 Understanding RAID 6 . . . 101
7.1.2 Creating a RAID 6 . . . 102
7.2 Creating Nested RAID 10 Devices with mdadm. . . 102
7.2.1 Understanding Nested RAID Devices . . . 102
7.2.2 Creating Nested RAID 10 (1+0) with mdadm . . . 103
7.2.3 Creating Nested RAID 10 (0+1) with mdadm . . . 104
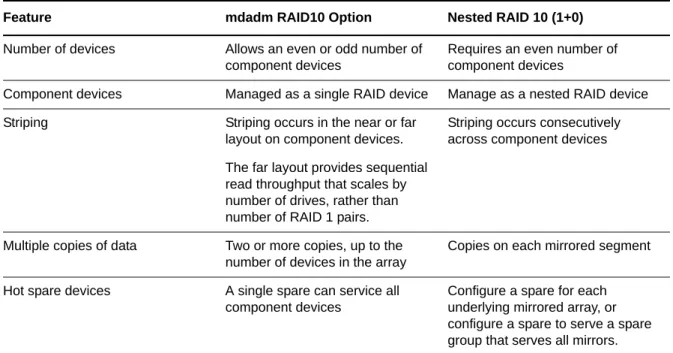
7.3 Creating a Complex RAID 10 with mdadm . . . 105
7.3.1 Understanding the mdadm RAID10 . . . 105
7.3.2 Creating a RAID10 with mdadm . . . 108
7.4 Creating a Degraded RAID Array. . . 108
8 Resizing Software RAID Arrays with mdadm 111 8.1 Understanding the Resizing Process . . . 111
8.1.1 Guidelines for Resizing a Software RAID . . . 111
8.1.2 Overview of Tasks . . . 112
8.2 Increasing the Size of a Software RAID . . . 112
8.2.1 Increasing the Size of Component Partitions. . . 112
8.2.2 Increasing the Size of the RAID Array . . . 114
8.2.3 Increasing the Size of the File System . . . 114
8.3 Decreasing the Size of a Software RAID . . . 117
8.3.1 Decreasing the Size of the File System . . . 117
8.3.2 Decreasing the Size of Component Partitions . . . 118
8.3.3 Decreasing the Size of the RAID Array . . . 119
9 Installing and Managing DRBD Services 121 9.1 Understanding DRBD. . . 121
9.3 Configuring the DRBD Service. . . 122
9.4 Testing the DRBD Service . . . 124
9.5 Troubleshooting DRBD . . . 125
9.5.1 Configuration . . . 125
9.5.2 Host Names . . . 125
9.5.3 TCP Port 7788 . . . 126
9.5.4 The --do-what-i-say Option . . . 126
9.5.5 DRBD Devices Are Broken after Reboot . . . 126
9.6 Additional Information . . . 126
9.6.1 Open Source Resources for DRBD . . . 126
9.6.2 HeartBeat2. . . 127
10 Troubleshooting Storage Issues 129 10.1 Is DM-MP Available for the Boot Partition? . . . 129
10.2 Rescue System Cannot Find Devices That Are Managed by EVMS . . . 129
10.3 Volumes on EVMS Devices Do Not Appear After Reboot . . . 129
10.4 Volumes on EVMS Devices Do Not Appear When Using iSCSI . . . 130
10.5 Device Nodes Are Not Automatically Re-Created on Restart . . . 130
A Documentation Updates 133 A.1 March 6, 2012 . . . 133
A.1.1 Installing and Managing DRBD Services . . . 133
A.2 July 12, 2011 . . . 134
A.2.1 Managing Multipath I/O for Devices. . . 134
A.3 May 5, 2011 . . . 134
A.4 January 2011 . . . 134
A.4.1 Managing Multipath I/O for Devices. . . 134
A.4.2 Installing and Managing DRBD Services . . . 135
A.5 June 21, 2010 . . . 135
A.5.1 Managing Multipath I/O . . . . 135
A.6 June 11, 2010 . . . 135
A.6.1 Managing Multipath I/O . . . . 136
A.6.2 Managing Software RAIDs 6 and 10 with mdadm . . . 136
A.7 February 23, 2010 . . . 137
A.7.1 Managing Multipath I/O . . . . 137
A.8 January 20, 2010 . . . 137
A.8.1 Managing Multipath I/O . . . . 137
A.9 October 20, 2009 . . . 138
A.9.1 Managing Multipath I/O . . . . 138
A.10 September 2, 2009 (SLES 10 SP3) . . . 138
A.10.1 Managing Multipath I/O . . . 138
A.10.2 Managing Software RAIDs 6 and 10 with mdadm . . . 139
A.10.3 Overview of EVMS. . . 139
A.11 May 15, 2009 . . . 139
A.11.1 Managing Multipath I/O . . . 139
A.12 November 24, 2008 . . . 139
A.12.1 Managing Multipath I/O . . . 140
A.12.2 Using UUIDs to Mount Devices . . . 140
A.13 June 10, 2008 . . . 140
A.13.1 Managing Multipath I/O . . . 140
A.14 March 20, 2008 (SLES 10 SP2) . . . 141
About This Guide
This guide provides information about how to manage storage devices on a SUSE Linux Enterprise Server 10 Support Pack 3 or 4 server. The guide also contains information on using the Enterprise Volume Management System (EVMS) 2.5.5 or later to manage devices. Related storage
administration issues are also covered as noted below.
Chapter 1, “Overview of EVMS,” on page 9
Chapter 2, “Using EVMS to Manage Devices,” on page 13
Chapter 3, “Using UUIDs to Mount Devices,” on page 29
Chapter 4, “Managing EVMS Devices,” on page 33
Chapter 5, “Managing Multipath I/O for Devices,” on page 41
Chapter 6, “Managing Software RAIDs with EVMS,” on page 79
Chapter 7, “Managing Software RAIDs 6 and 10 with mdadm,” on page 101
Chapter 8, “Resizing Software RAID Arrays with mdadm,” on page 111
Chapter 9, “Installing and Managing DRBD Services,” on page 121
Chapter 10, “Troubleshooting Storage Issues,” on page 129
Appendix A, “Documentation Updates,” on page 133
Audience
This guide is intended for system administrators.
Feedback
We want to hear your comments and suggestions about this manual and the other documentation included with this product. Please use the User Comments feature at the bottom of each page of the online documentation, or go to www.novell.com/documentation/feedback.html and enter your comments there.
Documentation Updates
For the most recent version of the SUSE Linux Enterprise Server 10 Storage Administration Guide for EVMS, visit the Novell Documentation Web site for SUSE Linux Enterprise Server 10 (http://
www.novell.com/documentation/sles10).
Additional Documentation
For information about managing storage with the Linux Volume Manager (LVM), see the SUSE Linux Enterprise Server 10 Installation and Administration Guide (http://www.novell.com/documentation/
For information about iSNS (Internet Storage Name Service), see “iSNS” (http://www.novell.com/ documentation/sles10/sles_admin/index.html?page=/documentation/sles10/sles_admin/data/
cha_isns.html) in the SUSE Linux Enterprise Server 10 Installation and Administration Guide (http://
1
1Overview of EVMS
The Enterprise Volume Management System (EVMS) 2.5.5 management tool for Linux is an
extensible storage management tool that integrates all aspects of volume management, such as disk partitioning, the Logical Volume Manager (LVM), the Multiple‐Disk (MD) manager for software RAIDs, the Device Mapper (DM) for multipath I/O configuration, and file system operations.
Section 1.1, “Benefits of EVMS,” on page 9
Section 1.2, “Plug‐In Layers,” on page 9
Section 1.3, “Supported File Systems,” on page 10
Section 1.4, “Terminology,” on page 11
Section 1.5, “Location of Device Nodes for EVMS Storage Objects,” on page 12
1.1
Benefits of EVMS
EVMS provides the following benefits: An open source volume manager
A plug‐in framework for flexible extensibility and customization Plug‐ins to extend functionality for new or evolving storage managers Support for foreign partition formats
Cluster‐aware
1.2
Plug-In Layers
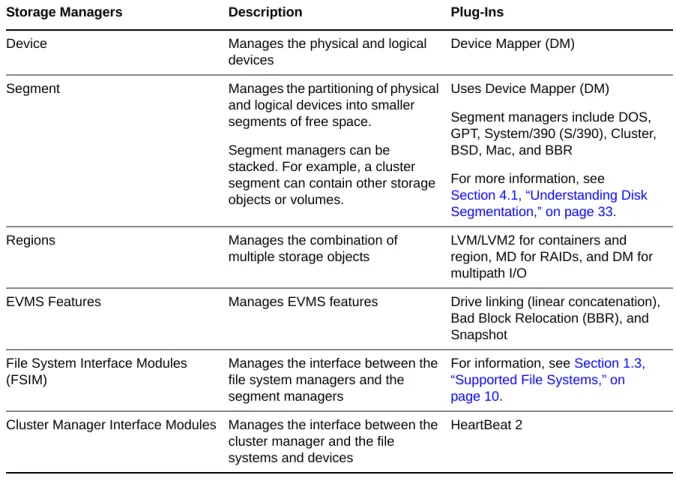
EVMS abstracts the storage objects in functional layers to make storage management more user‐ friendly. The following table describes the current EVMS plug‐in layers for managing storage devices and file systems:
Table 1-1 EVMS Plug‐In Layers
1.3
Supported File Systems
EVMS supports the following Linux file systems: EXT3 ReiserFS XFS OCFS2 JFS EXT2 Swap
NTFS (read only) FAT (read only)
For more information about file systems supported in SUSE Linux Enterprise Server 10, see the SUSE Linux Enterprise Server 10 Installation and Administration Guide. (http://www.novell.com/
documentation/sles10).
The Novell Storage Services (NSS) file system is also supported when used with the Novell Open Enterprise Server 2 for SUSE Linux Enterprise Server 10 SP1 (or later versions of OES 2 and SLES 10).
Storage Managers Description Plug-Ins
Device Manages the physical and logical devices
Device Mapper (DM)
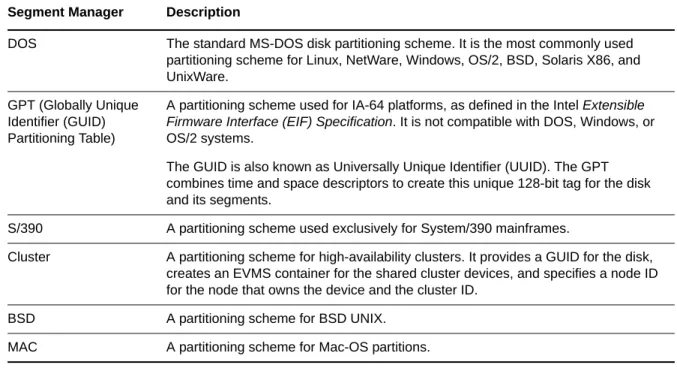
Segment Manages the partitioning of physical and logical devices into smaller segments of free space. Segment managers can be stacked. For example, a cluster segment can contain other storage objects or volumes.
Uses Device Mapper (DM) Segment managers include DOS, GPT, System/390 (S/390), Cluster, BSD, Mac, and BBR
For more information, see Section 4.1, “Understanding Disk Segmentation,” on page 33. Regions Manages the combination of
multiple storage objects
LVM/LVM2 for containers and region, MD for RAIDs, and DM for multipath I/O
EVMS Features Manages EVMS features Drive linking (linear concatenation), Bad Block Relocation (BBR), and Snapshot
File System Interface Modules (FSIM)
Manages the interface between the file system managers and the segment managers
For information, see Section 1.3, “Supported File Systems,” on page 10.
Cluster Manager Interface Modules Manages the interface between the cluster manager and the file systems and devices
The File System Primer (http://wiki.novell.com/index.php/File_System_Primer) describes the variety of file systems available on Linux and which ones are the best to use for which workloads and data.
1.4
Terminology
EVMS uses the following terminology in the EVMS user interface: Table 1-2 EVMS Terms
Term Description
Sector The lowest level that can be addressed on a block device. Disk A physical disk or a logical device.
Segment An ordered set of physically contiguous sectors on a single device. It is similar to traditional disk partitions.
Region An ordered set of logically contiguous sectors that might or might not be physically contiguous. The underlying mapping can be to logical disks, disk segments, or other storage regions.
Feature
(Feature Object, EVMS Feature, EVMS Object)
A logically contiguous address space created from one or more disks, segments, regions, or other feature objects through the use of an EVMS feature.
Storage Object Any storage structure in EVMS that is capable of being a block device. Disks, segments, regions, and feature objects are all storage objects.
Container
(Storage Container)
A collection of devices that is managed as a single pool of storage.
Private Storage Container: A storage container that is exclusively owned and accessed by only one server.
Cluster Storage Container: A storage container managed by the Cluster Resource Manager. It is accessible to all nodes of a cluster. An administrator can configure the storage objects in the cluster container from any node in the cluster. Cluster containers can be private, shared, or deported.
Private: The cluster container is exclusively owned and accessed by only one particular node of a cluster at any given time. The ownership can be
reassigned by failover policies or the administrator.
Shared: The cluster container is concurrently owned and accessed by all nodes of a cluster. Shared containers are preferred for distributed databases, clustered file systems, and cluster-aware applications that can coordinate safe access to shared volumes.
Deported: The cluster container is not owned or accessed by any node of the cluster.
1.5
Location of Device Nodes for EVMS Storage Objects
EVMS creates a unified namespace for the logical volumes on your system in the /dev/evms directory. It detects the storage objects actually present on a system, and creates an appropriate device node for each one, such as those shown in the following table.Table 1-3 Device Node Location
Volume
(Logical Volume)
A mountable storage object. Logical volumes can be EVMS volumes or compatibility volumes.
EVMS Volume: Volumes that contain EVMS metadata and support all EVMS features. Device nodes for EVMS volumes are stored in the /dev/evms
directory. For example: /dev/evms/my_volume
Compatibility Volume: Volumes that are backward-compatible to other volume managers. They do not contain EVMS metadata and cannot support EVMS features.
Term Description
Storage Object Standard Location the Device Node EVMS Location of the Device Node
A disk segment of disk /dev/sda5 /dev/evms/sda5
A software RAID device /dev/md1 /dev/evms/md/md1
An LVM volume /dev/lvm_group/lvm_volume /dev/evms/lvm/lvm_group/ lvm_volume
2
2Using EVMS to Manage Devices
This section describes how to configure EVMS as the volume manager of your devices.
Section 2.1, “Configuring the System Device at Install to Use EVMS,” on page 13
Section 2.2, “Configuring an Existing System Device to Use EVMS,” on page 20
Section 2.3, “Configuring LVM Devices to Use EVMS,” on page 25
Section 2.4, “Using EVMS with iSCSI Volumes,” on page 25
Section 2.5, “Using the ELILO Loader Files (IA‐64),” on page 26
Section 2.6, “Starting EVMS,” on page 26
Section 2.7, “Starting the EVMS Management Tools,” on page 26
2.1
Configuring the System Device at Install to Use EVMS
This section describes how to configure the system device during the Linux install to use EVMS as the volume manager instead of the current default of Linux Volume Manager (LVM).
Section 2.1.1, “Before the Install,” on page 13
Section 2.1.2, “During the Server Install,” on page 15
Section 2.1.3, “After the Server Install,” on page 18
2.1.1
Before the Install
“System Device” on page 13
“Device Size Limits” on page 14
“Data Loss Considerations for the System Device” on page 14
“Storage Deployment Considerations for the System Device” on page 14
System Device
For the purposes of this install documentation, a system device is any device that contains the Linux
/boot, swap, or root (/) partitions for your Linux computer. The install instructions assume the following:
All three system partitions are on the same physical disk.
If you use different disks for any of the system partitions, ensure that you modify the install instructions for your deployment scenario so that all of the system partitions are managed by EVMS.
You must configure the boot partition within the BIOS‐addressable space (such as 2 GB for x86 or 8 GB for x86‐64) of the first disk recognized by the system.
If this restriction is not required for your hardware, you can modify the location of the /boot partition as desired.
Your system uses the Grub or LILO boot loaders.
If you have an IA64 system, you must modify these install instructions to use the ELILO boot loader (/boot/efi/elilo.conf) instead.
WARNING: Whenever you manually alter the kernel or initrd on your system, ensure that you run /sbin/elilo before shutting down the computer. If you leave out this step, your system might not be bootable.
Device Size Limits
Version 2.3 and later of mdadm supports component devices up to 4 TB in size each. Earlier versions support component devices up to 2 TB in size.
IMPORTANT: If you have a local disk, external disk arrays, or SAN devices that are larger than the supported device size, use a third‐party disk partitioner to carve the devices into smaller logical devices.
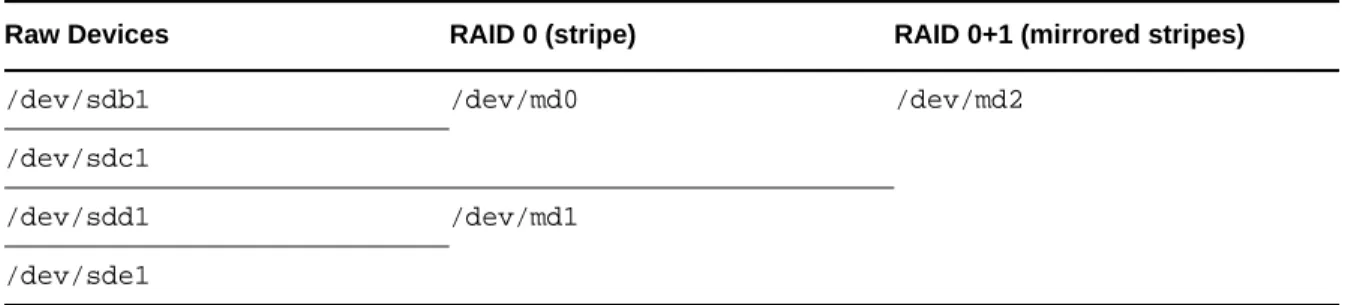
You can combine up to 28 component devices to create the RAID array. The md RAID device you create can be up to the maximum device size supported by the file system you plan to use. For information about file system limits for SUSE Linux Enterprise Server 10, see “Large File System Support” in the SUSE Linux Enterprise Server 10 Installation and Administration Guide. (http://
www.novell.com/documentation/sles10).
Data Loss Considerations for the System Device
This install requires that you delete the default partitioning settings created by the install, and create new partitions to use EVMS instead. This destroys all data on the disk.
WARNING: To avoid data loss, it is best to use the EVMS install option only on a new device. If you have data volumes on the system device, take one or more of the following precautionary measures:
Move the data volumes from the system device to another device.
If you cannot move the volumes, make a backup copy of the data, so you can restore the data volumes later from a backup copy.
Storage Deployment Considerations for the System Device
By default, the YaST install for SUSE Linux Enterprise Server uses the Linux Volume Manager to manage the system device. The install procedures in this section describe how to install SUSE Linux Enterprise Server with EVMS as the volume manager of the system device. The instructions assume the following:
Only the system device is to be configured during the install.
Other devices on the system are not configured during the install, or are attached to the server later. These additional devices are configured only after the system is operating and performing as expected.
2.1.2
During the Server Install
To install Linux with EVMS as the volume manager for your boot and system partitions, you must modify the Partitioning configuration in the Installation Settings.
WARNING: The following procedure destroys all data on the system device.
1 Begin the install, according to the instructions provided in Deployment (http://www.novell.com/
documentation/sles10/book_sle_reference/data/part_setup.html) in the SUSE Linux Enterprise 10
Installation and Administration Guide (http://www.novell.com/documentation/sles10/
book_sle_reference/data/book_sle_reference.html).
2 When the installation reaches the Installations Settings screen, delete the proposed LVM‐based partioning solution. This deletes the proposed partitions and the partition table on the system device so that the device can be marked to use EVMS as the volume manager instead of LVM.
2a In the list of Installation Settings, select Partitioning.
2b In the Partitioning menu, select Create Custom Partition Setup, then click Next.
2c Select Custom Partition ‐ for Experts, then click Next to open the Expert Partitioner dialog box.
2d Select Expert > Delete Partition Table and Disk Label, then click Yes twice to continue through the Warning advisories.
This deletes the recommended partitions and the partition table on the system disk.
3 Create a primary partition on the system disk to use as the boot partition:
3a Click Create.
3b From the list of devices, select the device you want to use for the boot partition, such as / dev/hda, then click OK.
If you have a single system disk, only one device is available, and you are not prompted to choose the device.
3c Select Primary Partition, then click OK.
3d Select Format, then select the native Linux file system you want to use, such as Ext3.
IMPORTANT: In a paravirtualized environment, use Ext2 as the file system for the boot device.
3e In Size (End Value) field, specify 200 MB or larger. For example, to set the size at 300 MB, type 300M.
3f Set the mount point to /boot.
3g Click OK.
4 Create a second primary partition on the system disk to use for both the swap and system volumes:
4a Click Create.
4b From the list of devices, select the device you want to use for the second primary partition, such as /dev/hda, then click OK.
If you have a single system disk, only one device is available and you are not prompted to choose the device.
4c Select Primary Partition, then click OK.
4d Select Do Not Format, then select Linux LVM (0x8E) from the list of file system IDs.
4e In Size (End Value field), set the cylinder End value to 5 GB or larger, depending on the combined partition size you need to contain your system and swap volumes.
IMPORTANT: Do not make the system partition larger than necessary. The remaining space on the system disk can be used to create NSS volumes or native Linux volumes that are managed by EVMS.
To determing how much space to use, consider the following recommendations:
For your system volume, allow 2 GB (minimum) to 10 GB (recommended), depending on the OES services that you intend to install.
If you intend to create additional NSS volumes on the same physical disk, you must leave unpartitioned space available.
Set aside 128 MB or larger for the swap volume.
Swap management is different for Linux kernel 2.4.10 and later. How much swap to add depends on the RAM size, the tasks that are planned for the system, and whether you want to make more virtual memory available than the RAM provides.
Some swap (at least 128 MB) is good to have to minimize the risk of losing data when active processes run out of RAM space. Swap is not required for systems with more than 1 GB of RAM. You must have at least 1 GB of virtual memory (RAM plus swap) during the install, but if the swap is more than 2 GB, you might not be able to install on some machines.
The total size should be the size you need for your system volume plus the size you need for your swap volume.
For example, if you have a 20 GB hard drive with 2 GB of RAM and plan to install all of the OES services on the system volume, your system partition should be at least 11 GB. The remaining 9 GB should remain as free unpartitioned space that can be used for NSS volumes or other Linux partitions that you might want to create later.
4f Click OK.
The partition appears as a logical device in the devices list, such as /dev/hda2.
5 Modify the volume management type from LVM to EVMS for the second primary partition you created in Step 4:
5a At the bottom of the page, click EVMS.
Available partitions for EVMS appear as devices under /dev/evms, such as /dev/evms/ hda2.
5b In the EVMS Configurator, select the LVM partition created in Step 4, then click Create Container.
5c In the Create EVMS Container dialog box, select the partition, specify the container name (such as system), then click Add Volume to create the lvm/system container, where system is the container name.
5d Click OK.
The EVMS Configurator displays the lvm/system container you just created, its size, and free space.
6 Create the swap volume in the lvm/system container:
6a Select lvm/system, then click Add.
6b In the Create Logical Volume dialog box, select Format, then select Swap from the File System drop‐down menu.
6c Specify swap as the volume name.
6d Specify 1 GB (recommended) for the swap volume.
The swap size should be 128 MB or larger, with a recommended size of 1 GB. For an explanation of this recommendation, see Step 4e.
6e Specify the mount point as swap.
6f Click OK.
7 Create the system volume in the lvm/system container:
7a Select lvm/system, then click Add.
7b In the Create Logical Volume dialog box, select Format, then select the file system to use from the File System drop‐down menu, such as Reiser or Ext3.
7c In the Volume Name field, specify a volume name, such as sys_lx.
7d In the Size field, click Max to set the size of the system volume as the remaining space available in the lvm/system partition.
7e Specify the mount point as / (root volume).
7f Click OK.
8 Click Next to return to the list of devices.
Below is an example of the physical and logical devices that should be configured on your system. Your setup depends on the number of devices in the server and the sizes you choose for your partitions.
Device Size F Type Mount Start End Used By
/dev/hda 149.0 GB 6Y160p0 0 19456
/dev/hda1 305.9 MB F Linux Native (Reiser)
/boot 0 38
/dev/hda2 20.0 GB Linux LVM 39 2649 EVMS
lvm/ system /dev/hdb 111.8 GB SP1203N 0 14595
/dev/evms/lvm/system/ sys_lx
10.0 GB F EVMS / -
-/dev/evms/lvm/system/ swap
-9 Click Next to return to the Installation Settings page.
You can dismiss the message warning that you should not mix EVMS and non‐EVMS partitions on the same device.
10 Continue with the SUSE Linux Enterprise Server installation.
IMPORTANT: After the install is complete, ensure that you perform the mandatory post‐install configuration of the related system settings to ensure that the system device functions properly under EVMS. Otherwise, the system fails to boot properly.
For information, see “After the Server Install” on page 18.
2.1.3
After the Server Install
After the SUSE Linux Enterprise Server 10 install is complete, you must perform the following tasks to ensure that the system device functions properly under EVMS:
“Edit the /etc/fstab File” on page 18
“Make a New initrd” on page 19
“Disable the boot.lvm and boot.md Services” on page 19
“Enable the boot.evms Service” on page 19
“Restart the Server” on page 20
“Verify the System Services” on page 20
Edit the /etc/fstab File
When you boot the system, the kernel reads the /etc/fstab file to identify which file systems should be mounted and then mounts them. This file contains a table of file system information about the root (/), /boot, and swap partitions plus other partitions and file systems you want to mount.
The /boot partition is separate from the EVMS container where you placed the root (/) and swap partitions and is not managed by EVMS at this time. However, in the following steps, you disable
boot.lvm and boot.md, then enable boot.evms. In effect, this forces EVMS to scan all the partitions at boot time, including the /boot partition, and it activates /boot under the /dev/evms directory. Therefore, this makes /boot a partition that is discovered by EVMS at startup, and requires that the device be listed under /dev/evms in the fstab file so it can be found when booting with boot.evms. You must edit the /etc/fstab file to modify the location of the /boot partition so it is under the / dev/evms directory.
In fstab, the entry for the boot device might present the boot device by the device node name (such as /dev/sda1) or by the UUID pathname (such as
/dev/disk/by-id/scsi-SServeRA_Drive_1_600BC00000-part1). In ether case, that name for the boot device must be changed to include evms in the path, such as /dev/evms/sda1.
The procedure in this section shows how to change /dev/sda1 to /dev/evms/sda1. Replace sda1 with the device name of the device you used for your /boot partition.
IMPORTANT: When working in the /etc/fstab file, do not leave any stray characters or spaces in the file. This is a configuration file, and it is highly sensitive to such mistakes.
To modify the path of the boot device in the /etc/fstab file, complete the following procedure:
1 Open the /etc/fstab file in a text editor.
2 Locate the line that contains the /boot partition.
For example, if your /boot partition uses device sda1 and the Reiser file system, look for a line similar to this:
/dev/sda1 /boot reiser defaults 1 1
3 In the Device Name column, modify the location of the /boot partition from /dev to /dev/evms so it can be managed by EVMS. Modify only the device name by adding /evms to the path:
/dev/evms/sda1 /boot reiser defaults 1 1
4 Save the file.
The changes do not take effect until the server is restarted. Do not restart at this time.
5 Continue with “Make a New initrd” on page 19.
Make a New initrd
1 Open a terminal console, and log in as the root user.
2 At the console prompt, enter
mkinitrd
This creates a new initrd file with the correct settings for the boot device. The changes do not take effect until the server is restarted. Do not restart at this time.
3 Continue with “Disable the boot.lvm and boot.md Services” on page 19.
Disable the boot.lvm and boot.md Services
Disable the boot.lvm and boot.md services so they do not run at boot time (runlevel B). EVMS now handles the boot.
1 In YaST, click System > System Services (Runlevel) > Expert Mode.
2 Select boot.lvm.
3 Click Set/Reset > Disable the Service.
4 Select boot.md.
5 Click Set/Reset > Disable the Service.
6 Click Finish, then click Yes.
The changes do not take effect until the server is restarted. Do not restart at this time.
7 Continue with “Enable the boot.evms Service” on page 19.
Enable the boot.evms Service
The boot.evms service should be enabled automatically after the install, but you should verify that it is enabled.
1 In YaST, click System > System Services (Runlevel) > Expert Mode.
3 Click Set/Reset > Enable the Service.
The B runlevel option is automatically selected.
4 Click Finish, then click Yes.
The changes do not take effect until the server is restarted.
NOTE: Effective in SUSE Linux Enterprise 10, the /dev directory is on tmpfs, and the device nodes are automatically re‐created on boot. It is no longer necessary to modify the /etc/ init.d/boot.evms script to delete the device nodes on system restart, as was required for previous versions of SUSE Linux.
5 Continue with “Restart the Server” on page 20.
Restart the Server
1 Restart the server to apply the post‐install configuration settings.
2 On restart, if the system device does not appear, it might be because EVMS has not been activated. At the prompt, enter
evms_activate
Verify the System Services
After the post‐install configuration is complete and you have restarted the server, ensure that the server is operating as expected.
2.2
Configuring an Existing System Device to Use EVMS
If you have already installed Linux with a different volume manager for the system device (that is, the devices where you installed the /boot, swap, or root (/) partitions), you can optionally configure the device for EVMS at any time after the install.
If you do not configure the device to use EVMS, you must manage the device and all of its volumes with its current volume manager (the default is LVM), and free space on the device cannot be used for volumes you want to create using EVMS. Beginning with the Linux 2.6 kernel, a given device cannot be managed by multiple volume managers. However, you can have different volume managers for different devices.
The following procedures assume that you installed Linux with three partitions on a single SCSI device named sda:
/dev/sda1 reiserfs /boot /dev/sda2 swap swap /dev/sda3 reiserfs /
IMPORTANT: Ensure that you modify the following procedures as necessary for your specific setup.
Section 2.2.1, “Disable the boot.lvm and boot.md Services,” on page 21
Section 2.2.2, “Enable the boot.evms Service,” on page 21
Section 2.2.5, “Force the RAM Disk to Recognize the Root Partition,” on page 24
Section 2.2.6, “Restart the Server,” on page 24
Section 2.2.7, “Verify that EVMS Manages the Boot, Swap, and Root Partitions,” on page 24
2.2.1
Disable the boot.lvm and boot.md Services
You need to disable boot.lvm (handles devices for Linux Volume Manager) and boot.md (handles multiple devices in software RAIDs) so they do not run at boot time. In the future, you want
boot.evms to run at boot time instead.
1 In YaST, click System > Runlevel Editor > Expert Mode.
2 Select boot.lvm.
3 Click Set/Reset > Disable the Service.
4 Select boot.md.
5 Click Set/Reset > Disable the Service.
6 Click Finish, then click Yes.
The changes do not take effect until the server is restarted. Do not restart at this time.
7 Continue with Section 2.2.2, “Enable the boot.evms Service,” on page 21.
2.2.2
Enable the boot.evms Service
You need to enable the boot.evms service so that it boots devices when you restart the server.
1 In YaST, click System > Runlevel Editor > Expert Mode.
2 Select boot.evms.
3 Click Set/Reset > Enable the Service.
The B runlevel option is automatically selected.
4 Click Finish, then click Yes.
The changes do not take affect until the server is restarted. Do not restart at this time.
NOTE: Effective in SUSE Linux Enterprise 10, the /dev directory is on tmpfs and the device nodes are automatically re‐created on boot. It is no longer necessary to modify the /etc/ init.d/boot.evms script to delete the device nodes on system restart as was required for previous versions of SUSE Linux.
5 Continue with “Edit the /etc/fstab File” on page 21.
2.2.3
Edit the /etc/fstab File
When you boot the system, the kernel reads the /etc/fstab file to identify which file systems should be mounted and then mounts them. This file contains a table of file system information about the / boot, swap, and root (/) partitions plus other partitions and file systems you want to mount.
You must edit the /etc/fstab file to modify the mount location of these three partitions so they are mounted under the /dev/evms directory. For example, change /dev/sda1 to /dev/evms/sda1.
Although the /boot partition is not managed by EVMS, the boot.evms script forces EVMS to scan all the partitions at boot time, including the /boot partition, and it activates /boot under the /dev/evms directory. Therefore, this makes /boot a partition that is discovered by EVMS at startup, and requires that the device’s path be listed under /dev/evms in the fstab file so it can be found when booting with boot.evms.
Ensure that you replace sda1, sda2, and sda3 with the device names you used for your partitions.
IMPORTANT: When working in the /etc/fstab file, do not leave any stray characters or spaces in the file. This is a configuration file, and it is highly sensitive to such mistakes.
1 Open the /etc/fstab file in a text editor.
2 Locate the line that contains the /boot partition.
For example, if your /boot partition uses device sda1 and the Reiser file system, look for a line similar to this:
/dev/sda1 /boot reiser defaults 1 1
3 In the Device Name column, modify the mount location of the /boot partition from /dev to / dev/evms so it can be managed by EVMS. Modify only the device name by adding /evms to the path:
/dev/evms/sda1 /boot reiser defaults 1 1
4 Repeat Step 2 and Step 3 to edit the Device Name entry in the lines for the swap and root (/) partitions.
For example, change /dev/sda2 to /dev/evms/sda2, and change /dev/sda3 to /dev/evms/ sda3.
5 Save the file.
The changes do not take effect until the server is restarted. Do not restart at this time.
6 Continue with Section 2.2.4, “Edit the Boot Loader File,” on page 22.
2.2.4
Edit the Boot Loader File
When you boot the system, the kernel reads the boot loader file for information about your system. For Grub, this is the /boot/grub/menu.1st file. For LILO, this is the /etc/lilo.conf file.
You must edit the boot loader file to modify the mount location of partitions so they are mounted under the /dev/evms directory. For example, change /dev/sda1 to /dev/evms/sda1. Ensure that you replace the path for all lines that contain device paths in the files. You can modify the boot loader file by editing fields in YaST, or use a text editor to modify the file directly.
IMPORTANT: When working in the boot loader file, do not leave any stray characters or spaces in the file. This is a configuration file, and it is highly sensitive to such mistakes.
Using YaST
To modify the boot loader file in the YaST Control Center:
1 Log in as the root user or equivalent.
3 Modify the boot loader image so that the root file system is mounted as /dev/evms/ instead of / dev/.
3a Select the boot loader image file, then click Edit.
3b Edit the device path in the Root Device field. For example, change the Root Device value from
/dev/sda2 to
/dev/evms/sda2
Replace sda2 with the actual device on your machine.
3c Edit any device paths in the Other Kernel Parameters field.
3d Click OK to save the changes and return to the Boot Loader page.
4 Modify the failsafe image so that the failsafe root file system is mounted as /dev/evms/ instead of /dev/.
4a Select the failsafe image file, then click Edit.
4b Edit the device path in the Root Device field.
4c Check the Other Kernel Parameters field and make changes if needed.
4d Click OK to save the change and return to the Boot Loader page.
5 Click Finish.
6 Continue with Section 2.2.5, “Force the RAM Disk to Recognize the Root Partition,” on page 24.
Using a Text Editor
To edit the boot loader file in a text editor:
1 Log in as the root user or equivalent.
2 Open the boot loader file in a text editor.
For Grub, this is the /boot/grub/menu.1st file. For LILO, this is the /etc/lilo.conf file.
3 Locate the line that contains the root= parameter.
For example, if your root file system uses device sda1, look for a line similar to this:
kernel (sd0,0)/vmlinuz root=/dev/sda1 vga=0x31a splash=silent showopts
4 Modify the mount location from /dev to /dev/evms so it can be managed by EVMS. For example, after the change, the line looks like this:
kernel (sd0,0)/vmlinuz root=/dev/evms/sda1 vga=0x31a splash=silent showopts
5 Repeat Step 3 and Step 4 to locate other lines in the file that need to be similarly modified.
6 Save the file.
The changes do not take effect until the server is restarted. Do not restart at this time.
2.2.5
Force the RAM Disk to Recognize the Root Partition
The mkinitrd(8) command creates file system images for use as initial RAM disk (initrd) images. These RAM disk images are often used to preload the block device modules (SCSI or RAID) needed to access the root file system.
You might need to force the RAM to update its device node information so that it loads the root (/) partition from the /dev/evms path.
NOTE: Recent patches to mkinitrd might resolve the need to do this task. For the latest version of mkinitrd, see Recommended Updates for mkinitrd in the Novell Knowledgebase (http://
support.novell.com/).
1 At a terminal console prompt, enter the EVMS Ncurses command as the root user or equivalent:
evmsn
2 Review the output to verify that EVMS shows only the /boot and swap partitions as active in EVMS.
You should see the following devices mounted (with your own partition names, of course) for these two partitions:
/dev/evms/sda1 /dev/evms/sda2
3 At a terminal console prompt, enter the following to update the initrd image with the /dev/ evms path information for the root (/) partition:
/sbin/mkinitrd -f evms
This does not take effect until you restart the server.
4 Continue with Section 2.2.6, “Restart the Server,” on page 24.
2.2.6
Restart the Server
1 Restart the server to apply the post‐install configuration settings.
When your system restarts, the kernel loads the init-ramdisk, which runs the EVMS tools to activate your volumes and mount your root file system. Then your boot scripts run the EVMS tools once more to ensure that your /dev/evms/ directory correctly reflects the current state of your volumes. Finally, the remaining EVMS volumes are mounted as specified in your /etc/ fstab file. Everything else on your system should start up as you would normally expect.
2 Continue with Section 2.2.7, “Verify that EVMS Manages the Boot, Swap, and Root Partitions,”
on page 24.
2.2.7
Verify that EVMS Manages the Boot, Swap, and Root Partitions
1 At a terminal prompt, enter the EVMS Ncurses command as the root user or equivalent:
evmsn
2 Review the output to verify that EVMS shows the /boot, swap, and root (/) partitions as active in EVMS.
You should see the following devices mounted (with your own partition names, of course) under the /dev/evms directory:
/dev/evms/sda1 /dev/evms/sda2 /dev/evms/sda3
2.3
Configuring LVM Devices to Use EVMS
Use the following post‐installation procedure to configure data devices (not system devices) to be managed by EVMS. If you need to configure an existing system device for EVMS, see Section 2.2,
“Configuring an Existing System Device to Use EVMS,” on page 20.
1 In a terminal console, run the EVMSGUI by entering the following as the root user or equivalent:
evmsgui
2 In the Volumes panel, review the names that EVMS reports as compatibility volumes, find the devices that represent the devices you want to manage using EVMS, then write down the names for future reference.
For example, /dev/sdb1.
3 In a text editor, edit the /etc/fstab file to use the EVMS volume names. For example, change the following entry for an LVM2 volume from this
/dev/sdb1 / reiserfs defaults 1 2
to this
/dev/evms/lvm2/sdb1 / reiserfs defaults 1 2
IMPORTANT: Ensure that you do not leave stray characters or spaces in the line.
With these changes, each time your system boots, your file system is mounted using EVMS as the volume manager.
4 Update the boot scripts as follows:
The command evms_activate must be run from your boot scripts in order to activate your volumes so they can be mounted.
If you run software‐RAID (boot.md) or LVM (boot.lvm) boot files in your boot scripts, and if you are moving all devices to EVMS, remove or disable those commands.
5 If you have not already done so, enable the boot.evms service. For information, see “Enable the boot.evms Service” on page 19.
6 Restart your system.
2.4
Using EVMS with iSCSI Volumes
If your EVMS devices, RAIDs, and volumes use storage devices from an iSCSI SAN, ensure that your system starts iSCSI before EVMS so that the SAN and its disks are available to EVMS on system startup. iSCSI must be started and running before any disks or volumes on the iSCSI SAN can be
accessed. If EVMS starts before iSCSI, EVMS cannot see or access the devices in the iSCSI SAN to mount the storage objects they contain, so the EVMS devices, RAIDs, and volumes might not be visible or accessible.
If EVMS starts before iSCSI on your system so that your EVMS devices, RAIDs, and volumes are not visible or accessible, you must correct the order in which iSCSI and EVMS are started. Enter the
chkconfig command at the Linux server console of every server that is part of your iSCSI SAN.
1 At a terminal console prompt, enter either
chkconfig evms on
or
chkconfig boot.evms on
This ensures that EVMS and iSCSI start in the proper order each time your servers restart.
2.5
Using the ELILO Loader Files (IA-64)
On a SUSE Linux Enterprise Server boot device EFI System Partition, the full paths to the loader and configuration files are:
/boot/efi/SuSE/elilo.efi /boot/efi/SuSE/elilo.conf
When configuring partitioning during the install on IA64 systems, set the file system type for the / boot partition to vfat, then choose Fstab Options and set the Arbitrary option value to umask=077 to ensure that the partition is accessible only to administrators.
WARNING: Whenever you manually alter the kernel or initrd on your system, ensure that you run
/sbin/elilo before shutting down the computer. If you leave out this step, your system might not be bootable.
2.6
Starting EVMS
If EVMS does not start during the system boot, you must activate it manually.
1 Open a terminal console, then log in as the root user or equivalent.
2 At the terminal console prompt, enter
evms_activate
2.7
Starting the EVMS Management Tools
IMPORTANT: When you are done, ensure that you exit the EVMS UI tool. When it is running, the EVMS UI tool locks the EVMS engine, potentially blocking other EVMS actions from taking place.
1 Open a terminal console, then log in as the root user or equivalent.
2 Enter one of the following commands to open the desired EVMS UI:
To stop evmsgui from running automatically on restart:
1 Close evmsgui.
2 Do a clean shutdown (not a restart).
3 Start the server.
When the server comes back up, evmsgui is not automatically loaded on restart.
Command Description
evmsgui Starts the graphical interface for EVMS GUI. For information about features in this interface, see ”EVMS GUI” (http://evms.sourceforge.net/user_guide/#GUI) in the
EVMS User Guide at the EVMS project on SourceForge.net.
evmsn Starts the text-mode interface for EVMS Ncurses. For information about features in this interface, see the “EVMS Ncurses Interface” (http://evms.sourceforge.net/ user_guide/#NCURSES) in the EVMS User Guide at the EVMS project on SourceForge.net.
evms Starts the EVMS commandline interpreter (CLI) interface. For information about command options, see “EVMS Command Line Interpreter” (http://
evms.sourceforge.net/user_guide/#COMMANDLINE) in the EVMS User Guide at the EVMS project on SourceForge.net.
3
3Using UUIDs to Mount Devices
This section describes the optional use of UUIDs instead of device names to identify file system devices in the boot loader file and the /etc/fstab file.
Section 3.1, “Naming Devices with udev,” on page 29
Section 3.2, “Understanding UUIDs,” on page 29
Section 3.3, “Using UUIDs in the Boot Loader and /etc/fstab File (x86),” on page 30
Section 3.4, “Using UUIDs in the Boot Loader and /etc/fstab File (IA64),” on page 31
Section 3.5, “Additional Information,” on page 32
3.1
Naming Devices with udev
In the Linux 2.6 and later kernel, udev provides a userspace solution for the dynamic /dev directory, with persistent device naming. As part of the hotplug system, udev is executed if a device is added or removed from the system.
A list of rules is used to match against specific device attributes. The udev rules infrastructure (defined in the /etc/udev/rules.d directory) provides stable names for all disk devices, regardless of their order of recognition or the connection used for the device. The udev tools examine every appropriate block device that the kernel creates to apply naming rules based on certain buses, drive types, or file systems. For information about how to define your own rules for udev, see Writing udev Rules (http://reactivated.net/writing_udev_rules.html).
Along with the dynamic kernel‐provided device node name, udev maintains classes of persistent symbolic links pointing to the device in the /dev/disk directory, which is further categorized by the
by-id, by-label, by-path, and by-uuid subdirectories.
NOTE: Other programs besides udev, such as LVM or md, might also generate UUIDs, but they are not listed in /dev/disk.
3.2
Understanding UUIDs
A UUID (Universally Unique Identifier) is a 128‐bit number for a file system that is unique on both the local system and across other systems. It is a randomly generated with system hardware
information and time stamps as part of its seed. UUIDs are commonly used to uniquely tag devices.
Section 3.2.1, “Using UUIDs to Assemble or Activate File System Devices,” on page 30
3.2.1
Using UUIDs to Assemble or Activate File System Devices
The UUID is always unique to the partition and does not depend on the order in which it appears or where it is mounted. With certain SAN devices attached to the server, the system partitions are renamed and moved to be the last device. For example, if root (/) is assigned to /dev/sda1 during the install, it might be assigned to /dev/sdg1 after the SAN is connected. One way to avoid this problem is to use the UUID in the boot loader and /etc/fstab files for the boot device.
The device ID assigned by the manufactuer for a drive never changes, no matter where the device is mounted, so it can always be found at boot. The UUID is a property of the filesystem and can change if you reformat the drive. In a boot loader file, you typically specify the location of the device (such as
/dev/sda1 or /dev/evms/sda1) to mount it at system boot. The boot loader can also mount devices by their UUIDs and administrator‐specified volume labels. However, if you use a label and file location, you cannot change the label name when the partition is mounted.
You can use the UUID as criterion for assembling and activating software RAID devices. When a RAID is created, the md driver generates a UUID for the device, and stores the value in the md superblock.
3.2.2
Finding the UUID for a File System Device
You can find the UUID for any block device in the /dev/disk/by-uuid directory. For example, a UUID looks like this:
e014e482-1c2d-4d09-84ec-61b3aefde77a
3.3
Using UUIDs in the Boot Loader and /etc/fstab File (x86)
After the install, you can optionally use the following procedure to configure the UUID for the system device in the boot loader and /etc/fstab files for your x86 system.
1 Install the SUSE Linux Enterprise Server for x86 with no SAN devices connected.
2 After the install, boot the system.
3 Open a terminal console as the root user or equivalent.
4 Navigate to the /dev/disk/by-uuid directory to find the UUID for the device where you installed /boot, /root, and swap.
4a At the terminal console prompt, enter
cd /dev/disk/by-uuid
4b List all partitions by entering
ll
4c Find the UUID, such as
e014e482-1c2d-4d09-84ec-61b3aefde77a —> /dev/sda1
5 Edit /boot/grub/menu.1st file, using the Boot Loader option in YaST2 or using a text editor. For example, change
kernel /boot/vmlinuz root=/dev/sda1
kernel /boot/vmlinuz root=/dev/disk/by-uuid/e014e482-1c2d-4d09-84ec-61b3aefde77a
IMPORTANT: Make a copy of the original boot entry, then modify the copy. If you make a mistake, you can boot the server without the SAN connected, and fix the error.
If you use the Boot Loader option in YaST, there is a defect where it adds some duplicate lines to the boot loader file when you change a value. Use an editor to remove the following duplicate lines:
color white/blue black/light-gray default 0
timeout 8
gfxmenu (sd0,1)/boot/message
When you use YaST to change the way that the root (/) device is mounted (such as by UUID or by label), the boot loader configuration needs to be saved again to make the change effective for the boot loader.
6 As the root user or equivalent, do one of the following to place the UUID in the /etc/fstab file: Open YaST to System > Partitioner, select the device of interest, then modify Fstab Options. Edit the /etc/fstab file to modify the system device from the location to the UUID.
For example, if the root (/) volume has a device path of /dev/sda1 and its UUID is
e014e482-1c2d-4d09-84ec-61b3aefde77a, change line entry from
/dev/sda1 / reiserfs acl,user_xattr 1 1
to
UUID=e014e482-1c2d-4d09-84ec-61b3aefde77a / reiserfs acl,user_xattr 1 1
IMPORTANT: Ensure that you make a backup copy of the fstab file before you begin, and do not leave stray characters or spaces in the file.
3.4
Using UUIDs in the Boot Loader and /etc/fstab File (IA64)
After the install, use the following procedure to configure the UUID for the system device in the boot loader and /etc/fstab files for your IA64 system. IA64 uses the EFI BIOS. Its file system
configuration file is /boot/efi/SuSE/elilo.conf instead of /etc/fstab.
1 Install the SUSE Linux Enterprise Server for IA64 with no SAN devices connected.
2 After the install, boot the system.
3 Open a terminal console as the root user or equivalent.
4 Navigate to the /dev/disk/by-uuid directory to find the UUID for the device where you installed /boot, /root, and swap.
4a At the terminal console prompt, enter
cd /dev/disk/by-uuid
4b List all partitions by entering
4c Find the UUID, such as
e014e482-1c2d-4d09-84ec-61b3aefde77a —> /dev/sda1
5 Edit the boot loader file, using the Boot Loader option in YaST2. For example, change
root=/dev/sda1
to
root=/dev/disk/by-uuid/e014e482-1c2d-4d09-84ec-61b3aefde77a
6 Edit the /boot/efi/SuSE/elilo.conf file to modify the system device from the location to the UUID.
For example, change
/dev/sda1 / reiserfs acl,user_xattr 1 1
to
UUID=e014e482-1c2d-4d09-84ec-61b3aefde77a / reiserfs acl,user_xattr 1 1
IMPORTANT: Ensure that you make a backup copy of the /boot/efi/SuSE/elilo.conf file before you begin, and do not leave stray characters or spaces in the file.
3.5
Additional Information
For more information about using udev(8) for managing devices, see “Dynamic Kernel Device Management with udev” (http://www.novell.com/documentation/sles10/book_sle_reference/data/
cha_udev.html) in the SUSE Linux Enterprise Server 10 dministration Guide.
For more information about udev(8) commands, see its man page. Enter the following at a terminal console prompt: