© 2013 SAP AG or an SAP affiliate company. All rights reserved. No part of this publication may be reproduced or transmitted in any form or for any purpose without the express permission of SAP AG.
Copyright
The information contained herein may be changed without prior notice. Some software products marketed by SAP AG and its distributors contain proprietary software components of other software vendors. National product specifications may vary. These materials are provided by SAP AG and its affiliated companies ("SAP Group") for informational purposes only, without representation or warranty of any kind, and SAP Group shall not be liable for errors or omissions with respect to the materials. The only warranties for SAP Group products and services are those that are set forth in the express warranty statements accompanying such products and services, if any. Nothing herein should be construed as constituting an additional warranty. SAP and other SAP products and services mentioned herein as well as their respective logos are trademarks or registered trademarks of SAP AG in Germany and other countries. Please see
http://www.sap.com/corporate-en/legal/copyright/index.epx#trademark for additional trademark information and notices.
Document history...9 Chapter 1
Getting started...11 Chapter 2
About this documentation ...11
2.1
Who should use this documentation?...11
2.2
What is BI launch pad...11
2.3
What's new in BI launch pad ...12
2.4 Licensing...13 2.5 Key concepts...13 2.6 Key tasks...14 2.7
BI launch pad basics...15 Chapter 3 User interface...15 3.1 Tabs...15 3.1.1 Home tab...15 3.1.2 Documents tab...16 3.1.3 Header panel...21 3.1.4
To log on to BI launch pad...21
3.2
Setting preferences...23 Chapter 4
Setting preferences...23
4.1
To set general preferences...23
4.1.1
To change your password...24
4.1.2
Preferred viewing locales...25
4.1.3
To set Crystal report viewing preferences...25
4.1.4
To set BI workspaces preferences...26
4.1.5
To set Analysis edition for OLAP preferences...27
4.1.6
Web Intelligence preferences...27
4.1.7
Viewing objects...33 Chapter 5
Viewing objects...33
To view an object...33
5.1.1
To refresh an object...34
5.1.2
To view an older instance...34
5.1.3
To pin a tab for future viewing...34
5.1.4
To open a report in a larger viewing area...35
5.1.5
Viewing Crystal reports...35
5.2
Crystal report viewers...35
5.2.1
SAP Crystal Reports viewer 2011...40
5.2.2
To drill down on Crystal report data...42
5.2.3
To view alerts in Crystal reports...42
5.2.4
To view and edit parameters of Crystal reports in the web viewer...42
5.2.5
To print Crystal reports...43
5.2.6
To export Crystal reports...44
5.2.7
To sort data interactively...45
5.2.8
Viewing Web Intelligence documents...46
5.3
Web Intelligence viewer toolbar...46
5.3.1
To display the navigation map...48
5.3.2
To display user prompts...48
5.3.3
To find text...49
5.3.4
To drill on document data...49
5.3.5
Working with objects...51 Chapter 6
Managing objects...51
6.1
Creating and adding new objects ...51
6.2
To add a document from your computer to BI launch pad...52
6.3
To replace third-party source documents...52
6.4
Sorting and filtering objects ...53
6.5
To sort or filter objects in the repository...53
6.5.1
To remove a filter...54
6.5.2
To set the object properties ...54
6.6
To copy an object...54
6.7
To move an object...55
6.8
To create a shortcut to an object...55
6.9
To send an object or an instance to a destination ...55
6.10
To create an OpenDocument link to an object...56
6.11
To delete an object...56
6.12
To create a hyperlink...57
6.13
How the search works...57
6.14
What the search looks for...59
6.15
Search techniques...61
6.16
To perform a search in BI launch pad...63
6.17
Folders and categories...64
6.18
To create a folder or category...65
6.18.1
To set the properties of a folder or category...65
6.18.2
Adding objects to a folder...66
6.18.3
To assign an object to a category...66
6.18.4
Scheduling objects...67 Chapter 7
Scheduling objects...67
7.1
To schedule an object...67
7.2
To label a scheduled instance...68
7.2.1
To select a recurrence pattern...68
7.2.2
To specify database logon information...71
7.2.3
To select an instance format...71
7.2.4
To select a destination...79
7.2.5
To apply a record selection formula...93
7.2.6
To select print settings for a Crystal report...94
7.2.7
To schedule an object with parameters (prompts)...95
7.2.8
To schedule an object with events...95
7.2.9
To select the scheduling server group for an object...96
7.2.10
To select a cache format for Web Intelligence documents...96
7.2.11
To select languages for Crystal report instances...97
7.2.12
Pausing or resuming an instance...97
7.3
To pause an instance...97
7.3.1
To resume a paused instance...98
7.3.2
Scheduling an object package ...98
7.4
To schedule an object package...99
7.4.1
Working with instances...99
7.5
To view the latest instance of an object...99
7.5.1
Viewing historical instances...100
7.5.2
Working with collaboration...103 Chapter 8
Collaboration column ...103
8.1
Icons in the Collaboration column...104
8.1.1
To show the Collaboration column...104
8.1.2
To hide the Collaboration column...105
8.1.3
Feed panel...105
8.2
Collaboration drawer features...105
8.2.1
To open the feed panel...106
8.2.2
To resize the feed panel ...106
8.2.3
To display an SAP StreamWork custom home page...107
Access rights required for collaboration...107
8.4
Document feeds...108
8.5
To refresh a feed...108
8.5.1
To view collaboration comments for an instance on a new tab ...108
8.5.2
To view collaboration comments via an OpenDocument link ...109
8.5.3
To follow a feed...110
8.5.4
To post a comment to a feed...110
8.5.5
To stop following a feed...111
8.5.6
To schedule content to SAP StreamWork...111
8.6
To send content to SAP StreamWork...112
8.7
Publishing...115 Chapter 9
About publishing...115
9.1
What is a publication?...115
9.2 Publishing concepts...115 9.3 Report bursting...116 9.3.1 Delivery rules...117 9.3.2 Dynamic recipients...119 9.3.3
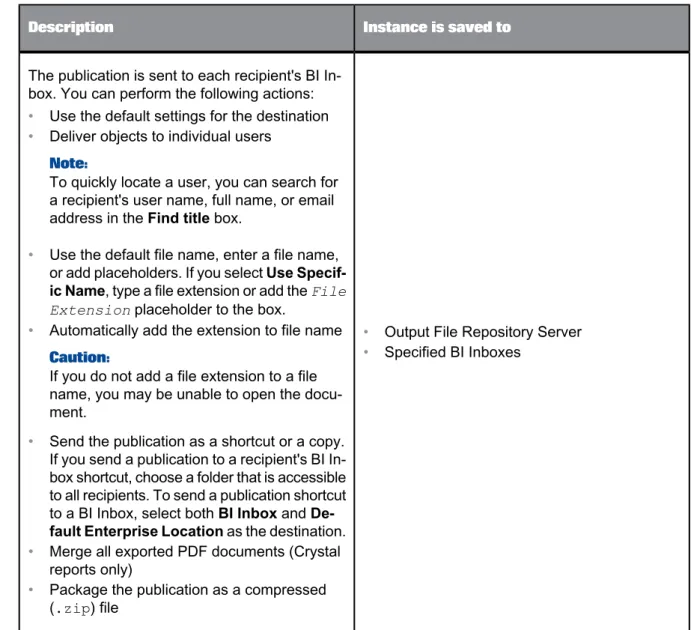
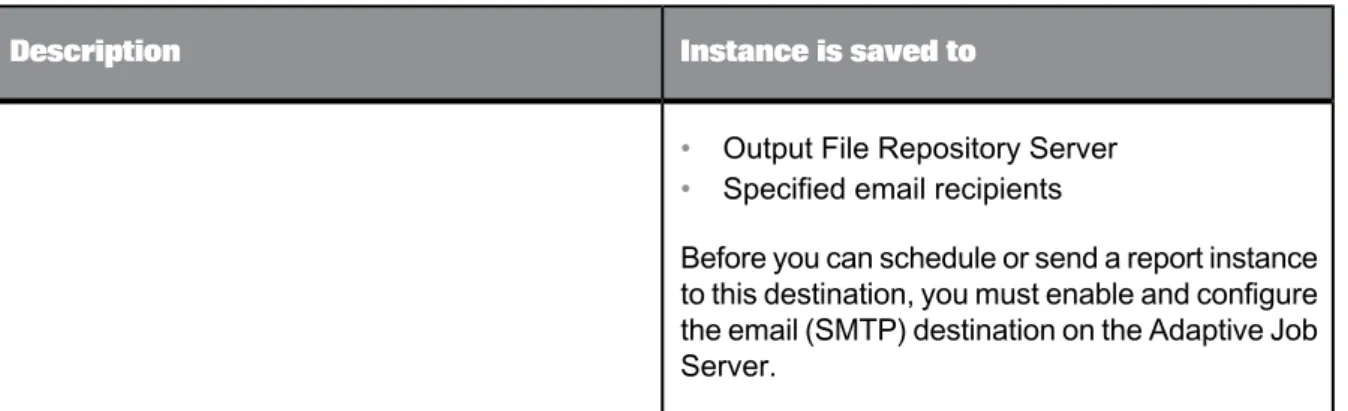
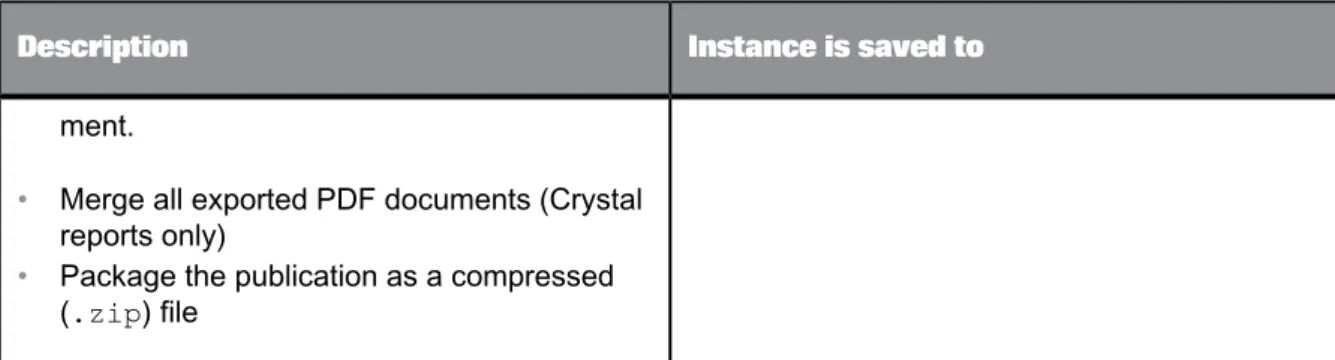
Publication delivery destinations...120
9.3.4
Personalized placeholders for publication source document names...127
9.3.5
Personalized placeholders for email fields ...127
9.3.6 Formats...128 9.3.7 Personalization...131 9.3.8 Publication extensions...132 9.3.9 Subscriptions...132 9.3.10
PDF-file merging for Crystal reports...133
9.3.11
Access rights required for publishing...133
9.4
Publishers and recipients: Who has rights to view what?...137
9.4.1
Working with publications...139 Chapter 10
Designing publications...139
10.1
Designing publications for Live Office...139
10.1.1
Designing publications for SAP recipients...139
10.1.2
To create a new publication in the CMC ...140
10.1.3
To create a new publication in BI launch pad...140
10.1.4
To open a publication...141
10.1.5
To define general properties for a publication...141
10.1.6
To select source documents...141
10.1.7
To select Enterprise recipients...142
10.1.8
To select dynamic recipients...143
10.1.9
To select a destination for a publication...144
10.1.10
To select a recurrence pattern...146
10.1.11
To select personalized placeholders for publication source documents...148
10.1.12
To embed content from a dynamic source document in an email...149
10.1.13
Crystal report design tasks...150
10.1.14
Web Intelligence document design tasks...164
10.1.15
Optional publication features...167
10.1.16
Post-design publication tasks...171
10.2
Finalizing a publication...171
10.2.1
To test a publication...171
10.2.2
To subscribe to or unsubscribe from a publication...172
10.2.3
To schedule a publication to run...172
10.2.4
Viewing publication results...173
10.2.5
To redistribute a publication instance...176
10.2.6
To retry a failed publication...176
10.2.7
Improving publication performance...177
10.3
Recommendations for adding source documents...179
10.3.1
Recommendations for using dynamic recipient sources...180
10.3.2
Recommendations for sending and receiving email publication instances...181
10.3.3
Working with alerting...183 Chapter 11
Alerting...183
11.1
Alert sources...184
11.1.1
Differences between alerting and Crystal report alert notifications...184
11.1.2
Alerting workflow...185
11.1.3
Access rights required for alerting...186
11.1.4
Locating alert source objects in BI launch pad...188
11.1.5
Viewing alert notifications...189
11.1.6
Alerting tasks...189
11.2
To subscribe to an alert...190
11.2.1
To unsubscribe from an alert...190
11.2.2
To subscribe other users to an alert...190
11.2.3
To exclude users from an alert...191
11.2.4
To manage custom alerting settings for an alert source...192
11.2.5
Working with applications...193 Chapter 12
Working with applications in BI launch pad...193
12.1
To start an application in BI launch pad...193
12.2
BEx web applications in BI launch pad...193
12.3
To access BEx web applications in BI launch pad...194
To save BEx web applications as bookmarks...194
12.3.2
Using discussions...197 Chapter 13
Working with discussions...197
13.1
To open the Discussions drawer...197
13.1.1
To add a note...197
13.1.2
To edit a note...198
13.1.3
To reply to a note...198
13.1.4
To delete a note...198
13.1.5
More Information...201 Appendix A
Index 203
Document history
The following table provides an overview of the most important document changes. Description Date
Version
Support for SAP Jam was added. When integrated, SAP Jam adds social media and col-laboration features to BI launch pad.
Additional collaboration access rights were added for users and groups. The collaboration feed panel includes a drop-down list of instances and times and a button for following or unfollow-ing a feed. Automatically follow all related instances when you follow a template document in SAP Jam or SAP StreamWork. Comments on instances are posted only for the instance. You can open OpenDocument links to documents and in-stances on a tab or via the link. When viewing a document or instance via an OpenDocument link, open the SAP StreamWork feed panel to monitor or reply to a document feed.
AnAdd File Extensioncheck box was added to the "Destina-tions" dialog box.
May, 2013 SAP BusinessObjects Business
Getting started
2.1 About this documentation
This documentation provides information and procedures for using SAP BusinessObjects Business Intelligence (BI) platform and BI launch pad.
BI launch pad runs in a web browser and is the main interface for working with objects in BI platform. Your administrator may deploy different types of objects, such as Crystal reports and Web Intelligence documents, that are created from BI platform plug-in components. You use BI launch pad to view the objects, organize them, and work with them.
Note:
Because the appearance and functionality of BI launch pad can be customized, your user interface may be different from this documentation. However, you can apply most of the information to your user interface.
2.2 Who should use this documentation?
This documentation is intended for users who work with objects over the web in BI platform and in BI launch pad.
For more information about BI platform, see theSAP BusinessObjects Business Intelligence Platform
User Guide and the SAP BusinessObjects Business Intelligence Platform Administrator Guide on the SAP Help Portal athttp://help.sap.com.
2.3 What is BI launch pad
SAP BusinessObjects Business Intelligence (BI) platform includes BI launch pad, a web application that acts as a window to business information about your company. You can use BI launch pad to perform the following tasks:
• View information in a web browser, export it to other business applications (such as Microsoft Excel or SAP Jam), and save it to a specified location
• Use analytic tools to explore business information in detail
Features of BI launch pad vary by content type, and the applications available in BI launch pad depend on your access rights. For information about the features of your BI platform deployment, contact your system administrator.
2.4 What's new in BI launch pad
SAP JamSAP Jam was added as a collaboration option in Business Intelligence (BI) launch pad. When integrated, SAP Jam adds social media and collaboration features to BI launch pad.
Collaboration improvements
With the addition of SAP Jam, BI launch pad supports two collaboration options. Your administrator must configure your collaboration application in the Central Management Console (CMC) before you can use it.
The following enhancements are supported by both collaboration applications:
• New viewer options
• Improved integration with BI launch pad
• New access rights
• Add comments to a feed when opening a document or instance via an OpenDocument link
Open the details panel in any viewer
You can open the details panel from anywhere in BI launch pad—and in a viewer when using an OpenDocument link.
Automatically add file extensions when scheduling
When selected, theAdd File Extensioncheck box in the "Destinations" dialog box automatically adds the file extension to a file name when scheduling reports and publications. The check box is selected by default.
You can also add a file-extension placeholder when scheduling to the following destination locations:
• BI Inbox
• FTP server
• File system
Caution:
If you do not add a file extension to a file name, you may be unable to open the document. Getting started
2.5 Licensing
BI platform supports the following types of user licenses:
• BI Viewer
• BI Analyst
• Concurrent user
• Named user
Each license type grants and restricts access to particular tasks and applications. Depending on which license you have, you may be unable to access some applications, to create content, or to add documents to the repository. To determine which license you have, contact your system administrator. For more information about licensing, see theSAP BusinessObjects Business Intelligence Platform Administrator Guide on the SAP Help Portal athttp://help.sap.com.
2.6 Key concepts
Before you begin, familiarize yourself with key concepts in BI launch pad. Depending on which tasks you perform, some concepts may not apply to you.
Objects
An object is a document or file created in BI platform or other software that is stored and managed in the BI platform repository.
Categories
A category is an organizational alternative to a folder. Use categories to label objects. Scheduling
Scheduling is the process of automatically running an object at a specified time. Scheduling refreshes dynamic content or data in an object, creates instances, and distributes the instances to users or stores them locally.
Events
An event is an object that represents an occurrence in the BI platform system. Events can be used for the following purposes:
• As scheduling dependencies that trigger actions after a scheduled job runs
• To trigger alert notifications
Calendars
A calendar is a customized list of run dates for scheduling jobs. Instances
An instance is a snapshot of an object that contains data from the time an object was run. Publishing
Publishing is the process of making personalized dynamic content publicly available for mass consumption.
Profiles
A profile is an object that associates users and groups with personalization values. Profiles are used with publishing to create personalized content and distribute it to recipients.
Alerting
Alerting is the process of notifying users and administrators when events occur in BI platform.
2.7 Key tasks
This section describes the following key tasks in BI launch pad:
• Viewing objects in BI launch pad
• Adding objects to BI launch pad
• Changing and managing the objects you add
• Distributing content to users
• Collaborating on content with SAP Jam or SAP StreamWork
• Setting personal preferences
Related Topics •Viewing objects •Managing objects •Scheduling objects
You can schedule an object to automatically run at specified times. When a scheduled object runs successfully, an instance is created.
•About publishing •Alerting
•Working with collaboration
Hosted on the web, SAP Jam or SAP StreamWork adds collaborative decision-making and social media to BI launch pad.
•Setting preferences Getting started
BI launch pad basics
3.1 User interface
3.1.1 Tabs
BI launch pad tabs enable the display of multiple pages and documents in one window. When you open an object or an application, it appears on a tab.
Note:
If your document viewing preferences are set to open objects in windows (instead of on tabs), objects and applications open in a window.
BI launch pad has two default tabs—HomeandDocuments. Your system administrator can configure
additional, custom home tabs as needed (for example, for SAP Jam). Tip:
To view a document in a larger viewing area, click the maximize button in the upper-right corner of the window.
3.1.2 Home tab
You use theHometab to manage documents and BI launch pad features. The defaultHometab
includes the following areas:
• My Recently Viewed Documentslists the last 10 documents that you viewed, sorted by view date, with the most recently viewed document at the top.
• Unread Messages in My Inboxlists the 10 most recent unread messages in your BI Inbox. To view all messages, clickSee Morein the lower-right corner of the module.
• My Recently Run Documentslists the last 10 documents in the repository that you scheduled or ran, with the status of each document instance.
To view successful instances or details of failed instances, click an instance link. • Unread Alertsshows the last 10 unread alert notifications.
To view all alert notifications, clickSee Morein the lower-right corner of the module. • My Applicationsprovides quick access to the applications in BI launch pad.
Custom home tabs
System administrators can create custom home tabs for users and groups that include objects such as a customized dashboard, a frequently used Crystal report, a web site, or the SAP Jam module. If you have the appropriate access rights, you can select a custom home tab in your BI launch pad preferences. SAP Jam or SAP StreamWork custom home tab
If you have the appropriate access rights, you can select a SAP Jam or SAP StreamWork custom home tab in your BI launch pad general preferences.
Related Topics •Setting preferences
•To display an SAP StreamWork custom home page
You can monitor updates to the feeds you follow on an SAP StreamWork custom home page in BI launch pad.
3.1.3 Documents tab
Use theDocumentstab to view and to manage objects in the repository.
3.1.3.1 Toolbar
BI launch pad basicsYou use the toolbar buttons to view and to manage objects. Description
Option
Use to view objects, the latest instance of an object, and object properties. Viewmenu
Use to upload documents and create the following types of new objects:
• Local documents
• Publications
• Hyperlinks
• Folders
• Categories
Newmenu
Use to manage object shortcuts, to cut, copy, paste, and delete objects (for exam-ple, messages), and to replace static documents (for examexam-ple, Microsoft Word, Adobe PDF, and Microsoft Excel files) with a new version of the document. Organizemenu
Use to send a document or instance to a destination. The available destinations depend on your BI launch pad configuration.
Sendmenu
Use to perform the following tasks:
• Schedule objects
• View the history of an object
• Add objects to categories
• View categories that objects belong to
• Create OpenDocument links to objects
• Follow documents (if collaboration is enabled in the CMC)
The available actions vary, depending on the object type and on your access rights.
More Actions menu
Use to show or hide the details panel for a document. Tip:
Alternately, you can click<on the left edge of the details panel to expand it. The button changes to>when the panel is expanded. Click>to minimize the details panel.
Note:
If BI launch pad is integrated with SAP Jam or with SAP StreamWork, the panel is called the feed panel.
Related Topics •Details panel
The details panel contains drawers that display summary information about an object. You click a drawer to access the information in the drawer.
•Feed panel
TheCollaborationdrawer provides access to the feed panel, where you can see and post comments about documents for which you have view or comment access rights.
3.1.3.2 Navigation panel
The navigation panel provides a top-level view of the folders and categories in BI platform. Related Topics
•Drawers
Drawers are expandable panes on the navigation panel and on the details panel.
3.1.3.3 Drawers
Drawers are expandable panes on the navigation panel and on the details panel.
You click a drawer to expand or to minimize it. Depending on your access rights, you may be unable to view some objects in drawers.
The following drawers are available on the navigation panel:
• My Documentscontains the user'sMy Favoritesfolder, BI Inbox,My Alertsfolder,Subscribed Alertsfolder, and personal categories.
• Foldersdisplays a folder view of the repository. • Categoriesdisplays a category view of the repository. • Searchdisplays search options and results.
The following drawers are available on the details panel:
• Summarydisplays information about the selected object (owner, description, document type, number of instances, and when the last instance ran).
• Collaboration, if BI launch pad is configured for collaboration with SAP Jam or SAP StreamWork • Discussions, if discussions are enabled for BI launch pad
Related Topics •Navigation panel •Details panel
The details panel contains drawers that display summary information about an object. You click a drawer to access the information in the drawer.
•Working with collaboration
Hosted on the web, SAP Jam or SAP StreamWork adds collaborative decision-making and social media to BI launch pad.
•Working with discussions
3.1.3.4 List panel
The list panel displays a list view of the objects in a folder or a category.
3.1.3.5 Details panel
The details panel contains drawers that display summary information about an object. You click a drawer to access the information in the drawer.
TheSummarydrawer on the details panel displays the following information about an object:
• Owner
• Description
• Object type
• Number of instances
• Last run date (for objects that can be scheduled)
If SAP Jam or SAP StreamWork is integrated with BI launch pad, the panel is called the feed panel and
includes aCollaborationdrawer. Click the drawer to view feeds for a document.
If discussions are enabled for BI launch pad and view rights are assigned to objects and associated notes, theDiscussionsdrawer is available on the details panel. Click theDiscussionsdrawer to show posted comments about a document.
Note:
Related Topics
•Working with collaboration
Hosted on the web, SAP Jam or SAP StreamWork adds collaborative decision-making and social media to BI launch pad.
•Working with discussions
3.1.3.5.1 To open the details panel
You can open the details panel from anywhere in BI launch pad or when viewing a document via an OpenDocument link.
Note:
If collaboration with SAP Jam or SAP StreamWork is enabled in the CMC, the details panel is called the feed panel.
• Click<on the left edge of the details panel. Note:
You can also clickDetailson the toolbar in BI launch pad.
The details panel appears, with theSummarydrawer open. You can click a document or instance
to display its summary information.
If SAP Jam or SAP StreamWork is integrated with BI launch pad, aCollaborationdrawer appears
instead.
If discussions are enabled, aDiscussionsdrawer appears instead.
Related Topics
•Working with collaboration
Hosted on the web, SAP Jam or SAP StreamWork adds collaborative decision-making and social media to BI launch pad.
•Working with discussions
3.1.3.5.2 To resize the details panel
You can resize the details panel from anywhere in BI launch pad. Note:
When BI launch pad is configured for SAP Jam or for SAP StreamWork, this panel is called the feed panel.
• To resize the details panel, click the left edge of the panel, and drag it to the width you want. Related Topics
•Feed panel BI launch pad basics
TheCollaborationdrawer provides access to the feed panel, where you can see and post comments about documents for which you have view or comment access rights.
3.1.3.5.3 To close the details panel
You can close the details panel from anywhere in BI launch pad or when viewing a document via an OpenDocument link.
• Click>on the left edge of the details panel. Note:
You can also clickDetailson the toolbar in BI launch pad.
3.1.4 Header panel
The header panel displays the name of the user account that is logged on to BI launch pad and contains the following menus:
• Applications, which provides access to plug-in applications for BI launch pad (such as BI workspaces). The applications available depend on your access rights.
• Preferences, which you use to configure how information appears in BI launch pad
• Help Menu, which provides access to the BI Launch Pad Help and the "About" dialog box that contains product information
ClickLog Offto log off from BI launch pad. Related Topics
•Documents tab
3.2 To log on to BI launch pad
Before you can log on to BI launch pad, you must have Microsoft Internet Explorer, Firefox, or Safari (for Macintosh users) installed on your computer.
1. In a web browser, type the URL for BI launch pad: http://<WebServer>:<PortNumber>/BOE/BI/ Replace<WebServer>with the name of the web server and<PortNumber>with the port number for BI platform.
If your system administrator has configured a custom URL for BI launch pad, you may need to ask your administrator for the name of the web server, the port number, or the URL to enter.
Tip:
If you have BI platform client tools installed on Windows, clickStart>Programs>SAP Business Intelligence> SAP BusinessObjects BI platform 4>SAP BusinessObjects BI platform Java BI Launch Pad.
By default, you do not need to enter a system name. However, some enterprise systems may require it.
2. If prompted, in theSystembox, type the name of your Central Management Server (CMS).
3. In theUser namebox and thePasswordbox, type your logon credentials.
By default, you are not asked to choose an authentication type. However, some Enterprise systems may require it.
4. If prompted, in theAuthenticationlist, select an authentication type.
Enterprise authenticationis the default authentication method. LDAP, Windows AD, Windows NT, and other third-party authentication types require a special configuration. If you are unsure of which authentication type to use, contact your system administrator. For information about authentication
types, see theSAP BusinessObjects Business Intelligence Platform Administrator Guide.
5. ClickLog On.
BI launch opens with the defaultHometab displayed.
Related Topics •Setting preferences BI launch pad basics
Setting preferences
4.1 Setting preferences
Preferences determine how you log on to BI launch pad, which views appear, and which settings apply to viewed objects.
The access rights assigned by your system administrator determine whether you can set your own preferences. If your administrator configured preference settings for you, you cannot change them. Before you start using BI launch pad, check whether your preferences have been set—and set them, if they are not configured.
4.1.1 To set general preferences
BI launch pad general preferences determine what appears in the default view of the software. Your system administrator configures the initial (default) preferences at installation. You can keep the default settings or set your own preferences.
Note:
If the administrator updates your user group, the preferences you set will revert to the default setting. 1. On the header panel, clickPreferences.
The "Preferences" dialog box appears, showing general preference options. 2. In the "Preferences" dialog box, clickGeneral.
3. Clear theUse Default Settings (Administrator defined)check box.
The options are editable and contain default values, until you change them. Tip:
To return the BI launch pad view to the default preferences set by your administrator (including any
updates implemented after you customized the view), selectUse Default Settings (Administrator
defined). The options on the "Preferences" dialog box update to show the inherited values, and the values become read only.
4. Choose the view that appears when BI launch pad starts:
• To choose the default view that your administrator configured, selectDefault Home tab. If your administrator did not configure a default BI launch pad view, the BI platformHometab is used.
• To choose a custom view, selectSelect Home tab, clickBrowse Home tab, choose a tab
in the "Select a Custom Home tab" dialog box, and clickOpen.
If a BI workspaces view was created for SAP Jam or SAP StreamWork, it is listed in the "Select a Custom Home tab" dialog box.
b. To display theDocumentstab, selectDocuments tab, and select the drawer and folder to open
by default.
You can select theMy Documents,Folders, orCategoriesdrawer. For example, if you want
theMy Documentsdrawer to open to your BI Inbox when you log on, selectMy Documents andMy Inbox.
5. UnderChoose columns displayed in Documents tab, select which column headings to display
in the summary information, for each object.
For example, to display a column for SAP Jam or SAP StreamWork collaboration, select the Collaboration / Discussion Statuscheck box.
6. UnderSet document viewing location, choose whether to open documents on a new tab or a new
browser window.
7. In theSet the maximum number of items per pagebox, type the maximum number of objects to
display per page when you view a list of objects. 8. ClickSave & Close.
Related Topics
•To log on to BI launch pad
4.1.2 To change your password
Depending on your access rights, you may be unable to perform this task. If you cannot change your password, contact your system administrator.
1. On the header panel, clickPreferences.
2. In the "Preferences" dialog box, clickChange Password.
3. In theOld Passwordbox, type your old password.
4. In theNew Passwordbox, type your new password.
5. In theConfirm New Passwordbox, retype your new password.
6. ClickSave & Close. Setting preferences
4.1.3 Preferred viewing locales
The preferred viewing locale (PVL) determines how dates, times, and numbers are formatted in BI launch pad. For multilingual objects, the PVL also sets the language used to display an object's name and description. If an object has multiple translated names and descriptions, the display language is determined in the following way:
1. The system displays the name and description that correspond to the user's PVL.
BI platform may use a default fallback locale, but it is typically a variation of the user's PVL. For example, if the PVL is French (Canada) and the object does not have a translated name and description in Canadian French, BI platform will use French (France).
2. If no PVL is set, BI platform displays the name and description in the same language as the product locale.
3. If option 1 or 2 is not feasible, BI platform displays the name and description in the object's source language.
4.1.3.1 To set locale and time zone preferences
Before scheduling objects to run, check the time zone selected for BI launch pad. The default time zone is local to the web server that is running BI platform, not to the Central Management Server (CMS) computer to which you connect. Properly setting the time zone ensures that scheduled objects are processed in the time zone in which you are working.
1. On the header panel, clickPreferences.
2. In the "Preferences" dialog box, clickLocales and Time Zone.
3. In theProduct Localelist, select the language that you want BI launch pad to use.
4. In thePreferred Viewing Localelist, select a locale that uses the formatting conventions for dates, numbers, and time that you want to use when viewing objects.
This option also determines in which language names and descriptions of multilingual objects will appear.
5. In theCurrent Time Zonelist, select your time zone. 6. ClickSave & Close.
4.1.4 To set Crystal report viewing preferences
2. In the "Preferences" dialog box, clickCrystal Reportsin the navigation list. 3. UnderSelect a default view format, select a viewer for displaying Crystal reports:
• Web (no downloading required)
This viewer does not download files and will work without Java or ActiveX. You must use this viewer to view reports created in Crystal Reports.
• Web ActiveX (ActiveX required)
This viewer is available if you use a version of Microsoft Internet Explorer that supports ActiveX controls.
• Web Java (Java required)
Use this viewer for web browsers that support the Java Virtual Machine.
4. If you selected theWeb (no downloading required)viewer, underSelect printing control (for
Web), perform one of the following actions:
• ClickPDF one-click printing (Adobe Acrobat required)to export reports to PDF so that you
can print PDF files. If a report has Flash objects that you want to print, you must print to a PDF file.
• ClickActiveX one-click printing (ActiveX required)to print reports from the viewer. You must
install a small ActiveX component.
5. If you selected theWeb (no downloading required)viewer, underSelect a rendering resolution
(for Web), choose a viewing resolution.
6. UnderSelect a default measuring unit, selectInchesorMillimeters.
7. Select theShow SAP Variable Technical Name (SAP Crystal Reports 2011 only)check box if
you want to see the technical names of SAP variables when you work with reports in SAP Crystal Reports 2011 format.
8. ClickSave & Close.
4.1.5 To set BI workspaces preferences
1. On the header panel, clickPreferences.
2. In the "Preferences" dialog box, clickBI workspaces.
3. UnderBI workspaces, in theDefault style style sheet to use when creating a new workspace
list, select a page format to apply to new BI workspaces.
4. UnderBackgrounds for style sheets, select a style sheet for new BI workspaces in theSelect a
style sheetlist.
5. To select a background image, select theImagecheck box, clickChange Image, and locate and
select the image.
Image files must be smaller than 2 MB. Image formats can be JPG, GIF, or PNG.
6. To select a background color, select theColorcheck box, and enter the color information. Setting preferences
7. Repeat steps 3 to 6 for each style sheet that you will use to create new BI workspaces. 8. ClickSave & Close.
Before you can edit a BI workspace, you must open the workspace as a tab in BI launch pad.
4.1.6 To set Analysis edition for OLAP preferences
1. Log on to BI launch pad.
2. On the header panel, clickPreferences.
3. In the "Preferences" dialog box, clickAnalysis edition for OLAPin the navigation list.
4. Select theAccessibility Modecheck box to use a screen reader with Analysis edition for OLAP.
5. ClickSave & Close.
The "Preferences Changed" dialog box appears, indicating that some changes will take place after the page reloads.
6. ClickOK.
The next time you use Analysis edition for OLAP, it will use a screen reader.
4.1.7 Web Intelligence preferences
4.1.7.1 To select a reading interface for Web Intelligence documents
All reading interfaces, except PDF, have view and design modes. Use the view mode to perform basic viewing tasks and the design mode to modify a document. The only difference between reading interfaces is that two of them require you to download components.
1. On the header panel, clickPreferences.
2. In the "Preferences" dialog box, clickWeb Intelligence.
3. UnderView, choose a reading interface for viewing Web Intelligence documents:
• SelectHTML (no download required)to view documents over the Internet, without downloading
components..
• SelectApplet (download required)to download a Java applet that you use to view documents.
• When you plan to work offline occasionally, selectDesktop (Rich Client, Windows only,
installation required) (installation required)to download a desktop application that you use to view documents.
4. ClickSave & Close.
4.1.7.2 To select a modification interface for Web Intelligence documents
Use a modification interface to create and/or edit Web Intelligence documents.All modification interfaces have similar features and capabilities. The only difference between the interfaces is that two of them require you to download components.
1. On the header panel, clickPreferences.
2. In the "Preferences" dialog box, clickWeb Intelligence.
3. UnderModify (creating, editing and analyzing documents), select a modification interface:
• SelectHTML (no download required)to create and modify documents online, without
downloading anything.
• SelectApplet (download required)to download a Java applet required for viewing documents.
• SelectDesktop (Rich Client, Windows only, installation required) (installation required)to
download a desktop application for viewing documents. Tip:
Select this option if you plan to work offline occasionally. 4. ClickSave & Close.
4.1.7.3 To select a default universe
You can specify a universe to use as the default data source when you create Web Intelligence documents.
1. On the header panel, clickPreferences.
2. In the "Preferences" dialog box, clickWeb Intelligence.
3. UnderSelect a default Universe, clickBrowse, and select a universe. 4. ClickOK, and clickSave & Close.
4.1.7.4 To select a formatting locale for Web Intelligence documents
The preferring viewing locale (PVL) determines how dates, times, and numbers are formatted in Web Intelligence documents.
1. On the header panel, clickPreferences. Setting preferences
2. In the "Preferences" dialog box, clickWeb Intelligence.
3. UnderWhen viewing a document, choose a locale:
• SelectUse the document locale to format the datato maintain the locale used when a document
was created.
• SelectUse my preferred viewing locale to format the datato use your PVL.
4. ClickSave & Close.
4.1.7.5 Drill options for data
You must specify how Web Intelligence documents should behave when you drill up or drill down on data. Drilling on data makes the view of data more or less detailed. For example, you might drill down on data grouped by country to view it grouped by region, or you might drill up on data grouped by city to view it grouped by country.
When you start drill mode, the drill toolbar automatically appears at the top of a report and displays the value(s) on which you drilled. The values filter the results that appear on the drilled report.
Each table, chart, or free-standing cell in a report represents a specific block of data. You can drill on a report with multiple report blocks in the following ways:
• Synchronize drill on report blocks • Drill on only the selected block
The following examples show how each option affects a report when you drill down on a table to analyze detailed results per service line. In the first example,Synchronize drill on report blocksis selected and both the table and the chart display the drilled values:
In the second example,Synchronize drill on report blocksis not selected. The drill is only performed on the selected block and only the table displays the drilled values:
You must have the necessary access permissions to drill out of the scope of analysis in a drill session. For example, when you drill on results in a document, you may want to drill to higher-level or lower-level information than is included in the scope of the document. This requires a new query to retrieve additional data from the data source, and you will be prompted to decide whether to run the additional query. For example, if you drill on year 2001, the results on the drilled table are for Q1, Q2, Q3, and Q4 of 2001. This means the quarterly values that you drilled to are filtered by 2001. The "drill" toolbar displays "2001," the value that filters the drilled results.
You can use the "drill" toolbar to select other values and filter the results differently. For example, if you use the "drill" toolbar to select "2002," the results on the drilled table will be for Q1, Q2, Q3, and Q4 of year 2002.
If a drilled report includes dimensions from multiple queries, when you point the cursor at a value on the filter, a tooltip indicates the name of the query and the dimension for the value.
4.1.7.5.1 To set the drill options
1. On the header panel, clickPreferences.
2. In the "Preferences" dialog box, clickWeb Intelligence.
3. UnderView, select either theHTML (no download required)orDesktop (Rich Internet, Windows
only, installation required) (installation required)reading interface. 4. UnderDrill options, choose general options to apply to drill sessions:
a. To be prompted when a drill action requires a new query to add data to a document, select
Prompt when drill requires additional data.
When prompted, you may be able to apply filters to the extra dimensions in the new query. The filters restrict the size of a query to the data necessary for your analysis.
b. To synchronize drilling on all report blocks, selectSynchronize drill on report blocks. c. To hide the "drill" toolbar when you switch to drill mode, selectHide Drill toolbar on startup.
The "drill" toolbar is hidden (for example, when you do not want to select filters during a drill session).
5. UnderStart drill session, choose an option to apply to drill sessions:
a. To retain a copy of the original document so that you can compare drilled results to the original data, selectOn duplicate report.
A duplicate of the original report is created. When you quit drill mode, both the original report and the drilled report remain in the document for viewing.
b. To drill on the current report so that it is modified by your drill actions, selectOn existing report. When you end drill mode, the report displays the drilled values.
6. ClickSave & Close.
4.1.7.6 To select an Excel format
The Microsoft Excel format you select determines the appearance of data in instances of Web Intelligence documents when you schedule or export the documents to Excel.
1. On the header panel, clickPreferences.
2. In the "Preferences" dialog box, clickWeb Intelligence.
3. UnderSelect a priority for saving to MS Excel, select an option:
• To display data in a format that is similar to Web Intelligence, clickPrioritize the formatting of the documents.
• To display data in a text format, clickPrioritize easy data processing in Excel. 4. ClickSave & Close.
Viewing objects
5.1 Viewing objects
TheDocumentstab is where you open objects that you want to view or edit. When you double-click an object, it opens on a new tab. From there, you can open it in a window if necessary.
When you view a Crystal report or a Web Intelligence document, your access rights and the default settings configured by your administrator determine which data you see. You can view report data from the source, in the latest instance of an object, or in a report's saved data. Depending on your access rights, you may be able to refresh a report or a document with new data from its source.
The way that you view an object determines which information you see. For example:
• When you double-click an object to view a dynamic content document (for example, a Crystal report
or a Web Intelligence document), the latest instance of the document opens. If the latest instance is unavailable, the object itself opens.
• When you selectView>View, the object opens.
• When you selectView>View Latest Instance, the latest object instance opens.
• When you view a publication or a program object, BI launch pad displays the object properties, if the latest instance is unavailable.
Note:
If an option is not available, you do not have access rights to that option.
5.1.1 To view an object
• On theDocumentstab, locate the object you want to view, and double-click the object.
If the object is a dynamic content document (for example, a Crystal report or a Web Intelligence document), the latest instance of the document opens. If the latest instance is unavailable, the object itself opens. If the latest instance of a publication or program object is unavailable, the object properties open.
5.1.2 To refresh an object
Before you can refresh data in an object, you must have refresh rights for the object, and the server must contain the data source information.
Refreshing an object enables you to view data on demand. However, refreshing may use a considerable amount of system resources.
Tip:
As a rule, refresh objects only when it is likely that data has changed.
• Click on the toolbar in the object viewer.
5.1.3 To view an older instance
1. Right-click the object for which you want to view an instance and selectHistory. 2. In the "History" dialog box, double-click the instance that you want to view. The instance you selected opens on a new tab.
5.1.4 To pin a tab for future viewing
Before you can pin a tab, your BI launch pad preferences must be configured to enable tabbed document viewing.
You can pin a document or instance that you frequently view to a tab in BI launch pad. The document or instance automatically opens on a tab the next time you log on to BI launch pad.
Note:
To unpin a tab, click in the upper-right corner of the tab. When not pinned, the icon on the button points sideways.
1. Perform one of the following actions:
• To open an object, right-click an object or instance and selectView.
• To open the latest instance of an object, right-click an object or instance and selectView Latest Instance.
Tip:
To open an older instance, right-click the object and selectHistory, and then select the instance in the "History" dialog box.
The object or instance opens on a new tab.
2. Click in the upper-right corner of the tab.
The icon on the button points down, indicating that the tab is pinned.
5.1.5 To open a report in a larger viewing area
To view more detail in reports, you can open them on a new tab or in a new window in BI launch pad. For example, if you need a larger viewing area for a report, open the report in a new window.
• Right-click a report and selectOpen in a new window.
5.2 Viewing Crystal reports
When you click a Crystal report, the report appears in a viewer. The type of viewer you have determines which tasks you can perform.
5.2.1 Crystal report viewers
Use Crystal report viewers to view reports, navigate multiple pages, refresh data, drill down to details behind charts and summarized data, select parameters, print, and export data. You can use Crystal report viewers to display reports even when you are not connected to BI platform.
Crystal report viewers support ActiveX, Java, and web-only viewing formats. Typically, your system administrator selects the viewer type that is best suited to your company's needs. However, you can manually select a viewer type in the BI launch pad preferences.
Note:
Some features of Crystal report viewers may be disabled by your administrator. For more information, contact your administrator.
Related Topics
•To set Crystal report viewing preferences •SAP Crystal Reports viewer 2011
5.2.1.1 Web viewer
Choose this viewer to view, refresh, and print reports, edit parameters, and export reports to a variety of formats. SelectFile>Opento open Crystal reports stored in the repository.
You can access the web viewer in a browser, without downloading a plug-in. Note:
The web viewer is the only Crystal report viewer that can access the "parameter panel" and that displays SAP Crystal Reports for Enterprise reports.
Related Topics
•SAP Crystal Reports viewer 2011
5.2.1.1.1 Web viewer toolbar options
Tip:
After drilling down a report, use tabs to navigate the report. Viewing objects
Description Option
From this menu, you can selectOpen,Send To,
Create Shortcut In My Favorites,Schedule, or History.
SelectFile>Opento open a Crystal report from the repository. Other options function the same as
BI launch padFilemenu options.
Filemenu
Click to move back one page or to move
forward one page in a report. and
Click to print a report.
Click to refresh a report to the most current data from a report's data source.
Click to export a Crystal report to your computer or to a location on a network.
• Click to go to the previous page or to
go to the next page in a report.
• SelectGo to First PageandGo to Last Page
in the list to go to the first or last page in a re-port.
Select400%,300%,200%,150%,125%,100%, 75%,50%, or25%in the list to view text in a report by that percentage of zoom or reduction.
Click to open the "group tree."
5.2.1.1.2 To open the group tree
•
5.2.1.2 Web ActiveX viewer
Choose this viewer to view, refresh, and print reports and to export reports to various formats. The web ActiveX viewer can be used with Microsoft Internet Explorer versions that support ActiveX controls. You must download and install the ActiveX component. If ActiveX is not installed, you cannot use the web ActiveX viewer. For assistance, download ActiveX or contact your system administrator.
Tip:
After drilling down on data in a report, you can use the report tabs to navigate the report. Related Topics
•Viewing Crystal reports Viewing objects
5.2.1.3 Web Java viewer
Choose this viewer to view, refresh, and print reports and to export reports to a variety of formats. You can access the web Java viewer in any browser that supports Java Virtual Machine.
Note:
You may experience minor problems when scrolling through reports in the web Java viewer. The problems result from the implementation of Java Virtual Machine in some web browsers. If you experience problems, repeatedly click the scroll buttons to scroll—do not hold down the scroll buttons.
Related Topics
•Viewing Crystal reports
5.2.1.3.1 Web Java viewer toolbar options
Tip:
Description Option
Click to print a report.
Click to refresh a report to the most current data from the report's data source.
Click to export a Crystal report to your computer or to a location on a network.
Click to stop report processing.
Click to show or hide the "group tree", which you use to navigate through data in a report.
Click a button to go to a page in a report: •
Click to go to the first page.
•
Click to go to the previous page.
•
Click to go to the next page.
•
Click to go to the last page.
Shows a report's page range. Type the page number you want to go to in the text box.
Click to search for text in a report.
Select400%,300%,200%,150%,100%,75%, 50%, or25%in the list to view text in a report by that percentage of zoom or reduction.
5.2.2 SAP Crystal Reports viewer 2011
Viewing objectsSAP Crystal Reports viewer 2011 is installed on your computer so you can view downloaded Crystal reports without connecting to BI platform. Use SAP Crystal Reports viewer 2011 to perform the following tasks:
• Print or export reports
• Save reports
• Select data to view
• Drill down on data in reports
• View multiple reports
SAP Crystal Reports viewer 2011 functions the same as Crystal report viewers in BI launch pad.
For more information about tasks you can perform with SAP Crystal Reports viewer 2011, see theSAP
Crystal Reports Viewer 2011 Help.
5.2.2.1 To install SAP Crystal Reports viewer 2011
When you install the Crystal Reports viewer 2011, it resides as a client-software viewer on your computer. Note:
This task applies only to the English-language version of the www.sap.com web site. 1. In a browser, go tohttp://www.sap.com/solutions.
2. In theSearchbox on the web page, search for “Crystal Reports Viewer”.
The search results appear.
3. Click the first result calledSAP Crystal Reports Viewer.
The SAP Crystal Reports viewer web page appears, with aDownload Nowlink on the right side of
the page.
4. Download and run the SAP Crystal Reports Viewer 2011 installation program.
5. Follow the onscreen instructions, accepting the default values when possible. 6. ClickFinish.
5.2.2.2 Opening SAP Crystal Reports viewer 2011
SAP Crystal Reports viewer 2011 opens when you double-click a Crystal report (.rpt) file on your computer.
Note:
If SAP Crystal Reports is installed on your computer, it takes precedence over SAP Crystal Reports viewer 2011 and displays reports by default.
5.2.3 To drill down on Crystal report data
You can drill down a report to see the data under charts and summarized groups. • In a Crystal reports viewer, double-click a link in a report.
5.2.4 To view alerts in Crystal reports
BI platform tracks report instances that trigger alerts. You can view the alerts for reports created in SAP Crystal Reports.
1. In the CMC, select theFoldersarea.
2. Locate the folder or category that contains the Crystal report you want to view, and select the object. 3. SelectMore Actions>Alerts.
The "Alerts" dialog box appears, displaying the instances that triggered an alert.
Figure 5-1: "Alerts" dialog box displaying alert triggers (English
example)
4. Double-click a title to open the report instance.
5.2.5 To view and edit parameters of Crystal reports in the web viewer
1. Locate and select the Crystal report that you want to view. 2. SelectView>View.
3. If prompted to enter report values, enter the values.
You must enter report values before you can view the report. 4. Select the data you want to view, and clickOK.
5. To identify which parameters you can access in the report, click .
The parameter panel displays the report parameters.
6. Select a parameter.
7. To edit the parameter value, perform either of the following actions: • On the "parameter" panel, type a new value.
• Click>to open an editing dialog box, type a new value, and clickOK.
8. Edit the remaining parameters as needed.
9. To view the report with the new parameter values, clickApply.
5.2.6 To print Crystal reports
You can print successful instances of reports and of reports that you view on demand. Note:
• Depending on the Crystal report viewer you use, the steps in this task may vary. However, the
general principles for printing reports are the same. If on-screen instructions are provided, follow those instructions instead of the steps in this task.
• The person who designs a report chooses the page orientation. You cannot change it in the "Print" dialog box.
1. Open the document that you want to view.
2. On the "viewer" toolbar, click . The "Print" dialog box appears.
3. UnderPrint range, selectAllor type the page range to print. 4. UnderCopies, type the number of copies to print.
Tip:
Select theCollatecheck box to print pages in numerical order. For example, if you are printing two copies of a four-page report, your report prints pages one, two, three, and four of the first copy and then prints pages one, two, three, and four of the second copy.
5. (Web viewer and web ActiveX viewer) UnderPrinter Paper, select the paper size and the paper
source options.
6. (Web viewer and web ActiveX viewer) UnderOptions, if a Crystal report is wide and you want it to fit on one page when it prints, clickFit Horizontal Pages to One Page.
7. If you want to print Flash objects embedded in a Crystal report, selectPrint Flash Objects for Current Page.
5.2.7 To export Crystal reports
You can export successful instances of Crystal reports and reports that you view on demand to multiple formats. For example, you can export data that predicts sales trends to an Excel spreadsheet and then email it to the sales team.
Tip:
For reports that you can drill down on, export the drilled-down view. 1. Open the Crystal report that you want to view.
2. On the "viewer" toolbar, click . The "Export" dialog box appears.
3. In theFile Formatlist, select the file format you want to export the Crystal report to.
4. UnderPage Range, selectAll Pagesor type the range of pages to export.
5. ClickExport.
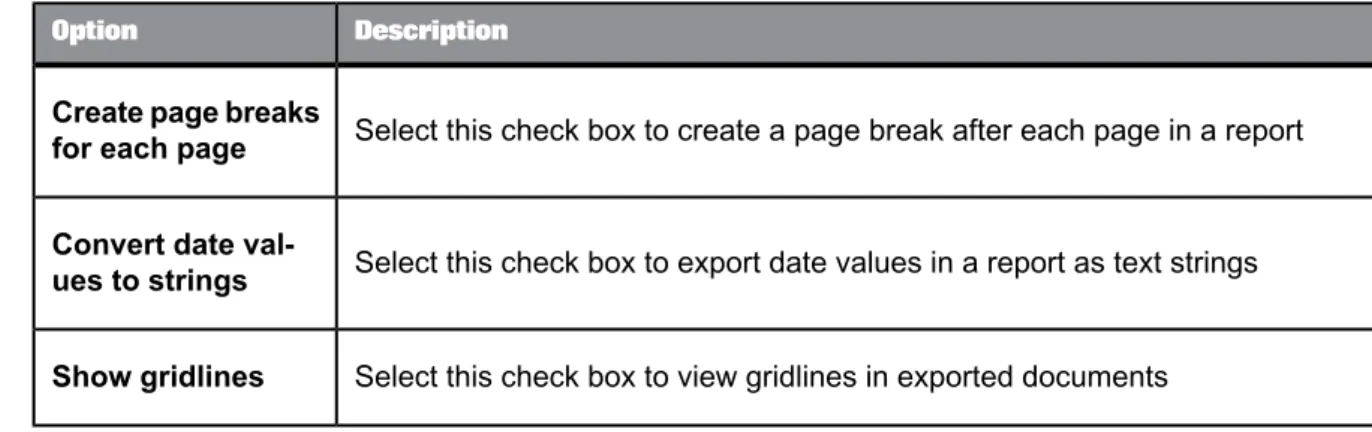
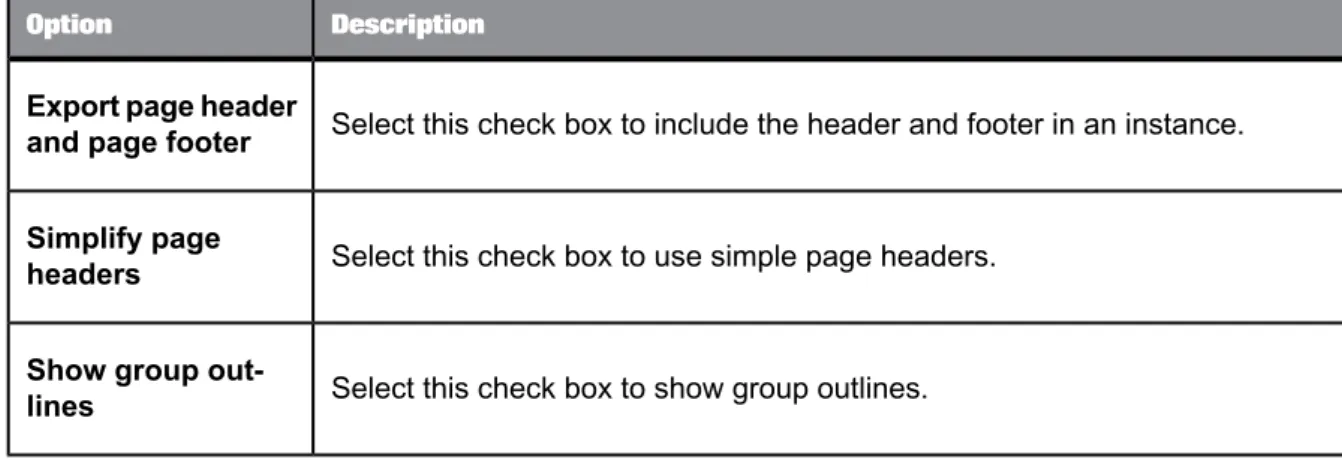
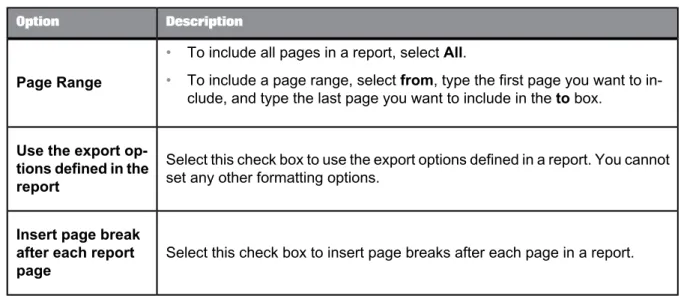
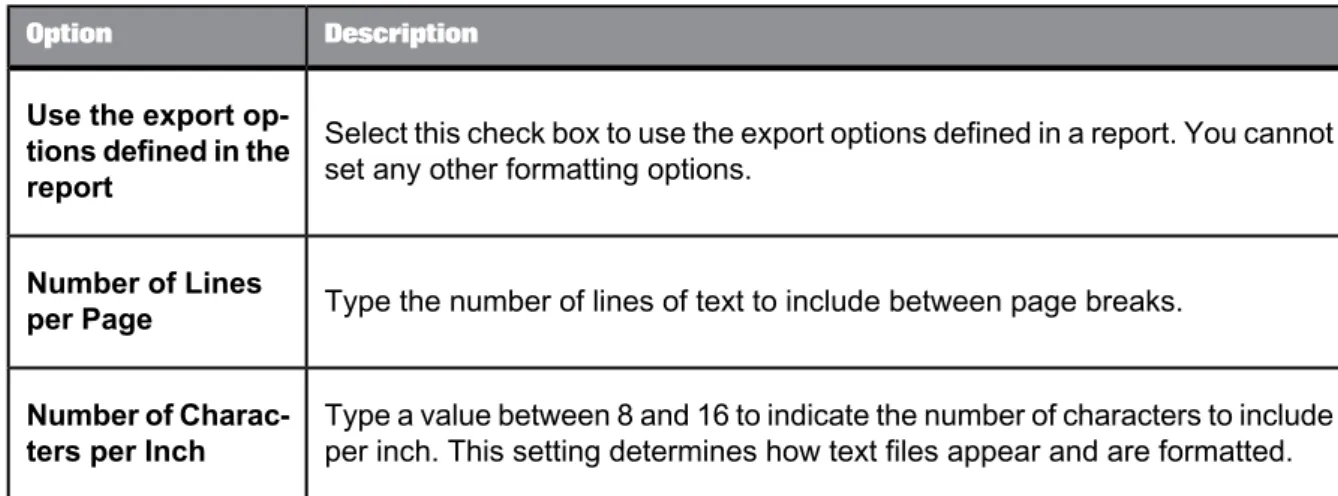
5.2.7.1 Export format options
When you export a report to a file format other than SAP Crystal Reports (.rpt), the report may lose some or all of its formatting. BI launch pad attempts to preserve as much formatting as the export format allows.
You can export reports to the following file formats:
Description File format
You cannot export to this.rptformat from a
drilled-down view. Crystal Reports
This read-only.rptrformat attempts to preserve the appearance of the original report.
Crystal Reports (RPTR)
.xlsformat
Microsoft Excel (97-2003)
Data-only.xlsformat
Microsoft Excel (97-2003) (Data Only)
.docformat
Microsoft Word (97-2003) Viewing objects
Description File format
.pdfformat
This.rtfformat is only available from a web viewer.
Rich Text Format (RTF)
This.docformat preserves less formatting than
theMicrosoft Word (97-2003)format. Text ap-pears in lines, and images are placed inline with text.
Microsoft Word - Editable (RTF)
.csvformat
Separated Values (CSV)
.xmlformat
XML
Note:
Flash objects only appear if you export to a Crystal report format (.rptor.rptr) or to Adobe PDF (.pdf). Fallback images appear when exporting to all other formats.
For information about scheduling a Crystal report to a specific format, see exporting information in the SAP Crystal Reports 2011 User Guide.
Related Topics
•Crystal report instance formatting options
5.2.8 To sort data interactively
1. Open a Crystal report that uses interactive sorting. 2. Choose a value to sort by.
3. Click an arrow to sort data in the report:
• To sort data in ascending order, click .
5.3 Viewing Web Intelligence documents
When you open a Web Intelligence document, the document appears in a viewer. Depending on the type of viewer and the functions enabled by your system administrator, you can perform different activities.
The following sections provide information about the Web Intelligence toolbar and instructions for working with the navigation map, displaying user prompts, finding text, and drilling down on data in documents.
For instructions on performing analysis on Web Intelligence documents, see the SAP BusinessObjects Web Intelligence documentation.
5.3.1 Web Intelligence viewer toolbar
Description Toolbar option
Use this menu to show or hide the following parts of the BI launch pad user in-terface. Select one of the following options:
• Filter Bar • Outline
• Side Panelmenu options:Normal,Minimized, orOff • Report Tabs
• Status Bar Web Intelligence
menu
Click to create a new Web Intelligence document. Click to open a Web Intelligence document for viewing.
Use this menu to save changes to a document to various file formats, with a new name, and locally on your computer. Select one of the following options:
• Save
• Save As
Click to create a PDF version of a document for printing. Click to search for text in a document.
Description Toolbar option
Click to show the dates of document instances.
Use this menu to export a document, the current report, or data to your computer in the format you choose. Select one of the following options:
• Export Document Asmenu options:PDF,Excel,Excel 2007, orText • Export Current Report Asmenu options:PDF,Excel,Excel 2007, orText • Export Data to CSV
Use this menu to send a document to a destination. The available destinations vary, depending on how BI launch pad is configured. Select one of the following options:
• Send to Mailto send the document to an email address • Send to Userto send the document to a particular user • Send to Ftpto send the document to an FTP server
Click to undo the previous action. Click to redo the previous action.
Use this menu to refresh content. Select one of the following options: • Refresh Queryto refresh the current tab
• Refresh Allto refresh the entire document
Use this menu to track changes in a document. Select one of the following op-tions:
• Trackto track changes
• Show Changesto show tracked changes • Display Optionsto set tracking options Trackmenu
Use this menu to drill up or down on document data. The options available de-pend on whether drilling is in progress. Select one of the following options: • Start Drill Modeto start drilling on data
• Stop Drill Modeto stop drilling on data
• Snapshotto capture a level of analysis revealed during data drilling. A copy of the report is created and opened on a new tab.
Drillmenu
Click to show or hide theReport Filtertoolbar Filter Bar
Description Toolbar option
Click to show or hide the document outline. Outline
Use this menu to read a document in a different format. Select one of the follow-ing options:
• HTML
Readingmenu
Use this menu to modify the design of a document. Select one of the following options:
• With Datato modify the data in the document
• Structure onlyto modify only the document's structure Designmenu
5.3.2 To display the navigation map
Use the navigation map ( ) to locate reports in a Web Intelligence document.
1. Open the Web Intelligence document in which you want to locate reports.
2. On the viewer toolbar, selectWeb Intelligence>Side Panel>Normal. 3.
On the side panel, click .
The "navigation map" appears in the side panel.
5.3.3 To display user prompts
For Web Intelligence documents, the information that prompts gather from users may determine which
data appears in a document. Use theuser prompt inputicon ( ) to gather information from users.
For example, in a document used by sales, a prompt may ask users to choose a region. When a user chooses a region, the document includes results for that region instead of results for all regions in the document.
1. Open the Web Intelligence document you want to view.
2. On the viewer toolbar, clickWeb Intelligence>Side Panel>Normal. 3.
On the side panel, click .
TheUser Prompt Inputpane appears in the side panel. Viewing objects