Eucalyptus 4.1.2 User Guide
Contents
Eucalyptus Overview...6
Getting Started...8
Getting Started with the Eucalyptus Management Console...8
Setup User Credentials and Euca2ools...8
Console Login...8
Launch and Connect to an Instance with the Management Console...9
Set Up A Web Server on an Instance...19
Reboot an Instance with the Management Console...20
Terminate an Instance with the Management Console...21
Getting Started with Euca2ools...23
Setup User Credentials and Euca2ools...23
Find an Image...24
Create Key Pairs...24
Authorize Security Groups...25
Launch an Instance...25
Log in to an Instance...26
Set Up A Web Server on an Instance...27
Reboot an Instance...28
Terminate an Instance...28
Using Instances...30
Instance Overview...30
Instance Concepts...30
Instance Basics...31
Instance Tasks...39
Find an Image...40
Create Key Pairs...40
Authorize Security Groups...41
Launch an Instance...41
Log in to an Instance...41
Reboot an Instance...43
Terminate an Instance...43
Using EBS...44
EBS Overview...44
Create and Attach an EBS Volume...44
List Available EBS Volumes...44
Detach an EBS Volume...45
Create a Snapshot...45
List Available Snapshots...45
Delete a Snapshot...45
Using Tags and Filters...46
Tagging and Filtering Overview...46
Tagging Resources...46
Filtering Resources...47
Tagging and Filtering Tasks...47
Add a Tag...48
List Tags...48
Change a Tag's Value...49
Delete a Tag...49
Filter by Tag...50
Managing Access...51
Groups...51
Create a Group...51
Add a Group Policy...51
Modify a Group...51
Add a User to a Group...52
Remove a User from a Group...52
List Groups...52
Delete a Group...52
Users...52
Add a User...53
Create a Login Profile...53
Modify a User...53
Change User Path...53
Change User Password...53
List Users...54
Delete a User...54
Credentials...54
Create Credentials...54
Get Credentials...54
Upload a Certificate...55
Using VM Networking and Security...56
Create a Security Group...56
Delete a Security Group...57
Authorize Security Group Rules...57
Revoke Security Group Rules...57
Using Auto Scaling...59
How Auto Scaling Works...59
Auto Scaling Concepts ...59
Understanding Launch Configurations...59
Understanding Auto Scaling Groups...59
Understanding Auto Scaling Policies...60
Understanding Health Checks...60
Understanding Instance Termination Policies...60
Auto Scaling Usage Examples...61
Creating a Basic Auto Scaling Configuration...61
Configuring a Demand-Based Scaling Policy...62
Configuring Health Checks...64
Configuring an Instance Termination Policy...64
Using Elastic Load Balancing...65
Elastic Load Balancing Overview...65
Elastic Load Balancing Concepts...65
Eucalyptus Load Balancing Usage Examples...67
Creating a Basic Elastic Load Balancing Configuration...67
Configuring the Health Check...68
Modifying an Elastic Load Balancing Configuration...68
Creating Elastic Load Balancing Sticky Sessions...69
Uploading SSL Certificates for Elastic Load Balancing...70
Adding SSL Support...70
Using CloudWatch...72
CloudWatch Overview...72
CloudWatch Concepts...72
Namespaces, Metrics, and Dimensions...76
CloudWatch Tasks...82
Configuring Monitoring...82
Viewing and Publishing Metrics...84
Configuring Alarms...85
Using Object Storage...87
Using CloudFormation...88
CloudFormation Run Options...92
CloudFormation Use Case...95
CloudFormation Templates...98
Troubleshooting CloudFormation...113
Using Virtual Private Cloud (VPC) (Tech Preview)...114
How VPC Works...114
Default VPCs...114
VPC Networking Concepts ...114
Understanding Subnets and IP Addressing ...114
Understanding Route Tables...115
Understanding Internet Gateways...115
VPC Security Concepts ...115
Understanding Security Groups...115
Understanding Network ACLs...115
VPC Usage Examples...116
Creating a Simple VPC...116
Creating a VPC with a Private Subnet...117
Eucalyptus Overview
Eucalyptus is open source software for building AWS-compatible private and hybrid clouds. As an Infrastructure as a Service product, Eucalyptus allows you to flexibly provision your own collections of resources (both compute and storage), on an as-needed basis. It also features high-availability configurations to ensure the robustness of your cloud. Whether you're looking for an on-premise complement to your public cloud setup, or already have a virtualized datacenter and now want to move into a private or hybrid cloud setup, Eucalyptus can help you get started today. Download Faststart and have your cloud up and running in half an hour, or take advantage of Eucalyptus' seamless interoperation with Amazon Web Services’ EC2 and S3 public cloud services, for an enterprise-grade hybrid cloud platform out of the box.
Who Should Read this Guide?
This guide is for Eucalyptus users who wish to run application workloads on a Eucalyptus cloud.
What’s in this Guide?
This guide contains instructions for users of the Eucalyptus cloud platform. While these instructions apply generally to all tools capable of interacting with Eucalyptus, such as the Eucalyptus Management Console or the AWS S3 toolset, but the primary focus is on the use of Euca2ools (Eucalyptus command line tools). The following is an overview of the contents of this guide.
Related Topic How do I …?
Getting Started
Begin using and configuring Eucalyptus
Using Instances
Run and control with VM instances
Using EBS
Use Eucalyptus’ elastic block storage
Using Tags and Filters
Apply tags and filters
Managing Access
Manage access for groups and users
Using VM Networking and Security
Understand the Eucalyptus VM networking and security features
Using Auto Scaling
Use Eucalyptus’ Auto Scaling features
Using Elastic Load Balancing
Use elastic load balancing
Using CloudWatch
Generate metrics about my cloud
Using Object Storage
Using scalable object storage
Eucalyptus Features
Eucalyptus offers ways to implement, manage, and maintain your own collection of virtual resources (machines, network, and storage). The following is an overview of these features.
Eucalyptus provides API compatibility with Amazon Web Services, to allow you to use familiar tools and commands to provision your cloud.
AWS API compatibility
Eucalyptus offers a High-Availability configuration, to ensure that your cloud is robust and fault-tolerant.
High-Availability configurations
Eucalyptus provides storage options compatible with Amazon's EBS (block-based) and S3 (bucket-based) storage products.
Block- and bucket-based storage abstractions
Eucalyptus offers a Management Console, allowing your users to request the resources they need, and automatically provisioning those resources where available.
Self-service capabilities
The Eucalyptus Management Console is accessible from any device via a browser. The Console initial page provides a Dashboard view of components available to you to manage, configure, provision, and generate various reports.
Web-based Interface
Resource Management
Eucalyptus offers tools to seamlessly manage a variety of virtual resources. The following is an overview of the types of resources your cloud platform.
Eucalyptus employs public and private keypairs to validate your identity when you log into VMs using SSH. You can add, describe, and delete keypairs.
SSH Key Management
Before running instances, someone must prepare VM images for use in the cloud. This can be an administrator or a user. Eucalyptus allows you to bundle, upload, register, describe, download, unbundle, and deregister VM images.
Image Management
Eucalyptus lets you run your own VMs in the cloud. You can run, describe, terminate, and reboot a wide variety of Linux-based VMs that were prepared using image management commands.
Linux Guest OS Support
Eucalyptus allows you to run, describe, terminate, reboot, and bundle instances of Windows VMs.
Windows Guest OS Support
Eucalyptus can allocate, associate, disassociate, describe, and release IP addresses. Depending on the networking mode, you might have access to public IP addresses that
IP Address Management
are not statically associated with a VM (elastic IPs). Eucalyptus provides tools to allow users to reserve and dynamically associate these elastic IPs with VMs.
Security groups are sets of firewall rules applied to VMs associated with the group. Eucalyptus lets you create, describe, delete, authorize, and revoke security groups.
Security Group Management
Eucalyptus allows you to create dynamic block volumes. A dynamic block volume is similar to a raw block storage device that can be used with VMs. You can create, attach,
Volume and Snapshot Management
detach, describe, bundle, and delete volumes. You can also create and delete snapshots of volumes and create new volumes from snapshots.
Document version: Build 2704 (2015-08-03 20:58:57)
Getting Started
This section helps you get started using your Eucalyptus cloud, and covers setting up your user credentials, installing and configuring the command line tools, and working with images and instances.
As a cloud user, you can access the Eucalyptus cloud using a command line interface such as Euca2ools, or using a web-based interface such as the Eucalyptus Management Console. You can switch between them freely. What you create in one will be accessible through the other.
To access Eucalyptus via the command line tools, you need keys for Euca2ools. To access Eucalyptus with the Management Console, you'll need a password for the Management Console. Talk to your cloud administrator to get your keys and passwords.
Getting Started with the Eucalyptus Management Console
This section helps you get started using your Eucalyptus cloud with the Eucalyptus Management Console.
To access Eucalyptus with the Management Console, you'll need a password for the Management Console. Talk to your cloud administrator to get your keys and passwords.
Setup User Credentials and Euca2ools
You must have proper credentials to use client tools (such as Euca2ools) to interact with a Eucalyptus cloud.
Once you've signed up for a cloud account, your cloud administrator should send you a zip file containing your cloud credentials. This zip file contains an X.509 certificate, as well as a .eucarc file that will set environment variables needed to access your Eucalyptus cloud using the command line tools.
To setup user credentials
1. From a command line, unzip your credentials zip file to a directory of your choice. In the following example we
download the credentials zip file to ~/.euca, then change access permissions, as shown:
mkdir ~/.euca cd ~/.euca
unzip <filepath>/euca2-<user>-x509.zip chmod 0700 ~/.euca
chmod 0600 *
2. From a command line, enter the following: source eucarc
Note: For your convenience, you may want to add these environment variables to your shell's resource
configuration file (for example: bashrc). Please consult your system documentation for more information. You're now ready to use Euca2ools, the Eucalyptus command-line interface (CLI). To explore further, please continue to the Using Instances section and go through the Instance Tasks.
Console Login
This screen allows you to log in to the Eucalyptus Management Console with either your Eucalyptus or your Amazon Web Services account. If you've forgotten your password, don't have login credentials, or do not know the URL for the Eucalyptus Management Console for your Eucalyptus account, please contact your system administrator.
1. Navigate to the Eucalyptus Management Console by typing the URL of the Management Console into your browser's
navigation bar. The URL of the Eucalyptus Management Console depends on how the console was installed in your cloud; see your system administrator for the specific URL for your installation.
2. Follow the appropriate instructions below for logging into either your Eucalyptus or your Amazon Web Services
cloud.
Log in to your Eucalyptus cloud
This area of the login dialog allows you to log in to your Eucalyptus cloud.
1. Click the Log in to Eucalyptus tab.
2. Type your account name into the Account name text box. 3. Type your user name into the User name text box. 4. Type your password into the Password text box. 5. Click the Log in to Eucalyptus button.
Log in to your Amazon Web Services cloud
This area of the login dialog allows you to log in to your Amazon Web Services cloud.
1. Click the Log in to AWS tab.
2. Note: To obtain your AWS security credentials, go to Amazon's Your Security Credentials page. Enter your AWS access key ID into the Access key ID text box.
3. Enter your AWS secret access key into the Secret access key text box. 4. Click the Log in to AWS button.
Launch and Connect to an Instance with the Management Console
To launch an instance:
1. Click on the Launch Instance button on the main console page:
2. Select an image from the list (for this example, we'll select a Centos 6 image), then click the Next button:
3. Select an instance type and availability zone from the Details tab. For this example, select the defaults, and then
4. On the Security tab, we'll create a key pair and a security group to use with our new instance. A key pair will allow
you to access your instance, and a security group allows you to define what kinds of incoming traffic your instance will allow.
b) Type the name of your new key pair into the Name text box, and then click the Create key pair button:
c) A dialog with the private half of your new key pair will display. You will need to save this keypair in a safe place. Click on the Download key pair button and save the key pair file to a safe place.
d) The Create key pair dialog will close, and the Key name text box will be populated with the name of the key pair you just created:
e) Next, we will create a security group. Click the Create security group link to bring up the Create security
group dialog:
f) On the Create security group dialog, type the name of your security group into the Name text box. g) Type a brief description of your security group into the Description text box.
h) We'll need to SSH into our instance later, so in the Rules section of the dialog, select the SSH protocol from the
Protocol drop-down list box.
i) Note: In this example, we allow any IP address to access our new instance. For production use, please
use appropriate caution when specifying an IP range. For more information on CIDR notation, go to
CIDR notation.
You need to specify an IP address or a range of IP addresses that can use SSH to access your instance. For this example, click the Open to all addresses link. This will populate the IP Address text box with 0.0.0.0/0, which allows any IP address to access your instance via SSH.
k) Click the Create security group button.
The Create security group dialog will close, and the Security group text box will be populated with the name of the security group you just created:
The Launch Instance dialog will close, and the Instances screen will display. The instance you just created will display at the top of the list with a status of Pending:
6. When the status of your new instance changes to Running, click the instance in the list to bring up a page showing
7. Note the Public IP address and/or the Public hostname fields. You will need this information to connect to your
new instance. For example:
8. Using the public IP address or hostname of your new instance, you can now use SSH to log into the instance using
the private key file you saved when you created a key pair. For example:
ssh -i my-test-keypair.private [email protected]
Set Up A Web Server on an Instance
Once you've launched an instance and connected to it, you can test it by setting up a web server.
1. ssh into your instance.
ssh 192.168.1.1 -l root 2. Install Apache:
yum install -y httpd
You should see output similar to the following:
Loaded plugins: fastestmirror, security, versionlock
Midokura-local | 2.9 kB 00:00 centos-6-x86_64-os | 3.7 kB 00:00 centos-6-x86_64-updates | 3.4 kB 00:00 centos-6-x86_64-updates/primary_db | 5.4 MB 00:00 elrepo-6-x86_64 | 2.9 kB 00:00 epel-6-x86_64 | 4.4 kB 00:00 epel-6-x86_64/primary_db | 6.3 MB 00:00 euca2ools-release | 1.2 kB 00:00 eucalyptus-release | 1.3 kB 00:00 eucalyptus-release/primary | 417 kB 00:00 extras | 3.3 kB 00:00 Setting up Install Process
Package httpd-2.2.15-31.el6.centos.x86_64 already installed and latest version Nothing to do
3. Start the web server: service httpd start
You should see output similar to the following:
Starting httpd: [ OK ]
4. Test connectivity to your instance by using a web browser and connecting to the web service on your instance.
For example:
Reboot an Instance with the Management Console
Rebooting preserves the root filesystem of an instance across restarts. To reboot an instance:
2. Click the Yes, Reboot button.
Terminate an Instance with the Management Console
Warning: Terminating an instance can cause the instance and all items associated with the instance (data,
packages installed, etc.) to be lost. Be sure to save any important work or data before terminating an instance. To terminate instances:
1. On the Instances page, Select Terminate from the Actions menu next to the instance you want to terminate.
3. The Status field of the instance will first change to Shutting-down:
...and then change to Terminated:
Getting Started with Euca2ools
This section helps you get started using your Eucalyptus cloud, and covers setting up your user credentials, installing and configuring the command line tools, and working with images and instances.
As a cloud user, you can access the Eucalyptus cloud using a command line interface such as Euca2ools, or using a web-based interface such as the Eucalyptus Management Console. You can switch between them freely. What you create in one will be accessible through the other.
Note:
This section primarily deals with using the Eucalyptus command line. For complete documentation on using web-based the Eucalyptus Console, see Console Login.
To access Eucalyptus via the command line tools, you need keys for Euca2ools. To access Eucalyptus with the Management Console, you'll need a password for the Management Console. Talk to your cloud administrator to get your keys and passwords.
Setup User Credentials and Euca2ools
You must have proper credentials to use client tools (such as Euca2ools) to interact with a Eucalyptus cloud.
Once you've signed up for a cloud account, your cloud administrator should send you a zip file containing your cloud credentials. This zip file contains an X.509 certificate, as well as a .eucarc file that will set environment variables needed
To setup user credentials
1. From a command line, unzip your credentials zip file to a directory of your choice. In the following example we
download the credentials zip file to ~/.euca, then change access permissions, as shown:
mkdir ~/.euca cd ~/.euca
unzip <filepath>/euca2-<user>-x509.zip chmod 0700 ~/.euca
chmod 0600 *
2. From a command line, enter the following: source eucarc
Note: For your convenience, you may want to add these environment variables to your shell's resource
configuration file (for example: bashrc). Please consult your system documentation for more information. You're now ready to use Euca2ools, the Eucalyptus command-line interface (CLI). To explore further, please continue to the Using Instances section and go through the Instance Tasks.
Find an Image
To find an image:
1. Enter the following command: euca-describe-images
The output displays all available images.
IMAGE emi-EC1410C1 centos-32/centos.5-3.x86.img.manifest.xml admin available public x86_64 machine
IMAGE eki-822C1344 kernel-i386/vmlinuz-2.6.28-11-server.manifest.xml admin available public x86_64 kernel
IMAGE eri-A98C13E4 initrd-64/initrd.img-2.6.28-11-generic.manifest.xml admin available public x86_64 ramdisk
2. Look for the image ID in the second column and write it down. The image ID starts with emi-. Once you find a suitable image to use, make sure you have a keypair to use.
Create Key Pairs
Eucalyptus uses cryptographic key pairs to verify access to instances. Before you can run an instance, you must create a key pair. Creating a key pair generates two keys: a public key (saved within Eucalyptus) and a corresponding private key (output to the user as a character string). To enable this private key you must save it to a file and set appropriate access permissions (using the chmod command), as shown in the example below.
Create Key Pairs with the Console
1. From the main dashboard screen, click the Key Pairs icon, or select the Network and Security menu at the top of
the dashboard. The Manage Keypairs screen will appear.
2. On the Key Pairs screen, click the Create New Key Pair link. The Create new key pair page will appear. 3. Type a name for the new key pair into the Name text box.
4. Click the Create and Download button. The private half of the key pair is saved to the default download location
for your browser.
Note: Keep your private key file in a safe place. If you lose it, you will be unable to access instances created
5. Change file permissions to enable access to the private key file in the local directory. For example, on a Linux or
Mac OS X system:
chmod 0600 <keypair_name>.private
Create Key Pairs with the Command Line
1. Enter the following command:
euca-create-keypair <keypair_name> > <keypair_name>.private
where <keypair_name> is a unique name for your keypair. For example:
euca-create-keypair alice-keypair > alice-keypair.private
The private key is saved to a file in your local directory.
2. Change file permissions to enable access to the private key file in the local directory: chmod 0600 <keypair_name>.private
3. Query the system to view the public key: euca-describe-keypairs
The command returns output similar to the following:
KEYPAIR alice-keypair
ad:0d:fc:6a:00:a7:e7:b2:bc:67:8e:31:12:22:c1:8a:77:8c:f9:c4
Authorize Security Groups
Before you can log in to an instance, you must authorize access to that instance. This done by configuring a security group for that instance.
A security group is a set of networking rules applied to instances associated with a group. When you first create an instance, it is assigned to a default security group that denies incoming network traffic from all sources. To allow login and usage of a new instance, you must authorize network access to the default security group with the euca-authorize command.
To authorize a security group, use euca-authorize with the name of the security group, and the options of the network rules you want to apply.
euca-authorize <security_group>
Use the following command to grant unlimited network access using SSH (TCP, port 22) and VNC (TCP, ports 5900 to 5910) to the security group default:
euca-authorize -P tcp -p 22 -s 0.0.0.0/0 default
euca-authorize -P tcp -p 5900-5910 -s 0.0.0.0/0 default
Use the following command to grant unlimited network access using Windows Remote Desktop (TCP, port 3389) to the security group windows:
euca-authorize -P tcp -p 3389 -s 0.0.0.0/0 windows
Launch an Instance
To launch an instance:
1. Use the euca-run-instances command and provide an image ID and the user data file, in the format euca-run-instances <image_id> --user-data-file=<filename>. For example:
euca-run-instances emi-EC1410C1 --user-data-file=combined-userdata.txt.gz
Eucalyptus returns output similar to the following example.
RESERVATION r-460007BE alice alice-default
INSTANCE i-2F930625 emi-EC1410C1 0.0.0.0 0.0.0.0 pending alice-keypair 2010-03-29T23:08:45.962Z eki-822C1344 eri-BFA91429
2. Enter the following command to get the launch status of the instance: euca-describe-instances <instance_id>
Log in to an Instance
For a Linux Instance
When you create an instance, Eucalyptus assigns the instance two IP addresses: a public IP address and a private IP address. The public IP address provides access to the instance from external network sources; the private IP address provides access to the instance from within the Eucalyptus cloud environment. Note that the two IP addresses may be the same depending on the current networking mode set by the administrator. For more information on Eucalyptus networking modes, see the Eucalyptus Administrator’s Guide.
To use an instance you must log into it via ssh using one of the IP addresses assigned to it. You can obtain the instance’s IP addresses using the euca-describe-instances query as shown in the following example.
To log into a VM instance:
1. Enter the following command to view the IP addresses of your instance: euca-describe-instances
Eucalyptus returns output similar to the following:
RESERVATION r-338206B5 alice default
INSTANCE i-4DCF092C emi-EC1410C1 192.168.7.24 10.17.0.130 running alice-keypair 0 m1.small 2010-03-15T21:57:45.134Z
Note that the public IP address appears after the image name, with the private address immediately following.
2. Look for the instance ID in the second field and write it down. Use this ID to manipulate and terminate this instance. 3. Note: Be sure that the security group for the instance allows SSH access. For more information, see Authorize
Security Groups.
Use SSH to log into the instance, using your private key and the external IP address. For example:
ssh -i alice-keypair.private [email protected]
You are now logged in to your Linux instance.
For a Windows Instance:
Log into Windows VM instances using a Remote Desktop Protocol (RDP) client. An RDP prompts you for a login name and password. By default, Windows VM instances are configured with a single user (named Administrator) and a random password generated at boot time. So, before you can log into a Windows VM instance via RDP, you must retrieve the random password generated at boot time using the euca-get-password command.
To log into a Windows instance:
1. Use euca-describe-groups to make sure the port for remote desktop (3389) is authorized in your security group.
The response from this command will look like the following example.
GROUP 955340183797 default default group
2. Enter the euca-get-password command followed by the unique id tag of the Windows VM instance and the
-k option with the name of private key file that corresponds to your credential keypair. In the following example we retrieve the password for a Windows VM instance with id tag i-5176095D and private key file name
mykey.private.
euca-get-password i-5176095D -k mykey.private
3. Log into the RDP client using the public (external) IP address associated with the running Windows VM instance.
Enter the following command to view the IP addresses of your instance:
euca-describe-instances
4. At the Log On to Windows prompt, prepend the user name Administrator to the public IP address of the instance,
and enter the password that you retrieved with euca-get-password, as shown:
You are now logged in and ready to use your Windows instance.
Set Up A Web Server on an Instance
Once you've launched an instance and connected to it, you can test it by setting up a web server.
1. ssh into your instance.
ssh 192.168.1.1 -l root 2. Install Apache:
yum install -y httpd
You should see output similar to the following:
Loaded plugins: fastestmirror, security, versionlock Loading mirror speeds from cached hostfile
* extras: centos.sonn.com
Midokura-local | 2.9 kB 00:00 centos-6-x86_64-os | 3.7 kB 00:00 centos-6-x86_64-updates | 3.4 kB 00:00 centos-6-x86_64-updates/primary_db | 5.4 MB 00:00 elrepo-6-x86_64 | 2.9 kB 00:00 epel-6-x86_64 | 4.4 kB 00:00 epel-6-x86_64/primary_db | 6.3 MB 00:00 euca2ools-release | 1.2 kB 00:00 eucalyptus-release | 1.3 kB 00:00 eucalyptus-release/primary | 417 kB 00:00 extras | 3.3 kB 00:00 Setting up Install Process
Package httpd-2.2.15-31.el6.centos.x86_64 already installed and latest version Nothing to do
service httpd start
You should see output similar to the following:
Starting httpd: [ OK ]
4. Test connectivity to your instance by using a web browser and connecting to the web service on your instance.
For example:
Reboot an Instance
Rebooting preserves the root filesystem of an instance across restarts. To reboot an instance: Enter the following command:
euca-reboot-instances <instance_id>
To reboot the instance i-34523332, enter:
euca-reboot-instances i-34523332
Terminate an Instance
The euca-terminate-instances command lets you cancel running VM instances. When you terminate instances, you must specify the ID string of the instance(s) you wish to terminate. You can obtain the ID strings of your instances using the euca-describe-instances command.
Warning: Terminating an instance can cause the instance and all items associated with the instance (data,
packages installed, etc.) to be lost. Be sure to save any important work or data to Walrus or EBS before terminating an instance.
To terminate VM instances:
1. Enter euca-describe instances to obtain the ID of the instances you wish to terminate. Note that an instance ID strings begin with the prefix i- followed by an 8-character string:
euca-describe-instances
RESERVATION r-338206B5 alice default
INSTANCE i-4DCF092C emi-EC1410C1 192.168.7.24 10.17.0.130 running mykey 0 m1.small 2010-03-15T21:57:45.134Z wind eki-822C1344 eri-BFA91429
2. Enter euca-terminate-instances and the ID string(s) of the instance(s) you wish to terminate:
euca-terminate-instances i-4DCF092C INSTANCE i-3ED007C8
Using Instances
Any application that runs on a cloud, whether public or private or hybrid, runs inside at least one instance. To start using the cloud, you must launch one or more instances. Every instance is created from stored images. An image contains the basic operating system and often other software that will be needed when the instance is running. When you launch an instance, you tell the cloud what image to base the instance on. Your cloud administrator should have set up a catalog of standard or customized images for you to use.
To find out more about what instances are, see Instance Overview. To find out how to use CloudWatch, see Instance Tasks.
Instance Overview
An instance is a virtual machine (VM). Eucalyptus allows you to run instances from both Linux-based and Windows-based images.
The following sections describe instances in more detail.
Instance Concepts
This section describes conceptual information to help you understand instances.
Eucalyptus Machine Image (EMI)
A Eucalyptus machine image (EMI) is a copy of a virtual machine bootable file system stored in the Walrus storage. An EMI is a template from you can use to deploy multiple identical instances—or copies of the virtual machine. EMIs are analogous to Amazon Machine Images (AMIs) in AWS. In fact, you can download and deploy any of the 10,000+ AMIs as EMIs in a Eucalyptus cloud without significant modification. While it is possible to build your own EMI, it is might be just as simple to find a thoroughly vetted, freely available image in AWS, download it to your Eucalyptus cloud, and use that instead.
EMIs can be Linux or Windows-based. In Linux it is an image of the / file system while in Windows it is an image of the C: drive.
When registered in a Eucalyptus cloud, each distinct EMI is given a unique ID for identification. The ID is in the format emi-<nnnnnnnn>.
Instance
A instance is a virtual machine deployed from an EMI. An instance then, is simply a running copy of an EMI, which means it always starts from a known baseline. There are two types of instances; instance store-backed and EBS-backed. This section describes store-backed instances. For information about EBS-backed instances, see Using EBS.
Every instance receives a unique ID in the format i-<nnnnnnnn>. In System and the two Managed network modes, the eight hexadecimal digits in the instance ID become the last four octets of the MAC address of the instance, prefaced by D0:0D. For example, if your instance ID is i-12121212, the MAC address of that instance would be D0:0D:12:12:12:12. You can deploy multiple instances using a single command. In this case all the instances will have unique instance IDs but will share a common reservation ID. This reservation ID can be seen, for example, from the euca2ools
euca-describe-instances command that lists running instances. Reservations IDs appear in the format r-<nnnnnnnn>.
Tip: A reservation is an EC2 term used to describe the resources reserved for one or more instances launched
in the cloud.
Persistence
Applications running in ephemeral instances that generate data that must be saved should write that data to some place other than the instance itself. There are two Eucalyptus options available. First, the data can be written to a volume that is attached to the instance. Volumes provided by the Storage Controller and attached to instances are persistent. Second, the data could be written to the Walrus using HTTP put/get operations. Walrus storage is also persistent.
If the application cannot be rewritten to send data to a volume or the Walrus, then the application should be deployed inside an EBS-backed instance. EBS-backed instances are persistent and operate in a manner more similar to a physical machine.
Instance Basics
This section describes information to help you decide which type of instance you need.
Virtual Machine Types
A virtual machine type, known as a VM type, defines the number of CPUs, the size of memory, and the size of storage that is given to an instance when it boots. There are five pre-defined VM types in Eucalyptus. You can change the quantity of resources associated with each of the five VM types, but you cannot change the name of the VM types or the number of VM types available. If you customize the sizes they must be well-ordered. That means that the CPU, memory, and storage sizes of the next VM type must be equal to, or larger than, the size of the preceding VM type. The VM type used to instantiate an EMI must have a defined disk size larger than the EMI file. If a 6GB EMI is loaded into an instance with a VM type defined with a 5GB disk, it will fail to boot. The status of the instance will show as
pending. The pending status is the result of the fact that the Walrus cannot finish downloading the image to the Node
Controller because the Node Controller has not allotted sufficient disk space for the download. Starting with Eucalyptus 3.2, if the user attempts to launch an instance with a VM type that is too small, they will receive an on-screen warning and the operation will terminate.
Available VM Types
Eucalyptus, like AWS, offers families of VM types. These families are composed of varying combinations of CPU, disk size, and memory. Eucalyptus offers enough VM types to give you the flexibility to choose the appropriate mix of resources for your applications. For the best experience, we recommend that you launch instance types that are appropriate for your applications.
• General Purpose: This family includes the M1 and M3 VM types. These types provide a balance of CPU, memory,
and network resources, which makes them a good choice for many applications. The VM types in this family range in size from one virtual CPU with two GB of RAM to eight virtual CPUs with 30 GB of RAM. The balance of resources makes them ideal for running small and mid-size databases, more memory-hungry data processing tasks, caching fleets, and backend servers.
M1 types offer smaller instance sizes with moderate CPU performance. M3 types offer larger number of virtual CPUs that provide higher performance. We recommend you use M3 instances if you need general-purpose instances with demanding CPU requirements.
• Compute Optimized: This family includes the C1 and CC2 instance types, and is geared towards applications that
benefit from high compute power. Compute-optimized VM types have a higher ratio of virtual CPUs to memory than other families but share the NCs with non optimized ones. We recommend this type if you are running any CPU-bound scale-out applications. CC2 instances provide high core count (32 virtual CPUs) and support for cluster networking. C1 instances are available in smaller sizes and are ideal for scaled-out applications at massive scale. • Memory Optimized: This family includes the CR1 and M2 VM types and is designed for memory-intensive
applications. We recommend these VM types for performance-sensitive database, where your application is memory-bound. CR1 VM types provide more memory and faster CPU than do M2 types. CR1 instances also support cluster networking for bandwidth intensive applications. M2 types are available in smaller sizes, and are an excellent option for many memory-bound applications.
• Micro: This Micro family contains the T1 VM type. The t1.micro provides a small amount of consistent CPU
resources and allows you to increase CPU capacity in short bursts when additional cycles are available. We recommend this type for lower throughput applications like a proxy server or administrative applications, or for low-traffic websites that occasionally require additional compute cycles. We do not recommend this VM type for applications that require sustained CPU performance.
The following tables list each VM type Eucalyptus offers. Each type is listed in its associate VM family.
Table 1: General Purpose VM Types
Memory Disk Size Virtual CPU Instance Type 256 5 1 m1.small 512 10 1 m1.medium 512 10 2 m1.large
Memory Disk Size Virtual CPU Instance Type 1024 10 2 m1.xlarge 2048 15 4 m3.xlarge 4096 30 4 m3.2xlarge
Table 2: Compute Optimized VM Types
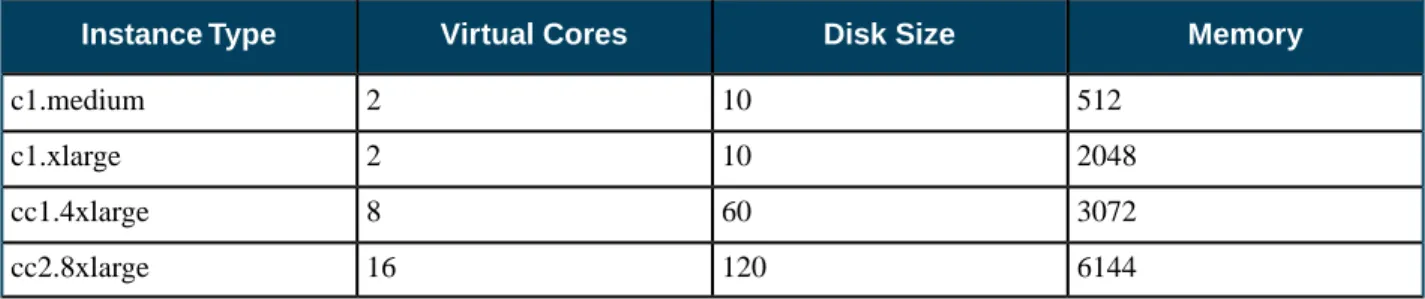
Memory Disk Size Virtual Cores Instance Type 512 10 2 c1.medium 2048 10 2 c1.xlarge 3072 60 8 cc1.4xlarge 6144 120 16 cc2.8xlarge
Table 3: Memory Optimized VM Types
Memory Disk Size Virtual Cores Instance Type 2048 10 2 m2.xlarge 4096 30 2 m2.2xlarge 4096 60 8 m2.4xlarge 16384 240 16 cr1.8xlarge
Table 4: Micro VM Types
Memory Disk Size Virtual Cores Instance Type 256 5 1 t1.micro
Linux and Windows Instances
A Linux instance store-backed instance actually consists of three separate images: • The Linux boot disk image (EMI) as previously defined
• A Eucalyptus kernel image (EKI), which is a low level operating system component that interfaces with the instance's virtual hardware
• A Eucalyptus ramdisk image (ERI) - the initrd - which is the initial root file system that is loaded as part of the kernel boot procedure and loads modules that make it possible to access the real root file system in the second stage of the boot process
When a Linux instance is launched, these three images (along with a few other files) are bound together using loop devices so that they appear as a single disk to the Linux operating system running in the instance. For Linux images, the same kernel and ramdisk files can be shared across multiple boot disk images, which allows for more efficient use of storage.
A Windows instance store-backed instance consists only of the bootable file system image (EMI). The reason for this is that in the Windows operating system the kernel and ramdisk components cannot be separated from the boot disk image, and thus each copy of a Windows image must also contain a copy of these components.
Ephemeral Linux Instances
Instance store-backed instances are ephemeral instances. This means that any changes made to a running instance are lost if the instance is either purposely or accidentally terminated. Applications running in ephemeral instances should write their data to persistent storage for safe keeping. Persistent storage available to instances includes Storage Controller volumes and the Walrus.
As an instance store-backed instance is launched, several files are brought together using loop devices on the Node Controller. As these files are brought together they form what looks like a disk to the instance's operating system. The illustration below lists a some of the files that make up a running instance. Notice that the EKI, EMI, and ERI images are presented to the instance's operating system as the partition /dev/sda1 and are mounted as the / file system.
Assume that the illustration above shows some of the files that make up an instance that was launched in a vmtype with 2GB of storage. Notice that the eki-*, emi-*, and eri-* files have been downloaded from the Walrus and cached on the Node Controller. These three files consume around 1.06GB of storage space. Notice also that a swap file was automatically created for the instance. The swap file has the string swap in its name and the file is approximately 500MB in size. It is presented to the instance's operating system as the partition /dev/sda3.
This means the EKI, ERI, EMI, and swap files have consumed approximately 1.5GB of the available 2GB of storage space. The remaining 500GB is allocated to the file with the string ext3 in its name. In our example, this space is formatted as an ext3 file system and is made available to the instance as the disk partition /dev/sda2, and is actually mounted to the /mnt directory in the instance. An example of this configuration is shown below.
Ephemeral Windows Instances
It is also possible to launch ephemeral Windows instances. Just like their Linux counterparts, modifications to Windows instance store-backed instances are lost when instances are purposely or accidentally terminated.
Ephemeral space in a Windows instance store-backed instance is presented as formatted drive space accessible via a logical drive letter. The logical drive is sized so that the instance’s total storage size matches the vmtype’s storage size.
Windows Instance Support
Eucalyptus supports several different Windows operating system versions running as instances. Normal Windows licensing policies still apply. The Windows operating systems supported include:
• Windows Server 2008 SP2 Datacenter (32/64-bit) • Windows Server 2008 R2 Datacenter (32/64-bit) • Windows 7 Professional (32/64-bit)
A VNC client is required during initial installation of the operating system but once Windows is fully installed, Remote Desktop Protocol can be used to connect to the Windows desktop. The VNC client is unnecessary if the Windows installation is configured as an unattended installation. As an example of one way to set up a Windows 7 unattended installation, see http://www.intowindows.com/how-to-create-unattended-windows-7-installation-setup.
All Windows images should be created on the hypervisor that runs on the Node Controllers. Eucalyptus does not support running a Windows image across multiple hypervisors. The Eucalyptus Windows Integration software, installed in the Windows EMI, has a utility that adds permissions to users or groups that allows them to use RDP to access the Windows desktop. By default, only the Administrator can do this. The Eucalyptus Windows Integration software also installs the Virtio device drivers for disk and network into the EMI so that it can run on a host configured with a KVM hypervisor. For more information about how to create a Windows image and install the Eucalyptus Windows Integration software, see the Eucalyptus User Guide at https://www.eucalyptus.com/docs.
EBS-Backed Instances
Eucalyptus supports two different types of instances; instance store-backed instances and EBS-backed instances. This section describes EBS-backed instances.
With EBS-backed instances you are booting an instance from a volume rather than a bundled EMI image. The boot volume is created from a snapshot of a root device volume. EBS-backed instances can be either Linux or Windows. The boot volume is persistent so changes to the instance are persistent.
Note: Linux boot-from-EBS instances do not require EKI and ERI images like instance store-backed instances.
Comparing Instance Types
The graphic below illustrates the differences between an instance store-backed instance and an EBS-backed instance. Both types of instances still boot from an EMI; the difference is what is behind the EMI. For an instance store-backed instance the EMI is backed by a bundled image. For an EBS-backed instance the EMI is backed by a snapshot of a volume that contains bootable software, similar to a physical host's boot disk.
Note that for the instance store-backed instance, the EMI, EKI, and ERI (assuming Linux) are copied from the Walrus directly to Node Controller. Both disk and memory on the Node Controller are used as cache so an instance store-backed instance can be considered a cache-based instance and is not persistent. Once the instance is terminated both the RAM and the disk cache are cleared and any modifications to the instance are lost.
When an EBS-backed instance is launched, the snapshot on which the EMI is based is automatically copied to a new volume which is then attached to the instance. The instance then boots from the attached volume. Changes to the EBS-backed instance are persistent because the volume used to boot the EBS-backed instance is persistent. As a result, EBS-backed instances can be suspended and resumed and not just terminated like an instance store-backed instance.
Using EBS-Backed Instances
An EBS-backed instance is very much like a physical machine in the way it boots and persists data. Because an EBS-backed instance functions in a manner similar to physical machine, it makes it a good choice to run legacy applications that cannot be re-architected for the cloud.
EBS-backed instances provide a workaround for the 10GB size limit for instance store-backed EMI images. This is particularly important for Windows instances which can easily exceed 10GB in size. EBS-backed instances have a maximum size of 1TB.
An EBS-backed boot volume can still be protected by taking a snapshot of it. In fact, other non-boot volumes can be attached to the EBS-backed instance and they can be protected using snapshots too.
Suspending and Resuming EBS-Backed Instances
An EBS-backed instance can be suspended and resumed, similar to the operating system and applications on a laptop. The current state of the EBS-backed instance is saved in a suspend operation and restored in a resume operation. Like instance store-backed instances, an EBS-backed instance can also be rebooted and terminated.
euca-stop-instances i-<nnnnnnnn>
To resume a suspended EBS-backed instance:
euca-start-instances i-<nnnnnnnn>
To reboot an EBS-backed instance:
euca-reboot-instances i-<nnnnnnnn>
To terminate an EBS-backed instance:
euca-terminate-instances i-<nnnnnnnn>
EBS EMI Creation Overview
You can create an EBS EMI from an existing .img file or create your own .img file. One way to create your own EBS .img file is to use virt-install as described below.
Use virt-install on a system with the same operating system version and hypervisor as your Node Controller. When using virt-install, select scsi as the disk type for KVM if the VIRTIO paravirtualized devices are not enabled. If you have KVM with VIRTIO enabled (the default), select virtio as the disk type of the virtual machine. If you create, successfully boot, and connect the virtual machine to the network in this environment, it should boot as an EBS-backed instance in the Eucalyptus cloud.
Note: For CentOS or RHEL images, you will typically need to edit the
/etc/sysconfig/network-scripts/ifcfg-eth0 file and remove the HWADDR line. This is because an instance's network interface will always be assigned a different hardware address at instantiation.
Note: WARNING: If you use an image created by virt-install under a different distribution or hypervisor combination, it is likely that it will not install the correct drivers into the ramdisk and the image will not boot on your Node Controller.
To create an EMI for EBS-backed instances will require initial assistance from a helper instance. The helper instance can be either an instance store-backed or EBS-backed instance and can be deleted when finished. It only exists to help create the initial volume that will be the source of the snapshot behind the EMI used to boot other EBS-backed instances. First you will need to create a volume large enough to contain the boot image file that was created by
virt-install. Once this volume has been created attach it to the helper instance. Then transfer the boot image file to the helper instance. The helper instance must have enough free disk space to temporarily hold the boot image file. Once there, transfer the boot image file, using the dd command, to the attached volume.
At this point the volume can be detached from the helper instance, a snapshot taken, and the snapshot registered as a new EMI.
The process to create a new EMI is summarized as follows:
1. Create the .img file using virt-install (the .img file is the virtual machine's disk file).
2. Create the helper instance.
3. Create and attach the volume to the helper instance.
4. Copy the .img file to the helper instance and from there to the attached volume.
5. Detach the volume and take a snapshot of it. 6. Register the snapshot as a new EMI.
Create an EBS EMI
To create a new EMI that is used to boot EBS-backed instances:
1. Create a new volume whose size matches the size of the bootable .img file:
euca-create-volume -z <cluster_name> -s <size_GB> 2. Attach the volume to a helper instance:
euca-attach-volume vol-<nnnnnnnn> -i i-<nnnnnnnn> -d <device> 3. Log in to the instance and copy the bootable image from its source to the helper instance. 4. While logged in to the helper instance, copy a bootable image to the attached volume:
dd if=/<path_to_image> of=<device> bs=1M
5. While logged in to the helper instance, flush the file system buffers after running the dd command:
sync
6. Detach the volume from the instance:
euca-detach-volume vol-<nnnnnnnn> 7. Create a snapshot of the bootable volume:
euca-create-snapshot vol-<nnnnnnnn> 8. Register the bootable volume as a new EMI:
euca-register --name "<descriptive_name>" / --snapshot snap-<nnnnnnnn>
9. Run a new EBS-backed instance:
euca-run-instances -k <key_name> emi-<nnnnnnnn>
Note: The snapshot cannot be deleted unless the EMI is first deregistered.
Instance Tasks
Find an Image
To find an image:
1. Enter the following command: euca-describe-images
The output displays all available images.
IMAGE emi-EC1410C1 centos-32/centos.5-3.x86.img.manifest.xml admin available public x86_64 machine
IMAGE eki-822C1344 kernel-i386/vmlinuz-2.6.28-11-server.manifest.xml admin available public x86_64 kernel
IMAGE eri-A98C13E4 initrd-64/initrd.img-2.6.28-11-generic.manifest.xml admin available public x86_64 ramdisk
2. Look for the image ID in the second column and write it down. The image ID starts with emi-. Once you find a suitable image to use, make sure you have a keypair to use.
Create Key Pairs
Eucalyptus uses cryptographic key pairs to verify access to instances. Before you can run an instance, you must create a key pair. Creating a key pair generates two keys: a public key (saved within Eucalyptus) and a corresponding private key (output to the user as a character string). To enable this private key you must save it to a file and set appropriate access permissions (using the chmod command), as shown in the example below.
Create Key Pairs with the Console
1. From the main dashboard screen, click the Key Pairs icon, or select the Network and Security menu at the top of
the dashboard. The Manage Keypairs screen will appear.
2. On the Key Pairs screen, click the Create New Key Pair link. The Create new key pair page will appear. 3. Type a name for the new key pair into the Name text box.
4. Click the Create and Download button. The private half of the key pair is saved to the default download location
for your browser.
Note: Keep your private key file in a safe place. If you lose it, you will be unable to access instances created
with the key pair.
5. Change file permissions to enable access to the private key file in the local directory. For example, on a Linux or
Mac OS X system:
chmod 0600 <keypair_name>.private
Create Key Pairs with the Command Line
1. Enter the following command:
euca-create-keypair <keypair_name> > <keypair_name>.private
where <keypair_name> is a unique name for your keypair. For example:
euca-create-keypair alice-keypair > alice-keypair.private
The private key is saved to a file in your local directory.
2. Change file permissions to enable access to the private key file in the local directory: chmod 0600 <keypair_name>.private
3. Query the system to view the public key: euca-describe-keypairs
The command returns output similar to the following:
KEYPAIR alice-keypair
ad:0d:fc:6a:00:a7:e7:b2:bc:67:8e:31:12:22:c1:8a:77:8c:f9:c4
Authorize Security Groups
Before you can log in to an instance, you must authorize access to that instance. This done by configuring a security group for that instance.
A security group is a set of networking rules applied to instances associated with a group. When you first create an instance, it is assigned to a default security group that denies incoming network traffic from all sources. To allow login and usage of a new instance, you must authorize network access to the default security group with the euca-authorize command.
To authorize a security group, use euca-authorize with the name of the security group, and the options of the network rules you want to apply.
euca-authorize <security_group>
Use the following command to grant unlimited network access using SSH (TCP, port 22) and VNC (TCP, ports 5900 to 5910) to the security group default:
euca-authorize -P tcp -p 22 -s 0.0.0.0/0 default
euca-authorize -P tcp -p 5900-5910 -s 0.0.0.0/0 default
Use the following command to grant unlimited network access using Windows Remote Desktop (TCP, port 3389) to the security group windows:
euca-authorize -P tcp -p 3389 -s 0.0.0.0/0 windows
Launch an Instance
To launch an instance:
1. Use the euca-run-instances command and provide an image ID and the user data file, in the format euca-run-instances <image_id> --user-data-file=<filename>. For example:
euca-run-instances emi-EC1410C1 --user-data-file=combined-userdata.txt.gz Note: Notice that it was not necessary to specify '--key' on the command line because cloud-init was used.
Eucalyptus returns output similar to the following example.
RESERVATION r-460007BE alice alice-default
INSTANCE i-2F930625 emi-EC1410C1 0.0.0.0 0.0.0.0 pending alice-keypair 2010-03-29T23:08:45.962Z eki-822C1344 eri-BFA91429
2. Enter the following command to get the launch status of the instance: euca-describe-instances <instance_id>
Log in to an Instance
For a Linux Instance
When you create an instance, Eucalyptus assigns the instance two IP addresses: a public IP address and a private IP address. The public IP address provides access to the instance from external network sources; the private IP address provides access to the instance from within the Eucalyptus cloud environment. Note that the two IP addresses may be the same depending on the current networking mode set by the administrator. For more information on Eucalyptus networking modes, see the Eucalyptus Administrator’s Guide.
To use an instance you must log into it via ssh using one of the IP addresses assigned to it. You can obtain the instance’s IP addresses using the euca-describe-instances query as shown in the following example.
To log into a VM instance:
1. Enter the following command to view the IP addresses of your instance: euca-describe-instances
Eucalyptus returns output similar to the following:
RESERVATION r-338206B5 alice default
INSTANCE i-4DCF092C emi-EC1410C1 192.168.7.24 10.17.0.130 running alice-keypair 0 m1.small 2010-03-15T21:57:45.134Z
Note that the public IP address appears after the image name, with the private address immediately following.
2. Look for the instance ID in the second field and write it down. Use this ID to manipulate and terminate this instance. 3. Note: Be sure that the security group for the instance allows SSH access. For more information, see Authorize
Security Groups.
Use SSH to log into the instance, using your private key and the external IP address. For example:
ssh -i alice-keypair.private [email protected]
You are now logged in to your Linux instance.
For a Windows Instance:
Log into Windows VM instances using a Remote Desktop Protocol (RDP) client. An RDP prompts you for a login name and password. By default, Windows VM instances are configured with a single user (named Administrator) and a random password generated at boot time. So, before you can log into a Windows VM instance via RDP, you must retrieve the random password generated at boot time using the euca-get-password command.
To log into a Windows instance:
1. Use euca-describe-groups to make sure the port for remote desktop (3389) is authorized in your security group.
The response from this command will look like the following example.
GROUP 955340183797 default default group
PERMISSION 955340183797 default ALLOWS tcp 3389 3389 FROM CIDR 0.0.0.0/0 2. Enter the euca-get-password command followed by the unique id tag of the Windows VM instance and the
-k option with the name of private key file that corresponds to your credential keypair. In the following example we retrieve the password for a Windows VM instance with id tag i-5176095D and private key file name
mykey.private.
euca-get-password i-5176095D -k mykey.private
3. Log into the RDP client using the public (external) IP address associated with the running Windows VM instance.
Enter the following command to view the IP addresses of your instance:
euca-describe-instances
4. At the Log On to Windows prompt, prepend the user name Administrator to the public IP address of the instance,
You are now logged in and ready to use your Windows instance.
Reboot an Instance
Rebooting preserves the root filesystem of an instance across restarts. To reboot an instance: Enter the following command:
euca-reboot-instances <instance_id>
To reboot the instance i-34523332, enter:
euca-reboot-instances i-34523332
Terminate an Instance
The euca-terminate-instances command lets you cancel running VM instances. When you terminate instances, you must specify the ID string of the instance(s) you wish to terminate. You can obtain the ID strings of your instances using the euca-describe-instances command.
Warning: Terminating an instance can cause the instance and all items associated with the instance (data,
packages installed, etc.) to be lost. Be sure to save any important work or data to Walrus or EBS before terminating an instance.
To terminate VM instances:
1. Enter euca-describe instances to obtain the ID of the instances you wish to terminate. Note that an instance ID strings begin with the prefix i- followed by an 8-character string:
euca-describe-instances
RESERVATION r-338206B5 alice default
INSTANCE i-4DCF092C emi-EC1410C1 192.168.7.24 10.17.0.130 running mykey 0 m1.small 2010-03-15T21:57:45.134Z wind eki-822C1344 eri-BFA91429
2. Enter euca-terminate-instances and the ID string(s) of the instance(s) you wish to terminate:
euca-terminate-instances i-4DCF092C INSTANCE i-3ED007C8
Using EBS
This section details what you need to know about Eucalyptus Elastic Block Storage (EBS).
EBS Overview
Eucalyptus Elastic Block Storage (EBS) provides block-level storage volumes that you can attach to instances running in your Eucalyptus cloud. An EBS volume looks like any other block-level storage device when attached to a running Eucalyptus instance, and may be formatted with an appropriate file system and used as you would a regular storage device. Any changes that you make to an attached EBS volume will persist after the instance is terminated.
You can create an EBS volume by using the Eucalyptus command line tools or by using the Eucalyptus management console and specifying the desired size (up to 10GB) and availability zone. Once you've created an EBS volume, you can attach it to any instance running in the same availability zone. An EBS volume can only be attached to one running instance at a time, but you can attach multiple EBS volumes to a running instance.
You can create a backup — called a snapshot — of any Eucalyptus EBS volume. You can create a snapshot by using the command-line tools or the Eucalyptus management console and simply specifying the volume from which you want to create the snapshot, along with a description of the snapshot. Snapshots can be used to create new volumes.
EBS Tasks
This section contains examples of the most common Eucalyptus EBS tasks.
Create and Attach an EBS Volume
The following example shows how to create a 10 gigabyte EBS volume and attach it to a running instance called
i-00000000 running in availability zone zone1.
1. Create a new EBS volume in the same availability zone as the running instance. euca-create-volume --zone zone1 --size 10
The command displays the ID of the newly-created volume.
2. Attach the newly-created volume to the instance, specifying the local device name /dev/sdf.
euca-attach-volume vol-00000000 -i i-00000000 -d /dev/sdf
You've created a new EBS volume and attached it to a running instance. You can now access the EBS volume from your running instance.
List Available EBS Volumes
You can use the Eucalyptus command line tools to list all available volumes and retrieve information about a specific volume.
1. To get a list of all available volumes in your Eucalyptus cloud, enter the following command: euca-describe-volumes
2. To get information about one specific volume, use the euca-describe-volumes command and specify the volume ID.
Detach an EBS Volume
To detach a block volume from an instance: Enter the following command:
euca-detach-volume <volume_id>
euca-detach-volume vol-00000000
Create a Snapshot
The following example shows how to create a snapshot. Enter the following command:
euca-create_snapshot <volume_id>
euca-create-snapshot vol-00000000
List Available Snapshots
You can use the Eucalyptus command line tools to list available snapshots and retrieve information about a specific snapshot.
1. To get a list of all available snapshots in your Eucalyptus cloud, enter the following command: euca-describe-snapshots
2. To get information about one specific snapshot, use the euca-describe-snapshots command and specify the snapshot ID.
euca-describe-snapshots snap-00000000
Delete a Snapshot
The following example shows how to delete a snapshot. Enter the following command:
euca-delete_snapshot <snapshot_id>
euca-delete-snapshot mytestsnaphot
Using Tags and Filters
This section describes features and tasks that enable you to manage your cloud resources, such as EMIs, instances, EBS volumes, and snapshots.
Tagging and Filtering Overview
This section describes what tagging is, its restrictions, and how tagging relates to filtering.
Tagging Resources
To help you manage your cloud's instances, images, and other Eucalyptus resources, you can assign your own metadata to each resource in the form of tags. You can use tags to create user-friendly names, make resource searching easier, and improve coordination between multiple users. This section describes tags and how to create them.
Tagging Overview
A tag consists of a key and an optional value for that key. You define both the key and the value for each tag. For example, you can define a tag for your instances that helps you track each instance's owner and stack level.
Tags let you categorize your cloud resources in various ways. For example, you can tag resources based on their purpose, their owner, or their environment. We recommend that you devise a set of tag keys that meets your needs for each resource type. Using a consistent set of tag keys makes it easier for you to manage your resources. You can search and filter the resources based on the tags you add. For more information about filtering, see Filtering Resources.
Eucalyptus doesn't apply any semantic meaning to your tags. Instead, Eucalyptus interprets your tags simply as strings of characters. Eucalyptus doesn't automatically assign any tags on resources.
You can only assign tags to resources that already exist. However, if you use the Eucalyptus User Console, you can add tags when you launch an instance. If you add a tag that has the same key as an existing tag on that resource, the new value overwrites the old value. You can edit tag keys and values, and you can remove tags from a resource at any time. You can set a tag's value to the empty string, but you can't set a tag's value to null.
Tagging Restrictions
The following restrictions apply to tags:
Description Restriction
10 Maximum number of tags per resource
128 Unicode characters Maximum key length
256 Unicode characters Maximum value length
You can't use either euca: or aws: as a prefix to either a tag name or value. These are reserved by Eucalyptus. Unavailable prefixes
Tag keys and values are case sensitive. Case sensitivity
You can't terminate, stop, or delete a resource based solely on its tags. You must specify the resource identifier. For example, to delete snapshots that you tagged with a tag key called temporary, you must first get a list of those snapshots using euca-describe-snapshots with a filter that specifies the tag. Then you use
euca-delete-snapshots with the IDs of the snapshots (for example, snap-1A2B3C4D). You can't call
euca-delete-snapshots with a filter that specified the tag. For more information about using filters when listing your resources, see Filtering Resources.