Setting Up Linux Desktops
in Horizon
You can find the most up-to-date technical documentation on the VMware website at: https://docs.vmware.com/ VMware, Inc. 3401 Hillview Ave. Palo Alto, CA 94304 www.vmware.com
Setting Up Linux Desktops in Horizon 6
1
Features and System Requirements 7Features of Horizon Linux Desktops 7
Overview of Configuration Steps for Setting Up Linux Desktops 13 System Requirements For Horizon Agent for Linux 14
Virtual Machine Settings for 2D Graphics 24
Configuring Session Collaboration on Linux Desktops 24
2
Preparing a Linux Virtual Machine for Desktop Deployment 28Create a Virtual Machine and Install Linux 28
Update the GNOME Shell Window List Extension on SLED/SLES Virtual Machines 29 Prepare a Linux Machine for Remote Desktop Deployment 30
Install Dependency Packages for Horizon Agent 33
Upgrade the Operating System of a Linux Virtual Machine 34
3
Setting Up Active Directory Integration and User Authentication Features for Linux Desktops 35Integrating Linux Desktops with Active Directory 35
Use the OpenLDAP Server Pass-Through Authentication 36
Set Up SSSD LDAP Authentication Against the Microsoft Active Directory 36 Use the Winbind Domain Join Solution 37
Configure PowerBroker Identity Services Open (PBISO) Authentication 37 Configure the Samba Offline Domain Join 39
Use the Realmd Join Solution for RHEL/CentOS 8.x 40 Setting Up Single Sign-On 41
Setting Up Smart Card Redirection 42
Configuring Smart Card Redirection for RHEL 8.x Desktops 44 Configuring Smart Card Redirection for RHEL 7.x Desktops 49 Configuring Smart Card Redirection for Ubuntu Desktops 55 Configuring Smart Card Redirection for SLED/SLES Desktops 64 Setting Up True SSO for Linux Desktops 72
Configure True SSO on RHEL/CentOS 8.x Desktops 73 Configuring True SSO for RHEL/CentOS 7.x Desktops 75 Configuring True SSO for Ubuntu Desktops 78
Configure Supported Linux Distributions for vGPU 89
Install the VIB for the NVIDIA GRID vGPU Graphics Card on the ESXi Host 89 Configure a Shared PCI Device for vGPU on the Linux Virtual Machine 91 Install the NVIDIA GRID vGPU Display Driver 92
Verify That the NVIDIA Display Driver Is Installed 92
5
Installing Horizon Agent 94Install Horizon Agent on a Linux Virtual Machine 94 install_viewagent.sh Command-Line Options 95
Configure the VMwareBlastServer Certificate for Horizon Agent for Linux 97 Upgrading Horizon Agent on a Linux Virtual Machine 98
Upgrade Horizon Agent on a Linux Virtual Machine 98 Uninstall Horizon AgentFrom a Linux Virtual Machine 100
6
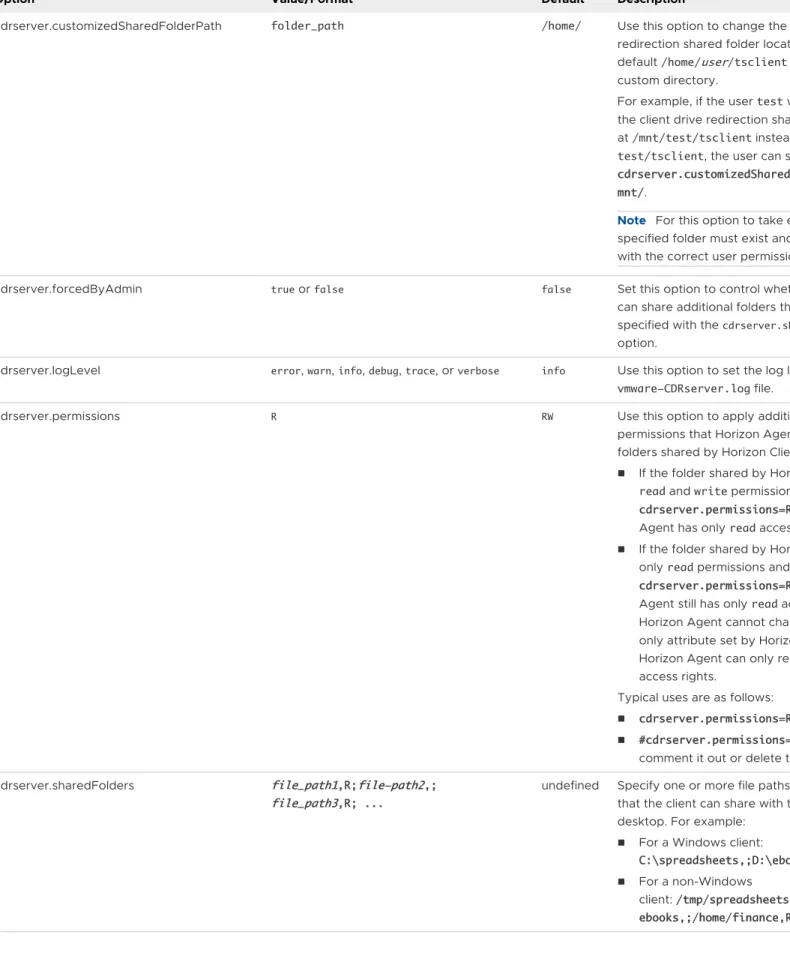
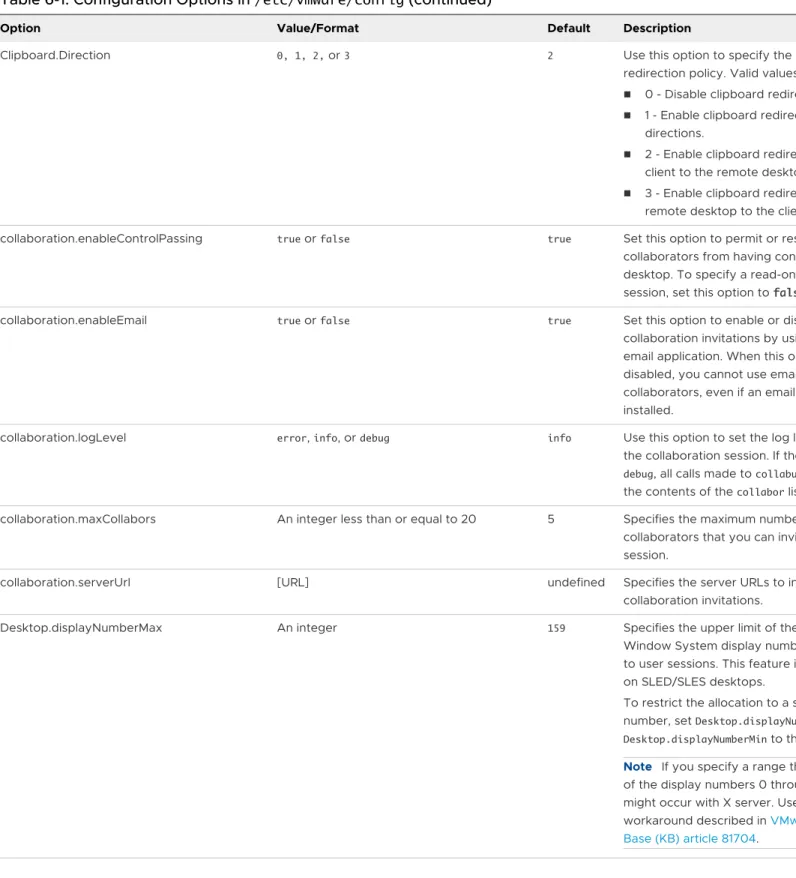
Configuration Options for Linux Desktops 101Setting Options in Configuration Files on a Linux Desktop 101 Using Smart Policies 114
Requirements for Smart Policies 114
Installing Dynamic Environment Manager 115 Configuring Dynamic Environment Manager 115 Horizon Smart Policy Settings 115
Adding Conditions to Horizon Smart Policy Definitions 116
Create a Horizon Smart Policy in Dynamic Environment Manager 116 Using DPI Synchronization with Linux Remote Desktops 118
Example Blast Settings for Linux Desktops 119
Examples of Client Drive Redirection Options for Linux Desktops 121
7
Create and Manage Linux Virtual Desktop Pools 122Create a Manual Desktop Pool for Linux 122 Manage Linux Desktop Pools 124
Create an Automated Full-Clone Desktop Pool for Linux 125 Create an Instant-Clone Floating Desktop Pool for Linux 127
8
Setting Up Linux Published Desktops and Applications for Multi-Session Use 132Considerations for Linux Farms, Published Desktops, and Published Applications 133 Create a Manual Farm of Linux Virtual Machines 134
Create an Automated Instant-Clone Farm of Linux Hosts 137 Create a Linux Published Desktop Pool 145
Create a Linux Published Application Pool Manually 148
9
Troubleshooting Linux Desktops 153Using Horizon Help Desk Tool in Horizon Console 153 Start Horizon Help Desk Tool in Horizon Console 154 Troubleshooting Users in Horizon Help Desk Tool 154 Session Details for Horizon Help Desk Tool 157 Session Processes for Horizon Help Desk Tool 160
Troubleshoot Linux Desktop Sessions in Horizon Help Desk Tool 161 Collect Diagnostic Information for a Linux Virtual Machine 162
Horizon Agent Fails to Disconnect on an iPad Pro Horizon Client 163 SSO Fails to Connect to a PowerOff Agent 163
The Setting Up Linux Desktops in Horizon document provides information about setting up a Linux virtual machine for use as a Linux desktop in VMware Horizon. The information includes preparing the Linux guest operating system, installing Horizon Agent on the virtual machine, and configuring the machine in Horizon Console for use in a Horizon deployment.
Intended Audience
This information is intended for anyone who wants to configure and use remote desktops that run on Linux guest operating systems. The information is written for experienced Linux system administrators who are familiar with virtual machine technology and data center operations.
Requirements
1
With Horizon Agent for Linux, users can connect to remote desktops that run the Linux operating system.
This chapter includes the following topics:
n Features of Horizon Linux Desktops
n Overview of Configuration Steps for Setting Up Linux Desktops n System Requirements For Horizon Agent for Linux
Features of Horizon Linux Desktops
The following list summarizes the key features supported on Horizon Linux desktops.
Note Where applicable, the following entries identify the subset of Linux distributions that support a given feature. For the complete list of Linux distributions supported for Horizon Agent, see System Requirements For Horizon Agent for Linux.
Active Directory Integration
n PowerBroker Identity Services Open (PBISO) Authentication supports offline domain join
with Active Directory for instant-cloned desktops running the following Linux distributions.
n Ubuntu 16.04, 18.04, and 20.04
n RHEL 7.x
n Samba supports offline domain join with Active Directory for instant-cloned desktops running the following Linux distributions.
n Ubuntu 16.04, 18.04, and 20.04
n RHEL 7.x and 8.x
For more information, see the subtopics under Integrating Linux Desktops with Active Directory.
Audio-in
Audio input redirection from a client host to a remote Linux desktop is supported. This feature is not based on the USB redirection function. If you want this feature enabled, you must select it during installation. You must select the system default audio in device
"PulseAudio server (local)" in your application for the audio input. This feature is supported on the following Linux distributions.
n Ubuntu 16.04 with MATE or Gnome Flashback (Metacity) desktop environment
n Ubuntu 20.04/18.04 with MATE or Gnome Ubuntu desktop environment n RHEL 7.x with KDE or Gnome desktop environment
n RHEL 8.x with Gnome desktop environment n SLED 12.x/15.x
n SLES 12.x/15.x
Audio-out
Audio output redirection is supported. This feature is enabled by default. To disable this feature, you must set the RemoteDisplay.allowAudio option to false. When accessed using Chrome and Firefox browsers, VMware Horizon HTML Access provides audio-out support for Linux desktops.
Automated Full-Clone Desktop Pool
You can create automated full-clone desktop pools of single-session Linux desktops.
Client Drive Redirection
When you enable the Client Drive Redirection (CDR) feature, your local system's shared folders and drives become available for you to access. You use the tsclient folder that is located in your home directory in the remote Linux desktop. To use this feature, you must install the CDR components.
Clipboard Redirection
With the clipboard redirection feature, you can copy and paste a rich text or a plain text between a client host and a remote Linux desktop. You can set the copy/paste direction and the maximum text size using Horizon Agent options. This feature is enabled by default. You can deactivate it during installation.
Display Scaling
With the Display Scaling feature enabled, Linux remote desktops support the client display's scale factor. If the DPI (Dots Per Inch) setting on the remote desktop does not match the DPI
setting on the client system, the remote session is displayed using a scale factor that matches the client system.
This feature is turned off by default. You can enable it by setting a configuration option as described in Setting Options in Configuration Files on a Linux Desktop.
DPI Synchronization
The DPI Synchronization feature ensures that the DPI setting in a remote session changes to match the DPI setting of the client system when users connect to a Linux remote desktop or published application. The feature is supported on Linux distributions running Horizon Agent 2012 or later, with one further requirement: RHEL/CentOS 7.x desktops must be running RHEL/CentOS 7.6 or later.
This feature is enabled by default. You can deactivate it by modifying a configuration option as described in Setting Options in Configuration Files on a Linux Desktop.
FIPS 140-2 Mode
The Federal Information Processing Standard (FIPS) 140-2 mode, although not yet validated with the NIST Cryptographic Module Validation Program (CMVP), is available for supported Linux desktops. FIPS mode is not supported on desktops running CentOS.
Horizon Agent for Linux implements cryptographic modules that are designed for FIPS 140-2 compliance. These modules were validated in operational environments listed in CMVP certificate #2839 and #2866, and were ported to this platform. However, the CAVP and CMVP testing requirement to include the new operational environments in VMware's NIST CAVP and CMVP certificates remains to be completed on the product roadmap.
Note The Transport Layer Security (TLS) protocol version 1.2 is required to support FIPS 140-2 mode.
Help Desk Tool
Horizon Help Desk Tool is a Web application that you can use to troubleshoot Linux desktop sessions. You can use Horizon Help Desk Tool to get the status of Horizon user sessions and to perform troubleshooting and maintenance operations. See Using Horizon Help Desk Tool in Horizon Console.
Horizon Smart Policies
You can use VMware Dynamic Environment Manager to create Horizon Smart Policies that control the behavior of the USB redirection, clipboard redirection, and client drive redirection features on specific remote Linux desktops. See Using Smart Policies.
H.264 Encoder and High Efficiency Video Coding (HEVC)
H.264 and HEVC can improve the Blast Extreme performance for a Horizon desktop,
especially under a low-bandwidth network. HEVC provides higher image quality than H.264 at the same bandwidth.
If the client system has both H.264 and HEVC turned off, Blast Extreme automatically falls back to JPEG/PNG encoding.
The H.264 and HEVC encoders include both hardware support and software encoder support. The hardware support has the following requirements.
n The vGPU is configured with an NVIDIA graphics card. For specific requirements, see the
video codec support matrix on https://developer.nvidia.com.
n The NVIDIA driver 384 series or later is installed in the NVIDIA graphics card.
When the system meets the preceding requirements, Horizon Agent for Linux uses the hardware encoder. Otherwise, the software encoder is used.
Instant-Clone Floating Desktop Pool
You can create instant-clone floating desktop pools of single-session Linux desktops. This feature is not supported on systems running CentOS.
For more information, see Create an Instant-Clone Floating Desktop Pool for Linux.
K Desktop Environment
The K Desktop Environment (KDE) is supported on the following Linux distributions.
n RHEL/CentOS 7.x
n Ubuntu 16.04, 18.04, and 20.04
Keyboard Layout and Locale Synchronization
This feature specifies whether to synchronize a client's system locale and current keyboard layout with the Linux desktops. When this setting is enabled or not configured,
synchronization is allowed. When this setting is disabled, synchronization is not allowed. This feature is supported only for Horizon Client for Windows, and only for the English, French, German, Japanese, Korean, Spanish, Simplified Chinese and Traditional Chinese locales.
Lossless PNG
Images and videos that are generated on a desktop are rendered on the client device in a pixel-exact manner.
Manual Desktop Pool
When configuring a manual desktop pool of single-session Linux desktops, you can choose from the following options for machine source:
n Managed Virtual Machine - Machine source of the vCenter virtual machine. A managed virtual machine is supported for new and upgrade deployments.
n Unmanaged Virtual Machine - Machine source of other sources. An unmanaged virtual
machine is only supported when the upgrade is from an unmanaged virtual machine deployment.
Note To ensure the best possible performance, do not use an unmanaged virtual machine.
MATE Desktop Environment
The MATE Desktop Environment is supported on Ubuntu 16.04, 18.04, and 20.04.
Multiple Monitors
vGPU desktop supports a maximum resolution of 2560x1600 on four monitors configured in any arrangement.
2D desktop on VMware vSphere® 6.0 or later supports the following maximum resolutions:
n 2560x1600 on three monitors configured in any arrangement
n 2048x1536 on four monitors configured in any arrangement n 2560x1600 on four monitors configured as follows:
n Two monitors arranged on the bottom and two monitors arranged on the top n Four monitors stacked vertically on top of one another.
The 2560x1600 resolution is not supported on four monitors arranged side by side. For Ubuntu 16.04/18.04/20.04, you must use Gnome, KDE, or the MATE desktop environment to use the multiple monitors feature. See http://kb.vmware.com/kb/2151294 for more
information.
Network Intelligence Support for VMware Blast
The Network Intelligence transport is supported for VMware Blast. This feature is enabled by default.
When User Datagram Protocol (UDP) is enabled, Blast establishes both Transmission Control Protocol (TCP) and UDP connections. Based on the current network conditions, Blast
dynamically selects one of the transports for transmitting data to provide the best user experience. For example, in a local area network, TCP performs better than UDP, and so Blast selects TCP to transport data. Similarly, in a wide area network (WAN), UDP performance is better than TCP and Blast selects the UDP transport in that environment.
If one of the inline components used does not support UDP, Blast establishes a TCP connection only. For example, if your connection is using the Blast Security Gateway component of the Horizon Connection Server, only a TCP connection is established. Even if both client and agent enabled UDP, the connection uses TCP because Blast Security Gateway does not support UDP. If users are connecting from outside the corporate network, the UDP component requires VMware Unified Access Gateway, which supports UDP.
Use the following information to establish a UDP-based Blast connection.
n If the client connects to a Linux desktop directly, enable UDP in both the client and agent. UDP is enabled by default in both the client and agent.
n If the client connects to a Linux desktop using Unified Access Gateway, enable UDP in the client, agent, and Unified Access Gateway.
Published Desktop and Application Pools
You can create published desktop and application pools based on manual or automated instant-clone farms of multi-session Linux host machines. Each published desktop or application can support multiple user sessions at the same time.
Published desktop and application pools are only supported on systems running the following Linux distributions:
n RHEL Workstation 8.x/7.x n Ubuntu 18.04/20.04
Note Ubuntu 20.04 machines running Horizon Agent for Linux 2012 can support published desktop pools but not published application pools.
For more information, see Chapter 8 Setting Up Linux Published Desktops and Applications for Multi-Session Use.
Session Collaboration
With the Session Collaboration feature, users can invite other users to join an existing remote Linux desktop session, or you can join a collaborative session when you receive an invitation from another user. This feature is supported only on desktops with the following Linux distributions installed.
n Ubuntu 18.04/20.04 with Gnome Ubuntu desktop environment
n RHEL Workstation 7.5 with Gnome Classic or KDE desktop environment
n RHEL Workstation 7.6 or later, or 8.x with Gnome Classic desktop environment n RHEL Server 7.8 or later, or 8.1 or later with Gnome Classic desktop environment
Single Sign-on
You can configure Active Directory single sign-on (SSO) for Linux desktops.
Smart Card Redirection
Smart card redirection enables users to authenticate into Linux desktops using a smart card reader connected to the local client system. This feature is not supported on desktops running CentOS.
This feature supports Personal Identity Verification (PIV) cards and Common Access Cards (CAC). For more information, see Setting Up Smart Card Redirection.
True SSO Support
You can configure the True SSO feature on Linux desktops.
For more information, see Setting Up True SSO for Linux Desktops.
USB Redirection
The USB Redirection feature gives you access to locally attached USB devices from remote Linux desktops. You must install the USB Redirection components and USB VHCI driver kernel module to use the USB feature. Ensure that you have been granted sufficient privileges to use the USB device that you want to redirect.
3Dconnexion Mouse
To begin using your 3Dconnexion mouse, you must install the appropriate device driver and pair the mouse using the Connect USB Device menu on your Linux desktop.
3D Graphics
The vGPU graphics feature is supported on the Linux distributions and NVIDIA graphics cards listed in the NVIDIA documentation. Go to the NVIDIA website and search for "grid product support matrix".
Limitations of Linux Desktops
Linux desktops have the following limitations:
n Location-based printing and Real-Time Video are not supported. n The VMware HTML Access file transfer feature is not supported.
n Only the X11 display server protocol is supported. The Wayland protocol is not supported.
Additional limitations apply to multi-session published desktops and published applications. For more information, see Considerations for Linux Farms, Published Desktops, and Published Applications.
Overview of Configuration Steps for Setting Up Linux
Desktops
When you configure Linux desktops, you must follow a different sequence of steps depending on whether you install 2D graphics or 3D graphics on the virtual machines.
2D Graphics - Overview of Configuration Steps
For 2D graphics, take the following steps:
1 Review the system requirements for setting up a Linux desktop deployment. See System Requirements For Horizon Agent for Linux.
3 Prepare the guest operating system for deployment as a desktop in a VMware Horizon environment. See Prepare a Linux Machine for Remote Desktop Deployment.
4 Configure the Linux guest operating system to authenticate with Active Directory. This step is implemented with 3rd-party software, based on the requirements in your environment. See
Integrating Linux Desktops with Active Directory for more information.
5 Install Horizon Agent on the Linux virtual machine. See Install Horizon Agent on a Linux Virtual Machine.
6 Create a desktop pool based on the configured Linux virtual machine. See Chapter 7 Create and Manage Linux Virtual Desktop Pools.
3D Graphics - Overview of Configuration Steps
You must complete the NVIDIA GRID vGPU configuration on the Linux virtual machines before you install Horizon Agent on the machines and deploy a desktop pool in Horizon Console. 1 Review the system requirements for setting up a Linux desktop deployment in a VMware
Horizon environment. See System Requirements For Horizon Agent for Linux.
2 Create a virtual machine in vSphere and install the Linux operating system. See Create a Virtual Machine and Install Linux.
3 Prepare the guest operating system for deployment as a desktop in a VMware Horizon environment. See Prepare a Linux Machine for Remote Desktop Deployment.
4 Configure the Linux guest operating system to authenticate with Active Directory. This step is implemented with 3rd-party software, based on the requirements in your environment. See
Integrating Linux Desktops with Active Directory for more information.
5 Configure 3D capabilities on your ESXi hosts and the Linux virtual machine. For more information, see Configure Supported Linux Distributions for vGPU.
6 Install Horizon Agent on the Linux virtual machine. See Install Horizon Agent on a Linux Virtual Machine.
7 Create a desktop pool based on the configured Linux virtual machine. See Chapter 7 Create and Manage Linux Virtual Desktop Pools.
System Requirements For Horizon Agent for Linux
To install Horizon Agent for Linux, you must meet certain requirements for the Linux operating system, Linux virtual machine, VMware Horizon system components, and vSphere platform.
Supported Linux Versions for Horizon Agent
Table 1-1. Supported Linux Operating Systems for Horizon Agent
Linux Distribution Architecture
Ubuntu 20.04, 18.04, and 16.04 x64 Red Hat Enterprise Linux (RHEL) Workstation 7.2, 7.3, 7.4, 7.5, 7.6, 7.7, 7.8, 7.9, 8.0, 8.1, 8.2, and 8.3
x64
Red Hat Enterprise Linux (RHEL) Server 7.8, 7.9, 8.2, and 8.3
x64
CentOS 7.2, 7.3, 7.4, 7.5, 7.6, 7.7, 7.8, 8.0, 8.1, 8.2, 8.3 x64 SUSE Linux Enterprise Desktop (SLED) 12 SP3, 15 SP1, and 15 SP2
x64
SUSE Linux Enterprise Server (SLES) 12 SP3, 12 SP5, 15 SP1, and 15 SP2
x64
Note Horizon Agent has dependency packages on some Linux distributions. See Install Dependency Packages for Horizon Agent for more information.
Required Platform and Software Versions
To install and use Horizon Agent for Linux, your deployment must meet certain requirements for the vSphere platform, Horizon Connection Server, and Horizon Client software.
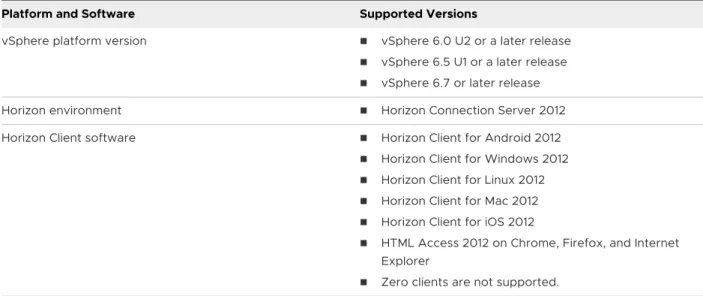
Table 1-2. Required Platform and VMware Horizon Software Versions
Platform and Software Supported Versions
vSphere platform version n vSphere 6.0 U2 or a later release
n vSphere 6.5 U1 or a later release
n vSphere 6.7 or later release Horizon environment n Horizon Connection Server 2012 Horizon Client software n Horizon Client for Android 2012
n Horizon Client for Windows 2012
n Horizon Client for Linux 2012
n Horizon Client for Mac 2012
n Horizon Client for iOS 2012
n HTML Access 2012 on Chrome, Firefox, and Internet Explorer
n Zero clients are not supported.
TCP/UDP Ports Used by Linux Virtual Machines
Horizon Agent and Horizon Clients use TCP or UDP ports for network access between each other and various Horizon server components.
Table 1-3. TCP/UDP Ports Used by Linux Virtual Machines
Source Port Target Port Protocol Description
Horizon Client * Linux Agent 22443 TCP/UDP Blast if Blast Security Gateway is used Horizon Connection Server or Unified Access Gateway appliance
* Linux Agent 22443 TCP/UDP Blast if Blast Security Gateway is used
Horizon Agent * Horizon Connection Server
4001, 4002 TCP JMS SSL traffic
Note For more information on TCP and UDP ports used by clients, see the Horizon Security document and the Network Ports in VMware Horizon guide.
To allow users to connect to their Linux desktops, the desktops must be able to accept incoming TCP connections from Horizon Client devices, Unified Access Gateway, and Horizon Connection Server.
On Ubuntu distributions, the iptables firewall is configured by default with an input policy of ACCEPT.
On RHEL and CentOS distributions, where possible, the Horizon Agent installer script configures the iptables firewall with an input policy of ACCEPT.
Make sure that iptables on an RHEL or CentOS guest operating system has an input policy of ACCEPT for new connections from the Blast port, 22443.
When the BSG is enabled, client connections are directed from a Horizon Client device through the BSG on the Horizon Connection Server to the Linux desktop. When the BSG is not enabled, connections are made directly from the Horizon Client device to the Linux desktop.
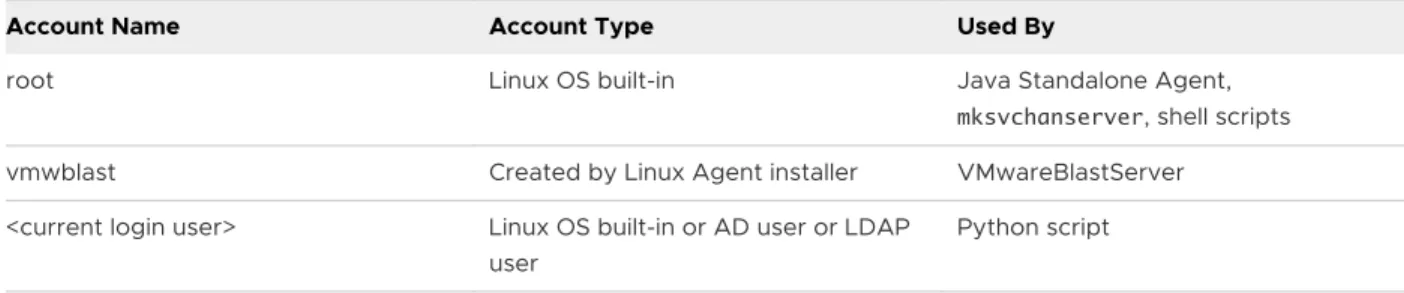
Verify the Linux Account Used by Linux Virtual Machines
The following table lists the account name and account type used by Linux virtual machines.
Table 1-4. Account Name and Account Type
Account Name Account Type Used By
root Linux OS built-in Java Standalone Agent, mksvchanserver, shell scripts vmwblast Created by Linux Agent installer VMwareBlastServer
<current login user> Linux OS built-in or AD user or LDAP user
Desktop Environment
Horizon Agent for Linux supports multiple desktop environments on different Linux distributions. The following table lists the default desktop environments for each Linux distribution and the additional desktop environments supported by Horizon Agent for Linux.
Table 1-5. Supported Desktop Environments
Linux Distribution
Default Desktop
Environment Desktop Environments Supported by Horizon Agent for Linux
Ubuntu 20.04/18.04 Gnome Gnome Ubuntu, K Desktop Environment (KDE), MATE Ubuntu 16.04 Unity Gnome Flashback (Metacity), KDE, MATE
RHEL/CentOS 7.x Gnome Gnome, KDE RHEL/CentOS 8.x Gnome Gnome
SLED/SLES Gnome Gnome
To change the default desktop environment used on one of the supported Linux distributions, you must use the following steps and commands appropriate for your Linux desktop.
Note Single sign-on (SSO) for KDE and the MATE Desktop Environment only works when your Linux desktop is using the GDM3 greeter (login screen). You must install KDE and MATE using the commands listed in Table 1-6. Commands to Install Desktop Environments.
When using RHEL/CentOS 7.x and Ubuntu distributions, SSO fails to unlock a locked KDE session. You must manually enter your password to unlock the locked session.
1 Install the supported Linux distribution's operating system with the default desktop environment setting.
2 Run the appropriate commands described in the following table for your specific Linux distribution.
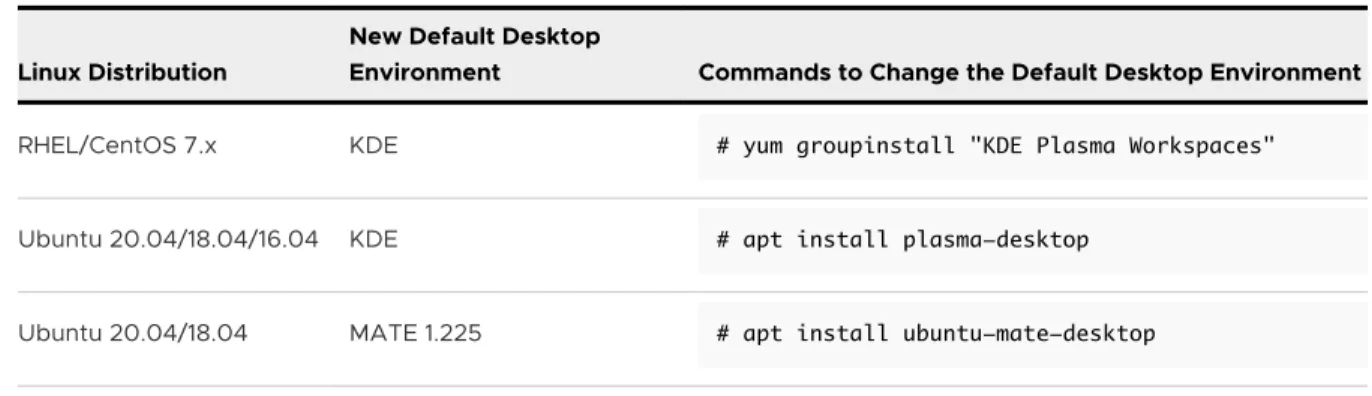
Table 1-6. Commands to Install Desktop Environments
Linux Distribution
New Default Desktop
Environment Commands to Change the Default Desktop Environment
RHEL/CentOS 7.x KDE # yum groupinstall "KDE Plasma Workspaces"
Ubuntu 20.04/18.04/16.04 KDE # apt install plasma-desktop
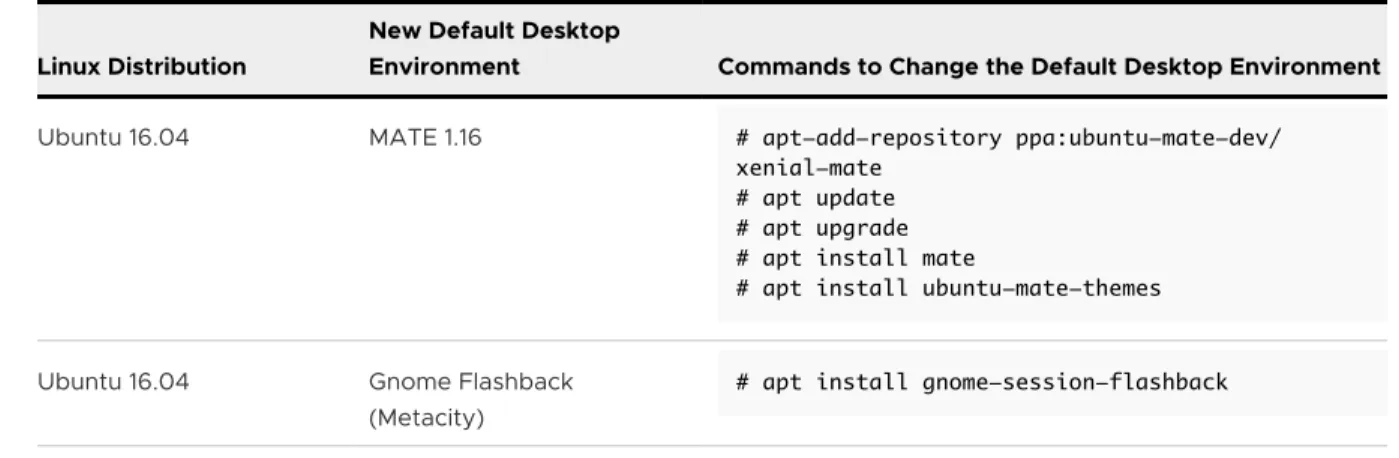
Table 1-6. Commands to Install Desktop Environments (continued)
Linux Distribution
New Default Desktop
Environment Commands to Change the Default Desktop Environment
Ubuntu 16.04 MATE 1.16 # apt-add-repository ppa:ubuntu-mate-dev/ xenial-mate
# apt update # apt upgrade # apt install mate
# apt install ubuntu-mate-themes
Ubuntu 16.04 Gnome Flashback (Metacity)
# apt install gnome-session-flashback
3 To begin using the new default desktop environment, restart the desktop.
If you enabled SSO on a Linux desktop that has multiple desktop environments installed, use the following information to select the desktop environment to use in an SSO session.
n For Ubuntu 20.04/18.04/16.04 and RHEL/CentOS 7.x, use the information in the following table to set the SSODesktopType option in the /etc/vmware/viewagent-custom.conf file to specify the desktop environment to use with SSO.
Table 1-7. SSODesktopType Option
Desktop Type SSODesktopType Option Setting
MATE SSODesktopType=UseMATE
GnomeUbuntu SSODesktopType=UseGnomeUbuntu GnomeFlashback SSODesktopType=UseGnomeFlashback
KDE SSODesktopType=UseKdePlasma
GnomeClassic SSODesktopType=UseGnomeClassic
n For RHEL/CentOS 8.x, for the SSO login session to use Gnome Classic, remove all the desktop
startup files, except for the Gnome Classic startup file, from the /usr/share/xsession
directory. Use the following set of commands as an example.
# cd /usr/share/xsessions # mkdir backup
# mv *.desktop backup
# mv backup/gnome-classic.desktop ./
After the initial setup, the end user must log out or reboot their Linux desktop to use Gnome Classic as the default desktop in their next SSO session.
If you disabled SSO on a Linux desktop that has multiple desktop environments installed, you do not need to perform any of the previously described steps. The end users have to select their desired desktop environment when they log in to that Linux desktop.
Network Requirements
VMware Blast Extreme supports both User Datagram Protocol (UDP) and Transmission Control Protocol (TCP). Network conditions affect the performances of UDP and TCP. To receive the best user experience, select UDP or TCP based on the network condition.
n Select TCP if the network condition is good, such as in a local area network (LAN) environment.
n Select UDP if the network condition is poor, such as in a wide area network (WAN) environment with packet loss and time delay.
Use a network analyzer tool, such as Wireshark, to determine whether VMware Blast Extreme is using TCP or UDP. Use the following set of steps, which use Wireshark, as a reference example. 1 Download and install Wireshark on your Linux VM.
For RHEL/CentOS:
sudo yum install wireshark
For Ubuntu:
sudo apt install tshark
2 Connect to the Linux desktop using VMware Horizon Client.
3 Open a terminal window and run the following command, which displays the TCP package or UDP package used by VMware Blast Extreme.
sudo tshark -i any | grep 22443
USB Redirection and Client Drive Redirection (CDR) features are sensitive to network conditions. If the network condition is bad, such as a limited bandwidth with time delay and packet loss, the user experience becomes poor. In such condition, the end user might experience one of the following.
n Copying remote files can be slow. In this situation, transmit smaller sized files instead.
n USB device does not appear in the remote Linux desktop.
n USB data does not transfer completely. For example, if you copy a large file, you might get a file smaller in size than the original file.
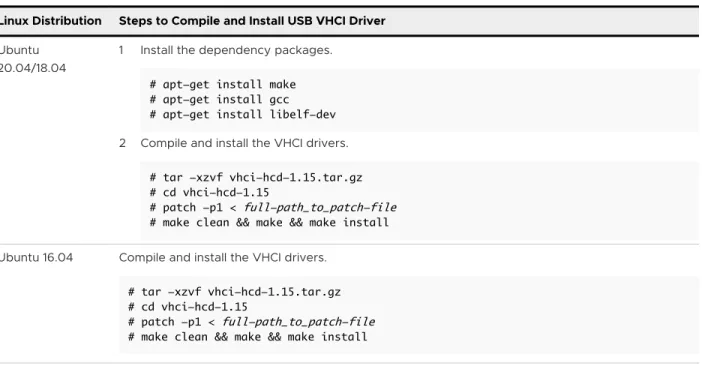
VHCI Driver for USB Redirection
The USB redirection feature has a dependency on the USB Virtual Host Controller Interface (VHCI) kernel driver. To support USB 3.0 and the USB redirection feature, you must perform the following steps:
1 Download the USB VHCI source code from https://sourceforge.net/projects/usb-vhci/files/ linux%20kernel%20module/.
2 To compile the VHCI driver source code and install the resulting binary on your Linux system, use the commands listed in the following table.
For example, if you unpack the installation file VMware-horizonagent-linux-x86_64-YYMM-y.y.y-xxxxxxx.tar.gz under the /install_tmp/ directory, the full-path_to_patch-file
is /install_tmp/VMware-horizonagent-linux-x86_64-YYMM-y.y.y-xxxxxxx/resources/ vhci/patch/vhci.patch and the patch command to use is
# patch -p1 < /install_tmp/VMware-horizonagent-linux-x86_64-YYMM-y.y.y-xxxxxxxi/resources/vhci/ patch/vhci.patch
Note The VHCI driver installation must be done before the installation of Horizon for Linux.
Table 1-8. Compile and Install the USB VHCI Driver
Linux Distribution Steps to Compile and Install USB VHCI Driver
Ubuntu 20.04/18.04
1 Install the dependency packages. # apt-get install make # apt-get install gcc # apt-get install libelf-dev 2 Compile and install the VHCI drivers.
# tar -xzvf vhci-hcd-1.15.tar.gz # cd vhci-hcd-1.15
# patch -p1 < full-path_to_patch-file # make clean && make && make install Ubuntu 16.04 Compile and install the VHCI drivers.
# tar -xzvf vhci-hcd-1.15.tar.gz # cd vhci-hcd-1.15
# patch -p1 < full-path_to_patch-file # make clean && make && make install
Table 1-8. Compile and Install the USB VHCI Driver (continued)
Linux Distribution Steps to Compile and Install USB VHCI Driver
RHEL/CentOS 7.x RHEL/CentOS 8.x
1 Install the dependency packages. # yum install gcc-c++
# yum install kernel-devel-$(uname -r) # yum install kernel-headers-$(uname -r) # yum install patch
# yum install elfutils-libelf-devel 2 Compile and install the VHCI drivers.
# tar -xzvf vhci-hcd-1.15.tar.gz # cd vhci-hcd-1.15
# patch -p1 < full-path_to_patch-file # make clean && make && make install
3 (RHEL/CentOS 8.x) To ensure that the VHCI drivers work properly with USB redirection, configure signing settings for the USB driver.
a Create an SSL key pair for the USB driver.
openssl req -new -x509 -newkey rsa:2048 -keyout MOK.priv -outform DER -out MOK.der -nodes -days 36500 -subj "/CN=Descriptive name/"
b Sign the USB driver.
sudo /usr/src/kernels/$(uname -r)/scripts/sign-file sha256 ./MOK.priv ./ MOK.der /lib/modules/$(uname -r)/kernel/drivers/usb/host/usb-vhci-iocifc.ko sudo /usr/src/kernels/$(uname -r)/scripts/sign-file sha256 ./MOK.priv ./ MOK.der /lib/modules/$(uname -r)/kernel/drivers/usb/host/usb-vhci-hcd.ko c Register the key for UEFI Secure Boot.
sudo mokutil --import MOK.der
Note This command issues a request to set a Machine Owner Key (MOK) password for UEFI Secure Boot.
d To set up UEFI Secure Boot in the vSphere console, reboot the system. For more information, see https://sourceware.org/systemtap/wiki/SecureBoot.
SLED/SLES 12.x SLED/SLES 15.x
1 Find the version of the current kernel package.
# rpm -qa | grep kernel-default-$(echo $(uname -r) | cut -d '-' -f 1,2)
The output is the name of the kernel package currently installed. If, for example, the package name is kernel-default-3.0.101-63.1, then the current kernel package version is 3.0.101-63.1. 2 Install the kernel-devel, kernel-default-devel, kernel-macros, and the patch packages.
# zypper install --oldpackage kernel-devel-<kernel-package-version> \ kernel-default-devel-<kernel-package-version> kernel-macros-<kernel-package-version> patch
For example:
# zypper install --oldpackage kernel-devel-4.4.21-90.1 kernel-default-devel-4.4.21-90.1 kernel-macros-4.4.21-90.1 patch
Table 1-8. Compile and Install the USB VHCI Driver (continued)
Linux Distribution Steps to Compile and Install USB VHCI Driver
3 Compile and install the VHCI drivers. # tar -xzvf vhci-hcd-1.15.tar.gz # cd vhci-hcd-1.15
# patch -p1 < full-path_to_patch-file
# mkdir -p linux/$(echo $(uname -r) | cut -d '-' -f 1)/drivers/usb/core # cp /lib/modules/$(uname -r)/source/include/linux/usb/hcd.h linux/$(echo $ (uname -r) | cut -d '-' -f 1)/drivers/usb/core
# make clean && make && make install
4 (SLED/SLES 15.x) To ensure that the VHCI drivers work properly with USB redirection, configure signing settings for the USB driver.
a Create an SSL key pair for the USB driver.
# openssl req -new -x509 -newkey rsa:2048 -keyout MOK.priv -outform DER -out MOK.der -nodes -days 36500 -subj "/CN=Descriptive name/"
b Find the path to the signing file for the USB driver. find / -name sign-file
This command returns the paths to all the signing files located on the system. The signing file path for the USB driver resembles the following example.
/usr/src/linux-5.3.18-24.9-obj/x86_64/default/scripts/
c Sign the USB driver. In the following commands, <sign-file-path> is the path to the signing file that you found earlier in step 4b.
# sudo /<sign-file-path>/sign-file sha256 ./MOK.priv ./MOK.der /lib/modules/$ (uname -r)/kernel/drivers/usb/host/usb-vhci-iocifc.ko
# sudo /<sign-file-path>/src/kernels/$(uname -r)/scripts/sign-file sha256 ./ MOK.priv ./MOK.der /lib/modules/$(uname -r)/kernel/drivers/usb/host/usb-vhci-hcd.ko
d Register the key for UEFI Secure Boot. # sudo mokutil --import MOK.der
Note This command issues a request to set a Machine Owner Key (MOK) password for UEFI Secure Boot.
e To set up UEFI Secure Boot in the vSphere console, reboot the system. For more information, see https://sourceware.org/systemtap/wiki/SecureBoot.
In addition, follow these guidelines:
n If your Linux kernel changes to a new version, you must recompile and reinstall the VHCI driver, but you do not need to reinstall Horizon for Linux.
n You can also add Dynamic Kernel Module Support (DKMS) to the VHCI driver using steps similar to the following example for an Ubuntu system.
a Install the kernel headers.
b Install dkms using the following command.
# apt install dkms
c Extract and patch the VHCI TAR file.
# tar xzvf vhci-hcd-1.15.tar.gz # cd vhci-hcd-1.15
# patch -p1 <full-path_to_patch-file> # cd ..
d Copy the extracted VHCI source files to the /usr/src directory.
# cp -r vhci-hcd-1.15 /usr/src/usb-vhci-hcd-1.15
e Create a file named dkms.conf and place it in the /usr/src/usb-vhci-hcd-1.15 directory.
# touch /usr/src/usb-vhci-hcd-1.15/dkms.conf
f Add the following contents to the dkms.conf file.
PACKAGE_NAME="usb-vhci-hcd" PACKAGE_VERSION=1.15 MAKE_CMD_TMPL="make KVERSION=$kernelver" CLEAN="$MAKE_CMD_TMPL clean" BUILT_MODULE_NAME[0]="usb-vhci-iocifc" DEST_MODULE_LOCATION[0]="/kernel/drivers/usb/host" MAKE[0]="$MAKE_CMD_TMPL" BUILT_MODULE_NAME[1]="usb-vhci-hcd" DEST_MODULE_LOCATION[1]="/kernel/drivers/usb/host" MAKE[1]="$MAKE_CMD_TMPL" AUTOINSTALL="YES"
g Add this VHCI driver in dkms.
# dkms add usb-vhci-hcd/1.15
h Build the VHCI driver.
# dkms build usb-vhci-hcd/1.15
i Install the VHCI driver.
Virtual Machine Settings for 2D Graphics
When you create certain Linux virtual machines for a VMware Horizon deployment, you must change the vCPU and virtual memory settings for performance requirements.
Virtual machines that are configured to use NVIDIA GRID vGPU use the NVIDIA virtual graphics card, which is based on the NVIDIA physical graphics accelerator. You do not need to change the vCPU and virtual memory settings for these virtual machines.
Virtual machines that are configured to use 2D graphics use the VMware virtual graphics card, and you must change vCPU and virtual memory settings to improve the desktop performance. Use the following guidelines:
n For improved performance of a 2D desktop, set more vCPUs and virtual memory for the
Linux virtual machine. For example, set 2 vCPUs and 2 GB of virtual memory.
n For the large screen display of multiple monitors, such as four monitors, set 4 vCPUs and 4
GB of virtual memory for the virtual machine.
n For improved video playback in a 2D desktop, set 4 vCPUs and 4 GB of virtual memory for
the virtual machine.
Configuring Session Collaboration on Linux Desktops
With the Session Collaboration feature, users can invite other users to join an existing Linux remote desktop session.
System Requirements for Session Collaboration
To support the Session Collaboration feature, your VMware Horizon deployment must meet certain requirements.
Table 1-9. System Requirements for Session Collaboration
Component Requirements
Linux remote desktops The Session Collaboration feature is supported on remote desktops running the following Linux distributions and desktop environments:
n Ubuntu 20.04/18.04 with Gnome desktop environment
n RHEL 7.5 with Gnome Classic or KDE desktop environment
n RHEL Workstation 7.6 or later, or 8.x with Gnome Classic desktop environment
n RHEL Server 7.8 or later, or 8.1 or later with Gnome Classic desktop environment
Connection Server The Connection Server instance uses an Enterprise license. Display protocol VMware Blast
Note RHEL 8.x desktops require additional system configuration to support Session Collaboration. See Configure a RHEL 8.x Desktop for Session Collaboration.
For information about how to use the Session Collaboration feature, see the Horizon Client documentation.
Setting Session Collaboration Options in Configuration Files
Set the following option in the /etc/vmware/viewagent-custom.conf file to enable or disable the Session Collaboration feature.
n CollaborationEnable
Set the following options in the /etc/vmware/config file to configure the settings used during a collaboration session. n collaboration.logLevel n collaboration.maxCollabors n collaboration.enableEmail n collaboration.serverUrl n collaboration.enableControlPassing
See Setting Options in Configuration Files on a Linux Desktop for more information.
Session Collaboration Feature Limitations
The following general limitations apply to the Session Collaboration feature:
n Users cannot use the following remote desktop features in a collaboration session.
n USB redirection
n Audio input redirection
n Client drive redirection n Smart card redirection
n Clipboard redirection
n Users cannot change the remote desktop resolution in a collaboration session.
n Users cannot have multiple collaboration sessions on the same client machine.
The following limitations apply to collaboration sessions on a RHEL 7.5 desktop with KDE desktop environment:
n To display the Session Collaboration menu, users must right-click the Session Collaboration icon in the system tray. Left-clicking the icon has no effect.
n Users might see the Email button, which is used to send invitation emails to collaborators but
is initially inactive. To make the button active, a user must first configure a default email application for the KDE desktop environment.
Note Use the following remedies to troubleshoot issues related to Session Collaboration:
n If the Session Collaboration icon fails to appear in the system tray after a user logs in for the first time to the remote desktop, instruct the user to disconnect from and reconnect to the desktop. The Session Collaboration icon usually appears after reconnection to the desktop.
n If the Session Collaboration icon in the system tray is unresponsive after a user logs in for the first time to the remote desktop, instruct the user to resize the remote desktop window. The Session Collaboration icon becomes responsive after the desktop window is resized.
Configure a RHEL 8.x Desktop for Session Collaboration
To use the Session Collaboration feature on a RHEL 8.x desktop, you must first download and install the required GNOME Shell extension.
Procedure
1 Download the required GNOME shell extension to the RHEL 8.x system from https:// extensions.gnome.org/extension/615/appindicator-support/.
n For RHEL 8.0, select 3.28 for the shell version and 26 for the extension version.
n For RHEL 8.1 and 8.2, select 3.32 for the shell version and 29 for the extension version.
2 Untar the downloaded package and rename the directory as
[email protected] (the "uuid" value in the metadata.json file in the package).
3 Use the mv command to move the [email protected] directory to this location: /usr/share/gnome-shell/extensions.
By default, the metadata.json file in the [email protected]
directory is only readable to the root user. To support Session Collaboration, you must make this file readable to other users as well.
4 Run the command to make metadata.json readable to other users, as shown in the following example.
chmod a+r metadata.json 5 Install gnome-tweaks.
6 In the desktop environment, restart GNOME Shell by pressing the following sequence of keys on the keyboard.
Alt+F2 r Enter
7 In the desktop environment, run gnome-tweaks and then enable KStatusNotifierItem/
for Desktop Deployment
2
Setting up a Linux desktop involves creating a Linux virtual machine and preparing the operating system for remote desktop deployment.
This chapter includes the following topics:
n Create a Virtual Machine and Install Linux
n Update the GNOME Shell Window List Extension on SLED/SLES Virtual Machines n Prepare a Linux Machine for Remote Desktop Deployment
n Install Dependency Packages for Horizon Agent
n Upgrade the Operating System of a Linux Virtual Machine
Create a Virtual Machine and Install Linux
You create a new virtual machine in vCenter Server for each remote desktop that is deployed in a VMware Horizon environment. You must install your Linux distribution on the virtual machine.
Prerequisites
n Verify that your deployment meets the requirements for supporting Linux desktops. See
System Requirements For Horizon Agent for Linux.
n Familiarize yourself with the steps for creating virtual machines in vCenter Server and
installing guest operating systems. For more information see the Setting Up Virtual Desktops
in Horizon document.
n Familiarize yourself with the video memory (vRAM) settings requirements for the monitors you plan to use with the virtual machine. See System Requirements For Horizon Agent for Linux.
Procedure
2 Configure custom configuration options.
a Right-click the virtual machine and click Edit Settings.
b Specify the number of vCPUs and the vMemory size. For the required settings, refer to the following guidelines.
n If you are preparing the virtual machine for deployment as a single-session virtual
desktop pool, follow the guidelines in the installation guide for your Linux distribution. For example, Ubuntu 18.04 specifies configuring 2048 MB for vMemory and 2 vCPUs.
n If you are preparing the virtual machine to serve as a multi-session host for a published desktop or application pool, specify at least 8 vCPUs and 40 GB of vMemory.
Important A minimum of 8 vCPUs and 40 GB of vMemory is required to support up to 50 user sessions per published desktop or published application.
3 Power on the virtual machine and install the required Linux distribution.
Note If you are preparing the virtual machine for use as a multi-session host, you must install one of the following required distributions:
n RHEL Workstation 8.x/7.x
n Ubuntu 20.04/18.04
4 Configure the desktop environment to use for the specific Linux distribution.
See the Desktop Environment section in System Requirements For Horizon Agent for Linux
for additional information.
5 Ensure that the system hostname is resolvable to 127.0.0.1.
Update the GNOME Shell Window List Extension on SLED/
SLES Virtual Machines
Due to a known issue, the default GNOME Shell window list extension on SLED/SLES virtual machines causes the window taskbar to appear in the middle of the screen when the remote desktop is started in full-screen mode. This topic describes how to remedy the display issue. A client user can correct the location of the taskbar by exiting and reentering full-screen mode. To fix this issue for all provisioned desktops, update the GNOME Shell window list extension to the current version on the SLED/SLES virtual machine.
Prerequisites
Ensure that Firefox version 56 or later is installed on the SLED/SLES machine. The updated GNOME Shell window list extension requires this browser version.
Procedure
1 From Firefox on the SLED/SLES machine, go to the GNOME Shell extensions site at https:// extensions.gnome.org/local/.
2 Click Click here to install browser extension.
3 Click Continue to installation.
4 Click Add.
5 Select the Allow this extension to run in Private Windows check box and click Okay, Got it.
6 Refresh the web page and locate the Windows List entry in the extensions list. Click the green update button next to that entry.
The updated windows list extension is installed on the machine. To confirm the installation, refresh the web page and verify that the green update button no longer appears next to the
Windows List entry.
Results
The window taskbar appears correctly at the bottom of the screen on remote desktops provisioned from this SLED/SLES machine.
Prepare a Linux Machine for Remote Desktop Deployment
You must perform certain tasks to prepare a Linux machine for use as a desktop in a VMware Horizon deployment.
To prepare a Linux machine for a VMware Horizon deployment, you must enable communication between the machine and the Connection Server. You must configure networking on the Linux machine so that the Linux machine can ping the Connection Server instance using its FQDN (fully qualified domain name).
If you are preparing the Linux machine for use as a multi-session host for a published desktop or application pool, you must perform several additional preparation steps.
Prerequisites
n Verify that a new virtual machine (VM) was created in vCenter Server and your Linux distribution was installed on the machine.
n If you are preparing the Linux machine for use as a multi-session host, verify that one of the following required distributions is installed on the machine:
n RHEL Workstation 8.x/7.x
n Ubuntu 20.04/18.04
n Familiarize yourself with the steps for configuring your Linux machine to be resolvable through DNS. These steps vary for the different Linux distributions and releases. For instructions, consult the documentation for your Linux distribution and release.
If you are preparing the Linux machine for deployment as an automated full-clone or instant-clone desktop pool or for inclusion in an automated instant-instant-clone farm, you must also do the following:
n Verify that the virtual switch that the instant-clone VMs connect to has enough ports to support the expected number of VMs. Each network card on a VM requires one port.
n To support instant-clone desktop pools or farms, verify that you have added an instant-clone domain administrator in Horizon Console.
Procedure
1 On an Ubuntu machine, manually install VMware Tools by using the following command:
apt-get install open-vm-tools-desktop
Note VMware Tools is pre-installed on RHEL/CentOS and SLED/SLES machines.
Note If you upgrade the Linux kernel after installing VMware Tools, VMware Tools might stop running. To resolve the problem, refer to VMware KB article 2050592.
2 Map the Linux machine's host name to 127.0.0.1 in the /etc/hosts file.
For RHEL, CentOS, SLES, and SLED, you must manually map the host name to 127.0.0.1 because it is not automatically mapped. For Ubuntu, this step is not necessary because the mapping is there by default.
Note If you change the Linux machine's host name after installing Horizon Agent, you must map the new host name to 127.0.0.1 in the /etc/hosts file. Otherwise, the old host name continues to be used.
3 To prepare the virtual machine for use in an automated instant-clone farm, in vSphere Client, disable the vApp Options setting on the virtual machine.
4 (RHEL and CentOS only) Verify that virbr0 is disabled.
virsh net-destroy default virsh net-undefine default service libvirtd restart
5 Ensure that the Horizon Connection Server instances in the pod can be resolved through DNS.
6 Configure the Linux machine to run in graphical mode by default.
For example, the following command configures a CentOS machine to run in graphical mode.
7 (Ubuntu only) If the machine is configured to authenticate with an OpenLDAP server, set the FQDN on the machine.
This step ensures that the information can be displayed correctly in the User field on the Sessions page in Horizon Console. Edit the /etc/hosts file as follows:
a # nano /etc/hosts
b Add the FQDN. For example: 127.0.0.1 hostname.domainname hostname. c Exit and save the file.
8 (SLED/SLES only) Disable Change Hostname via DHCP. Then set the static hostname and domain name.
a In Yast, click Network Settings. b Click the Hostname/DNS tab.
c Deselect Change Hostname via DHCP. d Enter the hostname and the domain name. e Click OK.
9 To prepare a virtual machine for use as a multi-session host in a farm, install the required software packages.
n For RHEL Workstation 8.x/7.x:
sudo yum install http://mirror.centos.org/centos/7/os/x86_64/Packages/ cpptest-1.1.1-9.el7.x86_64.rpm
sudo yum install https://rpmfind.net/linux/centos/7.8.2003/os/x86_64/Packages/ uriparser-0.7.5-10.el7.x86_64.rpm
n For Ubuntu 20.04/18.04:
apt-get install liburiparser1
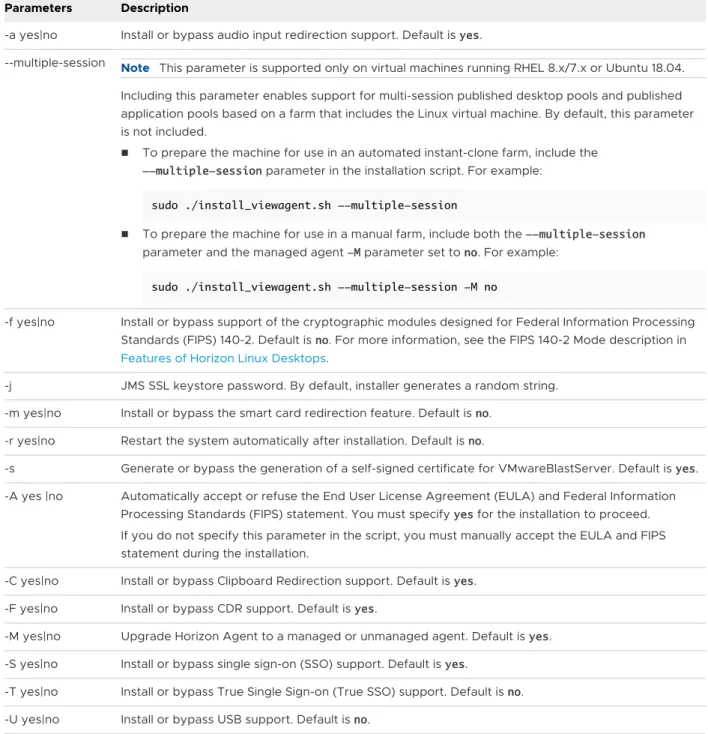
10 Install Horizon Agent on the machine, as described in Install Horizon Agent on a Linux Virtual Machine. Ensure that you include the appropriate parameters in the installation script to install or enable required features, as described in install_viewagent.sh Command-Line Options. For example:
n To prepare the virtual machine for inclusion in an automated instant-clone farm, use the
following installation script:
sudo ./install_viewagent.sh --multiple-session
n To prepare the virtual machine for inclusion in a manual farm, use the following installation
script:
11 To prepare the golden-image virtual machine for an instant-clone floating desktop pool or automated instant-clone farm, use vSphere Client or vSphere Web Client to take a snapshot of the virtual machine in its powered-down state. This snapshot is used as the baseline configuration for the first set of instant-clone machines that are anchored to the virtual machine.
For more information, see "Take a Snapshot in the VMware Host Client" in vSphere Single
Host Management - VMware Host Client, available from VMware vSphere Documentation.
Important Before you take a snapshot, completely shut down the golden-image virtual machine by using the shutdown or power-off command in the Linux operating system.
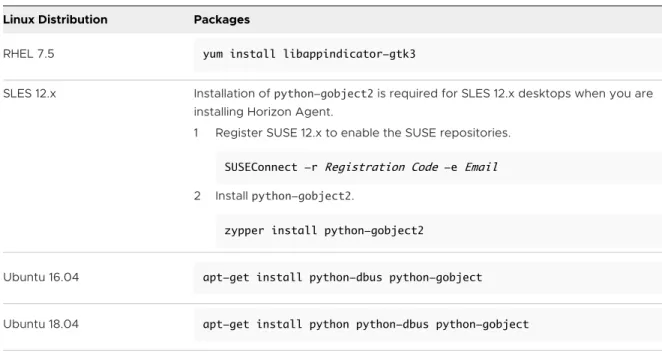
Install Dependency Packages for Horizon Agent
Horizon Agent for Linux has some dependency packages unique to a Linux distribution. You must install these packages before installing Horizon Agent for Linux.
Prerequisites
Verify that a new virtual machine (VM) is created in vCenter Server and your Linux distribution is installed on the machine.
Procedure
u Install the mandatory packages that are not installed or upgraded by default. If any package
does not meet the requirement, the installer breaks the installation.
Table 2-1. Mandatory Dependency Packages
Linux Distribution Packages
RHEL 7.5 yum install libappindicator-gtk3
SLES 12.x Installation of python-gobject2 is required for SLES 12.x desktops when you are installing Horizon Agent.
1 Register SUSE 12.x to enable the SUSE repositories. SUSEConnect -r Registration Code -e Email 2 Install python-gobject2.
zypper install python-gobject2
Ubuntu 16.04 apt-get install python-dbus python-gobject
Upgrade the Operating System of a Linux Virtual Machine
This topic explains how to upgrade the operating system of a Linux virtual machine (VM) that has Horizon Agent installed on it. Always follow the order of steps described in this topic when you want to upgrade your Linux VM to a new operating system version.
Prerequisites
Before starting the upgrade procedure, take a snapshot of the current Linux VM.
Procedure
1 Uninstall Horizon Agent from the VM.
See Uninstall Horizon AgentFrom a Linux Virtual Machine.
2 Upgrade the operating system of the VM, following the upgrade steps for your Linux distribution.
You can perform the upgrade using the graphical installation interface or installation commands for your Linux distribution.
3 Reinstall Horizon Agent on the VM.
Integration and User
Authentication Features for Linux
Desktops
3
Horizon Agent uses the existing Microsoft Active Directory (AD) infrastructure for user authentication and management. You can integrate your Linux virtual machines with Active Directory so that users can log in to a Linux desktop using their Active Directory user account. You can also configure features for user authentication, such as single sign-on (SSO), smart card redirection, and True SSO.
Note Horizon Agent expects the Linux desktop and the client user to reside in the same Active Directory domain. If the desktop and user reside in different domains, Horizon Agent might misidentify the desktop domain as being the user domain.
This chapter includes the following topics:
n Integrating Linux Desktops with Active Directory
n Setting Up Single Sign-On
n Setting Up Smart Card Redirection
n Setting Up True SSO for Linux Desktops
Integrating Linux Desktops with Active Directory
Multiple solutions exist to integrate Linux distributions with Microsoft Active Directory (AD). Horizon Agent for Linux has no dependency on which solution is used.
The following solutions are known to work for a Linux virtual machine running Horizon Agent for Linux.
n OpenLDAP Server Pass-through Authentication
n System Security Services Daemon (SSSD) LDAP Authentication against the Microsoft Active Directory
n PowerBroker Identity Services Open (PBISO) Authentication supports offline domain join with Active Directory for instant-cloned desktops running the following Linux distributions.
n RHEL 7.x
n Samba supports offline domain join with Active Directory for instant-cloned desktops running the following Linux distributions.
n Ubuntu 16.04, 18.04, and 20.04
n RHEL 7.x and 8.x
n SLED/SLES 15 SP1 and 15 SP2
If you use the LDAP-based solutions, you can perform the configuration in a template virtual machine and no additional steps are required in the cloned virtual machines.
Note For ease of deployment, if available, choose the solution that uses SSSD LDAP authentication against the Microsoft Active Directory.
Use the OpenLDAP Server Pass-Through Authentication
You can set up an OpenLDAP server and use the pass-through authentication (PTA) mechanism to verify the user credentials against Active Directory.
At a high level, the OpenLDAP pass-through authentication solution involves the following steps.
Procedure
1 To enable LDAPS (Lightweight Directory Access Protocol over SSL), install Certificate Services on the Active Directory.
2 Set up an OpenLDAP server.
3 Synchronize user information (except password) from the Active Directory to the OpenLDAP server.
4 Configure the OpenLDAP server to delegate password verification to a separate process such as saslauthd, which can perform password verification against the Active Directory.
5 Configure the Linux virtual machines to use an LDAP client to authenticate users with the OpenLDAP server.
Set Up SSSD LDAP Authentication Against the Microsoft Active
Directory
You can use LDAP authentication against Windows Active Directory by configuring a System Security Services Daemon (SSSD) in the Linux virtual machine.
Use the following high-level steps to implement the SSSD LDAP authentication solution.
Note To perform an instant-clone offline domain join, you must use one of the supported authentication methods: PowerBroker Identity Services Open (PBISO) authentication or Samba offline domain join. The SSSD LDAP authentication solution is not supported.
Procedure
1 To enable LDAPS (Lightweight Directory Access Protocol Over Secure Socket Layer), install the Certificate Services on the Active Directory server.
2 To use LDAP authentication directly against the Microsoft Active Directory, configure the SSSD in the Linux virtual machine.
Use the Winbind Domain Join Solution
The Winbind domain join solution, a Kerberos-based authentication solution, is another method of authenticating with Active Directory.
Use the following high-level steps to set up the Winbind domain join solution.
Procedure
1 Install the winbind, samba, and Kerberos packages on the Linux virtual machine.
2 Join the Linux desktop to Microsoft Active Directory (AD).
What to do next
If you use the Winbind Domain Join solution or another Kerberos authentication-based solution, join the template virtual machine to AD, and rejoin the cloned virtual machine to AD. For example, use the following command:
sudo /usr/bin/net ads join -U <domain_user>%<domain_password>
To run the domain rejoin command on a cloned virtual machine for the Winbind solution, include the command to a shell script and set the script path to the RunOnceScript option in the /etc/ vmware/viewagent-custom.conf file. For more information, see Setting Options in Configuration Files on a Linux Desktop.
Configure PowerBroker Identity Services Open (PBISO)
Authentication
The PowerBroker Identity Services Open (PBISO) authentication method is one of the supported solutions for performing an offline domain join.
Use the following steps to join a Linux virtual machine to Active Directory (AD) using PBISO.
Procedure
1 Download PBISO 8.5.6 or later from https://www.beyondtrust.com/products/powerbroker-identity-services-open/.
Note For Ubuntu 20.04, download PBISO 9.1.0 or later.
3 Install Horizon Agent for Linux.
4 Use PBISO to join the Linux virtual machine to the AD domain.
In the following example, lxdc.vdi is the domain name and administrator is the domain user name.
sudo domainjoin-cli join lxdc.vdi administrator 5 Set up the default configuration for domain users.
sudo /opt/pbis/bin/config UserDomainPrefix lxdc sudo /opt/pbis/bin/config AssumeDefaultDomain true sudo /opt/pbis/bin/config LoginShellTemplate /bin/bash sudo /opt/pbis/bin/config HomeDirTemplate %H/%U
6 Edit the /etc/pamd.d/common-session file.
a Locate the line that says session sufficient pam_lsass.so.
b Replace that line with session [success=ok default=ignore] pam_lsass.so.
Note This step must be repeated after you reinstall or update the Horizon Agent for Linux.
7 For Ubuntu 16.04, append the following lines to the /usr/share/lightdm/ lightdm.conf.d/50-unity-greeter.conf configuration file.
allow-guest=false
greeter-show-manual-login=true
Note If you are using Ubuntu 20.04/18.04, no change to the lightdm configuration file is required.
8 Restart the Linux virtual machine and log in.
What to do next
Note
n If the /opt/pbis/bin/config AssumeDefaultDomain option is set to false, you must update
the SSOUserFormat=<username>@<domain> setting in the /etc/vmware/viewagent-custom.conf file.
n When using the Horizon instant-clone floating desktop pool feature, to avoid losing the DNS
Server setting when the new network adapter is added to the cloned virtual machine, modify the resolv.conf file for your Linux system. Use the following example, for an Ubuntu 16.04 system, as a guide for adding the necessary lines in the /etc/resolvconf/resolv.conf.d/ head file.
nameserver 10.10.10.10 search mydomain.org
Configure the Samba Offline Domain Join
To support SSO on an instant-cloned Linux virtual machine (VM) in a VMware Horizon desktop environment, configure Samba on the golden-image Linux VM.
Use the following procedure as an example for using Samba to offline domain join an instant-cloned Linux VM to Active Directory (AD). This procedure provides the steps for an Ubuntu system.
Procedure
1 On your golden-image Linux VM, install the winbind and samba packages, including any other dependent libraries such as smbfs and smbclient.
2 Install the Samba tdb-tools package using the following command.
sudo apt-get install tdb-tools 3 Install Horizon Agent for Linux.
4 Edit the /etc/samba/smb.conf configuration file so that it has content similar to the following example. [global] security = ads realm = LAB.EXAMPLE.COM workgroup = LAB idmap uid = 10000-20000 idmap gid = 10000-20000 winbind enum users = yes winbind enum group = yes template homedir = /home/%D/%U template shell = /bin/bash client use spnego = yes client ntlmv2 auth = yes encrypt passwords = yes
winbind use default domain = yes restrict anonymous = 2
5 Edit the /etc/krb5.conf configuration file so that it has content similar to the following example. [libdefaults] default_realm = EXAMPLE.COM krb4_config = /etc/krb.conf krb4_realms = /etc/krb.realms kdc_timesync = 1 ccache_type = 4 forwardable = true proxiable = true
YOUR-DOMAIN = { kdc = 10.111.222.33 } [domain_realm] your-domain = EXAMPLE.COM .your-domain = EXAMPLE.COM
6 Edit the /etc/nsswitch.conf configuration file, as shown in the following example.
passwd: files winbind group: files winbind shadow: files winbind gshadow: files
7 Verify that the host name is correct and that the system date and time are synchronized with your DNS system.
8 To inform Horizon Agent that the Linux VM is domain-joined using the Samba method, set the following option in the /etc/vmware/viewagent-custom.conf file.
OfflineJoinDomain=samba
9 Restart the golden-image Linux VM and log back in.
Use the Realmd Join Solution for RHEL/CentOS 8.x
To ensure the operation of features such as single sign-on for a RHEL/CentOS 8.x desktop, use the realmd solution to join the RHEL/CentOS 8.x virtual machine to your Active Directory (AD) domain.
Procedure
1 Configure a fully qualified host name for the RHEL/CentOS 8.x virtual machine (VM).
For example, if rhel8 is the unqualified host name of the VM and LXD.VDI is the AD domain, run the following command.
# hostnamectl set-hostname rhel8.lxd.vdi
2 Verify the network connection with the AD domain, as shown in the following example.
# realm discover -vvv LXD.VDI
3 Install the required dependency packages, as shown in the following example.
# dnf install -y sssd adcli samba-common-tools oddjob oddjob-mkhomedir 4 Join the AD domain, as shown in the following example.
5 Edit the /etc/sssd/sssd.conf so that it resembles the following example. Add
ad_gpo_map_interactive = +gdm-vmwcred under the [domain/domain name] section.
[sssd] domains = LXD.VDI config_file_version = 2 services = nss, pam [domain/LXD.VDI] ad_domain = LXD.VDI krb5_realm = LXD.VDI
realmd_tags = manages-system joined-with-adcli cache_credentials = True id_provider = ad krb5_store_password_if_offline = True default_shell = /bin/bash ldap_id_mapping = True use_fully_qualified_names = False fallback_homedir = /home/%u access_provider = ad ad_gpo_map_interactive = +gdm-vmwcred
6 To ensure that the domain-join takes effect, restart the VM and log back in.
7 Verify that the domain users are configured correctly. The following example shows how to use the id command to return the configuration output from domain user zyc1.
# id zyc1
uid=1084401403(zyc1) gid=1084400513(domain users) groups=1084400513(domain users)
8 Using the credentials of a domain user, verify that you can successfully log in to the VM.
Note Horizon Agent only supports the X11 display server protocol for RHEL/CentOS 8.x desktops.
Setting Up Single Sign-On
To set up single sign-on (SSO) for Linux desktops, you must perform some configuration steps. The VMware Horizon single sign-on module communicates with PAM (pluggable authentication modules) in Linux and does not depend on the method that you use to integrate the Linux virtual machine with Active Directory (AD). VMware Horizon SSO is known to work with the OpenLDAP and Winbind solutions that integrate Linux virtual machines with AD.
By default, SSO assumes that AD's sAMAccountName attribute is the login ID. To ensure that the correct login ID is used for SSO, you must perform the following configuration steps if you use the OpenLDAP or Winbind solution:
n For Winbind, add the following statement to the configuration file /etc/samba/smb.conf.
winbind use default domain = true
If users must specify the domain name to log in, you must set the SSOUserFormat option on the Linux desktop. For more information, see Setting Options in Configuration Files on a Linux Desktop. SSO always uses the short domain name in upper case. For example, if the domain is
mydomain.com, SSO uses MYDOMAIN as the domain name. Therefore, you must specify
MYDOMAIN when setting the SSOUserFormat option. Regarding short and long domain names, the following rules apply:
n For OpenLDAP, you must use short domain names in upper case. n Winbind supports both long and short domain names.
AD supports special characters in login names, but Linux does not. Therefore, do not use special characters in login names when setting up SSO.
In AD, if a user's UserPrincipalName (UPN) attribute and sAMAccount attribute do not match, and the user logs in with the UPN, SSO fails. For example, if you have a user, juser in AD
mycompany.com, but the user's UPN is set to [email protected] instead of
[email protected], SSO fails. The workaround is for the user to log in using the name that is stored in sAMAccount. For example, juser.
Horizon Agent does not require the user name to be case-sensitive. You must ensure that the Linux operating system can handle case-insensitive user names.
n For Winbind, the user name is case-insensitive by default.
n For OpenLDAP, Ubuntu uses NSCD to authenticate users and is case-insensitive by default. RHEL and CentOS use SSSD to authenticate users and the default is case-sensitive. To change the setting, edit the file /etc/sssd/sssd.conf and add the following line in the
[domain/default] section:
case_sensitive = false
If your Linux virtual machine has multiple desktop environments installed on it, refer to Desktop Environment to select the desktop environment to use with SSO.
Setting Up Smart Card Redirection
When smart card redirection is enabled on a Linux desktop, a user can authenticate into the desktop using a smart card reader connected to the local client system. To set up smart card redirection, you must perform some configuration steps.