THE EFFECT OF RECOMBINANT HUMAN BONE MORPHOGENETIC PROTEIN-2 ON THE OSSEOINTEGRATION OF TEMPORARY ANCHORAGE DEVICES
A Thesis presented to
the Faculty of California Polytechnic State University, San Luis Obispo
In Partial Fulfillment
of the Requirements for the Degree
Master of Science in Engineering, with Specialization in Biomedical Engineering
by Eden E. Cruz
© 2010 Eden E. Cruz
COMMITTEE MEMBERSHIP
TITLE: The Effect of Recombinant Human Bone
Morphogenetic Protein-2 on the Osseointegration of Temporary Anchorage Devices
AUTHOR: Eden E. Cruz
DATE SUBMITTED: May 2010
COMMITTEE CHAIR: Lanny V. Griffin, Dept Chair-Biomed & Gen Eng
COMMITTEE MEMBER: Daniel W. Walsh, Assoc Dean Grad Prgm/Rsrch
ABSTRACT
The Effect of Recombinant Human Bone Morphogenetic Protein-2 on the Osseointegration of Temporary Anchorage Devices
Eden E. Cruz
Titanium has been widely used for dental implants, and in particular, roughened titanium surfaces have provided a means for increasing bone apposition and
strengthening the implant-to-bone interface. Finding a way to further increase
osseointegration is important because there is a significant clinical benefit to patients if a stable anchor can be established instead of anchoring orthodontic hardware to the molars. In this study, the effect of recombinant human bone morphogenetic protein-2 (rhBMP-2) on the ability of temporary anchorage devices (TADs) to osseointegrate was investigated. The temporary anchorage devices (TADs) used in this study were manufactured from commercially pure titanium and divided into 2 types of treatments: (1) sandblasted and acid-etched (i.e. the control) and (2) sandblasted and acid-etched treated with Medtronic INFUSE® Bone Graft (recombinant human bone morphogenetic protein-2 placed on an absorbable collagen sponge). The implants were placed on the cranial bones of 10 adult male Sprague-Dawley rats. The rats were euthanized by carbon dioxide asphyxiation 6 weeks following surgery for histological examination and biomechanical testing. The results from visual inspection and biomechanical testing showed that the sandblasted and acid-etched TADs treated with rhBMP-2 promoted better osseointegration than TADs that were only sandblasted and acid-etched. Specifically, surface modified TADs treated with rhBMP-2 on bottom showed an increased surface coverage by bone and an increase in the adhesion strength at the TAD-to-bone interface.
ACKNOWLEDGMENTS
It is a pleasure to thank those who made this thesis possible.
I first offer my sincerest gratitude to my advisor, Dr. Lanny V. Griffin, for his patience, guidance, and continuous support throughout my thesis project at Cal Poly, San Luis Obispo. The start and successful completion of this thesis would not have been possible without his remarkable teaching abilities, wise advice, and encouragement throughout the entire process.
I thank my parents, Jaime and Edna Cruz, for their endless love and support throughout my studies at Cal Poly, San Luis Obispo. My mother has always been a constant source of encouragement during my graduate study, and I am deeply grateful for her patience and persistent support which motivated me to complete this thesis. My father has always been a constant inspiration in my life, and I am sincerely thankful for his accessibility and willingness to always share his knowledge.
This thesis would not have been possible without my sister, Erin Cruz, a great support system in my life who was by my side from the very beginning of this thesis project. Her enthusiasm for research and engineering and her hard work intensified my passion for engineering during my graduate study and motivated me to work just as hard. I am heartily thankful that I was given the opportunity to learn and grow with my sister throughout this thesis project.
Furthermore, I would like to thank all of those who supported me in any respect during this thesis project.
TABLE OF CONTENTS
Page
LIST OF TABLES ………. viii
LIST OF FIGURES ……… ix
CHAPTER 1. LITERATURE REVIEW ………... 1
2. RESEARCH & SPECIFIC AIMS ……….. 9
Objective ………. 9
Specific Aim ………... 9
Hypothesis ……….. 10
3. MATERIALS & METHODS ………. 11
Rationale for Species & Numbers ……….. 11
Surgical Procedures ……… 11
Introduction ……… 11
Implant Preparation ……… 12
Pre-Operative ………. 13
Operative ……… 14
Post-Operative ……… 14
Historical Evaluation ……….. 15
Biomechanical Testing ………... 15
Proof of Experimental Concept ……….. 15
Test Setup for Biomechanical Testing ………... 16
4. RESULTS ………... 18
TAD Bone Coverage ……….. 18
Biomechanical Testing: Failure Load ………. 19
5. DISCUSSION ………. 20
TAD Bone Coverage ……….. 20
Strength at TAD/Bone Interface ………. 22
6. CONCLUSIONS ………. 26
REFERENCES ……… 27
APPENDICES A. Data from Lab Notebook: Rat#, Surgery Details ……… 30
B. Preliminary Experiments ………. 34
Using the IFUSE® Bone Graft Sample Kit ……… 38
Using One Rat to Determine the Following ……… 42
C. Surgery Checklist ……… 51
D. Anesthetics/Analgesics ……… 54
Bottle Concentrations (mg/mL) ………... 54
Dosage (mg/kg of body weight) ……….. 54
E. Photographs of TAD Bone Coverage ……….. 56
LIST OF TABLES
Table Page
4.1 TAD bone coverage ………... 18
4.2 Biomechanical testing: measuring failure load ……….. 19
A.1 Surgical details from lab notebook ……….... 30
B.1 Evaluating butyl cyanoacrylate ……….. 35
D.1 Number of mL administered of each drug based on weight ………. 54
E.1 Visual inspection: TAD bone coverage ……….. 56
LIST OF FIGURES
Figure Page
3.1 1 cm x 1 cm ACS treated with 0.09 cc of saline ………. 13
3.2 Proof of experimental concept ……… 16
3.3 Biomechanical test setup ………. 17
3.4 Applying load in the shear direction with a force at constant speed ………. 17
4.1 TAD bone coverage summary ……… 18
4.2 Biomechanical testing: failure load summary ………. 19
5.1 TAD bone coverage summary for treatment 1 (control) ……… 21
5.2 TAD bone coverage summary for treatment 2 (rhBMP-2) ………. 22
5.3 Failure load summary for treatment 1 (control) ………... 23
5.4 Failure load summary for treatment 2 (rhBMP-2) ……… 23
B.1 Adhesion strength vs. curing time (cow bone, no UV light) ……… 36
B.2 Adhesion strength vs. curing time (NY steak, no UV light) ………. 36
B.3 Adhesion strength vs. curing time (cow bone, UV light) ………. 37
B.4 Adhesion strength vs. curing time (NY steak, UV light) ……….. 37
B.5 Absorbable collagen sponge ……….. 41
F.1 Force-displacement curve for Rat 8 ……….. 59
F.2 Force-displacement curve for Rat 12 ………. 59
F.3 Force-displacement curve for Rat 13 ………. 60
F.4 Force-displacement curve for Rat 14 ………. 60
F.5 Force-displacement curve for Rat 15 ………. 61
1. LITERATURE REVIEW
With the objective of replacing missing teeth for patients, titanium implants have continued to play an important role in the dental industry since the time when Dr. Per Ingvar Branemark discovered titanium’s biocompatibility and its ability to integrate into bone in the 1960’s. Specifically, the use of titanium implants as temporary anchorage devices (TADs) has been a significant application in orthodontic practice for the past 5 years. As an alternative to using molars as anchors, which may lead to undesired teeth movement, these TADs offer orthodontists the ability to move teeth against fixed objects instead of against neighboring teeth, thus avoiding the equal and opposite reaction forces as described by Newton’s third law [1, 2].
Although TADs offer orthodontists unparalleled opportunities to move specific teeth while avoiding undesired movement of the surrounding teeth, they also present potential danger to patients. Possible risks and complications that may occur if an
insufficient amount of bone is available at the implant site include root trauma, soft-tissue irritation, nerve injury, sinus perforation, and damage of maxillary and mandibular
periosteum) without piercing it, then serious side effects and insertion site limitations may be avoided.
To tackle the issue of bone height and bone piercing, Block and Hoffman developed the “onplant,” which is a disk-like hydroxyapatite-coated structure
approximately 10 mm in diameter and 2mm in height. The onplant is usually located subperiosteally on the posterior portion of the hard palate, and with a transpalatal arch, the onplant is attached to the orthodontic bands on the upper molar teeth [5]. According to Block and Hoffman, this mechanism has been shown to resist greater than 300 g of continuous orthodontic force [5]. Therefore, the onplant provides maximum anchorage to the molars and total anchorage for tooth movement without reciprocal movement of the onplant [1, 4]. Unfortunately, the surgical procedures for removing the onplant are intricate and involve re-exposing a large portion of soft tissue, which can be distressing for the patient. Advancement in the safety of TADs and minimal discomfort for patients would be available if bone piercing and painful removal procedures could be prevented. Should surface TADs be considered?
Surface TADs seem to address the potential side effects involved with bone piercing, but like bone piercing TADs, surface TADs present limitations that are worth considering. Unlike bone piercing TADs that are long and wide and can provide
established. During the 1960’s, Dr. Per Ingvar Branemark introduced the phenomenon of “osseointegration,” which meant the direct structural and functional connection between living bone and the surface of a load-bearing implant [1, 6]. Through experimentation, Branemark found that titanium itself integrates into bone. Titanium microscope heads placed into the thighbone of a rabbit could not be taken out during the removal process because the titanium oxide at the surface of the microscope heads had permanently fused with the bone. If it were possible to use titanium as the implant material for TADs, then mechanical retention and a stable anchor could be obtained.
Titanium has been used for artificial hip joints for many years, and unlike other alloys, titanium has been shown to be biocompatible with the human body. In addition to its biocompatibility, titanium is lightweight, strong, corrosion and fracture resistant, has low thermal conductivity, and can be machined and formed easily [7, 8]. Furthermore, its titanium oxide layer allows the direct contact between a titanium implant surface and bone (i.e. osseointegration). While stainless steel has also been used in orthodontics because of its high strength, it cannot be shaped easily like titanium because of its high linear coefficient of thermal expansion. In addition, stainless steel’s high nickel content makes stainless steel less desirable in terms of biocompatibility because nickel is not biocompatible. Therefore, titanium, with its excellent biocompatibility, is the more desirable choice for implant material.
example, titanium surfaces with microscale roughness have been shown to enhance osseous apposition by increasing the total surface area available for bone formation. In particular, a combination of sandblasting and acid-etching techniques has been effective in producing these microrough titanium surfaces [10, 11]. Implants with sandblasted and acid-etched surfaces have increased osteoblastic attachment and differentiation, which in turn, have strengthened bone implant contact and enhanced removal torque values in biomechanical testing.
Currently, sandblasted and acid-etched surfaces are considered a high standard of treatment for titanium implants, but is there a way to improve surface modifications to further increase osseointegration and implant stability? If additional modifications can be made to the TAD surface, the TAD can act as a stable anchor while eliminating the need to puncture the bone. By finding a way to further enhance osseointegration, the surface modification necessary for optimal bone apposition and optimal quality of the bone-TAD interface can be achieved.
transforming growth factor-β (TGF–β) superfamily. Within this TGF–β superfamily, two members in particular, BMP-2 and BMP-7, have become the subject of extensive
research. Exhibiting great osteogenic capacity, BMP-2 and BMP-7 have the ability to radically induce osteoblast differentiation in a variety of cell types and their significance in bone development is supported in various experimental studies [15, 17]. Furthermore, BMP-2 and BMP-7 have shown great potential in therapeutic applications, specifically in the treatment of bone-related conditions and defects.
From the time BMPs were first discovered, their importance in healing bone and stimulating bone growth within the body has been undeniable. When BMPs were
discovered more than 40 years ago, they were naturally occurring within the bone matrix itself. However, for the first time in 1988, these naturally occurring proteins were isolated and genetically reproduced to form recombinant human bone morphogenetic protein, or rhBMP. Like the naturally occurring protein, the recombinant form, according to several preclinical studies, has demonstrated the ability to induce new bone growth [16, 18, 19, 20]. Specifically, rhBMP-2 has been studied more than any other BMP and has been approved by the Food and Drug Administration (FDA) for use in tibial, oral, and spinal surgical procedures. Furthermore, studies have shown that when rhBMP-2 is used with a carrier, for example a collagen sponge, it has the ability to improve spinal fusion,
chosen for this current study. In particular, Medtronic INFUSE® Bone Graft, which uses an absorbable collage sponge (ACS) as a carrier for the rhBMP-2, is used.
Medtronic INFUSE® Bone Graft has been used in various applications and has the capability of facilitating bone growth in different parts of the body. In tibial fractures, it has aided in the healing of broken bones, and in the spine, it has helped minimize back pain and maximize spine stability by allowing the vertebrae to fuse. Moreover, Medtronic INFUSE® Bone Graft has helped in localized alveolar ridge augmentation and sinus augmentation, types of maxillofacial and oral grafting procedures.
Recombinant human bone morphogenetic protein-2 has great potential in
facilitating new bone growth and promoting enhanced osseointegration, but its ability to do so relies greatly on implant stabilization. The ability of a TAD to osseointegrate is compromised when implant stabilization is not present because the potential for microfractures at the bone-TAD interface increases. Osseointegration does not occur instantly, and thus, during this waiting period, it is critical to find a way to stabilize the TAD. This is very important because a “loose” TAD could influence the effectiveness of the rhBMP-2.
mechanical resistance so that implant stability can occur. The problem with screw TADs, however, is that it involves puncturing of the bone. This defeats the purpose of the study which is to eliminate puncture of the bone while promoting enhanced osseointegration. Therefore, another method aside from screw TADs must be considered to achieve desired implant stability.
The use of cyanoacrylate, or “tissue glue,” can be a means of stabilizing the TAD without having to puncture the bone. Cyanoacrylates have been used in a variety of applications ranging from the manufacture of electronics, shoes, and sports equipment, to areas of dentistry and surgery [21]. As a whole, cyanoacrylates have been very useful in general and medical applications. Cyanoacrylate tissue adhesives have been shown to have similar results to suturing and to be a considerably faster method of skin edge apposition in small facial lacerations [22]. In fact, it has been used to seal wounds and stop bleeding since the time of the Vietnam War. More specifically, there are several types of cyanoacrylates, which include methyl, ethyl, butyl, and octyl cyanoacrylate. In most cases, the type of cyanoacrylate that is used depends on the specific application. Methyl cyanoacrylate, for example, works well for metal bonding applications, whereas ethyl cyanoacrylate works well for bonding plastics, metals, and rubber. Butyl
cyanoacrylate is notable for bonding tissues and can be used as an alternative to suturing [22, 23]. Finally, octyl cyanoacrylate is useful for surface wound healing. In general, cyanoacrylates are useful because they have fast curing times. Implant stability is
2. RESEARCH & SPECIFIC AIMS 2.1 Objective
Titanium has been widely used for dental implants, and in particular, roughened titanium surfaces (i.e. sandblasted and acid-etched) have provided a means for
accelerating osseointegration and strengthening the bone-implant interface. The goal of this study is to determine the effect of recombinant human bone morphogenetic protein-2 (rhBMP-2), or more specifically, Medtronic INFUSE® Bone Graft, on the ability of temporary anchorage devices (TADs) to osseointegrate. In particular, this study will determine the influence of rhBMP-2 in addition to a sandblasted and acid-etched surface on implant anchorage and increased bone formation. Finding a way to increase
osseointegration is important because there is a significant clinical benefit to patients if a stable anchor can be established instead of anchoring orthodontic hardware to the molars. Moreover, increasing osseointegration of surface TADs would ideally minimize
interfacial movement, prevent slip, and increase long-term implant stability without piercing the bone.
2.2 Specific Aim
will be done to determine if the rhBMP-2 treatment on the TAD produces any significant changes in the bond strength between the bone and TAD.
2.3 Hypothesis
3. MATERIALS & METHODS 3.1 Rationale for Species & Numbers
Ten adult male Sprague-Dawley rats (4 controls and 6 treated with the absorbable collagen sponge/rhBMP-2 mixture) with average weight of 359 ± 108 g were used for this study and handled in accordance with an IACUC approved protocol and with the National Institutes of Health (NIH) guidelines for the care and use of laboratory animals (NIH publication 85-23, Rev. 1985). Specifically, Simonsen albino adult male rats were chosen for this study. In addition, the number of rats was calculated using the 1-Sample t test to ensure that a sufficient amount of data would be produced while limiting the number of rats used. The Sprague-Dawley rat was selected as the appropriate species of choice due to its genetic similarity to humans and its ability to serve as a general model for the study of human health and disease. Sprague-Dawley rats are widely used for experimental purposes, and in particular, their calmness and ease of handling make them the choice of species for this study. Studies similar to this current study have shown sound scientific results with the use of Sprague-Dawley rats.
3.2 Surgical Procedures 3.2.1 Introduction
3.2.2 Implant Preparation
The temporary anchorage devices (TADs) used in this study were manufactured from commercially pure titanium and divided into 2 types of treatments: Type 1 was sandblasted (with grit) and acid-etched (combination of anorganic acids, HCl/H2SO4 acid
bath), and Type 2 was treated with Medtronic INFUSE® Bone Graft (recombinant human bone morphogenetic protein-2 placed on an absorbable collagen sponge) in
addition to a sandblasted and acid-etched treatment. Type 1 treated surfaces served as the control TADs for this study because previous studies have shown that the combination of sandblasting and acid-etching is a high standard of treatment for titanium that creates a modified surface topography and allows for enhanced bone apposition and bone implant contact. An absorbable collagen sponge soaked in saline was used for the control TAD in order to reduce the variability of the results and focus solely on the effect of the rhBMP-2 on the osseointegration of the TAD. Type 2 treated surfaces were also sandblasted and acid-etched, but had an additional treatment of Medtronic INFUSE® Bone Graft on bottom in order to determine if rhBMP-2 improves on the already working technology (sandblasted and acid-etched treatment).
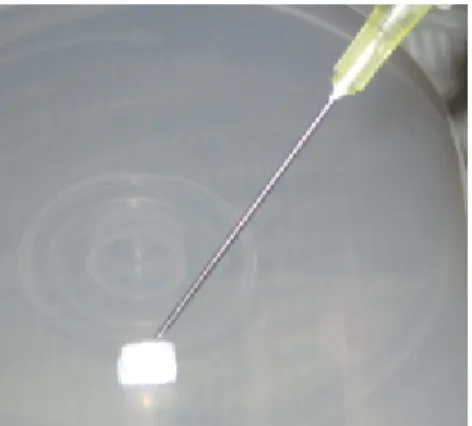
For a Type 1 TAD, a 1 cm x 1 cm absorbable collagen sponge (ACS) was treated with 0.09 cc of saline using a sterile syringe and sterile tray. Refer to Figure 3.1.
Figure 3.1 1 cm x 1 cm ACS treated with 0.09 cc of saline
3.2.3 Pre-Operative
The dosages administered to the Sprague-Dawley rats for general anesthesia and pain medication were based on the weight of the animal. A mixture of Ketamine and Xylazine (44 mg/kg body weight of Ketamine, 10 mg/kg body weight of Xylazine) was used for inducting general anesthesia. This provided approximately 30 minutes of effective anesthesia. In addition, a dose of Buprenorphine was administered
For surgery, the rat was prepped by shaving the surgical site (rat’s head), applying depilatory cream to remove excess hair, and disinfecting the area with Betadine solution using sterile cotton swabs applied in a circular motion. This process was preformed 3 times (with 3 different cotton swabs), and the antiseptic was in contact with the skin for a minimum of 3 minutes before incision. Prior to surgery, a sterile surgical drape was put over the animal to ensure that aseptic standards were met.
3.2.4 Operative
Using the “tips-only” technique, an incision was made along the midline of the head from the eyes to the ears. Once the incision was made, the periosteum was carefully held back to expose the bony complex on the surface of the cranium. Sterile forceps were used to pick up a temporary anchorage device and place it on the surface of the cranial bone (either on the frontal or parietal bone) in order to contour it to fit the shape of the animal’s skull. A sterile instrument was used to place the collagen sponge (wet with saline or rhBMP-2) on the rat skull before placing the TAD on top of it and stabilizing the TAD with butyl cyanoacrylate. The butyl cyanoacrylate took
approximately 2 minutes to set. While surgery was in progress, the animal’s vital signs were continually monitored. Once the implant was in place, the incision was closed using butyl cyanoacrylate.
3.2.5 Post-Operative
return the animal’s body temperature back to normal. Upon full recovery from the anesthesia, the rat was returned to its routine housing; each rat was caged separately. Buprenorphine (0.01 -0.05 mg/kg) was administered 3 times a day for 2 days as
necessary for pain management. In the event of an infection, the wound site was cleaned 2 times/day with Betadine solution. The rats were visually inspected daily post-op for infection, and a surgical record (procedure, date, anesthesia dose, route of administration) was maintained. The rats were euthanized by carbon dioxide asphyxiation 6 weeks after surgery for histological evaluation and biomechanical testing.
3.3 Histological Evaluation
After the rats were euthanized by carbon dioxide asphyxiation, a qualitative analysis was performed. Qualitative analysis included examining surface topography and the amount of the TAD surface covered by bone through photographs and visual
inspection. A comparison of surface topography and TAD coverage was made between the rhBMP-2 treated TAD and the control specimen (sandblasted and acid-etched TAD).
3.4 Biomechanical Testing
3.4.1 Proof of Experimental Concept
Figure 3.2 Proof of experimental concept
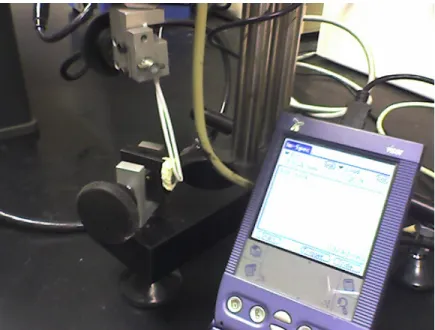
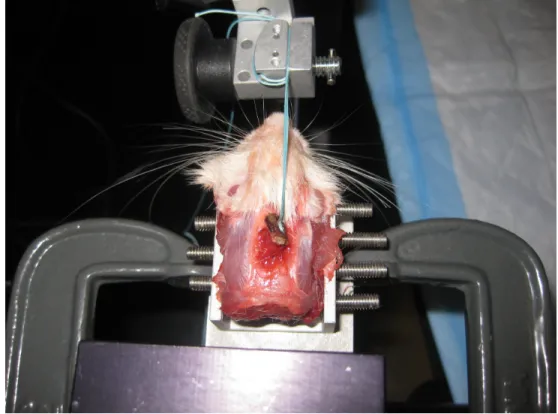
3.4.2 Test Setup for Biomechanical Testing
Biomechanical testing was performed using a micromechanical testing system (In Spec, Instron Corporation, Camden, MA). The rat head was secured in a chuck in
Figure 3.3 Biomechanical test setup
4. RESULTS
4.1 TAD Bone Coverage
Table 4.1 TAD bone coverage
Rat # Control or rhBMP-2 treated Bone Coverage
Rat 4 Control, sponge on bottom
Bone coverage observed; however, data discarded as TAD was left in rat for over 6
weeks Rat 8 Control, sponge on bottom 10% bone coverage Rat 12 Sponge on bottom w/ rhBMP-2 35% bone coverage Rat 13 Control, sponge on bottom 20% bone coverage Rat 14 Sponge on bottom w/ rhBMP-2 40% bone coverage Rat 15 Sponge on bottom w/ rhBMP-2 80% bone coverage Rat 16 Control, sponge on bottom 15% bone coverage Rat 17 Sponge on bottom w/ rhBMP-2 45% bone coverage Rat 18 Sponge on bottom w/ rhBMP-2 95% bone coverage
Rat 20 Control, sponge on bottom No bone coverage observed – TAD stuck to soft tissue
Rat 25 Sponge on bottom w/ rhBMP-2 30% bone coverage
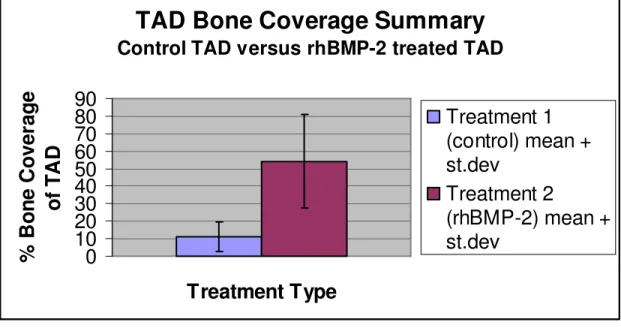
The raw data (photographs of TAD bone coverage) for each rat is found in Appendix E. The TAD bone coverage summary, including mean and standard deviation, is represented in Figure 4.1 below.
TAD Bone Coverage Summary
Control TAD versus rhBMP-2 treated TAD
0
10
20
30
40
50
60
70
80
90
Treatment Type
%
B
o
n
e
C
o
v
e
ra
g
e
o
f
T
A
D
Treatment 1
(control) mean +
st.dev
Treatment 2
(rhBMP-2) mean +
st.dev
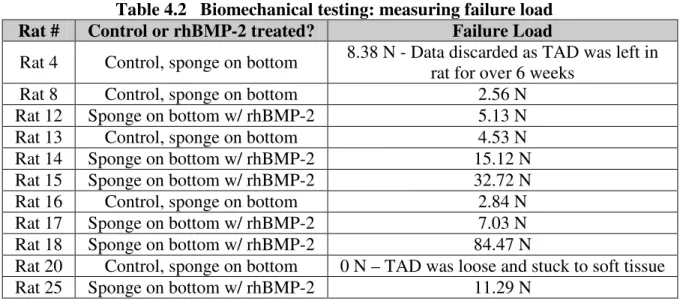
4.2 Biomechanical Testing: Failure Load
Table 4.2 Biomechanical testing: measuring failure load Rat # Control or rhBMP-2 treated? Failure Load
Rat 4 Control, sponge on bottom 8.38 N - Data discarded as TAD was left in rat for over 6 weeks
Rat 8 Control, sponge on bottom 2.56 N
Rat 12 Sponge on bottom w/ rhBMP-2 5.13 N
Rat 13 Control, sponge on bottom 4.53 N
Rat 14 Sponge on bottom w/ rhBMP-2 15.12 N
Rat 15 Sponge on bottom w/ rhBMP-2 32.72 N
Rat 16 Control, sponge on bottom 2.84 N
Rat 17 Sponge on bottom w/ rhBMP-2 7.03 N
Rat 18 Sponge on bottom w/ rhBMP-2 84.47 N
Rat 20 Control, sponge on bottom 0 N – TAD was loose and stuck to soft tissue
Rat 25 Sponge on bottom w/ rhBMP-2 11.29 N
The failure load graph (i.e. force-displacement curve) for each rat is found in Appendix F. The failure load summary, including mean and standard deviation, is represented in Figure 4.2 below.
Biomechanical Testing: Failure Load Summary Control TAD versus rhBMP-2 treated TAD
-10
0
10
20
30
40
50
60
Treatment Type
F
a
il
u
re
l
o
a
d
(
N
)
Treatment 1
(control) mean
+ st.dev
Treatment 2
(rhBMP-2)
mean + st.dev
5. DISCUSSION
5.1 TAD Bone Coverage
Bone coverage was present on all rhBMP-2 treated TADs and all but one of the control TADs. This observation was made through visual inspection and photographs taken prior to biomechanical testing. For the control TAD in Rat #20, no bone coverage was observed because the TAD had lost contact with the bone sometime during the 6 week implantation. It is most likely that the TAD had become loose early on before any osseointegration could be achieved. The TAD may have gotten loose because an
insufficient amount of butyl cyanoacrylate was used to secure the TAD to the bone.
In addition, through visual inspection and photographs, it was discovered that the TADs that had been treated with rhBMP-2 showed significantly more bone coverage than the control TADs. The rhBMP-2 treated TADs and the control TADs both have a
bone coverage for the control TAD. Therefore, for 95% of the time, an rhBMP-2 treated TAD will show greater % surface coverage by bone than a control TAD.
20 15
10 5
0
Median Mean
25 20
15 10
5 0
1st Q uartile 2.500 M edian 12.500 3rd Q uartile 18.750 M aximum 20.000
-2.338 24.838
0.000 20.000
4.837 31.839 A -S quared 0.20 P -V alue 0.705 M ean 11.250 S tD ev 8.539 V ariance 72.917 S kew ness -0.752837 Kurtosis 0.342857
N 4
M inimum 0.000 A nderson-D arling N ormality Test
95% C onfidence Interv al for M ean
95% C onfidence Interv al for M edian
95% C onfidence Interv al for S tD ev
9 5 % C onfidence Inter v als
Summary for Treatment 1 (Control)
100 80 60 40 Median Mean 90 80 70 60 50 40 30
1st Q uartile 33.750
M edian 42.500
3rd Q uartile 83.750
M aximum 95.000
26.122 82.212
31.786 89.643
16.681 65.543
A -S quared 0.50
P -V alue 0.119
M ean 54.167
S tDev 26.724
V ariance 714.167
S kew ness 0.95187
Kurtosis -1.10487
N 6
M inimum 30.000
A nderson-Darling N ormality Test
95% C onfidence Interv al for M ean
95% C onfidence Interv al for M edian
95% C onfidence Interv al for S tDev 9 5 % C onfidence Inter vals
Summary for Treatment 2 (rhBMP-2)
Figure 5.2 TAD bone coverage summary for treatment 2 (rhBMP-2)
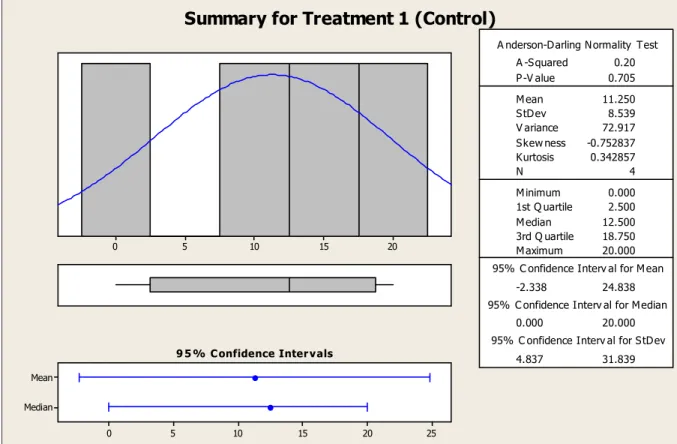
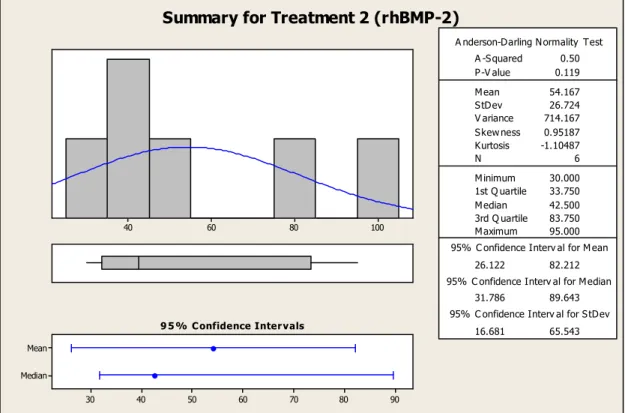
5.2 Strength at TAD/Bone Interface
5 4 3 2 1 0 Median Mean 6 5 4 3 2 1 0
1st Q uartile 0.6400 M edian 2.7000 3rd Q uartile 4.1075 M aximum 4.5300
-0.4928 5.4578 0.0000 4.5300
1.0592 6.9718 A -S quared 0.26 P -V alue 0.494 M ean 2.4825 S tD ev 1.8698 V ariance 3.4963 S kew ness -0.68011 Kurtosis 1.65361
N 4
M inimum 0.0000 A nderson-D arling N ormality Test
95% C onfidence Interv al for M ean
95% C onfidence Interv al for M edian 95% C onfidence Interv al for S tD ev
9 5 % C onfidence Inter vals
Summary for Treatment 1 (Control)
Figure 5.3 Failure load summary for treatment 1 (control)
80 60 40 20 0 Median Mean 75 60 45 30 15 0
1st Q uartile 6.555 M edian 13.205 3rd Q uartile 45.657 M aximum 84.470
-5.850 57.770 5.809 65.988
18.921 74.343 A -S quared 0.74 P -V alue 0.025 M ean 25.960 S tD ev 30.312 V ariance 918.813 S kew ness 1.94278 Kurtosis 3.78187
N 6
M inimum 5.130 A nderson-D arling N ormality Test
95% C onfidence Interv al for M ean
95% C onfidence Interv al for M edian 95% C onfidence Interv al for S tD ev
9 5 % C onfidence Inter vals
Summary for Treatment 2 (rhBMP-2)
For the control TAD, the failure load of 0 N (data for Rat #20) was included. This TAD had a failure load of 0 N because it had migrated or become loose sometime during its 6 week implantation on the rat’s skull. When the rat’s skull was re-exposed to
investigate the results, it was found that the TAD was stuck to the soft tissue and no longer had any contact with the bone. Thus, TAD stability was lost, preventing
osseointegration. The most likely reason for the TAD coming loose is that not enough butyl cyanoacrylate was used to ensure TAD stability.
Taking a closer look at the measured failure load values for the rhBMP-2 treated TADs, the values ranged anywhere from 5.13 N (minimum) to 84.47 N (maximum), hence the large standard deviation and variance as indicated in Figure 5.4 (failure load summary for Treatment 2 (rhBMP-2)). It is suspected that the variability in these values is due to the stability of the TAD. The more stable the TAD, the greater the chance for enhanced osseointegration. How stable the TAD is prior to osseointegration is dependent on how well the butyl cyanoacrylate can “glue” the TAD to the bone. The absorbable collagen sponge, which acted as the carrier for the rhBMP-2, was placed between the TAD and the bone and made it even more challenging to stabilize the TAD with the cyanoacrylate. In addition, the contour and shape of each rat skull varied, and therefore, some TADs fit closer than others. All the factors mentioned above had an effect on how much bone formed and how strong the TAD-to-bone interface was. The failure loads varied between each TAD/rat even though the same procedure, test methods, and
of 5.13 N was still greater than the maximum failure load measured for the control TAD of 4.53 N.
According to Figure 5.3, the 95% confidence interval for the mean failure load for a control TAD is -0.4928 N to 5.4578 N. In addition, according to Figure 5.4, the 95% confidence interval for the mean failure load for an rhBMP-2 treated TAD is -5.850 N to 57.770 N. The confidence interval for the rhBMP-2 treated TAD shows that it is possible that no osseointegration will occur for an rhBMP-2 treated TAD because the failure load value could be 0 N (which lies between the lower and upper limits of the confidence interval). In addition, it is possible that the failure load of an rhBMP-2 treated TAD could be equal or similar to the failure load of a sandblasted and acid-etched
(control) TAD since their confidence intervals overlap at some point. Therefore, a control TAD may osseointegrate just as well as an rhBMP-2 treated TAD. However, the upper limit (with 95% confidence) for the rhBMP-2 treated TAD (57.770 N) is
approximately 10 times greater than the upper limit (with 95% confidence) for the control TAD (5.4578 N). Thus, for 95% of the time, the failure load of the control TAD (even at its maximum) is not likely to reach or exceed the potential adhesion strength of an
6. CONCLUSIONS
The results from visual inspection and biomechanical testing show that, on average, the sandblasted and acid-etched temporary anchorage devices (TADs) treated with recombinant human bone morphogenetic protein-2 (rhBMP-2) promote better osseointegration than TADs that are only sandblasted and acid-etched. Specifically, surface modified TADs treated with rhBMP-2 showed an increased % surface coverage by bone and an increase in the adhesion strength at the TAD-to-bone interface.
Using TADs treated with rhBMP-2 promotes enhanced osseointegration which would help increase long-term TAD stability without piercing the bone. By avoiding direct insertion into the bone, this reduces the likelihood of developing bone infections. Moreover, before osseointegration can be achieved, it is critical that TAD stability be established. As evident in the results, this stability can be achieved using butyl
cyanoacrylate. By increasing osseointegration, TADs treated with rhBMP-2 can provide a significant clinical benefit to patients by establishing a stable anchor and thus
REFERENCES
1. Higuchi, K.W., Block, M.S., Brunski, J.B., Kokich, V.G., Oesterle, L.J., Roberts, W.E., Slack, J.M., Smalley, W.M., Spear, F.M, Thilander, B., Ueda, M. Orthodontic Applications of Osseointegrated Implants. Illinois: Quintessence Publishing Co, Inc., 2000.
2. McGuire, M.K., Scheyer, E.T., Gallerano, R.L., 2006. Temporary Anchorage Devices for Tooth Movement: A Review and Case Reports. Journal of Periodontology 77 (10), 1-12.
3. Kravitz, N.D., Kusnoto, B., Tsay, P., Hohlt, W.F., 2007. The Use of Temporary Anchorage Devices for Molar Intrusion. Journal of the American Dental Association 138 (1), 56-64.
4. Sung, J.H., Kyung, H.M., Bae, S.M., Park, H.S., Kwon, O.W., McNamara Jr., J.A. Microimplants in Orthodontics. Daegu: Dentos, Inc., 2006.
5. Ismail, S.F.H., Johal, A.S., 2002. Current Products and Practice Section: The role of implants in orthodontics. Journal of Orthodontics 29, 239-245.
6. Ratner, B.D., Hoffman, A.S., Schoen, F.J., Lemons, J.E. Biomaterials Science 2nd Edition. San Diego: Elsevier Inc., 2004.
7. Galloza, A., Torres, J.J., Torres, J., Vargas, V.M., Vega, O.M., 2004. Biomechanics of Implants and Dental Materials. Applications of Engineering Mechanics in Medicine, GED-University of Puerto Rico, Mayagüez.
8. ADA Council on Scientific Affairs, 2003. Titanium Applications in Dentistry. The Journal of the American Dental Association 134 (3), 347-349.
9. Knabe, C., Howlett, C.R., Klar, F.,Zreiqat, H., 2004. The Effect of Different Titanium and Hydroxyapatite-Coated Dental Implant Surfaces on Phenotypic Expression of Human Bone-Derived Cells. Journal of Biomedical Materials Research 71A, 98-107.
Biological Properties of Acid Etched Titanium Implants: Effect of Sandblasting on Bone Anchorage. Journal of Biomedical Materials Research Part B: Applied Biomaterials 68B, 149-159.
11. Ferguson, S.J., Broggini, N., Wieland, M., de Wild, M., Rupp, F., Geis-Gerstorfer, J., Cochran, D.L., Buser, D., 2006. Biomechanical Evaluation of the Interfacial Strength of a Chemically Modified Sandblasted and Acid-Etched Titanium Surface. Journal of Dental Research 78A, 291-297.
12. Buser, D., Broggini, N., Wieland, M., Schenk, R.K., Denzer, A.J., Cochran, D.L., Hoffmann, B., Lussi, A., Steinemann, S.G., 2004. Enhanced Bone Apposition to a Chemically Modified SLA Titanium Surface. Journal of Dental Research 83 (7), 529-533.
13. Cigna HealthCare Coverage Position, 2008. Recombinant Human Bone Morphogenetic Protein (rhBMP) For Use in Bone Repair. Coverage Position Number: 0118, pp. 1-17.
14. Xiao, Y.T., Xiang, L.X., Shao, J.Z., 2007. Bone Morphogenetic Protein.
Biochemical and Biophysical Research Communications 362, 550-553.
15. Zabka, A.G., Pluhar, G.E., Edwards III, R.B., Manley, P.A., Hayashi, K., Heiner, J.P., Kalscheur, V.L., Seeherman, H.J., Markel, M.D., 2000. Histomorphometric Description of Allograft Bone Remodeling and Union in a Canine Segmental Femoral Defect Model: A Comparison of rhBMP-2, Cancellous Bone Graft, and Absorbable Collagen Sponge. Journal of Orthopaedic Research 19, 318-327.
16. Schmitt, J.M., Hwang, K., Winn, S.R., Hollinger, J.O., 1999. Bone Morphogenetic Proteins: An Update on Basic Biology and Clinical Relevance. Journal of
Orthopaedic Research 17, 269-278.
18. Bishop, G.B., Einhorn, T.A., 2007. Current and Future Clinical Applications of Bone Morphogenetic Proteins in Orthopaedic Trauma Surgery. International Orthopaedics 31, 721-727.
19. Hsu, H.P., Zanella, J.M., Peckham, S.M., Spector, M., 2006. Comparing Ectopic Bone Growth Induced by rhBMP-2 on an Absorbable Collagen Sponge in Rat and Rabbit Models. Journal of Orthopaedic Research 24, 1660-1669.
20. Becker, J., Kirsch, A., Schwarz, F., Chatzinikolaidou, M. Rothamel, D., Lekovic, V., Jennissen, H.P., 2006. Bone Apposition to Titanium Implants Biocoated with Recombinant Human Bone Morphogenetic Protein-2 (rhBMP-2). A Pilot Study in Dogs. Clinical Oral Investigations, pp. 217-224.
21. Courtney, P.J., Verosky, C., 1999. Advances in Cyanoacrylate Technology for Device Assembly. Medical Device & Diagnostic Industry.
22. Drew, P.J., Monson, J.R.T, Qureshi, A., Roberts, A.C., 1997. n-Butyl cyanoacrylate adhesive for skin closure of abdominal wounds: preliminary results. Ann R Coll Surg Engl 79: 414-415.
23. Bhaskar, S.N., Cutright, D.E., 1968. Healing of Skin Wounds with Butyl Cyanoacrylate. Department of Dental and Oral Pathology, United States Army Institute of Dental Research 48 (2), 294-297.
24. Adamcak, A., Otten, B., 2000. Rodent Therapeutics. Vet Clin North Am Exot Anim Pract. 3(1):221-237.
Appendix A
Data from Lab Notebook: Rat#, Surgery Details
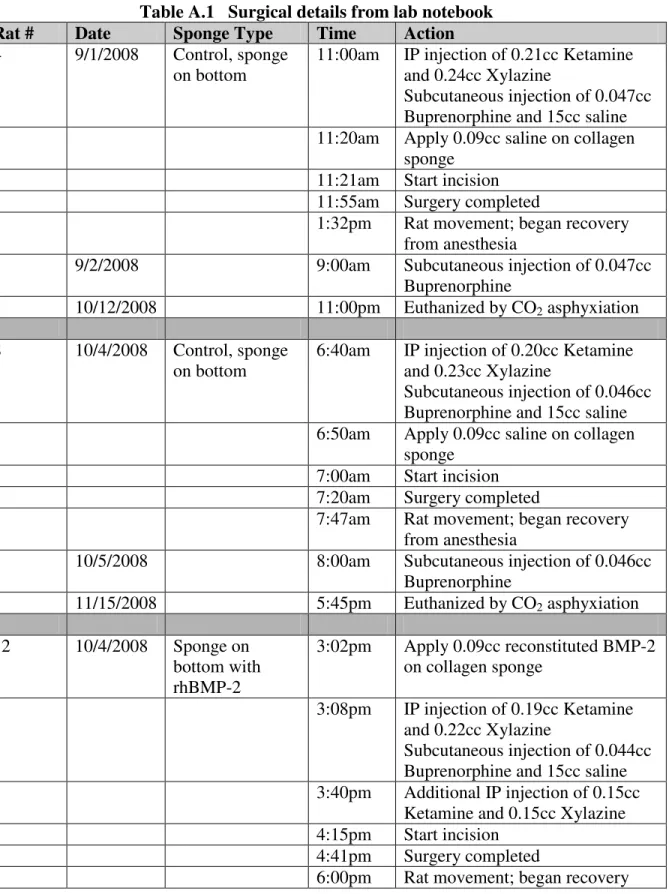
Table A.1 Surgical details from lab notebook
Rat # Date Sponge Type Time Action
4 9/1/2008 Control, sponge on bottom
11:00am IP injection of 0.21cc Ketamine and 0.24cc Xylazine
Subcutaneous injection of 0.047cc Buprenorphine and 15cc saline 11:20am Apply 0.09cc saline on collagen
sponge 11:21am Start incision 11:55am Surgery completed
1:32pm Rat movement; began recovery from anesthesia
9/2/2008 9:00am Subcutaneous injection of 0.047cc Buprenorphine
10/12/2008 11:00pm Euthanized by CO2 asphyxiation
8 10/4/2008 Control, sponge on bottom
6:40am IP injection of 0.20cc Ketamine and 0.23cc Xylazine
Subcutaneous injection of 0.046cc Buprenorphine and 15cc saline 6:50am Apply 0.09cc saline on collagen
sponge 7:00am Start incision 7:20am Surgery completed
7:47am Rat movement; began recovery from anesthesia
10/5/2008 8:00am Subcutaneous injection of 0.046cc Buprenorphine
11/15/2008 5:45pm Euthanized by CO2 asphyxiation
12 10/4/2008 Sponge on bottom with rhBMP-2
3:02pm Apply 0.09cc reconstituted BMP-2 on collagen sponge
3:08pm IP injection of 0.19cc Ketamine and 0.22cc Xylazine
Subcutaneous injection of 0.044cc Buprenorphine and 15cc saline 3:40pm Additional IP injection of 0.15cc
Ketamine and 0.15cc Xylazine 4:15pm Start incision
Rat # Date Sponge Type Time Action
from anesthesia
10/5/2008 8:05am Subcutaneous injection of 0.044cc Buprenorphine
11/15/2008 5:55pm Euthanized by CO2 asphyxiation
13 10/4/2008 Control, sponge on bottom
3:15pm IP injection of 0.20cc Ketamine and 0.23cc Xylazine
Subcutaneous injection of 0.046cc Buprenorphine and 15cc saline 3:19pm Apply 0.09cc saline on collagen
sponge
3:21pm Additional IP injection of 0.15cc Ketamine and 0.15cc Xylazine 3:40pm Start incision
4:09pm Surgery completed
5:20pm Rat movement; began recovery from anesthesia
10/5/2008 8:08am Subcutaneous injection of 0.046cc Buprenorphine
11/15/2008 5:55pm Euthanized by CO2 asphyxiation
14 10/4/2008 Sponge on bottom with rhBMP-2
4:19pm IP injection of 0.18cc Ketamine and 0.20cc Xylazine
Subcutaneous injection of 0.044cc Buprenorphine and 15cc saline 4:29pm Apply 0.09cc reconstituted BMP-2
on collagen sponge
4:30pm Additional IP injection of 0.15cc Ketamine and 0.15cc Xylazine 4:56pm Additional IP injection of 0.10cc
Ketamine and 0.10cc Xylazine 4:59pm Start incision
5:15pm Surgery completed
6:30pm Rat movement; began recovery from anesthesia
10/5/2008 8:12am Subcutaneous injection of 0.044cc Buprenorphine
11/15/2008 6:00pm Euthanized by CO2 asphyxiation
15 10/4/2008 Sponge on bottom with rhBMP-2
4:52pm IP injection of 0.15cc Ketamine and 0.18cc Xylazine
Rat # Date Sponge Type Time Action
on collagen sponge 5:20pm Start incision 6:00pm Surgery completed
7:45pm Rat movement; began recovery from anesthesia
10/5/2008 8:16am Subcutaneous injection of 0.035cc Buprenorphine
11/15/2008 6:00pm Euthanized by CO2 asphyxiation
16 10/4/2008 Control, sponge on bottom
8:48pm IP injection of 0.16cc Ketamine and 0.18cc Xylazine
Subcutaneous injection of
0.0368cc Buprenorphine and 15cc saline
8:55pm Apply 0.09cc saline on collagen sponge
9:00pm Start incision 9:17pm Surgery completed
10:40pm Rat movement; began recovery from anesthesia
10/5/2008 8:20am Subcutaneous injection of 0.035cc Buprenorphine
11/15/2008 6:07pm Euthanized by CO2 asphyxiation
17 10/4/2008 Sponge on bottom with rhBMP-2
9:05pm Apply 0.09cc reconstituted BMP-2 on collagen sponge
9:18pm IP injection of 0.17cc Ketamine and 0.19cc Xylazine
Subcutaneous injection of
0.0379cc Buprenorphine and 15cc saline
9:25pm Start incision 9:43pm Surgery completed
11:00pm Rat movement; began recovery from anesthesia
10/5/2008 8:23am Subcutaneous injection of
0.0379cc Buprenorphine
11/15/2008 6:07pm Euthanized by CO2 asphyxiation
18 10/4/2008 Sponge on bottom with rhBMP-2
9:05pm Apply 0.09cc reconstituted BMP-2 on collagen sponge
Rat # Date Sponge Type Time Action
and 0.23cc Xylazine Subcutaneous injection of
0.0454cc Buprenorphine and 15cc saline
9:48pm Start incision 10:02pm Surgery completed
11:30pm Rat movement; began recovery from anesthesia
10/5/2008 8:25am Subcutaneous injection of
0.0454cc Buprenorphine
11/15/2008 6:15pm Euthanized by CO2 asphyxiation
20 10/5/2008 Control, sponge on bottom
8:55am Apply 0.09cc saline on collagen sponge
8:56am IP injection of 0.17cc Ketamine and 0.19cc Xylazine
Subcutaneous injection of
0.0377cc Buprenorphine and 15cc saline
9:06am Start incision 9:22am Surgery completed
10:55am Rat movement; began recovery from anesthesia
10/6/2008 8:00am Subcutaneous injection of
0.0377cc Buprenorphine
11/15/2008 6:30pm Euthanized by CO2 asphyxiation
25 2/7/2009 Sponge on bottom with rhBMP-2
4:05pm IP injection of 0.20cc Ketamine and 0.20cc Xylazine
Subcutaneous injection of
0.0454cc Buprenorphine and 15cc saline
4:10pm Apply 0.09cc saline on collagen sponge
4:15pm Start incision 4:10pm Surgery completed
5:00pm Rat movement; began recovery from anesthesia
2/8/2009 8:25am Subcutaneous injection of
0.0454cc Buprenorphine
Appendix B
Preliminary Experiments
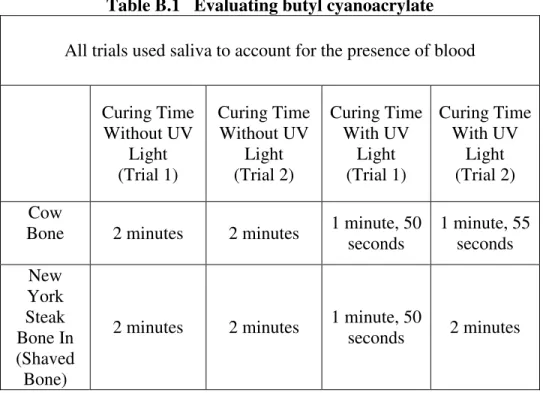
B.1 Evaluating Butyl Cyanoacrylate
In the presence of moisture, cyanoacrylates rapidly polymerize and set quickly. A quick and easy way to test whether a certain type of cyanoacrylate will adhere to tissue with degrees of moisture is to apply the cyanoacrylate to designated sections of the implant and see if it adheres to cow bone or fresh meat from the grocery store. The tissue found in cow bone is similar to the tissue found in rats, and therefore using the cow bone allows for quick and effective testing without having to perform surgery on the rat for this preliminary step.
In addition, saliva added to the site of the implant accounts for the presence of blood during the actual surgery. This aids in determining whether the saliva, with
chemical and physical components somewhat similar to blood, will have any effect on the implant’s ability to adhere. From this experiment, the curing time and whether the
cyanoacrylate is an effective adhesive can be determined. Moreover, the effect of UV light (which has been known to reduce curing time) will also be evaluated. Finding a way to reduce the curing time is desired to ensure implant stability and to minimize the
An experiment using Vetbond butyl cyanoacrylate was performed. The results from the experiment can be found in the following table:
Table B.1 Evaluating butyl cyanoacrylate
All trials used saliva to account for the presence of blood
Curing Time Without UV
Light (Trial 1)
Curing Time Without UV
Light (Trial 2)
Curing Time With UV
Light (Trial 1)
Curing Time With UV
Light (Trial 2) Cow
Bone 2 minutes 2 minutes 1 minute, 50 seconds
1 minute, 55 seconds New
York Steak Bone In (Shaved Bone)
2 minutes 2 minutes 1 minute, 50
seconds 2 minutes
% Adhesion Strength vs. Curing Time (cow bone, no UV light)
0 20 40 60 80 100 120 0 1 0 2 0 3 0 4 0 5 0 6 0 7 0 8 0 9 0 1 0 0 1 1 0 1 2 0
Curing Time (se c)
A d h e s io n S tr e n g th ( % ) Trial 1 Trial 2
Figure B.1 Adhesion strength vs. curing time (cow bone, no UV light)
% Adhesion Strength vs. Curing Time (NY steak, no UV light)
0 20 40 60 80 100 120 0 1 0 2 0 3 0 4 0 5 0 6 0 7 0 8 0 9 0 1 0 0 1 1 0 1 2 0 1 2 5
Curing Time (sec)
A d h e s io n S tr e n g th ( % ) Trial 1 Trial 2
% Adhesion Strength vs. Curing Time
(cow bone, UV light)
0 20 40 60 80 100 120
0 10 20 30 40 50 60 70 80 90
100 110
Curing Time (sec)
A d h e s io n S tr e n g th ( % ) Trial 1 Trial2
Figure B.3 Adhesion strength vs. curing time (cow bone, UV light)
% Adhesion Strength vs. Curing Time
(NY steak, UV light)
0 20 40 60 80 100 120
0 10 20 30 40 50 60 70 80
90 100 110
Curing Time (sec)
A d h e s io n S tr e n g th ( % ) Trial 1 Trial 2
Several conclusions were made from the above experiment:
• Saliva does not affect the ability of the implant to adhere to bone. Thus, blood, with chemical and physical components somewhat similar to blood, is also assumed to have little effect on the ability of the implant to adhere to bone.
• The curing time with UV light is less than the curing time without UV light. However, the difference is not that significant.
B.2 Using the INFUSE® Bone Graft Sample Kit
Note: A buffer was used to substitute for the rhBMP-2 in the sample kit Questions to be answered from the experiment:
• Is it possible or necessary to separate the rhBMP-2 and sterile water into separate vials for smaller samples? If so, how should this be done?
• Is the effectiveness of the rhBMP-2 / sterile water mixture compromised if it is not used all at one time?
• What tools are necessary to cut the absorbable collagen sponge (ACS) into its desired shape?
• Should the collagen sponge be cut before or after the rhBMP-2 / sterile water mixture is applied to it?
• How much ACS is need for one implant?
• How can a hole be created in the middle of the shaped sponge for the protruding part of the implant when the rhBMP-2/ACS is placed on top of the TAD? (Note: this is not applicable for this particular study, which solely focuses on the effect of rhBMP-2/ACS placed underneath the implant).
• Since the kit states that the wet collagen sponges must be used within 2 hours, how many rats can undergo surgery within 2 hours with the assumption that the sponges will be prepared before the surgeries begin?
Experimental procedure
• Take a 10 mL syringe out into the field, and draw 8.4 mL of sterile water into the syringe.
• Inject 8.4 mL of sterile water into the buffer powder vial and swirl the vial to ensure adequate mixing.
• Open the collagen sponge package and take out one of the collagen sponges.
• Since 4 mL of the rhBMP-2 / sterile water mixture is needed for 3 collagen sponges, calculate the amount of mixture needed for 1 collagen sponge: 4 mL / 3 sponges = 1.33 mL / sponge.
• Use another 10 mL syringe to withdraw 1.33 mL of reconstituted rhBMP-2 from the vial.
• Uniformly distribute 1.33 mL of reconstituted rhBMP-2 on 1 of the 2.5 cm x 5 cm collagen sponges.
• After 15 minutes, use 2 different tools to cut the collagen sponge in the shape of the implant.
• Place a sample implant on the collagen sponge and used an x-acto knife to cut around the outer edge of the implant.
• Using another section of the collagen sponge, use a 1-hole punch to punch a hole through the wet sponge.
• Take out a second collagen sponge. This time, cut the non-wetted sponge with the x-acto knife. Likewise, use the 1-hole punch on the non-wetted sponge.
Experimental Results and Conclusions
• It is not necessary to separate the rhBMP-2 and sterile water into smaller vials. As long as the reconstituted rhBMP-2 is refrigerated, it can be used at another point in time. The effectiveness of the rhBMP-2 / sterile water mixture is not compromised if it is not used all at once. The kit instructions state that the wet collagen sponge must be used within 2 hours, but there is nothing stating that the rhBMP-2 / sterile water mixture must be used within 2 hours.
• The 1-hole punch is not a good tool for the purposes of this study because it punches out a diameter that is smaller than the diameter of the implant for both the non-wetted and wet sponge.
• It is difficult to cut a circular shape through a non-wetted sponge with the x-acto knife, but easy to cut straight lines.
• Cutting the non-wetted sponge is easier than cutting the wet sponge.
• A 1.00 cm x 1.25 cm section (1/10 of 1 collagen sponge) of a non-wetted sponge is needed for 1 implant. Once the sponge is wet, it can be shaped circularly to follow the shape of the implant.
• Use the following procedure to prepare the rhBMP-2/ACS for the implant: 1. Cut one non-wetted collagen sponge (2.5 cm x 5 cm) into 10 equal
sections (1.00 cm x 1.25 cm).
Figure B.5 Absorbable collagen sponge (figure not drawn to scale)
sterile water mixture is needed per section. The syringe given in the kit is a 10 mL syringe with increments of 0.2 mL. For better accuracy, use a smaller syringe with smaller increments.
3. After waiting at least 15 minutes, place the wet collagen sponge on the rat skull location where the implant will be placed, contouring the shape to fit the circular shape of the implant. Set the implant over the wet collagen sponge.
• Since the wet collagen sponge must be used within 2 hours, only wet a 1.00 cm x 1.25 cm section of absorbable collagen sponge before each rat goes through surgery.
• Note: the collagen sponge pieces used during the actual surgery were different in size than those used during the experimental phase. Specifically, 1 cm x 1 cm pieces were used with 0.09 cc of reconstituted rhBMP-2.
B.3 Using One Rat to Determine the Following 1. Effectiveness of the type of anesthesia
A mixture of Ketamine and Xylazine (44 mg/kg body weight of Ketamine, 10 mg/kg body weight of Xylazine) should be used for inducing general
must be available to continue the anesthesia if the surgery takes longer than expected. The Ketamine/Xylazine and Buprenorphine mixture works well because emergence from anesthesia is smoother and it has a high factor of safety. The reason why the Ketamine/Xylazine and Buprenorphine mixture is chosen over an inhalant anesthetic, such as Halothane, is because Halothane requires that the rats wear a mask during surgery. Unfortunately, this mask would interfere with the surgical site, and therefore the Ketamine/Xylazine and Buprenorphine mixture is the better choice.
2. Instrumentation needed
Tray for BMP-2 procedures, BMP-2 / ACS, syringes, forceps, fine
forceps, ultrafine forceps, weight boat, bench covers, sterile gowns, scrubs, mask, rat gloves, nitrile gloves, sterile gloves, Ketamine, Xylazine, Buprenorphine, shaver, depilatory cream (Veet®), Betadine solution, Petri dish with saline, surgical drapes, scissors, scalpel, butyl cyanoacrylate / applicator, glass slab for butyl, head cap, cotton gauze and swabs (both sterile and non-sterile), disposable bag for blood and contaminated items, heating pad, recovery bin, etc.
3. Preparation / surgical procedures
Pre-operative:
a. Sterilize instruments (using the method of heat sterilization) needed for prep and surgery: tray for rhBMP-2 procedures, forceps, fine forceps, ultrafine forceps, scissors, scalpel, butyl cyanoacrylate applicator, glass slab for butyl, surgical drapes, syringes, gloves, Petri dish with saline, cotton gauze, and cotton swabs.
b. Bring to surgical suite: sterile instruments mentioned above as well as butyl cyanoacrylate, tupperware for weighing the rat, isolation mask and cap, sterile gowns, bench covers, weight boat, and rat in the cage.
c. Obtain in surgical suite: Ketamine, Xylazine, Buprenorphine, scrubs, rat gloves, nitrile gloves, sterile gloves, shaver, depilatory cream (Veet®), Betadine solution, disposable bag for blood and contaminated items, heating pad, recovery bin, and non-sterile cotton swabs and gauze.
d. In an area of the surgical suite, separate from the prep and surgery area, an assistant must wash their hands, put on sterile gloves, and do the
following:
• For a control TAD, take a 1 cm x 1 cm absorbable collagen sponge with sterile forceps and wet it with 0.09 cc of saline using a sterile syringe and a sterile tray. Let it stand for at least 15 minutes before use.
reconstituted rhBMP-2 using a sterile syringe and a sterile tray. Let it stand for at least 15 minutes before use.
• Meanwhile, continue with the following pre-operative procedures.
e. Weigh the animal in a weight boat to determine the appropriate dosages of Ketamine, Xylazine, and Buprenorphine. The amount of anesthesia given to a rat is determined by the following criteria: 44 mg/kg body weight of Ketamine, 10 mg/kg body weight of Xylazine, and 0.01 – 0.05 mg/kg body weight of Buprenorphine. Record the dosages in the lab notebook. f. Place a bench cover down on the table.
g. Put on rat gloves and grab the animal around the torso to administer the anesthesia. Use a mixture of Ketamine and Xylazine (44 mg/kg body weight of Ketamine, 10 mg/kg body weight of Xylazine) for inducing general anesthesia. This will provide approximately 30 minutes of effective anesthesia.
h. In addition, administer a dose of Buprenorphine subcutaneously (0.01 – 0.05 mg/kg body weight) between the shoulder blades. The
Ketamine/Xylazine and Buprenorphine mixture works well because emergence from anesthesia is smoother and has a high factor of safety. Place the rat in a chamber until the anesthesia takes effect and the animal is down.
surgery starts the surgical scrub and puts on a sterile gown to prepare for surgery.
j. Assistant: put scrubs and nitrile gloves on for prepping procedures. k. Take the rat out of the chamber and place on the bench cover. Use the
clippers provided in the surgical suite to shave the surgical site (rat’s head). Then, apply depilatory cream on the surgical site. Wait a few minutes for the depilatory cream to set. Rub the surgical site with a damp 2 x 2 cotton sponge to remove excess hair.
l. Pour Betadine antiseptic solution on a swab and apply it to the rat’s head in a circular motion. Repeat a minimum of 3 times. Put the animal back in the chamber.
m. Throw away the bench cover.
n. Disinfect the table to maintain a clean, uncluttered, and sanitized area. Use gauze sponge to wipe it down.
o. Place down a new bench cover.
p. Put the rat down on the new bench cover. q. Take off nitrile gloves and wash hands.
r. Take pre-sterile surgical packages with surgical drape and sterile instruments, sterile gloves, isolation mask and cap, butyl
cyanoacrylate/applicator, glass slab, gauze, and cotton swabs and place them on the table within reach of the individual performing surgery. s. Put the heating pad in the microwave so it is ready to heat up once surgical
t. Open up the sterile surgical package cover, and open up covering for sterile instruments (without touching the actual instruments).
u. Once the “surgeon” has scrubbed and put on the sterile gown, he/she must put on the sterile gloves and sit down to begin surgery.
v. The surgeon should now pull out the surgical drape from the sterile surgical packages and place it on the animal. Use forceps and scissors to cut drape at incision site. Use other forceps and scissors to do actual incision (internal work).
Operative:
a. Begin surgery with sterile instruments and handle instruments aseptically. b. Using the “tips-only” technique, make an incision along the line from the
middle of the eyes to the middle of the ears.
c. Once the incision is made, carefully fold back the periosteum using sterile instruments (i.e. scalpel, forceps, etc.).
d. When the bony complex on the surface of the cranium is exposed, use sterile forceps to pick up a titanium implant and contour it to fit the skull shape. Use a sterile instrument to place the collagen sponge (wet with saline or rhBMP-2) on the rat skull before placing the implant on top of it and stabilizing it with butyl cyanoacrylate. Wait approximately 2 minutes for the butyl cyanoacrylate to set.
f. Once the implant is stable, place as much of the periosteum over the implant.
g. Use sterile forceps to hold the sides of skin at the incision site together while an assistant closes the incision site using butyl cyanoacrylate. At this point, have another assistant go to the microwave to heat up the circulating heating pad for about 3-4 minutes to heat up to 37 degrees.
Post-Operative:
a. Remove the surgical drape.
b. Give the rat a subcutaneous injection of Buprenorphine (0.01 - 0.05 mg/kg).
c. Move the rat to a warm area (recovery bin) to return its body temperature back to normal. In the recovery bin, place the rat on a blue bench cover, above a heating pad, to allow it to recover. Return the animal to its routine housing only after full recovery from anesthesia. Each rat will be caged separately.
d. Buprenorphine (0.01 -0.05 mg/kg) should be administered 3 times a day for 2 days as necessary for pain management. In the event of an infection, the wound site will be cleaned 2 times/day with Betadine solution.
4. Surgical site to least elicit blood flow, angulations, and location of incision The incision should be made in such a way that it elicits the least amount of blood flow. In terms of the vascular structures in a rat, the common carotid artery splits into the internal and external carotid arteries ventral to the auditory bulla (bony capsule enclosing the middle and inner ear). The internal carotid artery moves anteriorly to supply blood to the brain and the external carotid artery moves anteriorly to supply blood to most of the structures of the head. To avoid compromising the rat’s vascular system, an incision approximately 1 inch in length should be made along the midline of the skull. The midline incision in the scalp should be made using firm pressure to guarantee a clean cut in a single stroke. The incision should be made from the area between the eyes to the area between the ears. Then, once the incision is made, the periosteum can be carefully removed. The periosteum can be pulled back and removed from the skull using scalpel, forceps and scissors.
5. Implant contour, adhesion method, and incision site closure
will be used to ensure the adhesion of the implant to the bone and for closure of the incision.
6. Implant size and protruding length
Appendix C Surgery Checklist
Date____________ Rat Skull Surgery Initials____________ Rat Information
Breed: _______________ Sex: ________________ Weight: ______________ Tag: _________________ Cage: ________________ Materials
Sterilized Instruments ___1. forceps ___2. fine forceps ___3. ultrafine forceps ___4. scissors
___5. scalpel ___6. cotton gauze ___7. cotton swabs Bring to Surgical Suite
___8. sterile surgical drapes ___9. sterile syringes
___10. butyl cyanoacrylate/applicator/glass slab ___11. sterile gown, mask and cap
___12. bench covers ___13. weight boat Obtained in Surgical Suite
___14. anesthesia (Ketamine and Xylazine) ___15. analgesic (Buprenorphine)
___16. scrubs ___17. rat gloves ___18. sterile gloves ___19. shaver
___20. depilatory cream (Veet®) ___21. Betadine solution
___22. disposable bag for blood and contaminated items ___23. heating pad
___24. recovery bin
rhBMP-2/ACS or Saline/ACS Preparation
___27. Take a 1 cm x 1 cm absorbable collagen sponge and wet it with 0.09 cc of reconstituted rhBMP-2 or saline (if control TAD).
___28. Let collagen sponge stand for at least 15 minutes before use. Surgery Preparation
___29. Weigh animal in weight boat.
___30. Put on rat gloves and grab animal around torso to administer anesthesia. Use a mixture of Ketamine and Xylazine (44 mg/kg body weight of Ketamine, 10 mg/kg body weight of Xylazine). Record dosages in the lab notebook. ___31. Give the rat a subcutaneous injection of Buprenorphine (0.01 – 0.05 mg/kg
body weight). Record dosage in the lab notebook.
___32. Place rat in chamber (anesthesia box) to let the anesthesia take effect.
___33. Surgeon: put on mask/cap, perform surgical scrub, and put on sterile gown and gloves to prepare for surgery.
___34. Assistant: put scrubs and nitrile gloves on. Perform prepping procedures below. ___35. Place bench cover on table for preparation procedures.
___36. Take rat out of chamber and place on bench cover. ___37. Shave hair on surgical site (rat’s head) using clippers.
___38. Apply depilatory cream to surgical site and wait a few minutes.
___39. Rub surgical site with a damp 2 x 2 cotton sponge to remove excess hair. ___40. Apply Betadine solution on the rat’s head a minimum of 3 times in a circular motion.
___41. Return rat to chamber. ___42. Throw away bench cover.
___43. Disinfect table. Use gauze to wipe it down. ___44. Place down a new bench cover.
___45. Put the rat down on the new bench cover. ___46. Take off nitrile gloves and wash hands.
___47. Place pre-sterile surgical packages (with sterile drape), sterile instruments, sterile gloves, and isolation mask and cap on the table.
___48. Place heating pad in microwave so it is ready to heat up once surgery is done. ___49. Put on mask and cap.
___50. Open up sterile surgical packages (sterile drape and instruments) without touching the inside of the sterile packages.
Surgery
___51. Surgeon: pull out sterile surgical drape from sterile package and put over rat. Perform surgery procedures below.
___52. Use forceps and scissors to cut drape at incision site.
___53. Make an incision along the midline of the rat’s head, from the middle of the eyes to the middle of the ears.
___54. Carefully fold back the periosteum using forceps.
___55. Use sterile forceps to pick up a titanium implant and contour it to fit the shape of the skull.
2) on the rat skull before placing the TAD on top of it.
___57. Stabilize the TAD with butyl cyanoacrylate and let it set for approximately 2 minutes.
___58. Close the incision using butyl cyanoacrylate. At this time, have an assistant microwave the heating pad for about 45 seconds.
Post-Surgical
___59. Remove surgical drape.
___60. Give the rat a subcutaneous injection of Buprenorphine (0.01 – 0.05 mg/kg). ___61. Place rat in recovery bin, on a blue bench cover, above a heating pad to allow to
recover.