Session Overview
This training guide is intended for use by both new and experienced users. It is also intended to work in concert with either a live training session with an ECS Pro Professional Services Consultant, or while viewing the Inventory Management Video/DVD.
This training course has been divided into several sections. For new users going through this material for the first time your Professional Services Consultant will take through all sections in detail. If you are viewing the Training Video/DVD you should review the entire contents before your PS Consultant arrives on site. If you are an experienced user you may view only those sections that you need further training on. In both cases this document is not intended to take the place of ECS Pro manuals. Your Inventory Management Manual should be referred to anytime you are looking for more detail about the material presented here.
Inventory Preferences
Inventory Management has several preferences that you should review and set prior to the full implementation of this module. Listed below are those preferences, along with a brief description of each. Your Professional Services Consultant will provide guidance to the proper settings of these preferences for your company. You should also refer to the ECS Pro System Preferences Guide for detailed information regarding each preference
Edit Duration of Physical Count History
(System administration / History purging durations)
Set up the number of days to retain each type of Physical Count. This is based on the confirmation date.
Inventory Adjustment History Purging Preferences
(System administration / History purging durations)
Use this program to specify the length of time to retain inventory adjustment transactions on the system for use by the Sales to G/L integration option.
Edit Duration of Inventory Transaction History
(System administration / History purging durations)
Enter the number of days to retain inventory transaction history.
General Inventory Preferences
(System administration /Preferences/Inventory Preferences)
P.E./GMROI option...Calculate PE (Turns X Avg GP%) ...Calculate GMROI (Turns X Avg
MU%)
Min/Max quantity option...Do not generate at period close ...Automatically generate at period
close
Raw material cost option ...Enter in pricing U/M ...Enter in receiving U/M LIFO method ...Link chain
...Double extension ...LIFO is not used LIFO cost preference...Last cost
...LIFO is not used
Physical count QOH preference ...Do not display current QOH in count entry
...Display current QOH in count entry User Defined Text/Numeric Fields………Select to name UDF (Global) User Defined INV Text/Numeric Fields………Select to name UDF (By Location) Cost Plus Option……….Select to define % to add to average
cost display.
Sold Qty in Stock Status Report………Do not include quantity used in assembly in the sold qty
………Include quantity used in assembly in the sold quantity
Average Cost Adjustment………..Create Inventory Adjustments ………Do not create inventory
adjustments
Vendor Item Replacement Cost Update……..Update item replacement cost when updating vendor item cost
……….Do Not update item replacement cost.
Quantity Adjustment Management
Quantity Adjustment Management contains several programs, and two reports to help you to manage adjustments of your inventory due to shrinkage, remanufacturing, etc.
Quantity Adjustment Entry
Quantity Adjustment Entry provides a tool to adjust inventory either up or down. Transactions entered in this program create ADJ transactions in Inventory History. Appropriate uses for this program could be to adjust inventory due to damage, theft, substitutions. Adjustments due to value added remanufacturing, or Physical Counts should not be handled through this program. Consult with your ECS Professional Services Consultant to determine the best processes to handle Inventory adjustments for your company.
Quantity Adjustment Entry
Location – Warehouse location for adjustment
Item Code – Item code (lookup available)
Qty to Adjust – Quantity (assumes positive, enter a – to indicate negative adjustment)
Adjust Amount – Value of adjustment (qty * avg cost)
Reference Number – Reference number. Inventory Adjustment Report, and the Inventory Transaction report subtotal by this number
Retail Price – Retail price as determined through Price Preferences
Average Cost – Current average cost of item
Qty on Hand – QOH before adjustment
New Qty on Hand – QOH after adjustment
Last Count Date – Last count date
No of Items Adjusted – Total quantity adjusted in session
While in Adjustment Entry note that you do have scrolling, and item lookup capabilities
Special Item Types
There are some special considerations for certain special item types in Quantity Adjustment Entry
Tally Items – Only individual items may be adjusted, no header items
Miscellaneous Items – Miscellaneous (Item type 3) are held in your inventory by dollar value. So adjustments must represent a dollar value (100 = 1.00, 200 = 2.00, etc)
Special Order Items – Items coded as SO items (Field 32=S) must be adjusted by the detail record. A lookup is provided once you type in the SO Item code.
Inventory Adjustment Report
The Inventory Adjustment Report provides information regarding inventory adjustments created through Quantity Adjustment Entry, Cuts and Mods, and Quick Count Entry.
Inventory Adjustment Report Criteria
Cuts and Mods
Cuts and Mods provides a tool to adjust inventory with an added value. In this program you are able to enter raw material(s), the resulting manufactured material(s) and establish a process with an associated cost. You may also create templates to speed further adjustments. The processing cost is calculated into the average costs of the manufactured item. Transactions created by this program create TLO (Treated Lumber Out) and TLI (Treated Lumber In) transactions in Inventory History.
Cuts & Mods Entry
Reference Number – The reference number you wish to assign to this adjustment
Description – Description of the adjustment
Date – Date of the adjustment
Process – The process used for this adjustment. Process codes are created from the utilities pulldown and are used by the Cuts and Mods report to provide subtotals by process
Cost – Cost associated with this process
Location – Warehouse location of item that is adjusted
Raw Material/Manufactured Item – You may enter in as many raw items as necessary to create one or many manufactured items
Item Code – the item code of the raw or manufactured item you are entering
Quantity – the quantity of the raw item needed, or the manufactured item created. Depends on whether you are entering a raw or manufactured item.
Note; Cuts & Mods Entry provides one type of tool to handle manufacturing. Other tools exist in the system that could conceivably be used for the same purpose. Consult with your ECS Professional Services Consultant for advice on what tools to use for your company.
Cuts and Mods Report
The Cuts and Mods Report provides a report of cuts and modifications to raw materials that resulted in manufactured items through Cuts and Mods Entry
Cuts and Mods Report Criteria
Cuts and Mods Report Column Definitions
Adjust Unspecified Tally Sales
This program allows you to specify tally individuals used in a sale after the fact. Preferences allow you to prevent these types of sales.
Requisition/Transfer Management
Inventory Requisitions and Transfers are handled through Transaction Entry in ECS Pro. A Requisition (Transaction Type 6) is intended for when you use items from your inventory for store purposes. A Transfer (Transaction Type 5) is when you have multiple inventory locations and you transfer inventory from one location to another. There are preferences that set what cost is used for these transactions as well as how these accounts are handled in A/R
Customer Sales Preference for Transfers/Requisitions
A/R Preference for Requisition. Similar one exists for Transfers
Transfer and Requisition Accounts are setup in Customer Maintenance. Refer to the 4.1 System Operations Training Guide, or the ECS Pro Primary File Guide for detailed information on how to code these accounts.
Note; Consult with your ECS Professional Services Consultant to help you setup your Transfer Accounts, and to determine the best processes to use for Transfers and Requisitions
Inventory Transfer Report
The Inventory Transfer Report will produce a report of all transfers created in the specified date range
Inventory Transfer Report Column Definitions
Transfer Totals Report
The Transfer Totals Report will give you Transfer Totals by Location
Transfer Totals Report Column Definitions. Detail (Top) Totals (Bottom)
Transfer Totals By Group Report
The Transfer Totals By Group Report will give you transfer totals by location, by inventory group
Transfer Totals By Group Column Definitions
Inventory Requisition Report
This report will give you a listing of all Requisitions processed during a specified date range
Inventory Requisition Report Criteria
Physical Counts
The ECS Pro System provides several tools to manage Physical Counts. The central program is Physical Count Management. This program provides all the necessary tools to handle all types of counts from Cycle to Annual. Consult with your ECS Professional Services Consultant to
determine the best way to implement these tools into your counting processes.
Physical Count Management
As noted above this is the primary program in ECS Pro to manage your Physical Count Processes. The process to do a physical count is presented below. For detailed information regarding any of these steps refer to your ECS Pro Inventory Management Manual Chapter 4
Physical Count Management
Create a Count List
The count list will eventually contain all of the information regarding a count. You may have several lists active at one time, however you should never have the same items on two or more active lists. To create a new list you will select “new” under the file pulldown window
Adding a new list
List Name – The name you wish to apply to this physical count
Location – The warehouse location of the items you are going to count
Count Type – The type of count you are performing. History Duration Preferences exist that control how long you keep updated counts, by type.
Period – The G/L period that should be affected by this count. If you do not use GL to Physical Count Integration then no entry is necessary
Add Items to The Count
Once you have created a Count List you will add items that are to be counted. With the Count List highlighted you will select Edit Item Ranges from the file pulldown menu. From this window you will choose to add or import (more on this later)
Add Physical Count List Range
Item Code From – Beginning item code (Lookup available)
Item Code To – Ending item code (Lookup available)
Aisle – Aisle location you are counting (May be left blank) If item is located in several aisles each aisle will be listed.
ABCD Code – Uses ABC ranking of item (May be left blank) Good way to format a count of just fast (A) or non (D) moving items.
Negative Quantity Option – Select only negative or all. Useful if you just want to do a spot count of items in a negative state.
You may add as many different item code ranges as you wish.
Master Count Lists
(Inventory Management/Maintenance/Master Count Lists)
Master Count Lists may be created and then imported into counts. Master Count lists provide an excellent tool to help manage cycle, or frequent counts. Creating Master Count Lists works much like adding item code ranges to a Count. The first step is to create a new (file pulldown choice) list and name it. The second step is to add ranges of items to it, exactly as demonstrated above.
Format Count List
Formatting a Count List sets criteria for when you choose to print Take Sheets. Once a count is formatted you will not be able to add more items, or alter existing items on the count.
Format Count List
Print Take Sheets
With your Count List highlighted select “print/print take sheets” from the process pulldown menu.
Print take sheets
Printing Take Sheets is optional, however take sheets provide an excellent tool to record counts. If you choose to enter counts automatically the count is presented in the same format as the Take Sheet.
Most options are self explanatory, if you choose to print a range of take sheets an additional window will open allowing the entry of a beginning and ending page number (default to 1st page, and last page)
Confirm Physical Count List
Just prior to actually counting the Count List must be confirmed. With your count highlighted select Confirm Physical Count List from the Process pulldown. Confirming the count list locks the Book Quantity and the average cost of each item formatted to the count. Using a print out of the Take Sheet you can determine if any corrections should be made prior to confirmation. Once a Count is confirmed no activity should take place on any item in the count until it has been physically counted. Once items have been physically counted activity may resume. All variances will be measured against counted quantity and book (confirmed) quantity.
Confirm Physical Count List
Enter Counts
Counts may be entered either automatically, or manually. Both selections are available from the process pulldown
Automatic Count Entry
Automatic Count Entry is accessed from the process pulldown/Enter Counts. Once Automatic is chosen the following window will open.
Automatic Count Entry
Enter the page number from the take sheet. A lookup must be performed in the Counted By field to select the appropriate person record.
Automatic Count Entry
Enter counts in the Qty field. No count quantity entered will be treated as an uncounted item and the quantity will be updated to zero. This program may be accessed as often as necessary until the count has been updated. Any count edit should be treated as a replacement count. Each time an automatic count page is accepted the following window will open.
Automatic Count Confirmation Page
The page total is the sum of the quantity entered, and can be compared to page totals on the Take Sheet.
Manual Count Entry
Counts may be entered manually as well as automatically, both methods may be used on one count. Keep in mind that the Uncounted Items report will be useless if Manual Count Entry is used, as this report compares automatic counts to the count list.
Manual count entry options
Prior to entering counts options will need to be selected. Appending to the last page appends your manual counts to the last page of your formatted take sheet. This option is fine if you only have a few manual counts to add. Entry by page number allows you to enter a page number. This page number must be at least one greater than the last page number on your take sheet. If you have several users entering in manual counts it’s best to assign them ranges of page numbers to use so they do not conflict.
Counts entered manually will be added to any other counts entered manually or automatically. For example if a count of 100 was entered automatically and three separate manual counts of 50 were entered the total counted quantity would be 250.
Manual Count Entry Screen
Item code – Item code of item you are counting (lookup available)
Quantity – Counted quantity
Area – Indicator of area item is located. No lookup and may be anything. Required field but retains value for next entries.
Count Proofread Report
The Count Proofread Report can be used to proofread automatic or manual count entries. This report can be accessed from the process pulldown under print
Count Proofread Report Criteria
Uncounted Items Report
The Uncounted Items report prints a report of items where no count has been entered through Automatic Count Entry. If you are using the manual count entry program this report will not accurately report uncounted items. This report is accessed from the process pulldown under print.
Uncounted Item Report Criteria
Item Count Inquiry
Item Count Inquiry allows you to see every entry of an item in a count, both automatically and manually.
Item Count Inquiry
Count Variance Report
The count variance report can be run at anytime after counts have been entered. This report can be used to check the accuracy of your count as well as reporting simply your variances. The Count Variance Report can be accessed from the process pulldown under print
The Count Variance Report Criteria
Summary/Detail Option – Summary will report total counted for each item. Detail will show each entry as well as total counted for each item.
Totals Option – Print Group and Section totals, or not
Paging Option – Page by Group and Section, or not
Exceptions Option – Choosing to print items exceeding a specific variance will open an additional window so you can specify a dollar variance. Excellent tool for that first spot check of your count.
Order Option – Print in the order that you imported items into your count. Or print in logical (price book) order regardless of how items were imported.
Cost Option – Display average cost or current last cost on report.
Update Counts
Once you are satisfied that you have completed your count the last step is to update the count list. This program is accessed from the process pulldown. Updating your counts creates Physical Count Adjustments (PCA) in Inventory History. Once a count is updated you can no longer modify counted quantity, however you can continue to run the variance report.
Quick Count Entry
Quick Count Entry may be used for spot counts where you are just trying to correct QOH for a few items. This count type does not provide for any variance reporting, and the adjustments (PCA) are immediate.
Quick Count Entry
Quick Count Take Sheets
Quick Count Take Sheets can be used in conjunction with Quick Count Entry to provide paperwork for a Quick Count
Min/Max Quantity Tables
Overview
ECS Pro 4.0 provides for the calculation of minimum and maximum quantities for inventory items contained in your system. There is a Min/Max Quantity Table Maintenance program that allows you to setup the logic the system uses in calculations of min/max. This program also provides the functionality to assign these min/max tables to single items, ranges of items, or any combination of items for one or all of your warehouses. There is also a Min/Max Quantity Table Generation program that allows you to generate min/max quantities on demand, or you can set a preference to have min/max quantities automatically calculated at the end of each System Period. If you are familiar with the Assigned Price table programs you will find the functionality of Min/Max Tables to be very similar.
Min/Max Quantity Table Maintenance
Inventory Management/Min Max quantity tables/Min Max maint.
The Min/Max Quantity Table Maintenance program is used to establish the logic you want to use to calculate min/max. this program is also used to assign this logic to inventory items. As you will see you may create several tables so that you can employ multiple methods of logic to calculate min/max quantities.
When you choose Min/Max Quantity Table Maintenance from the Min/Max Quantity Tables menu, the Min/Max Quantity Table Maintenance window opens.
Min/Max Quantity Table Maintenance window
If no tables exist, “No Selections” displays and you must use the Add table feature from the Change pulldown to add a table. If you select an existing table name, when you press <Do>, the Modify table name window opens.
Adding and Modifying a Min/Max Quantity Table
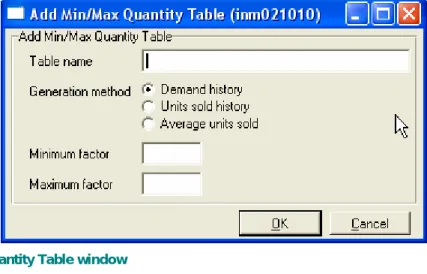
When you select File | New or File | Modify, the system displays either the Add Min/Max Quantity Table window or the Modify Min/Max Quantity Table window.
New Min/Max Quantity Table window
Modify Min/Max Quantity Table window Table Name
Enter any unique table name up to 30 characters. Keep in mind that this table name will be displayed in other programs, such as Primary File Administration, Item Inquiry, etc. And the name should be able to give you some indication as to how min/max are calculated, or what product group the table is used for.
Generation Method
Select the method to use to calculate a daily usage:
•
Demand history uses demand quantity from specified periods to calculate a daily usage for the item. Demand quantity is determined by how you set Demand Quantity Preferences in System Period Maintenance.•
Units sold history uses month-to-date units sold from specified periods to calculate a daily usage for the item.•
Average units sold uses the average units sold the last 12 months to calculate a daily usage for the item.Minimum Factor
Enter the factor up to 9999.99 that will be multiplied by the daily usage to calculate the minimum quantity for the item. This factor could be characterized as the number of days supply that you would like to be used as a minimum quantity. In other words daily usage as specified in
Generation Method * this factor = Minimum Quantity
Maximum Factor
Enter the factor up to 9999.99 that will be multiplied by the daily usage to calculate the maximum quantity for the item. This factor could be characterized as the number of days supply that you would like to be used as a maximum quantity. In other words daily usage as specified in Generation Method * this factor = Maximum Quantity.
If you have chosen Demand history or Units sold history as the Generation Method, and press <Do>, the Period Weighting window opens.
Period Weighting window
In the Weight field, enter a number from 1 to 9 or leave the field blank. When a number is entered, the usage from the period is included in the minimum and maximum calculation and the usage is weighted that number of times. If the field is left blank, the usage from the period is not used in the calculation. Typically the weight for a period you want to be used in the calculation of min/max is 1. You may want to weight a period higher if some sort of unusual event caused history for that month to be lower than normal. Also note how these periods are listed. Current, current –1, current-2, etc. So your not specifying exact periods, rather the current period less the number of months indicated. This facilitates the automatic calculation feature.
Deleting a Min/Max Quantity Table
Before accessing the Delete feature, select a table to delete in the Min/Max Quantity Table Maintenance window. You cannot delete a table if it assigned to any item records.
When you select File | Delete table, the Delete Min/Max Quantity Table window opens. Select 1. Delete min/max quantity table to delete the table or select 2. Resume without deleting the table to return to the Min/Max Quantity Table Maintenance window.
Assigning Items to Min/Max Quantity Tables
Assign items to the Min/Max Quantity Tables after you have entered a table name, chosen the generation method, determined the minimum and maximum factors and period weighting. Select the following features from the Utilities menu on the Min/Max Quantity Table Maintenance window to access programs to assign items to the Min/Max Quantity Tables:
•
Assign table name by range--Select to assign ranges of items in your inventory to a min/max quantity table.•
Assign table name by item--Select to assign one item at a time to a min/max quantity table.Assigning Table Name by Range
Select a table to which to assign items from the Min/Max Quantity Table Maintenance window. Then select Utilities | Assign table name by range on the Min/Max Quantity Table Maintenance window. The system displays the Assign Table Name by Range window and positions the cursor in the Item code from field.
Assign Table Name by Range window Item Code
Enter the beginning item code of the first item in the range you are assigning to this min/max quantity table. The system displays the associated item description and positions the cursor in the Item code to field.
Enter the ending item code of the last item in the range you are assigning to this min/max quantity table. The system displays the associated item description and positions the cursor in the
Location
Accept the default, *ALL*, and inventory items at all your locations will be included in the min/max quantity table. Or, to select a single location, press Lookup to perform a location lookup. If you entered a single location, the system displays the associated location name and positions the cursor in the Old table name field.
Old Table Name
If you are assigning all the items in the entered range to a new table, regardless of the table to which each is currently assigned, accept the default *ANY*.
Or, enter the table name to which to assign the items in the specified range. Only the items in the range that are currently assigned to the old value are changed to the new value. If you are unsure of the table name to enter, press Lookup to open the Min/Max Quantity Table Selection window, which displays the name of every min/max quantity table in your system, and then select a table name from the list.
New Table Name
Accept the table name displayed, previously selected from the Min/Max Quantity Table Maintenance window.
Or, enter a different table name that you want the specified items to use. If you are unsure of the table name to enter, press Lookup to open the Min/Max Quantity Selection window, which displays the name of every min/max quantity table in your system, and then select a table name from the list.
Or, enter *NONE* if you do not want the items in the specified range, that are using the old table, to be assigned to a different min/max quantity table. Min/max quantities cannot be assigned to these items until you assign them to a specific min/max quantity table.
Press or click <Enter> to accept the entered information. The specified items are assigned to the new table you selected. However, if you entered *NONE* as the new table name, the specified items are not assigned to any table.
The system displays a status message as the items are being assigned to the selected table. When the system is finished assigning the items to the selected table, the system returns to the Min/Max Quantity Table Maintenance window.
Depending on the number of items in the range, this process may take some time to complete. As long as the status window is on your screen, the system is continuing to work.
Using Assign Table Name by Range to Delete Assigned Tables
The Assign Table Name by Range feature can also be used to delete a table to which items are assigned. However, before deleting an assigned table, you must re-assign any items assigned to the table to another table.
Specify the following criteria in the Assign Table Name by Range window to delete an assigned table:
•
Enter your entire range of inventory using the first item code and the last item code.•
Enter the table name you intend to delete in the Old table name field.•
In the New table name field, enter a new table name to which to assign the items assigned to the table to be deleted. Or, enter *NONE* if you do not want the items assigned to the table to be deleted to be assigned to another table.After performing the steps listed above, the system searches through your inventory and re-assigns all items that used the old table, enabling you to delete the old table using the Delete feature of Min/Max Quantity Table Maintenance.
Assigning One Item to a Table
Follow these steps to assign one item to a min/max quantity generation table:
•
Select a table to which to assign an item from the Min/Max Quantity Table Maintenance screen.•
Select Utilities | Assign table name by item on the Min/Max Quantity Table Maintenance window. The system displays the Assign Table Name by Item window and positions the cursor in the Item Code field.Assign Table Name by Item window Item Code
Enter the item code you are assigning to the selected table and the system positions the cursor in the Location field.
Accept the default, *ALL*, and inventory items at all your locations will be included in the min/max quantity table. Or, to select a single location, press lookup to perform a location lookup. If you entered a single location, the system displays the associated location name and positions the cursor in the New table name field.
New Table Name
Accept the displayed default table name, previously selected from the Min/Max Quantity Table window, or enter the specified item to use as a different table name. If you are unsure of the table name to enter, press <Lookup> to open the Min/Max Quantity Table Selection window, which displays the name of every min/max quantity table set up in your system, and then select the table name from the list.
Enter *NONE* if you do not want to assign the selected item to a min/max quantity table. You cannot generate minimum and maximum quantities for an item until you assign it to a specific min/max quantity table.
Press or click <Enter> to accept the entered information. The specified item is assigned to the new table. However, if you entered *NONE* as the new table, the specified item is not assigned to any table.
Click Cancel when you have finished assigning items to tables. The system closes the Assign Table Name by Item window and returns to the Min/Max Quantity Table Maintenance window.
Min/Max Quantity Table Generation
Inventory Management/Min Max quantity tables/Min Max Table generation
Once you have created Min/Max Quantity tables you can use the Min/Max Quantity Table
Generation program to generate min/max quantities for you inventory file. Another option is to set a preference to allow the system to use your Min/Max Tables and automatically generate
min/max quantities at the end of each month.
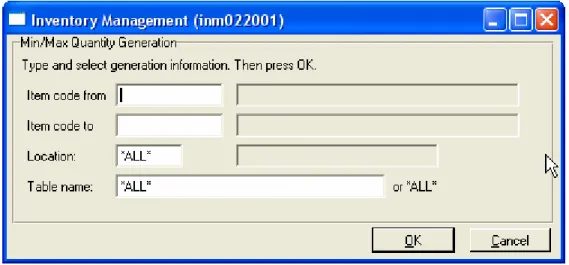
When you choose Min/Max Quantity Table Generation from the Min/Max Quantity Tables menu, the Min/Max Quantity Table Generation window opens.
Min/Max Quantity Table Generation window Item Code
Enter the beginning item code of the first item in the range you want to generate a min/max quantity table for. The system displays the associated item description and positions the cursor in the Item code to field.
Enter the ending item code of the last item in the range you are generating a min/max quantity table for. The system displays the associated item description and positions the cursor in the Location field.
Location
Accept the default, *ALL*, and inventory items at all your locations will be included in the
generation of the min/max quantity table. Or, to select a single location, press Lookup to perform a location lookup. If you entered a single location, the system displays the associated location name and positions the cursor in the Old table name field.
Table Name
Accept the default, *ALL*, and min/max quantities in all the tables will be generated. Or, enter a valid min/max quantity table name.
Press or click <Enter> and the system generates the Min/Max Quantity Tables. Once, complete, a confirmation message displays.
Automatic Generation of Min/Max Tables
As mentioned above you may set a preference to allow the system to automatically generate your min/max quantities at the end of each month.
This preference is located under Inventory Preferences in your Preference menu (System Administration/Preferences/Inventory Preferences
Min/Max Quantity Option Do not generate at period close
Generate at period close
Do not generate is the system default. If you choose to generate your Min/Max Tables at period close, the system will calculate new min/max quantities based on your min/max tables during the system month end program.
Example of Min/Max Calculation
In this example a table has been created that uses Units Sold History as the base for the
calculation. The Minimum factor is 5, the Maximum is 10. Two periods were weighted. One period had 848 units sold, one had 750 units sold.
((848 + 750) / 62 (number of days in the two weighted periods)) X 5 =128 (minimum quantity) ((848 + 750) / 62 (number of days in the two weighted periods)) X 10 =258 (maximum quantity)
Inventory Status Information
Item Inquiry
Item Inquiry is the primary inquiry program for inventory items. From this inquiry you can see information regarding value, sales, receipts, purchasing, pricing, transaction history, etc
Item Inquiry
Price Pulldown
Price Information – Price information only
Price and Cost Information – Price and cost information
Tally Price 1-6 – Tally individual pricing PL 1-6
Tally Price 7-8 – Tally individual pricing PL 7&8
Tally GM Information – Tally individual Gross Margin information
Promotion Information – Promotion (Sale) information on current or past promotions
Competitor Information – Competitor pricing information
Purchasing Pulldown
PO Information – Summary PO information
Item Purchase Order Information – Detailed information on purchase orders for item
Item Receipt – Detailed information regarding inventory receipts
Inventory Transaction – Detailed information regarding all transactions affecting inventory
Quantity Position – Quantity information based on open quotes
Sales Pulldown
Sales Information – Summary sales information
Promotion Analysis – Analysis of current or previous promotions
Units Sold History – Units sold by period information
Sales Transaction Inquiry – Detailed information from sales transactions
Item on Order – Detailed information regarding Order Transactions
Item on Quote – Detailed information regarding Quote Transactions
Miscellaneous Pulldown
Inventory Value – Summary value information
Tally Quantity – Tally individual quantity information
Inventory Area – Area information based on areas setup via Area Maintenance
Item Usage – Information regarding item use on transactions
Min/Max –View and change min/max values
User Defined Fields – View user defined field values
Item Messages – View item messages such as hazardous material, and or change product notes
Millwork – View millwork combination information
Special Order Information – View special order item detail information
Multiple Item Inquiry
Multiple Item Inquiry allows you to see multiple items at once. Items are listed in group section (sequence) order. While not as complete as Item Inquiry, Multiple Item Inquiry allows you to view item information for groups of items.
Multiple Item Inquiry
Inquiry Pulldown
Item Inquiry – Flip to full featured Item inquiry
Sales Transaction Inquiry – Detailed information from sales transactions
Order Transaction Inquiry - Detailed information regarding Order Transactions
Quote Transaction Inquiry – Detailed information regarding Quote Transactions
Item Purchase Order – Detailed information on purchase orders for item
Item Receipt – Detailed information regarding inventory receipts
Inventory Transaction Inquiry - Detailed information regarding all transactions affecting inventory
Inventory Stock Status Report
Inventory Stock Status Report Criteria
Inventory Sales and Stock Status
Reports sales information as well as Inventory Status. Can be run on multiple periods and locations
Inventory Sales & Stock Status Report Criteria
Inventory Sales & Stock Status Report Column Definitions
The Special Order Item Report
Inventory Management/Inventory Status/Special Order Item Report
This report provides information that allows you to track SO Item detail records. Based on criteria you can look at the history of SO Items from order to invoice and any other transaction that may have impacted the item. You may also use this report to simply find out what detail records are available for sale, or on PO, or on Customer Orders.
Special Order Item Report Criteria Window
Sample Special Order Item Report (All Detail)
Item Usage
A new inquiry program, and report have been added to help you to determine what transactions items are on. This can be helpful when trying to deactivate or delete items. This program can be found in Item Maintenance under the Utilities pulldown, in Item Inquiry, under the Miscellaneous pulldown, or in Inventory Management under Inventory Status.
Dataline8000 System sys126001 Item Usage Criteria Type and select criteria. Then press Do.
Item code XXXXX Item Description
Location . . 1
Usage option > Open orders Open quotes Open POs
Open physical counts Assembly item parts Permanent transactions Permanent POs
Special price list Promotions
Do Help F11=Cancel
sys###002 Item Usage Inquiry
Open orders Trans# Trans date Type Status Customer Loc Line# 123456 mm/dd/yyyy 11 Accepted XYZ 1 12 1234 mm/dd/yyyy 12 Entered ABC 1 3 Open quotes Trans# Trans date Type Status Customer Loc Line# 123456 mm/dd/yyyy 21 Accepted XYZ 1 2 1234 mm/dd/yyyy 22 Entered ABC 1 1 Open POs PO# PO date Type Status Vendor Loc Line# 12345 mm/dd/yyyy 1 Accepted HWI 1 12 678 mm/dd/yyyy 1 B/O ACE 1 22 Open counts Count name Loc
2001 Annual count 1 Assembly part Assembly item
XXX YYYYYYYYYYYYYYYYYYYYYYYYYYYYYYY XXX YYYYYYYYYYYYYYYYYYYYYYYYYYYYYYY Permanent transaction
xxxxxxxxxxxxxxxxxxxxxxxxxxxxx Permanent PO
xxxxxxxxxxxxxxxxxxxxxxxxxx Special price list
xxxxxxxxxxxxxxxxxxxxxxxxxx
Promotion Loc xxxxxxxxxxxxxxxxxxxxxxxxxx 1
Do Help F11=Cancel PF3=Print
Sample Item Usage Inquiry
If you press <PF3>, the program will access the print selector so that you can print a hard-copy of the information.
Item Activity Information
This module contains reports to aid you in tracking item activity, or inactivity.
Inventory Transaction Report
This report produces a list of daily inventory transactions, net change in inventory, and month-to-date and year-to-date inventory totals.
Inventory Transaction Report Criteria
Inventory Sales Report
This report allows you to print a summary of month-to-date and year-to-date sales information for selected items in your inventory during specified periods at specified locations.
Inventory Sales Report Criteria
Inventory No Sales Report
This report displays items that have not been sold all year or since a certain date entered in program dialog.
Inventory No Sales Report Criteria
Inventory ABC Report
This report indicates the items that contribute most to sales and ranks items by a variety of sales or cost values.
ABC Report Column Definitions
Controlled Item Sales Report
This report is used to print a report of sales for controlled, or specified, items.
Controlled Item Sales Report Criteria
Sales By Store By Location
This report is used to print a report of daily sales activity when a store requests shipment from a different warehouse.
Sales By Store By Location Report Criteria
Sales By Store By Location Column Definitions
Group Total Sales Report
This report produces a report of daily and monthly sales totals, cost totals, and gross profit percentages by inventory group.
Inventory Transaction History
Inventory Transaction History is used to inquire into, track, and report the inventory transactions that are retained in the database on your ECS Pro system. Storing inventory transactions for a specified period of time
provides you with the ability to see a complete chronological history of every type of transaction that affected any item on your system during any time period specified. With this information stored on your system, you can use the programs listed below for display and reporting purposes:
Inventory Transaction History Inquiry
This program allows you to inquire on what has happened to any item during a specified period at one location. You can choose to inquire on all transaction types containing the selected item, or on one specific transaction type.
Inventory Transaction History Inquiry
A Fields selection for Invoices, Credits, Transfers, Requisitions, Receipts will drill down to the actual transaction. Double click any transaction for summary information
Inventory Transaction Report
Using this report, you can obtain a list of transactions for a specific item entered during a specified period of time at one location, as well as a net change figure for the item during that period. You can report all
transaction types containing the selected item, or only one specific transaction type. This report can be used to print item details or item summary information for all items, or to print variance transactions only.
Column Definition Transaction Detail
Negative Selling History Report
This is a report of items that have reached a negative quantity on hand as a result of inventory transactions. Using this report, you can track the variance between the cost at which the items sold and the cost at which they should have sold.
Negative Selling History Report Criteria
Item Purchase Cost Inquiry
This program allows you to inquire on the price your company paid for an item each time you purchased it during a specified period. It provides a way of observing cost trends for any item in your inventory.
Item Purchase Cost Inquiry
Item Quantity Check
This program allows you to track quantity versus units sold or received on a percentage basis for a range of items. Because it is so versatile, you can use it to perform any number of analyses.
Item Quantity Check
The Item Quantity Check program is used to track quantity versus units sold or received on a percentage basis for a range of items. With this program, you can find out which items have a quantity on hand that is less than 10% of all units sold last month. Perhaps you’d like to know which items have a quantity that is greater than 90% of all units received over the last three months. There are any number of analyses you can form using the Item Quantity Check program, depending on the needs of your company. The conclusions you can reach may help you determine whether you need to replenish stock to maintain the desired quantities, or have a special promotion or sale for those items of which you have an abundance.