Sqlconsole Guide Page 1
SQLConsole Guide
Sqlconsole Guide Page 2
Trademarks
Gupta, the Gupta logo, Gupta Powered, the Gupta Powered logo, Centura, Centura Ranger, the Centura logo, Centura Web Developer, Fast Facts, Object Nationalizer, Quest, Quest/Web, QuickObjects, SQL/API, SQLBase, SQLConsole, SQLGateway, SQLHost, SQLNetwork, SQLRouter, SQLTalk, and Team Object
Manager are trademarks of Gupta Technologies and may be registered in the United States of America and/or other countries. SQLWindows is a registered trademark and TeamWindows, ReportWindows and EditWindows are trademarks exclusively used and licensed by Gupta Technologies.
Team Object Manager, Web Developer, QuickObjects, Object Nationalizer, Report Builder, Connectivity Administrator, Development Kit, Component Development Kit, SQLBase Resource Manager, and SQLConsole are names of products from Gupta Technologies.
Adobe is a trademark of Adobe Systems, Incorporated.
IBM, OS/2, NetBIOS, and AIX are registered trademarks of International Business Machines Corporation. Linux is a trademark of Linus Torvalds. Red Hat is a trademark of Red Hat, Incorporated. Novell and Netware are trademarks of Novell, Inc. SUSE is a trademark of SUSE LINUX AG. Java, JavaScript, and Solaris are trademarks of Sun Microsystems, Incorporated. Microsoft, Outlook, PowerPoint, Visual C++, Visual Studio, Internet Explorer, Internet Information Server, DOS, Win 32, Windows, ActiveX, MSDN, SQL Server, and Visual Basic are either registered trademarks or trademarks of Microsoft Corporation in the United States of America and/or other countries.
This product includes software developed by the OpenSSL Project for use in the OpenSSL Toolkit. (http://www.openssl.org/).
All other product or service names mentioned herein are trademarks or registered trademarks of their respective owners.
Copyright
Sqlconsole Guide Page 3
Table of Contents
SQLConsole Guide ... 1
Trademarks... 2
Copyright ... 2
Table of Contents ... 3
Chapter 1 Introduction to SQLConsole ... 7
SQLConsole Overview ... 8
Where to go from here ... 9
Chapter 2 Requirements and Startup ... 10
The SQLConsole environment ... 11
Startup options ... 11
The SQLCON database ... 12
Customizing SQLConsole settings ... 13
Chapter 3 Using a Workspace ... 14
What is a SQLConsole workspace? ... 14
Creating, altering, or dropping database objects ... 18
The View menu ... 19
Performance issues ... 19
Function key shortcuts ... 20
Chapter 4 Workspace Designer ... 21
What is the Workspace Designer? ... 22
Creating a new workspace ... 23
Altering an existing workspace ... 25
Customizing a workspace ... 27
Sqlconsole Guide Page 4
Viewing the SQLConsole tools... 37
Calendar ... 37
Connect Manager ... 37
SQLTalk ... 40
Log Manager ... 40
Scheduling Manager ... 41
Event Manager ... 41
Mail Manager ... 41
Stored Procedure Manager ... 43
Tool bar ... 43
Outline window ... 44
SQLConsole Settings ... 45
Chapter 6 DBA Operations ... 48
Connecting a server ... 49
Disconnecting a server ... 51
Shutting down a server ... 52
Enabling a server ... 52
Terminating a server ... 52
Creating a database ... 53
Connecting a database ... 54
Disconnecting a database ... 55
Deleting a database... 56
Installing a database... 56
Deinstalling a database ... 57
Sqlconsole Guide Page 5
Enabling a database ... 58
Loading and unloading a database ... 58
Restoring a database ... 66
Partitioning a database ... 67
Chapter 7 Managing SQLBase Performance ... 69
Monitoring your SQLBase server ... 70
Database statistics... 78
Process statistics ... 79
Cursor statistics ... 79
Lock statistics ... 80
Logging information statistics ... 81
How SQLConsole manages log files ... 81
How to log information statistics ... 82
Chapter 8 Server Auditing ... 87
Server auditing ... 88
Using the Audit Manager ... 90
Chapter 9 Alarm Manager... 95
What is the Alarm Manager? ... 95
The Alarm Manager interface ... 95
Alarm types ... 97
Escalator ... 99
Termination ... 99
Escalator actions ... 99
Tracking alarms ... 100
Sqlconsole Guide Page 6
Chapter 10 Automatic Maintenance with the Scheduling Manager ... 104
What is the Scheduling Manager? ... 105
Scheduling backups ... 110
Example ... 112
Chapter 11 Security and Authorization... 115
Managing user accounts and information ... 115
Table and view privileges ... 116
Appendix A Server and Database Properties ... 120
Database and server properties ... 121
Sqlconsole Guide Page 7
Chapter 1
Introduction to SQLConsole
This chapter introduces you to SQLConsole. It contains an overview of SQLConsole’s features and tells you where to go for more information.
Sqlconsole Guide Page 8
SQLConsole Overview
SQLConsole is a graphical database administration and monitoring tool for SQLBase servers and
databases. From a single Windows desktop, SQLConsole lets you easily perform administrative tasks for a local SQLBase server and all the SQLBase servers on a network.
Simplify database administration
SQLConsole shows database objects graphically. This makes it easy to view or make changes to your tables, user accounts, stored commands, external functions, and other database objects. The following picture shows you a SQLConsole window.
Automate common database tasks
SQLConsole’s Scheduling Manager automatically executes many DBA functions — such as initiating a backup, checking database integrity, and updating optimizer statistics — and logs the results of automated operations for later verification.
The Scheduling Manager lets you schedule data- and time-intensive operations when they cause the least disruption, reducing system management costs and improving network performance.
Sqlconsole Guide Page 9
Monitor database performance
To help you tune your system, you can use SQLConsole’s statistics windows. The statistics windows are a valuable tool for performance tuning because they provide an objective measure of how your system performs over time and under typical conditions. You can view server and database activity down to the process, cursor, and lock level. You can use this detailed information, presented in easy-to-read forms and online graphs, to make sound optimization decisions and detect problems.
Detect potential trouble
To help you circumvent potential problems, SQLConsole’s Alarm Manager alerts you when user-defined thresholds for various server conditions are exceeded. The alarm can trigger a predefined action, such as killing the connection that is causing the alarm condition.
And more...
You can use SQLConsole’s graphical interface to perform DBA operations, like database load and unload operations, without the need for SQL commands. You can easily change server or database properties. And you can also audit a SQLBase server, for example, monitor who logs on to a database and which tables they access.
Where to go from here
To install and start SQLConsole, refer to the online installation instructions and Chapter 2. After you start SQLConsole, use the following table as a guide for your next steps.
If You Want To... Read this Chapter
Begin using SQLConsole by opening and using a workspace. This is the
foundation for almost any activity you perform with SQLConsole. Chapter 3
Customize a workspace. Chapter 4
Perform server or database operations. Chapter 5
Monitor your system’s performance. Chapter 7
Perform server auditing. Chapter 8
Set up automated responses to certain server conditions. Chapter 9
Automate database maintenance tasks. Chapter 10
Sqlconsole Guide Page 10
Chapter 2
Requirements and Startup
This chapter discusses:• The SQLConsole environment • System requirements
• Installing SQLConsole • Startup options
Sqlconsole Guide Page 11
The SQLConsole environment
SQLConsole is available on these platforms: • Windows 95
• Windows NT
You can run SQLConsole locally (where SQLConsole and all SQLBase files reside on a local machine), in a LAN environment (where the client and server programs run on different machines), or both. Refer to CERTIFY.HTM for detailed information about supported platforms and configurations.
System requirements
To use SQLConsole, you need the hardware and software listed in the following table.
Category Requirements
Computer A Pentium equivalent or higher running
Windows 95, 98, ME, NT, 2000 and XP, Windows 7.
Monitor VGA capabilities
Memory 32 MB minimum; 128 MB recommended
Disk space 25 MB minimum
SQLBase SQLBase version 6.0 or higher.
Installing SQLConsole
SQLConsole is installed with SQLBase. To install SQLConsole, follow the instructions that appear on your screen when you install SQLBase.
Startup options
When you start SQLConsole for the first time, it asks you to choose a startup option. The following sections describe each option.
Starting with SQLBase 11.5, it’s possible to run both the console and service at the same time. You can also open and close SQLConsole as needed without shutting down the server.
Running in standard mode
During startup, SQLConsole asks if you want to disable SQLConsole’s automated features. If you say yes, SQLConsole enables standard mode. Standard mode is an option that speeds application startup but
Sqlconsole Guide Page 12 disables SQLConsole’s automated features (enhanced mode). In standard mode, the title bar displays "standard mode." If you run in standard mode, you do not need to install the SQLCON database. Other than at startup, you can enable standard mode:
• With the General tab of the SQLConsole Settings property sheet. For more information, read SQLConsole Settings on page 5-8.
• By starting SQLConsole with a command line argument: SQLCON85.EXE - T
Running in enhanced mode
Enhanced mode enables the following automated features:
• Alarm Manager, which can alert you when user-defined thresholds for various server conditions are exceeded.
• Scheduling Manager, which lets you automate database maintenance activities. • Mail Manager, which lets you use e-mail with SQLConsole.
• Calendar, which lets you view maintenance events that you schedule with the Scheduling Manager.
• Logging database statistics to the SQLCON database.
Use standard mode if you do not require these automated features. In enhanced mode, the title bar displays "enhanced mode."
The SQLCON database
If you start SQLConsole in enhanced mode, SQLConsole looks for a SQLCON database. If the database does not exist, it asks if you want to create it. The SQLCON database performs several functions:
• Stores the settings for the Alarm Manager. • Stores the settings for the Scheduling Manager.
• Stores logging information from the server monitoring and information windows. • Acts as an outbox for Mail Manager (e-mail) support.
If you want to use any of these features, you must install a SQLCON database on a local database server. This means you need to install SQLBase server software on the machine where you want to install the SQLCON database if the server software is not already installed there.
Sqlconsole Guide Page 13 If the SQLCON database is on a networked server, each copy of SQLConsole writes data to the single SQLCON database. We do not recommend this configuration because the SQLCON database does not handle input from multiple copies of SQLConsole.
If you remove or prevent the installation of the SQLCON database, Alarm Manager, Scheduling Manager, Mail Manager, and server Event Manager logs are disabled.
Note: If you have a SQLBase version 6.0 SQLCON database (from a SQLConsole version 6.0 release), SQLConsole automatically alters it so it runs against version 6.1 and higher.
Customizing SQLConsole settings
Depending on your requirements, you may want to change certain default settings. You do this with the SQLConsole Settings node (under the Tools node) on a workspace.
You can change a setting at any time. When you change a setting, the new setting takes effect
immediately. The new setting is saved when you close the session, so subsequent SQLConsole sessions also use the new setting. SQLConsole Settings apply to all workspaces.
In general, you may want to change one or more SQLConsole settings if you want to: • Change the rate at which the SQLConsole activity screens refresh. • Switch between standard and enhanced mode.
• Log information about server activity (see Logging information statistics on page 7-13). • Use SQLConsole with your e-mail system.
To change a SQLConsole setting, you must first open a workspace (as described in Chapter 3) and then use the procedure Change a SQLConsole setting in Chapter 5.
Sqlconsole Guide Page 14
Chapter 3
Using a Workspace
Nearly every action you perform in SQLConsole is performed on a workspace. This chapter explains: • What a workspace is.
• How to use the workspace interface. • How to open a workspace.
• How to use a workspace to create, alter, and drop database objects.
What is a SQLConsole workspace?
When you work with SQLConsole, you perform actions on a SQLConsole workspace. Typically, a workspace shows:
• One or more server nodes, which show a graphical representation of your servers and databases.
• A Tools node, which shows various SQLConsole database administration tools. A workspace is a combination of two windows (also called panes). The window on the left is the main window. It shows an overall view of the tools and servers and is where you click to perform your work. The window on the right shows you a detailed view of the node you select in the left window.
Sqlconsole Guide Page 15 This picture shows you a sample workspace.
Sqlconsole Guide Page 16 A workspace organizes your SQLConsole tools, servers, and databases. You can build several
workspaces, each customized for certain tasks. For example, if you do not want certain databases to appear on a workspace, you can build a customized workspace that hides those databases.
A workspace makes a SQLBase server easier to understand and manage by representing each part of a server as a node (or branch) in a tree structure, much like Microsoft Windows Explorer does for files and directories.
Note: If you run in standard mode, certain tools do not appear on your workspace. For more information, read Running in standard mode in Chapter 2.
Which servers and databases appear on a workspace?
You must manually connect to servers and databases using SQLConsole’s Connection Manager. For more, read Chapter 6, DBA Operations. If the connection is successful, a node representing the server appears on any workspace you open (unless you customize the workspace to prevent the server node from appearing, as described in Chapter 4).
When you establish a server connection, you can also establish a connection to all the installed databases on that server, and a node for each database appears on the workspace.
Using a workspace
Sqlconsole Guide Page 17
Right-click to see a context menu
Many SQLConsole tasks require that you right-click a workspace node to display its context menu. The context menu shows which actions you can perform on the node: enabled actions are black, and disabled actions are grey.
Open and close a node
Double-clicking a node in the left workspace window expands the node to display the child nodes underneath it. If the node you select has no child nodes, then double- clicking the node opens a dialog box or information window. Double-clicking an expanded node closes it.
Alternatively, you can:
• Right-click a node and then select Explore from the context menu. This expands the node. Selecting Explore on an expanded node closes the node.
• Use the Plus (+) and Minus (-) keyboard keys to expand and contract a node. As you expand nodes in the left window, the right window changes to display either child nodes or details about the selected node.
SQLConsole provides a default workspace
SQLConsole provides a special workspace named DEFAULT. The DEFAULT workspace contains all possible tools and nodes that can appear on a workspace. It is the superset of all workspaces.
Sqlconsole Guide Page 18 When you begin using SQLConsole, your first step is to open the DEFAULT workspace. Later, you can use the DEFAULT workspace to create your own customized workspaces.
Opening a workspace
This section describes how to open a workspace. When you begin using SQLConsole, start by opening the DEFAULT workspace. (If you want, you can make a customized workspace later, as described in Chapter 4.) The DEFAULT workspace opens automatically.
This procedures assumes that you have opened SQLConsole by clicking the SQLConsole icon in the SQLBase program group. If you are starting SQLConsole for the first time, SQLConsole asks you a series of questions. For more information, read Startup options in Chapter 2.
1. Select Workspace, Open
The Select Workspace dialog box opens. It lists the workspaces automatically provided by SQLConsole (DEFAULT) and any other workspace you created.
2. Click on the workspace you want to open and click OK. If you have not yet created a workspace, select the DEFAULT workspace.
SQLConsole displays the workspace. For information on navigating and opening the nodes on the workspace, read Using a workspace in Chapter 3.
Note: You can open multiple instances of a workspace, if required.
Creating, altering, or dropping database objects
A workspace’s graphical interface makes it easy to create, alter, or drop items in a server or database.
Create, alter, or drop a database object
1. Right-click a node in a left workspace window to display its context menu. For example, right-click the Tables node (under a database node).
Sqlconsole Guide Page 19 2. From the context menu, select the action you want to perform.
3. Enter information in the dialog box that appears. 4. Click OK.
Alternatively, you can click a database object node and then click either the Create, Alter, or Drop push button (assuming the push button is enabled). Whenever you click a node, the push buttons enable and disable themselves to show you the valid actions for that particular node.
Note: To identify a push button, position your cursor over it and wait a few seconds for its label to appear. For example, when you put your cursor over the push button with a hammer, a "create" label appears.
For more information on viewing the nodes on the workspace, read Using a workspace on page 3-3.
The View menu
This section describes the View menu options. To turn on any of these options, open a workspace, select View, then click the option (so a check appears next to it). To turn off an option, select View and then click the option to make the check disappear.
Show System Objects
With a workspace open, select this option from either the View menu or the System Objects check box on the workspace tool bar. When you turn on this option, the workspace displays both system catalog objects (for example, the SYSTABLES and SYSINDEXES tables) and user-defined objects.
Using this option increases SQLConsole’s overhead and thus slows performance. Once you are accustomed to the SQLConsole interface, we recommend that you turn off this option.
Show Qualified Names
When this option is enabled, SQLConsole displays fully-qualified object names where appropriate. For example, the fully-qualified name for table SYSTABLES is SYSADM.SYSTABLES. This setting has no performance impact.
Performance issues
Use the System Objects option (described above) only if needed since it can slow SQLConsole performance.
In addition, applications that perform UPDATE, CREATE, or DROP commands and that fail to commit these transactions will cause SQLConsole to time out when it tries to select information from the database. There are two solutions to this problem:
Sqlconsole Guide Page 20 • Preferably, locate the application that creates the exclusive lock and make it commit its
transactions. Use the Lock statistics window (under the Statistics node for each database) to search for the offending application.
• If you cannot find the application that creates the exclusive lock, you can set the database to enable read-only mode and then reconnect SQLConsole to the database. SQLConsole detects that read-only mode is enabled and connects a read-only isolation level cursor for selecting its information, thus eliminating the timeout problem.
Be aware that enabling read-only mode for a database has negative performance implications and should be considered only a temporary fix.
Note: To see how to enable read-only mode through SQLConsole, read Appendix A, Server and Database Properties.
Function key shortcuts
You can use the function keys to perform the following tasks: • F5 — Refresh current window.
Sqlconsole Guide Page 21
Chapter 4
Workspace Designer
You can perform all your work with the DEFAULT workspace that SQLConsole provides, or you can customize a workspace so only the nodes you want to see are available on it. This chapter shows how to use the Workspace Designer to customize a workspace.
Sqlconsole Guide Page 22
What is the Workspace Designer?
The Workspace Designer is a workspace editor used to altering accessible nodes on your workspace. You can use it to alter any workspace except the DEFAULT workspace that SQLConsole provides. For
example, you can create a workspace that shows a subset of:
• Tools. For example, do not show the Stored Procedure Manager node.
• Database object nodes. For example, do not show the Stored Commands, Stored Procedures, or External Functions nodes.
Sqlconsole Guide Page 23
The Workspace Designer windows
In the Workspace Designer, the window on the left is your template. It shows you all possible nodes you can include on a workspace. The window on the right shows you only the nodes that will be available on the workspace after you leave the Workspace Designer and then open the workspace.
If you have a color monitor, the black nodes in the left window are enabled. This means they will be available on the workspace you are designing. The blue nodes are disabled and will not be available on the workspace you are designing.
Creating a new workspace
Although you can use the DEFAULT workspace for all your SQLConsole work, you may find it useful to create a new workspace that you customize according to your environment.
Create a new workspace
1. Select Workspace, Design New.
2. In the dialog box that appears, select the template you want to use for the new workspace (DEFAULT, for example), then click OK.
Sqlconsole Guide Page 24 In the Workspace Designer, the left window is your template and shows all possible nodes that can appear on the workspace you are designing. The right window shows only the nodes that will appear on the workspace (after you exit the Workspace Designer and then open the workspace you are now designing).
3. Customize the new workspace as needed. Use one or more of the methods described in the Customizing a workspace section that follows to:
• Make a node appear on a workspace. • Remove a node from a workspace.
Sqlconsole Guide Page 25 • Set which database objects appear on a workspace.
4. Select Workspace, Save As.
5. In the Save As Workspace dialog box, enter the new workspace name. You can enter up to 25 alphanumeric characters. (Workspace names are stored in the SQLCON.INI file.)
6. If you want, enter comments in the Comment field. 7. Click OK.
8. Close the Workspace Designer window.
You can now open the new workspace by selecting Workspace, Open.
Altering an existing workspace
Altering a workspace lets you change any of the following:
• Which tools nodes appear on the workspace. For example, you can change whether the SQLTalk node (under the Tools node) appears on a workspace.
• Which database objects and statistics nodes appear on a workspace. • Which servers or databases appear on a workspace.
You cannot alter the workspaces that SQLConsole provides (DEFAULT).
Alter a workspace
You can alter any workspace that you create, but you cannot alter the DEFAULT workspace. 1. Select Workspace, Open.
Sqlconsole Guide Page 26 2. Select the workspace you want to alter and click OK.
Sqlconsole Guide Page 27 The Workspace Designer appears.
In the Workspace Designer, the left window is your template and shows all possible nodes that can appear on the workspace you are designing. The right window shows only the nodes that will appear on the workspace (after you exit the Workspace Designer and then open the workspace you are now designing).
4. Customize the new workspace as needed. Use one or more of the methods described in the Customizing a workspace section that follows to:
• Make a node appear on a workspace.
• Remove a node from a workspace.
• Set which servers or databases appear on a workspace.
• Set which database objects appear on a workspace. 5. Select Workspace, Save.
6. Close the Workspace Designer window.
Customizing a workspace
Sqlconsole Guide Page 28
Make a node appear on a workspace
This procedure assumes you have accessed the Workspace Designer (as described in steps 1 and 2 of Create a new workspace or steps 1 through 3 of Alter a workspace).
1. Select a node in the left window and then click the Enable push button.
The switch on the Enable push button moves to the "up" position, and the node turns from blue to black (if you have a color monitor), The node appears on the window on the right. Enabling (or disabling) a node enables (or disables) its child nodes.
2. Repeat step 1 as needed.
Note: You can shift-click to select multiple nodes. To easily select or deselect all the nodes on the workspace, you can use the Select All and Clear Selection push buttons. For example, click Select All and then Enable to turn on all the nodes on a workspace.
3. Save your change and exit the Workspace Designer as described in Create a new workspace. Remove a node from a workspace
This procedure assumes you have accessed the Workspace Designer as described above. 1. Select a node in the left window and then click the Enable push button.
The switch on the Enable push button moves to the "down" position, the node turns from blue to black (if you have a color monitor), and the node disappears from the window on the right. Disabling (or enabling) a node also disables (or enables) its child nodes. For example, if you disable the Server node, all database nodes and Statistics nodes are also disabled.
Note: Note: You can shift-click to select multiple nodes. To easily select or deselect all the nodes on the workspace, you can use the Select All and Clear Selection push buttons. For example, click Select All and then Enable to turn on all the nodes on a workspace.
2. Repeat step 1 as needed.
Sqlconsole Guide Page 29
Set which servers or databases appear on a workspace
You can explicitly include or exclude particular servers or databases from a workspace. For example, you may want to show databases TEST1 and TEST2 on your workspace, but not TEST3.
This procedure assumes you have accessed the Workspace Designer.
Note: The Connect Manager controls which servers and databases appear by default on all workspaces. In order for a server (and, by default, all the installed databases on it) to appear on a workspace, a connection to the server must exist in the Connect Manager. Once the connection is established, you can use the Workspace Designer to more precisely filter which servers or databases appear on a specific workspace.
1. Right-click a server or database node, then select Properties. A database or server property sheet appears.
Sqlconsole Guide Page 30 2. Enter a text string (for example, TEST2) in the Entry window.
3. Click the push button that moves the entry down to the Selection List window.
Click here.
4. To exclude databases (or servers, if you are working on the server property sheet) that match the text string you entered, click the push button with an "X."
To include databases (or servers) that match the text string, click the push button with an arrow (this is the default).
Sqlconsole Guide Page 31 As noted on the property sheet, you can use the asterisk (*) and percent (%) characters in the
text strings.
5. Repeat steps 2 and 4 as needed.
6. Click OK to exit and save your changes, or Close to exit and discard your changes. 7. Save your change and exit the Workspace Designer.
Set which database objects appear on a workspace
You can explicitly include or exclude certain database objects from a workspace. Here we show you how to set which tables appear on a workspace, but you can use this procedure to include or exclude any of the following:
• Users • Tables • Columns • Indexes • Views • Synonyms
• Stored commands • Stored procedures • External Functions • Triggers
This procedure assumes you have accessed the Workspace Designer.
1. Right-click any 1...N database object node. For example, right-click the Tables 1...N node.
Note: Each 1...N node in the Workspace Designer is a generic representation for all the individual instances of that database object that will eventually appear on the workspace, after you open it outside the Workspace Designer. For example, the Tables 1...N node represents all the table nodes.
2. Select Properties.
Sqlconsole Guide Page 32 3. Enter a text string in the Entry window, then click the push button that moves the entry down to
the Selection List window (refer to the picture). For example, type TABLE2.
4. To exclude database objects that matches the text string you entered, click the push button with an "X." To include database objects that matches the text string, click the push button with an arrow (this is the default).
For example, click the push button with an "X" to exclude table Table2 from the workspace. As noted on the property sheet, you can use the asterisk (*) and percent (%) characters in the text strings.
5. Repeat steps 3 and 4 as needed.
6. Click OK to exit and save your changes, or Close to exit and discard your changes. 7. Save your change and exit the Workspace Designer.
Set database objects to appear on a workspace — Alternative SQL filter
method
This method is identical to the preceding example, except that it enhances performance because it edits the WHERE clause that SQLConsole uses to populate the database object nodes on a workspace. The preceding example, on the other hand, applies additional restrictions after a SQL query gets information from the database about which objects to place on the workspace.
Sqlconsole Guide Page 33 Use this method only if you are familiar with SQL. If you make an error, your workspace will fail to populate with objects and data. As in the preceding example, we use the Tables 1...N node as an example, but you can use any 1...N node.
1. Perform steps 1 through 2 of the preceding procedure (Set which database objects appear on a workspace).
2. Click the Test Connect tab of the property sheet that appears.
3. In the Database field, enter the name of the database. 4. Enter the user name and password.
5. Click the Test Lever push button to test your connection to the database. A dialog box indicates your connection is successful.
Sqlconsole Guide Page 34 6. Close the Sample Items dialog box.
7. Click the SQL Filter tab.
8. Enter edits the WHERE clause in the Append to Where Clause window, then click the Test Lever push button to test the query.
9. Save your change and exit the Workspace Designer.
If you perform this procedure against the ISLAND database, the following results appear after you enter COLCOUNT>10 AND PAGECOUNT=2 and click the Test Lever push button.
Sqlconsole Guide Page 35 10. Close the Sample Items dialog box.
11. If you want, enter information in the bind variable fields.
12. Repeat steps 8 and 11 as needed until you are satisfied with the results of your query. 13. Click OK to exit and save your changes, or Close to exit and discard your changes.
Sqlconsole Guide Page 36
Chapter 5
SQLConsole Tools
This chapter provides an overview of the SQLConsole tools:• Calendar
• Connect Manager • SQLTalk
• Log Manager • Event Manager • Scheduling Manager • Mail Manager
• Stored Procedure Manager • SQLConsole Settings
Sqlconsole Guide Page 37
Viewing the SQLConsole tools
To view a SQLConsole tool, double-click its node on a workspace. For example, to view the Calendar, double-click the Tools node to open it, then double-click the Calendar node.
To see how to open a workspace so you can view the tools, read Using a workspace on page 3-3.
Note: If you are in standard mode, only a subset of tools appears on your workspace or workspaces.
Calendar
You can use the Calendar to monitor either or both of the following:
• Database maintenance events that you schedule with the Scheduling Manager (see the Calendar information in Viewing and managing events on page 10-2).
• Server conditions that you track with the Alarm Manager (see the Calendar information in The Alarm Manager interface on page 9-1).
Connect Manager
The Connect Manager sets the assignments for servers and databases. Your Connect Manager settings apply to all workspaces, and any change you make to them takes effect when you restart SQLConsole.
Sqlconsole Guide Page 38
What appears in the Connect Manager?
If you have a server connection, you can connect to all the available databases on that server. By default, these databases appear on your workspaces but do not appear in the Connect Manager. Instead, a database appears in the Connect Manager (in the Databases group box in the bottom half of the Connect Manager window) only if you explicitly enter a row with the database information.
You can connect to a database even if you do not have a connection to the server on which it is installed (read "Connecting to a Database" on page 6-7).
Disabling connections
You can use the Connect Manager not only to establish connections, but also to prevent SQLConsole from connecting to a server or database. For example, if a particular database will be offline for a several weeks, you can tell SQLConsole to bypass making a connection to it (read "Connecting to a Database" on page 6-7).
Interaction with the Workspace Designer
You can use the Workspace Designer to prevent a server or database from appearing on a workspace, even if you have a connection to it. For example, if you have a connection to a server (SERVER1, for example), you may also have a connection to each installed database on it (DB1, DB2, and DB3). You can, however, use the Workspace Designer to filter which databases appear on your workspace, so only DB1 and DB2 appear on your workspace.
For more information...
Read Chapter 6, DBA Operations, for more detailed information on connecting and disconnecting to servers and databases.
Sqlconsole Guide Page 40
SQLTalk
SQLTalk is an interactive user interface for managing SQLBase databases. SQLTalk has a complete implementation of SQL and many extensions.
If you are familiar with SQL or have extensive SQL scripts that you use with
SQLBase, you may prefer to use SQLTalk for certain database maintenance tasks. You can use SQLTalk to:
• Execute SQL commands.
• Connect or disconnect cursors and databases.
• Perform database administration functions such as BACKUP, RESTORE,LOAD, and REORGANIZE.
• Store, run, and erase SQL stored commands and procedures. • Run scripts of SQLTalk commands.
• Format, display, and print the results of a SQL query in a complex multi-page report. For more information, refer to online help for SQLTalk or the SQLTalk Command Reference.
Note: Any isolation level you set while running SQLTalk from SQLConsole applies to your entire process (SQLConsole). Remember this, so you do not cause SQLConsole to leave unintended locks on databases.
Log Manager
With SQLConsole, you can collect statistics on a variety of server and database attributes. To use the statistics information most effectively, log the information to files and then examine the results over time. This allows you to use your own system’s performance as a baseline and to objectively measure the results of any tuning changes you make.
You can monitor SQLBase statistics without using the Log Manager (by opening the nodes under the Statistics node on a server or database), but using the Log Manager is recommended because it lets you capture your system’s performance over a period of time under its usual operating conditions.
For more information on the Log Manager, read Logging information statistics in Chapter 7.
Sqlconsole Guide Page 41
Scheduling Manager
With the Scheduling Manager, you can make SQLBase automatically execute database backups, scripts, and other database maintenance tasks. For more information, read Chapter 10, Automating
Maintenance with the Scheduling Manager.
Event Manager
Whenever the Scheduling Manager or the Alarm Manager logs information, the Event Manager window opens.
You can control the amount of information in the Event Manager by clicking the Filter push button and entering information in the Event Filter dialog box.
Mail Manager
You can use the Mail Manager to send mail to a user from SQLConsole. This functionality makes it easy to notify users of server events, such as an impending shutdown.
You can send mail when the MAIL_ID cursor parameter of the recipient cursor is set. Although a user’s application can set this through a sqlset call, you can set a user’s MAIL_ID globally in the user’s WIN.INI file by creating a SQLBASE heading. If the SQLBASE heading already exists, add the MAIL_ID section to it.
Sqlconsole Guide Page 43 For example, in the following portion of a WIN.INI file, "Corina Lazo" is the user’s e-mail name:
[SQLBASE]
MAIL_ID=Corina Lazo
The Windows SQL/API library reads the WIN.INI file, sees the setting, and sets the cursor parameter for all connected cursors.
Stored Procedure Manager
Stored procedures can improve performance and simplify your applications by moving flow control language and SQL statements to the server.The Stored Procedure Manager is an editor that lets you create or alter stored procedures within SQLConsole.
To open the Stored Procedure Manager, double-click its node (under the Tools node)on a SQLConsole workspace .
Note: For general information on stored procedures, refer to theSQLBase SQL Language Reference.
Tool bar
Use the push buttons on the tool bar to help you edit a stored procedure. To identify a push button, put the cursor over it and wait a few seconds for the push button’s label to appear. At the same time, the status bar in the bottom left of the Stored Procedure Manager window shows the push button’s description.
Sqlconsole Guide Page 44
Outline window
Write code in the Outline window. You name a procedure, specify the data type and name for procedure parameters and local variables, and enter the actions for the procedure.
Sqlconsole Guide Page 45 You must follow certain convention for the indentation and arrangement of stored procedure code. For more information, refer to the SQLBase SQL Language Reference.
Execution table
When you store a stored procedure with parameters, an execution table appears that lets you enter values for the function parameters and look at the results that the stored procedure returns. This is a useful way to test stored procedure logic.
Each parameter in a stored procedure appears as the name of a column in the table. Put a value in the input row underneath the column header and press the Execute push button (the push button with a test lever handle on it). This returns the results in the table below the input line. If a stored procedure is written to return a result set, all the rows of the result set appear in the table.
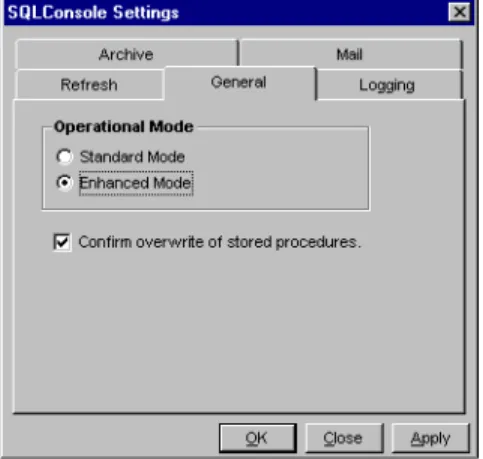
SQLConsole Settings
Depending on your requirements, you may want to change certain default SQLConsole options. You do this with the SQLConsole Settings node on a SQLConsole workspace, which is visible under the Tools node.
When you change a setting, the new setting takes effect immediately. The new setting is saved when you close the SQLConsole session, so subsequent sessions also use the new setting.
In general, you may want to change one or more SQLConsole settings if you want to: • Change the rate at which the SQLConsole activity screens refresh. • Switch between standard and enhanced mode.
• Log information about server activity (see Logging information statistics in Chapter 7). • Use SQLConsole with your e-mail system.
Note: Any change you make to a SQLConsole setting applies to all workspaces.
Change a SQLConsole setting
1. Double-click the SQLConsole Settings node (under the Tools node on a workspace).
Note: If you need to open the Tools node, double-click it. Double-clicking alternately opens and closes a node.
Sqlconsole Guide Page 46 The Settings property sheet appears.
2. Click the appropriate tab (Logging, for example).
3. Change a setting or settings, then save your changes and close the window by using the push buttons:
• OK — Applies change and closes the property sheet. • Close — Closes the property sheet.
• Apply — Applies change but does not close property sheet.
Description of settings
Use the guidelines in the following table to change settings.
Tab Description
Refresh • Automatic Refresh — If a check appears in the check box, automatic refresh is on (enabled). If no check appears it is off (disabled). Note that the Automatic Refresh push button (the push button that looks like a clock) turns automatic refresh on or off in a given window.
• Refresh scroll bar — If automatic refresh is enabled, use this scroll bar to control the rate at which SQLConsole refreshes all SQLConsole windows. To change the rate, drag the scroll bar to the desired location, from 1 to 64 seconds. Alarms are checked at this refresh rate, and are checked even if automatic refresh is disabled. You can selectively turn automatic refresh off in individual information windows while letting it continue to run in
Sqlconsole Guide Page 47 Tab Description
General Use this to set:
• Standard mode. Standard mode (unlike enhanced mode) disables certain automated SQLConsole functionality in order to speed performance at startup.
• Whether to confirm overwrite of stored procedures.
• Visible modem control — If set when you use SQLConsole with a pager, displays the progress of a call. Note that SQLConsole does not perform error reporting of modem or phone or pager host problems.
Logging Use this to capture server statistics in log files.
Archive Use this to specify how and where to keep archives of the server activity logs (if you log server statistics; see the Logging tab).
Mail Configures SQLConsole to work with your mail system. Use this option if you want to use e-mail to notify a user if a particular action occurs, or if you want SQLConsole’s Alarm Manager to automatically send e-mail if a particular action occurs.
• Mail — Your mail system. SQLConsole is supported only with Microsoft Mail.
• Logon Name — The mail user. You may want to set up a separate user for SQLConsole's use. • Password — The password for the user.
Sqlconsole Guide Page 48
Chapter 6
DBA Operations
This chapter describes how to perform common DBA (database administration) tasks with SQLConsole: • Connecting a server.
• Disconnecting a server. • Shutting down a server. • Enabling a server. • Terminating a server. • Creating a database. • Connecting a database. • Deleting a database. • Installing a database. • Deinstalling a database. • Shutting down a database. • Enabling a database. • Backing up a database. • Restoring a database. • Partitioning a database.
Sqlconsole Guide Page 49
Connecting a server
When the DEFAULT workspace first opens it only displays the Tools node. For security reasons,
SQLConsole makes no attempt to automatically locate or connect to servers or databases. Every server which SQLConsole will be used to manage must be added to the connect tree by means of the
Connection Manager (under the Tools node). You may also use the Connection Manager to tell SQLConsole the user name and password to be used to connect to databases on those servers.
You can use the Connection Manager to instruct the SQLConsole to cancel a construction of a server or database connection (see the sections Disconnecting a database or Disconnecting a server in this chapter).
Note: Note: Your Connection Manager settings apply to all workspaces.
Connecting to a server enables the following operations:
• Backing up, recovering, and restoring a database and its logs. • Creating and deleting a database and its logs.
• Installing and deinstalling a database. • Monitoring the server.
• Alarm notification.
A server connection is not required in order to use the Scheduling Manager.
Note: Note: If you use the Connection Manager to connect to a database for which you do not have a server connection, the Connection Manager displays the associated server information for that database. This row of server information, though, is for your information and is not an actual server connection.
Connect to a SQLBase server
1. Open a workspace (read Using a workspace on page 3-3).
Sqlconsole Guide Page 50 The Connection Manager window opens. The Server window shows a list of all connected servers.
3. Click the New Server Entry push button.
An outlined row appears for you to insert information. 4. Type the server name.
5. Enter a password in the Password field.
If the server has a password defined in the SQL.INI file, use that value. If you do not have a server password defined in SQL.INI, then any value in the password field will do, including a null password. However, we recommended that you set a password for a SQLBase server. For example:
[DBWSERVR] SERVERNAME=SERVER1 PASSWORD=2MINNEOLA
6. If you do not want SQLConsole to connect to the server, click to remove the check from the Connected To check box. Otherwise, by default SQLConsole is enabled to connect to the server. SQLConsole automatically enters the information in the remaining fields.
Sqlconsole Guide Page 51 8. Exit from and then restart SQLConsole to see the new server connection.
Note that SQLConsole is connected to a server only if it appears in the Servers group box and the Connected To check box is checked.
Note: If you are connected to a server, you will also see the installed databases on that server, even though a specific row for each database does not appear in the database section of the Connection Manager.
Disconnecting a server
Disconnecting a server removes it from the list of connected servers. All monitoring and alarm notification is halted and any windows open for the server are closed.
You must restart SQLConsole to see the effect of disconnecting from the server. After you disconnect a server and restart SQLConsole, the databases on the server do not appear on a workspace unless you explicitly connect to them in the Databases group box (as described in Connecting a database on page 6-7).
Disconnect a server
1. Open a workspace (read Using a workspace on page 3-3).
2. Double-click the Connection Manager node (under the Tools node on a SQLConsole workspace). The Connection Manager window opens.
3. Click the light bulb icon on the left of the server information row of the server you want to disconnect, then click the Delete Server Entry push button.
Sqlconsole Guide Page 52 4. Exit from and then restart SQLConsole.
Shutting down a server
Shutting down a server prevents new connections to it. No one can connect to the server after you shut it down (except for a server handle), but users who are already connected can continue their work. To bring a server back online after a shutdown, enable the server.
Shut down a server
1. Open a workspace.
2. Right-click a server node in a SQLConsole workspace. 3. Select Shutdown from the context menu.
4. In the Shutdown Server dialog box, select Shutdown.
Enabling a server
This command allows a server that has been shut down to accept new connections. 1. Open a workspace.
2. Right-click a server in a SQLConsole workspace. 3. Select Enable from the context menu.
Terminating a server
Terminating the server is equivalent to pressing the Escape key on the server machine’s keyboard. Connected user sessions are terminated and open transactions are left uncommitted. When the server is subsequently started and a database connection occurs, crash recovery occurs and open transactions roll back. Note that after the server is terminated, the databases on it are no longer available.
1. Open a workspace.
2. Right-click a server in a SQLConsole workspace. 3. Select Terminate from the context menu.
Sqlconsole Guide Page 53
Creating a database
This operation physically creates, installs, and brings online a database. SQLBase creates the database in a subdirectory of the directory specified by the DBDIR keyword in the server's SQL.INI file. The default for DBDIR is \SQLBASE. This operation requires a server connection.
1. Open a workspace.
2. Right-click a server in a SQLConsole workspace.
3. Select Manage Database, Create from the context menu.
4. In the Create Database dialog box, enter the new database name.
The maximum length of a database name is eight characters. Unlike ordinary identifiers, you cannot use special characters (such as $, #, @, and ) in a database name, and the first letter must be alphabetic. Do not specify an extension for a database name, such as DEMO.XYZ. SQLBase automatically assigns a database name extension of .DBS. Do not specify the name MAIN for a database, since this is used to store control information for partitioned databases. Also, do not specify the name of an existing server for a database.
5. If you want log backup enabled, click On in the Log Backup group box. 6. Click Create.
It may take 30 or more seconds to complete this operation. When the database is created, it appears on your workspace. To enable the database so operations can be performed on it, you have to tell
SQLConsole the username and password to use when connecting to the database. To do this, either right-click on the database name and choose security from the pop-up menu, or go to the Connection Manager and add a new line for the newly-created database. The change takes effect after SQLConsole is restarted.
Sqlconsole Guide Page 54
Connecting a database
If you have a server connection (for example, a connection to a local SQLBase server when you start SQLConsole), you also have a connection to (and can thus perform actions on) all the available databases on that server. These databases appear on your workspace or workspaces, but they do not appear in the Connection Manager.
Use the Connection Manager to connect to a database only if you do not have a server connection in the Connection Manager. For example, if you want to connect to the SALES database but not the server on which SALES is installed, connect to SALES in the Databases group box.
When you connect to a database in the Connection Manager, the change takes effect after you restart SQLConsole.
Connect to a database
1. Open a workspace.
2. Double-click the Connection Manager node (under the Tools node). The Connection Manager window opens.
3. Click the New Database Entry push button.
An outlined row appears for you to insert information. 4. Type the database name.
Sqlconsole Guide Page 55 6. Enter the password in the Password field.
7. If you do not want SQLConsole to connect to the database, click to remove the check from the Connected To check box. Otherwise, by default SQLConsole will connect to the database. 8. Click OK.
9. Restart SQLConsole to see the effect of your change.
Disconnecting a database
Use the following procedure to prevent SQLConsole from connecting to a database. For example, if a database will be offline for several days, you can prevent SQLConsole from trying to connect to it.
Disconnect a database
1. Open a workspace.
2. Double-click the Connection Manager node (under the Tools node). The Connection Manager window opens.
3. Enter a row for the database in the Databases group box (if a row for the database does not already exist). Use the procedure in step 3 through step 6 in Connecting a database on page 6-7. 4. Next, click to remove the check from the Connected To check box.
Sqlconsole Guide Page 56
Deleting a database
The delete database operation physically deletes the entire database directory of a database. The database and all associated log files are removed. If log files have been redirected to a different drive, the log directory also is removed. This operation requires a server connection.
Delete a database
1. Open a workspace.
2. Right-click the database you want to delete. 3. Select Manage, Delete from the context menu. 4. In the Delete Database dialog box, select Delete.
SQLConsole checks whether users are connected to the database you want to delete; if so, you receive an error. If you are successful, the database name disappears from all workspaces.
Installing a database
This operation installs a database on the current server and adds a DBNAME keyword for it in the server’s SQL.INI file. Before you can install a database, it must exist on the server’s disk in an appropriate subdirectory. This command requires a server connection.
Install a database
1. Open a workspace.
2. Right-click on the server node that contains the database. 3. Select Manage Database, Install from the context menu. The Install Database dialog box appears.
Sqlconsole Guide Page 57
Deinstalling a database
This operation removes a database from the server and removes its corresponding DBNAME entry from the SQL.INI file. This operation does not physically delete the database. You can deinstall a database only if there are no connections to it. This operation requires a server connection.
Deinstall a database
1. Open a workspace.
2. Right-click the database you want to deinstall. 3. Select Manage, Deinstall from the context menu. 4. In the Deinstall Database dialog box, select Deinstall. To re-install the database on the server, install the database.
Shutting down a database
Shutting down a database prevents new database connections. No one can connect to the database after it is shut down, except for a DBA, but users already connected can continue their work.
Only SYSADM can shut down a database.
After this function completes, anyone trying to connect to the database receives a "shutdown in progress" message. All current users remain connected and all current transactions continue.
To bring a database back online after it has been shut down, you need either to deinstall and install the database, or to enable it.
Shut down a database
1. Open a workspace.
2. Right-click the database you want to shut down. 3. Select Shutdown from the context menu.
Sqlconsole Guide Page 58
Enabling a database
Enabling a database that has been shut down lets users establish new connections to the database.
Enable a database
1. Open a workspace.
2. Right-click the database you want to enable. 3. Select Enable from the context menu.
4. In the Enable Database dialog box, click Enable.
Loading and unloading a database
A load operation can either restore data from a file created with a SQLBase unload operation, or a load operation can enter data into the database from an external file. Unloading data involves moving database information to a flat file. You can then load this information to a new database.
SQLBase uses the server to perform load and unload processes. This relieves the client of unnecessary processing, reduces network traffic, and allows the server to load and unload the data locally on its own machine.
SQLBase load and unload operations handle large amounts of data, especially for large tables or databases. Load and unload files consume storage space and can be expensive to transmit. The
compression option reduces the size of these external files. You can compress the external file when you unload it, and decompress it when you reload it. Compression occurs at the server before transmission over the network.
Note: If you perform a load operation with SQLTalk, you can issue a SET RECOVERY OFF command to enhance load performance (as discussed in the SQLBase Database Administrator’s Guide). You are unable to issue this command from the SQLConsole load dialog box.
Load a database
1. Open a workspace.
2. Right-click the database into which you want to load data. 3. Select Manage, Load from the context menu.
Sqlconsole Guide Page 59 The Load dialog box appears.
4. Enter the appropriate information in the load dialog box. For more information,refer to the table that follows this procedure.
5. Click Load.
During the load operation, autocommit is temporarily disabled by SQLBase.
6. When the load operation terminates, use the Commit or Rollback push buttons to manually commit or rollback the session, or use the Control group box settings to automatically commit or rollback the session.
7. Click Close to exit the dialog box.
Selecting load options
The following table describes the options in the load dialog box. Load Option Description
From Use to indicate whether the files are located on the client (local user) or database server machine.
Sqlconsole Guide Page 60 File Use to indicate whether to load data from a single file or from multiple
file segments.
• Unload File — Loads data from a single file whose name you enter in the data field to the right (you can use the file browse button to locate the file).
• Control File — Use with a load control file name if you are loading information from multiple file segments where the unload operation was performed using a control file. Enter the name of the load control file or use the Browse push button to locate the file.
Format Select the format of the file to be loaded:
• SQL — Specifies that the load file is a series of SQL commands and was probably created by an UNLOAD command. If the file is
compressed, check Compressed. A SQL format file contains the CREATE TABLE and CREATE INDEX data definition commands along with
corresponding INSERT commands for each table. Since the load file contains the CREATE TABLE command, SQLBase creates the table or tables and associated indexes, so the tables cannot yet exist. The command LOAD SQL is equivalent to running the file as a script. The data rows are inserted using bind variables
• ASCII Specifies a load file that contains input data organized in
Options • Start at Line — Use to start the load operation from a specific line in the load input file. Select Load Log in conjunction with this option, since the log file displays the line number where the error occurred.
• Load Log — Use to automatically create a log file. The log file records activities and errors that occur during the load operation. Errors are logged with the line number at which the error occurred. After you fix an error, use the line number with the START AT LINE option to restart the load operation at that point in the source file. Select the format of th
Tables/Views When loading an ASCII or DIF file, use this list box to select the target table or view to which the data will be loaded.
Sqlconsole Guide Page 61 Controls Use to specify the action to occur if the load operation is successful or
has an error:
• On Success — Select Commit to automatically commit if successful. During the load, autocommit is disabled, so failing to commit could lose the results of the operation.
• On Error — Indicate whether you want to commit or rollback if an error occurs. Use Commit if you are generating a log file, so you can pick up the transaction at the point of error using the START AT LINE option.
Unload a database
An unload operation allows you to back up a database or transfer data from a database to another program through interchange formats. An unload operation does not unload invalid stored commands. 1. Open a workspace.
2. Right-click the database you want to unload.
3. In the pop-up properties box, select Manage, Unload. The Unload dialog box appears.
4. Enter the appropriate information in the dialog box. For more information, refer to the table the follows this procedure.
Sqlconsole Guide Page 62
Note: You can use the Export push button to create the unload command that SQLBase would use and save the command to a file (without actually unloading the database).
6. Click Close to exit the dialog box.
Selecting unload options
The following table describes the options in the unload dialog box. Unload Option Description
Type Use this setting to indicate what data will be exported. The choices are: • Database — The default. Unloads the entire database to which a user is connected. You must be logged on as SYSADM to give this command. • Schema — Similar to the Database option (above), but unloads only DDL commands (unloads the schema without unloading the data).
• All — Unloads all tables and indexes belonging to connected user (you can explicitly connect as a certain user in the Connection Manager). This command does not unload any other database objects.
• Object + Data — Unloads the CREATE TABLE statement and the INSERT
statements for each row for the object you select. Whether the file format is SQL, ASCII, or DIF can have varying implications for the contents of the file. When you select this option, the Tables/Views window populates to show the database objects. • Data Only — Indicates that only data is written to the external file and no CREATE TABLE or CREATE INDEX statements are written. Whether the file format is SQL, ASCII, or DIF can have varying implications for the contents of the file.
Format You can use these settings only if you select Object + Data or Data Only in the Type group box:
• SQL — The external file is created with a series of SQL commands. The file contains INSERT commands followed by data rows.
• ASCII — The external file contains only data, organized in ASCII format. You can specify only one source table. ASCII format is similar to the data format in SQL except that the character fields are delimited by double quotes ("). You cannot unload LONG data type columns in ASCII.DIF — The external file contains data organized in Data Interchange Format (DIF), which is a common format for spreadsheets and
databases. Only one table can be unloaded in a single DIF file. Only the data in the table is written to the file. You cannot unload LONG data type columns in DIF. Options These settings affect the way the output file is written:
• Compress — Compress the data when you unload it. This option is not valid for DIF
or ASCII data files.
Sqlconsole Guide Page 63 To Indicates whether the files will be written to the client (local user) or the database
server. The default is server. You can enter the volume and path in the Destination field, or you can browse the directories of the client or server, whichever is selected, by clicking on the File Folder push button.
Sqlconsole Guide Page 64 Unload Option Description
Log Creates a log of the unload operation and any errors that occur. You must enter a name for the log file. The log file is created in the same location where the unload file is placed.
Tables These settings apply only to an Object + Data or Data Only unload. Use this to set which items to include in the unload operation. Items in the left list box represent the tables and views in the database, while items in the right list box represent the objects to be unloaded.
Check the System Objects checkbox under the left list box if you want to include system objects in the Tables/Views list box.
File Depending on the size of the data you need to unload, use one of these two options for unloading the data:
• Unload File — Use to unload all data to a single file, whose name you enter. • Control File — Use along with an unload control file name if you are unloading information into multiple file segments. This allows you to unload the data to multiple volumes where the database is too large to fit in a single volume. You must create an unload control file for SQLBase to use by entering a control file name, the prefix of the file segment names, the directory into which to place the segments, and the maximum size of an unload segment file in megabytes. Name as many segments as are required for the size of the unload operation.
When you finish entering the information for the control file, save the file using the Save Control File push button.
Backing up a database
There are two ways of backing up a SQLBase database: online or offline. You make an offline backup with an operating system utility or copy command after you deinstall the database. You make an online backup with the SQLTalk BACKUP command, a call to a SQL/API function, or by right-clicking a database node and then selecting Backup from the context menu that appears.
This section discusses how to perform an online backup using the Backup menu item from a database context menu.
For information on backing up a database with the BACKUP command in SQLTalk (which you can do through the SQLTalk node on your workspace), refer to the SQLTalk Command Reference.
For information on automating database backup through SQLConsole, read Scheduling backups in Chapter 10.