Red Hat Satellite Documentation Team
User Guide
A guide to using Satellite entitlement management software.
Edition 3
A guide to using Satellite entitlement management software.
Edition 3
Copyright © 2015 Red Hat.
This document is licensed by Red Hat under the
Creative Commons
Attribution-ShareAlike 3.0 Unported License
. If you distribute this document, or a modified version
of it, you must provide attribution to Red Hat, Inc. and provide a link to the original. If
the document is modified, all Red Hat trademarks must be removed.
Red Hat, as the licensor of this document, waives the right to enforce, and agrees
not to assert, Section 4d of CC-BY-SA to the fullest extent permitted by applicable
law.
Red Hat, Red Hat Enterprise Linux, the Shadowman logo, JBoss, MetaMatrix, Fedora,
the Infinity Logo, and RHCE are trademarks of Red Hat, Inc., registered in the United
States and other countries.
Linux ® is the registered trademark of Linus Torvalds in the United States and other
countries.
Java ® is a registered trademark of Oracle and/or its affiliates.
XFS ® is a trademark of Silicon Graphics International Corp. or its subsidiaries in the
United States and/or other countries.
MySQL ® is a registered trademark of MySQL AB in the United States, the European
Union and other countries.
Node.js ® is an official trademark of Joyent. Red Hat Software Collections is not
formally related to or endorsed by the official Joyent Node.js open source or
commercial project.
The OpenStack ® Word Mark and OpenStack Logo are either registered
trademarks/service marks or trademarks/service marks of the OpenStack
Foundation, in the United States and other countries and are used with the
OpenStack Foundation's permission. We are not affiliated with, endorsed or
sponsored by the OpenStack Foundation, or the OpenStack community.
All other trademarks are the property of their respective owners.
Abstract
The Red Hat Satellite 6 User Guide describes how to use Satellite, including
subscriptions, content management, provisioning, and system control.
. . . . . . . . . . . . . . . . . . . . . . . . . . . . . . . . . . . . . . . . . . . . . . . . . . . .
Table of Contents
Chapt e r 1. Re d Hat Sat e llit e Se rve r 6 Basic Co nf igurat io n Wo rkf lo w Chapt e r 2. Acce ssing Re d Hat Sat e llit e
2.1. Logging in to Red Hat Satellite
2.2. Changing the Password in Red Hat Satellite
Chapt e r 3. St art ing and St o pping Re d Hat Sat e llit e
Chapt e r 4. Co nf iguring O rganiz at io ns, Lo cat io ns and Lif e Cycle Enviro nme nt s 4.1. O rganizations
4.2. Locations
4.3. Life Cycle Environm ents 4.4. Viewing Im port History
Chapt e r 5. Using t he Re d Hat Sat e llit e Co nt e nt Dashbo ard Chapt e r 6. Using Co nt e nt Vie ws
6.1. Creating a Content View
6.2. Adding Repositories to the Content View 6.3. Filtering Content
6.4. Publishing a Content View Chapt e r 7. Se arching f o r Co nt e nt
7.1. Basic Content Search
7.2. Content Com parison across Environm ents Chapt e r 8. Vie wing and Applying Errat a
8.1. Inspecting Available Errata 8.2. Applying Errata to Content Hosts 8.3. Subscribing to Errata Notifications
Chapt e r 9. Se curit y Co mpliance Manage me nt wit h O pe nSCAP 9.1. Installation
9.2. SCAP Concepts
9.3. Com pliance Reports O verview 9.4. Uploading Additional SCAP Content Chapt e r 10. Wo rking wit h Co nt aine rs
10.1. Managing Containers 10.2. Managing Repositories 10.3. Im porting External Registries
10.4. Im porting Im ages to Com pute Resources 10.5. Using Container Tags
Chapt e r 11. Co nf iguring Act ivat io n Ke ys 11.1. Creating an Activation Key
11.2. Rem oving an Activation Key 11.3. Editing Activation Keys
11.4. Autom ated Host Registration with Activation Keys Chapt e r 12. Co nf iguring GPG Ke ys
12.1. Creating a GPG Key 12.2. Rem oving a GPG Key
Chapt e r 13. Co nf iguring t he Pro visio ning Enviro nme nt
4 6 6 7 9 10 10 12 14 15 17 19 19 20 20 22 23 23 23 24 24 26 27 28 28 29 33 39 40 40 46 46 46 47 48 48 49 49 52 53 53 53 54
. . . . . . . . . . . . . . . . . . . . . . . . . . . . . . . . . . . . 13.1. Creating a Host Group
13.2. Param eters
13.3. Configuring Provisioning Settings
13.4. Storing and Maintaining Host Inform ation Chapt e r 14. Co nf iguring Ho st s
14.1. Creating a Host
14.2. Configuring a Host for Registration 14.3. Registration
14.4. Configuring an Additional Network Interface 14.5. Rem oving a Host
Chapt e r 15. Disco ve ring Bare -me t al Ho st s o n Sat e llit e 15.1. Configuring the Satellite Discovery Plug-in
15.2. Configuring the Satellite Capsule Discovery Plug-in 15.3. Provisioning Discovered Hosts
15.4. Extending the Discovery Im age 15.5. Troubleshooting Satellite Discovery Chapt e r 16. Co nf iguring Ho st Co lle ct io ns
16.1. Creating a Host Collection
16.2. Adding Hosts to a Host Collection 16.3. Adding Content to Host Collections
16.4. Rem oving Content from a Host Collection
16.5. Changing the Life Cycle Environm ent or Content View of a Host Collection 16.6. Rem oving a Host from a Host Collection
16.7. Rem oving a Host Collection 16.8. Cloning a Host Collection
16.9. Reviewing Host Collection Details Chapt e r 17. Use rs and Ro le s
17.1. Creating and Managing Users 17.2. Creating User Groups
17.3. Creating and Managing Roles 17.4. Granular Perm ission Filtering
Chapt e r 18. Backup and Disast e r Re co ve ry 18.1. Backing up Red Hat Satellite Server
18.2. Restoring Red Hat Satellite Server from a Backup Chapt e r 19. Maint aining a Re d Hat Sat e llit e Se rve r
19.1. Logging and Reporting
19.2. Collecting Inform ation from Log Files 19.3. Enabling Debug Logging
19.4. Using Log Files in Support Cases
Chapt e r 20. Co nf iguring Ext e rnal Aut he nt icat io n 20.1. Using LDAP
20.2. Using Identity Managem ent
20.3. Using Active Directory with Cross-Forest Trust 20.4. Using Active Directory Directly
20.5. External Authentication for Provisioned Hosts
Chapt e r 21. Re d Hat Sat e llit e Use r Int e rf ace Plug-ins 21.1. Accessing Custom er Portal Services from Red Hat Satellite Chapt e r 22. Co mmand Line Re f e re nce
54 55 58 65 69 69 69 70 76 80 82 82 85 86 89 90 92 92 92 92 93 94 94 94 95 95 96 96 100 101 104 107 107 107 109 109 109 110 112 113 113 116 118 118 121 127 127 131
. . . .
. . . . . . . . Chapt e r 22. Co mmand Line Re f e re nce
22.1. Configuring ham m er
Appe ndix A. Glo ssary o f T e rms Appe ndix B. Re visio n Hist o ry
131 131 133 138
Chapter 1. Red Hat Satellite Server 6 Basic
Configuration Workflow
Prerequisit es
Be fore continuing with this workflow you mus t have s ucce s s fully ins talle d a Re d Hat Sate llite 6 Se rve r and any re quire d Caps ule Se rve rs . Se e Re d Hat Sate llite Ins tallation Guide for furthe r information.
Init ial Co nf igurat io n
The s e are the initial proce dure s to configure a bas ic Re d Hat Sate llite Se rve r. You ne e d the adminis trator privile ge s for the majority of the following actions :
1. Log in to the Sate llite Se rve r. Se e Se ction 2.1, “Logging in to Re d Hat Sate llite ” for more information.
For information about changing the pas s word, s e e Se ction 2.2, “Changing the Pas s word in Re d Hat Sate llite ”.
2. Edit the Re d Hat Sate llite Inte grate d Caps ule Se rve r to s e le ct the de s ire d
organizations and locations . The name of the Sate llite Inte grate d Caps ule Se rve r will be the s ame as the hos tname of the s e rve r that Sate llite 6 Se rve r is ins talle d on. Se e Se ction 4.1.3, “Editing an Organization” and Se ction 4.2.2, “Editing a
Location” for more information.
3. Edit the de s ire d location to s e le ct the re s ource s to be as s ociate d with that location. Se e Se ction 4.2, “Locations ” for more information.
4. Edit the de fault organization to s e le ct the re s ource s to be as s ociate d with that organization. Se e Se ction 4.1, “Organizations ” for more information.
Co nf iguring a Red Hat Sat ellit e Server
The s e are the initial proce dure s to configure a bas ic Re d Hat Sate llite Se rve r: 1. Cre ate a domain. Se e Se ction 13.3.1, “Domains ” for more information. 2. Cre ate a s ubne t. Se e Se ction 13.3.2, “Subne ts ” for more information. 3. Cre ate the de s ire d life cycle e nvironme nts . Se e Se ction 4.3, “Life Cycle
Environme nts ” for more information.
4. Cre ate any de s ire d cus tom products . Se e the Cre ating a Product s e ction in the
Ins tallation Guide for more information. 5. Choos e the de s ire d Re d Hat Re pos itorie s .
a. Cre ate a manife s t from the Re d Hat Cus tome r Portal. Se e the Se tting up a Manife s t s e ction in the Ins tallation Guide for more information.
b. Upload the manife s t in the Sate llite Se rve r we b inte rface . This will propagate the s ubs cription information into the Sate llite Se rve r. Se e the Uploading a Subs cription Manife s t s e ction in the Ins tallation Guide for more information. c. Once the manife s t has be e n uploade d, the Re d Hat Re pos itorie s available
from valid Re d Hat Subs criptions are importe d into the Sate llite Se rve r. Choos e which re pos itorie s are re le vant to your organization. Se e the
Uploading a Subs cription Manife s t s e ction in the Ins tallation Guide for more information.
d. Optional:
a. Re d Hat s ource re pos itorie s update conte nt bas e d on s e curity e rrata, bug fixe s , and e nhance me nts . To e ns ure that the Sate llite Se rve r is update d automatically, Cre ating a Synchronization Plan and Cre ating a Synchronization Sche dule s e ctions in the Ins tallation Guide are
re comme nde d practice s .
6. Manually s ynchronize conte nt. Se e the Synchronization Status s e ction in the
Ins tallation Guide for more information.
7. Cre ate a conte nt vie w with the de s ire d re pos itorie s , puppe t module s , and filte rs . Publis h the conte nt vie w the n promote it to othe r life cycle e nvironme nts as re quire d. Se e Chapte r 6, Using Content Views for more information.
8. Optional:
a. Cre ate a hos t colle ction and as s ign it to the de s ire d life cycle e nvironme nt and conte nt vie w. Se e Chapte r 16, Configuring Host Collections for more information.
9. Cre ate an activation ke y as s igning it to the de s ire d life cycle e nvironme nt and conte nt vie w. Se e Se ction 11.1, “Cre ating an Activation Ke y” for more information. 10. Edit an e xis ting provis ioning te mplate and as s ociate it with the pre vious ly cre ate d
ope rating s ys te m. Se e Se ction 13.3.8, “Provis ioning Te mplate s ” for more information.
11. Edit the ope rating s ys te m cre ate d by de fault whe n cre ating the conte nt vie w with the de s ire d de tails and e ns ure it is as s ociate d with the de s ire d partition table and provis ioning te mplate . Se e Se ction 13.3.10, “Ope rating Sys te ms ” for more
information.
12. Cre ate a ins tallation me dium with the de s ire d de tails . Ens ure that the me dia is as s ociate d with the re quire d locations and organizations . Se e Se ction 13.3.6, “Ins tallation Me dia” for more information.
13. Cre ate a hos t group with the de s ire d de tails . Se e Se ction 13.1, “Cre ating a Hos t Group” for more information.
Creat ing a Backup o f a Red Hat Sat ellit e Server
To cre ate a backup of the Re d Hat Sate llite Se rve r, s e e Se ction 18.1, “Backing up Re d Hat Sate llite Se rve r”.
Chapter 2. Accessing Red Hat Satellite
2.1. Logging in t o Red Hat Sat ellit e
Afte r Red Hat Sat ellit e has be e n ins talle d and configure d us e the we b us e r inte rface to log in to Sat ellit e for furthe r configuration.
The s e s te ps s how how to log in to Re d Hat Sate llite .
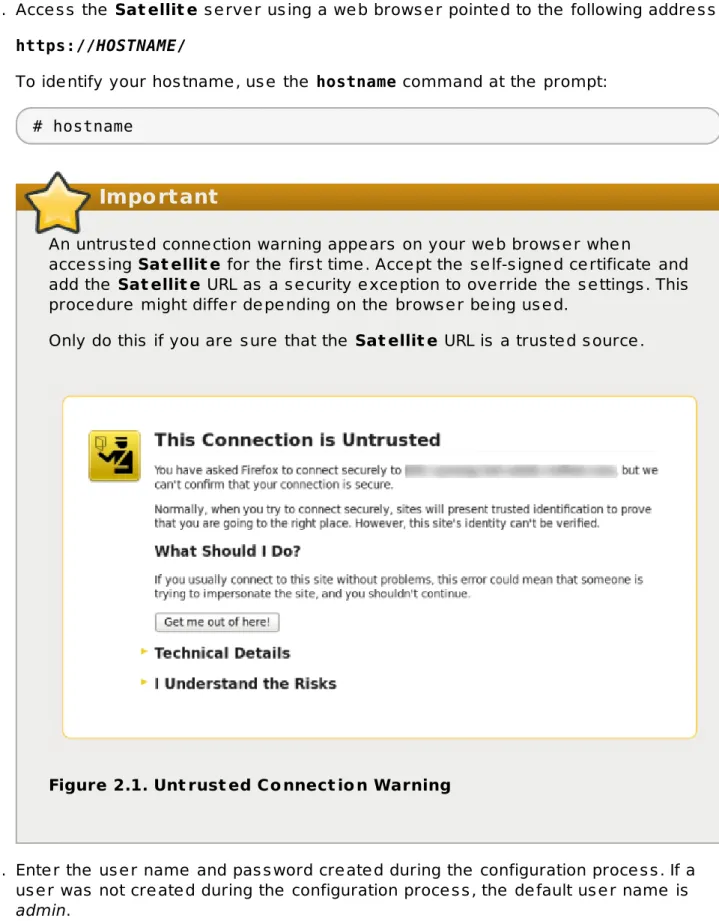
1. Acce s s the Sat ellit e s e rve r us ing a we b brows e r pointe d to the following addre s s : https://HOSTNAME/
To ide ntify your hos tname , us e the hostname command at the prompt: # hostname
Important
An untrus te d conne ction warning appe ars on your we b brows e r whe n
acce s s ing Sat ellit e for the firs t time . Acce pt the s e lf-s igne d ce rtificate and add the Sat ellit e URL as a s e curity e xce ption to ove rride the s e ttings . This proce dure might diffe r de pe nding on the brows e r be ing us e d.
Only do this if you are s ure that the Sat ellit e URL is a trus te d s ource .
Figure 2.1. Unt rust ed Co nnect io n Warning
2. Ente r the us e r name and pas s word cre ate d during the configuration proce s s . If a us e r was not cre ate d during the configuration proce s s , the de fault us e r name is admin.
Result
Whe n you have s ucce s s fully logge d in, you are take n to the Sat ellit e das hboard. The das hboard contains an ove rvie w of the Sat ellit e and the hos ts re gis te re d.
The main navigation tabs are as follows :
T able 2.1. Navigat io n T abs
Navigat io n T abs Descript io n
Organization@Loca tion
Clicking this tab change s the organization and location. If no organization or location is s e le cte d, the de fault organization is Any Organization and the de fault location is Any Location. Us e this tab to change to diffe re nt value s .
Monitor Provide s s ummary das hboards and re ports .
Content Provide s conte nt manage me nt tools . This include s Conte nt Vie ws , Activation Ke ys , and Life Cycle Environme nts .
Hosts Provide s hos t inve ntory and provis ioning configuration tools . Configure Provide s ge ne ral configuration tools and data including Hos t
Groups and Puppe t data.
Infrastructure Provide s tools on configuring how Sate llite 6 inte racts with the e nvironme nt.
Administer Provide s advance d configuration for s e ttings s uch as Us e rs and RBAC, as we ll as ge ne ral s e ttings .
User Name Provide s us e r adminis tration whe re us e rs can e dit the ir pe rs onal information.
Note
If you have forgotte n the adminis trative pas s word, log on to the Sat ellit e command-line inte rface to re s e t the adminis tration us e r and pas s word:
# foreman-rake permissions:reset
Reset to user: admin, password: qwJxBptxb7Gfcjj5
This will re s e t the pas s word of the de fault us e r admin to the one printe d on the command line . Change this pas s word upon logging in to pre ve nt any s e curity is s ue s from occurring.
2.2. Changing t he Password in Red Hat Sat ellit e
The s e s te ps s how how to change your pas s word.Pro cedure 2.1. Changing Passwo rd
1. Click your us e r name at the top right corne r. 2. Se le ct My Acco unt from the me nu.
3. Type in a ne w pas s word in the Password fie ld. 4. Type in the ne w pas s word again in the Verify fie ld. 5. Click the Submit button to s ave your ne w pas s word.
Chapter 3. Starting and Stopping Red Hat Satellite
Sate llite provide s the katello-service command to manage Sate llite s e rvice s from the command line . This is us e ful whe n upgrading Sate llite or whe n cre ating a backup, s e e theRe d Hat Sate llite Ins tallation Guide for de tails on the s e us e cas e s .
Afte r ins talling Sate llite with the katello-installer command, all Sate llite s e rvice s are s tarte d and e nable d automatically. Vie w the lis t of the s e s e rvice s by e xe cuting:
# katello-service list
To s e e the s tatus of running s e rvice s , e xe cute : # katello-service status
To s top all Sate llite s e rvice s , e xe cute : # katello-service stop
To s tart all Sate llite s e rvice s , e xe cute : # katello-service start
To re s tart all Sate llite s e rvice s , e xe cute : # katello-service restart
Chapter 4. Configuring Organizations, Locations and
Life Cycle Environments
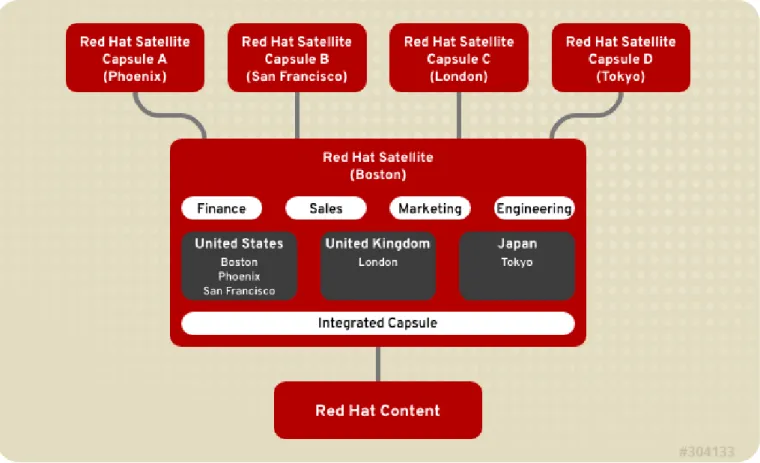
Re d Hat Sate llite 6 take s a cons olidate d approach to Organization and Location
manage me nt. Sys te m adminis trators de fine multiple Organizations and multiple Locations in a s ingle Sate llite s e rve r. For e xample , a company might have thre e Organizations
(Finance , Marke ting, and Sale s ) acros s thre e countrie s (Unite d State s , Unite d Kingdom, and Japan). In this e xample , the Sate llite s e rve r manage s all Organizations acros s all
ge ographical Locations , cre ating nine dis tinct conte xts for managing s ys te ms . In addition, us e rs can de fine s pe cific locations and ne s t the m to cre ate a hie rarchy. For e xample , Sate llite adminis trators might divide the Unite d State s into s pe cific citie s , s uch as Bos ton, Phoe nix, or San Francis co.
Figure 4.1. Example T o po lo gy f o r Red Hat Sat ellit e 6
The main Sate llite s e rve r re tains the manage me nt function, while the conte nt and configuration is s ynchronize d be twe e n the main Sate llite s e rve r and a Sate llite Caps ule as s igne d to ce rtain locations .
4.1. Organizat ions
Organizations divide hos ts into logical groups bas e d on owne rs hip, purpos e , conte nt, s e curity le ve l, or othe r divis ions .
Multiple organizations can be vie we d, cre ate d, and manage d within the we b inte rface . Software and hos t e ntitle me nts can be allocate d acros s many organizations , and acce s s to thos e organizations controlle d.
Each organization mus t be cre ate d and us e d by a s ingle Re d Hat cus tome r account,
howe ve r e ach account can manage multiple organizations . Subs cription manife s ts can only be importe d into a s ingle organization and Sate llite will not upload a ce rtificate that has alre ady be e n uploade d into a diffe re nt organization.
By de fault, Red Hat Sat ellit e will have one organization alre ady cre ate d, calle d "De fault Organization", which can be modifie d to s uit your own ins tallation, or de le te d. The
organization name has a corre s ponding labe l Default_Organization.
Important
If a ne w us e r is not as s igne d a de fault organization the ir acce s s will be limite d. To grant s ys te ms rights to us e rs , as s ign the m to a de fault organization and have the m log out and log back in again.
4.1.1. Creat ing an Organizat ion
The s e s te ps s how how to cre ate a ne w organization.
Pro cedure 4.1. T o Creat e an Organizat io n:
1. Navigate to Administ er → Organizat io ns. 2. Click New Organization.
3. Ins e rt the name of the ne w organization in the Name fie ld. 4. Ins e rt the labe l of the ne w organization in the Label fie ld.
5. Ins e rt a de s cription of the ne w organization in the Description fie ld. 6. Click Submit.
7. Se le ct the hos ts to as s ign to the ne w organization.
Click Assign All to as s ign all hos ts with no organization to the ne w organization. Click Manually Assign to manually s e le ct and as s ign the hos ts with no
organization.
Click Proceed to Edit to s kip as s igning hos ts .
8. Spe cify the configuration de tails of the organization s uch as Caps ule s , s ubne ts or compute re s ource s . You can modify the s e s e ttings late r as de s cribe d in
Se ction 4.1.3, “Editing an Organization”. 9. Click Submit.
4.1.2. Creat ing an Organizat ion Debug Cert ificat e
The s e s te ps s how how to ge ne rate and download a de bug ce rtificate for an organization. De bug ce rtificate s unlock all conte nt from an organization and are re quire d for e xporting provis ioning te mplate s .
1. Navigate to Administ er → Organizat io ns.
2. Se le ct an organization for which you want to ge ne rate a de bug ce rtificate . 3. Click Generate and Download. This ge ne rate s a de bug ce rtificate . Save the
ce rtificate file in a s e cure location.
Note
De bug Ce rtificate s are automatically ge ne rate d for provis ioning te mplate downloads if the y do not alre ady e xis t in the organization for which the y are be ing downloade d.
4.1.3. Edit ing an Organizat ion
Pro cedure 4.3. T o Edit an Organizat io n:
1. Navigate to Administ er → Organizat io ns. 2. Click the name of the organization to be e dite d. 3. Se le ct the re s ource to e dit from the lis t on the le ft.
4. Click the name of the de s ire d ite ms to add the m to the Selected Items lis t. 5. Click Submit.
Note
Us e rs with adminis trator privile ge s are not lis te d unde r the Users tab whe n e diting an organization.
4.1.4. Removing an Organizat ion
Pro cedure 4.4. T o Remo ve an Organizat io n:
1. Navigate to Administ er → Organizat io ns.
2. Se le ct Delet e from the drop-down me nu to the right of the name of the organization you want to re move .
3. An ale rt box appe ars : Delete Organization?
4. Click OK to de le te the organization.
4.2. Locat ions
Locations divide organizations into logical groups bas e d on ge ographical location. Each location is cre ate d and us e d by a s ingle Re d Hat cus tome r account, although e ach account can manage multiple locations and organizations .
The Re d Hat Sate llite ins tallation proce s s cre ate s one location, calle d Default Location, which you can modify to s uit your own ne e ds . If a ne w us e r is not as s igne d a de fault location the ir acce s s will be limite d. To grant s ys te m rights to us e rs , as s ign a de fault location and have the m log out and log in again.
Important
You cannot de le te the de fault location, but you can re name it to s uit your ne e ds . Sate llite re turns an e rror me s s age if you try to de le te the de fault location us ing e ithe r the we b UI or the command line .
4.2.1. Creat ing a Locat ion
The s e s te ps s how how to cre ate a location.
Pro cedure 4.5. T o Creat e a Lo cat io n:
1. Navigate to Administ er → Lo cat io ns. 2. Click New Location.
3. Ins e rt the name of the ne w location in the Name fie ld. If you want to cre ate a ne s te d location, s e le ct a Parent location from the drop-down me nu. Optionally, s pe cify a Description of the location. Click Submit.
4. Se le ct the hos ts to as s ign to the ne w location.
Click Assign All to as s ign all hos ts with no location to the ne w location.
Click Manually Assign to manually s e le ct and as s ign the hos ts with no location. Click Proceed to Edit to s kip as s igning hos ts .
5. Spe cify the configuration de tails of the location s uch as Caps ule s , s ubne ts or compute re s ource s . You can modify the s e s e ttings late r as de s cribe d in
Se ction 4.2.2, “Editing a Location”. 6. Click Submit.
4.2.2. Edit ing a Locat ion
Pro cedure 4.6. T o Edit a Lo cat io n:
1. Navigate to Administ er → Lo cat io ns. 2. Click the name of the location to be e dite d.
3. Se le ct the re s ource to e dit from the lis t on the le ft.
4. Click the name of the de s ire d ite ms to add the m to the Selected Items lis t. 5. Click Submit.
The s e s te ps s how how to re move an e xis ting location.
Pro cedure 4.7. T o Remo ve a Lo cat io n:
1. Navigate to Administ er → Lo cat io ns.
2. Se le ct Delet e from the drop-down me nu to the right of the name of the location you want to re move .
An ale rt box appe ars : Delete Location? 3. Click OK.
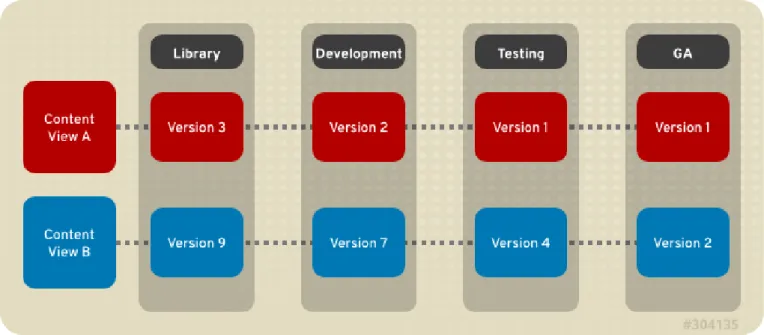
4.3. Life Cycle Environment s
Application life cycle s are divide d into life cycle environments, which re pre s e nt e ach s tage of the application life cycle . Life cycle e nvironme nts are linke d to form an environment path. You can promote conte nt along the e nvironme nt path to the ne xt life cycle
e nvironme nt whe n re quire d. For e xample , if de ve lopme nt e nds on a particular ve rs ion of an application, you can promote this ve rs ion to the te s ting e nvironme nt and s tart
de ve lopme nt on the ne xt ve rs ion.
Figure 4.2. An Enviro nment Pat h Co nt aining Fo ur Enviro nment s
4.3.1. Creat ing Life Cycle Environment s
This proce dure de s cribe s how to cre ate a life cycle e nvironme nt in Re d Hat Sate llite .
Pro cedure 4.8. T o Creat e a Lif e Cycle Enviro nment :
1. Se le ct an organization from the me nu in the top le ft hand corne r.
2. Click Co nt ent → Lif e Cycle Enviro nment s and the n click New Environment Path.
3. Ins e rt a name and a labe l (automatically fills in the Name fie ld input) for the life cycle e nvironme nt. The Description fie ld is optional.
4. Click Save to cre ate the e nvironme nt.
4.3.2. Promot ing Cont ent Views
Afte r you have cre ate d a conte nt vie w and an e nvironme nt path cons is ting of two or more life cycle e nvironme nts , you can promote the conte nt vie w from one e nvironme nt to the ne xt as re quire d. This me ans that the mos t re ce nt ve rs ion of the conte nt vie w that e xis ts in a s pe cifie d e nvironme nt will be promote d, or copie d, to the ne xt e nvironme nt in the life cycle e nvironme nt path.
You can promote a conte nt vie w to any e nvironme nt whe re that ve rs ion doe s not e xis t. The s ys te m automatically s ugge s ts the ne xt e nvironme nt in the life cycle e nvironme nt path, but you can ove rride this and promote to a diffe re nt e nvironme nt if re quire d.
Pro cedure 4.9. T o Pro mo t e a Co nt ent View:
1. On the main me nu, click Co nt ent → Co nt ent Views.
2. In the Name column, click the name of the conte nt vie w that you want to promote . 3. On the Versions tab, ide ntify the late s t ve rs ion, and click Promote.
4. Ide ntify the promotion path whe re you want to promote the conte nt vie w, s e le ct the appropriate life cycle e nvironme nt, and click Promote Version.
5. Afte r the promotion has comple te d, the Versions tab update s to dis play the ne w s tatus of your conte nt vie ws .
4.3.3. Removing Life Cycle Environment s
This proce dure de s cribe s how to re move a life cycle e nvironme nt from Re d Hat Sate llite .
Pro cedure 4.10 . T o Remo ve a Lif e Cycle Enviro nment :
1. On the main me nu, click Co nt ent → Lif e Cycle Enviro nment s.
2. Click the name of the life cycle e nvironme nt that you want to re move , and the n click Remove Environment.
3. In the confirmation dialog box, click Remove to re move the e nvironme nt.
Note
You can only de le te the late s t e nvironme nt in an e nvironme nt path. For e xample , if thre e e nvironme nts e xis t in the orde r Library, Dev, and Prod, you ne e d to de le te Prod be fore you can de le te Dev. You cannot de le te the Library e nvironme nt.
4.4. Viewing Import Hist ory
Pro cedure 4.11. Viewing Impo rt Hist o ry
1. Click Co nt ent → Red Hat Subscript io ns. 2. Click the Manage Manifest button.
Chapter 5. Using the Red Hat Satellite Content
Dashboard
The Re d Hat Sate llite conte nt das hboard provide s a s tatus ove rvie w of the s ubs criptions and hos ts curre ntly re gis te re d, an ove rvie w of promotions and s ynchronization, and a lis t of the late s t notifications .
Navigate to Mo nit o r → Co nt ent Dashbo ard to acce s s the conte nt das hboard. The das hboard can be re arrange d by clicking on a s e ction title and dragging the s e ction to a diffe re nt pos ition. The following s e ctions are available :
Co nt ent Ho st Subscript io n St at us
An ove rvie w of the s ubs criptions curre ntly cons ume d by the hos ts re gis te re d to Sate llite . A s ubs cription is a purchas e d ce rtificate that unlocks acce s s to s oftware , upgrade s , and s e curity fixe s for hos ts . The following table s hows the pos s ible s tate s of s ubs criptions .
T able 5.1. Ho st Subscript io n St at es
St at e Descript io n Ico n
Invalid Subscriptions
Hos ts that have products ins talle d, but have not cons ume d a s ubs cription. The s e hos ts ne e d atte ntion imme diate ly.
Insufficient Subscriptions
Hos ts that have cons ume d a s ubs cription and have a valid e ntitle me nt, but that are not cons uming the ir full e ntitle me nts . The s e hos ts s hould be monitore d to e ns ure the y are
configure d as e xpe cte d. Current
Subscriptions
Hos ts that have a valid e ntitle me nt and are cons uming the ir full e ntitle me nts .
Click the s ubs cription type to vie w conte nt hos ts as s ociate d with s ubs criptions of the s e le cte d type .
Lat est No t if icat io ns
A lis t of me s s age s produce d by hos ts including adminis tration information, product and s ubs cription change s , and any e rrors . Click the ge ar button to change the numbe r of notifications dis playe d.
Monitor this s e ction for global notifications s e nt to all us e rs and to de te ct any unus ual activity or e rrors .
Sync Overview
An ove rvie w of all products or re pos itorie s e nable d in Sate llite and the ir
Synchronization s tatus . All products that are in the que ue for s ynchronization, are uns ynchronize d or have be e n pre vious ly s ynchronize d are lis te d in this s e ction. Click a product name to vie w the s ynchronization s tatus . Click the ge ar button to change the numbe r of notifications dis playe d.
A lis t of all hos t colle ctions in Sate llite and the ir s tatus , including the numbe r of conte nt hos ts in e ach hos t colle ction. Click a hos t colle ction name to vie w that hos t colle ction. Click the ge ar button to change the numbe r of notifications dis playe d.
Current Subscript io n T o t als
An ove rvie w of the curre nt s ubs cription totals that s hows the numbe r of active s ubs criptions , the numbe r of s ubs criptions that e xpire in the ne xt 120 days , and the numbe r of s ubs criptions that have re ce ntly e xpire d. Click the numbe r to lis t s ubs criptions of the s e le cte d type .
Co nt ent Views Overview
A lis t of all Conte nt Vie ws in Sate llite and the ir publis h s tatus . Click the ge ar button to change the numbe r of notifications dis playe d.
Errat a Overview
A lis t of all e rrata available for hos ts re gis te re d to Sate llite . Click the ge ar button to change the numbe r of notifications dis playe d.
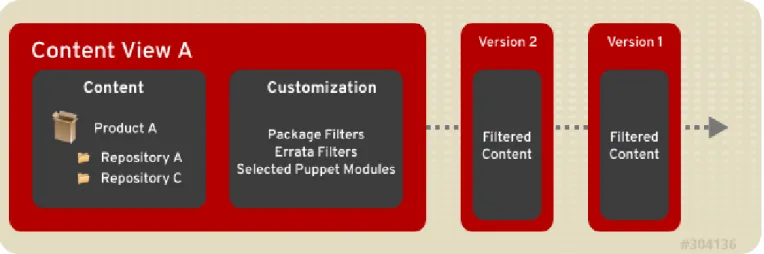
Chapter 6. Using Content Views
Conte nt vie ws are manage d s e le ctions of conte nt, which contain one or more re pos itorie s (yum, puppe t, or containe rs ) with optional filte ring. The s e filte rs can be e ithe r inclus ive or e xclus ive , and tailor a s ys te m vie w of conte nt for life cycle manage me nt. The y are us e d to cus tomize conte nt to be made available to clie nt s ys te ms .
Figure 6.1. T his diagram det ails t he creat io n o f new versio ns o f a Co nt ent View. T hese co nt ent view versio ns are pro mo t ed alo ng an enviro nment pat h during t he applicat io n lif e cycle.
Publis he d conte nt vie ws are us e d with life cycle e nvironme nts .
6.1. Creat ing a Cont ent View
A us e r with adminis trator privile ge s can cre ate conte nt vie ws for us e within the life cycle e nvironme nts .
Pro cedure 6.1. T o Creat e a Co nt ent View:
1. Log in as a Sate llite adminis trator. 2. Click Co nt ent → Co nt ent Views. 3. Click Creat e New View.
4. Spe cify the Name of the conte nt vie w. The Label fie ld is automatically populate d whe n the Name fie ld is fille d out. Optionally, provide a de s cription of the conte nt vie w.
5. Se le ct the Composite View che ck box to combine a s e rie s of publis he d conte nt vie ws into one and choos e which conte nt vie w.
Note
If you s e le ct Composite View it will ove rride any filte ring and allow you to choos e a group of publis he d conte nt vie ws and bundle thos e vie ws into a compos ite one .
6. Click Save.
6.2. Adding Reposit ories t o t he Cont ent View
A re pos itory provide s s torage for conte nt. For e xample , a YUM re pos itory, Puppe t re pos itory, or a Docke r re pos itory.
Pro cedure 6.2. T o Asso ciat e a Repo sit o ry wit h a Co nt ent View:
1. Click Co nt ent → Co nt ent Views and choos e the Conte nt Vie w to add re pos itorie s to.
2. De pe nding on the type of conte nt you want to s tore :
Click Yum Content and s e le ct Repo sit o ries from the drop-down me nu. From the s ubme nu, click Add.
Click Puppet Modules and click Add New Module. Click Docker Content and click Add in the s ubme nu. 3. Se le ct the re pos itorie s to add and click Add Repositories.
6.3. Filt ering Cont ent
Filters provide a me chanis m to pre ve nt package s from be ing promote d to s ubs e que nt e nvironme nts . You can us e package name s or re gular e xpre s s ions in the filte r to cre ate the rule s to blacklis t package s . The n you can as s ociate the filte r to e ntire products or individual re pos itorie s within any product.
6.3.1. Creat ing a Filt er
The following proce dure s hows how to cre ate a filte r for package s .
Pro cedure 6.3. T o Creat e a Filt er:
1. Navigate to Co nt ent → Co nt ent Views and s e le ct the Conte nt Vie w you want to filte r.
2. Click Yum Co nt ent → Filt ers and click New Filter.
3. Spe cify the name of the ne w filte r in the Name fie ld and choos e a conte nt type from the Content Type drop-down me nu. Choos e whe the r the filte r include s or e xclude s the s e le cte d conte nt type by s e le cting the Type drop-down me nu. Optionally, ins e rt a de s cription in the Description fie ld.
4. Click Save to s ave your ne w filte r.
6.3.2. Adding Cont ent t o a Filt er
The following proce dure s hows how to add conte nt to a package filte r.
1. Navigate to Co nt ent → Co nt ent Views and s e le ct the Conte nt Vie w you want to filte r.
2. Click Yum Co nt ent → Filt ers and click the name of the filte r you want to e dit. De pe nding on the type of filte r s e le cte d, pe rform the following actions :
a. If the filte r is made for package s , s pe cify a package name on the Packages s ubtab, and s e le ct a Det ail value from the drop-down me nu. Click Add to add the package to the filte r.
b. If the filte r is made for package groups , click the Add s ubtab, and choos e the de s ire d package group. Click Add Package Group.
c. If the filte r is made for e rrata, click the Add s ubtab. Se le ct the e rrata type (Security, Enhancement, or Bugfix), and s pe cify a s tart date and e nd date . Click Add Errata.
d. If the filte r is made for e rrata - date and type , on the Erratum Date Range s ubtab, s e le ct the e rrata type (Security, Enhancement, or Bugfix) and s pe cify a s tart date and e nd date . Click Save.
3. On the Affected Repositories s ubtab, choos e whe the r the filte r will affe ct all or a s ubs e t of re pos itorie s . If you choos e a s ubs e t of re pos itorie s , s e le ct the de s ire d re pos itorie s and click Update Repositories.
4. Click Publish New Version. Ins e rt a comme nt if de s ire d, the n click Save.
6.3.3. Removing Cont ent from a Filt er
The following proce dure s hows how to re move conte nt from a package filte r.
Pro cedure 6.5. T o Remo ve Co nt ent f ro m a Filt er:
1. Navigate to Co nt ent → Co nt ent Views and s e le ct the Conte nt Vie w you want to filte r.
2. Click Yum Co nt ent → Filt ers and click the name of the filte r you want to e dit. De pe nding on the type of filte r s e le cte d, pe rform the following actions :
a. If the filte r is made for package s , click the Packages s ubtab and s e le ct the Package Name che ck box ne xt to the package to be re move d. Click Remove Packages to re move the package from the filte r.
b. If the filte r is made for package groups , click the List/Remove s ubtab and s e le ct the Name che ck box ne xt to the package group to be re move d. Click Remove Package Group to re move the package group from the filte r. c. If the filte r is made for e rrata, click the List/Remove s ubtab s e le ct the
Errata ID che ck box ne xt to the e rrata to be re move d. Click Remove Errata to re move the e rrata from the filte r.
d. If the filte r is made for e rrata - date and type , on the Erratum Date Range s ubtab, che ck the e rrata type (Security, Enhancement, or Bugfix). Spe cify the s tart date and e nd date . Click Save.
3. On the Affected Repositories s ubtab, choos e whe the r the filte r will affe ct all or a s ubs e t of re pos itorie s . If you choos e a s ubs e t of re pos itorie s , s e le ct the de s ire d re pos itorie s and click Update Repositories.
4. Click Publish New Version. Ins e rt a comme nt if de s ire d, and click Save.
6.3.4. Removing a Filt er
The following proce dure s hows how to re move a filte r.
Pro cedure 6.6. T o Remo ve a Filt er:
1. Navigate to Co nt ent → Co nt ent Views and s e le ct the Conte nt Vie w you want to filte r.
2. Click Yum Co nt ent → Filt ers and s e le ct the che ck box ne xt to the name of the package filte r you want to re move .
3. Click Remove Filters.
6.4. Publishing a Cont ent View
Afte r a conte nt vie w has be e n cre ate d, it ne e ds to be publis he d in orde r for it to be vis ible and us able by hos ts . Be fore publis hing the conte nt vie w de finition, make s ure that the conte nt vie w de finition has the ne ce s s ary products , re pos itorie s and filte rs .
Pro cedure 6.7. T o Publish a Co nt ent View Def init io n:
1. Click Co nt ent → Co nt ent Views.
2. Click on the conte nt vie w to be publis he d. 3. Click Publish New Version.
4. Fill in a comme nt. 5. Click Save.
Chapter 7. Searching for Content
7.1. Basic Cont ent Search
Conte nt Se arch allows us e rs to look for s pe cific information about conte nt vie ws , products , re pos itorie s , or e rrata.
Pro cedure 7.1. T o Perf o rm a Co nt ent Search:
1. Click Co nt ent → Co nt ent Search.
2. Se le ct e ithe r Co nt ent Views, Pro duct s, Repo sit o ries, Packages, Errat a, or
Puppet Mo dules from the Content drop-down me nu.
3. Ente r the name of the conte nt vie w, product, re pos itory, package , e rrata, or puppe t module you are s e arching for in the Pro duct s fie ld, and click Search.
7.2. Cont ent Comparison across Environment s
You can compare conte nt acros s diffe re nt e nvironme nts us ing the content search fe ature .
Pro cedure 7.2. T o Search f o r and Co mpare Co nt ent Acro ss Dif f erent Enviro nment s:
1. Click Co nt ent → Co nt ent Search.
2. Se le ct the e ntity type that you want to compare from the Co nt ent drop-down me nu.
3. Ente r the name of the e ntity in the Pro duct s fie ld and click Add.
4. On the right pane l, move your curs or ove r the "plus " (+) icon, s e le ct the e nvironme nts you want to compare , and click Search.
5. Se le ct e ithe r Unio n, Int ersect io n, or Dif f erence from the View drop-down me nu to filte r your re s ults .
Chapter 8. Viewing and Applying Errata
Software package s in Re d Hat products are s ubje ct to update s , re fe rre d to as errata, that are re le as e d at re gular inte rvals as we ll as as ynchronous ly. Re d Hat Sate llite provide s tools to ins pe ct and filte r e rrata, allowing for pre cis e update manage me nt. This way, you can s e le ct re le vant update s and propagate the m through conte nt vie ws to s e le cte d
conte nt hos ts . Se e Chapte r 6, Using Content Views for more information on conte nt vie ws .
Important
Ins tall the katello-agent package on the Sate llite s e rve r as de s cribe d in
Se ction 14.3.2, “Ins talling the Kate llo Age nt”. This package provide s the ne ce s s ary s e rvice s for e rrata manage me nt.
Be fore applying the late s t update s , make s ure you have corre ctly s ynchronize d the Sate llite conte nt. For more information on s ynchronizing conte nt for conne cte d or dis conne cte d Sate llite s e e the Populating Re d Hat Sate llite with Conte nt" s e ction in the
Re d Hat Sate llite Ins tallation guide. Navigate to Mo nit o r → Co nt ent Dashbo ard to s e e the ove rvie w of e rrata s ynchronization.
Errata contain advis orie s that de s cribe the change s introduce d by the update . The re are thre e type s of advis orie s (in orde r of importance ):
Securit y Adviso ry de s cribe s fixe d s e curity is s ue s found in the package . The s e curity
impact of the is s ue can be Low, Moderate, Important, or Critical.
Bug Fix Adviso ry de s cribe s bug fixe s for the package .
Pro duct Enhancement Adviso ry de s cribe s e nhance me nts and ne w fe ature s adde d
to the package .
Note
Errata are labe le d according to the mos t important advis ory type the y contain. The re fore , e rrata labe le d as Product Enhancement Advisory can contain only
e nhance me nt update s , while Bug Fix Advisory e rrata can contain both bug fixe s and e nhance me nts , and Security Advisory can contain all thre e type s .
In Re d Hat Sate llite , the re are two ke ywords that de s cribe an e rratum's re lations hip to the available conte nt hos ts :
Applicable: e rratum applie s to one or more conte nt hos ts , which me ans it update s
package s pre s e nt on the conte nt hos t. Applicable e rrata are not ye t acce s s ible by the conte nt hos t.
Inst allable: e rratum applie s to one or more conte nt hos ts and it has be e n made
available to the conte nt hos t. Ins tallable e rrata are pre s e nt in the conte nt hos t’s life cycle e nvironme nt and conte nt vie w, but are not ye t ins talle d. This way, e rrata can be ins talle d by us e rs who have pe rmis s ions to manage conte nt hos ts , but are not e ntitle d for e rrata manage me nt at highe r le ve ls .
The following proce dure de s cribe s how to vie w and filte r the available e rrata and how to dis play me tadata of the s e le cte d advis ory.
Pro cedure 8.1. T o Inspect Available Errat a:
1. Navigate to Co nt ent → Errat a to vie w the lis t of available e rrata.
2. Us e the filte ring tools at the top of the page to limit the numbe r of dis playe d e rrata: Se le ct the re pos itory to be ins pe cte d from the drop-down lis t. All
Repositories is s e le cte d by de fault.
The Applicable che ck box is s e le cte d by de fault to vie w only e rrata applicable to the s e le cte d re pos itory. Se le ct the Installable che ck box to vie w only e rrata marke d as ins tallable .
To s e arch the table of e rrata, type the que ry in the Search fie ld in the form of: parameter operator value
Se e Table 8.1, “Parame te rs Available for Errata Se arch” for the lis t of parame te rs available for s e arch. Find the lis t of applicable ope rators in
Table 17.2, “Supporte d Ope rators for Granular Se arch”. Automatic s ugge s tion works as you type . You can als o combine que rie s with the us e of and and or ope rators . For e xample , to dis play only s e curity advis orie s re late d to the kernel package , type :
type = security and package_name = kernel Pre s s Enter to s tart the s e arch.
3. Click the Errata ID of the e rratum you want to ins pe ct:
The Details tab contains the de s cription of the update d package as we ll as docume ntation of important fixe s and e nhance me nts provide d by the update . On the Content Hosts tab, you can apply the e rratum to s e le cte d conte nt hos ts as de s cribe d in Se ction 8.2, “Applying Errata to Conte nt Hos ts ”.
The Repositories tab lis ts re pos itorie s that alre ady contain the e rratum. You can filte r re pos itorie s by the e nvironme nt and conte nt vie w, and s e arch for the m by the re pos itory name .
T able 8.1. Paramet ers Available f o r Errat a Search
Paramet er Descript io n Example
bug Se arch by the Bugzilla numbe r. bug = BZ#1172165
cve Se arch by the CVE numbe r. cve = CVE-2015-0235
id Se arch by the e rrata ID. The auto-s ugge s t s ys te m dis plays a lis t of available IDs as you type .
id = RHBA-2014:2004
is s ue d Se arch by the is s ue date . You can s pe cify the e xact date , like "Feb16,2015", or us e ke ywords , for e xample "Yesterday", or "1 hour ago". The time range can be s pe cifie d with the us e of the "<" and ">" ope rators .
issued < "Jan 12,2015"
package Se arch by the full package build name . The auto-s ugge s t s ys te m dis plays a lis t of available package s as you type .
package = glib2-2.22.5-6.el6.i686 package _nam
e
Se arch by the package name . The auto-s ugge s t s ys te m dis plays a lis t of available package s as you type .
package_name = glib2
s e ve rity Se arch by the s e ve rity of the is s ue fixe d by the s e curity update . Spe cify Critical, Important, or Moderate.
severity = Critical
title Se arch by the advis ory title . title ~ openssl
type Se arch by the advis ory type . Spe cify security, bugfix, or enhancement.
type = bugfix update d Se arch by the date of the las t update . You can
us e the s ame formats as with the issued parame te r.
updated = "6 days ago"
Paramet er Descript io n Example
8.2. Applying Errat a t o Cont ent Host s
The following proce dure s s how how to apply one or more e rrata to conte nt hos ts .
Pro cedure 8.2. T o Apply a Single Errat um t o Co nt ent Ho st s:
1. Navigate to Co nt ent → Errat a to vie w the lis t of available e rrata. 2. Click the Errata ID of the e rratum you want to apply.
3. On the Content Hosts tab, s e le ct one or more conte nt hos ts to be update d. You can filte r the available conte nt hos ts by the e nvironme nt, and s e arch for the m by name . If you s e le ct the che ck box at the top of the page , only the conte nt hos ts that alre ady have the ins tallable e rratum in the ir life cycle e nvironme nt are dis playe d. 4. Click Apply to Hosts.
If the e rratum is applicable, a ne w minor ve rs ion of the conte nt vie w is cre ate d. If you s e le ct Apply Errata to Content Hosts Immediately after
publishing, Sate llite will automatically ins tall the e rratum on the conte nt hos t whe n promoting the update d conte nt vie w. Othe rwis e , the e rratum will be made available for ins tallation on the conte nt hos t. Ins tallable e rrata can be applie d late r us ing the s ame proce dure , or manually pe r conte nt hos t as de s cribe d in
Proce dure 8.4, “To Apply Ins tallable Errata to a Conte nt Hos t:”.
If the e rratum is installable, which me ans it is alre ady pre s e nt in the s e le cte d conte nt hos t's life cycle e nvironme nt but is not ins talle d ye t, no ne w conte nt vie w ve rs ion is cre ate d.
5. Click Confirm.
Pro cedure 8.3. T o Apply Mult iple Errat a t o Co nt ent Ho st s:
1. Navigate to Co nt ent → Errat a to vie w the lis t of available e rrata.
2. Se le ct e rrata you want to apply by s e le cting the che ck box to the le ft of the Errata ID fie ld.
4. Se le ct one or more conte nt hos ts to be update d. You can filte r the available conte nt hos ts by the e nvironme nt, and s e arch for the m by name . If you s e le ct the che ck box at the top of the page , only conte nt hos ts that alre ady have the ins tallable e rrata in the ir life cycle e nvironme nt are dis playe d.
5. Click Next. If s ome of the s e le cte d e rrata are applicable, a ne w minor ve rs ion of the conte nt vie w is cre ate d. If you s e le ct Apply Errata to Content Hosts Immediately after publishing, Sate llite will automatically ins tall e rrata on the conte nt hos t whe n promoting the update d conte nt vie w. If only ins tallable e rrata are s e le cte d, the y are ins talle d without cre ating a ne w conte nt vie w ve rs ion.
If the conte nt hos t's life cycle e nvironme nt contains ins tallable e rrata, you can ins tall the m from the Content Hosts page as de s cribe d in Proce dure 8.4, “To Apply Ins tallable Errata to a Conte nt Hos t:” This way, e rrata can be applie d by us e rs who have pe rmis s ions to manage conte nt hos ts , but are not e ntitle d for e rrata manage me nt at highe r le ve ls . Similarly, you can apply ins tallable e rrata to hos t colle ctions as de s cribe d in
Se ction 16.3.2, “Adding Errata to a Hos t Colle ction”.
Pro cedure 8.4. T o Apply Inst allable Errat a t o a Co nt ent Ho st :
1. Navigate to Ho st s → Co nt ent Ho st s.
2. Click the name of the conte nt hos t you want to manage . 3. On the Errata tab, s e le ct e rrata you want to ins tall. 4. Click Apply Selected to ins tall the s e le cte d update s .
8.3. Subscribing t o Errat a Not ificat ions
You can configure e mail notifications for Sate llite us e rs as de s cribe d in Se ction 17.1.4, “Configuring Email Notifications ”. Us e rs can re ce ive a s ummary of applicable and ins tallable e rrata, notifications on conte nt vie w promotion or afte r s ynchronizing a re pos itory.
Chapter 9. Security Compliance Management with
OpenSCAP
The Se curity Conte nt Automation Protocol (SCAP) e nable s the de finition of configuration and s e curity policie s , als o the me ans of auditing for compliance with thos e policie s . In Sate llite 6, SCAP is imple me nte d with the tools provide d by the Ope nSCAP proje ct. For more information about Ope nSCAP s e e the Re d Hat Ente rpris e Linux 7 Se curity Guide. Ope nSCAP provide s the me ans of conducting compliance auditing acros s your manage d e nvironme nt. Configuration and s e curity policie s are e xpre s s e d in a SCAP-compliant format and hos ts are che cke d for compliance . The Sate llite we b UI provide s the me ans of compliance auditing and tools to analys e non-compliance . Sche dule d auditing agains t policie s e ns ure s that non-compliant hos ts are ide ntifie d, e ve n if the y we re pre vious ly compliant.
The following s pe cifications are s upporte d by Ope nSCAP:
XCCDF: The Exte ns ible Configuration Che cklis t De s cription Format (ve rs ion 1.2) OVAL: Ope n Vulne rability and As s e s s me nt Language (ve rs ion 5.11)
As s e t Ide ntification (ve rs ion 1.1)
ARF: As s e t Re porting Format (ve rs ion 1.1)
CCE: Common Configuration Enume ration (ve rs ion 5.0) CPE: Common Platform Enume ration (ve rs ion 2.3) CVE: Common Vulne rabilitie s and Expos ure s
CVSS: Common Vulne rability Scoring Sys te m (ve rs ion 2.0)
9.1. Inst allat ion
The high-le ve l ins tallation s te ps for Ope nSCAP are :
Ins tall the Ope nSCAP package s on the Sate llite s e rve r.
Ins tall the Ope nSCAP package s on all Sate llite Caps ule s e rve rs .
Import the Puppe t clas s e s and as s ociate the m with s pe cific e nvironme nts .
Note
If Ope nSCAP functionality is to be e nable d on a Sate llite Caps ule s e rve r, Puppe t mus t alre ady have be e n e nable d on that s e rve r.
Pro cedure 9.1. Inst all OpenSCAP
1. On the Sate llite s e rve r, ins tall the ruby193-rubygem-foreman_openscap RPM package .
On Re d Hat Ente rpris e Linux 7 # systemctl restart httpd On Re d Hat Ente rpris e Linux 6
# service httpd restart
This action adds to the Sate llite we b UI a Compliance s e ction, unde r the Ho st s me nu, containing the following page s :
Po licies
SCAP Co nt ent s Repo rt s
3. On the Sate llite s e rve r and all Sate llite Caps ule s e rve rs , ins tall the puppet-foreman_scap_client and rubygem-smart_proxy_openscap RPM package s .
The puppet-foreman_scap_client package provide s the Puppe t clas s e s re quire d to s e t up hos ts to pe rform s cans via Ope nSCAP and cre ate s the Cron job for
pe riodic s canning as s pe cifie d by the applicable policy.
4. On the Sate llite s e rve r and all Sate llite Caps ule s e rve rs , re s tart the foreman-proxy s e rvice .
Red Hat Ent erprise Linux 7
# systemctl restart foreman-proxy
Red Hat Ent erprise Linux 6
# service foreman-proxy restart
5. In the Sate llite we b UI, s e le ct Co nf igure → Puppet classes → Impo rt f ro m SATELLITE_HOST. Se le ct the line with the ne w module and click Update to load the module .
9.2. SCAP Concept s
9.2.1. SCAP Cont ent
SCAP conte nt is a datas tre am format containing the configuration and s e curity bas e line agains t which hos ts are che cke d. Che cklis ts are de s cribe d in the extensible checklist configuration description format (XCCDF) and vulne rabilitie s in the open vulnerability and assessment language (OVAL). Che cklis t ite ms , als o known as rules e xpre s s the de s ire d
configuration of a s ys te m ite m. For e xample , you may s pe cify that no-one can login to a hos t ove r SSH us ing the root us e r account. Rule s can be groupe d into one or more
profile s , allowing multiple profile s to s hare a rule . SCAP conte nt cons is ts of both rule s and profile s .
You can e ithe r cre ate SCAP conte nt or obtain it from a ve ndor. A numbe r of s upporte d profile s are provide d for Re d Hat Ente rpris e Linux in the scap-security-guide package . The cre ation of SCAP conte nt is outs ide the s cope of this guide , but s e e the Re d Hat
Ente rpris e Linux 7 Se curity Guide or Re d Hat Ente rpris e Linux 6 Se curity Guide for
information on how to download, de ploy, tailor, and de fine your own conte nt us ing the SCAP Workbe nch. The SCAP conte nt provide d with Re d Hat Ente rpris e Linux is compliant with SCAP s pe cification 1.2.
If you ins tall the Ope nSCAP compone nts of Sate llite 6 on Re d Hat Ente rpris e Linux 6, de fault SCAP conte nt will be ins talle d for Re d Hat Ente rpris e Linux 6. If you ins tall the Ope nSCAP compone nts of Sate llite 6 on Re d Hat Ente rpris e Linux 7, de fault SCAP conte nt will be ins talle d for both Re d Hat Ente rpris e Linux 6 and Re d Hat Ente rpris e Linux 7.
9.2.2. XCCDF Profile
An XCCDF profile is a che cklis t agains t which a hos t or hos t group is e valuate d. Profile s are ge ne rally cre ate d to ve rify compliance with a s tandard, whe the r that be an indus try s tandard or a cus tom s tandard.
To lis t all available profile s , ope n the Sate llite we b UI, navigate to Ho st s → Po licies, s e le ct Edit from the drop-down lis t ne xt to the policy of inte re s t and s e le ct the SCAP Content tab. Se le ct the SCAP Content of inte re s t and brows e the available profile s in the XCCDF Profile drop-down lis t.
The profile s provide d with Sate llite 6 are obtaine d from the SCAP Se curity Guide proje ct, which is hos te d at https ://fe dorahos te d.org/s cap-s e curity-guide.
9.2.3. Compliance Policy
A compliance policy is the application of s pe cific SCAP conte nt and XCCDF profile to one or more hos t groups , on a s e t s che dule . The s che dule on which a s can is run is s pe cifie d by the Sate llite s e rve r but the s can its e lf occurs on the hos t. Whe n the s can is comple te , an Asset Reporting File (ARF) is output in XML format and uploade d to the Sate llite s e rve r. You can s e e the re s ults of the s can in the compliance policy das hboard.
The Ope nSCAP conte nt include s s e ve ral profile s and the ir as s ociate d rule s but no policie s are include d by de fault. For de tails on how to cre ate a policy, s e e Se ction 9.2.5, “Cre ating a Policy”.
9.2.4. Element s of a Compliance Policy
A compliance policy s pe cifie s the following:SCAP Conte nt (including the XCCDF profile )
Sche dule at which the policy will be run on the targe t hos t(s ) Locations , organizations and hos t groups to which it applie s
The SCAP Content tab provide s the option of s e le cting the SCAP conte nt and XCCDF profile for this policy. Once you have s e le cte d the s e , the SCAP Content tab provide s the name of the SCAP conte nt file which will be dis tribute d to the dire ctory
/var/lib/openscap/content/ on all targe t hos ts .
Figure 9.1. Element s o f a Co mpliance Po licy
9.2.5. Creat ing a Policy
Follow the s e s te ps to cre ate a compliance policy, which s pe cifie s the SCAP conte nt and profile to be applie d to a location and e ithe r a hos t or hos t group at a s pe cifie d time .
Pro cedure 9.2. T o Creat e a Po licy:
1. In the Sate llite we b UI, navigate to Ho st s → Po licies, click New Compliance Policy and follow the wizard’s s te ps .
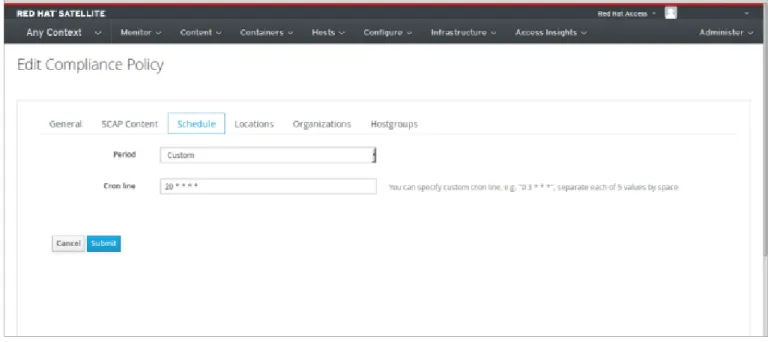
2. Ente r a name for this policy, a de s cription (optional), the n click Next. 3. Se le ct the SCAP Conte nt and XCCDF Profile to be applie d, the n click Next. 4. Spe cify the s che dule d time whe n the policy is to be applie d, the n click Next.
Se le ct Weekly, Mo nt hly or Cust o m from the Period drop-down lis t. If you s e le ct Weekly, als o s e le ct the de s ire d day of the we e k from the
Weekday drop-down lis t.
If you s e le ct Mo nt hly, als o s pe cify the de s ire d day of the month in the Day of month fie ld.
If you s e le ct Cust o m, e nte r a valid Cron e xpre s s ion in the Cron line fie ld. The Cust o m option allows for gre ate r fle xibility in the policy's s che dule than e ithe r the Weekly or Mo nt hly options .
5. Se le ct the location(s ) to which the policy is to be applie d, the n click Next. 6. Se le ct the organizations to which the policy is to be applie d, the n click Next.
7. Se le ct the hos t group(s ) to which the policy is to be applie d, the n click Next. 8. Click Submit.
Whe n the Puppe t age nt runs on the hos ts which be long to the s e le cte d hos t group, or hos ts to which the policy has be e n applie d, the Ope nSCAP clie nt will be ins talle d and a Cron job adde d with the policy's s pe cifie d s che dule .
Figure 9.2. Creat ing a Co mpliance Po licy
9.2.6. Viewing a Policy
Follow the s e s te ps to pre vie w the rule s which will be applie d by s pe cific Ope nSCAP conte nt and profile combination. This is us e ful whe n planning policie s .
1. In the Sate llite we b UI, navigate to Ho st s → Po licies. 2. Click Sho w Guide.
9.2.7. Edit ing a Policy
Follow the s e s te ps to e dit an e xis ting policy.
1. In the Sate llite we b UI, navigate to Ho st s → Po licies.
2. From the drop-down lis t to the right of the policy's name , s e le ct Edit . 3. Edit the ne ce s s ary attribute s .
4. Click Submit.
An e dite d policy is applie d to the hos t whe n its Puppe t age nt ne xt che cks with the Sate llite s e rve r for update s . By de fault this occurs e ve ry 30 minute s .
9.2.8. Delet ing a Policy
1. In the Sate llite we b UI, navigate to Ho st s → Po licies.
2. From the drop-down lis t to the right of the policy's name , s e le ct Delet e. 3. Click OK in the confirmation me s s age .
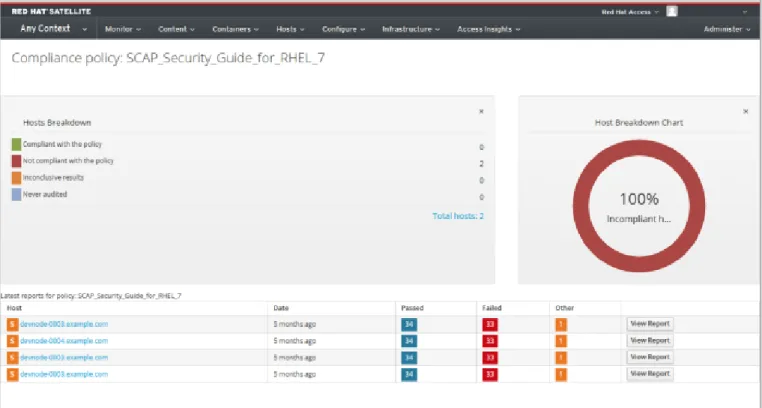
9.2.9. Compliance Policy Dashboard
The compliance policy das hboard provide s an ove rvie w of hos ts ' compliance with a policy. To vie w a compliance policy's das hboard, ope n the Sate llite we b UI and navigate to Ho st s → Po licies, the n click the policy's name . The das hboard provide s the following information:
A ring chart illus trating a high-le ve l vie w of hos ts ' compliance with the policy. A s tatis tical bre akdown of hos ts ' compliance with the policy, in tabular format. Links to the policy's late s t re ports .
Figure 9.3. Co mpliance Po licy Dashbo ard
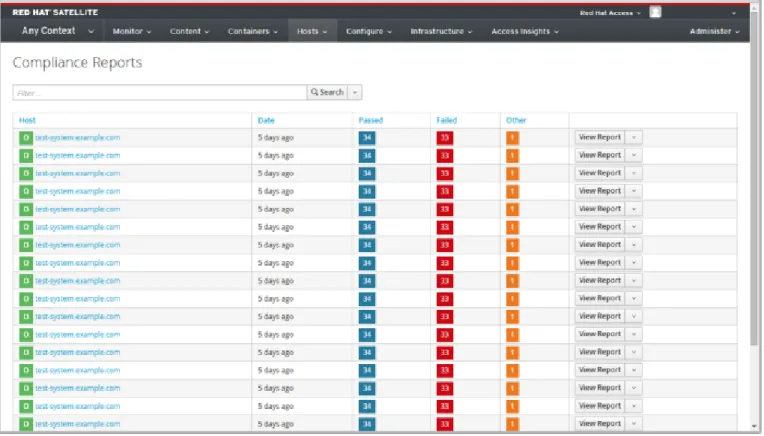
9.3. Compliance Report s Overview
A Compliance re port is the output of a policy run agains t a hos t. From the Compliance Reports page you can vie w individual re ports or filte r the lis t of available re ports . All re ports are lis te d in de s ce nding date orde r. For e ach re port the total numbe r of rule s pas s e d or faile d pe r policy are lis te d. Click on e ach column's labe l to s ort the lis t by that column, in e ithe r de s ce nding or as ce nding orde r.
All Compliance re ports are available in the Sate llite we b UI via Ho st s → Repo rt s. To de le te a compliance re port, s e le ct Delet e from the drop-down lis t be s ide View Report.
Figure 9.4. Co mpliance Repo rt s Overview
9.3.1. Searching Compliance Report s
To narrow the lis t of compliance re ports , e nte r s e arch crite ria in the Search fie ld and e ithe r pre s s Ente r or click Search. The s e arch pe rforme d is cas e -ins e ns itive . Click on the e mpty Search fie ld to s e e a lis t of available s e arch parame te rs .
Se e Table 17.2, “Supporte d Ope rators for Granular Se arch” for de tails of all available s e arch ope rators . You can cre ate comple x que rie s with the logical ope rators : and, not and has.
Lo gical Operat o rs
not: Ne gate s an e xpre s s ion.
has: Obje ct mus t have a s pe cifie d prope rty. and: Combine s s e arch crite ria.
The following s e arch crite ria finds all compliance re ports for which more than five rule s faile d.
failed > 5
Re gular e xpre s s ions are not valid s e arch crite ria, howe ve r multiple fie lds can be
s e arche d. For e xample , the following que ry s e arche s for Ope nSCAP re ports ge ne rate d by the compliance _policy rhel7_audit from an hour ago.
"1 hour ago" && compliance_policy = date = "1 hour ago" && compliance_policy = rhel7_audit
To again lis t all available compliance re ports , de le te the Search crite ria and pre s s Ente r or click Search.
Bo o kmarking Yo ur Searches
You can bookmark a s e arch, allowing you to e as ily apply the s ame s e arch crite ria. To cre ate a bookmark:
Pro cedure 9.3. T o Bo o kmark a Search
1. Apply your s e arch crite ria.
2. From the Search lis t s e le ct Bookmark this search. 3. Comple te the Name fie ld.
If you want the bookmark available to othe r us e rs of this Sate llite ins tance , s e le ct the Public che ck box.
4. Click Submit.
To us e a bookmark, navigate to Ho st s → Repo rt s, click the drop-down ite m be s ide the Search button and click the bookmark.
9.3.2. Viewing a Compliance Report
Navigate to Ho st s → Repo rt s and click View Report in the row of the s pe cific hos t. A compliance re port cons is ts of the following s e ctions :
Introduction
Evaluation Characte ris tics Compliance and Scoring Rule Ove rvie w
9.3.2.1. Evaluation Characteristics
This s e ction provide s de tails about an e valuation agains t a s pe cific profile , including the hos t that was e valuate d, the profile us e d in the e valuation, and whe n the e valuation
s tarte d and finis he d. For re fe re nce , the IPv4, IPv6 and MAC addre s s e s of the hos t are als o lis te d.
Evaluat io n Charact erist ics
Target machine
The fully-qualifie d domain name (FQDN) of the e valuate d hos t. Example : test-system.example.com.
Benchmark URL
The URL of the SCAP conte nt agains t which the hos t was e valuate d. Example : /var/lib/openscap/content/1fbdc87d24db51ca184419a2b6f.
Benchmark ID
The ide ntifie r of the be nchmark agains t which the hos t was e valuate d. A be nchmark is a s e t of profile s . Example :
xccdf_org.ssgproject.content_benchmark_RHEL_7. Profile ID
The ide ntifie r of the profile agains t which the hos t was e valuate d. Example : xccdf_org.ssgproject_content_profile_rht-ccp.
Started at
The date and time at which the e valuation s tarte d, in ISO 8601 format. Example : 2015-09-12T14:40:02.
Finished at
The date and time at which the e valuation finis he d, in ISO 8601 format. Example : 2015-09-12T14:40:05.
Performed by
The local account name unde r which the e valuation was pe rforme d on the hos t. Example : root.
Figure 9.5. Evaluat io n Charact erist ics
9.3.2.2. Compliance and Scoring
This s e ction provide s an ove rvie w of whe the r or not the hos t is in compliance with the profile ’s rule s , a bre akdown of compliance failure s by s e ve rity, and an ove rall compliance s core as a pe rce ntage . If compliance with a rule was not che cke d, this is cate gorize d in the Rule results as Other.
Figure 9.6. Co mpliance and Sco ring
9.3.2.3. Rule Overview
This s e ction provide s de tails of e ve ry rule and the compliance re s ult, with the rule s pre s e nte d in a hie rarchical layout.
Se le ct or cle ar the che ck boxe s to narrow the lis t of rule s include d in the compliance re port. For e xample , if the focus of your re vie w is any non-compliance , cle ar the pass and informational che ck boxe s .
To s e arch all rule s , e nte r a crite rion in the Search fie ld. The s e arch is dynamically applie d as you type . Only a s ingle , plain te xt crite rion is acce pte d and applie d as a cas e
-ins e ns itive s e arch. As a re s ult of the s e arch, only thos e rule s whos e de s criptions match the s e arch crite rion will be lis te d. The Search fie ld acce pts a s ingle plain-te xt s e arch te rm. To re move the s e arch filte r, de le te the s e arch crite rion.
For an e xplanation of e ach re s ult, hove r the curs or ove r the s tatus s hown in the Result column.
Figure 9.7. Rule Overview
9.3.2.4. Examining Rule Results
To de te rmine why a hos t faile d compliance on a rule , click on the rule 's title . The window which the n ope ns provide s furthe r de tails , including: a de s cription of the rule (optionally ins tructions for bringing the hos t into compliance ), the rationale for the rule , and optionally a re me diation s cript.