Installing the Dark GDK with Visual Studio 2008
The Dark GDK installer assumes that you are using Microsoft Visual C++ 2008 Express Edition. If
you plan to use the Dark GDK with Visual Studio, you will need to follow the instructions in this
document.
• Install Visual Studio.
• Run Visual Studio. If asked to choose your default development environment settings,
choose Visual C++ Development Settings.
• Close Visual Studio.
Note that the Dark GDK requires this specific version of the DirectX SDK. If you have installed a later version, you should uninstall it before installing this version.
• Begin the installation by clicking this link:
http://download.microsoft.com/download/3/3/f/33f1af6e‐c61b‐4f14‐a0de‐ 3e9096ed4b3a/dxsdk_aug2007.exe
• When you click on the link shown above, a File Download dialog box will appear. Click
Run to download and run this part of the installation. (The file that is downloaded in this
step is large, and might take some time to install.)
• Once the file has downloaded, the WinZip dialog box shown in Figure 1 will appear.
Make sure the "Overwrite files without prompting" and "When done unzipping open:
Setup.exe" boxes are checked, and then click the Unzip button.
• The program will begin unzipping files to your system, and then you will see a dialog box
indicating that the files were unzipped successfully. Click OK to dismiss the dialog box.
STEP
1:
Install
and
Run
Visual
Studio
STEP
2:
Install
the
August
2007
version
Figure 1: WinZip dialog box
• You may experience a momentary pause at this point, while the setup program for the
August 2007 DirectX 9.0 SDK loads. When the setup program begins, you will see the
screen shown in Figure 2. Click the Next button to continue with the setup. Once you've
accepted the license agreement on the next screen, simply click the Next button to
accept the default options on each of the screens that you see. The installation will take
a few minutes. When it is finished you will see a screen with the message "InstallShield
Wizard Completed."
Note: During setup you will see a message warning that the pre‐release version of XAudio2 has expired. You may ignore this warning.
Figure 2: DirectX SDK setup
• Begin the installation by clicking this link: http://go.microsoft.com/?linkid=7708310
• When the Dark GDK setup program executes, you will see the screen shown in Figure 3.
Click the Next button to continue with the setup. Once you've accepted the license
agreement on the next screen, simply click the Next button to accept the default
options on each of the screens that you see. The installation will take a few minutes.
When it is finished you will see a screen with the message "Installation Complete."
Figure 3: Dark GDK setup
• Despite the message displayed on the previous screen, the installation isn't complete
yet. You still need to run the executable file that was just installed. In your Documents
folder (or My Documents if you are running XP) you should have a folder named MSDN,
and in that folder you should have a folder named The Game Creators Dark GDK. (In
fact, you may see the contents of this folder displayed on the screen at this time.) In this
folder you will have an executable file named something like Dark GDK ‐ 161107.exe.
Run that file.
Note: You may see a message warning you that the Microsoft Visual C++ compiler was not detected. You may ignore that warning because it refers to the Express Edition compiler. When asked if you want to install the compiler before proceeding, click No.
• Next you will be asked if you have run the Visual C++ compiler at least once. Click Yes,
and then on the subsequent screens simply click Next to accept the default options. (On
one screen you will be asked to click Yes to accept the licensing agreement.) When the
installation is complete, you will finally see a message indicating that the Dark GDK has
been installed on your computer. Click the Finish button.
• Go to the following folder:
C:\Program Files\Microsoft Visual Studio 9.0\VC\vcprojects Inside that folder, create a folder named Dark GDK
• Copy all of the files from this folder:
C:\Program Files\The Game Creators\Dark GDK\Wizards\Files
to the folder you just created.
Go to the Dark GDK folder that you created in Step 4, at this location:
C:\Program Files\Microsoft Visual Studio 9.0\VC\vcprojects\Dark GDK
Inside that folder you should see some .vsz files. Use Notepad (or any other plain text editor) to
edit the files as follows:
• In the 2D Game.vsz file, find the line that begins Param = "ABSOLUTE_PATH…"
Change that line to read:
Param="ABSOLUTE_PATH = C:\Program Files\The Game Creators\Dark
GDK\Wizards\Projects\Dark GDK ‐ 2D Game\Dark GDK ‐ 2D Game"
STEP
4:
Copy
the
Dark
GDK
Project
Templates
• In the 3D Game.vsz file, find the line that begins Param = "ABSOLUTE_PATH…"
Change that line to read:
Param="ABSOLUTE_PATH = C:\Program Files\The Game Creators\Dark
GDK\Wizards\Projects\Dark GDK ‐ 3D Game\Dark GDK ‐ 3D Game"
• In the Game.vsz file, find the line that begins Param = "ABSOLUTE_PATH…"
Change that line to read:
Param="ABSOLUTE_PATH = C:\Program Files\The Game Creators\Dark
GDK\Wizards\Projects\Dark GDK ‐ Game\Dark GDK ‐ Game"
• Run Visual Studio. On the menu bar select Tools, and then select Options. The Options
Dialog box shown in Figure 4 will appear. As shown in the figure, in the left‐hand pane
under Projects and Solutions select VC++ Directories.
Figure 4: Options Dialog Box
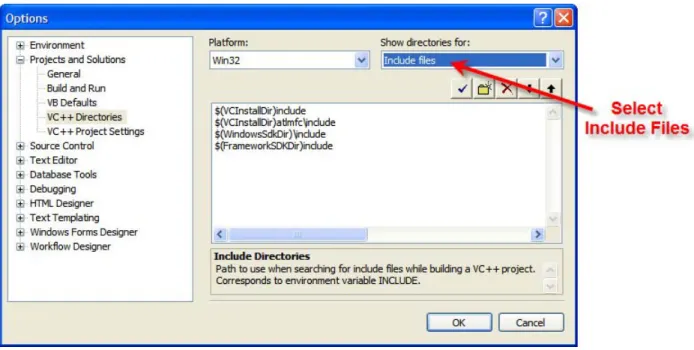
• In the top right‐hand area of the dialog box, under Show directories for, select Include
Files from the drop‐down list. This is shown in Figure 5.
Figure 5: Select Include Files
• Double‐click the area at the bottom of the list of include directories, and then click the button as shown in Figure 6.
Figure 6: Editing the List of Include Directories
• You should now see a Select Directory dialog box. Navigate to and select the following
directory, then click the OK button:
C:\Program Files\The Game Creators\Dark GDK\Include
• The screen should now appear as shown in Figure 7, with the directory that you just
selected shown in the list.
Figure 7: Dark GDK Include Directory Added to the List
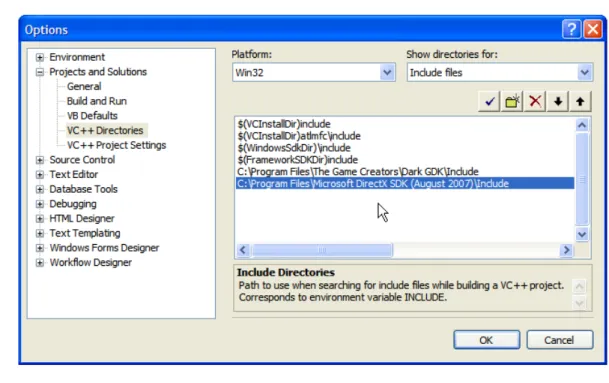
• Now you will add the Include directory for the DirectX 9.0c August 2007 SDK to the list.
Repeat the steps that you just completed to select the following directory:
C:\Program Files\Microsoft DirectX SDK (August 2007)\Include
• The screen should now appear as shown in Figure 8, with the directory that you just
selected shown in the list.
Figure 8: DirectX SDK (August 2007) Include Directory Added to the List
• In the top right‐hand area of the dialog box, under Show directories for, select Library
Files from the drop‐down list. This is shown in Figure 9.
Figure 9: Select Library Files
• Double‐click the area at the bottom of the list of library directories, and then click the button. The Select Directory dialog box will appear. Use this dialog box to select
the following directory and add it to the list:
C:\Program Files\The Game Creators\Dark GDK\Lib\vs9
• Repeat the same procedure to add the following directory to the list:
C:\Program Files\Microsoft DirectX SDK (August 2007)\Lib\x86
• The screen should now appear as shown in Figure 10, with the two directories that you
just selected shown in the list. Click the OK button and you're done!
Figure 10: Dark GDK and DirectX SDK Library Directories Added to the List