Musculoskeletal ultrasound: technical guidelines
Edited by The Ultrasound Subcommittee of the European Society of Musculoskeletal Radiology (ESSR)
Preface
Ultrasound is the most rapidly developing technique in musculoskeletal imaging. Continuing technological advances have broadened its application, such that it may now replace MR imaging in many specific clinical settings. The main drawbacks of musculoskeletal ultrasound remain a strong operator dependence and the lack of standardized scanning protocols. To overcome this limitation, the European Society of Musculoskeletal Radiology (ESSR) has issued technical standards for ultrasound examination of joints, including the shoulder, the elbow, the wrist, the hip, the knee and the ankle. These guidelines have been obtained by consensus of a large number of experts throughout Europe and reflect what the ESSR considers essential scanning protocols for a complete high-quality ultrasound examination in each joint. Musculoskeletal radiologists who perform ultrasound are expected to follow these guidelines while recognizing that variations will be required in some cases, depending on patients’ needs and available equipment. We believe these standards will improve education and practise among radiologists and establish the use of ultrasound as a diagnostic modality of the musculoskeletal system. Such guidelines are not intended, however, to establish a legal standard of care.
Carlo Martinoli, MD
Chairman of the Ultrasound Subcommittee of the
European Society of Musculoskeletal Radiology for the years 2005-2007 Associate Professor of Radiology
Cattedra di Radiologia – DISC Università di Genova,
Genova, Italy Insights Imaging
DOI 10.1007/s13244-010-0032-9
Authors’ List
Ian Beggs, FRCR
Department of Radiology Royal Infirmary,
Edinburgh, UK
Stefano Bianchi, MD PD Fondation des Grangettes, Geneva, Switzerland
Angel Bueno, MD
Department of Imaging Diagnosis
Fundación Hospital Alcorcon, Madrid, Spain
Michel Cohen, MD Medical Imaging Centre, Marseilles, France
Michel Court-Payen, MD Department of Radiology Køge Hospital,
Copenhagen, Denmark
Andrew Grainger, MRCP FRCR Department of Radiology Leeds General Infirmary, Leeds, UK
Franz Kainberger, MD Department of Diagnostic Radiology
Medical University of Vienna, Vienna, Austria
Andrea Klauser, MD
Department of Radiology II Medical University Innsbruck, Innsbruck, Austria
Carlo Martinoli, MD
Cattedra di Radiologia “R” – DICMI
Università di Genova, Genova, Italy
Eugene McNally, FRCR FRCPI Nuffield Orthopaedic Centre and John Radcliffe Hospitals, Oxford UK
Philip J. O’Connor, MRCP FRCR Department of Radiology Leeds General Infirmary, Leeds, UK
Philippe Peetrons, MD Department of Radiology Hopitaux Iris Sud
(Moliere-Longchamp) Bruxelles, Belgium
Monique Reijnierse, MD Sint Maartenskliniek Nijmegen, The Netherlands
Philipp Remplik, MD
Radiologie München Zentrum München, Germany
Enzo Silvestri, MD
Cattedra di Radiologia “B” – DIMES
Università di Genova, Genova, Italy
Shoulder
LegendSubS subscapularis tendon; SupraS supraspinatus tendon; arrow long head of the biceps tendon; LT lesser tuberosity; GT greater tuberosity; SH short head of the biceps; LH long head of the biceps; H humeral shaft; arrowheads
pectoralis major tendon
1.
Although the patient’s positioning for shoulder US varies widely across different countries and institutions, reflecting multifaceted opinions and the experience of different examiners, we strongly recommend examining the patient while seated on a revolving stool. This position allows the examiner to reach the anterior, lateral and posterior aspects of the shoulder with the probe by simply asking the patient to rotate on the chair.
Shift the probe up to examine the biceps in its intra-articular course and down to reach the myotendinous junction (level of the pectoralis major tendon).
2.
Long head of the biceps tendon
3.
Subscapularis tendon
Rotate the arm externally, fixing the elbow on the iliac crest to show the subscapularis tendon and its insertion on the lesser tuberosity (slight supination of the hand may be helpful to neutralize the tendency to lift and abduct the elbow from the lateral chest wall).
This tendon should be evaluated along its long (transverse planes) and short (sagittal planes) axis during passive external and internal rotation with hanging arm. Sweep the transducer up and down over the subscapularis until its full width is demonstrated.
LegendArrow long head of the biceps tendon; dashed line insertion of the subscapularis tendon; Co coracoid; Del deltoid muscle; LT lesser tuberosity; SubS subscapularis tendon; void arrowheads tendon fascicles of the subscapularis; white arrowheads muscle tissue interposed between tendon fascicles
4.
Anteromedial structures and coracoacromial ligament
Moving the probe towards medial on transverse planes, look at the coracoid process, the coraco-acromial ligament (the medial margin of the transducer is on the coracoid process and the lateral edge is shifted upwards and laterally towards the acromion), the conjoined tendon and the anterior aspect of the subacromial subdeltoid bursa. Then check the subscapularis recess and the subcoracoid bursa for effusion. External and internal rotation may also be used to demonstrate anteromedial impingement (distance between coracoid process and lesser tuberosity measured in internal rotation).
Legend Acr acromion; arrows short head of the biceps; arrowheads coracoacromial ligament; Co coracoid; CoBr
coracobrachialis; HH humeral head; SubS subscapularis tendon; SupraS supraspinatus
5.
Supraspinatus tendon: positioning (1)
6.
Supraspinatus tendon
Refer to the intra-articular portion of the biceps as a landmark to obtain proper transducer orientation for imaging the supraspinatus. In fact, these tendons run parallel each other and the intra-articular portion of the biceps is easily recognized owing to due to a more clearly defined fibrillar pattern. One should rotate the transducer until the biceps is depicted as more elongated than is possible in the US image. Then the probe is shifted upwards and posteriorly over the supraspinatus without changing its orientation. The resulting image is in axis with the supraspinatus. Between the supraspinatus and the deltoid, the normal subacromial-subdeltoid bursa appears as a thin hypoechoic band.
Tilt the transducer gently in the area overlying the tendon insertion to avoid anisotropy. Remember to examine the lateral pouch of the subacromial subdeltoid bursa along the lateral edge of the greater tuberosity. When looking for the supraspinatus on short axis, the normal cuff must have almost the same thickness extending 2 cm backwards from the biceps tendon landmark: from this point backwards the tendon seen is the infraspinatus.
LegendAcr acromion; asterisk myotendinous junction; Del deltoid muscle; GT greater tuberosity; void arrowhead articular cartilage; curved arrow hypoechoic artifact related to anisotropy; straight arrow long head of the biceps tendon; SupraS
supraspinatus tendon; white arrowheads subacromial subdeltoid bursa; Sub subscapularis tendon
7.
Supraspinatus tendon: positioning (2)
Place the dorsum of the hand over the opposite back pocket (forced internal rotation, stress manoeuver). There should not be any gap between the elbow and the lateral chest wall. Using this position, the supraspinatus becomes a more anterior structure and the transducer should be orientated almost vertically to be in axis with it. Consider that the tendon fibres are more stretched than in the position described under paragraph 5 (above). This may be a possible cause of overestimation of tear size. Owing to an excessive internal rotation it may be difficult to visualize the long head of the biceps tendon in this position.
Legend Neutral and internal rotation
8.
Subacromial impingement test
Dynamic assessment of subacromial (antero-superior) impingement can be attempted by placing the probe in the coronal plane with its medial margin at the lateral margin of the acromion. The patient abducts his/her arm while in internal rotation. With this manoeuver, the supraspinatus and the bursa can be seen passing deep to the coracoacromial arch.
LegendAcr acromion; GT greater tuberosity;
9.
Infraspinatus and teres minor tendons
Place the transducer over the posterior aspect of the glenohumeral joint with the arm in the same position described under paragraph 2 (above) (or with the hand on the opposite shoulder) and increase the depth to include the structures of the posterior fossa within the field-of-view of the US image. Use the spine of the scapula as the landmark to distinguish the supraspinous fossa (transducer shifted up) from the infraspinous fossa (transducer shifted down) on sagittal planes.
Look at the infraspinatus and teres minor muscles as individual structures filling the infraspinous fossa deep to the deltoid (x-plane). After examining these muscles, sweep the transducer towards the greater tuberosity on sagittal planes. The two tendons can be perceived as individual structures arising from the respective muscles (y-plane).
Legendaa supraspinatus; arrow spine of the scapula; b infraspinatus; c teres minor; dashed line spine of the scapula; 1 supraspinous fossa; 2 infraspinous fossa; white arrowheads
deltoid; black arrowheads trapezius
b Asterisk spine of the scapula; dashed lines boundaries of the infraspinatus and teres minor; Del deltoid muscle; GT greater tuberosity; InfraS infraspinatus muscle; Tm teres minor muscle; void arrow teres minor tendon; white arrows infraspinatus tendon
x-plane
y-plane
10
. Posterior structures and posterior glenohumeral joint recess
Examine these tendons separately on their long axis (transverse planes) during external and internal rotation of the arm (same position as under paragraph 2, above) by placing the probe over the posterior aspect of the glenohumeral joint.
LegendAsterisk spinoglenoid notch; curved arrow bony glenoid; HH humeral head; InfraS infraspinatus; void arrows
teres minor tendon; white arrows infraspinatus tendon; white arrowheads posterior labrum
LegendAcr acromion; arrowheads superior acromioclavicular ligament; asterisk acromioclavicular joint; Cl clavicle
11
. Acromioclavicular joint
Place the transducer in the coronal plane over the shoulder to examine the acromioclavicular joint. Sweep the transducer anteriorly and posteriorly over this joint to assess the presence of an os acromiale. Shifting the probe posterior to the acromioclavicular joint, it is possible to assess the status of the supraspinatus muscle.
Elbow
Note
The systematic ultrasound technique described below is only theoretical, considering the fact that the examination of the elbow is, for the most, focused on one quadrant only of the joint, based on clinical findings.
1.
ANTERIOR ELBOW
For examination of the anterior elbow, the patient is seated facing the examiner with the elbow in an extension position over the table. The patient is asked to extend the elbow and supinate the forearm. A slight bending of the patient’s body towards the examined side makes full supination and assessment of the anterior compartment easier. Full elbow extension can be obtained by placing a pillow under the joint.
Transverse US images are first obtained by sweeping the probe from approximately 5 cm above to 5 cm below the trochlea-ulna joint, perpendicular to the humeral shaft. Cranial US images of the supracondylar region reveal the superficial biceps and the deep brachialis muscles. Alongside and medial to these muscles, follow the brachial artery and the median nerve: the nerve lies medially to the artery.
Legenda Brachial artery; arrow median nerve; arrowheads distal biceps tendon; asterisks articular cartilage of the humeral trochlea;
Br brachialis muscle; Pr pronator muscle
2.
Distal biceps tendon: technique
The distal biceps tendon is best examined on its long axis. Careful scanning technique is need to examine the distal portion of the biceps using short-axis planes because changes in probe orientation may produce dramatic variation in tendon echogenicity and create confusion between the tendon and the adjacent artery.
LegendArrows distal biceps tendon; asterisk coronoid fossa and anterior fat pad; Br brachialis muscle; HC humeral capitellum; RH radial head; s supinator muscle
Follow the short brachialis tendon on long-axis planes down to its insertion on the coronoid process.
3.
Anterior joint recess
LegendArrow brachialis tendon; arrowheads anterior coronoid recess;
asterisks articular cartilage of distal humeral epiphysis; Br brachialis muscle; curved arrow anterior fat pad; HC humeral capitellum; HTr
humeral trochlea
b
With anterior sagittal planes, check the coronoid fossa which appears as a concavity of the anterior surface of the humerus filled with the anterior fat pad. In normal states, a small amount of fluid may be seen between the fat pad and the humerus. On transverse images, the anterior distal humeral epiphysis appears as a wavy hyperechoic line covered by a thin layer of hypoechoic articular cartilage: its lateral third corresponds to the humeral capitellum (round), whereas its medial two-thirds relate to the humeral trochlea (V-shaped). On sagittal planes, the radial head exhibits a square appearance: its articular facet is covered by cartilage.
4.
Radial and posterior interosseous nerves
Moving to the anterolateral elbow, follow the main trunk of the radial nerve in its short axis between the brachioradialis and the brachialis muscle down to its bifurcation into the superficial sensory branch and the posterior interosseous nerve. Continue to follow these latter nerves by the careful examination along their short axis. The posterior interosseous nerve must be demonstrated using short-axis planes as it pierces the supinator muscle and enters the arcade of Frohse passing between the superficial and deep parts of this muscle. Evaluation of the posterior interosseous nerve is made easier by sweeping the probe over the supinator in a transverse plane while performing forearm pronation and supination.
LegendArrow posterior interosseous nerve; arrowhead cutaneous sensory branch of the radial nerve; Br brachialis muscle; BrRad brachioradialis muscle; curved arrow main trunk of the radial nerve; RH radial head; RN radial neck; s1 superficial head of the supinator muscle; s2 deep head
of the supinator muscle
5.
LATERAL ELBOW: common extensor tendon origin
The lateral aspect of the elbow is examined with both elbows in extension, thumbs up, palms of hands together or with the elbow in flexion. The common extensor tendon is visualized on its long axis using coronal planes with the cranial edge of the probe placed on the lateral epicondyle.
Short-axis planes should also be
obtained over the tendon insertion. Under normal conditions, the lateral ulnar collateral ligament cannot be separated from the overlying extensor tendon, owing to a similar fibrillar echotexture.
LegendArrowhead lateral ulnar collateral ligament; curved arrow lateral synovial fringe; LE lateral epicondyle; RH radial head; straight arrows common extensor tendon
6.
Radiocapitellar joint
Check the lateral synovial fringe that fills the superficial portion of the lateral aspect of the radiocapitellar joint. Dynamic imaging during passive pronation and supination of the forearm may help to assess the status of the radial head and to rule out possible occult fractures. With this manoeuver, check the annular ligament. At the radial neck, the annular recess is visible only if distended by fluid.
LegendArrowhead posterior interosseous nerve; asterisk lateral synovial fringe; curved arrow common extensor tendon;
LE lateral epicondyle; RH radial head; straight arrow annular ligament
7.
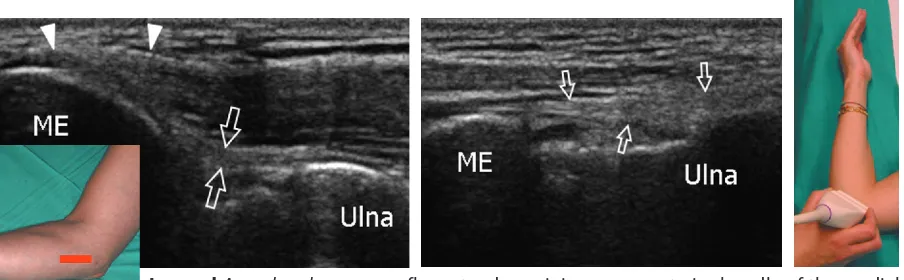
MEDIAL ELBOW: common flexor tendon and medial collateral
ligament
For examination of the medial elbow, the patient is asked to lean towards the ipsilateral side with the forearm in forceful external rotation while keeping the elbow extended or slightly flexed, resting on a table. Coronal planes with the cranial edge of the probe placed over the medial epicondyle (epitrochlea) reveal the common flexor tendon in its long axis. The tendon is shorter and larger than the common extensor tendon. Deep to this tendon, check the anterior bundle of the medial collateral ligament.
More adequate positioning for examination of this ligament is obtained with the patient supine keeping the shoulder abducted and externally rotated and the elbow in 90° of flexion. Dynamic imaging in valgus stress (demonstration of joint space widening) may be useful in partial tears, in which the ligament is continuous but lax.
LegendArrowheads common flexor tendon origin; arrows anterior bundle of the medial collateral ligament; ME medial epicondyle
8.
POSTERIOR ELBOW: triceps tendon
The posterior elbow may be examined by keeping the joint flexed 90° with the palm resting on the table. Cranial to the olecranon, the triceps muscle and tendon are evaluated by means of long-axis and short-axis images. The most distal portion of the triceps tendon needs to be carefully examined to rule out enthesitis.
Deep to the triceps, the olecranon fossa and the posterior olecranon recess are evaluated by means of long-axis and short-axis images. While examining the joint at 45° flexion, intra-articular fluid tends to move from the anterior synovial space to the olecranon recess, thus making the identification of small effusions easier. Gentle rocking motion (backward and forward) of the patient’s elbow during imaging may be helpful to shift elbow joint fluid into the olecranon recess. Care should be taken not to apply excessive pressure with the probe when evaluating the superficial olecranon bursa because small bursal effusions may be squeezed away.
9.
Cubital tunnel and ulnar nerve
For evaluation of the cubital tunnel, the patient’s elbow should be placed in forceful internal rotation with extended elbow (olecranon facing the examiner). The ulnar nerve is examined in its short axis (long-axis images are less useful) from the distal arm through the distal forearm. Care should be taken to identify nerve shape changes across the epicondylar groove (a) and the cubital tunnel (b).
LegendArrowheads posterior olecranon recess; arrows triceps tendon; asterisk posterior fat pad; TR triceps muscle
LegendArrow ulnar nerve; asterisk triceps tendon; ME medial epicondyle; O olecranon process; void arrowhead ulnar head of the flexor carpi ulnaris muscle; white arrowhead humeral head of the flexor carpi ulnaris muscle; 1 cubital tunnel retinaculum (Osborne ligament); 2 arcuate ligament; 3 flexor carpi ulnaris muscle
10
. Ulnar nerve instability
Dynamic imaging of the cubital tunnel is performed either with the patient seated and the elbow placed on a stiff pillow or, at least for the right side, with the patient supine and the arm abducted, hanging over the table. The position of the ulnar nerve and the medial head of the triceps relative to the medial epicondyle is assessed throughout elbow flexion while placing the probe in the transverse plane with one edge on the olecranon and the other on the medial epicondyle. During this manoeuver, it is important to avoid pressing the transducer too firmly on the skin as it may prevent the anterior dislocation of the nerve from the tunnel.
Legend Ulnar nerve instability. Arrow ulnar nerve; asterisk common flexor tendon; ME medial epicondyle; mht medial head of triceps muscle; O olecranon process. During flexion, the ulnar nerve snaps out of the cubital tunnel. Ulnar nerve instability is related to the absence of the Osborne retinaculum
Wrist
Note
The standard US examination of the wrist begins with evaluation of its dorsal aspect, followed by the palmar one. Depending on the specific clinical presentation, US images can be obtained in different positions of the wrist (flexion and extension, radial and ulnar deviation, pronation and supination), with the patient seated in front of the examiner.
1.
DORSAL WRIST: compartments of extensor tendons
Place the transducer on a transverse plane over the dorsal aspect of the wrist to allow proper identification of the extensor tendons. In general, one should first recognize a given tendon and then follow it on short-axis planes down to the distal insertion. Long-axis US images of the extensor tendons are less useful: they may help to evaluate the integrity of tendons and assess their dynamic motion in detail. Dynamic imaging of the extensor tendons can be performed by placing the hand on a gel tube with the fingers hanging outside its edge to allow easy finger movement.
LegendAPL abductor pollicis longus; EPB
extensor pollicis brevis; ECRL extensor carpi radialis longus; EPCB extensor carpi radialis brevis; EPL extensor pollicis longus;
EIP extensor indicis proprius; EDC exten-sor digitorum communis; EDQ extensor digiti quinti proprius; ECU extensor carpi ulnaris
2.
First compartment
Keeping the patient’s wrist halfway between pronation and supination, place the probe over the lateral aspect of the radial styloid to examine the first compartment of the extensor tendons – abductor pollicis longus (ventral) and extensor pollicis brevis (dorsal).
Check the retinaculum and note the possible occurrence of a vertical septum that splits the compartment into two distinct spaces. Follow the abductor pollicis longus distally over the scaphoid to assess possible accessory tendons.
Legend APL abductor pollicis longus;
3.
Radial artery and radial nerve
Look at the radial artery and the sensory branch of the radial nerve, the first encroaching deep, the second superficial to the first compartment. On imaging from proximal to distal, note the radial nerve and its branches snapping from ventral to dorsal over these tendons.
LegendA radial artery; APL abductor pollicis longus tendon; arrow radial nerve; asterisks tendinous slips of the abductor pollicis longus; EPB extensor pollicis brevis tendon; v, cephalic vein
4.
Second compartment
With the palm facing the examination table, shift the probe medially on transverse planes to depict the second compartment – extensor carpi radialis longus and extensor carpi radialis brevis tendons. Sweep the probe cranially over these tendons to demonstrate the abductor pollicis longus and extensor pollicis brevis muscles that encroach superficial to them at the distal forearm (intersection) to reach the first compartment.
LegendECRL extensor carpi radialis longus tendon; ECRB extensor carpi radialis brevis tendon; arrows bulk of the abductor longus and extensor pollicis brevis muscles crossing superficial to the tendons of the II compartment;
I first compartment; II second compartment
a b
a
b
5.
Third compartment
Find the Lister tubercle over the dorsal radius as the bone landmark to separate the second compartment (lateral) from the third compartment (medial).
Once detected at the medial side of the Lister tubercle, the extensor pollicis longus tendon must be followed on short-axis planes down to its insertion. Care should be taken to demonstrate this tendon as it crosses the extensor carpi radialis brevis and extensor carpi radialis longus tendons.
LegendECRB extensor carpi radialis brevis tendon; Lt Lister tubercle; EPL extensor pollicis longus tendon; IV fourth compartment of extensor tendons.
LegendArrows extensor pollicis longus tendon; ecrb extensor carpi radialis brevis tendon; ecrl
extensor carpi radialis longus tendon
6.
Fourth and fifth compartment
Place the transducer on the transverse plane over the mid dorsal wrist to examine the fourth – extensor digitorum communis and extensor indicis proprius – and fifth – extensor digiti minimi – compartments. Dynamic examination during finger flexion and extension may help to differentiate the individual tendons of the fourth compartment. Dynamic imaging is also useful to identify the extensor digiti minimi.
LegendArrowhead V compartment of extensor tendons (extensor digiti quinti minimi); arrows
IV compartment of extensor tendons (extensor digitorum communis; extensor indicis proprius);
asterisks articular cartilage of the ulnar head; EPL extensor pollicis longus; ECRB extensor carpi radialis brevis tendon; ECRL extensor carpi radialis longus tendon; Lt Lister tubercle
7.
Scapholunate ligament
Sweeping the probe distally from the level of the Lister tubercle on transverse planes, image the dorsal portion of the scapholunate ligament. US examination while in radial and ulnar deviation of the wrist may be useful to assess the integrity of this ligament.
LegendArrow dorsal part of the scapholunate ligament; asterisk dorsal capsule and extrinsic ligaments; ECRB extensor carpi radialis brevis tendon; IV fourth compartment of extensor tendons; V fifth compartment of extensor tendons
8.
Sixth compartment
Place the wrist in slight radial deviation to examine the sixth compartment – extensor carpi ulnaris. Short-axis and long-axis planes should be obtained over this tendon.
LegendArrows extensor carpi ulnaris tendon;
asterisk styloid process of the ulna
Look at the styloid process of the ulna and at the gap between the styloid and the radius filled with the triangular fibrocartilage complex: this structure can be evaluated partially by means of transverse and oblique coronal images.
9.
Distal radioulnar joint
Examine the dorsal aspect of the distal radioulnar joint by placing the probe on the transverse plane at a more proximal level than the joint line, where the capsule has a greater compliance to distension.
Legend Arrows posi-tion of the distal radioulnar joint recess;
arrowhead d i s t a l radioulnar joint line;
Uhead ulnar head;
Uneck, ulnar neck; IV
fourth compartment;
V fifth compartment
a b
a b
10
. Radiocarpal and midcarpal joints
Based on the hyperechoic profile of the carpal bones, localize the synovial recess of the radiocarpal, midcarpal and carpometacarpal joints using long-axis planes. Look for effusion or synovial thickening.
Legend Arrowhead dorsal recess of the carpometacarpal joints; asterisk IV compart-ment of the extensor tendons; black arrows
dorsal recess of the midtarsal joint; white arrows dorsal recess of the radiocarpal joint;
Rad radius; Lun lunate; Cap capitate; Met
metacarpal
11
. VENTRAL WRIST: proximal carpal tunnel
Moving to the volar aspect of the wrist, the patient keeps the dorsal wrist facing the examination table. Seek the bony landmarks of the proximal carpal tunnel – the scaphoid tubercle (radial-sided) and the pisiform (ulnar-sided) – placing the probe over the palmar crease on the axial plane. Once detected, the probe orientation should be adjusted accordingly (one edge over the scaphoid, the other over the pisiform). Tilting the probe back and forth may help to optimize depiction of the soft tissues contained within the tunnel. Check the flexor retinaculum and each of the nine long flexor tendons (four from the flexor digitorum superficialis, four from the flexor digitorum profundus and the flexor pollicis longus radially) contained within the carpal tunnel. Dynamic imaging during passive flexion and extension of the respective finger may help to assess their integrity. Check the content of the carpal tunnel to recognize possible abnormal findings, including anomalous muscles and flexor tenosynovitis.
At the radial side of the carpal tunnel, check the flexor carpi radialis tendon that overlies the hyperechoic cortex of the scaphoid tubercle.
Legenda ulnar artery; arrowheads flexor retinaculum; d flexor digitorum profundus tendons; fcr
flexor carpi radialis tendon; fpl flexor pollicis longus tendon; s flexor digitorum superficialis tendons;
12
. Distal carpal tunnel
From the position described under paragraph 11 (above), shift the probe to a more distal transverse plane to identify the two bony landmarks of the distal carpal tunnel – the trapezium tubercle (radial-sided) and the hamate hook (ulnar-(radial-sided). Owing to the oblique course of the flexor tendons and the median nerve towards depth, mild changes in probe orientation or slight flexion of the wrist should be performed to improve depiction of these structures.
With probe as described under paragraph 11 and 12 (above), sweep the transducer up and down over the median nerve. The median nerve should be systematically examined in its short axis from the distal radius (cranial to the proximal edge of the retinaculum) through the palm (beyond the distal edge of the retinaculum). Care should be taken to identify anatomical variants (bifid nerve, persistent median artery of the forearm) and changes in the nerve cross-sectional area occurring at the carpal tunnel level.
13
. Guyon tunnel and ulnar nerve
Move the transducer medially on the transverse plane to examine the Guyon tunnel. Use the pisiform as a landmark. Check the ulnar artery (radial-sided) and the ulnar nerve (ulnar-sided). Follow the nerve distally on short-axis planes to examine its two divisional branches – the superficial sensory branch and the deep motor branch (the latter coursing alongside the hamate hook).
Legenda ulnar artery; asterisk hamate hook; curved arrow deep motor branch of the ulnar nerve; d flexor digitorum profundus tendons; fpl flexor pollicis longus tendon; s flexor digitorum superficialis tendons; star tubercle of trapezius; void arrowheads flexor retinaculum; void straight arrow superficial sensory branch of the ulnar nerve; white arrowhead flexor carpi radialis tendon;
white arrows median nerve
Legend a ulnar artery;
asterisk hamate hook;
curved arrow deep motor branch of the ulnar nerve;
void arrowheads flexor retinaculum; void straight arrow superficial sensory branch of the ulnar nerve;
white arrowhead arcade of the flexor brevis; white arrow main trunk of the ulnar nerve
a b
Hip
1.
ANTERIOR HIP: anterior joint recess and iliopsoas tendon
With the patient supine, place the transducer in an oblique longitudinal plane over the femoral neck to examine the anterior synovial recess using the femoral head as a landmark. In obese patients, lower frequency probes may help the examination. Cranial to the anterior recess, the fibrocartilaginous anterior glenoid labrum of the acetabulum can be detected as a homogeneously hyperechoic triangular structure (same appearance as the knee meniscus). Look at the iliofemoral ligament that can be demonstrated superficial to the labrum.
Legend A acetabulum;
arrowhead anterosuperior labrum; arrows anterior joint recess; asterisk
distended anterior recess by joint effusion; FH
femoral head; FN femoral neck
Legend A acetabulum;
arrowhead anterosuperior labrum; arrows iliopsoas tendon; asterisk acetabular labrum; IP iliopsoas muscle;
FH femoral head
Over the joint space and the femoral head, the iliopsoas muscle is identified lateral to the femoral neurovascular bundle. The iliopsoas tendon is found in a deep eccentric position within the posterior and medial part of the muscle belly and lies over the iliopectineal eminence. The iliopsoas bursa lies between the tendon and the anterior capsule of the hip joint: in normal states, it is collapsed and cannot be detected with US.
2.
Tensor fasciae latae and sartorius
Place the transducer in the axial plane over the anterior superior iliac spine. The short tendons of the sartorius (medial) and the tensor fasciae latae (lateral) are then visualized by means of sagittal planes. Shifting the probe down over the muscle bellies, the sartorius can be seen directing medially to reach the medial thigh over the rectus femoris muscle, whereas the tensor fasciae latae proceeds laterally and caudally to insert into the anterior border of the fascia lata, superficial to the vastus lateralis.
LegendArrowheads and 1, tensor fasciae latae muscle; AIIS
anteroinferior iliac spine; ASIS anterosuperior iliac spine;
asterisk greater trochanter; curved arrow lateral femoral cutaneous nerve; gm gluteus medius muscle; 3 rectus femoris muscle; 4 iliopsoas muscle; 5 pectineus muscle;
void arrows and 2 sartorius muscle; white arrow insertion of tensor fasciae latae; vl vastus lateralis muscle
Just medial to the attachment of the inguinal ligament into the anterior superior iliac spine, look at the lateral femoral cutaneous nerve. Shifting the transducer up on axial planes, image the abdominal portion of the psoas and the iliacus muscles which lie internally to the iliac wing.
3.
Femoral neurovascular bundle
Medial to the iliopsoas muscle and tendon, look at the femoral nerve (lateral), the common femoral artery and the common femoral vein (medial). The vein is larger than the artery and is compressible with the probe. Check for enlarged lymph nodes. Further medially, the pectineus muscle is seen over the pubis.
Legenda femoral artery; arrow femoral nerve; im
iliacus muscle; pm pectineus muscle; v femoral vein
a
b
4.
Rectus femoris
Place the transducer over the anterior inferior iliac spine to examine the direct tendon of the rectus femoris. On long-axis planes, note the posterior acoustic shadowing that underlies the direct tendon related to changes in orientation of tendon fibres at the union of the direct and indirect tendons.
LegendAIIS anteroinferior iliac spine; arrowheads direct tendon of the rectus femoris muscle; arrows indirect tendon of the rectus femoris muscle
Shifting the transducer downwards, transverse planes can demonstrate the myotendinous junction of the rectus femoris with its muscle fibres that arise from the lateral aspect of the tendon. More distally, the muscle belly is seen progressively enlarging between the tensor fasciae latae and the sartorius.
LegendAIIS anteroinferior iliac spine; arrows direct tendon of the rectus femoris muscle; curved arrow
central aponeurosis; IPs iliopsoas muscle; Sa sartorius muscle; tfl tensor fasciae latae muscle; Vint vastus intermedius muscle; void arrowheads proximal myotendinous junction of the rectus femoris muscle;
white arrowheads rectus femoris muscle
In the proximal rectus femoris muscle, the central aponeurosis is the distal continuity of the indirect tendon, whereas the superficial aponeurosis arises from the direct tendon.
LegendAIIS anteroinferior iliac spine; 1 direct tendon; 2 indirect tendon; 3
reflected tendon; 4 central aponeurosis; RF rectus femoriis muscle
5.
MEDIAL HIP: adductors
For examination of the medial hip, place the patient with the thigh abducted and externally rotated and the knee bent. Examine the insertion of the iliopsoas tendon on the lesser trochanter using long-axis planes. Placing the probe over the bulk of the adductors, three muscle layers are recognized on longitudinal planes: the superficial refers to the adductor longus (lateral) and the gracilis (medial), the intermediate to the adductor brevis and the deep to the adductor magnus. To image the adductor insertion, sweep the probe over the long axis of these muscles up to reach the pubis. The insertion of the adductor longus tendon is seen with its triangular hypoechoic shape.
From a transverse plane on the pubis, shift the probe laterally and obtain an oblique longitudinal image over the conjoint tendon of transversus abdominis and internal oblique. Further medially, the anterior aspect of the symphysis pubis may be seen.
6.
LATERAL HIP: abductors
The US examination of the lateral hip is performed by asking the patient to lie on the opposite hip assuming an oblique lateral or true lateral position. Transverse and longitudinal US planes obtained cranial to the greater trochanter show the gluteus medius (superficial) and gluteus minimus (deep) muscles. To recognize them, the tensor fasciae latae can be used as a land-mark: shifting the transducer posterior to it, the anterior margin of both muscles appears.
Alternatively, obtain posterior US images over the anterior portion of the gluteus maximus: moving the transducer anterior to this muscle, the posterior margin of the gluteus medius appears. The fascia lata lies over the lateral aspect of the gluteus medius and the greater trochanter.
insertion; 1 adductor longus muscle; 2 adductor brevis muscle; 3 adductor magnus muscle; g gracilis muscle; P pubis; Pt pectineus muscle
LegendAsterisk greater trochanter; 1 gluteus minimus tendon; 2 gluteus medius (anterior tendon); 3 gluteus medius (posterior tendon); GMi gluteus minimus muscle; GMa gluteus maximus muscle; GMe gluteus medius muscle
Hip
7.
Gluteus minimus, gluteus medius and fascia lata
Moving the probe down to reach the greater trochanter, the gluteus minimus tendon is seen as an anterior structure that arises from the deep aspect of the muscle and inserts into the anterior facet of the greater trochanter.
Long-axis and short-axis US images obtained over the lateral facet of the greater trochanter demonstrate the gluteus medius tendon as a curvilinear fibrillar band. Shifting the probe posteriorly, the anterior portion of the gluteus maximus can be seen covering the posterior part of the tendon of the gluteus medius. Coronal planes demonstrate the fascia lata
cranial to caudal, overlies the gluteus medius muscle, the gluteus medius tendon and the greater trochanter.
Owing to their limited fluid content, the bursae around the greater trochanter are not visible with US under normal conditions.
Legend Asterisk gluteus maximus muscle; curved arrow gluteus minimus tendon; Gmin gluteus minimus muscle; GT
greater trochanter; void arrow gluteus medius tendon; white arrow
gluteus minimus tendon;
arrowheads fascia lata
8.
POSTERIOR HIP: hamstrings
For examination of the posterior hip, the patient lies prone with the feet hanging hanging down from the bed. Lower US frequencies may be required to image thick thighs or obese patients. The gluteus maximus muscle is first evaluated by means of transverse and coronal oblique planes orientated according to its long and short axis.
Legend Asterisk
ischiatic tuberosity;
G m a x g l u t e u s maximus muscle; SM
semimembranosus;
ST semitendinosus;
LHB long head of the biceps femoris
a
b
9.
Hamstrings and sciatic nerve
Posterior axial planes are the most useful to recognize the proximal origin of the ischiocrural (semimembranosus, semitendinosus, long head of the biceps femoris) muscles. The ischial tuberosity is the main landmark: once detected, the most cranial portion of the ischiocrural tendons can be demonstrated as they insert on its lateral aspect. At this level, the semimembranosus tendon and the conjoined tendon of the semitendinosus and the long head of the biceps femoris cannot be separated. Lateral to them, the sciatic nerve is seen as a flattened structure with fascicular echotexture emerging from under the piriformis muscle.
Shifting the probe downwards on axial planes, the conjoined tendon of semitendinosus and biceps femoris can be distinguished from the tendon of semimembranosus owing to its more superficial and lateral position. The conjoined tendon of the semitendinosus and biceps femoris appears as a sagittal hyperechoic image separating the muscle bellies of the semitendinosus (medial) and the biceps (lateral). The semimembranosus has a large aponeurosis connected to the medial side of the tendon: its muscle belly arises from the medial end of this aponeurosis.
LegendAsterisk ischiatic tuberosity; arrows common tendon origin of the semitendinosus-long head of biceps femoris
LegendLarge void arrow sciatic nerve; narrow void arrow conjoined tendon of the semitendinosus and long-head of the biceps; 1 long-head of the biceps muscle; 2 semitendinosus muscle; 3 adductor magnus muscle; white arrow
semimembranosus tendon; arrowheads semimembranosus aponeurosis; curved arrow semimembranosus muscle belly
a b
a b
Knee
Note
The systematic ultrasound technique described below is only theoretical, because examination of the knee is, for the most part, focused only on one quadrant of the joint based on clinical findings.
1.
ANTERIOR KNEE: quadriceps tendon
The anterior aspect of the knee is examined with the patient supine. A knee flexion of approximately 20-30° obtained by placing a small pillow beneath the popliteal space stretches the extensor mechanism and avoids possible anisotropy related to the concave profile that the quadriceps and patellar tendons assume in full extension.
Legend Arrows quadriceps tendon; 1 superficial layer (from rectus femoris); 2 intermediate layer (from vastus lateralis and vastus medialis); 3
deep layer (from vastus intermedius); F femur;
P patella; Vlat vastus lateralis muscle; Vmed
vastus medialis muscle; Vint vastus intermedius muscle
Sagittal US images obtained in the midline while keeping the distal edge of the probe over the patella display the quadriceps tendon. On long-axis and short-axis planes, observe the multilayered appearance of this tendon due to the close apposition and distal union of the three tendon layers arising from the bellies of the quadriceps femoris muscle. The ability to discriminate among the individual tendon components has practical value to allow differentiation between full-thickness (three layers involved) and partial-thickness (one/two layers involved) tears.
Shifting the transducer cranially on axial planes, the myotendinous junctions of the quadriceps femoris can be appreciated: the one of the rectus femoris is located at a more proximal level compared with those of the vastus muscles.
a
2.
Suprapatellar and parapatellar joint recesses
Deep to the distal third of the quadriceps tendon, the suprapatellar fat pad is found just cranially to the patella. Immediately superficial to the femur, the prefemoral fat pad appears as a large hyperechoic space. The suprapatellar synovial recess lies deep to the quadriceps tendon and the suprapatellar fat pad and superficial to the prefemoral fat; in normal states, it appears as a thin hypoechoic
Imaging should be extended over the lateral and medial sides of the quadriceps tendon because small amounts of synovial fluid tend to accumulate in the lateral and medial parts of the suprapatellar recess (which are dependent with the patient supine) and within the parapatellar recesses.
Legend a Arrows quadriceps tendon; asterisks
suprapatellar synovial recess; 1 suprapatellar fat pad; 2
prefemoral fat pad; F femur; P patella
Legend bArrowheads lateral parapatellar recess; arrows
medial patellar retinaculum; F femur; P patella
3.
Femoral trochlea
With full knee flexion, the femoral V-shaped trochlea and the overlying articular cartilage are examined on the axial planes. In this position, the quadriceps tendon is pushed anteriorly by the femoral trochlea and assumes a curved course over
it. Legendquadriceps tendonAsterisks articular cartilage of the trochlea; qt
b
a S-shaped space. Dynamic imaging during isometric contraction of the quadriceps or squeezing the parapatellar recesses with the non-examining hand may be helpful to detect small effusions. If needed, compression with the probe may help to differentiate effusion and synovial thickening.
4.
Patellar retinacula and patellar medial articular facet
The medial and lateral retinacula are imaged on each side of the patella by means of axial planes: they appear as bilayered structures that cannot be distinguished from the underlying joint capsule. An attempt to evaluate the medial articular facet of the patella with US can be made by tilting and pushing the patella internally while keeping the knee extended. The lateral facet is not visible with US.
Check the prepatellar bursa, which is located over the lower pole of the patella and the proximal patellar tendon: under normal conditions, the bursa is not visible with US. Avoid excessive pressure with the probe over this bursa so as not to squeeze the fluid away from the field-of-view of the US image. Much gel may help to avoid excessive pressure on the bursa with the probe.
5.
Patellar tendon
LegendArrowheads medial patellar retinaculum; asterisks articular cartilage of the medial facet of the patella; P patellaWith the patient’s positioning as described under paragraph 1 (above), examine the patellar tendon from its cranial origin down to its distal insertion using long- and short-axis planes. Because the lower pole of the patella has a V-shaped appearance, one should be aware that the tendon inserts not only on the apex but also along the inferolateral and inferomedial edges of the bone. Short-axis US images over the proximal patellar tendon should also be performed because tendinopathy may occur out of the midline.
Deep to the patellar tendon, look at the intracapsular Hoffa fat pad and check the deep infrapatellar bursa between the distal patellar tendon and the anterior aspect of the tibial epiphysis. Mild distension of the bursa appears as a small triangular hypoechoic area and should be regarded as normal. Normally, the superficial infrapatellar bursa is not visible.
LegendArrowheads patellar tendon; arrow deep infrapatellar bursa; Hfp
6.
MEDIAL KNEE: medial collateral ligament and pes anserinus tendons
For examination of the medial knee, the patient is asked to rotate the leg externally while maintaining 20-30° of knee flexion. Place the transducer obliquely orientated over the long axis of the medial collateral ligament. Care should be taken to examine the entire length of this ligament. Dynamic imaging during valgus stress can improve the assessment of its integrity. Check the soft tissues immediately superficial to the base of the medial meniscus.
Follow the profile of the medial collateral ligament distally and then rotate the transducer forwards to image the tendons of the pes anserinus complex (sartorius, gracilis and semitendinosus) in their long axis. These tendons are closely apposed and cannot be separated at the level of the insertion on the tibia (small concave area).
Legend Void arrows medial collateral ligament; asterisk medial meniscus; void arrowheads superficial portion of medial collateral ligament; white arrowheads meniscofemoral ligament; white arrows pes anserinus complex insertion
7.
LATERAL KNEE: iliotibial band
For examination of the lateral knee, rotate the patient’s leg internally while maintaining 20-30° of knee flexion. Check the iliotibial band on its long axis down to reach the Gerdy’s tubercle. If doubts exist on whether the probe is correctly orientated, consider that the iliotibial band is located between the anterior and middle third of the lateral aspect of the knee and orientated along the major axis of the thigh. Check the soft tissues immediately superficial to the base of the lateral meniscus: when a meniscal cyst is suspected, examine the knee in forceful flexion to produce bulging of the cyst outside the joint space, thus improving its detection.
Legend Arrowheads iliotibial band; asterisk Gerdy’s tubercle; lfc lateral femoral condyle
a
b
8.
Lateral collateral ligament
With extended knee, place the lower edge of the probe on the peroneal head and then rotate its upper edge anteriorly until the lateral collateral ligament appears as elongated as possible in the US image. Just deep to the proximal part of the lateral collateral ligament, the popliteal tendon can be imaged in its bony groove. Transverse US planes may help to assess the relationship of the lateral collateral ligament with the more posterior biceps femoris tendon.
Check the superior tibiofibular joint for joint effusion and para-articular ganglia by means of axial and coronal US images obtained over the anterior aspect of the fibular head.
9.
POSTERIOR KNEE: medial tendons
Legend Arrow popliteal tendon;
arrowheads lateral collateral ligament;
asterisk lateral meniscus; F fibular head
For examination of the posterior knee, the patient is asked to lie prone with the knee extended. Imaging the posteromedial knee on transverse planes demonstrates, from medial to lateral, the sartorius – made, at this level, of muscle fibres – the gracilis tendon and the semitendinosus tendon, which is located behind the semimembranosus tendon.
LegendAsterisks articular cartilage of the medial femoral condyle;
10
. Semimembranosus-gastrocnemius bursa
Check the semimembranosus-gastrocnemius bursa between the semimembranosus tendon medially and the medial head of the gastrocnemius laterally using axial planes and the cartilage of the posterior aspect of the medial femoral condyle using sagittal planes.
Legend a popliteal artery; asterisk tendon of the medial head of gastrocnemius; curved arrow tibial nerve; mfc medial femoral condyle; MHG medial head of gastrocnemius; star
semimembranosus tendon; Sa sartorius muscle; ST semitendinosus tendon; straight arrows semimembranosus-gastrocnemius bursa;
v popliteal vein
11
. Popliteal neurovascular bundle and intercondylar fossa
In the popliteal fossa, sweep the probe up and down over the popliteal neurovascular bundle to demonstrate the popliteal artery (deep), the popliteal vein (intermediate) and the tibial nerve (superficial), which are aligned on an oblique sagittal plane. Because the patient is prone, the popliteal vein tends to collapse: a small elevation of the leg from the examination bed, which is obtained while flexing the knee, causes filling of the popliteal vein and enhances its detection.
Legenda popliteal artery; curved arrow tibial nerve; F femur; LHG lateral head of gastrocnemius; MHG medial head of gastrocnemius; T tibia;
straight arrows posterior cruciate ligament; v popliteal vein
More deeply, in the intercondylar fossa, examine the mid-distal portion of the posterior cruciate ligament in its long axis using oblique sagittal planes, with the proximal end of the probe rotated slightly medially in the direction of the medial femoral condyle. If an anterior cruciate ligament tear is suspected, check the lateral aspect of the intercondylar fossa for a haematoma (indirect sign).
12
. Posterolateral corner and biceps femoris
Moving to the posterolateral aspect of the knee, examine the biceps femoris muscle and tendon by means of long- and short-axis planes. Proximal images must include careful evaluation of the myotendinous junction of the two heads of the biceps femoris muscle because this is a common site of sport-related tears. The biceps femoris tendon can be followed straight downwards from its origin to the fibular head. A small sesamoid – the fabella – can occasionally be seen in the tendon of the lateral head of the gastrocnemius. Check the cartilage of the posterior aspect of the lateral femoral condyle using sagittal planes.
LegendArrow fabella; arrowheads biceps femoris tendon; asterisks articular cartilage of lateral femoral condyle; bfm biceps femoris muscle; M lateral meniscus; fh fibular head; lfc lateral femoral condyle
13
. Peroneal nerve
From the position described under paragraph 11 (above), shift the probe up over the tibial nerve to find the origin of the common peroneal nerve from the sciatic nerve. Follow the common peroneal nerve in its short axis throughout the lateral region of the popliteal space down to reach the fibular head and neck. The peroneal nerve is found posteriorly to the biceps femoris. Note the divisional (superficial and deep) branches of the peroneal nerve that wind round the fibula, passing deep to the peroneus longus attachment.
LegendArrow peroneal nerve; arrowhead tibial nerve; asterisks articular cartilage of lateral femoral condyle; bf biceps femoris muscle; fh fibular head; fn fibular neck; lhg lateral head of gastrocnemius; lfc lateral femoral condyle; pl peroneus longus muscle
a
b
c
Ankle
Note
The systematic ultrasound technique described below is only theoretical, considering the fact that the examination of the ankle is, for the most, focused on one (or a few) aspect(s) only of the joint based on clinical findings.
1.
ANTERIOR ANKLE: extensor tendons
The patient is seated on the examination bed with the knee flexed 45° so that the plantar surface of the foot lies flat on the table. Alternatively, the patient may lie supine with the foot free to allow manipulation by the examiner during imaging. Place the transducer in the axial plane and sweep it up and down over the dorsum of the ankle to examine the tibialis anterior, extensor hallucis longus and extensor digitorum longus. These tendons must be examined in their full length starting from the myotendinous junction. Look at the tibialis anterior artery and the adjacent deep peroneal nerve.
Legenda anterior tibial artery;
edl extensor digitorum longus tendon; ehl extensor hallucis longus tendon; ta tibialis anterior tendon; void arrows distal tibialis anterior tendon; v anterior tibial vein; void arrowheads superior extensor retinaculum; white arrowhead deep peroneal nerve
2.
Anterior recess of the ankle joint
Place the transducer in the mid-longitudinal plane over the dorsum of the ankle to examine the anterior recess of the tibiotalar joint. Fluid may be shifted away from this recess using excessive plantar flexion; 60-70% of the talar dome can be easily assessed by moving the
probe medially and laterally. Legend tibia; TD talar dome; Asterisks anterior fat pad; TH talar headarrows anterior recess of the tibiotalar joint; T
3.
Anterior talofibular ligament
From the position described under paragraph 1 (above), roll the forefoot slightly internally (inversion) to stretch the lateral ligaments. A small pillow under the medial malleolus may help to improve the contact between transducer and skin over the lateral ankle. Place the transducer parallel to the examination bed with its posterior edge over the distal lateral malleolus to image the anterior talofibular ligament.
When distinguishing a partial from a complete tear is difficult, perform a sonographic anterior drawer test by placing the patient prone with the foot hanging over the edge of the examination table while pulling the forefoot anteriorly when in plantar flexion and inversion. When the ligament is torn, the anterior shift of the talus against the fibula will open the gap in the substance of the ligament.
Legend aLM lateral malleolus; void arrowheads anterior talofibular ligament
4.
Anterior tibiofibular ligament
From the position described under paragraph 3 (above), keep the posterior edge of the transducer on the lateral malleolus and rotate its anterior edge upwards to image the anterior tibiofibular ligament. The transducer will pass over a part of the talar cartilage, which lies in between the anterior talofibular ligament and the anterior tibiofibular ligament.
Legend Arrowheads anterior tibiofibular ligament; LM lateral malleolus
5.
Calcaneofibular ligament
With the ankle lying on its medial aspect, place the transducer in an oblique coronal plane with its superior edge over the tip of the lateral malleolus and its inferior margin slightly posterior to it, towards the heel, while the foot is dorsiflexed to image the calcaneofibular ligament. With full dorsiflexion, this ligament becomes taut and can be better examined across its full length. This manoeuvre may help to distinguish partial from complete ligament tears.
LegendArrowheads calcaneofibular ligament; LM lateral malleolus; pb peroneus brevis tendon; pl peroneus longus tendon
6.
Dorsal midtarsal ligaments
Look at the following midtarsal ligaments: dorsal talonavicular, dorsal calcaneocuboid and calcaneo-cuboido-navicular ligament (the latter involved in avulsion of the anterolateral tubercle of the calcaneus).
7.
LATERAL ANKLE: peroneal tendons
Behind the lateral malleolus, place the transducer over the peroneal tendons to examine them in their short axis (long-axis planes are of limited utility). Because these tendons arc around the malleolus, tilt the transducer progressively to maintain the US beam perpendicular to them and avoid anisotropy. Continue to follow these tendons upwards for approximately 5 cm and downwards through the inframalleolar region.
Check them at the level of the peroneal tubercle of calcaneus, and the peroneus longus down to the area where the os peroneum can be found. Follow the peroneus brevis until the base of the 5th metatarsal. Look at the superior and inferior peroneal retinacula.
When intermittent subluxation of the peroneals is suspected clinically, ultrasound should be performed at rest and during dorsiflexion and eversion of the foot against resistance, placing the transducer in a transverse plane over them, at the level of the lateral malleolus. Stress eversion can be done while pushing with the examiner’s free hand on the forefoot of the patient, to see subtle subluxation or bulging of the superior retinaculum.
Legend Arrowheads dorsal talonavicular ligament; NAV navicular bone
LegendArrowheads peroneus brevis tendon;
curved arrows superior extensor retinaculum;
LM lateral malleolus; pbm peroneus brevis muscle; void arrow peroneal tubercle; white arrow peroneus longus tendon
a b
8.
MEDIAL ANKLE: tibialis posterior and flexor digitorum longus
tendons
For examination of the medial ankle, the patient is seated with the plantar surface of the foot rolled internally or in a “frog-leg” position. Alternatively, the patient may lie supine with the foot rotated slightly laterally. A small pillow under the lateral malleolus may help to improve the contact between transducer and skin over the medial ankle. The examination of tendons is performed first.
Behind the medial malleolus, place the transducer over the short-axis of the tibialis posterior and the flexor digitorum longus tendons. Follow the tibialis posterior from the myotendinous junction down to its insertion on short-axis planes. Check the presence of an accessory navicular bone on long-axis planes over the insertion of the tibialis posterior.
Legenda tibialis posterior artery; MM medial malleolus; v posterior tibial veins; void arrowheads flexor digitorum longus tendon; white arrowheads flexor retinaculum; white arrows tibialis posterior tendon
9.
Tarsal tunnel and tibial nerve
Examine the flexor digitorum longus tendon down to reach the sustentaculum tali. Look at the flexor retinaculum, the posterior tibial vessels and the tibial nerve with its divisional branches (medial and lateral plantar nerves). Compression may help to assess whether the veins are patent.
Legend AbdH abductor hallucis muscle; curved arrow tibial nerve; fhl flexor hallucis longus tendon; ST sustentaculum tali; straight arrows flexor digitorum longus tendon; void arrowhead posterior tibial artery; white arrowheads
posterior tibial veins
10
. Flexor hallucis longus tendon (short-axis)
In the same position, look more posteriorly to demonstrate the flexor hallucis longus. Bony landmarks are the lateral and medial talar tubercles. The tendon lies in between them. Use passive flexion-extension of the great toe to assess this tendon while it curves over the posterior talus. Follow this tendon on the short-axis plane as it passes under the sustentaculum tali and crosses the flexor digitorum longus.
LegendAsterisk medial tubercle; star lateral tubercle; arrows flexor hallucis longus tendon; arrowheads retinaculum
11
. Deltoid ligament
The posterior part of the deltoid ligament is examined while dorsiflexing the foot by means of coronal images. The superior edge of the transducer is kept over the tip of the medial malleolus whereas the inferior edge is rotated slightly posterior (tibiotalar), parallel or slightly anterior (tibiocalcanear) to it. The anterior part (tibionavicular) of the ligament is best seen in a neutral position. Look at the spring ligament (lateral calcaneonavicular) ligament which lies straight between the sustentaculum tali and the navicular bone.
Legend a a deltoid ligament components. 1 tibiotalar ligament; 2 tibiocalcanear ligament; 3 tibionavicular ligament
Legend b, cArrows, posterior tibial tendon; MM medial malleolus; void arrowheads tibiotalar ligament; white arrowheads tibiocalcanear ligament;
Calc calcaneus
a
12
. POSTERIOR ANKLE: Flexor hallucis longus tendon (long-axis) and
posterior joint recess
Place the patient prone with the foot resting on the toes over the table to maintain the foot perpendicular to the leg. The probe is positioned just medial to the Achilles tendon in an oblique sagittal plane to examine the proximal portion of the flexor hallucis longus in its long-axis and the posterior recesses of the tibiotalar and subtalar joints. Fluid in the posterior recess may travel anteriorly in this position.
LegendAsterisk posterior fat pad; arrowhead
flexor hallucis longus muscle; curved arrow
posterior ankle recess; straight arrows flexor hallucis longus tendon; PM posterior tibial malleolus
13
. Achilles tendon
In a prone position, let the foot hang outside the edge of the examination table (rest) or with the toes lying over it (stretching). Look clinically to the position of the foot, comparing both sides to see any differences that can lead to the diagnosis of Achilles tendon full-thickness tear. Then examine the Achilles tendon from its myotendinous junction to its calcaneal insertion by means of transverse and longitudinal planes. While imaging the Achilles tendon on short-axis planes, tilt the probe on each side of the tendon to assess the peritendinous envelope. Measure the size of the Achilles tendon only on transverse planes. The Achilles tendon has to be followed down to its calcaneal insertion. Check the retroachilles and the retrocalcaneal bursae.
Check the plantaris tendon. In cases of complete Achilles tendon tear, the plantaris may mimic residual intact fibres of the Achilles. Dynamic imaging during passive dorsal and plantar flexion help to distinguish partial from complete Achilles tendon tears.
Legend Arrowheads Achilles tendon; asterisk anisotropy; fhl flexor hallucis longus muscle
14
. Plantar fascia
In the same position described under paragraph 12 (above), place the transducer over the plantar aspect of the hindfoot to examine the calcaneal insertion of the plantar fascia. Long-axis images obtained just medial to midline are used. Measure the fascia at the point where it leaves the calcaneal tuberosity. The gain may be increased to avoid beam absorption by the thick plantar sole.