University of New Orleans University of New Orleans
ScholarWorks@UNO
ScholarWorks@UNO
University of New Orleans Theses and
Dissertations Dissertations and Theses
12-17-2004
Three Factor Authentication Using Java Ring and Biometrics
Three Factor Authentication Using Java Ring and Biometrics
Jyothi Chitiprolu
University of New Orleans
Follow this and additional works at: https://scholarworks.uno.edu/td
Recommended Citation Recommended Citation
Chitiprolu, Jyothi, "Three Factor Authentication Using Java Ring and Biometrics" (2004). University of New Orleans Theses and Dissertations. 187.
https://scholarworks.uno.edu/td/187
THREE FACTOR AUTHENTICATION USING JAVA RING AND BIOMETRICS
A Thesis
Submitted to the Graduate Faculty of the University of New Orleans
in partial fulfillment of the requirements for the degree of
Master of Science in
The Department of Computer Science
by
Jyothi Chitiprolu
B.E. Madras University, 2001
ACKNOWLEDGMENTS
I would like to thank my husband Sravan, for his love, support and encouragement. He is truly my best friend and partner. This thesis would not have been possible with out his help and patience. I would like to thank my mother and father for their constant love and support and for being the best parents any one could wish for. I would like to thank my sister and brother for their abundant love, affection and humor.
Very special thanks to Dr. Golden Richard III, for supervising my thesis, for all his help, support and patience and for being an excellent teacher and advisor.
I would like to thank Dr. Shengru Tu for his help through my years at UNO.
TABLE OF CONTENTS
LIST OF FIGURES...vi
ABSTRACT ...vii
INTRODUCTION...1
COMPUTER SECURITY...3
Authentication ...4
Passwords...4
Host-Based Authentication...5
Physical Tokens...5
Biometrics...5
One Factor Authentication ...6
Two Factor Authentication...8
Three Factor Authentication ...9
JAVA RING ...12
Introduction to Java Ring...12
iButton...14
How secure is iButton ...16
Java Card Technology ...17
Smart Card ...18
Introduction to Java Card...22
Java Card and OpenCard...24
Java Card Applets ...24
Programming in iButton...29
Host Application Structure...30
iButton Applet Structure...34
Java Card Applet Example...39
FINGERPRINT AUTHENTICATOR...48
Introduction to Fingerprint Authenticator ...48
TruePrint Technology ...52
Security concerns with storing fingerprints ...52
Authentec API...53
IMPLMENTATION...66
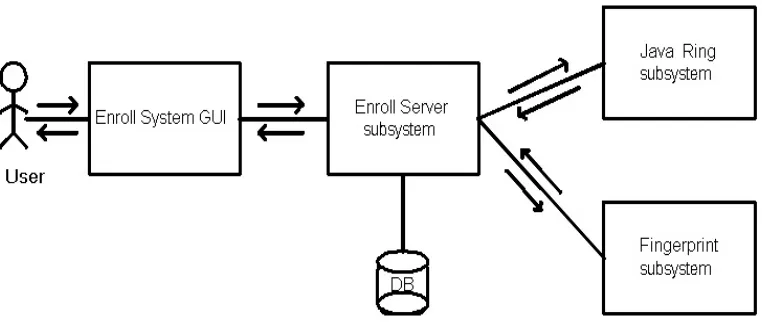
Enroll System...73
Enroll User Use Case...74
Collaboration Diagrams ...77
Features of Enroll System...78
Authenticate System ...81
Authenticate User Use Case...82
Collaboration Diagrams...85
System Initialization...88
iButton Implementation ...89
Fingerprint Implementation...98
CONCLUSION...103
FUTUREWORK...106
REFERENCES...109
LIST OF FIGURES
Number Page
Java Ring ...12
iButton...12
Blue Dot Receptor ...13
Self-powered computer chip in an iButton...14
OpenCard Framework Architecture ...21
Java Card System Architecture ...23
Command and Response APDU structure...26
Working of APDU’s from the reader side to the card side ...35
Different Biometrics...49
Face Recognition and Handwriting ...50
The Entrepad Family Authentec AES4000 ...52
Biometric data Stored/ Matched...68
High level design of Enroll System...73
Collaboration diagram for Enroll User use case ...77
High level design of Authenticate System ...81
Collaboration diagram for Authenticate User use case...85
Communication between host and applet during Enroll process...90
ABSTRACT
C h a p t e r 1
INTRODUCTION
As the computer technology is prevailing, the security related problems with computers are also increasing. The purpose of computer security is to protect an organization's valuable resources, such as information, hardware, and software. To know if a person is right user, we need to authenticate the person. The goal of authentication is to identify a person directly or indirectly.
This thesis implements one of the best ways of authenticating a person taking many issues into consideration. The structure of this thesis is organized as follows.
Chapter 2 provides security background and different kinds of authentications. It introduces different ways of authentications and also discusses how multiple factors can be used for authentication.
Chapter 3 introduces Java Ring, and iButton. It discusses different functions the iButton provides and also focuses on how secure an iButton is. It details the Java Card technology and its functionality in an iButton. It discusses about smart card technology and open card framework. It also explains as to how the communication takes place between a Java Card and an Open Card.
Chapter 4 describes the different biometrics and how fingerprints are better than other biometrics. It discusses the fingerprint API used in the implementation.
Chapter 6 concludes by summarizing the security aspects of the system implementation.
C h a p t e r 2
COMPUTER SECURITY
Computer security has become a prevalent concern from the dawn of the Internet and before. Network breaches and e-commerce fraud are increasing rapidly, as reported in the Computer Security Institute -2001 Computer Crime and Security Survey [7]. Today 85% of large corporations and government agencies acknowledge network security breaches. Of these organizations, 64% acknowledge financial losses that run into millions of dollars due to network breaches and e-commerce fraud [7].
Security is about well-being (integrity) and about protecting property or interests from intrusion, stealing or wire-tapping (privacy) [1]. The purpose of computer security is to protect an organization's valuable resources, such as information, hardware, and software. Examples include remote access to computer accounts, access to web sites, and bank account access at automated teller machines. Through the selection and application of appropriate safeguards, security helps the organization's mission by protecting its physical and financial resources, reputation, legal position, employees, and other tangible and intangible assets. To grant access to a few, we need to know whom we can trust and we need to verify the credentials (authenticate) of those who come near us.
Security is thus based on the following independent issues [1]:
• Privacy - the ability to keep things private/confidential
• Authenticity - are security credentials in order? Are we talking to whom we think we are talking to, privately or not?
• Integrity - has the system been compromised/altered already?
Information security is a necessary underpinning for further advances in electronic business. Technologies such as session encryption, firewalls, virtual private networks, wireless LANs, and digital certificates have all emerged as pieces of the solution. While each is designed to enhance some aspect of information security — whether by restricting access to or preventing the interception of private data — none of them alone is designed to address the fundamental security issue that underlies the most damaging information crimes such as “is the person who is attempting to access protected files or resources an authentic user or an impostor?” To know this we need to authenticate the user.
2.1. Authentication:
The goal of authentication is to identify a user either directly or indirectly. There are many possible ways of authentication available. Some of them are passwords, host-based authentication, physical tokens and biometrics.
2.1.1. Passwords:
2.1.2. Host-Based Authentication:
Host based authentication is situation where authentication takes place based on the host information, rather than the more usual method of prompting for a password. This is very convenient if a non-interactive process is trying to authenticate with a remote machine. SSH relies on such authentications and uses public and private key pairs to establish a secure connection.
2.1.3. Physical Tokens:
Physical Token includes physical devices that are used to compute the credentials presented to the verifier as well as software files that must be possessed by the claimant in order to compute the credentials. Examples of physical devices include smart cards, magnetic stripe cards and one-time password generators. Software files will typically contain secret or private keys that are used to compute credentials; however physical devices may contain these keys as well. These physical devices are sometimes called authentication tokens or dongles.
2.1.4. Biometrics:
Biometrics includes something inherent to a person. In this category, human physical characteristics such as fingerprints, facial features, heat signature of head, retinal scans, handwriting or voice are used to produce the credentials. There are many biometric devices available. An example of biometric is the car Lexus 430s model 2004 which uses a fingerprint recognition system to identify its owner. The owner’s fingerprint is scanned when he opens the door handle which uses fingerprint recognition technology to authenticate [3].
Today, the most common form of authentication is password control. In general, technologies for authenticating a potential user of an information system are organized into three identification factors: something you know, something you have, and something you are. An example of something you know is a password or a personal identification number (PIN), something you have is a physical token such as a smart card and something you are is a biometric such as a fingerprint. An application can use either one of these authentication techniques or a combination of two or more of these techniques. However, each of these factors is vulnerable to attack if used alone or in pairs. Highly secure systems can use multiple factors to secure their systems. We will next discuss about one factor, two factor and three factor authentications.
2.2. One Factor Authentication:
One factor authentication relies on one of the above three factors for authentication. Using a password is one of the most common one factor authentication used. Unfortunately, passwords can be easily misapplied and provide a weak level of security. One reason is that users tend to pick simple passwords that are easy to remember. Some of the ways passwords can be compromised are as follows.
• Keystroke Monitoring is monitoring and storing every keystroke a person makes on keyboard. Using special software, passwords are easily lifted, leading to a potential security compromise. In more extreme situations, a monitor’s emissions can be read and deciphered, revealing everything displayed on the screen [8].
• Password cracking tools such as brute force that allow an attacker to automate the process of guessing user passwords are readily available for download from the Internet, making it relatively easy to crack the average password. This type of security breach is a result of repeated login attempts with different key combinations or words.
• Furthermore, many successful attacks are accomplished using passwords obtained from social engineering (an attacker’s use of clever manipulation to trick trusting users into divulging password information), a problem that even the best of corporate password policies find difficult to address[6].
• Using Man-in-the-Middle Attack, a computer is set up as an interface between a client computer and the server that handles authentication. The computer in the middle accepts the client’s password as if it were the server and logs in to the server using the client’s identity.
Password security mechanisms can be strengthened further through the use of “one-time passwords.” One-time passwords can be implemented through either software or hardware. But one One-time passwords have their own set of complications. User error is a common problem with password generators because users must manually enter each password during the authentication process. This can be cumbersome when repeated many times and can increase the likelihood of repeated errors. Session-based authentication is vulnerable to ‘session hijacking’ because the end-user is able to leave the computer unattended while the authenticated session is still active. In addition back-end management of password generation environments is time consuming and costly as databases and servers must be retooled to accommodate the changing password requirements [8].
2.3. Two factor Authentication:
When two factors are used to authenticate, it is called two factor authentication. The two factors involved may be any two of three methods: passwords, physical tokens or biometrics. Two factor authentications are better than one factor authentication because, if passwords are the only ones used, there is a probability for the password to be compromised. Passwords with physical tokens such as a smart card can be used for two factor authentication. This type of authentication is resistant to single-factor attacks including keystroke monitoring, social engineering, man-in-the-middle attacks, network monitoring, and password cracking. One example in daily use is the Bank application where the user is prompted to enter his card after which he is prompted for a pin.
authentication server decrypts using the public key. In this approach, the user’s private key never has to be communicated outside of the smart card and never leaves the smart card’s circuitry. This helps preserve the integrity of the private key.
Systems using this form of two-factor authentication are vulnerable to attacks through theft of the hardware token coupled with the use of password compromise techniques mentioned above.
An example of a product which uses two factor authentication and goes beyond a simple static password is DataCard. Datacard's Two-Factor Authentication is designed to curb network and e-commerce abuse [7].
2.4. Three factor Authentication:
Three factor authentication systems relies on three factors for authentication: something you know such as password, something you possesses such as a physical token, something you are, a biometric characteristics. Using a combination of all three makes the security system stronger. Biometrics is one of the most reliable and most widely used forms of authentication these days.
Having three factors makes it difficult to cheat a system, thus strengthening the security. There are many companies and software products that use three factor authentication. Some companies and software products in today’s market which use three factor authentication are given below along with the factors each use for three factor authentication.
Fortress AirFortress wireless security gateway, has three layer of authentication, Network Authentication, Device Authentication and User Authentication.
Dekart Logon, a software program designed to add the strong authentication and convenience to the standard Windows logon procedure allows to access Windows driven computers and domains in an easy, fast and secure way by using different types of hardware keys. The login and password of the user are entered automatically once the hardware key is connected to the computer. Users gain the flexibility to select from different smart cards, hardware tokens, as well as USB flash drives and other types of removable media to provide fast and convenient two- or three-factor authentication within their Windows environment [5].
Lock-Out 2000 Biometric Authentication Edition is a combination of Biometric Middleware and Authentication Middleware. The core module of Lock-Out 2000 Biometric Authentication Middleware is designed to engage three-factor's of authentication access. The security administrator of the workstation assigns a unique wearable Java-powered iButton to the user and then assigns a PIN number for (two-factor) authentication, similar to any bank ATM machine. The administration utility tool then acts as the Biometrics enrollment station, whereby the users look straight into a camera and is enrolled in less than 20 seconds with 11 default pictures. This authentication assures a 90-100% verification results.
wants. Because the PDA manages the creation and use of passwords for each account, users no longer have a need to remember passwords for individual accounts [6].
C h a p t e r 3
JAVA RING
3.1. Introduction to JavaRing:
A Java Ring is a wearable finger ring that contains a small microprocessor. The Java Ring is an extremely secure Java-powered electronic token with a continuously running, unalterable real time clock. The rugged packaging of the Java Ring makes it suitable for many applications. The jewel of the Java Ring is the Java iButton.
Figure 3.1 Java Ring
The Java Rings made their appearance at 1998 Java One Conference.
The iButton is a one-million transistor; single-chip trusted microcomputer with a powerful Java virtual machine (JVM) housed in a rugged and secure stainless-steel case [9].
When coming to secure internet transactions, the two most fundamental problems with internet transactions involving sensitive information are authentication and secure transmission of the data. By eavesdropping, someone can gain information about a person and steal his identity. The iButton provides for secure end-to-end internet transactions–including granting conditional access to Web pages, signing documents, encrypting sensitive files, securing email and conducting financial transactions safely - even if the client computer, software and communication links are not trustworthy. When PC software and hardware are hacked, information remains safe in the physically secure iButton chip. The ibutton connects to computers with a Blue Dot receptor [10].
Figure 3.3: Blue Dot Receptor
These are some of the functions that can be done by simply pressing the Blue Dot with the iButton:
• Granting access privileges to sensitive information on a conditionally accessed Web page using PKI challenges/response authentication.
newspaper story, sign it at your vacation home and email it to the publisher.
• Encrypt and decrypt messages, securing email for the intended eyes only.
•
Conduct hassle-free monetary transactions–print your own electronic postage stamps or prints, write, and sign your own electronic checks [10].3.2. iButton:
The iButton is a self-powered computer chip with networking serial number housed in a 16mm stainless steel can.
Figure 3.4: Self-powered computer chip in an iButton
The iButton form factor has a computer chip with a unique way of communication by touch contact of the button to a variety of read/write devices. iButton makes many capabilities which are limited to a stationary or hard-wired computer, portable and universally available. Among these capabilities are user-accessible memory, timekeeping, temperature measurement or logging, and encryption computation.
Signature Standard (FIPS 186), and many other modern cryptographic
operations.
Each iButton has a unique 8-byte serial number and guarantees that no two serial numbers are the same. Each iButton can be easily used in a network with its serial number as an address for Internet connection.
As mentioned earlier, an iButton communicates with a processor by a simple touch to a 1-Wire interface called a Blue Dot Receptor. The iButton is ideal for applications where information needs to travel with a person or object. Some iButtons are memory devices that can hold files and subdirectories and can be read and written like small floppy disks. There are iButtons with password-protected capabilities for a file for security applications where the iButtons counts the number of times the files have been rewritten for securing financial transactions, point-of-sale transactions, remote access authorization, data logging (including time and temperature), maintenance and quality control.
Java Ring with the iButton can be carried around as an accessory for many reasons. Passwords are difficult to keep as a secret. They can be stolen. Short passwords are easy to guess where as long passwords are difficult to remember and tend to be written down. There are many password breaking tools available such as brute force, scanning word lists and using patterns. Many network applications transmit passwords clear over the network.
The receptor has an adapter that connects to the computer's serial, parallel, or USB port. Communication is established when an iButton is touched to the Blue Dot receptor. The iButton draws the power it requires to operate from the connection. When not in contact with a receptor, the state of the Java virtual machine and memory is maintained with lithium backup power.
Java iButton is Java Card 2.0 compliant. Java iButton, can be used to write applets that can be compiled with the standard tools available from Sun Microsystems. These applets can be loaded into the Java iButton, and run on demand to support a wide variety of financial applications. The Java Card 2.0 specification provides the opportunity to implement a useful version of the JVM and runtime
environment with the limited resources available to a small processor. Java Card and its related topics are discussed in chapter 3.
3.2.1. How secure is iButton:
The National Institute of Standards (NIST) and the Communications security Establishment (CSE) have validated a version of the crypto iButton for protection of sensitive, unclassified information. FIPS 140-2 validation assures government agencies that the products provide a trusted, physically secure module to properly protect secure information [10].
penetrate the iButton's barriers and read its contents in less than the time it takes to erase its private keys.
There are specific intrusions that result in zeroization. Opening the case of the iButton, removing the chips metallurgically bonded substrate barricade, micro-probing the chip or subjecting the chip to temperature extremes leads to zeroization.
In addition to above, the sole I/O pin is designed in such a way that if an excess voltage is encountered, the I/O pin fuses and renders the chip inoperable.
The U.S. Postal Service's (USPS) Information Based Indicia Program Postal Security Device Specification is intended to permit printing of valid U.S. postage on any PC. This required a combination of two areas of expertise, cryptographic security and high resistance to attack by hackers.
With it zeroization capability and the private key, crypto iButton is one of the least counterfeitable devices. It would destroy itself rather than reveal its secret when tampered. The iButton in the Java Ring is Java Card 2.0 compliant. Java Card is a type of smart card. Next chapter explains what smart cards and Java Cards are and how they work and a closer look at writing applets in Java Card.
The iButton provides different pins such as User PIN, Admin PIN and Master PIN that can be set on the ibutton to control the operations on the iButton.
3.3. Java Card Technology
discusses how smart cards communicate. The Java Card section discusses about Java Card, how Java Card communicates and how the applets run in a Java Card.
3.3.1. Smart Card:
Smart cards are small computing devices that act as tokens to enable services that require security. A smart card is a type of chip card, embedded with a computer chip that store and transact data between users. This data in a smart card is associated with either value or information or both and is stored and processed within the card’s chip which is either a memory or microprocessor.
A smart card resembles a credit card in size and shape, but inside it is an embedded 8-bit microprocessor. There are two basic kinds of smart cards: An intelligent smart card contains a microprocessor and offers read, write, and calculating capability, like a small microcomputer. A memory card, on the other hand, does not have a microprocessor and is meant only for information storage. A memory card uses security logic to control the access of memory [12].
In all, there are five types of smart cards:
1. memory cards
2. processor cards
3. electronic purse cards
4. security cards
5. JavaCard
A smart card can communicate by inserting it into a Card Acceptance Device (CAD), which may be connected to another computer. The Card Acceptance Device can be a terminal, reader, or interface device. They all provide the same basic functions such as supplying the card with power and establishing a data-carrying connection.
Smart Card Communication model:
The Communication takes place in a smart card by inserting Smart Cards into a CAD which is connected to some computer, where the applications reside. These applications are known as host applications. The host applications communicate by sending commands to the applets in the smart cards. These commands are known as Command APDUs (Application Protocol Data Unit). APDU contains either a command or a response message. In this card model, the master-slave model is used whereby a smart card always plays the passive role. In other words, a smart card always waits for a command APDU from a terminal. It then executes the action specified in the APDU and replies to the terminal with a response APDU. Command APDUs and response APDUs are exchanged alternatively between a card and a terminal. A detail look at APDU is given in the Java Card section of the chapter.
Smart Card Applications:
Smart Cards are used for many applications. Smart cards can be used with a smart-card reader attachment to a personal computer to authenticate a user. Web browsers can use smart card technology to supplement Secure Sockets Layer (SSL) for improved security of Internet transactions. Smart-card readers can also be found in mobile phones and vending machines.
The most common smart card applications are:
• Credit cards
• Electronic cash
• Loyalty systems (like frequent flyer points)
• Banking
• Satellite TV
•
Government identification [14]3.3.2. OpenCard Framework :
Using a smart card requires an interface for the user to be able to read the card and communicate with it using an application. These interfaces are implemented by OpenCard framework.
OpenCard provides a framework by defining interfaces that must be implemented. Applications using smart cards can read and communicate by implementing the interfaces defined by OpenCard framework. Once these interfaces are implemented, other services in the upper layers of the API can be used.
OpenCard Framework architecture:
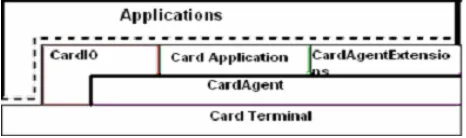
The architecture of the OpenCard Framework is made up of the CardTerminal, the CardAgent, the Agents and/or applications that interact with these components. OpenCard consists of four Java packages with the prefix opencard:
1. application
2. io
3. agent
4. terminal
The figure below gives an overview of the OpenCard Framework architecture.
Figure 3.5: OpenCard Framework Architecture
The opencard.agent package abstracts the functionality of the smart card through the CardAgent. The opencard.terminal package contains classes to represent the card-terminal hardware, to interact with the user, and to manage card-terminal resources. A card terminal abstracts the device that is used in a computer system to communicate with a smart card.
3.3.3. Introduction to JavaCard
JavaCard was introduced by Schlumberger and submitted as a standard by JavaSoft [15]. Java Card is a smart card with the potential to set the overall smart card standard, and is comprised of standard classes and APIs that let Java applets run directly on a standard ISO 7816 compliant card [15]. Java Cards enable secure and chip-independent execution of different applications.
A Java Card means a smart card that is enabled to work with Java Card Technology. Java Card Technology allows applets written in the Java language to be executed on smart cards. A Java card is a smart card that is able to execute Java byte code, similar to the way Java-enabled browsers can execute. But standard Java with all of its libraries is far too big to fit on a smart card. A solution to this problem is a stripped-down flavor of Java. Java Card is a special, stripped-down version of Java that runs on a smartcard itself. In whole, Java Card Technology provides JCRE (Java Card Runtime Environment) together with other classes and APIs for developers to create applets to be executed on smart cards. It is based on a subset of the Java API plus some special-purpose card commands. Unlike smartcard products which have only one application per card, Java Card allows smart cards to have multiple applications on them. The minimum system requirement is 16 kilobytes of read-only memory (ROM), 8 kilobytes of EEPROM, and 256 bytes of random access memory (RAM).
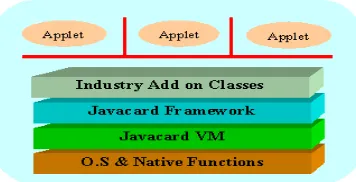
Figure 3.6: Java Card System Architecture
As shown in the figure, the Java Card VM is built on top of a specific integrated circuit (IC) and native operating system implementation. The JVM layer hides the manufacturer's proprietary technology with a common language and system interface. The Java Card framework defines a set of Application Programming Interface (API) classes for developing Java Card applications and for providing system services to those applications. Add-on libraries to provide a service or to refine the security and system model are supplied by specific industry or business supplies. Java Card applications are called applets. Multiple applets can reside on one card. Each applet is identified uniquely by its AID (application identifier), as defined in ISO 7816 [19].
The Java Card virtual machine separates applications from the underlying hardware and operating system. The Java Card platform’s standardized API provides a uniform interface to disparate smart cards. This unique approach uses the widely-understood benefits of object-oriented programming to enable security at both the application and platform level [22].
Due to limited memory resources and computing power, the Java Card specifically, does not support:
• Security manager
• Threads and synchronization
• Object cloning
• Finalization
•
Large primitive data types (float, double, long) and char data type [17]3.3.4. Java Card and OpenCard:
An OpenCard Framework is Java in the computer or terminal talking to a smartcard. Java applications running on a PC can use OpenCard to access Java Card smart cards and standard smart cards. Java applets (also known as cardlets) can be written and run on Java Card which is compliant with the Java Card standard. OpenCard is the ideal host-side application framework for accessing Java Card. Any smart card to access Java Card needs a card service which supports the interfaces of Java Card applet [13].
3.3.5. Java Card Applets:
When a Java Card is inserted, the Card Acceptance Device (CAD) accepts the Java Card and selects an applet which sends a series of commands to execute. Each applet in a Java Card is identified and selected by its unique Application Identifier (AID). Commands are formatted and transmitted between the application and the applets using Application Protocol Data Units (APDU). Applets reply to each APDU command as status words. Applets can optionally reply to an APDU with other data. The communication between the applet and the application are discussed in detail in the next part.
• Specifying the working functionality of the applet
• Requesting and assigning AIDs to both the applet and the packages containing the applet class
• Designing the class structure of the program and
• Defining the interface between the applet and the terminal application.
Interface between an Applet in Java Card and Its Terminal Application:
The APDU is like an interface between an applet and the application hosted on the CAD. All the communication between an applet and the application hosted on the Cad is carried by the APDU.
APDU (Application Protocol Data Unit):
• APDU commands are always a set of pairs. Each pair contains a Command APDU and a Response APDU. A Command APDU specifies a command sent by the application through a CAD, and response APDU specifies the result executed by the applet.
• The terminal application sends a command APDU through the CAD. The JCRE receives the command and either selects a new applet or passes the command to the currently selected applet, which processes the command and returns a response APDU to the terminal application. Command APDU and response APDU are exchanged alternately between a card and a CAD.
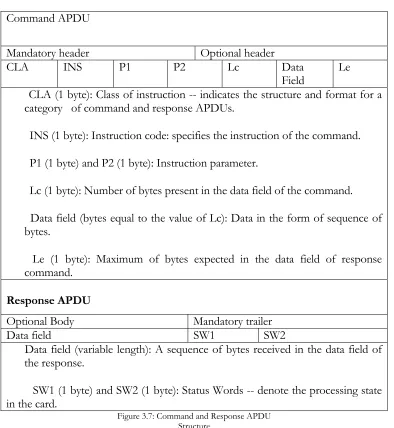
Command APDU
Mandatory header Optional header
CLA INS P1 P2 Lc Data
Field Le CLA (1 byte): Class of instruction -- indicates the structure and format for a
category of command and response APDUs.
INS (1 byte): Instruction code: specifies the instruction of the command.
P1 (1 byte) and P2 (1 byte): Instruction parameter.
Lc (1 byte): Number of bytes present in the data field of the command.
Data field (bytes equal to the value of Lc): Data in the form of sequence of bytes.
Le (1 byte): Maximum of bytes expected in the data field of response command.
Response APDU
Optional Body Mandatory trailer
Data field SW1 SW2
Data field (variable length): A sequence of bytes received in the data field of the response.
SW1 (1 byte) and SW2 (1 byte): Status Words -- denote the processing state in the card.
Figure 3.7: Command and Response APDU Structure
final static private byte THIS_APPLET_CLA = (byte)0x80; ...
public void process(APDU apdu) {
byte[] buffer = apdu.getBuffer(); //Check for a valid CLA.
if(buffer[ISO.OFFSET_CLA] != THIS_APPLET_CLA) {
ISOException.throwIt(ISO.SW_CLA_NOT_SUPPORTED); }
...
INS - The INS field is meant to be used to tell the applet what instruction the host wishes to be performed. The particular value of the instruction bytes do not matter, as long as the applet and host both know what numbers each instruction corresponds to. For example, both a host and its corresponding applet might have the following declarations:
// BEGIN INSTRUCTION DECLARATIONS
public static final byte BASICS_CLA = (byte)0x80;
public static final byte BASICS_INS_STORE_NUMBER = (byte)0; public static final byte BASICS_INS_GET_NUMBER = (byte)1;
// END INSTRUCTION DECLARATIONS
The process method would perform the appropriate instruction by doing a switch on the INS field of the apdu, calling the appropriate method:
//Call the appropriate dispatch method for the given INS. switch (buffer[ISO.OFFSET_INS])
{
case BASICS_INS_STORE_NUMBER:
store_numberDispatch(apdu, buffer[ISO.OFFSET_P1], buffer[ISO.OFFSET_P2]);
case BASICS_INS_GET_NUMBER: get_numberDispatch(apdu, buffer[ISO.OFFSET_P1], buffer[ISO.OFFSET_P2]); break; default: ISOException.throwIt(ISO.SW_INS_NOT_SUPPORTED); }
P1 & P2 - The P1 and P2 fields are normally used as additional control data. For example, if you had an instruction to sort a byte array on the iButton with the option to sort forwards or backwards. You may not want to break that up into separate instructions. Instead, you could pass the same instruction, and set a value of P1 or P2 to indicate how the array should be sorted.
DATA - This field contains the data (in the form of a byte array) sent. An example of how to access this data follows:
public void process(APDU apdu) {
...
byte[] buffer = apdu.getBuffer();
apduData = new byte[buffer[ISO.OFFSET_LC] & 0x0FF]; short apduDataOffset = 0;
//Read in the entire APDU.
short bytesRead = apdu.setIncomingAndReceive(); //Loop until all bytes have been read.
while (bytesRead > 0) {
Util.arrayCopyNonAtomic(buffer, ISO.OFFSET_CDATA, apduData, apduDataOffset, bytesRead);
apduDataOffset += bytesRead;
bytesRead = apdu.receiveBytes(ISO.OFFSET_CDATA); }
/*********************************************** * The byte array apduData now contains the * data sent from the host to the applet.
Functionality inside a Java Card:
Inside a Java Card, JCRE (Java Card Runtime Environment) refers to the Java Card virtual machine and the classes in the Java Card Framework. JCRE assigns the unique AID to each applet within a Java Card. After an applet is correctly loaded into the card's persistent memory and linked with the Java Card Framework and other libraries on the card, JCRE calls the applet's install method as the last step in the applet installation process. A public static method, install, must be implemented by an applet class to create an instance of the applet and register it with JCRE.
An applet on the card remains inactive until it is explicitly selected. The terminal sends a select APDU command to JCRE. JCRE suspends the currently selected applet and invokes the applet's deselect method to perform any necessary cleanup. JCRE then marks the applet whose AID is specified in the select APDU command as the currently selected applet and calls the newly selected applet's select method. The select method prepares the applet to accept APDU commands. JCRE dispatches the subsequent APDU commands to the currently selected applet until it receives the next select APDU command.
3.4. Programming in iButton :
Programming for the iButton requires writing both a host application and an iButton applet. These two are completely separate Java programs that will communicate with each other but be executed on two different machines.
The applet is downloaded and run on the iButton itself. Once installed and selected to run, it waits to process host instructions. A detailed explanation of the structure of an iButton applet is given in the iButton Applet Structure part of this section.
3.4.1. Host Application Structure:
The host application is responsible for controlling the iButton applet. It allows a user to interact with the applet, sending command instructions and displaying output.
The host code, with full security access, has complete control of the iButton. It can retrieve and erase an iButton's contents, download an applet, or select a particular applet already installed on the button to run.
Host Interface
A host application must implement opencard.core.event.CTListener. This allows the host application to receive events when an iButton is inserted or removed. A host that implements CTListener must implement the methods cardInserted and cardRemoved. A CardTerminalEvent is the parameter to these methods, and can be used to obtain a SlotChannel, which is used to send APDU's to the iButton.
Host and Applet Communication
execution, which means no errors or exceptions, occurred in processing the instruction is indicated with a status word of 0x9000 [21].
The host application must know the class and instruction bytes of each iButton applet it expects to control. These bytes are passed in the CommandAPDU header and will tell the applet what action to perform. The class byte is generally used as identification for the applet. Normally, most applets have one class byte (usually named CLASSNAME_CLA) that it references each time a CommandAPDU arrives from the host application. If the class byte sent from the host doesn't match the class byte of the applet, it throws an ISO.SW_CLA_NOT_SUPPORTED exception. In concert with the instruction byte, it can be used to act as additional control data.
Since a host application can't make a remote function call on the iButton, it has to send commands to indicate what functions to call or what actions to perform. The instruction byte of the CommandAPDU carries this information. Suppose an applet has designated the byte 0x04 to perform ‘exclusive or’ on two hardcoded integers, the host knows it wants the iButton to perform this action, it would send a CommandAPDU with applet's class byte and an instruction byte of 0x04.
The structure of a Host Application is shown below: [21]
Minimal Host Application, OpenCard API
import opencard.core.event.*; import opencard.core.service.*; import opencard.core.terminal.*; import opencard.opt.applet.*; import java.util.*;
import java.io.*;
{
public static final byte OCF_CLA = (byte)0x80;
public static final byte OCF_INS_EXECUTE = (byte)0; /**
* Sets up the listener for iButton inserted and iButton * removed events.
*
* @param appletPath the path to the applet that should * be loaded into the iButtons.
* @param appletName the name of the applet that should * be loaded into the iButtons.
*/
public ocf_Host() {
//************************************* //* Add any initialization code here. * //************************************* try {
opencard.core.service.SmartCard.start();
CardTerminalRegistry reg = CardTerminalRegistry.getRegistry(); reg.addCTListener(this);
reg.createEventsForPresentCards(this); } catch(Exception e)
{
System.out.println("Caught an exception: "+e.toString()); System.exit(0);
} } /**
* Called when an iButton gets inserted. *
* @param event the insertion event. */
public void cardInserted(CardTerminalEvent ctevent) {
System.out.println("Card has been inserted"); SlotChannel sc = null;
try {
***************************************************/ CardTerminal ct = ctevent.getSlot().getCardTerminal(); int slotid = ctevent.getSlot().getSlotID();
Object lock = new Object();
sc = ct.openSlotChannel(slotid, lock);
//***************************************** //* Insert any code to be done when * //* an iButton is inserted here, * //* using the SlotChannel object 'sc' * //***************************************** executeDispatch(sc);
} catch(CardTerminalException cte) {
System.err.println("ERROR: CardTerminalException occurred while communicating with iButton.");
cte.printStackTrace(); } catch(IOException ioe)
{ System.out.println("IO Exception"); ioe.printStackTrace();
} catch(Exception e) {
//Exceptions that occur in iButtonInserted events //will be drained in the OpenCard internals if we //don't catch them here.
System.err.println("Exception in cardInserted:"); e.printStackTrace();
}
finally {
//we must ALWAYS close the slot channel!!! try
{ if (sc!=null) sc.close();
iButton Applet Structure:
The iButton applet runs on the iButton itself. It receives and executes instructions from the host. After an applet has been downloaded to the iButton and selected, it waits for Command APDU's to be sent from the host. When an APDU is received, the applet's process method is called to handle the command. The process method should perform the correct function for the instruction contained in the APDU and will automatically return a Response APDU. This response APDU contains any data the applet writes out, and a status word indicating the success or failure of executing the instruction.
Data Types
The iButton applet has the following data types available: int, short, byte, boolean, and one dimensional arrays. There is no String data type available on the iButton. String data should be saved into a byte array in order to be used in an iButton applet.
Structure:
An applet written to run on the Java ring follows a very simple structure. The iButton applet must extend javacard.framework.Applet and must override the constructor, the install method, and the process method. The constructor must first make a call to the register() function, which registers this applet with the JCRE (Java Card Runtime Environment). The process of writing an applet is very similar to applet programming in that there are several methods that you have to override. These methods are:
• deselect -- another applet, or possibly this one, is about to be selected
• install -- installs the applet
• register -- register applet
• select -- called when a select command is received
The static install method should create a new instance of this applet. The process method should perform the appropriate function based on the instruction passed in the APDU. The process method will be called when the applet is selected. So it should check to see if selection is the reason it is being called. (If the applet is being selected, then the CLA will be 0x00, and the INS will be 0xA4.)
The workings of the process() with the APDU is shown in the figure below. The APDU commands are sent from the host (client) application as shown in the figure below.
Figure 3.8: Workings of the APDU from the reader side to the card side
The basic structure of an iButton applet is as shown below
import javacard.framework.*;
public class Basics_Applet extends Applet {
...
public Basics_Applet() {
//************************************** //* Add any initialization code here. * //************************************** }
public static void install(APDU apdu) {
new Basics_Applet(); }
public void process(APDU apdu) {
byte[] buffer = apdu.getBuffer();
//Determine if the applet is being selected.
if((buffer[ISO.OFFSET_CLA] == SELECT_CLA) && (buffer[ISO.OFFSET_INS] == SELECT_INS)) {
//*********************************** //* Add any code to be executed on * //* applet selection here. *
//*********************************** return;
}
//Check for a valid CLA.
if(buffer[ISO.OFFSET_CLA] != BASICS_CLA) {
ISOException.throwIt(ISO.SW_CLA_NOT_SUPPORTED); }
else {
default:
ISOException.throwIt(ISO.SW_INS_NOT_SUPPORTED); }
} } ...
Java developers must override at least the install and process methods of the super class, Applet. In simple applets such as Business Card discussed next, install simply constructs a new instance. It is the job of the constructor to register the applet with the Java Card runtime environment (JCRE).
The following code segment demonstrates how to override the install method. [9] The install method is normally used to set up the applet environment. Simple applets may be ready to run after calling install. More complicated applets may require additional initialization sequences. The code in the process method is not given below.
class BusinessCard extends Applet { public BusinessCard() {
// Register our applet with the JCRE register();
}
public static void install(APDU apdu) { new BusinessCard();
}
public void process(APDU apdu) throws ISOException { .
. . } . . . }
whenever a command APDU is received from the host. Following is a segment of BusinessCard's implementation of the process method. Its structure is typical of Java Card applets.
public void process(APDU apdu) throws ISOException { byte[] buffer = apdu.getBuffer();
// process selects separately .
. .
if (buffer[ISO.OFFSET_CLA] != BC_CLA) { // Don't know what to do with this instruction
throw new ISOException(ISO.SW_CLA_NOT_SUPPORTED); }
else {
switch (buffer[ISO.OFFSET_INS]) { // Store new business card data case BC_INS_STORE:
businessCardStore(apdu); break;
// Send business card data to the host case BC_INS_RETRIEVE:
businessCardRetrieve(apdu); break;
// Don't know what to do with this instruction default:
throw new ISOException(ISO.SW_INS_NOT_SUPPORTED); }
} }
3.5. Java Card Applet Example:
The following example is an electronic wallet application, which stores electronic cash. The wallet handles read_balance, deposit, and debits APDU commands. Access to the wallet is authenticated by an owner PIN [17].
The example is formatted in two columns: The left column contains Java code with Java style comments; the right column provides further explanation of the code that it lines up with on the left side.
package bank.purse; Java Card supports
package and identifier name convention as in standard Java
import javacard.framework.*; import javacardx.framework.*;
public class Wallet extends Applet {
/* constants declaration */
An applet is an instance of a class which extends from javacard.framework.Applet
// code of CLA byte in the command APDU header
final static byte Wallet_CLA =(byte)0xB0;
CLA identifies the application
// codes of INS byte in the command APDU header
final static byte Deposit = (byte) 0x10; final static byte Debit = (byte) 0x20;
final static byte Balance = (byte) 0x30; final static byte Validate = (byte) 0x40;
application instructions
// maximum number of incorrect tries before the PIN is blocked
final static byte PinTryLimit =(byte)0x03;
// maximum size PIN
final static byte MaxPinSize =(byte)0x04;
PIN object parameters
// status word (SW1-SW2) to signal that the balance becomes negative;
final static short SW_NEGATIVE_BALANCE = (short)
0x6910;
Applet specific static word
/* instance variables declaration */ OwnerPIN pin;
byte balance;
byte buffer[];
// APDU buffer
private Wallet() {
// It is good programming practice to allocate
// all the memory that an applet needs during its
// lifetime inside the constructor
pin = new OwnerPIN(PinTryLimit, MaxPinSize);
balance = 0;
register();
} // end of the constructor
method. Applet registers itself with JCRE by calling register method, which is defined in class Applet. Now the applet is visible to the outside world
public static void install(APDU apdu){
// create a Wallet applet instance new Wallet();
} // end of
install method
Method install is invoked by JCRE as the last step in the applet installation process
public boolean select() {
// reset validation flag in the PIN object to false pin.reset();
// returns true to JCRE to indicate that the applet
// is ready to accept incoming APDUs.
return true;
}// end of select method
messages.
public void process(APDU apdu) {
// APDU object carries a byte array (buffer) to // transfer incoming and outgoing APDU header // and data bytes between card and CAD
buffer = apdu.getBuffer();
After the applet is successfully selected, JCRE dispatches incoming APDUs to this method.
APDU object is owned and maintained by JCRE. It encapsulates details of the underlying
transmission protocol (T0 or T1 as specified in ISO 7816-3) by providing a common interface.
// verify that if the applet can accept this // APDU message
if (buffer[ISO.OFFSET_CLA] !== Wallet_CLA)
ISOException.throwIt
(ISO.SW_CLA_NOT_SUPPORTED);
When an error occurs, the applet may decide to terminate the process and throw an exception containing status word (SW1 SW2) to indicate the processing state of the card.
caught by an applet is caught by JCRE.
switch (buffer[ISO.OFFSET_INS]) { case Balance: getBalance(apdu); return; case Debit:
debit(apdu); return;
case Deposit: deposit(apdu);return; case Validate: validate(apdu);return
default:
ISOException.throwIt
(ISO.SW_INS_NOT_SUPPORTED);
}
} // end of process method
The main function of process method is to perform an action as specified in APDU
and returns an appropriate response to the terminal.
INS byte specifies the type of action needs to be performed
private void deposit(APDU apdu) {
// access authentication
if ( ! pin.isValidated() )
ISOException.throwIt (ISO.SW_PIN_REQUIRED);
// Lc byte denotes the number of bytes in the data
// field of the comamnd APDU
byte numBytes = (byte) (buffer[ISO.OFFSET_LC]);
// indicate that this APDU has incoming data and // receive data starting from the offset
// ISO.OFFSET_CDATA
byte byteRead = (byte)(apdu.setIncomingAndReceive());
// it is an error if the number of data bytes read does
not
// match the number in Lc byte
if (byteRead != 1)
ISOException.throwIt(ISO.SW_WRONG_LENGTh);
// increase the balance by the amount specified in the // data field of the command APDU.
balance = (byte)
(balance + buffer[ISO.OFFSET_CDATA]);
// return successfully return;
} // end of deposit method
Upon receiving the APDU object from JCRE, the first 5 bytes (CLA, INS, P1, P2, Lc/Le) are available in the APDU buffer. Their offsets in the APDU buffer are specified in the class ISO. Because the data field is optional, the applet needs to explicitly inform JCRE to retrieve additional data bytes.
response APDU.
When JCRE catches an Exception, which signals an error during processing the command, JCRE would use the status word contained in the Exception to construct the response APDU.
private void debit(APDU apdu) {
// access authentication if ( ! pin.isValidated() )
ISOException.throwIt(ISO.SW_PIN_REQUIRED);
byte numBytes = (byte)(buffer[ISO.OFFSET_LC]); byte byteRead = (byte)(apdu.setIncomingAndReceive());
if (byteRead != 1)
ISOException.throwIt(ISO.SW_WRONG_LENGTH);
// balance can not be negative
if ( ( balance - buffer[ISO.OFFSET_CDATA]) < 0 ) ISOException.throwIt(SW_NEGATIVE_BALANCE);
balance = (byte)
In debit method, The APDU object contains a data field, which specifies the amount to be
(balance - buffer[ISO.OFFSET_CDATA]);
} // end of debit method
private void getBalance(APDU apdu) {
// access authentication
if ( ! pin.isValidated() )
ISOException.throwIt(ISO.SW_PIN_REQUIRED);
// inform system that the applet has finished processing // the command and the system should now prepare to // construct a response APDU which contains data field apdu.setOutgoing();
// indicate the number of bytes in the data field apdu.setOutgoingLength((byte)1);
// move the data into the APDU buffer starting at offset 0 buffer[0] = balance;
// send 1 byte of data at offset 0 in the APDU buffer apdu.sendBytes((short)0, (short)1);
} // end of getBalance method
getBalance returns the Wallet’s balance in the data field of the response APDU.
Because the data field in response APDU is optional, the applet needs to explicitly inform JCRE of the additional data. JCRE uses the data array in the APDU object buffer and the proper status word to construct a complete response APDU.
private void validate(APDU apdu) {
// retrieve the PIN data which requires to be valid ated // the user interface data is stored in the data field of the
APDU
byte byteRead = (byte)(apdu.setIncomingAndReceive());
// validate user interface and set the validation flag in the
user interface
// object to be true if the validation succeeds.
// if user interface validation fails, PinException would be
// thrown from pin.check() method.
pin.check(buffer, ISO.OFFSET_CDATA, byteRead);
} // end of validate method
} // end of class Wallet
PIN is a method
commonly used in smart cards to protect data from unauthorized access
A PIN records the number of unsuccessful tries since the last correct PIN verification. The card would be blocked, if the number of unsuccessful tries exceeds the maximum number of allowed tries defined in the PIN.
After the applet is successfully selected, PIN needs to be validated first, before any other
C h a p t e r 4
FINGERPRINT AUTHENTICATOR
4.1. Introduction to Fingerprint Authenticator:
Biometrics is defined in the security industry as a measurable physical characteristic or personal behavioral trait used to recognize the identity or verify the claimed identity of a person and biometric identification is the use of computers to confirm the identity of a user [24].
Unlike other ways of authentication such as passwords – something a person knows, security device – something a person possess, biometrics deals with something a person is. While a password and a security device can be stolen, a biometric cannot be stolen and is always with you. Biometrics have proven to be an effective solution for high-security access control, ensuring that only authorized individuals can access protected or secure data. Biometric systems require controlled and accurate enrollment processes, careful monitoring of security settings to ensure that the risk of unauthorized entry is low and well-designed interfaces to ensure rapid acquisition and matching.
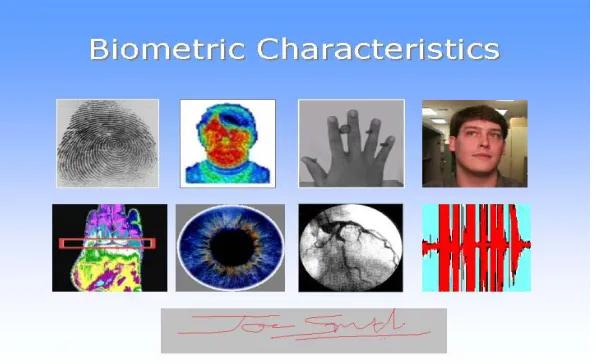
Figure 4.1: Different Biometrics
The first image is a finger print, second a spatial thermogram where an infrared image of the face is obtained by the heat emitted from the face. The third image shows the hand geometry, fourth face recognition, fifth heat emitted by the hand, sixth iris, seventh retina scan where a light is used to scan the retina, eight speech recognition and ninth signature.
Figure 4.2: Face Recognition and Handwriting [24]
As the complexity involved with fingerprint is not as much as with other kinds of biometric authentication, fingerprint authentication is considered a better way of authentication. Since different fingers have different ridges and characteristics, these minute details help to identify a person and do not reveal other information about the person than required. These minute details are permanent for each person. Even identical twins have different fingerprints. Fingerprints have a long history and are considered to be unique. Fingerprint impressions in clay tablets over 2000 years old have been seen in archaeological materials from both China and the Middle East. Fingerprinting received a scientific basis through work performed in the 19th and 20th century by a wide variety of researchers and institutions [28].
The problem with fingerprints is that the fingerprint sensor can be fooled. Here are some of the cases where fingerprint sensors were fooled.
This can be done by lifting a latent print from a sensor or spoofing with an easily crafted gummy finger made of a home made gelatin mold [25]. Fingerprints are lifted from objects such as a coffee cup and a gummy finger is created and touched up using a microscope.
• Reactivating a latent fingerprint by placing a water-filled plastic bag on the sensor or brushing graphite powder on the sensor and applying pressure to an adhesive film on top of the powder are some of the other ways of fooling a fingerprint sensor [26].
• Latent prints placed on a transparency by simply pressing on the surface. The prints are increased in clarity and contrast by using a black latent print powder. After brushing away the excess powder, the latent fingerprint is lifted using scotch tape. The tape and print is then placed on to the sensor with the sticky side down and pressure is applied to activate the sensor. [26].
• A Milpitas, California-based company claims to have addressed some fingerprint fooling methods with a technology that relies on a combination of a new algorithm and monitoring of physical changes to the optical sensor reading the print [25].
• Factors such as calluses, dryness, moisture or the affects of aging can affect the image capturing of the fingerprint sensor.
Figure 4.3: The Entrepad Family Authentec AES4000
This fingerprint uses Trueprint technology.
4.1.1. TruePrint Technology:
TruePrint based fingerprint sensors are small components that can be easily designed into almost any electronic device. The user simply places his finger flat on the sensor surface to activate the system. The sensor generates an image of the pattern in the finger skin that touches it.
TruePrint technology sensors can capture images from beneath the surface of the skin where the ridge-and-valley pattern suffers less damage from day-to-day living. It is this technology that does not let the fingerprint sensor be fooled by a gummy finger or any of the sensor fooling methods mentioned before. By looking below the surface layer of the skin, TruePrint Technology reads the real fingerprint, producing an unaffected, undistorted image, thus avoiding the limitations of previous techniques where the upper layer of the finger is scanned. Unlike prior approaches, skin surface conditions such as calluses, dryness, moisture or the effects of aging do not limit the image capturing ability. Contaminants such as ink, paint or glue have little or no effect as it is the second layer that is scanned.
4.1.2. Security concern with storing fingerprints:
control who will be able to peruse or access it. To date, this lack of control has been subject to the limitations of regulation and of the technology itself.
The authentication system in this project provides a solution. It allows individuals to control the access themselves - thus rendering individuals no longer impotent to the vulnerability of computers, databases and software or to accidents, malfunction or intrusion. This project aims to hand the individual back control of their identity. This is done by storing the fingerprint in the iButton of the Java Ring which an individual carries with him. This is discussed in the implementation part in chapter 5.
4.2. Authentec API:
The fingerprint system used in this thesis provides the developers of the AuthenTec fingerprint biometrics with AuthenTec Windows Fingerprint System (AWFS) API library. In further sections of the thesis AuthenTec Windows Fingerprint System is referenced as AWFS.
The next part of this chapter goes through the fundamentals of AWFS API and discusses all the terms and functions needed in the thesis.
The AWFS API supports a comprehensive set of functions for single application using a single sensor. It provides functions for fingerprint database management to store user and fingerprint data and algorithms for extracting template data from fingerprint images and for matching fingerprint template data.
Below are some of the definitions and terminology used through the project.
an enrollment takes place, the template is stored in BLOB. The AWFS allows an application to store arbitrary information (in addition to templates) for a user in the form of a BLOB in the AWFS database.
Enrollment: The process by which the reference template for a user is constructed and stored in a database is called Enrollment. This is done by collecting one or more images from the fingerprint sensor, extracting salient feature data and combining these results to make a template.
Identification: A match operation in which a fingerprint is compared to templates in an AWFS database to determine the identity, i.e., name and finger number, associated with the fingerprint.
Image Item: An image item is an opaque structure that is used by the AWFS to pass image data to and receive image data from an application. An image item contains pixel data, sizing data and other AWFS proprietary data.
Match Template: A template that is created during an authentication operation from one or more images acquired from the sensor is called a Match template. During authentication, match templates are compared to reference templates to determine if they represent the same fingerprint.
Reference Template: A template created during the enrollment process is called a Reference Template.
Verification: A match operation in which a finger print is matched against an application-supplied list of templates. An application will use a verification operation when it maintains reference templates in its own database.
Sensor Interface:
The AWFS software can support from 1 to 36 physical sensors attached to a single system. This application uses a single sensor
AT_RESULT_CODE ATOpenSensor ( TCHAR* pszStrSensorName,
int16 AccessMode )
An application must call ATOpenSensor() to open an AWFS sensor prior to performing any sensor access functions. The first parameter, pszStrSensorName, in the function is the name of the sensor to open. In the most common usage case, a system with a single unnamed sensor, an application will pass NULL for the sensor name. If pszStrSensorName is non-NULL, it must be the name assigned to the sensor by running the ATSensorWizzard.
Database Services:
Some of the features of the AWFS database are as follows:
Shareable and Exclusive Use Databases: An application using an AWFS database can open it with either shared or exclusive access. When more than one application need the same user data and need to access the same database, shared access database is used. A database can be opened with exclusive access when an application wants to preclude use of the database by other applications or processes.
Support for Binary Large Objects: The AWFS database provides functions to save and retrieve application-defined binary data for a user. The AWFS is not concerned with the data content of this user information and deals with this user data as a Binary Large Object (BLOB). A BLOB has no structure that can be interpreted by the AWFS and is known only by its size in bytes [30].
Deletion of Stored Data: The AWFS provides functions to delete specified templates for a user, to delete all data for a user and to delete all data for all users.
Database Query Support: The AWFS provides functions to get a count of the number of users in the database, to obtain a list of all users enrolled in the database and to obtain a list of fingers enrolled for a given user.
Some of the functions of AWFS database are creating a database, opening a database, closing a database. An application using an AWFS database must open it before performing any database read, write or delete functions. An error will be returned to the application if it fails to open a database prior to calling an AWFS API function. An application calls ATOpenDatabase() to create a new database or to open an existing database.


![Figure 4.2: Face Recognition and Handwriting [24]](https://thumb-us.123doks.com/thumbv2/123dok_us/8931225.1846683/58.612.146.501.104.281/figure-face-recognition-and-handwriting.webp)
![Figure 4.4: Biometric data Stored/Matched [31]](https://thumb-us.123doks.com/thumbv2/123dok_us/8931225.1846683/76.612.168.492.200.409/figure-biometric-data-stored-matched.webp)