Office 2013
A L L - I N - O N E
FOR
by Peter Weverka
Office 2013
A L L - I N - O N E
FOR
Office 2013 All-in-One For Dummies®
Published by
John Wiley & Sons, Inc.
111 River Street Hoboken, NJ 07030-5774
www.wiley.com
Copyright © 2013 by John Wiley & Sons, Inc., Hoboken, New Jersey Published by John Wiley & Sons, Inc., Hoboken, New Jersey Published simultaneously in Canada
No part of this publication may be reproduced, stored in a retrieval system or transmitted in any form or by any means, electronic, mechanical, photocopying, recording, scanning or otherwise, except as permit-ted under Sections 107 or 108 of the 1976 Unipermit-ted States Copyright Act, without either the prior written permission of the Publisher, or authorization through payment of the appropriate per-copy fee to the Copyright Clearance Center, 222 Rosewood Drive, Danvers, MA 01923, (978) 750-8400, fax (978) 646-8600. Requests to the Publisher for permission should be addressed to the Permissions Department, John Wiley & Sons, Inc., 111 River Street, Hoboken, NJ 07030, (201) 748-6011, fax (201) 748-6008, or online at http:// www.wiley.com/go/permissions.
Trademarks: Wiley, the Wiley logo, For Dummies, the Dummies Man logo, A Reference for the Rest of Us!, The Dummies Way, Dummies Daily, The Fun and Easy Way, Dummies.com, Making Everything Easier, and related trade dress are trademarks or registered trademarks of John Wiley & Sons, Inc. and/or its affiliates in the United States and other countries, and may not be used without written permission. Microsoft is a trademark of Microsoft Corporation. All other trademarks are the property of their respective owners. John Wiley & Sons, Inc. is not associated with any product or vendor mentioned in this book.
LIMIT OF LIABILITY/DISCLAIMER OF WARRANTY: THE PUBLISHER AND THE AUTHOR MAKE NO REPRESENTATIONS OR WARRANTIES WITH RESPECT TO THE ACCURACY OR COMPLETENESS OF THE CONTENTS OF THIS WORK AND SPECIFICALLY DISCLAIM ALL WARRANTIES, INCLUDING WITHOUT LIMITATION WARRANTIES OF FITNESS FOR A PARTICULAR PURPOSE. NO WARRANTY MAY BE CREATED OR EXTENDED BY SALES OR PROMOTIONAL MATERIALS. THE ADVICE AND STRATEGIES CONTAINED HEREIN MAY NOT BE SUITABLE FOR EVERY SITUATION. THIS WORK IS SOLD WITH THE UNDERSTANDING THAT THE PUBLISHER IS NOT ENGAGED IN RENDERING LEGAL, ACCOUNTING, OR OTHER PROFESSIONAL SERVICES. IF PROFESSIONAL ASSISTANCE IS REQUIRED, THE SERVICES OF A COMPETENT PROFESSIONAL PERSON SHOULD BE SOUGHT. NEITHER THE PUBLISHER NOR THE AUTHOR SHALL BE LIABLE FOR DAMAGES ARISING HEREFROM. THE FACT THAT AN ORGANIZATION OR WEBSITE IS REFERRED TO IN THIS WORK AS A CITATION AND/OR A POTENTIAL SOURCE OF FURTHER INFORMATION DOES NOT MEAN THAT THE AUTHOR OR THE PUBLISHER ENDORSES THE INFORMATION THE ORGANIZATION OR WEBSITE MAY PROVIDE OR RECOMMENDATIONS IT MAY MAKE. FURTHER, READERS SHOULD BE AWARE THAT INTERNET WEBSITES LISTED IN THIS WORK MAY HAVE CHANGED OR DISAPPEARED BETWEEN WHEN THIS WORK WAS WRITTEN AND WHEN IT IS READ.
For general information on our other products and services, please contact our Customer Care Department within the U.S. at 877-762-2974, outside the U.S. at 317-572-3993, or fax 317-572-4002. For technical support, please visit www.wiley.com/techsupport.
Wiley publishes in a variety of print and electronic formats and by print-on-demand. Some material included with standard print versions of this book may not be included in e-books or in print-on-demand. If this book refers to media such as a CD or DVD that is not included in the version you purchased, you may download this material at http://booksupport.wiley.com. For more information about Wiley products, visit www.wiley.com.
Library of Congress Control Number: 2012956418
ISBN: 978-1-118-51636-2 (pbk); ISBN 978-1-118-55025-0 (ebk); ISBN 978-1-118-55029-8 (ebk); ISBN 978-1-118-55024-3 (ebk)
About the Author
Peter Weverka is the best-selling author of many For Dummies books, including Office 2010 All-in-One For Dummies, as well as 38 other computer books about various topics. Peter’s humorous articles and stories — none related to computers, thankfully — have appeared in
Dedication
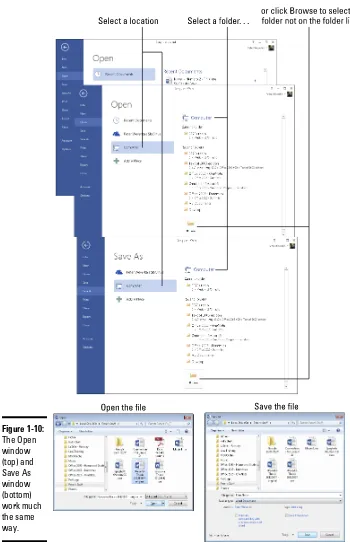
For Aiko Sofia and Henry Gabriel.
Author’s Acknowledgments
This book owes a lot to many hard-working people at the offices of John Wiley & Sons, Inc. in Indiana. For the umpteenth time, I want to express my gratitude to Steve Hayes for his encouragement and the opportunity to write another For Dummies book.
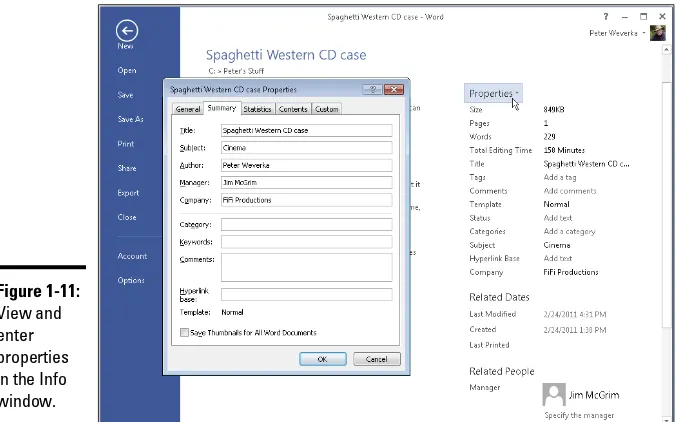
Susan Christophersen knows the editing craft as well as any editor I have ever worked with. It was a pleasure — once again — to work with her. Technical Editor Michele Krazniak made sure that all the explanations in this book are indeed accurate, and I would like to thank her for her diligence and suggestions for improving this book. I would also like to thank BIM Proofreading & Indexing Services for writing the index. If you turn this page you will see, on the flip side, the names of all the people who worked on this book. I am grateful to all of them.
Publisher’s Acknowledgments
We’re proud of this book; please send us your comments at http://dummies.custhelp.com. For other comments, please contact our Customer Care Department within the U.S. at 877-762-2974, outside the U.S. at 317-572-3993, or fax 317-572-4002.
Some of the people who helped bring this book to market include the following:
Acquisitions and Editorial Project and Copy Editor: Susan
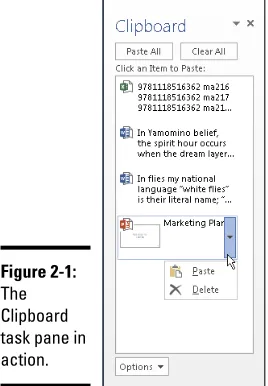
Christophersen
Executive Editor: Steve Hayes
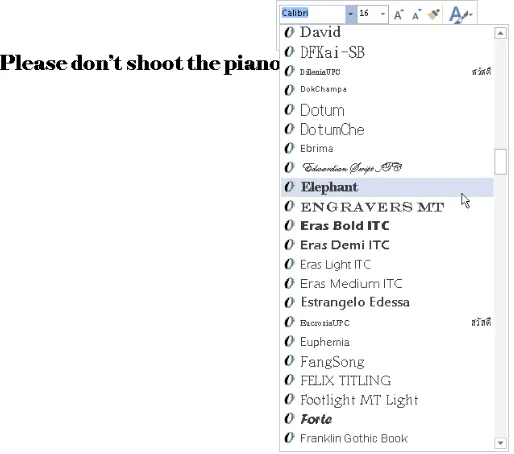
Technical Editor: Michelle Krazniak
Editorial Manager: Jodi Jensen
Editorial Assistant: Annie Sullivan
Sr. Editorial Assistant: Cherie Case
Cover Photo: © iStockphoto.com / kzenon
Composition Services
Project Coordinator: Patrick Redmond
Layout and Graphics: Ana Carrillo, Jennifer Creasey, Joyce Haughey
Proofreaders: Jessica Kramer, Linda Seifert
Indexer: BIM Indexing & Proofreading Services
Publishing and Editorial for Technology Dummies
Richard Swadley, Vice President and Executive Group Publisher
Andy Cummings, Vice President and Publisher
Mary Bednarek, Executive Acquisitions Director
Mary C. Corder, Editorial Director
Publishing for Consumer Dummies
Kathleen Nebenhaus, Vice President and Executive Publisher
Composition Services
Contents at a Glance
Introduction ... 1
Book I: Common Office Tasks ... 7
Chapter 1: Office Nuts and Bolts ... 9
Chapter 2: Wrestling with the Text... 29
Chapter 3: Speed Techniques Worth Knowing About ... 47
Book II: Word 2013 ... 55
Chapter 1: Speed Techniques for Using Word ... 57
Chapter 2: Laying Out Text and Pages ... 75
Chapter 3: Word Styles ... 99
Chapter 4: Constructing the Perfect Table ... 115
Chapter 5: Taking Advantage of the Proofing Tools... 139
Chapter 6: Desktop Publishing with Word ... 159
Chapter 7: Getting Word’s Help with Office Chores ... 177
Chapter 8: Tools for Reports and Scholarly Papers ... 197
Book III: Excel 2013 ... 219
Chapter 1: Up and Running with Excel ... 221
Chapter 2: Refining Your Worksheet ... 239
Chapter 3: Formulas and Functions for Crunching Numbers ... 253
Chapter 4: Making a Worksheet Easier to Read and Understand ... 275
Chapter 5: Advanced Techniques for Analyzing Data... 293
Book IV: PowerPoint 2013 ... 307
Chapter 1: Getting Started in PowerPoint... 309
Chapter 2: Fashioning a Look for Your Presentation ... 331
Chapter 3: Entering the Text ... 347
Chapter 4: Making Your Presentations Livelier ... 363
Chapter 5: Delivering a Presentation ... 379
Book V: OneNote 2013 ... 401
Chapter 1: Up and Running with OneNote... 403
Chapter 2: Taking Notes ... 415
Book VI: Outlook 2013 ... 439
Chapter 1: Outlook Basics ... 441
Chapter 2: Maintaining the Contacts Folder ... 455
Chapter 3: Handling Your E-Mail ... 465
Chapter 4: Managing Your Time and Schedule ... 489
Chapter 5: Tasks, Reminders, and Notes ... 497
Book VII: Access 2013 ... 505
Chapter 1: Introducing Access ... 507
Chapter 2: Building Your Database Tables ... 521
Chapter 3: Entering the Data ... 549
Chapter 4: Sorting, Querying, and Filtering for Data ... 559
Chapter 5: Presenting Data in a Report... 579
Book VIII: Working with Charts and Graphics ... 583
Chapter 1: Creating a Chart ... 585
Chapter 2: Making a SmartArt Diagram ... 603
Chapter 3: Handling Graphics, Photos, and Clip Art ... 623
Chapter 4: Drawing and Manipulating Lines, Shapes, and Other Objects ... 641
Book IX: Office 2013: One Step Beyond ... 671
Chapter 1: Customizing an Office Program ... 673
Chapter 2: Ways of Distributing Your Work ... 687
Chapter 3: Working with Publisher ... 697
Book X: File Sharing and Collaborating ... 713
Chapter 1: Preparing to Use the Office Web Apps ... 715
Chapter 2: Using the Office Web Apps ... 725
Chapter 3: Sharing and Collaborating ... 733
Table of Contents
Introduction ... 1
What’s in This Book, Anyway? ... 1
What Makes This Book Different ... 2
Easy-to-look-up information ... 3
A task-oriented approach ... 3
Meaningful screen shots ... 3
Foolish Assumptions ... 3
Conventions Used in This Book ... 4
Icons Used in This Book ... 4
Book I: Common Office Tasks ... 7
Chapter 1: Office Nuts and Bolts . . . .9
A Survey of Office Applications ... 9
Starting an Office Program ... 11
Starting an Office program in Windows 7 and Vista ... 11
Starting an Office program in Windows 8 ... 13
Finding Your Way Around the Office Interface ... 14
The File tab and Backstage ... 15
The Quick Access toolbar ... 15
The Ribbon and its tabs ... 15
Context-sensitive tabs ... 16
The anatomy of a tab ... 17
Live previewing ... 18
Mini-toolbars and shortcut menus ... 18
Office 2013 for keyboard lovers ... 19
Saving Your Files ... 20
Saving a file ... 20
Saving a file for the first time ... 20
Declaring where you like to save files ... 20
Saving AutoRecovery information ... 22
Navigating the Save As and Open Windows ... 23
Opening and Closing Files ... 25
Opening a file ... 25
Closing a file... 26
Reading and Recording File Properties ... 26
Locking a File with a Password ... 27
Password-protecting a file ... 27
Office 2013 All-in-One For Dummies
xii
Chapter 2: Wrestling with the Text . . . .29
Manipulating the Text ... 29
Selecting text ... 29
Moving and copying text... 30
Taking advantage of the Clipboard task pane ... 31
Deleting text... 32
Changing the Look of Text ... 32
Choosing fonts for text ... 33
Changing the font size of text ... 34
Applying font styles to text ... 35
Applying text effects to text ... 36
Underlining text ... 37
Changing the color of text ... 38
Quick Ways to Handle Case, or Capitalization ... 38
Entering Symbols and Foreign Characters ... 40
Creating Hyperlinks ... 41
Linking a hyperlink to a web page ... 41
Creating a hyperlink to another place in your file ... 43
Creating an e-mail hyperlink... 44
Repairing and removing hyperlinks ... 45
Chapter 3: Speed Techniques Worth Knowing About . . . .47
Undoing and Repeating Commands ... 47
Undoing a mistake ... 47
Repeating an action — and quicker this time ... 48
Zooming In, Zooming Out ... 48
Viewing a File Through More Than One Window ... 50
Correcting Typos on the Fly ... 50
Entering Text Quickly with the AutoCorrect Command ... 52
Book II: Word 2013 ... 55
Chapter 1: Speed Techniques for Using Word . . . .57
Introducing the Word Screen ... 57
Creating a New Document ... 59
Getting a Better Look at Your Documents ... 61
Viewing documents in different ways ... 61
Splitting the screen ... 64
Selecting Text in Speedy Ways ... 65
Moving Around Quickly in Documents ... 66
Keys for getting around quickly ... 66
Navigating from page to page or heading to heading ... 67
Going there fast with the Go To command... 68
Bookmarks for hopping around ... 68
Table of Contents
xiii
Entering Information Quickly in a Computerized Form ... 70
Creating a computerized form ... 71
Entering data in the form ... 73
Chapter 2: Laying Out Text and Pages . . . .75
Paragraphs and Formatting ... 75
Inserting a Section Break for Formatting Purposes ... 76
Breaking a Line ... 78
Starting a New Page ... 78
Setting Up and Changing the Margins ... 79
Indenting Paragraphs and First Lines ... 81
Clicking an Indent button (for left-indents) ... 81
“Eye-balling it” with the ruler ... 81
Indenting in the Paragraph dialog box ... 83
Numbering the Pages ... 83
Numbering with page numbers only ... 84
Including a page number in a header or footer ... 85
Changing page number formats ... 85
Putting Headers and Footers on Pages ... 86
Creating, editing, and removing headers and footers ... 87
Fine-tuning a header or footer... 89
Adjusting the Space Between Lines ... 90
Adjusting the Space Between Paragraphs ... 91
Creating Numbered and Bulleted Lists ... 92
Simple numbered and bulleted lists ... 92
Constructing lists of your own ... 93
Managing a multilevel list ... 94
Working with Tabs ... 95
Hyphenating Text ... 96
Automatically and manually hyphenating a document ... 97
Unhyphenating and other hyphenation tasks ... 98
Chapter 3: Word Styles . . . .99
All About Styles ... 99
Styles and templates ... 99
Types of styles ... 100
Applying Styles to Text and Paragraphs ... 101
Applying a style ... 101
Experimenting with style sets ... 103
Choosing which style names appear on the Style menus ... 104
Creating a New Style ... 105
Creating a style from a paragraph ... 106
Creating a style from the ground up ... 106
Modifying a Style ... 108
Creating and Managing Templates ... 109
Creating a new template ... 109
Opening a template so that you can modify it ... 113
Office 2013 All-in-One For Dummies
xiv
Chapter 4: Constructing the Perfect Table . . . .115
Talking Table Jargon ... 115
Creating a Table ... 116
Entering the Text and Numbers ... 118
Selecting Different Parts of a Table ... 119
Laying Out Your Table ... 120
Changing the size of a table, columns, and rows ... 120
Adjusting column and row size ... 121
Inserting columns and rows ... 121
Deleting columns and rows ... 123
Moving columns and rows ... 123
Aligning Text in Columns and Rows ... 124
Merging and Splitting Cells ... 125
Repeating Header Rows on Subsequent Pages ... 126
Formatting Your Table ... 127
Designing a table with a table style ... 127
Calling attention to different rows and columns ... 129
Decorating your table with borders and colors ... 129
Using Math Formulas in Tables ... 132
Neat Table Tricks ... 133
Changing the direction of header row text ... 133
Wrapping text around a table ... 134
Using a picture as the table background ... 135
Drawing diagonal lines on tables ... 136
Drawing on a table ... 137
Chapter 5: Taking Advantage of the Proofing Tools . . . .139
Correcting Your Spelling Errors ... 140
Correcting misspellings one at a time ... 140
Running a spell-check ... 141
Preventing text from being spell checked ... 143
Checking for Grammatical Errors in Word ... 143
Getting a Word Definition ... 144
Finding and Replacing Text ... 145
The basics: Finding stray words and phrases ... 145
Narrowing your search ... 146
Conducting a find-and-replace operation ... 152
Researching a Topic Inside Word ... 153
Finding the Right Word with the Thesaurus ... 155
Proofing Text Written in a Foreign Language ... 156
Telling Office which languages you will use ... 156
Marking text as foreign language text ... 157
Table of Contents
xv
Chapter 6: Desktop Publishing with Word . . . .159
Experimenting with Themes ... 159
Sprucing Up Your Pages ... 161
Decorating a page with a border ... 161
Putting a background color on pages ... 162
Getting Word’s help with cover letters ... 162
Making Use of Charts, Diagrams, Shapes, Clip Art, and Photos ... 163
Working with the Drawing Canvas ... 164
Positioning and Wrapping Objects Relative to the Page and Text ... 165
Wrapping text around an object ... 166
Positioning an object on a page ... 167
Working with Text Boxes ... 169
Inserting a text box ... 170
Making text flow from text box to text box ... 170
Dropping In a Drop Cap ... 171
Watermarking for the Elegant Effect ... 171
Putting Newspaper-Style Columns in a Document ... 173
Doing the preliminary work ... 173
Running text into columns ... 173
Landscape Documents ... 174
Printing on Different Size Paper ... 175
Showing Online Video in a Document ... 176
Chapter 7: Getting Word’s Help with Office Chores . . . .177
Highlighting Parts of a Document ... 177
Commenting on a Document ... 178
Entering a comment ... 178
Viewing and displaying comments ... 180
Caring for and feeding comments ... 180
Tracking Changes to Documents ... 181
Telling Word to start marking changes ... 182
Reading and reviewing a document with change marks ... 183
Marking changes when you forgot to turn on change marks ... 184
Accepting and rejecting changes to a document... 186
Printing an Address on an Envelope ... 186
Printing a Single Address Label (or a Page of the Same Label) ... 188
Churning Out Letters, Envelopes, and Labels for Mass Mailings ... 189
Preparing the source file ... 190
Merging the document with the source file... 191
Printing form letters, envelopes, and labels... 195
Chapter 8: Tools for Reports and Scholarly Papers . . . .197
Alphabetizing a List ... 197
Outlines for Organizing Your Work ... 198
Viewing the outline in different ways ... 199
Office 2013 All-in-One For Dummies
xvi
Collapsing and Expanding Parts of a Document ... 200
Generating a Table of Contents ... 200
Creating a TOC ... 201
Updating and removing a TOC ... 202
Customizing a TOC ... 202
Changing the structure of a TOC ... 203
Indexing a Document ... 205
Marking index items in the document... 206
Generating the index ... 207
Editing an index... 209
Putting Cross-References in a Document ... 209
Putting Footnotes and Endnotes in Documents ... 211
Entering a footnote or endnote ... 212
Choosing the numbering scheme and position of notes ... 213
Deleting, moving, and editing notes ... 214
Compiling a Bibliography ... 214
Inserting a citation for your bibliography ... 215
Editing a citation ... 217
Changing how citations appear in text ... 217
Generating the bibliography ... 217
Book III: Excel 2013 ... 219
Chapter 1: Up and Running with Excel . . . .221
Creating a New Excel Workbook ... 221
Getting Acquainted with Excel ... 223
Rows, columns, and cell addresses ... 225
Workbooks and worksheets ... 225
Entering Data in a Worksheet ... 225
The basics of entering data ... 225
Entering text labels ... 227
Entering numeric values ... 227
Entering date and time values ... 228
Quickly Entering Lists and Serial Data with the AutoFill Command ... 231
Formatting Numbers, Dates, and Time Values ... 232
Conditional Formats for Calling Attention to Data ... 235
Establishing Data-Validation Rules ... 236
Chapter 2: Refining Your Worksheet . . . .239
Editing Worksheet Data ... 239
Moving Around in a Worksheet ... 240
Getting a Better Look at the Worksheet ... 241
Freezing and splitting columns and rows ... 241
Hiding columns and rows ... 243
Comments for Documenting Your Worksheet ... 244
Table of Contents
xvii
Deleting, Copying, and Moving Data ... 247
Handling the Worksheets in a Workbook ... 247
Keeping Others from Tampering with Worksheets ... 249
Hiding a worksheet ... 250
Protecting a worksheet ... 250
Chapter 3: Formulas and Functions for Crunching Numbers . . . .253
How Formulas Work ... 253
Referring to cells in formulas ... 253
Referring to formula results in formulas... 256
Operators in formulas ... 257
The Basics of Entering a Formula ... 258
Speed Techniques for Entering Formulas ... 259
Clicking cells to enter cell references ... 259
Entering a cell range ... 260
Naming cell ranges so that you can use them in formulas ... 261
Referring to cells in different worksheets... 264
Copying Formulas from Cell to Cell ... 264
Detecting and Correcting Errors in Formulas ... 266
Correcting errors one at a time... 266
Running the error checker... 267
Tracing cell references ... 268
Working with Functions ... 269
Using arguments in functions ... 271
Entering a function in a formula ... 271
Chapter 4: Making a Worksheet Easier to Read and Understand . . .275
Laying Out a Worksheet ... 275
Aligning numbers and text in columns and rows ... 276
Inserting and deleting rows and columns... 278
Changing the size of columns and rows ... 279
Decorating a Worksheet with Borders and Colors ... 280
Cell styles for quickly formatting a worksheet ... 281
Formatting cells with table styles ... 283
Slapping borders on worksheet cells ... 284
Decorating worksheets with colors ... 285
Getting Ready to Print a Worksheet ... 285
Making a worksheet fit on a page ... 286
Making a worksheet more presentable ... 289
Repeating row and column headings on each page ... 290
Chapter 5: Advanced Techniques for Analyzing Data . . . .293
Seeing What the Sparklines Say ... 293
Managing Information in Lists ... 294
Sorting a list ... 295
Filtering a list ... 296
Office 2013 All-in-One For Dummies
xviii
Performing What-If Analyses with Data Tables ... 299
Using a one-input table for analysis ... 299
Using a two-input table for analysis ... 301
Analyzing Data with Pivot Tables ... 303
Creating a PivotTable ... 303
Putting the finishing touches on a PivotTable ... 305
Book IV: PowerPoint 2013 ... 307
Chapter 1: Getting Started in PowerPoint . . . .309
Getting Acquainted with PowerPoint ... 310
A Brief Geography Lesson ... 311
A Whirlwind Tour of PowerPoint ... 312
Creating a New Presentation ... 313
Advice for Building Persuasive Presentations ... 316
Creating New Slides for Your Presentation ... 318
Inserting a new slide ... 319
Speed techniques for inserting slides ... 319
Conjuring slides from Word document headings ... 321
Selecting a different layout for a slide ... 322
Getting a Better View of Your Work ... 323
Changing views ... 323
Looking at the different views ... 323
Hiding and Displaying the SlidesPane and Notes Pane ... 324
Selecting, Moving, and Deleting Slides ... 325
Selecting slides ... 325
Moving slides ... 325
Deleting slides ... 326
Putting Together a Photo Album ... 326
Creating your photo album ... 326
Putting on the final touches ... 328
Editing a photo album ... 329
Hidden Slides for All Contingencies ... 329
Hiding a slide ... 329
Showing a hidden slide during a presentation ... 330
Chapter 2: Fashioning a Look for Your Presentation . . . .331
Looking at Themes and Slide Backgrounds ... 331
Choosing a Theme for Your Presentation ... 334
Creating Slide Backgrounds on Your Own ... 334
Using a solid (or transparent) color for the slide background .... 335
Creating a gradient color blend for slide backgrounds ... 335
Placing a picture in the slide background ... 337
Using a photo of your own for a slide background ... 338
Table of Contents
xix
Changing the Background of a Single or Handful of Slides ... 341
Choosing the Slide Size ... 342
Using Master Slides and Master Styles for a Consistent Design ... 342
Switching to Slide Master view ... 342
Understanding master slides and master styles ... 343
Editing a master slide ... 344
Changing a master slide layout ... 345
Chapter 3: Entering the Text . . . .347
Entering Text ... 347
Choosing fonts for text ... 348
Changing the font size of text ... 349
Changing the look of text ... 349
Fun with Text Boxes and Text Box Shapes ... 350
Controlling How Text Fits in Text Frames and Text Boxes ... 352
Choosing how PowerPoint “AutoFits” text in text frames ... 353
Choosing how PowerPoint “AutoFits” text in text boxes ... 355
Positioning Text in Frames and Text Boxes ... 356
Handling Bulleted and Numbered Lists ... 357
Creating a standard bulleted or numbered list ... 357
Choosing a different bullet character, size, and color ... 358
Choosing a different list-numbering style, size, and color ... 359
Putting Footers (and Headers) on Slides ... 359
Some background on footers and headers ... 360
Putting a standard footer on all your slides ... 360
Creating a nonstandard footer ... 361
Removing a footer from a single slide ... 362
Chapter 4: Making Your Presentations Livelier . . . .363
Suggestions for Enlivening Your Presentation ... 363
Presenting Information in a Table ... 364
Exploring Transitions and Animations ... 365
Showing transitions between slides ... 367
Animating parts of a slide ... 368
Making Audio Part of Your Presentation ... 370
Inserting an audio file on a slide ... 371
Telling PowerPoint when and how to play an audio file ... 372
Playing audio during a presentation ... 373
Playing Video on Slides ... 374
Inserting a video on a slide ... 374
Fine-tuning a video presentation ... 374
Experimenting with the look of the video... 376
Recording a Voice Narration for Slides ... 377
Chapter 5: Delivering a Presentation . . . .379
All about Notes ... 379
Office 2013 All-in-One For Dummies
xx
Showing Your Presentation ... 381 Starting and ending a presentation ... 382 Going from slide to slide ... 383 Tricks for Making Presentations a Little Livelier ... 385 Wielding a pen or highlighter in a presentation ... 385 Blanking the screen ... 387 Zooming In ... 387 Delivering a Presentation When You Can’t Be There in Person ... 388 Providing handouts for your audience ... 388 Creating a self-running, kiosk-style presentation ... 389 Creating a user-run presentation ... 391 Presenting a Presentation Online ... 393 Packaging your presentation on a CD ... 395 Creating a presentation video ... 398
Book V: OneNote 2013 ... 401
Chapter 1: Up and Running with OneNote . . . .403
Introducing OneNote ... 403 Finding Your Way Around the OneNote Screen ... 404 Notebook pane ... 405 Section (and section group) tabs ... 405 Page window ... 405 Page pane ... 405 Units for Organizing Notes ... 405 Creating a Notebook ... 407 Creating Sections and Section Groups ... 408 Creating a new section ... 408 Creating a section group ... 409 Creating Pages and Subpages ... 410 Creating a new page ... 410 Creating a new subpage ... 410 Renaming and Deleting Groups and Pages ... 411 Getting from Place to Place in OneNote ... 411 Changing Your View of OneNote ... 412
Chapter 2: Taking Notes . . . .415
Table of Contents
xxi
Drawing on the Page ... 418 Drawing with a pen or highlighter ... 419 Drawing a shape ... 420 Changing the size and appearance of drawings and shapes ... 421 Converting a Handwritten Note to Text ... 422 Writing a Math Expression in a Note ... 423 Taking a Screen-Clipping Note ... 424 Recording and Playing Audio Notes ... 425 Recording an audio note ... 426 Playing an audio note ... 426 Attaching, Copying, and Linking Files to Notes ... 427 Attaching an Office file to a note ... 427 Copying an Office file into OneNote ... 429 Linking a Word or PowerPoint file to OneNote ... 429 Copying a note into another Office program... 430
Chapter 3: Finding and Organizing Your Notes . . . .431
Finding a Stray Note ... 431 Searching by word or phrase ... 431 Searching by author ... 432 Tagging Notes for Follow Up ... 433 Tagging a note ... 434 Arranging tagged notes in the task pane ... 435 Creating and modifying tags ... 435 Color-Coding Notebooks, Sections, and Pages ... 437 Merging and Moving Sections, Pages, and Notes ... 437
Book VI: Outlook 2013 ... 439
Chapter 1: Outlook Basics . . . .441
Office 2013 All-in-One For Dummies
xxii
Chapter 2: Maintaining the Contacts Folder . . . .455
Maintaining a Happy and Healthy Contacts Folder ... 455 Entering a new contact in the Contacts folder ... 456 Changing a contact’s information ... 458 Contact Groups for Sending Messages to Groups ... 459 Creating a contact group ... 460 Addressing e-mail to a contact group ... 461 Editing a contact group ... 461 Finding a Contact in the Contacts Folder ... 461 Printing the Contacts Folder ... 462 Different ways to print contact information ... 462 Changing the look of printed pages ... 463
Chapter 3: Handling Your E-Mail . . . .465
Setting Up an E-Mail Account ... 465 Addressing and Sending E-Mail Messages ... 466 The basics: Sending an e-mail message ... 466 Addressing an e-mail message ... 468 Sending copies and blind copies of messages ... 470 Replying to and forwarding e-mail messages ... 470 Sending Files and Photos ... 471 Sending a file along with a message ... 472 Including a photo in an e-mail message ... 472 Being Advised When Someone Has Read Your E-Mail ... 473 Receiving E-Mail Messages ... 474 Getting your e-mail ... 474 Being notified that e-mail has arrived ... 475 Reading Your E-Mail in the Inbox Window ... 475 Handling Files That Were Sent to You ... 478 Saving a file you received ... 478 Opening a file you received ... 479 Techniques for Organizing E-Mail Messages ... 479 Flagging e-mail messages ... 481 Being reminded to take care of e-mail messages ... 481 Rules for earmarking messages as they arrive ... 483 All about E-Mail Folders ... 484 Moving e-mail messages to different folders ... 484 Creating a new folder for storing e-mail... 485 Yes, You Can Prevent Junk Mail (Sort Of) ... 485 Defining what constitutes junk e-mail ... 486 Preventative medicine for junk e-mail... 486
Chapter 4: Managing Your Time and Schedule . . . .489
Table of Contents
xxiii
Scheduling Appointments and Events ... 492 Scheduling an activity: The basics ... 492 Scheduling a recurring appointment or event ... 494 Scheduling an event... 494 Canceling, Rescheduling, and Altering Activities ... 495
Chapter 5: Tasks, Reminders, and Notes . . . .497
Tasks: Seeing What Needs to Get Done ... 497 Entering a task in the Tasks window ... 498 Examining tasks in the Tasks window ... 499 Handling and managing tasks ... 500 Reminders for Being Alerted to Activities and Tasks ... 500 Handling reminder messages ... 501 Scheduling a reminder message ... 501 Making reminders work your way ... 502 Making Notes to Yourself ... 502
Book VII: Access 2013 ... 505
Chapter 1: Introducing Access . . . .507
What Is a Database, Anyway? ... 507 Tables, Queries, Forms, and Other Objects ... 509 Database tables for storing information ... 509 Forms for entering data ... 509 Queries for getting the data out ... 511 Reports for presenting and examining data ... 512 Macros and modules ... 513 Creating a Database File ... 513 Creating a blank database file ... 513 Getting the help of a template ... 514 Finding Your Way Around the Navigation Pane ... 514 Designing a Database ... 516 Deciding what information you need ... 516 Separating information into different database tables ... 517 Choosing fields for database tables ... 519 Deciding on a primary key field for each database table ... 519 Mapping the relationships between tables ... 520
Chapter 2: Building Your Database Tables . . . .521
Office 2013 All-in-One For Dummies
xxiv
Designating the primary key field ... 530 Moving, renaming, and deleting fields ... 531 Field Properties for Making Sure That Data Entries Are Accurate ... 532 A look at the Field Properties settings ... 532 Creating a lookup data-entry list ... 537 Indexing for Faster Sorts, Searches, and Queries ... 540 Indexing a field ... 540 Indexing based on more than one field ... 540 Establishing Relationships Between Database Tables ... 542 Types of relationships ... 543 Handling tables in the Relationships window ... 544 Forging relationships between tables ... 545 Editing table relationships ... 547
Chapter 3: Entering the Data . . . .549
The Two Ways to Enter Data ... 549 Entering the Data in Datasheet View ... 550 Entering data ... 551 Two tricks for entering data quicker ... 552 Changing the appearance of the datasheet ... 553 Entering the Data in a Form ... 554 Creating a form ... 555 Entering the data... 555 Finding a Missing Record ... 556 Finding and Replacing Data ... 557
Chapter 4: Sorting, Querying, and Filtering for Data . . . .559
Table of Contents
xxv
Six Kinds of Queries ... 574 Select query ... 574 Top-value query ... 574 Summary query ... 574 Calculation query ... 575 Delete query ... 577 Update query ... 577
Chapter 5: Presenting Data in a Report . . . .579
Creating a Report ... 579 Opening and Viewing Reports ... 581 Tweaking a Report ... 581
Book VIII: Working with Charts and Graphics ... 583
Chapter 1: Creating a Chart . . . .585
The Basics: Creating a Chart ... 585 Choosing the Right Chart ... 587 Providing the Raw Data for Your Chart ... 588 Positioning Your Chart in a Workbook, Page, or Slide ... 590 Changing a Chart’s Appearance ... 591 Changing the chart type ... 591 Changing the size and shape of a chart ... 593 Choosing a new look for your chart ... 593 Changing the layout of a chart ... 593 Handling the gridlines ... 595 Changing a chart element’s color, font, or other particular ... 596 Saving a Chart as a Template So That You Can Use It Again ... 597 Saving a chart as a template ... 597 Creating a chart from a template ... 598 Chart Tricks for the Daring and Heroic ... 598 Decorating a chart with a picture ... 598 Annotating a chart ... 599 Displaying the raw data alongside the chart ... 600 Placing a trendline on a chart ... 600 Troubleshooting a Chart ... 601
Chapter 2: Making a SmartArt Diagram . . . .603
Office 2013 All-in-One For Dummies
xxvi
Changing the Size and Position of a Diagram ... 607 Laying Out the Diagram Shapes ... 608 Selecting a diagram shape ... 608 Removing a shape from a diagram ... 608 Moving diagram shapes to different positions ... 608 Adding shapes to diagrams apart from hierarchy diagrams ... 609 Adding shapes to hierarchy diagrams ... 610 Adding shapes to Organization charts ... 611 Promoting and demoting shapes in hierarchy diagrams ... 613 Handling the Text on Diagram Shapes ... 614 Entering text on a diagram shape ... 614 Entering bulleted lists on diagram shapes ... 615 Changing a Diagram’s Direction ... 615 Choosing a Look for Your Diagram ... 616 Changing the Appearance of Diagram Shapes ... 617 Changing the size of a diagram shape ... 617 Exchanging one shape for another ... 618 Changing a shape’s color, fill, or outline... 618 Changing fonts and font sizes on shapes ... 620 Creating a Diagram from Scratch ... 620
Chapter 3: Handling Graphics, Photos, and Clip Art . . . .623
All about Picture File Formats ... 623 Bitmap and vector graphics ... 623 Resolution ... 625 Compression... 626 Color depth ... 626 Choosing file formats for graphics ... 627 Inserting a Picture in an Office File ... 627 Inserting a picture of your own ... 628 Obtaining a picture online ... 629 Touching Up a Picture ... 631 Softening and sharpening pictures ... 631 Correcting a picture’s brightness and contrast ... 632 Recoloring a picture ... 633 Choosing an artistic effect ... 634 Selecting a picture style ... 635 Cropping off part of a picture ... 636 Removing the background ... 637 Compressing Pictures to Save Disk Space ... 639
Chapter 4: Drawing and Manipulating Lines,
Shapes, and Other Objects . . . .641
Table of Contents
xxvii
Attaching and handling arrowheads on lines and connectors .... 645 Connecting shapes by using connectors ... 646 Handling Rectangles, Ovals, Stars, and Other Shapes ... 648 Drawing a shape ... 648 Changing a shape’s symmetry ... 650 Using a shape as a text box ... 650 WordArt for Embellishing Letters and Words ... 651 Creating WordArt ... 652 Editing WordArt ... 652 Manipulating Lines, Shapes, Art, Text Boxes, and Other Objects ... 652 Selecting objects so that you can manipulate them... 654 Hiding and displaying the rulers and grid ... 655 Changing an Object’s Size and Shape ... 656 Changing an Object’s Color, Outline Color, and Transparency ... 657 Filling an object with color, a picture, or a texture ... 658 Making a color transparent ... 660 Putting the outline around an object ... 661 Moving and Positioning Objects ... 662 Tricks for aligning and distributing objects ... 662 When objects overlap: Choosing which appears
above the other ... 665 Rotating and flipping objects ... 667 Grouping objects to make working with them easier ... 668
Book IX: Office 2013: One Step Beyond ... 671
Chapter 1: Customizing an Office Program . . . .673
Customizing the Ribbon ... 673 Displaying and selecting tab, group, and command names ... 675 Moving tabs and groups on the Ribbon ... 675 Adding, removing, and renaming tabs, groups, and commands .... 676 Creating new tabs and groups ... 677 Resetting your Ribbon customizations ... 678 Customizing the Quick Access Toolbar ... 679 Adding buttons to the Quick Access toolbar ... 679 Changing the order of buttons on the Quick Access toolbar... 680 Removing buttons from the Quick Access toolbar ... 681 Placing the Quick Access toolbar above or below the Ribbon .... 681 Customizing the Status Bar ... 682 Changing the Screen Background ... 682 Customizing Keyboard Shortcuts in Word ... 684
Chapter 2: Ways of Distributing Your Work . . . .687
Office 2013 All-in-One For Dummies
xxviii
Sending Your File in an E-Mail Message ... 690 Saving an Office File as a Web Page ... 691 Choosing how to save the component parts... 692 Turning a file into a web page ... 692 Opening a web page in your browser ... 693 Blogging from inside Word ... 693 Describing a blog account to Word ... 694 Posting an entry to your blog ... 695 Taking advantage of the Blog Post tab ... 696
Chapter 3: Working with Publisher . . . .697
“A Print Shop in a Can” ... 697 Introducing Frames ... 698 Creating a Publication ... 699 Redesigning a Publication ... 700 Choosing a different template ... 701 Choosing a color scheme ... 701 Setting up your pages ... 701 Getting a Better View of Your Work ... 701 Zooming in and out ... 702 Viewing single pages and two-page spreads ... 703 Going from page to page ... 703 Entering Text on the Pages ... 703 Making Text Fit in Text Frames ... 704 Fitting overflow text in a single frame ... 705 Making text flow from frame to frame ... 706 Making Text Wrap around a Frame or Graphic ... 707 Replacing the Placeholder Pictures ... 707 Inserting, Removing, and Moving Pages ... 709 Master Pages for Handling Page Backgrounds ... 710 Switching to Master Page view... 710 Changing the look of a master page ... 710 Applying (or unapplying) a master page to publication pages ... 710 Running the Design Checker ... 711 Commercially Printing a Publication ... 712
Book X: File Sharing and Collaborating ... 713
Chapter 1: Preparing to Use the Office Web Apps . . . .715
Table of Contents
xxix
Managing Your Folders ... 719 Creating a folder... 720 Viewing and locating folders in the SkyDrive window ... 720 Going from folder to folder in SkyDrive ... 722 Deleting, moving, and renaming folders ... 723
Chapter 2: Using the Office Web Apps . . . .725
Creating an Office File in SkyDrive ... 725 Uploading Office Files to a Folder on SkyDrive ... 726 Saving a File from Office 2013 to SkyDrive ... 727 Opening Office Files Stored on SkyDrive ... 729 Opening a file in an Office Web App ... 729 Opening a file in an Office 2013 application ... 729 Downloading Files from SkyDrive to Your Computer ... 731 Managing Your Files on SkyDrive ... 731
Chapter 3: Sharing and Collaborating . . . .733
Sharing Files: The Big Picture ... 733 File access privileges ... 733 Links for sharing files ... 734 Sharing Your Files and Folders with Others ... 735 Seeing Files and Folders Others Shared with You ... 737 Investigating and Changing How Files and Folders Are Shared ... 737 Co-editing Shared Files on SkyDrive ... 739 Soliciting Information with a Survey Form ... 739
Office 2013 All-in-One For Dummies
Introduction
T
his book is for users of Microsoft Office 2013 who want to get to the heart of Office without wasting time. Don’t look in this book to find out how the different applications in the Office suite work. Look in this book to find out how you can get your work done better and faster with these applications.I show you everything you need to make the most of each of the Office appli-cations. On the way, you have a laugh or two. No matter how much or how little skill you bring to the table, this book will make you a better, more pro-ficient, more confident user of the Office 2013 applications.
What’s in This Book, Anyway?
This book, comprising ten mini-books, is your guide to making the most of the Office applications. It’s jam-packed with how-to’s, advice, shortcuts, and tips. Here’s a bare outline of the ten mini-books of this book:
✦ Book I: Common Office Tasks: Looks into the many commands and fea-tures that are common to all or several of the Office programs. Master the material in Book I and you will be well on your way to mastering all the programs. Book I explains handling text, the proofing tools, and speed techniques that can make you more productive in most of the Office applications.
✦ Book II: Word 2013: Explains the numerous features in Office’s word processor, including how to create documents from letters to reports. Use the techniques described here to construct tables, manage styles, turn Word into a desktop-publishing program, and quickly dispatch office tasks such as mass-mailings. You also discover how to get Word’s help in writing indexes, bibliographies, and other items of interest to scholars and report writers.
What Makes This Book Different
2
✦ Book IV: PowerPoint 2013: Demonstrates how to construct a meaning-ful presentation that makes the audience say “Wow!” Included in Book IV are instructions for making a presentation livelier and more original, both when you create your presentation and when you deliver it.
✦ Book V: OneNote 2013: Covers how to write, store, and organize notes in the Office 2013 note-taking application. You find out how to record video and audio notes, link notes to files and web pages, find stray notes, and make OneNote a way to organize your thoughts and ideas.
✦ Book VI: Outlook 2013: Shows you how to send and receive e-mail mes-sages and files, as well as track tasks, maintain an address book, and keep a calendar with Outlook. If you’re one of those people who receive numerous e-mail messages each day, you will be delighted to discover all the ways to track and manage e-mail — and junk e-mail — in Outlook.
✦ Book VII: Access 2013: Describes how to create a relational database for storing information, as well as query the database for information and gather the data into meaningful reports. Don’t be frightened by the word “database.” You will be surprised to discover how useful Access can be in your work.
✦ Book VIII: Working with Charts and Graphics: Explains how to present information in charts and diagrams, and how to use photos and clip art in your Word documents, PowerPoint presentations, and Excel spread-sheets. You also discover how to create lines, shapes, and text boxes to illustrate your ideas.
✦ Book IX: Office 2013: One Step Beyond: For people who want to take full advantage of Office, Book IX delves into customizing the Office 2013 applications. It also looks into alternative ways to distribute your work — in a blog or a web page, for example. You find out how to create bro-chures, pamphlets, newsletters, and other publications with Microsoft Publisher 2013, the “print shop in a can.”
✦ Book X: File Sharing and Collaborating: Explores how to use the Office Web Apps, the online versions of the Office software, to share files with co-workers and collaborate online. You find out how to manage folders on SkyDrive, the Microsoft service for storing and sharing files.
What Makes This Book Different
Foolish Assumptions
3
Easy-to-look-up information
This book is a reference, which means that readers have to be able to find instructions quickly. To that end, I have taken great pains to make sure that the material in this book is well organized and easy to find. The descriptive headings help you find information quickly. The bulleted and numbered lists make following instructions simpler. The tables make options easier to understand and compare.
I want you to be able to look down the page and see a heading or list with the name of the topic that concerns you. I want you to be able to find instructions quickly. Compare the table of contents in this book to the book next to it on the bookstore shelf. The table of contents in this book is put together better and presents topics so that you can find them in a hurry.
A task-oriented approach
Most computer books describe what the software is, but this book explains how to complete tasks with the software. I assume that you came to this book because you want to know how to do something — print form letters, create a worksheet, or query a database. You came to the right place. This book describes how to get tasks done.
Meaningful screen shots
The screen shots in this book show only the part of the screen that illustrates what is being explained in the text. When instructions refer to one part of the screen, only that part of the screen is shown. I took great care to make sure that the screen shots in this book serve to help you understand the Office 2013 programs and how they work. Compare this book to the one next to it on the bookstore shelf. Do you see how clean the screenshots in this book are?
Foolish Assumptions
Please forgive me, but I made one or two foolish assumptions about you, the reader of this book. I assumed that:
✦ You own a copy of Office 2013, the latest edition of Office, and you have installed it on your computer.
✦ You use a Windows operating system. All people who have the Windows operating system installed on their computers are invited to read this book. It serves people who have Windows 8, Windows 7, and Windows Vista.
Conventions Used in This Book
4
Conventions Used in This Book
I want you to understand all the instructions in this book, and in that spirit, I’ve adopted a few conventions.
Where you see boldface letters or numbers in this book, it means to type the letters or numbers. For example, “Enter 25 in the Percentage text box” means to do exactly that: Enter the number 25.
Sometimes two tabs on the Ribbon have the same name. To distinguish tabs with the same name from one another, I sometimes include one tab’s “Tools” heading in parentheses if there could be confusion about which tab I’m referring to. In PowerPoint, for example, when you see the words “(Table Tools) Design tab,” I’m referring to the Design tab for creating tables, not the Design tab for changing a slide’s appearance. (Book I, Chapter 1 describes the Ribbon and the tabs in detail.)
To show you how to step through command sequences, I use the ➪ symbol. For example, on the Insert tab in Word, you can click the Page Number button and choose Top of Page➪Simple to number pages. The ➪ symbol just creates a shorthand method of saying “Choose Top of Page and then choose Simple.”
To give most commands, you can press combinations of keys. For example, pressing Ctrl+S saves the file you’re working on. In other words, you can hold down the Ctrl key and press the S key to save a file. Where you see Ctrl+, Alt+, or Shift+ and a key name or key names, press the keys simultaneously. Yet another way to give a command is to click a button. When I tell you to
click a button, you see a small illustration of the button in the margin of this book (unless the button is too large to fit in the margin). The button shown here is the Save button, the one you can click to save a file.
Icons Used in This Book
To help you get the most out of this book, I’ve placed icons here and there. Here’s what the icons mean:
Next to the Tip icon, you can find shortcuts and tricks of the trade to make your visit to Officeland more enjoyable.
Icons Used in This Book
5
When I explain a juicy little fact that bears remembering, I mark it with a Remember icon. When you see this icon, prick up your ears. You will discover something that you need to remember throughout your adventures with Word, Excel, PowerPoint, or the other Office application I am demystifying. When I am forced to describe high-tech stuff, a Technical Stuff icon appears
Visit www.dummies.com for great Dummies content online.
Book I
Contents at a Glance
Contents at a Glance
Chapter 1: Office Nuts and Bolts . . . .9
A Survey of Office Applications ... 9 Starting an Office Program ... 11 Find Your Way Around the Office Interface ... 14 Saving Your Files ... 20 Navigating the Save As and Open Windows ... 23 Opening and Closing Files ... 25 Reading and Recording File Properties ... 26 Locking a File with a Password ... 27
Chapter 2: Wrestling with the Text . . . .29
Manipulating the Text ... 29 Changing the Look of Text ... 32 Quick Ways to Handle Case, or Capitalization ... 38 Entering Symbols and Foreign Characters ... 40 Creating Hyperlinks ... 41
Chapter 3: Speed Techniques Worth Knowing About . . . .47
Chapter 1: Office Nuts and Bolts
In This Chapter
✓ Introducing the Office applications ✓ Running an Office application ✓ Exploring the Office interface
✓ Saving and auto-recovering your files ✓ Opening and closing an Office file ✓ Recording a file’s document properties ✓ Clamping a password on a file
C
hapter 1 is where you get your feet wet with Office 2013. Walk right to the shore and sink your toes in the water. Don’t worry; I won’t push you from behind.In this chapter, you meet the Office applications and discover speed tech-niques for opening applications and files. I show you around the Ribbon, Quick Access toolbar, and other Office landmarks. I also show you how to open files, save files, and clamp a password on a file.
A Survey of Office Applications
Office 2013, sometimes called the Microsoft Office Suite, is a collection of computer applications. Why is it called Office? I think because the people who invented it wanted to make software for completing tasks that need doing in a typical office. When you hear someone talk about “Office” or “Office software,” they’re talking about several different applications. Table 1-1 describes the Office applications.
Table 1-1
Office Applications
Application Description
Word A word processor for writing letters, reports, and so on. A Word file is called a document (see Book II).
Excel A number cruncher for performing numerical analyses. An Excel file is called a workbook (see Book III).
A Survey of Office Applications
10
Table 1-1 (continued)
Application Description
PowerPoint A means of creating slide presentations to give in front of audiences. A PowerPoint file is called a presentation, or sometimes a slide show (see Book IV).
OneNote A way to take notes and organize your ideas (see Book V). Outlook A personal information manager, scheduler, and e-mailer
(see Book VI).
Access A database management application (see Book VII). Publisher A means of creating desktop-publishing files — pamphlets,
notices, newsletters, and the like (see Book IX, Chapter 3).
Table 1-2 describes the different Office 2013 editions. The Office Web Apps are free, abridged versions of Office software that were designed to help people collaborate online (Book X describes how to use them). Office 365 is a subscription service. For a monthly fee, subscribers to Office 365 can download and use Office software.
Table 2-2
Office 2013 Editions
Edition Applications
Office 2013 Professional Word, Excel, PowerPoint, OneNote, Outlook, Access, Publisher
Office 365 Word, Excel, PowerPoint, OneNote, Outlook, Access, Publisher
Office 2013 Home & Business Word, Excel, PowerPoint, OneNote, Outlook Office 2013 Home & Student Word, Excel, PowerPoint, OneNote Office Web Apps Word, Excel, PowerPoint, OneNote
Book I Chapter 1
Office Nuts
and Bolts
Starting an Office Program
11
Starting an Office Program
Unless you start an Office program, you can’t create a document, construct a worksheet, or make a database. Many have tried to undertake these tasks with mud and papier-mâché without starting a program first, but all have failed.
How you start an Office program depends on which version of the Windows operating system is on your computer. Read on.
Starting an Office program in Windows 7 and Vista
Here are the various ways to start an Office program on computers that run Windows 7 and Windows Vista:
✦ The old-fashioned way: Click the Start button, choose All
Programs➪Microsoft Office 2013, and then choose the program’s name on the submenu.
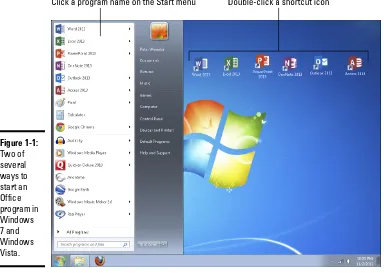
✦ The Start menu: Click the program’s name on the Start menu, as shown in Figure 1-1. The Start menu is the menu you see when you click the Start button. By placing a program’s name on the Start menu, you can open the program simply by clicking the Start button and then clicking the program’s name. To place an Office program on the Start menu:
1. Click the Start button and choose All Programs➪Microsoft Office 2013.
2. Move the pointer over the program’s name on the submenu, but don’t click to select the program’s name.
3. Right-click the program’s name and choose Pin to Start Menu on the shortcut menu that appears.
To remove a program’s name from the Start menu, right-click the name and choose Remove from This List.
✦ Desktop shortcut icon: Double-click the program’s shortcut icon (see Figure 1-1). A shortcut icon is an icon you can double-click to do some-thing in a hurry. By creating a shortcut icon on the Windows desktop, you can double-click the icon and immediately start an Office program. To place an Office shortcut icon on the desktop:
Starting an Office Program
[image:44.531.84.468.92.365.2]12
Figure 1-1: Two of several ways to start an Office program in Windows 7 and Windows Vista.
2. Move the pointer over the program’s name on the submenu, but don’t click the program’s name.
3. Right-click the program’s name and choose Send To➪Desktop (Create Shortcut) on the shortcut menu that appears.
To remove a desktop shortcut icon from the Windows desktop, right-click it, choose Delete, and right-click Yes in the Delete Shortcut dialog box. Don’t worry about deleting a program when you delete its short-cut icon. All you do when you choose Delete is remove the program’s shortcut icon from the desktop and make your desktop a little less crowded.
Book I Chapter 1
Office Nuts
and Bolts
Starting an Office Program
13
Starting an Office program in Windows 8
Here are the various ways to start an Office program on computers that run Windows 8:
✦ The conventional way: Right-click a blank area on the screen and click All Apps (located in the lower-left corner of the screen). Then scroll to the Office application you want to open and click its name.
✦ The Start menu: Click the application’s tile on the Start screen, as shown in Figure 1-2. To place an Office application tile on the Start screen:
1. Right-click a blank area of the screen.
2. Choose All Apps (located in the lower-right corner of the screen). 3. Scroll to the Office application that needs a tile on the Start screen. 4. Right-click the application’s name.
5. Click Pin to Start.
[image:45.531.77.456.328.592.2]You can find this command at the bottom of the screen.
Figure 1-2:
Finding Your Way Around the Office Interface
14
✦ Desktop shortcut icon: Double-click the program’s shortcut icon. To place an Office shortcut icon on the Windows 8 desktop:
1. In the Start window, right-click a blank area on the screen. 2. Click All Apps on the Windows toolbar.
3. In the Apps window, scroll to the right until you see the Office application tiles (Access 2013, Excel 2013, and so on).
4. Right-click the name of an Office 2013 program and choose Send To➪Desktop (Create Shortcut) on the shortcut menu.
To remove a desktop shortcut icon from the Windows desktop, right-click it, choose Delete, and right-click Yes in the Delete Shortcut dialog box.
Finding Your Way Around the Office Interface
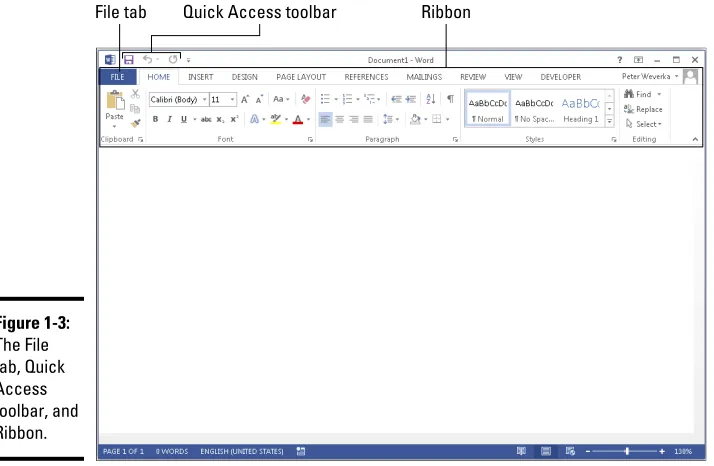
Interface, also called the user interface, is a computer term that describes how a software program presents itself to the people who use it (and you probably thought interface meant two people kissing). Figure 1-3 shows the Word interface. You will be glad to know that the interface of all the Office programs is pretty much the same.
[image:46.531.87.444.402.635.2]These pages give you a quick tour of the Office interface and explain what the various parts of the interface are. Click along with me as I describe the inter-face and you’ll know what’s what by the time you finish reading these pages.
Figure 1-3:
Book I Chapter 1
Office Nuts
and Bolts
Finding Your Way Around the Office Interface
15
The File tab and Backstage
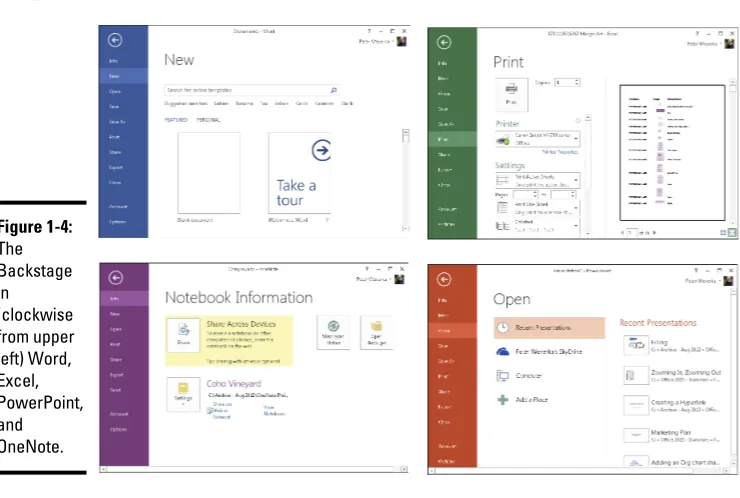
In the upper-left corner of the window is the File tab (see Figure 1-3). Clicking the File tab opens the Backstage (Microsoft’s word, not mine). As shown in Figure 1-4, the Backstage offers commands for creating, opening, and saving files, as well as performing other file-management tasks. Notice the Options command on the Backstage. You can choose Options to open the Options dialog box and tell the application you are working in how you want it to work. To leave the Backstage and return to the application window, click the Back
[image:47.531.74.444.215.464.2]button. This button is located in the upper-left corner of the Backstage.
Figure 1-4: The Backstage in (clockwise from upper left) Word, Excel, PowerPoint, and OneNote.
The Quick Access toolbar
No matter where you travel in an Office program, you see the Quick Access toolbar in the upper-left corner of the screen (refer to Figure 1-3). This tool-bar offers three necessary buttons: the all-important Save button, the trusty Undo button, and the convenient Repeat button. You can place more buttons on the Quick Access toolbar as well as move the toolbar lower in the window. I explain how to customize the Quick Access toolbar in Book IX, Chapter 1.
The Ribbon and its tabs
Finding Your Way Around the Office Interface
16
Context-sensitive tabs
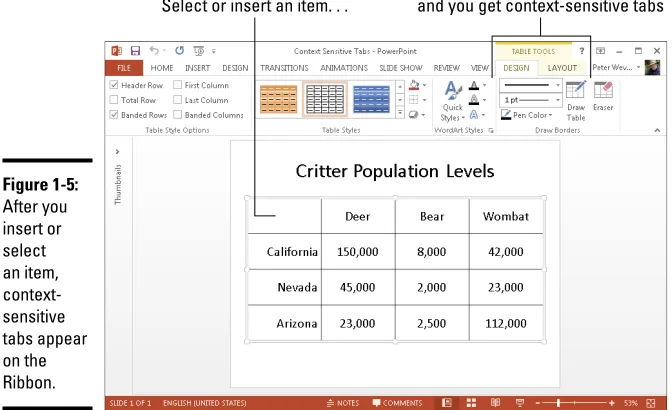
To keep the Ribbon from getting too crowded with tabs, Microsoft has arranged for some tabs to appear only in context — that is, they appear on the Ribbon after you insert or click something. These tabs are called context-sensitive tabs.
In Figure 1-5, for example, I inserted a table, and two additional tabs — the Design and the Layout tab — appear on the Ribbon under the heading “Table Tools.” These context-sensitive tabs offer commands for designing and laying out tables. The idea behind context-sensitive tabs is to direct you to the commands you need and exclude all other commands.
If you can’t find a tab on the Ribbon, the tab is probably context-sensitive. You have to insert or select an item to make some tabs appear on the Ribbon. Context-sensitive tabs always appear on the right side of the Ribbon under a heading with the word Tools in its name.
Collapsing and showing the Ribbon
To get more room to view items on-screen, con-sider collapsing the Ribbon. When the Ribbon is collapsed, only tab names on the Ribbon appear; the buttons and galleries are hidden from view.
Use these techniques to collapse the Ribbon: ✓ Click the Collapse the Ribbon button
(located to the right of the Ribbon). ✓ Press Ctrl+F1.
✓ Right-click a tab on the Ribbon and select Collapse the Ribbon on the shortcut menu. ✓ Double-click a tab on the Ribbon.
✓ Click the Ribbon Display options button and choose Show Tabs.
Use these techniques to show the Ribbon when it is collapsed:
✓ Click a tab to display the Ribbon and then click the Pin the Ribbon button.
✓ Press Ctrl+F1.
✓ Right-click a tab and deselect Collapse the Ribbon.
✓ Double-click a tab on the Ribbon.
Book I Chapter 1
Office Nuts
and Bolts
Finding Your Way Around the Office Interface
17
Figure 1-5: After you insert or select an item, context-sensitive tabs appear on the Ribbon.
The anatomy of a tab
All tabs are different in terms of the commands they offer, but all are the same insofar as how they present commands. On every tab, commands are organized in groups. On every tab, you find group buttons, buttons, and gal-leries. Group buttons, buttons, galleries — what’s up with that?
Groups and group buttons
[image:49.531.71.407.91.296.2]Commands on each tab are organized into groups. The names of these groups appear below the buttons and galleries on tabs. For example, the Home tab in Excel is organized into several groups, including the Clipboard, Font, Alignment, and Number group, as shown in Figure 1-6.
Figure 1-6:
Finding Your Way Around the Office Interface
18
Groups tell you what the buttons and galleries above their names are used for. On the Home tab in Excel, for example, the buttons in the Font group are for formatting text. Read group names to help find the command you need. Many groups have a group button that you can click to open a dialog box or task pane (officially, Microsoft calls these little buttons dialog box launchers,
but let’s act like grownups, shall we?). Group buttons are found to the right of group names. Move the pointer over a group button to open a pop-up help box with a description of the dialog box or task pane that appears when the button is clicked (refer to Figure 1-6).
Buttons and galleries
Go to any tab and you find buttons of all shapes and sizes. What matters isn’t a button’s shape or size, but whether a down-pointing arrow appears on its face. Click a button with an arrow and you get a drop-down list with options you can choose.
You can find out what clicking a button does by moving the pointer over it, which makes a pop-up description of the button appear.
Built in to some tabs are galleries. A gallery presents you with visual options for changing an item. When you move the pointer over a gallery choice, the item on your page or slide — the table, chart, or diagram, for example — changes appearance. In galleries, you can preview different choices before you click to select the choice you want.
Live previewing
Thanks to live previewing, you can see the results of a menu or gallery choice before actually making the choice. Here’s how live previewing works: Move the pointer over an option in a gallery or drop-down list and glance at your page or slide. You can see the results of selecting the option. For exam-ple, you see a different font or shape color. You can judge whether choosing the option is worthwhile without choosing the option first.
Mini-toolbars and shortcut menus
Book I Chapter 1
Office Nuts
and Bolts
Finding Your Way Around the Office Interface
19
Figure 1-7:
A mini-toolbar (top) and shortcut menu (bottom).
In Word, Excel, and PowerPoint, you see a mini-toolbar and a shortcut menu when you right-click text.
Office 2013 for keyboard lovers
People who like to give commands by pressing keyboard shortcuts will be glad to know that Office offers Alt+key shortcuts. Press the Alt key and letters — they’re called KeyTips — appear on tab names, as shown in Figure 1-8. After you press the Alt key, follow these instructions to make use of KeyTips:
✦ Go to a tab: Press a KeyTip on a tab to visit a tab.
✦ Make KeyTips appear on menu items: Press a KeyTip on a button or gallery to make KeyTips appear on menu items.
Figure 1-8:
Saving Your Files
20
Saving Your Files
Soon after you create a new file, be sure to save it. And save your file from time to time while you work on it as well. Until you save your work, it rests in the computer’s electronic memory (RAM), a precarious location. If a power outage occurs or your computer stalls, you lose all the work you did since the last time you saved your file. Make it a habit to save files every ten minutes or so, or when you complete an important task.
These pages explain how to save a file, declare where you want to save files by default, and handle files that were saved automatically after a computer failure.
Saving a file
To save a file:
✦ Click the Save button (you’ll find it on the Quick Access toolbar).
✦ Press Ctrl+S.
✦ Go to the File tab and choose Save.
Saving a file for the first time
The first time you save a presentation, the Save As dialog box opens. It invites you to give the file a name and choose a folder in which to store it. Enter a descriptive name in the File Name text box. To locate a folder for storing your presentation, see “Navigating the Save As and Open Windows,” later in this chapter.
Declaring where you like to save files
When you attempt to save a file for the first time in the Save As dialog box, Office shows you the contents of the Documents folder on the assumption that you keep most of your files in that folder. The Documents folder is the center of the universe as far as Office is concerned, but perhaps you keep the majority of your files in a different folder. How would you like to see it first in the Save As and Open dialog boxes?
To direct Office to the folder you like best and make it appear first in the Save As and Open dialog boxes, follow these steps:
1.
In Word, Excel, PowerPoint, or Access, go to the File tab and choose Options.Book I Chapter 1
Office Nuts
and Bolts
Saving Your Files
21
2.
In Word, Excel, and PowerPoint, select the Save category; in Access, select the General category.Figure 1-9 shows the topmost options in this category.
3.
In the Default File Location (or Default Database Folder) text box, enter the address of the folder where you prefer to keep your files.For example, if you’re fond of keeping files in the My Stuff folder on the C drive of your computer, enter C:\My Stuff or click the Browse button (if it’s available) and select the My Stuff folder in the Modify Location dialog box.
4.
Click OK.Figure 1-9:
The Save options in the Options dialog box.
Converting Office 97–2010 files to 2013
When you open a file made in an earlier version of Office, the program switches to compatibility mode. Features that weren’t part of earlier ver-sions of the program are shut down. You can tell when a file is in compatibility mode because the words Compatibility Mode appear in the title bar ne