TURBO PROLOG TOOLBOX™
User's Guide and Reference Manual
Copyright© 1987 All Rights Reserved BORlAND INTERNATIONAL, INC. 4585
scans
VALLEY DRIVEINTERNATIONAL
Table of Contents
Chapter 1 Introduction 1
Wha t These Tools Can Do for You ... 2
How to Use This Book ... 3
Who's Who? ... 3
The Distribution Disks ... 3
Tool Domains and Predicates ... 4
Running the Sample Programs ... 5
Installing the Toolbox on a Hard Disk ... 5
Installing the Toolbox on Floppy Disks ... 6
A Helpful Hint . . . .. 7
Reserved Windows ... 7
Part 1 User's Guide 9 Chapter 2 User Interface Tools 11 Status Lines ... 11
A Sample Program Using a Status Line ... . . . .. 12
Some Basic Menus . . . .. 13
The menu Tool Predicate ... 14
Using menu in a Sample Program ... 15
The Tool Predicate menu_leave . ... 17
Using menu_leave in a Sample Program ... 17
The Tool Predicate menu_mult ... 17
Using menu_mult in a Sample Program ... 18
Using menu, menu_leave, and menu_mult in a Program ... 20
longmenu, longmenu_leave, and longmenu_mult ... 21
Using the longmenu Tool Predicates in a Program ... 21
Box Menus ... 23
Using boxmenu and boxmenu_mult in a Program ... 24
A Line Menu ... 25
Using linemenu in a Program ... 26
Pull-d.own Menus ... 26
Using treemenu in a Program ... . . . . .. 32
A Line Input Driver. . . .. 33
Using the Three lineinput Tool Predicates in a Program ... 34
Reading a File Name . . . .. 36
Using readfilename in a Program ... 36
Context-Sensitive Help ... 37
Help Contexts in Tool Predicates ... 40
Resizing Windows. . . .. 41
Using resizewindow in a Program. . . .. 42
A Mixed Bag of BIOS Calls ... 43
Setting and Reading the Verify Switch . . . .. 43
Changing the Color of the Screen Border. . . .. 44
Reading File Names from the Directory. . . .. 44
Chapter 3 Screen-Layout Tools 47 Basic Screen-Layout Definition ... 48
Basic Use of the Screen Handler ... 51
Facilities in SCRDEF.PRO ... 53
Define Screen Layout ... 54
Save Screen Layout ... 56
Load Screen Layout . . . .. 56
Edit Layout Definition File. . . .. 57
Associating Values with Fields ... 57
Associating Actions with Fields ... 61
No-Input Fields ... 64
Computing Travel Time ... . . . .. 65
Three Sample Programs ... . . . .. 70
Sorting for Common Interests ... 70
Using Screen Handlers in a Sample Program ... 72
Recording Sales Transactions. . . .. 76
A Label-Printing Program ... 80
More Advanced Uses of the Screen Handler ... 86
Specifying New Special Keys . . . .. 86
Associating Help Text With a Field ... 86
Adding Your Own Screen-Definition Types ... 87
Using Several Screen Layouts Interchangeably , .. , ... 89
Creating New Screen Definitions from Old. . . .. 90
Printing Formatted Reports ... 90
Virtual-Screen Coordinates ... 96
Low-level Tool Predicates and Virtual Coordinates ... 96
The Predicate plot ... 97
The Predicate box ... 97
The Predicate ellipse ... 98
The Predicate sector ... 98
The Predicate lineShade ... 99
Using Low-level Tool Graphics Predicates in a Sample Program . 100 Defining Scales . . . .. 103
Drawing Axes on the Screen ... 106
Using Scales and Axes in a Sample Program. . . .. 107
Other Tool Predicates for Handling Coordinates ... 112
Setting a Scale . . . .. 112
Conversion Between Virtual and Text Coordinates . . . .. 112
Conversion Between Scaled and Text or Virtual Coordinates ... 113
Pie Charts ... 114
Using a Pie Chart in a Sample Program . . . .. 115
Bar Charts . . . .. 119
Using bargraph and bargraph3d in a Sample Program . . . .. 120
Color Graphics with the EGA Card ... 122
Using the EGA Palettes in a Sample Program. . . .. 123
Loading .PIC Files .... . . .. 126
Using Zoadpic in a Sample Program . . .. . . .. .. . .. .. . . . .. 127
Using Zoadpic and savepic to Create an On-Screen Presentation .. 128
Chapter 5 Communication with Remote Serial Devices 131 The Communication Tool Predicates ... 131
Hardware Considerations ... 132
Pinouts for DTE-to-DTE Configuration ... 133
Pinouts for DTE-to-OCE Configuration . . . .. 133
General Serial Communications ... 134
Opening a Serial Port ... 134
Closing a Serial Port ... 136
Obtaining Transmission Status Information ... ;. 136
Transmit a Character from a Serial Port . . . .. 138
Receiving a Character from a Serial Port ... 139
Obtaining Input and Output Queue Sizes ... . . . .. 139
Deleting the Output Buffer. . . .. 140
Deleting the Input Buffer ... 140
A Printer Driver That Lets You Modify the File Being Printed ... 141
Terminal Emulation ... 143
Polled Communication with Time Out ... 144
Transmission with a True Subset of the XMODEM Protocol .... 146
Modem Communication ... 153
Sending a Break Signal to a Modem . . . .. 153
Setting the Modem Mode . . . .. 153
Sending a Command or Data to a Modem ... 155
Receiving a Response from a Modem. . . .. 155
A Menu-Driven Serial Communications Program. . . .. 156
Chapter 6 Importing Data from Other Systems 165 Accessing a Reflex File ... 166
Reading One Reflex Record at a Time ... 168
Accessing a dBASE III File . . . .. 170
Reading One dBASE III Record at a Time ... 172
Accessing a Lotus 1-2-3 or Symphony File ... 174
Reading All Cells . . . .. 177
Reading a Specific Cell ... 177
Chapter 7 The Parser Generator 181 What Does a Parser Do? .... . . .. 181
The Different Types of Parsers . . . .. . . .. 182
Lexical Analysis: The Scanner ... 183
Describing the Grammar ... 183
Backus Naur Form Grammar. . . .. 184
The Toolbox Parser Generator . . . .. 186
Specifying the Input to the Parser Generator ... 187
Creating Your Own Grammar ... 190
Examples Demonstrating the Parser Generator ... 193
The Toolbox Version of a Grammar ... 194
Example of the Parser Generator's Input Grammar. . . .. 195
Example of a Parser Domains File Generated by the Parser. . . .. 196
Example of a Scanner for the Generated Parser ... 197
Example of Generated Parser ... 198
Example of the Scanner and Generated Parser Used Together. .. 199
Error Handling. . . .. 201
Using the Whole System in a Working Sample . . . .. 202
The Generated Domain Definitions ... 203
The Generated Parser ... 204
The Parser Generator System ... 212
The System Around the Generated Parser. . . .. 212
Bootstrapping a Parser ... 213
Part 2 Reference Guide 217 Chapter 8 Reference Guide 219 Introduction ...•... 219
axisla1>els . . . .. 224
bargraph ... 225
batGraph3d ... 227
border ... 229
box ... 230
boxmenu . . . .. 231
boxmenu_leave ... 233
boxmenu_mult . . . .. 235
changestatus ... 237
closeRS232 ... 238
createwindow (used by scrhnd) . . . .. 239
defineScale ... 240
delInBuf_RS232 ... 241
delOt1tBuf_RS232 . . . .. 242
disks pace ... 243
dosver ... 244
draw ... 245
ellipse ... 246
field_action (programmer defined) . . . .. 247
field_value (programmer defined) ... 248
Findmatch . . . .. 249
findScale ... 250
getverify ... 251
gwrite ... 252
help ... 253
init_dBase3 ... 254
init_Reflex . . . .. 255
lineinput ... 256
lineinput_leave ... 258
lineinput_repeat ... 259
lineMenu . . . .. 261
longmenu 0 0 0 0 0 0 0 0 0 0 0 0 0 0 0 0 0 0 0 0 0 0 0 0 0 0 0 0 0 0 0 0 0 0 0 0 0 0 0 0 0 0 0 0 0 0 0 0 0 0 265
longmenu_leave 0 0 0 0 0 0 0 0 0 0 0 0 0 0 0 0 0 0 0 0 0 0 0 0 0 0 0 0 0 0 0 0 0 0 0 0 0 0 0 0 0 0 0 0 267
longmenu_mult 0 0 0 0 0 0 0 0 0 0 0 0 0 0 0 0 0 0 0 0 0 0 0 0 0 0 0 0 0 0 0 0 0 0 0 0 0 0 0 0 0 0 0 0 0 269
makeAxes 0 0 0 0 0 0 0 0 0 0 0 0 0 0 0 0 0 0 0 0 0 0 0 0 0 0 0 0 0 0 0 0 0 0 0 0 0 0 0 0 0 0 0 0 0 0 0 0 0 0 271
makestatus 0 0 0 0 0 0 0 0 0 0 0 0 0 0 0 0 0 0 0 0 0 0 0 0 0 0 0 0 0 0 0 0 0 0 0 0 0 0 0 0 0 0 0 0 0 0 0 0 0 273
menu 0 0 0 0 0 0 0 0 0 0 0 0 0 0 0 0 0 0 0 0 0 0 0 0 0 0 0 0 0 0 0 0 0 0 0 0 0 0 0 0 0 0 0 0 0 0 0 0 0 0 0 0 0 0 274
menu_leave 0 0 0 0 0 0 0 0 0 0 0 0 0 0 0 0 0 0 0 0 0 0 0 0 0 0 0 0 0 0 0 0 0 0 0 0 0 0 0 0 0 0 0 0 0 0 0 0 276
menu_mult 0 0 0 0 0 0 0 0 0 0 0 0 0 0 0 0 0 • 0 0 0 0 0 0 0 0 0 0 0 0 0 0 0 0 0 0 0 0 0 0 0 0 0 0 0 0 0 0 0 278
mkdir 0 0 0 0 0 0 0 0 0 0 0 0 0 0 0 0 0 0 0 0 0 0 0 0 0 0 0 0 0 0 0 0 0 0 0 0 0 0 0 0 0 0 0 0 0 0 0 0 0 0 0 0 0 0 280
modify' Axes 0 • • • • 0 0 • 0 0 • • • • • • • • • • • • • • • • 0 • • 0 • • • • • • • • • 0 • • 0 • • • • • 281
noinput (programmer defined) 0 0 0 0 0 0 0 0 0 0 0 0 0 0 0 . . . 0 0 • 0 0 0 . . 0 0 0 0 0 0 282
openRS232 0 0 0 0 0 0 0 0 0 0 0 0 0 0 0 0 0 0 0 0 0 0 0 0 0 0 0 0 0 0 0 0 0 0 0 0 0 0 0 0 0 0 0 0 0 0 0 0 0 283
pdwaction (programmer defined) o. 0 0 0 0 0 0 0 0 0 0 • 0 0 0 0 • 0 0 0 0 0 0 0 0 0 • 0 285
pieChart 0 0 0 0 • 0 0 0 0 0 0 0 0 0 0 0 0 0 0 0 0 0 0 0 0 0 0 • 0 • 0 0 0 • • 0 0 0 0 0 0 0 0 0 • 0 0 0 0 o. 287
plot 0 0 0 0 0 . 0 0 0 0 0 0 0 0 . 0 0 0 0 0 0 0 0 0 0 0 0 0 0 0 0 0 0 . 0 0 0 0 • • 0 0 0 0 . 0 0 0 0 . 0 0 0 0 0 0 289
pop_helpcontext 0 0 0 0 . 0 0 0 0 0 0 0 0 0 . 0 0 0 0 0 0 0 0 0 0 0 0 • • 0 . 0 • • 0 0 0 . 0 0 0 0 0 0 290
pulldown 0 0 0 0 • 0 0 0 • • 0 0 0 0 • • 0 0 0 0 0 0 0 0 0 0 • 0 0 0 0 0 0 • 0 0 0 • • 0 0 0 0 • 0 • 0 0 0 0 291
push_helpcontext 0 • • 0 0 0 0 • • 0 0 0 0 . 0 0 0 0 0 0 0 0 0 0 0 0 . 0 0 . 0 • • 0 0 0 . 0 0 0 0 0 0 293
queueSize 0 0 0 0 • 0 0 0 0 0 0 0 • 0 • • 0 0 0 0 0 0 0 0 0 0 • 0 0 0 0 • 0 • 0 0 0 0 0 • 0 0 0 • • • 0 0 o. 294
rd_dBase3File . 0 . 0 0 • • • 0 0 0 • • • 0 0 0 0 . 0 0 0 0 0 . 0 . 0 0 0 • • 0 . 0 . 0 0 . 0 • • 0 0 0 0 . 295
rd_dBase3Rec 0 . 0 . 0 . 0 0 0 0 0 0 • • 0 0 0 0 . 0 0 0 0 0 0 0 0 0 0 • • • • • 0 . 0 0 0 0 • • 0 0 0 0 0 296
rd_LotusCell 0 0 • 0 • 0 • • 0 0 0 0 0 0 0 0 0 0 0 • • 0 0 0 0 0 0 0 0 0 • 0 • 0 0 0 0 0 0 0 0 • • 0 0 0 0 0 297
rd_LotusFile 0 0 0 0 0 0 0 0 0 0 0 0 0 0 0 0 0 0 • • • 0 0 0 0 0 0 0 • • • 0 • 0 0 0 • 0 • 0 0 • • 0 0 0 0 0 298
rd_ReflexFile 0 0 0 0 0 0 0 0 . 0 0 0 0 0 • 0 0 0 0 0 0 0 0 0 0 0 0 0 0 0 . 0 0 0 0 • • 0 0 0 0 0 0 0 0 0 0 299
rd_ReflexRec . 0 0 0 0 0 0 0 0 0 0 0 0 0 . 0 0 . 0 0 0 0 . 0 0 0 0 0 0 . 0 . 0 0 0 0 0 . 0 0 . 0 0 0 0 0 . 300
readfilename 0 0 0 0 0 0 0 0 0 0 0 0 0 • • 0 0 0 0 0 0 0 0 0 0 0 0 0 0 0 • • • 0 • • • • 0 0 0 • • 0 0 0 o. 301
refresh status 0 0 0 0 0 0 0 0 0 0 0 0 . 0 0 0 . 0 • • 0 0 0 0 0 0 0 0 0 0 • • 0 . 0 • • • • 0 0 . 0 0 0 0 0 0 303
removestatus 0 . 0 0 0 0 0 0 0 0 0 0 0 . 0 0 0 • • • 0 0 0 0 • • 0 0 0 . 0 0 0 0 0 0 • • 0 0 0 0 0 0 0 0 0 304
resizewindow .... 0 0 • • • • • • • • • • • • • • • • • • • • • • • • • • • • • • • • • • • • • • • • • 305
rmdir 0 0 0 0 0 0 0 0 0 0 0 0 0 0 0 0 0 0 0 . 0 0 0 0 0 0 0 0 0 0 . 0 0 . 0 0 0 0 0 0 • • • 0 0 . 0 0 ' 0 . 0 0 . 306
rxch_RS232 0 0 0 0 0 0 0 0 0 0 0 0 0 0 • 0 0 • 0 0 0 • 0 0 0 0 • 0 • 0 • 0 • 0 0 0 0 0 0 • 0 0 • 0 0 0 0 0 0 307
rxStr_Modem 0 0 0 0 0 0 • 0 0 0 • 0 0 • • 0 0 0 • • • 0 0 • • 0 • 0 • 0 • 0 0 0 0 0 0 0 0 0 0 • 0 0 0 0 0 308
savepic. 0 • • • 0 0 • • 0 . 0 . 0 0 0 0 0 0 0 0 . 0 0 . 0 . 0 0 0 0 0 0 0 0 . 0 0 0 . 0 • • 0 0 0 • • 0 0 0 0 0 309
scaleCursor 0 0 0 • 0 0 0 • • 0 0 0 0 0 • 0 0 0 0 0 0 0 • 0 • 0 • 0 • 0 0 0 • • 0 0 0 • 0 0 0 0 0 • 0 0 0 0 0 310
scaleLine 0 0 0 • 0 • 0 0 0 0 • • 0 • 0 0 • • 0 • 0 0 • • 0 0 0 0 0 0 0 0 0 0 • • • • • • 0 • • • • • • 0 0 • • 311
scalePlot . 0 0 0 0 0 0 0 0 0 0 0 0 0 0 0 • • 0 0 0 0 • • 0 0 0 0 0 0 0 0 0 0 0 0 0 0 0 0 0 0 0 • 0 0 • 0 • • • 312
scalePolygon 0 • 0 0 0 0 0 0 0 0 0 0 0 0 0 0 0 0 0 0 0 • 0 0 • 0 0 • 0 • • • • 0 0 0 • 0 0 0 0 • 0 0 0 0 • • 313
scale_text 0 0 0 0 0 • 0 . 0 0 . 0 0 • 0 0 • • 0 0 0 0 0 0 0 0 0 0 0 0 • • 0 0 • 0 • • • 0 • • 0 0 0 • • 0 0 0 . 314
scale_virtual 0 • • 0 0 0 0 0 0 • 0 0 0 0 0 0 0 0 0 0 • 0 0 0 0 0 0 0 0 0 • • 0 0 • 0 0 0 0 0 0 0 0 0 0 0 0 0 315
sector ... 318
sendBreak_RS232 ... 319
setModemMode . . . .. 320
setverify ... 322
shiftScale . . . .. 323
status_RS232 . . . .. 324
temp_helpcontext ... 326
tempstatus ... 327
ticks ... 328
treemenu ... 329
txCh_RS232 ... 331
txStr_Modem ... 332
virtual_text ... 333
writescr (programmer defined) . . . .. 334
Appendix A Compiling a Project 335 Compiling Projects Provided in the Toolbox. . . .. 335
Creating Your Own Project File . . . .. 336
Glossary 337
c
H A p T E R1
Introduction
Before the introduction of Turbo Prolog, Prolog was famous as the language for cost-effective software prototyping. With the implementation of Turbo Prolog, Prolog has become a practical tool that can be used for actual implementation work.
The Turbo Prolog Toolbox, a collection of software tools, increases the efficiency with which applications can be constructed. Many time-consuming (and therefore costly) operations-such as designing screen layouts-<:an be carried out quickly and easily using the predicates and programs defined within the Turbo Prolog Toolbox.
The Toolbox gives you over 80 tools (8,000 lines of source code) that you can incorporate into your programs. In addition, 40 sample programs demonstrate how to use the tools and can be adapted to your particular needs. These tools consist of built-in predicates, which specify relations among the defined objects.
Each major predicate is provided in a self-contained file that may be
included in your programs. However, freque,!}.t1Y. __ 1].~~~ domains . and predicate declarations have been incornorated into the files-fDOMS]?RO'-, .. ,
. . . . - . _ _ ... ,.oP...,.~..;~ •• ~ .... .lJI...._...<-'" .Jt. • .., .... ~~"".,"": .,''','''' ... :''''~,,' .,,"." • I~., .':;"".,'A ."'~~,.,.,..., :.K_ . ;' _'." .. .,' """ ,._," ."--.... " .. "".,'~:~',e'· .. ".':"".,I."" _._..,.,:'- •• , .... ,~~''"''..,...., .. ,~'''',''-'''''''~.-... ~.~
an.9-~~Q~:.~gQL"~!1!slt~h~.~9:.E!
..
!~~~~~~~ti!t:,~!tpiogram$. thaJ.l:l~~ ,ti;le ... too,fs described ,here. If your machine nas limited memory and you need todon't need. (It's a good idea to edit a copy of the files, so that you have the originals for later use.)
This manual assumes that you have a good working knowledge of Turbo Prolog. If you don't, you should first work through the tutorials in the Turbo Prolog Owner's Handbook.
What These Tools Can Do for You
The Toolbox is a distillation of the most useful tools for developing dif-ferent types of software, including:
spreadsheets database systems file-handling systems mailing-list systems integrated systems system utilities
communications packages visual presentation systems compilers
expert systems
Your Turbo Prolog Toolbox provides facilities for
• User-interface design and construction including a wide variety of menus (pull down, pop up, line, tree, and box), context-sensitive help, and predicates to include status lines in your programs.
• Screen-layout design tools that allow layout specifications to be constructed on the actual PC screen (and even on a virtual screen). Tool predicates can then make use of such specifications to generate printed reports.
• Business graphics images including predicates that create bar charts, pie charts, and graphs. An interface allows you to incorporate .PIC files into your Turbo Prolog programs.
• Importing files from other systems such as Reflex: The Database Manager, dBASE III, Lotus 1-2-3, and Symphony .
• A parser generator that automatically creates a Turbo Prolog source-code parser for a specified grammar. The parser can then be applied to construct your own user interfaces in Turbo Prolog.
How to Use This Book
Chapters 2 through 7 describe each tool in detail and list sample programs that show you how the tools can be used. While you'll want to read through all the chapters eventually, you can skip ahead to the chapters most relevant to your needs.
The final chapter, Chapter 8, is a reference guide. It's an alphabetical lookup of all of the tools, showing each tool's predicate, declaration, flow patterns, function, parameters, and any relevant information. It also contains a table that lists the Toolbox files and the files required by each file.
Following the chapters is an appendix, IICompiling a Project," that tells you how to load and run a project file. If you're unfamiliar with projects, you may want to read through this appendix early on and refer to it as needed.
You won't need to enter the code used to illustrate the concepts in each chapter; they're on your distribution disk under the file name given. They're also listed in the program examples that follow each explanation.
Who'sWho?
In this manual, user always means the person who works with Turbo Prolog programs and programmer refers to the person who creates the Turbo Prolog code.
The Distribution Disks
The tool files on Disk 1 can be divided among four levels, each providing tools or declarations and clauses from which higher-level tools are constructed:
• Level 1: Declaration files These files at the lowest level contain declarations of domains used by the Toolbox predicates. For example, TDOMS.PRO is a declaration file.
• Level 2: Low-level tool files These contain several predicate definitions that are used by the higher level tool predicates. For example, TPREDS.PRO contains clauses for the predicates repeat, max, and min. GRAPHICS.OBJ contains external tool predicates, provided in .OBJ-code form because they have been implemented in C or assembler.
• Level 3: Tool files These files are function specific in that each contains either a major tool or a family of closely related tools. Thus, in order for an application to use two tools at this level (for instance, a status line and a menu), two tool files must be included in the application program (in this case, STATUS. PRO and MENU. PRO). The tool files include MENU.PRO, LONGMENU.PRO, BOXMENU.PRO, and SCRHND.PRO. • Level 4: Utility program files These include a program for defining texts
to be used when offering users context-sensitive help (HELPDEF.PRO), a program for defining screen layouts (SCRDEF.HLP), and a parser generator. (NOTE: The license agreement at the beginning of this manual specifies that these program files are for your personal use alone. You may not give away or sell them in any form.)
Tool Domains and Predicates
When using the tool predicates, it is assumed that the domains and predicates defined specifically for the purpose of constructing the tools are available in any containing program. These include the domains stringlist, row, col, len, in tergerlis t, and key, and many of the predicates in TPREDS.PRO. This availability is guaranteed if the appropriate files (TDOMS.PRO, TPREDS.PRO, and so on) are included in the containing program. Details of the predicates called by each tool predicate are easily obtained by listing the files that hold the tools.
Some tool predicates are implemented in C or assembler; they are provided in this Toolbox in the form of .OBJ files. For example, the tool predicate loadpic, which loads pictures into the Turbo Prolog system, is contained in the file PICTOOLS.OBJ. In order to use tools of this kind, you must create a Turbo Prolog project definition containing both PICTOOLS.OBJ and your program. If the project name is MYPROJ, then a corresponding module list, MYPROJ.PRJ, should be created containing the name(s) of the .OBJ file(s) used and the name(s) of your module(s). See Appendix A for more information on project files.
See the reference guide (Chapter 8) for a handy table listing all the Toolbox files and their contents.
Running the Sample Programs
All the sample programs are listed on the second distribution disk as Prolog source code. Their program names are prefixed with X. To execute most demos, load the program into the Prolog system and select the Run option from Turbo Prolog's main menu. Some of the demos (for instance, those concerning communications, graphics, and external data access tool predicates) need to be linked up to object modules. To execute these demos, select Compile Project from the Turbo Prolog main system menu and then give the name of the demo. (If you press Return at this point, a complete list of the demos implemented as projects is displayed on the screen.)
Installing the Toolbox on a Hard Disk
The demos are designed to be executed without modification. However, it is recommended that you set up a Toolbox directory. Here's one way to do it.
First, you should copy your Toolbox files into a subdirectory off of your Turbo Prolog directory. Let's say you named your Turbo Prolog directory PROLOG and will call the subdirectory TOOLBOX.
PRO directory C:' TOOLBOX
OBI directory C:' TOOLBOX
EXE directory C:' TOOLBOX
TURBO directory C: 'PROLOG
That's it-you're set to begin programming with the Toolbox.
Installing the Toolbox on Floppy Disks
If you have a computer with two floppy drives, you first need to set up a Turbo Prolog work disk (disk 1) using a blank formatted disk. Insert your Turbo Prolog disk into Drive A and disk 1 into Drive B. Copy the following files onto disk 1:
From the Turbo Prolog Program Disk: PROLOG.OVL
PROLOG.HLP PROLOG.ERR PROLOG.SYS
Do not copy PROLOG.EXE.
From the Turbo Prolog Library & Sample Programs Disk: PROLOG.LIB
INIT.OBI
From your DOS Disk: COMMAND.COM
Remove disk 1 from Drive B.
Next, insert a second blank formatted disk (a development work disk, disk 2) into Drive B and copy these Toolbox files onto it:
TOOMS.PRO TPREDS.PRO
Now, load Turbo Prolog,. (the disk containing PROLOG.EXE and PROLOG.OVL) from Drive A. Remove your Turbo Prolog disk and insert disk 1 into Drive A.
Select Setup from the main menu and Directories from the pull-down menu. Set up the following directories:
PRO directory: 'tB '. \ OBI directory: ~B :\ EXE directory: \B '.\ TURBO directory: \A : \
You are now ready to use the Turbo Prolog Toolbox.
A Helpful Hint
Start with the simplest example in a chapter and add files to your work disk as needed. When you've filled your development work disk, you can select unnecessary files and delete them. That way, you can continue using the same work disk.
As you progress, you may find it convenient to set up different development work disks according to your areas of interest.
Reserved Windows
p A R T
1
c
H A p T E R2
User Interface Tools
This chapter introduces the various tools that help you develop customized user interfaces. It includes tools for status lines, different types of menus, line inputs, context-sensitive Help, window resizing, and some BIOS (Basic Input/Output System) calls. Sample programs follow each tool description, to suggest how you can implement the tool in your program.
Status Lines
STATUS.PRO contains a set of tools that uses window number 83 (see makewindow) to display a status line at the bottom of the screen, rather like the Turbo Prolog editor status line, which reminds you of the action of each function key. A status line is initially displayed via the makestatus tool predicate, which takes the form
rnakestatus(ATTR,STRING)
ATTR is the window color attributes; STRING is the text status window. The call
rnakestatus(112,"d=date t=time rn=rnore l=less ")
If a containing program destroys the status line, such as by drawing a window that overlaps it, the status line can be refreshed with the tool predicate refreshstatus. The tool predicate removestatus deletes the status window. Another tool predicate, changes tat us, takes the string and is used with the call changestatus(newstatus).
If a call to makestatus is followed by·calls that can fail, tempstatus should be used instead. Then, in the event of backtracking to the tempstatus call, the status line is removed.
ternpstatus (ATTR, STRING)
A Sample Program Using a Status Line
The following program, XSTATUS.PRO, demonstrates the status-line family of tool predicates. Remember, you can refer to the table in the reference guide to quickly see what files XSTATUS.PRO requires.
1Dclud. "tdorns. pro"
1Dclude "tpreds.pro"
1Dclude "status.pro"
90&1
makewindow(2,7,0,"1,0,0,25,80), makewindow(1,7,7,"1,0,0,24,80), cursor (20, 0),
XSTATUS.PRO
makestatus(7,"Press any key (first status line)"),
write ("A status line can be created easily with the makestatus tool predicate."),
nl,nl, readkey( ),
write(II*~***************************************************\n"),
write ("\nThe contents of the status line can later be changed by the") , write(lI\nchangestatus command"),
write(lI\n\nPress the space bar to see the effect of \n"),
write (lI\tchangestatus (\"A new status line: please press the spacebar\")\n\n"), readkey( ),
changestatus ("A new status line: please press the spacebar"), readkey( ),
changestatus ("A new status line"),
write(II*****************************************************\n"),
removestatus, readkey( ),
write(II*****************************************************\n"), write("\nAnd they can overlap. Press the space bar again") ,nl,nl, readkey( ),
write(IIWe will create two status lines, one on top of another"),nl, write("using:\n\n\t\tmakestatus(7,\"First of two overlapping status
lines\"),"),nl,
write (lI\t\tmakestatus (135, \"Second of two overlapping status lines\II), ") ,nl,nl,nl,
makestatus (7, "First of two overlapping status lines"), makestatus(135,"Second of two overlapping status lines"), write (IIBelow is the second status line. Press the space bar to see
the first"),
write(II\nand then press the space bar once again to remove this also.\n"), readkey( ),
removestatus, readkey( ), remove status,
write(II\n*****************************************************\n"), write("\nIf you want the status line to disappear automatically"),nl, write(IIduring fail, then you should use tempstatus instead of
makestatus"),nl, readkey( ),
tempstatus (112, II This line is created by tempstatus"),
write(lI\n*****************************************************\n"), write (II\nSometimes the status line can disappear because another window"), write(II\nis placed on the top of it. II),
write(lI\n\nPress any key and the status line will disappear"), write (II\nbecause of: \"shiftwindow (2), shiftwindow(1) \"\n"), readkey( ),
shiftwindow (2) , shiftwindow (1) ,
write("\n\nPress any key to see the effect of refreshstatus\n"), readkey( ),
refreshstatus,
write("\n*****************************************************\n"), write(II\n\nNow the program will fail. Notice that tempstatus"), write(II\nremoves the status line. II),
readkey( ),
fail.
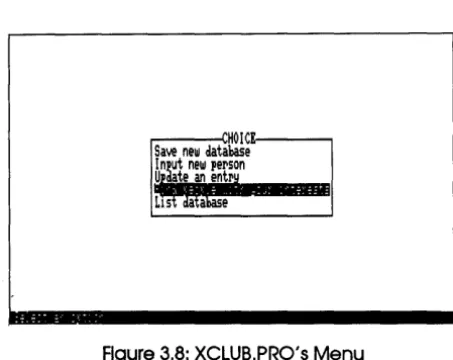
-Some Basic Menus
The
menu
Tool Predicate
The menu predicate implements a menu in which the arrow keys can be used to indicate the various options and the FlO or Return key to select an option. It takes the form
menu (PosRow,PosCol, Wattr, Fattr, ItemList,Title, Initltem ,ChoiceCode)
and has eight parameters:
• PosRow and PosCol, respectively, indicate the row and column positions on the text screen of the upper left-hand comer of the menu window. • Wltfr and Fatfr specify the attribute values for the inside of the window
and its frame; if the frame attribute is zero, the window will not have a frame.
• Itemlist is a list of strings, one string for each menu item, with a description of that item.
• Title is a string heading for the menu, which is included in the menu window's frame when it is drawn.
• InitItem specifies the number of the menu item on which the selection bar is drawn when the menu is first displayed.
• ChoiceCode, the integer parameter, is bound to a code number indicating the user's actual menu selection:
o
Esc was pressed and no selection made. 1 The first item on the menu was selected. 2 The second item on the menu was selected.3 The third item on the menu was selected, and so on.
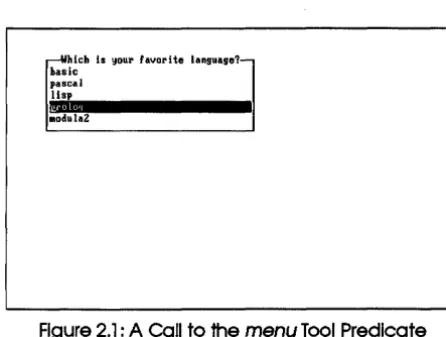
Thus, the call
menu(5,lO,7,7,[Basic,Pascal,Lisp,Prolog,Modula2), "Which is your favorite language'1",4,Langno)
~hlch Is your favorite language?-hasic
pascal lisp
[image:26.490.124.347.135.303.2].Pi
ModulaZFigure 2.1 : A Call to the menu Tool Predicate
The word prolog is highlighted when the menu is first displayed. If the user presses the arrow keys to highlight (modula2) and then presses Return, menu succeeds with Langno instantiated to 5.
Using
menu
in a Sample Program
XCAREER.PRO
iDcl_ "tdoms. pro"
iDcl_ "tpreds. pro"
iDclwl. "menu.pro"
douin.
number list = integer*
FecI1cat ••
ask (numberlist, integer) career (integer, string) q(integer, string, stringlist)
9011
makewindow (1, 7,0, '"',0,0,25, SO), ask([1,2,3,4],Total),career(Total,Job), makewindow(1,7,7,"Career",20,10,5,50), nl,write("You should be in",Job),readcharC).
ella •••
q(4,"If you were at a party and saw someone standing alone, would you:", ["organize lots of people to go over and talk to that person",
"go over and talk to him or her yourself", "just smile at him or her sympathetically", "take no notice"]).
q(3,"Which of the following activities do you most enjoy?",
[parties,"going out for a meal", sports, cinema, "flower arranging", "reading a book"]).
q(2,"Which one of the following best describes you?", [obstinate, determined, ambitious, considerate, thoughtful,
"couldn't care what turns up"]).
q(l,"Which one of the following best describes you?",
[wild,"very extroverted",extroverted,happy,"quiet and refined", quiet, "very introverted", "extremely shy"]).
ask( [] ,0). ask([X I Y],S)
:-ask(Y,T),q(X,Title,Choicelist),
menu (10, 7, 7, 7,Choicelist,Title,1,ChoiceNo), S = T+ChoiceNo.
The Tool Predicate
menu_leave
This tool is also found in the file MENU.PRO and implements the predicate menu_leave, which creates a pop-up menu as in menu. However, on return from menu_leave, the window is not removed from the screen. menu_leave takes the same eight parameters as menu.
Using
menu_leave in a Sample Program
If the clauses defining the ask predicate of the previous sample program are replaced with a version in which menu_leave is used instead of menu, successive windows remain on the screen and overlap. (This amended program is in XLCAREER.PRO.)
XLCAREER.PRO
ask( [l ,0).
ask([X I Yl,S) :- ask(Y,T),q(X,Title,Choicelist), R = 4*(4-X), C = 7*(4-X), FATTR = 7t16*X
menu leave(R,C,7,FATTR,Choicelist,Title,1,ChoiceNo), S = TtChoiceNo.
The Tool Predicate
menu_mulf
The clauses that define menu_mult are in the file MENU.PRO. menu_mult implements a pop-up menu similar to the menu predicate but returns a list of selections made from the menu rather than just a single selection. This list consists of numeric codes for the selections made (as with menu and menu_leave). (If Esc is pressed during menu selection, however, an empty list is returned.) Use the arrow keys to highlight a choice from the menu and press Return to select it. Press FlO to indicate that all the desired selections have been made.
~1
~'\Il ...J.~
~~
'-
"-{'t
..., ~~
" St,
~,~. ,~
~"'/~
,,~. ~
The parameters for menu_mult are the same as menu, except thC!i the choicg.,
't
--t.,b·and a call of the form
menu_mult(Row,Col,Wattr,Fattr,List,Header,StartList,ChoiceList)
places a menu on the screen, with these parameters:
• Row and Col indicate the row and column positions on the text screen of the top left-hand comer of the menu window.
•
~ttr and Fattr specify the attribute values for the window forming themenu and the menu frame.
• List names the items on the menu.
• Header is the string holding the menu title.
• StartList specifies the selection to be highlighted when the menu is first displayed.
• ChoiceList returns the selections made from the menu.
Using
menu_mulf In a Sample Program
The following sample program (in the file XIQ.PRO) uses menu_mult to create a simple multiple-choice brain-teaser.
XIQ.PRO
iDcl. "tdoms. pro" iDcl. "tpreds. pro" iDcl. "menu.pro"
clauiDa
number list = integer*
pJ:.clicat ••
solution (integer,integerlist) ask (numberlist, integer)
append (integerlist,integerlist, integerlist) member (integer, integerlist)
q(integer,string,stringlist) same (integerlist,integerlist) allelts(integerlist,integerlist) message (integer)
checkanswer (integer, integer list, integer list, integer)
90a1
nl,nl,ask([4,3,2,1],Totalok),
nl,nl,write(1I - The puzzle is over. 1I),nl,nl, message (Totalok) , nl, nl,
write (" Please press the space bar."), readcharU·
clau ••
q(l,"Question 1: Which animal(s) are the odd ones out?", [dog,cat,duck,rabbit,whale,swan]).
q (2, "Question 2: Which number (s) are the odd ones out? II ,
["2","3","4","5","6","7" ]).
q(3,"Question 3: Which colors are the odd ones out?", [red,orange,yellow,pink,green,brown,black]).
q(4,"Question 4: Which name(s) are the odd ones out?", [kim,tom,george,alison,mary,martha]).
solution(l, [3,6]). solution (2, [3,5]). solution (3, [4,6,7]). solution (4, [1,2]).
message (4) :-write (" write ("
message (0)
:-write (" write ("
message (Totalok) write (" write ("
ask([J,O) .
You got all 4 correct. ") ,nl,
Professor Blanketbrain thinks you are a genius").
You got none of them correct."),nl,
Professor Blanketbrain thinks you can improve your knowledge") .
You got ",Totalok," correct. 1I),nl, Not bad but not good either .") .
ask ([X I Y], Newscore)
ask(Y,Oldscore),q(X,Title,Choicelist),
menu mult(10, 10, 7, 7, Choicelist, Title, [],Oddlist), solution(X,L),checkanswer(X,L,Oddlist,Score), Newscore = Oldscore+Score.
checkanswer(X,L,Oddlist,l) :-same (L,Oddlist),
write (" Your answer to question ",X is), write(1I correct. Please press the space bar. "), nl,readchar( ).
checkanswer(X, , ,0)
:-write(1I - -Sorry, but your answer to question ",X is), write(1I wrong - Please press the space bar."), nl, readchar U .
same (A,B) :- allelts(A,B),allelts(B,A).
allelts([], ).
member (X, [X I ]).
member(X,UYJ) :- member(X,Y).
append ( [] ,X,X) .
append([XIL11,L2,[XIL3]) :- append(L1,L2,L3).
Using
menu, menu_leave,
and
menu_mull
in a
Program
The program XMENU.PRO demonstrates the use of menus in a program. It
asks the user to choose one or more numbers from each selection offered and displays the choices made. Menus of various designs are produced-with and without frames, with different highlights, and so on. In the program, CR stands for Carriage Return (the Return key).
XMENU.PRO
iDclude "tdoms. pro"
iDclude "tpreds. pro"
iDclacle "status. pro"
iDclude "menu. pro"
pzecl1cat ••
test
clau •••
test
test
test
test
changestatus("Normal menu CR:Select ESC:Abort"),
menu (10, 10, 7,7, [first, second, third, fourth], "Normal menu", 3, CHOICE), write("You chose: ",CHOICE),nl,faU.
changestatus("Normal menu with specified initial selection CR:Select
ESC:Abort"),
menu (10, 10, 7, 7, [first,second,third,fourth],"Normal menu",3,CHOICE), write("You chose: ",CHOICE) ,nl,fa1l.
changestatus(IIUse of menu without a frame CR:Select ESC:Abort"), menu (10, 10, 112, 0, [first, second, third, fourth], "No frame" ,2,CHOICE), write("You chose: ",CHOICE),nl,fa11.
removewindow, removewindow, removewindow,
write("You chose: ",CHl,", ",CH2,", ",CH3),nl,fall.
test
:-90al
changestatus("Use of menu mult "(F10:End CR:Select or delete ESC:Abort")-;
menu mult (10, 10, 7,66, [first, second, third, fourth, fifth, "6", "7"],
- "test", [3,6] CHOICEL),
write("You chose: ",CHOICEL),nl,fall.
makewindow (1,23, 0, "test", 0, 0, 24, 80), makestatus(112,"Choose a number"), test,
changestatus ("End of demo") ,n!.
longmenu, 'ongmenu_'eave,
and
longmenu_mulf
The tools just discussed, menu, menu_leave, and menu_mult, are limited to a maximum of 23 items on any menu-that's 25lines on the screen, less 2 for the border drawn around the menu. The predicates longmenu, longmenu_leave, and longmenu_mult in the file LONGMENU.PRO, on the other hand, allow arbitrarily long lists of menu items. They behave like their more restrictive counterparts except that each has an extra parameter after the ROWand COL parameters. This parameter determines the number of menu items to be displayed on the screen at anyone time; the remaining choices are displayed by using the cursor keys, PgUp, and PgDn. For example, the parameters of longmenu are given by
longmenu (Row, Col,Maxrows, Wattr, Fattr, Stringlist, Header, StartChoice, Selection)
Using the
longmenu
Tool Predicates in a Program
XLONGMNU.PRO
1Dclucle "tdoms. pro"
1Dclucle "tpreds.pro"
1Dclucle "lon9lllenu.pro"
1Dclucle II status. pro"
FecI1cate.
test
for (INTEGER, INTEGER, INTEGER) str (STRING)
c1au ••
for (X,X, ).
for(I,A,B) :- B)A,A1 = At1,for(I,A1,B).
str(first). str( second) . str(third).
str (S) :- for (I, 4, 50), str _int (S, I) .
test
test
test
test
test
changestatus(IILon9lllenu is used to select from more than
23 alternatives CR:Select ESC:Abort"),
fiDdal.l. (X, str (X), L),
lon9lllenu (10,10,5,7,7, L, "lon9lllenu", 0, CHOICE),
write(IILast time you chose: ",CHOICE),nl,fall.
changestatus (IIlon9lllenu with pre-selected starting point for the cursor
CR:Select ESC:Abort"),
fiAdall (X, str (X) , L) ,
lon9lllenu (10, 10, 5, 7,7, L, "lon9lllenu", 3, CHOICE) ,
write(IILast time you chose: ",CHOICE),nl,fall.
changestatus(IIUsing lon9lllenu to create an unframed menu
CR:Select ESC:Abort"),
fiAdall (X, str (X) , L) ,
lon9lllenu(10,10,5,112,0,L,"This message will not be visible",2,CHOICE), write(IILast time you chose: ",CHOICE),nl,faU.
changestatus("Lon9lllenu leave: Make one selection from each menu
displayed CR:Select ESC:Abort"),
fiAdall (X, str (X) , L) ,
lon9lllenu leave(5,0,5, 7, 7,L,first,1,CHl),
lon9lllenu -leave (10,20, 5, 7,7, L, second,2,CH2),
lon9lllenu -leave (15,40, 5, 7,7, L, third,3,CH3),
removewindow, removewindow, removewindow,
write(IILast time you chose: ",CH1,", ",CH2,", ",CH3),nl,fall.
changestatus ("Use longmenu mult to allow any number of options
p l
fiDdall (X, str (X) , L) ,
longmenu mult (10, 10, 5, 7,7, L, "test", [2], CHOICEL), write("Last time you chose: ",CHOICEL),nl,fdl.
makewindow(1,7,O,"test",O,0,24,80),
write ("Use cursor keys to inspect the rest of the menu items\n\n"), makestatus(112,"Choose a number"),
test,
write("End of demo").
Box Menus
With a box menu, users can select items from more than one column of choices. The Turbo Prolog system, for example, displays a box menu containing file names when the empty string is given as a response to the Load option of Files. The boxmenu tool predicate is contained in the file BOXMENU.PRO and takes theform
boxmenu (Row, Col, NoOfRows, NoOfCols, Wattr, Fattr, Stringlist, Header, StChoice,Choicel
where
• Row and Col determine the position of the window. • NoOfRows determines the number of rows in the window. • NoOfCols determines the number of columns in the window.
• ~ttr and Fattr determine respectively the attributes for the window itself and for its frame-if Fattr is zero, there is no frame on the window. • Stringlist contains the list of possible selections.
, • Header is the text in the top of the window.
• StChoice determines where the bar should be placed when the menu is first displayed.
• Choice is bound to the selection made.
For example, ~oI/1,
boxmenu (5, 5,,\~, 7,5, [a,b,c, d,e, f,g,h, i, j,k, l,m,n], "letters", 3,CHOICE)
the string letters. When the box menu is first displayed, the third menu entry is highlighted, and the letter selected is returned in the variable Choice.
BOXMENU.PRO also contains its own corresponding versions of menu_leave and menu_multo boxmenu_leave and boxmenu_mult are related to menu_leave and menu_mult (respectively) in the same way that boxmenu and menu are related. boxmenu_leave takes the same parameters as boxmenu, whereas boxmenu_mult takes the form
boxmenu mult(Row,Col,NoOfRows,NoOfCols,Wattr,Fattr,Stringlist,Header, - StChoiceList,ChoiceList)
The only difference is that the parameter in whiC;h tbe sele.9tions made are returned is npw a list of INTEGERs .. ~h&
fh
f' sJp r1/1;1(1. 'tt
fNt5 a"e
hI,?
111/,];1
&&
a cuJt-ti, /It?To
f/,(' I 1\r
e
1 f?;-( l'Sf stLiSt
Cho/c:::e IUsing boxmenu and boxmenu_mulf in a Program
Once again, the sample program (in XBOXMENU.PRO) involves selecting numbers in different ways. First, one selection each must be made from three box menus, and the choices are then displayed. Next, as a demonstration of boxmenu_mult, several choices can be made from one menu.
XBOXMENU.PRO
iDclude "tdoms. pro" iDclude "tpreds. pro" iDclude "boxmenu. pro" iDclucl. "status. pro"
predicat ••
test
for (INTEGER, INTEGER, INTEGER) str (STRING)
c1au ...
for(X,X, ).
for(I,A,B) :- B)A,Al = A+l,for(I,Al,B).
str(one) . str(two) . str(three).
test
test
test
90&1
f1Dclal1 (X, str (X) , L) ,
boxmenu(0,0,18, 78, 7, 7,L,"This is a demonstration of boxmenu", 0, CHOICE) ,
write(IILast time you chose the number:",CHOICE),nl,f&l1.
changestatus ("Now choose three numbers, one from each menu"),
f1Dclal1 (X, str (X) , L) ,
boxmenu leave(0,0,10,50, 7, 7,L,
-IIThis is a demonstration of boxmenu leave",O,CHI),
boxmenu leave(4,20,10,50, 7, 7,L,
--IIThis is a demonstration of boxmenu leave II ,0, CH2) ,
boxmenu leave(8,40,10,50, 7, 7,L,
--IIThis is a demonstration of boxmenu leave",0,CH3),
removewindow, remove window , removewindow,
-write(IILast time you chose the numbers: ",CHI,", II,CH2,", ",CH3), nl,f&l1.
changestatus ("Now choose several numbers
FIO:End CR:Select or remove"),
f1Ddall (X, str (X) , L) ,
boxmenu mult (0, 0, 18, 78, 7,7, L,
-IIThis is a demonstration of boxmenu mult",
[5,10,20],CHOICEL),
-write(IILast time you chose the numbers:",CHOICEL),nl,f&l1.
makewindow (1, 7,0,1111,0,0,25,80), makewindow(1, 7,0, "test", 20, 0, 4, 80), makestatus (112, "Choose a number"), test,
write(IIEnd of demonstration"),nl,readkey(J.
A Line Menu
The tool predicate linemenu implements a menu on a single line and is contained in the file LINEMENU.PRO. It takes the form
linemenu (Row, Attr, Attr, Stringlist, Integer)
which has five parameters:
• The Row on which the line menu is to appear.
• The two attributes of the window containing the menu and its frame-both of internal type Attr.
• A variable of Integer type that will become instantiated to an integer code for choices made in the usual way.
Thus,
linemenu(0/7/0/[run/compile/edit/options/files, setup, quit], CHOICE)
produces a line menu rather like the top line of Turbo Prolog's pull-down menu system.
Using
IInemenu in a Program
This program, in the file XLINEMNU.PRO, asks the user to select a programming language, first from a framed line menu and then from an unframed line menu. It then displays the choice made in each case.
XLiNEMNU.PRO
1nclwle "tdoms. pro"
1nclwle "tpreds. pro"
1nclwle "linemenu.pro"
1nclwle "status.pro"
90&1
makewindow(1, 7, O,"test", 0, 0,24,80), cursor(5,O),
makestatus (112,"Choose a programming language 11),
linemenu(O, 7, 7, [IBasicl ,IFortranl ,IPascall ,IApll,ILispl,IProlog"],CH1),
write ("Last time you chose item number ", CHl) I nI,
changestatus ("Now choose from an unframed menu") I
linemenu (0, 7, 0, [IBasicl,IFortran" I IPascall,IApll,"Lisplt ,"Prolog"], CHOICE),
changestatus (1111) I
write(ItThis time you chose item number "/CHOICE),nl, write (ItEnd of demolt ) ,nl, readkey(J.
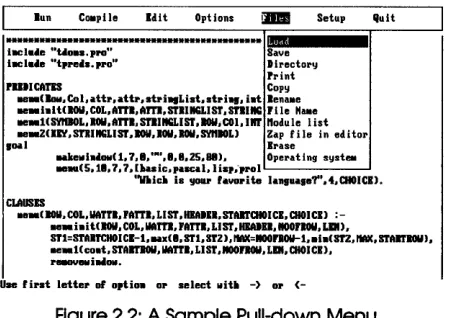
Pull-down Menus
menu item (see Figure 2.2). This vertical menu contains items closely related to the horizontal heading. Of course, some horizontal menu items have no corresponding vertical menu (such as Run, Compile, and Edit in Turbo Prolog's main system menu).
lun COIIpile Edit Options !JII!I Setup lluit
... _
iltCle.e "Uoe •. pro"... I.
SaveIltCle'e "t'l'e' •• pro" Dlrector~
rullCATIS Cop~
_ ( ... COl.dtr.attr.stri . . Li.t •• tri ... iat lenaMe _iaIUIOII.COL.A"I.Am.STIIIIGLIST.mlllG rile Hute _ _ HSYIIIOL. 1011. mi. mlllGLIST .lOWiCOI.IIIT nodu Ie list lleaaZ(llY. ml IIGLI ST. lOW. 1011. ROIl. SYltIOLl Zap file in editol'
I~ ~~
CLAUSES
IIilkellla'OIoI(l. 7 ••• • .. • ••• 1.25.81). Operating s~"teoo
_ . . (5.1 •• 7.7.I ... ic.p.a:d.li •• . - . 1 ' 0 1 L - - - '
"'IIIic. i. !lOIlI' r.VID'ite lanluale?'·.4.aIOICIJ. Me_( I0Il. COL. WAUl. rA"I. LIST .IIIAI". STAlTaIOICI. CHOICI)
:-_ :-_ iaiUIOII.COL.WAm.rml.LlST.IlIAID.IIOOrlOll.LlIU.
Sr1=st'AlrctIOICI-l.lMx( •• ST1.Sr2).IWC=lIOOnoY-l •• la(ST2.IWC.STAJrIOll).
Me_I( coat. STAII'fIOU .IM"I. LI sr .lIOOlIOII. LIII. CHOI CI).
1 ' _ l I I I i . . OII.
Use fil'at lettel' or o.tio. 01' select lIiU -) 01' (
-Figure 2.2: A Sample Pull-down Menu
The pulldown tool predicate in PULLOOWN.PRO implements a pull-down menu of this type. The pull-down window is declared as follows:
pulldown (Attr,Menulist, Choice, SubChoice)
Its parameters are given by
pulldown (Attr,Menulist, Choice, SubChoice)
where
• Attribute is the color attribute to be used in all the windows (and their frames) that are part of the pull-down menu system.
• Menulist is a list constructed using the curtain functor (as described in the following paragraphs), which contains the text for each of the menus that can be pulled down.
[image:38.486.132.364.185.344.2]• On return from pulldown, SubChoice is bound to the code number for the actual menu selection, made by pressing Return.
(If there is no vertical menu corresponding to a horizontal menu item and that horizontal menu is selected by pressing Return, SubChoice is bound to zero and Choice is bound to the code number for the horizontal menu item.)
The following parameters create a main pull-down menu similar to Turbo Prolog's main menu:
pull down (7,
[curtain (5, "Run", []), curtain (13, "Compile", []), curtain (25, "Edit", []),
curtain (35, "Option", ["Memory", "Obj File","Exe File"]), curtain (47, "File", ["Load", "Save", "Directory", "Print"]), curtain (56, "Setup", ["Color", "Window size", "DIR"]), curtain (67, "Quit", [])],
Choice,Sub_Choice),
In a pull-down menu system built using puZldown, the action taken when a given menu item has been selected is determined by the pdwaction predicate. This allows the program to perform commands with the pull-down window remaining on the screen. If pdwaction fails, Choice and SubChoice are bound to the relevant values; the entire menu system is removed from the screen and pulldown succeeds. If, on the other hand, pdwaction succeeds, then puZldown continues to loop and the last selected menu item remains highlighted.
To use pulldown, you must include the database predicate pdwstate in your program's database declarations as follows:
clataba ••
pdwstate (ROW, COL, SYMBOL, ROW, COL)
Menulist is specified by giving a list of values for the curtain functor. It takes three parameters, as in
curtain (COL, STRING, STRINGLIST)
The first parameter specifies which column the horizontal menu item should begin on, the second gives the name of that menu item, and the third is the list of items that are to appear in the corresponding vertical menu. Thus,
specifies part of a pull-down menu system in which, if the Animals heading is selected, a submenu appears containing Dog, Cat, and Bullfinch.
A simple model showing part of Turbo Prolog's user interface can be
constructed using pUlldown with the following MENULIST:
[curtain (7, "Run", [ll , . curtain (14, "Compile", []), curtain (26, "Edit", []),
]
curtain (35, "Options", ["Memory", "Obj File" ,Exe File"ll, curtain (47, "Files", ["Load", "Save", "Directory", "Print"]),
When the user makes a choice, any actions to be carried out must be
specified by a clause with the pdwaction predicate. This clause takes just two integer parameters: The first gives the code of the horizontal (or main) menu item, and the second specifies the corresponding vertical menu item selected (which is zero if no vertical menu exists). Thus, if pulldown were used with the above MENULIST and the Save option of the Files menu were selected, then the corresponding action would be defined by completing the right-hand side of the clause:
pdwaction(5,2) :- ... ..
Besides pressing Return, the user can also select a given item from a pu1l-down menu by pressing the highlighted letter of that item. pulldown highlights the first capital letter of each menu item or, if no letters are capitalized, the first lowercase letter.
Using pulldown in a Program
The following sample program from XPULLDW.PRO displays simple messages on the screen. If horizontal menu item 5 (Quit) is selected, however, the action is determined by
pdwaction(5,O) :- msg(l5,20,"Please press the space bar"),exit.
which displays the message Please press the space bar at row 15, column 20. The standard predicate exit then returns control to the Turbo Prolog system.
If the program is then re-run and the Quit menu option selected, you'll see the action of pulldown when pdwstate fails.
XPU LLDW. PRO
include "tdoms. pro"
databa.e
pdwstate(ROW,COL,SYMBOL,ROW,COL)
1nclude "tpreds. pro"
1nclude "status.pro"
1nclude "pulldown. pro"
predicate.
msg (ROW, COL, STRING)
clau.e.
r
Pulldown tries first to call pdwaction with the windows open .• ,r
If no pdwaction is found CHOICE and SUBCHOICE are returned and·'r
the windows are removed .• ,r
pdwaction(1,l) :- msg(3,10,"Input 1 selected"). pdwaction(1,2) :- msg(4,10,"Input 2 selected"). pdwaction (1,3) : - msg (5,10, "Input 3 selected"). pdwaction(2,0) :- msg(5,25,"List all"). pdwaction(3,1) :- msg(3,42,"Load something"). pdwaction(3,2) :- msg(4,42,"Save something"). pdwaction(3,3) :- msg(5,42,"Delete some garbage"). pdwaction(3,4) :- msg(6,42,"Change directory"). pdwaction(4,1) :- msg(3,45,"Actions with directories"). pdwaction(4,2) :- msg(4,45,"Change colors").
pdwaction(5,0) :- msg(15,10,"Please press the space bar."),exit.
msg(R,C,S)
:-makewindow (1, 7,7, "" ,R, C, 5, 30), window str (S),
readkey( ), removewindow.
1 2 3 4 5 6 7
01234567890123456789012345678901234567890123456789012345678901234567890123456789
.,
INPUT LIST FILES SETUP QUITmakewindow (1, 7,0,1"1,0,0,25,80),
pull down (7,
[curtain (5, "Input", ["First", "Second", "Third"]), curtain (20, "List", []),
curtain (65,IQuit" ,[ J)
I, CH, SUBCH ),
write("\n CH = ",CH),
write("\n SUBCH = ",SUBCH),nl.
Tree Menu Input
The file TREE.PRO includes tools to build tree menus. A tree menu may come in handy when your underlying data structure is a tree-for example, in designing an expert-system shell or even a customized expert system. Expert systems are merely databases filled with detailed facts on a specific subject, which are then manipulated by an inference engine. The treemenu tool predicate takes three arguments:
treemenu(SYMBO~,TREE,SELECTOR)
A SYMBOL can be up, down, left, or right to indicate which way the tree is to be drawn when it is displayed. More details follow on the TREE definition. The SELECTOR parameter returns a code for the menu item chosen.
In each case, the code to be returned when a certain tree item is selected is included in the definition of that item via the tree functor. This functor takes three arguments: The first is a S1RING giving the text for that menu item; the second is the code to be returned if that menu item is selected; and the third is a TREELIST specifying the rest of the tree. Thus, a TREE domain is defined by
SELECTOR = INTEGER
TREE = tree (STRING, SELECTOR, TREELIST)
TREELIST = TREE*
The SELECTOR can actually be of any type you prefer.
You select from a menu with the arrow keys and the Return or FlO key as usual.
Using
treemenu
in a Program
The following sample program (from XTREE.PRO) illustrates how treemenu is used.
XTREE.PRO
code=3000
inclucle "tdoms. pro"
domain.
SELECTOR = INTEGER
TREE = tree (STRING, SELECTOR, TREELIST) \
TREELIST = TREE* ., 11. \- , .. ,~r.\
tou
'1i.)/J... ,T'V\ .(> l'\h e".e w 1 "1 • 0 "'l I I
clataba.. ~ I 1) '.)":i (. " , I ) . fl ~ +-.. \
treewindow(ROW,COL,R8W;CCtiR9ii,eet.) """ \J S+ t ~~. 1"'£ ~~, Q..&...uL
treechoice(SELECTOR) , - < ' , ~'rti\...+iQ'\r'tS
iDclucie "tpreds. pro"
iDclucie "status. pro"
inclucle "menu. pro"
iDclucie "tree. pro"
clau •••
treeaction( ) :-cursor (R, C),
menu (R, C, 7, 7, [continue, select) , test, 0, CHI , CH = 2.
preclicat ••
test show (SYMBOL)
clau •••
show (DIRECTION)
treemenu(DIRECTION,tree ("start", 1, [tree ("start problem", 2,
[tree ("gasoline help", 3, [)), tree("electrical system",4, [tree ("battery flat", 5,
[tree ("another", 6, [) ), tree ("recharge", 7,[)), tree ("push start", 8, [)) J), tree("wet weather", 9, [)))), tree ("alternative", 10, [)))), tree ("overheating", 11, [)), tree ("smell", 12, [)), tree ("vibration", 13, [)), tree ("start last", 14,
[tree ("bad running", 15, [tree("bad idling",16,[)),
CHOICE) ,
tree ("brakes", 18, (1),
tree ("wiper", 19, (1),
tree ("lights", 20, []),
tree (lhorn",21, (]) 1) 1),
clearwindow,
write(IChoice=",CHOICE),nl.
test :- makewindow(5, 112, 112, 1111, 5, 5,20, 70),
write("You are invited to make a selection from a tree menu.\n\n"), write(IIThe menu will be shown with the tree drawn in a total of\n\n"), write(lIfour different attitudes.\n\n"),
write(IIEach time you press FlO or ESC, or make a selection by pressing\n\n"),
write ("RETURN while the cursor is in a field, the menu will reappear\n\n"),
write(lIwith the tree drawn in a new attitude.\n\n"),
write("You can move around the tree by using the cursor keys.\n\n"), write ("" Press the space bar to begin"" "II), readkey ( ),
removewindow,fail.
-test :- show(right),fail. test :- show(left),fail. test :- show(down),faU. test :- show(up),faU.
90al
repeat, test.
A Line Input Driver
This section describes three tools, contained in LINEINP.PRO, which accept input from a user in a given screen field. In each case, a call to the corresponding tool predicate results in a window being displayed that contains the given field. Default text appears in the field. Users can press Return or FlO to accept the default text, or modify it in the usual way. The main advantage of these three tools is that they allow you to control all keystrokes-including function keys and arrow keys.
The first of the three, the tool predicate lineinput, is declared as follows:
lineinput (ROW, COL, LEN,ATTR,ATTR,STRING, STRING, STRING)
It takes the form:
FILE:DD.DAT
Prompt BeforeString
The predicate lineinput creates a window containing BeforeString at position (Row,Col) on the screen with attribute Attr, and it allows input in the field of length Len characters as indicated. You can either type new text or edit existing BeforeString text using the arrow and delete keys. Once all information is entered, the user types FlO or Return, and the modified string is returned in AfterString. If Esc is pressed during input, lineinput fails.
The two other versions of lineinput both take the same set of parameters. lineinput_leave leaves the input field on the screen after text entry has been completed; lineinput_repeat succeeds after each text input (and stacks a backtracking point) unless Esc is pressed, in which case it fails. Thus, several texts can be entered in the same field by using the lineinput_repeat ... fail combination. For instance,
type forever :- lineinput_repeat(3,5,40,7,7,"Type anything","",_), fail.
accepts input from a user and does nothing with it until he or she presses Esc.
In order to use lineinput, lineinpuCleave, or lineinput_repeat, the following
database predicates must be declared in the containing program:
databa ••
insmode
lineinpstate (STRING, COL) lineinpflag
Using the Three lineinputTool Predicates in a Program
iDclwle "tdoms. pro"
clataba ..
insmode
lineinpstate (STRING, COL) lineinpflag
o1a •••
insmode.
iDclwle "tpreds. pro" iDclwle "lineinp.pro" iDclwle "status.pro"
~edicat •• test
o1au •••
test
XUNEINP.PRO
line input (10, 10, 45, 7,7, "Which computer do you have:", "IBM PC", TXT), write("Resulting text input: ",TXT),nl,faU.
test
test
90al
changestatus ("Modify each of the three texts, pressing CR after each"), lineinput leave(7,10,40, 7, 7, "Text1: ","This is old text l",TXTl), lineinput-leave(10,10,40,7,7,"Text2: ","This is old text 2",TXT2), lineinput-Ieave(13,10,40,7,7,"Text3: ","This is old text 3",TXT3), removewindow, removewindow, removewindow,
write("TEXTl = ",TXTl),nl,
write("TEXT2 = ",TXT2),nl,
write("TEXT3 = ",TXT3),nl,
fail.
write(lI\nPress the space bar for a demo of lineinputJepeatll
) ,
readkey( ), clearwindow,
changestatus (Illineinput repeat requests for new lines until the ESC key is pressed."), line input repeat (7,10,40, 7, 7,"Text: II,IIII,TXT), shiftwindow (OLD) ,
shiftwindow(2) , write(ITEXT=",TXT),nl, shiftwindow (OLD), fail.
makewindow (2, 7,0,1111,0,0,24,80),
Reading a File Name
The tool predicate readfilename in FILENAME.PRO implements a file name input facility similar to that of Turbo Prolog's user interface. readfilename allows the user to type in only the file's first name; the default file type is added to that first name automatically, just as Turbo Prolog adds the .PRO extension to file names when LOADing and SAVEing programs. Alternatively, if the user just presses Return with the window empty, then a complete directory appears in a window on the screen, from which the user can select a file name by using the arrow keys and pressing Return. Again, this is the same as the Turbo Prolog system.
read filename is declared as follows:
readfilename (ROW, COL, ATTR, ATTR, STRING, STRING, STRING)
It takes the form
readfilename(Row,Col,Wattr,Fattr,Extension,OldFileName, NewFileName)
where
• Row and Col determine the position of the input field on the screen. • l'V.zttr and Fattr are the window and frame attributes respectively. • Extension is the STRING that is to be added to the file name if no file
type is specified.
• OldFileName is the file name to be displayed in the window when it is first displayed. Users can edit this text and then press Return or FlO once their preferred file name is in the window.
• NewFileName becomes bound to the new file name with the Extension added automatically to the user's input if no file type was specified.
A program that uses read filename must include the file LINEINP.PRO-in addition to TPREDS.PRO, TDOMS.PRO, and FILENAME.PRO-and contain the following database declarations at an appropriate point:
clataba ••
insmode
Using
readfilename
in a Program
The following sample program is given in XFILENAM.PRO.
1Dclucle "tdoms. pro"
clataba ••
insmode
lineinpstate (STRING, COL) lineinpflag
1Dclucle "tpreds. pro"
1Dclucle "lineinp.pro"
1Dclv.de "filename.pro"
1Dclucle "status.pro"
90al
XFILENAM.PRO
makewindow (2, 7,7, "Instructions", 0, 0, 24, 35), disk (DIR),
nl, wri te (" 1. Set the directory\n to your TOOLS dir: \n" , DIR) , nl, nl,
makewindow(3,7,7,"Results",0,35,24,45) ,
setdir(5,5),disk(DIR),write("Directory=",DIR),nl,nl, shiftwindow(2),
write (" Now try the following in turn: ") ,nl, write (" ============================"), nl, nl, write (" 2. Just press RETURN"),nl,
write (" 3. Give the file name \"test\"") ,nl, write (" 4. Try the file name \"test.txt\""),nl,
write (" 5. Delete the old name and\n then press RETURN"), nl, nl, nl, nl,
write (" - CTRL-BACKSPACE deletes the\n old file name"), write("\n\n\n - Use CTRL-BREAK to stop"),
shiftwindow(3) ,
makestatus (112," Give some file names and inspect the result of readfilename.") ,
repeat, refreshstatus,
read filename (20, 41, 7,7, pro, "oldname. datil ,NEWNAME), write (IFilename=",NEWNAME) ,nl,
fail.
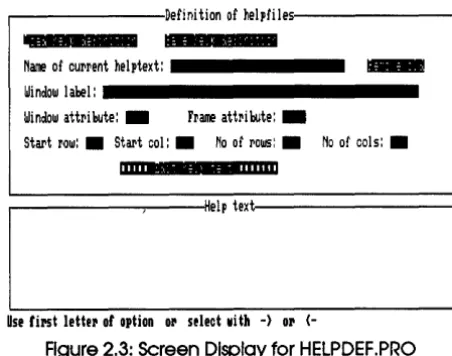
Context-Sensitive Help
the program in HELPDEF.PRO. When that program is executed, the screen display looks like this:
r---Definition of helpfiles---.
-
Name of current helptext: _ _ _ _ _ _n
_Window lal:!el: _ _ _ _ _ _ _ _ _ _ _ _ _
Window attribute: _ Frame attribute: _
Start row: • Start col:. No of rows:. No of cols: •
11111 : to- : ; - : - 1111111
.---,---I1Help text~---,
Use first lettel' of option 01' select lIIith -) 01'
(-Figure 2.3: Screen Display for HELPDEF.PRO
Each Help text to be stored in the Help file is given a name (which can be any STRING) by typing it in the Name of current help text field. Run the program, place the cursor in this field by using the arrow keys, and press Return. Type the name helpl into the prompt window and press Return. Next, specify the string that will be used as a label for the window containing this particular Help text. Move the cursor to the beginning of the
Window label field, and type the label HELP FROM helpl (there's no need to
press Return afterwards). Now fill in the five fields describing the window and its frame in the same way: make the window and frame attributes 7; start the window at row 4, column 10; and give it another 6 rows and 20 columns.
Now you are ready to enter the Help text itself. Move the cursor to the Edit help text field and press Return. Type in or edit the Help text using the standard Turbo Prolog editing commands. Enter the following text:
Our first example of help
Is a poem to soothe troubled users.
[image:49.490.130.356.143.321.2]Sugar is sweet And users are too!
Leave the editor by pressing FlO. Now save this first Help text in a file: Move the cursor to the Save help definition field and press Return. When prompted for a file name enter, XHELP • DEF.
Having done this, let's type in another Help text. Return the cursor to the Name of current helptext field and press Return. Give this second Help text the name help2. Now continue as before, labeling the containing window
MORE HELP STILL (just type over the old text), and use the same window size attributes as last time, but start this one in row 12, column 30. The H