Interleaf
Tips
and
Tricks
Stacy Dyma/ski
ONwnRO®
Interleaf Tips and Tricks
Stacy Dymalski
Published by
OnWord Press 2530 Camino Entrada
Santa Fe, NM 87505-4835 USA
All rights reserved. No part of this book may be reproduced or transmitted in any form or by any means, electronic or mechanical, including photocopying, recording or by any information storage and retrieval system without written permission from the publisher, except for the inclusion of brief quotations in a review.
Copyright © 1994 Stacy Dymalski
SAN 694-0269 First Edition, 1994
10987654321
Printed in the United States of America
Library of Congress Cataloging-in-Publication Data
Stacy Dynlalski
Interleaf Tips and 1licks Includes index.
1. Interleaf (computer software) 2. Desktop publishing I. Title 94-65057
ISBN 1-56690-050-6
Trademarks
Interleaf, and SystemS are trademarks or registered trademarks of Interleaf Inc. On Word Press is a registered trademark of High Mountain Press, Inc. Other products and services are mentioned in this book that are either trademarks or registered trademarks of their respective companies. On Word Press and the author make no claim to these marks.
Warning and Disclaimer
This book is designed to provide information about Interleaf. Every effort has been made to make this book complete and as accurate as possible; however, no warranty or fitness is implied. The information is provided on an as-is basis. OnWord Press shall have neither liability nor responsibility to any person or entity with respect to any loss or damages in connection with or rising from the information contained in this book.
Acknowledgments
A project like this always ends up a bigger undertaking than anyone ever expects in the beginning. The people who helped me with this book were extremely supportive, even when things became accelerated and a little crazy toward the end. For generously donating their time, I'd like to thank Sandy Ferguson, Karen Hanke, Reyn Johnson, Sandra McDougle, Shelli Sandrew, Douglas Wamack, David Weinberger, and Information
Technology Partners. Special thanks to Adrienne, Amy
c.,
Amy W, Diana,Jola, and Marty for their continuous moral support. And most of all, I'd like to thank my husband, George, who unselfishly encourages all my endeavors, and makes me believe I can accomplish anything.
About the Author
Stacy Dymalski has been working with computer graphics and desktop publishing for over 10 years, and specifically with Interleaf software for the past six years. She has written for ComputerEdge and San Diego Woman magazines, and briefly wrote for a local cable comedy TV show in L.A .
The founder and CEO of Saffire Systems & Development (a technical
consulting firm), Stacy currently makes her living as a consultant and writer, and moonlights as a standup comic.
Book Production
This book was produced in Interleaf 5. The cover design is by Lynne Egensteiner, using QuarkXpress 3.11 and Aldus FreeHand 3.0.
On
Word Press
On Word Press is dedicated to the fine art of professional documentation. In addition to the development team who edited the material for this book, other members of the On Word Press team contributed to making this book. Thanks to the following people and the other members of the On Word Press team who contributed to the production and distribution of this book.
Dan Raker, Publisher
Kate Hayward, Director of Operations
Gary Lange, Manager of Contracts and Administration David Talbott, Acquisitions Editor
Carol Lebya, Production Manager Frank Conforti, Managing Editor Margaret Burns, Project Editor Sandra McDougle, Production Editor Lynne Egensteiner, Designer
Tierney Tully and Bob Leyba, Production Assistants Catherine Heminway, Copy Editor
Kate Bemis, Indexer
Contents
1.
Introduction. . . ..
12. Customizing the Desktop . . . ..
7
Using the Interleaf Tools ... 7
Altering the Look and Feel of Your Desktop ... 17
Accessing Online Documentation ... 37
3. Documents and Windows ..
~. . . ..
55
Opening and Saving Documents ... 55
Viewing Documents ... 60
Manipulating Windows on the Interleaf Desktop ... 63
4. Customizing Documents ...
75
The Straight Story on Inline Components ... 75
Customizing Autonumber Streams ... 77
Creating Cross References ... 95
Tricks with Tabs ... 104
Annotating the Header, Footer, and Margins ... 113
5. Using Template Documents ...
125Setting Up Templates in General ... 126
Creating Special Thmplates ... 128
Creating Custom Calendar Documents ... 134
6. Manipulating Font Properties ...
139Changing Text ... 139
Tools for Changing Text Properties ... 149
7. ContrOlling Page Layout. . . ..
155Portrait vs. Landscape ... 155
Controlling Page Configuration ... 157
Controlling Page Margins, Headers, and Footers ... 161
Customizing Page Number Streams ... 174
vi INTERLEAF 5 TIPs AND TRICKS
8. Getting the Most Out of Books . . . ..
183Taking Advantage of Books . . . 183
Adding Catalogs for Consistent Style ... 198
Creating a Table of Contents and Index ... 207
9. Printing
a
Document ...
217Printing Pages ... 217
Page Layout ... 220
File Formats ... 224
Interface Support ... 225
10. Dictionaries and Spellchecking ...
233Dictionary Types ... 233
Creating Dictionaries ... 235
Special Dictionary Functions ... 240
Spellchecking Special Areas of a Document ... 241
Controlling Hyphenation ... 242
11. ContrOlling Graphics ... . . . ..
251General Graphics ... 251
Creating Graphic Objects ... 264
Creating Special Effects ... 274
12. Special Graphic Applications ... 303
Creating Business Chart Graphics ... 304
Editing Image Files ... 326
13. Manipulating Tables ...
335Table Basics ... 335
Rows ... 336
Columns ... 347
Cells ... 352
Sizing a Table ... 366
Rulings ... 372
Frames and Thbles ... 376
Converting Text to Tables ... 381
14. Conditional Control ... . . . ..
387Defining Terms ... 388
Setting Up Conditions ... ; ... 389
Modifying Control Expressions and Attribute Values ... 402
TABLE OF CONTENTS vii
15. Lisp Programming . . . ..
411The Developer's Toolkit ... 411
Executing Lisp Code ... 415
Interleaf and Lisp ... 423
16.
Document Format Conversions . . . ..
425
Working with Older Versions of Interleaf ... 425
Using Filters ... 428
17.
Macros... . . . ..
445
Setting Up Macros ... 445
Saving Macros ... 459
Using Macros ... 463
18.
Potpourri.... . . ..
467Error Recovery ... 467
Units of Measurement ... 470
Revision Bars ... 475
Desktop Shortcuts ... 479
Sharing Files ... 490
1. Introduction
Nothing is more frustrating than being expected to be productive on a piece of software you really know nothing about. We've all been there: working fe-verishly on a project that everyone wanted done by yesterday, using a piece of publishing software that seems as foreign as another language. Why is it that in spite of vendor manuals, online helps, tutorials, and third party books, we still have trouble figuring out what it is we need to know (at the exact moment we need to know it)?
Regardless of what the answer might be, working in the dark can prove ex-tremely frustrating if you are killing yourself to meet a deadline. It never fails that you desperately need to learn how to make the software perform a certain way before you can finish. I've had this experience with every piece of software I've ever come in contact with, including Interleaf. The difference with Inter-leaf, however, is that outside the reference materials that come with the prod-uct, there are very few books, if any, that help users learn to be more productive with the Interleaf software. I don't know about you, but I'd like to see that change.
Why this Book?
For quite a while now, I've earned a living as a software consultant. When Interleaf 5 was being developed, Interleaf asked my husband (also a consultant) and me if we could help out by writing Interleaf 5 applications that would later be used for marketing purposes. We happily agreed, and in the process became very familiar with the functionality of Interleaf 5.
When the product was released, sales of Interleaf 5 increased rapidly, prompt-ing the need for user trainprompt-ing. Interleaf has a fine trainprompt-ing department, with extremely competent instructors, and conveniently located training centers nationwide. When the demand for training increased, however, Interleaf found a need for more instructors. Interleaf again approached me and asked if I would like to work as an Interleaf instructor on a contract basis. Once again I agreed, and eventually became qualified to teach all of the Interleaf 5 train-ing courses.
2 INTERLEAF TIPs AND TRICKS
During my tenure as an Interleaf 5 instructor, I noticed that students asked the same questions in just about every class. These questions usually started out as a single question involving a specific application. Answers led to further
questions, and before I knew it, I was repeating the same Q and A session in
yet another class - which is fine, because that's what training is for.
Another common denominator was that the users in these classes complained
about the Interleaf 5 user manuals. I repeatedly heard that the manuals were
of little help because they did not answer specific questions or teach the user how to master particular skills. In response, I would gently try to tell them that this is not a fair assessment of the user manuals. The manuals that come with the software are meant as reference materials, not tutorials (by the way,
Interleaf 5 does come with an online desktop tutorial). The manuals are
provided so you can look up the definition of a term, the functionality of a command, or the location of a command on a pulldown menu. They are not there to teach you how to create your specific application or template. The
manual is a building block that you use to make your own creations. A good
analogy that illustrates this point is a dictionary. A dictionary is a reference book that shows you how to spell a word, and gives the definition of a word.
It does not tell you how to structure your sentences, and you wouldn't expect
it to.
The fact that people were asking me the same questions in class, and that these same people felt the manuals were lacking, led me to believe that there was room in the market for a book that did nothing but answer common Interleaf 5 questions. Over the years, I have kept a notebook of the questions that I was asked, along with the answers I came up with through research. As you can imagine, my collection grew, and eventually the questions and answers ended
up in this book. If you are an advanced user, some ofthese questions may seem
elementary to you (however, you would be surprised how many advanced users learned something new when they reviewed this material). The questions tackled here range from how to change your mouse button configuration to how to create an encapsulated postscript (EPS) file, with just about every level of expertise in between. I'm hoping there's a little something here for everybody.
What Is Not Included in this Book
You can find out which topics I cover simply by reading the table of contents.
If you do this, however, you will notice that there are a few glaring omissions.
CHAPTER 1: INTRODUCTION 3
so some of the more esoteric topics were purposely left out. For example, revision tracking is not covered. Revision tracking is a purchasable option to Interleaf 5, and I have found that the people who buy it usually don't ask a lot of questions about it. I don't know if this is because they don't really use it or because they are exceptionally bright people (I'll assume the latter). In any case, space became a premium as this book grew, so revision tracking was eliminated.
WorldView is also another topic not tackled. WorldView is actually an addi-tional product developed and distributed by Interleaf, and hence really de-serves its own book. If, however, you use WorldView at your site, the chapter on filters (Chapter 16: Document Format Conversions) will be of help to you.
I also touch only lightly on Lisp and developing Lisp applications. This is a top-ic that can go very deep, because it involves creating your own Interleaf ap-plications via writing Lisp programs. I do introduce the concept of Lisp (in Chapter 15), and explain how to use it on the Interleaf desktop in a cursory manner, but I do not get into how to create your own applications and pack-ages. For that you need to go to other sources. To get you started, I recom-mend you read Adventurer's Guide to Interleaf Lisp, by David Weinberger (OnWord Press).
And finally, I do not teach you the basics of using Interleaf. The subject matter and writing in the following chapters are geared toward the intermediate to ad-vanced Interleaf user, and therefore assumes the reader has the prerequisite knowledge listed below.
Audience
To get the most out of this book, you should already know how to use Interleaf.
If you don't, you might want to go through the Interleaf online tutorial first or take the Introduction to Interleaf course. The answers to the questions in this book assume that you already know how to invoke Interleaf and navigate through the Interleaf desktop. If you are using this book as a reference, here are the minimum Interleaf prerequisites with which you must be familiar:
II
How to use the mouse buttons in conjunction with the Interleaf desktopII
How to use the Interleaf 5 desktop menus and pulldown menu structureII
How to move, cut, copy, and paste icons on the Interleaf tlesktop4 INTERLEAF TIPs AND TRICKS
II
How to open and close a documentII
How to edit a documentII
How to create new containers (such as folders, drawers, books, andcabi-nets)
II
How to open and close a containerII
How to move and resize open windows on the Interleaf desktopII
How to exit the Interleaf desktopSoftware Requirements
This book was written for the Interleaf 5 software. An jnterleaf 6 Tips and Tricks book of the same format and with the same type of questions is currently in the works. If, however, you are already using Interleaf 6, the Interleaf 5 Tips and Tricks book can still be of help. Most of the changes between Interleaf 5 and 6 involve the user interface. Much of the product functionality is the same. Therefore, if you have a specific question regarding an open document, for ex-ample, you will more than likely still be able to get your answer from this book.
How to Read this Book
Each chapter is composed of a series of questions and an~wers, grouped
to-gether in topical sections. This book was written so that it could be read one of two ways: from beginning to end (like a novel, if you will), or in sections that apply only to your needs. To get the most value out of this book, I recommend that you first scan the questions in each chapter. Many times the answer to one question directly leads to the next question. Scanning will give you the flavor of the book, as well as allow you to see how the book is organized.
After you have become familiar with the book, you can use it as a reference whenever you need to learn how to perform a particular function. Each chap-ter has been divided into sections that you can easily refer to lachap-ter.
The Companion Disk
CHAPTER 1: INTRODUCTION 5
in document files on the companion disk that comes with this book. If a
ques-tion has a document associated with it, the text will refer you to a specific docu-ment on the companion disk. Let me stress, however, that the files on the
com-panion disk are
not
required. The answers to the questions do not dependupon your having access to the files on the companion disk. The companion disk is there only for your added benefit. So if you misplace it, you can still use this book as a viable reference.
Installing the Companion Disk
This disk contains files "packed" together into one file by the Interleaf Desk-top utility (IDU). The IDU file is named "leafware.idu". To use these files, you must unpack them using IDU. When IFU unpacks them, you will end up with a subdirectory named "lispware" that should appear as an Interleaf desk-top cabinet. Inside will be further cabinets, as well as README files. IDU will ensure that the files you receive follow the differing naming conventions used by MS-DOS, UNIX, and other operating systems supported.
1. To unpack the files with IDU, first locate the idu utility. On UNIX systems,
its probable path is: linterleaf/ileaf5/binlidu. On DOS, it probable path is: \ileaf5\bin\idu.exe.
2. Next, change to your desktop directory (e.g., "cd D:\Desktop" in DOS).
3. Now extract the files by typing at the prompt: idu-path -xf idu-file-path
Where "idu-path" is the path to your idu utility and idu-file-path is the path to "lispware.idu."
For example, in DOS the command might be: \ileafS\bin\idu -xf A:\lispware.idu
and in UNIX it might be:
linterleaf/ileafS/bin/idu -xf Ipcfs/lispware.idu
4. If you have Interleaf up and running already, do a "Rescan" on you
desk-top to force it to notice the new files put there.
5. If you have copied "lispware.idu" to your hard drive, after "unpacking" it you may delete it.
My Offer to You
6 INTERLEAF TIPs AND TRICKS
questions. Some existing questions and answers, particularly those that
pertain to known bugs, will be removed. If you have a question about
Interleaf 5 or Interleaf 6 that is not covered in this book, send me your question
and maybe (I stress the maybe here), the question and its answer will end up
in the next revision. I cannot promise you that I will response to you personally
(in fact, I probably won't), but if you have a good question whose answer would
benefit the masses, then it will more than likely end up in the next edition of this book.
Send your questions to Stacy Dymalski, PO Box 770, #368, Park City, UT, 84060. In addition to your question, include your name, address, and phone number (in case I like your question and need to speak to you further about it).
2. Customizing the Desktop
In most offices everyone has a desk and work area, whether it be a private of-fice, a cubicle, or just a corner of the room. When you want to personalize your work area, what do you do? You might put framed family pictures on your desk. Hang a poster or two. Display a calendar. Add plants. Whatever it is that you do, you add a piece of yourself to your work space when you decorate. There is nothing wrong with this. In fact, it contributes to a very healthy work environment because it allows you to express your personality while you work.
Your Interleaf desktop should be no different from your physical desk or of-fice. In most cases, no one but you will use your computer. That means you can decorate your desktop to your heart's content. In fact, let's say that you like hearts so much, you want to see them scattered all over your Interleaf desktop. You can create a heart shade pattern, paint it red, and then apply your new creation to your desktop. From then on, everyone will know which desk-top is unmistakably yours.
Interleaf provides you with myriad tools that allow you to customize your desk-top in a variety of ways. The nice thing about customization is that it is option-al. You do not have to change the way your desktop functions or appears, if you're currently happy with it. The point of customization is to make your ex-perience with Interleaf a more pleasant and efficient one. Don't be afraid to experiment and try new options. Customizing your desktop is very easy, once you know how to use the Interleaf tools.
Using the Interleaf Tools
Every Interleaf desktop that leaves the factory looks exactly the same. They are all the same color, use the same naming conventions, and have the same popup menus. This configuration is known as the Interleaf 5 Defaults.
The Interleaf 5 Defaults axe acceptable to most people, however, there may come a time when you find yourself wishing that the Interleaf desktop behaved just a little bit differently. For example, you might like to use online
8 INTERLEAF TIPS AND TRICKS
tation. Or you may want your mouse buttons configured differently. Or maybe the WordPerfect filter doesn't convert a document exactly to your liking.
Whatever it may be, Interleaf has anticipated your request to make minor modifications to their software. As a courtesy, Interl~af allows (in fact, en-courages) Interleaf 5 users to customize the Interleaf desktop. Customization is made possible through the use of the Interleaf tools.
How do I customize my desktop?
It's true that you can customize your desktop to look and behave in just about any manner that you can imagine. There are two ways that you, as a user, can accomplish this:
1 By writing Interleaf Lisp layered applications
2 By invoking the Interleaf tools
What are the Interleaf Tools?
The Interleaf tools are a collection of Lisp applications that run on the Inter-leaf desktop. They are provided by InterInter-leaf, and allow you to change the way you interact with the Interleaf desktop. For example, one of the tools is called the User Profile Tool (sometimes called Profile Tool for short). It allows you to
set up a desktop profile which dictates things like how your window scroll bar responds, how the buttons on your mouse are configured, or how often the software performs a backup save.
Where can I find a list of the Interleaf tools?
Right here.
Too/Name
Active Reference Tool
Active Tutorial
Cloverleaf
Inter/eat Too/s
Functionality
Provides interactive online reference information for the Interleaf software.
Provides an online tutorial for new Interleaf users.
CHAPTER 2: CUSTOMIZING THE DESKTOP 9
Interleaf Tools (continued)
Tool Name Functionality
Font Manager Utility (FMU) Allows you to install additional fonts, and modify them to fit your application needs
Developer's Toolkit (DTK)
Hyperleaf Toolkit (Hyperleaf)
Keyboard Tool
Leafware
Macro Tool
Online Help
Relational Document Manager (RDM)
Provides you with the necessary
development environment to create your own layered applications using the Interleaf Lisp programming language. Included in the DTK are program editors, debugging tools, a compiler, and other tools that are helpful during the
development process.
Allows you to add hypertext links to your Interleaf documents.
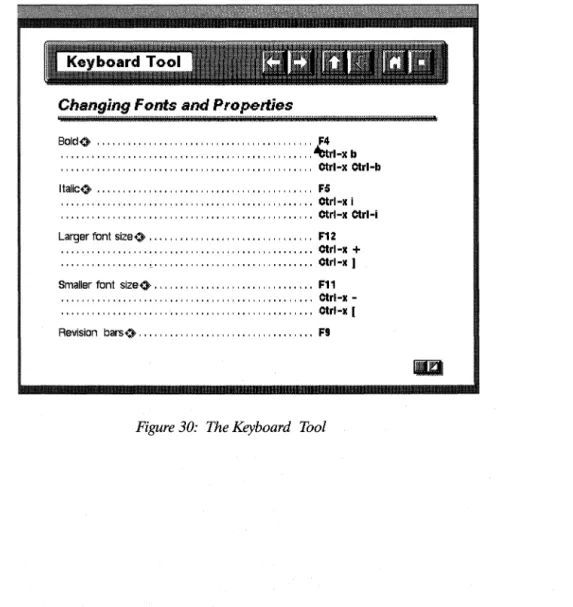
Provides you with a list of the functions associated with specific function keys and key sequences used in the Interleaf software.
Allows you to use unsupported, yet useful, Lisp scripts. (However, Interleaf does not guarantee that they will work for you, so use them with caution!)
Allows you to record, play, and store your own macros on your Interleaf desktop.
Provides you with online help for the Interleaf popup menu items.
Allows you to manage documents
10 INTERLEAF TIPs AND TRICKS
Interleat Tools (continued)
Tool Name
User Interface Painter (UI Painter)
User Profile Tool (Profile Tool)
WorldView Press Toolkit (WorldView Press)
Functionality
Allows you to create your own custom colors, color palettes, and shade patterns for use on your desktop and window backgrounds, icons, stickups, popups, property sheets, menu items, and other objects on the Interleaf desktop.
Allows you to make minor modifications to your working environment and Interleaf desktop interface.
Allows you to press files, making them readable by the WorldView Viewer.
Some ofthe tools in the above table are options that can be purchased. Contact your local Interleaf sales office or Interleaf VAR to find out which tools are optional, and how much they cost. Your systems administrator can tell which tools your site has already purchased.
How do I obtain access to the Interleaf tools?
The Interleaf tools are accessible through the popup menus on your desktop. By default, however, the Interleaf tools are not automatically loaded when you invoke the Interleaf desktop. This is because the tools take time to load, and need computer resources to be maintained. Interleaf's philosophy is, if you are not going to use the tools, then why waste the resources to load them? Therefore, Interleaf requires that you specifically activate the tools you will be using.
You activate the Interleaf tools by invoking the Tool Manager.
What is the Tool Manager?
The Tool Manager is a Lisp script that allows you to install the Interleaf tools
that you want to use. You invoke the Tool Manager as follows:
CHAPTER 2: CUSTOMIZING THE DESKTOP 11
4 Hold down the menu button and execute Custom-7TooIMgr.
The main window of the Tool Manager appears on your desktop, as shown in Figure 1.
@
'."!TE.:~.~~~
III
OTHERSelect this
op-Figure 1
12 INTERLEAF TIPs AND TRICKS
The Interleaf tools window appears on your desktop, as shown in Figure 2. (The tools window that you see on your desktop may vary from the one shown
Inter/eaf
,·· .... ··11
Active Reference [Active Ref ] $ ... ... Il Active Tutorial [Tutorial] $ ... Il Cloverleaf $ ... ... Il Developer's Toolkit [DTK] $ ... Il HyperLeaf Toolkit 1.1 [HyperLeaf] $ ... Il Keyboard Tool $ ... Il Maau Tool [Maau]$ ... Il Online Help $ ... Il User I nterface Painter [U I Painter] $ ... ... Il User Profile Tool [Profile Tool] $ ... Il
Wot1dView Press Toolkit 1.0.1 [WondView Press 1.0.1]$ ...
IJ
Figure 2
in Figure 2, depending on the tools that your site has purchased. Not all of the tools that Interleaf provides automatically come with the product. Some of them are purchasable options.)
How do I install the tools I want?
In Figure 2, notice that each tool has a dotted leader on its right, followed by a box. If you've never invoked the Tool Manager before, all of the boxes contain
CHAPTER 2: CUSTOMIZING THE DESKTOP 13
To install a tool, you perform the following steps:
6 Move the mouse cursor into the box associated with the tool you want, and click the select button once.
Notice that the zero in the box changes to a one. Use this same proce-dure to activate all the tools you wish to install.
7 Once you have selected the tools you want, hold down menu
but-ton, and execute Apply.
The software installs your selected tools in your System5 cabinet. A Tool Manager Log window appears, informing you of the status of this installation. As each tool is placed in your System5 cabinet, a message will appear that states "Setup of (name of tool) succeeded." If you see this message then you know that everything is okay, and that you will be able to access the specified tool from a popup menu. If you get an error, print the Tool Manager Log (by placing the mouse cursor inside the Tool Manager Log window, holding down the menu button and executing Print), and show it to your systems administrator.
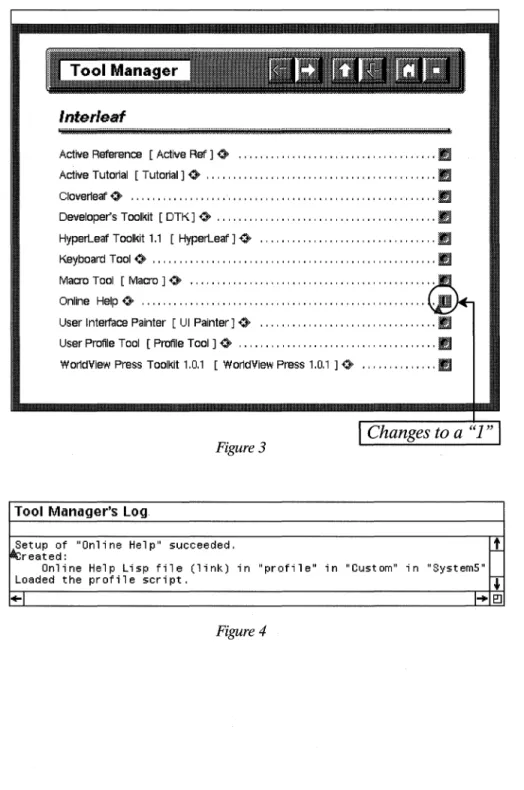
For example, let's assume that you want to install the Online Help. Here's what
you do:
8 In the open Tool Manager window, move the mouse cursor into the
box associated with the Online Help, and click the select button
once.
Notice that the zero in the box changes to a one, as shown in Figure 3.
9 With the mouse cursor inside of the open Tool Manager window,
execute Apply.
The Tool Manager's Log window appears as shown in Figure 4, in-forming you that "Setup of the Online Help succeeded. "
10 To dismiss the Tool Manager Log window, place the mouse cursor
inside the window, hold down the menu button and execute Close.
11 To dismiss the Tool Manager window, place the mouse cursor inside
the window, hold down the menu button and execute Close.
Where on my desktop does the Tool Manager put the tools?
The tools are placed in the Tools drawer, which is in the No Selection cabinet,
which is in the Custom cabinet, which is in the System5 cabinet, as shown in
14 INTERLEAF TIPs AND TRICKS
Inter/eat
! . . . .
AcliveReference [Aclive Ref] 0- ... " ... " ... " .. " .. ,""IJ
Aclive Tutorial [Tutorial] 0- """"""""""""""""""""", IJ Cloverleaf' 0- """""""""""""',',""""""",',",""'" IJ Developer's Toolkit [DTK]o- ... " .. , ... ,', .... " .... ,"', .... IJ Hyperleaf' Toolkit 1,1 [Hyperleaf'] 0- ... , IJ Keyboard Tool 0- """"""""""""""""""""" , , , , , , , , , , , IJ
Macro Tool [Macro] 0- """"""",""""""""""""""'"
Online Help 0- ... ,... ,
User Interface Painter [UI Painter] 0- """""""""""""""'" IJ
User Profile Tool [Profile Tool] 0- """""""""""""""""", IJ
WorldView Press Toolkit 1,0,1 [WorldView Press 1,0,1 ] 0- """"""" IJ
Figure 3
Changes to a
"1 "Tool Manager's log
,~tup of "Online Help" succeeded,
r1
reated:
Online Help Lisp file (1 i nk) in "profile" in IICustomll in "SystemS"
Loaded the profile script, ~
+-1 I" E!l
CHAPTER 2: CUSTOMIZING THE DESKTOP 15
~
lL.:.I
Create Custom Release Notes
( LlStOtl1
Graphics Samples
Macro No Selc( trnl1
[!t:l)
-'....
,..
ID
-m
[lin]
'...
ToolMgr List f"pungo
Selection
ID
, ... -+TID
...-
[JUll
Resean ReadEval Close All
I ool~
[JEn
[IUn
Keyboard Tool Tutorial
Figure 5
~.
--protlle
§
....
Mise
[J
Tools
,
-'l!I"I!I
If I open the Tools drawer in the SystemS cabinet, will I be able to
see
the tools?
Yes. As you can see in Figure 5 the tools are represented by icons that have funny little arrows on them. These icons indicate Lisp applications. The tools are Lisp programs that Interleaf provides for your convenience.
Can I edit the tools in the Tool drawer?
Yes, if you know how to program in Interleaf Lisp, and if you have the
16 INTERLEAF TIPS AND TRICKS
learn Lisp before you attempt to rewrite the Interleaf code. If you are interested in learning more about Lisp, a good place to start is Adventurer's Guide to Interleat Lisp by David Weinberger (OnWord Press).
H
I want to use the same tools between sessions, do I have to invoke
the Tool Manager every time I log on to Interleaf?
No. The good news is once you install a tool, it remains in your SystemS cabinet until you use the Tool Manager to explicitly remove it. So every time you invoke Interleaf, the tools you installed during your previous Interleaf session will al-ways be available to you.
How do I use the tools once I've installed them?
Most of the tools that you install are available to you from the desktop Custom
menu; however, some are available through other means. To access a particu-lar tool, perform the following steps:
12 Move the mouse cursor to the desktop (make sure that you don't have any icons selected).
13 Hold down the menu button and execute
Custom~Tools~(select the tool).
H
I install the tools on my desktop, do other Interleaf users on our
network also have access to the tools that I've installed?
No. When you install Interleaf tools on your desktop, only you have access to those tools. Each user has the opportunity to install (or not install) his or her own selected tools.
Are there any other tools available for the Interleaf desktop?
Yes. There are third party software developers that create utilities and tools specifically designed for the Interleaf 5 desktop.
Saffire Systems & Development, Inc., has created a product called the
InterleatS Desktop Buddy©. The Desktop Buddy is a collection of desktop utilities that enhance the Interleaf desktop (similar to how the Peter Norton utilities enhance DOS). A sampling of the utilities available in the current release of the Desktop Buddy includes the following:
CHAPTER 2: CUSTOMIZING THE DESKTOP 17
II
A window manager that displays all the names of the windows open onyour desktop and allows you to bring anyone of those windows to the fore-ground, even if the window you want is completely obscured.
II
A word count that records and displays the number of words in adocu-ment.
II
An alarm clock reminder that you can set to go off at any time, and thatgoes off with your own custom message.
This is only a small subset of the Desktop Buddy tools. For more information
on the Desktop Buddy write to Saffire Systems & Development, Inc., PO Box
770, #368, Park City, UT, 84060, or call (801) 649-4146.
Another third party vendor, Avalanche, Inc., has created an Interleaf utility packaged called Proof Positive. Proof Positive provides document editing tools specifically designed for Interleaf documents, including a Thesaurus and a Grammar Check facility (neither of which Interleaf 5 currently provides).
For more information on Proof Positive, write to Avalanche Development Company, 947 Walnut Street, Boulder, CO, 80302, or call (303) 449-5032.
Altering the Look and Feel of Your Desktop
One of the most dramatic modifications you can make to your desktop is to change the way it looks and responds. With the Interleaf tools not only can you change the color and shade pattern of your desktop, but you can change the way your mouse and desktop windows behave as well.
How do I change my mouse button configuration?
By default, the Interleaf 5 desktop configures the mouse such that the menu button is the right button, and the extend button is in the middle. This is be-cause Interleaf 5 inherits its mouse configuration from the windowing system
desktop (Open Look, Motif, etc.). If you prefer to have your mouse buttons
as Select, Menu, Extend (left, middle, right), instead of Select, Extend, Menu, then you can either invoke Interleaf from the system command line using the -sme parameters, or you can use the Interleaf 5 User Profile Tool to reconfi-gure your mouse.
Using the Command Line Parameters
18 INTERLEAF TIPs AND TRICKS
(which stand for Select, Menu, Extend). For example, if your site invokes
Inter-leaf by typing in ileaf at the system prompt, then you would invoke the following
to change the mouse button configuration:
ileaf -sme
This changes the mouse button configuration only for the current session. If
you later reinvoke Interleafwithout the -sme parameters, the mouse buttons
go back to being Select, Extend, Menu.
Using the User Profile Tool
To change the mouse button configuration using the User Profile Tool, perform
the following steps:
14 Invoke the Tool Manager and install the User Profile Tool (if you for-get how to install a tool using the Tool Manager, review the first sec-tion ofthis chapter).
If you have already set up the User Profile Tool, then you may skip Step 1, and proceed with Step 2.
15 From the desktop, execute Custom~Tools~Profile Tool.
CHAPTER 2: CUSTOMIZING THE DESKTOP 19
.... DESKTOP
• DOCUMENTS ... , ...
,
• GRAPHICS
• TABLES ...
,
• GENERAL USER INTERFACE ...
Figure 6
16 Select the General User Inteiface button in the Profile Tool window.
20 INTERLEAF TIPs AND TRICKS
GENERAL USER INTERFACE
I
•
•
•
•
•
Mouse/Cursor POPUpS/Pulidowns Property Sheets Screen/output Fidelity Stickups
Template Defaults Windows
Figure 7
... ··· .. ···· .. ·· .. ·· .. ···· .... ···· .. ··1
17 Select the Mouse/Cursor button in the Profile Tool window.
The current mouse button configuration appears, as shown in Figure 8.
,
CHAPTER 2: CUSTOMIZING THE DESKTOP 21
General UI: Mouse/Cursor
Busy cursor delay time 0 ...
I:
10 0oJ
millisecondsLeft mouse button 0 ... !selec:tj
Middle mouse button 0 ... !Extendj
Right mouse button 0 ...
.l
Menuj
Figure 8
19 Move the mouse cursor into the Right mouse button field, hold
down the menu button and select Extend.
22 INTERLEAF TIPS AND TRICKS
General UI: Mouse/Cursor
... ···1
Busy cursor delay lime 0> ...
[UDDl
millisecondsLeft mouse button 0> ...
!selectj
Middle mouse button 0> ...
!Menuj
RighI mouse button 0> ...
JExtendj
Figure 9
20 Hold down the menu button and execute Load.
lOur new mouse button configuration is loaded into memory. Notice that the middle button is now the menu button, and the right button is the extend button.
21 Close the Profile Tool window.
Why doesn't the software retain my new mouse button configuration
when I exit and then reinvoke Interleaf?
CHAPTER 2: CUSTOMIZING THE DESKTOP 23
Is there a way to permanently retain the desktop changes I make
using the Profile Tool?
Yes. To maintain your Profile Tool changes between sessions, you have to save your changes in a Profile Tool icon, and then put that icon in your Profile draw-er. (The Profile drawer is in the Custom cabinet, which is in the SystemS cabi-net.)
For example, to permanently modify your mouse buttons, make your configu-ration changes in the Profile Tool window, then perform the following steps:
22 In the open Profile Tool window, hold down the menu button and execute Save.
A stickup window appears, asking you to enter a Profile name.
23 In the stickup window type, "My Profile," and then select Enter.
The stickup window disappears, and your changes are saved in a Pro-file Tool Pro-file, which is represented by a ProPro-file Tool icon (created on your desktop), as shown in Figure 10. The name of the icon is the same name you typed in the stickup.
FiU
l.!JI
Figure 10
24 Close the Profile Tool window.
25 Open the SystemS cabinet.
26 Open the Custom cabinet.
27 Open the Profile drawer.
24 INTERLEAF TIPs AND TRICKS
Every time you invoke Interleaf, the software checks the Profile drawer foryour desktop customizations. At login, the software loads whatever it finds in the Profile drawer. If your Profile Tool icon is in the Profile drawer, it will automatically be loaded when Interleaf is invoked, which means that all of the changes that you made to the Profile Tool window will automatically be loaded when you log in.
Now every time you invoke Interleaf, you will be-able to use your new mouse configuration without having to reinvoke the Profile Tool.
How do I change the color of my desktop?
The User Interface Painter (also known as the UI Painter) is the tool you use to change desktop color. (Note: You must have a window environment and mon-itor (and in the case of DOS, a video card) that supports color before the UI Painter can change the color of your desktop.)
Interleaf software leaves the factory with a default monochrome desktop. This is because Interleaf does not know where each copy of their software is going, so they choose the lowest common denominator as far as desktop color is con-cerned; monochrome works on all systems.
To change the color of your desktop, perform the following steps:
29 Invoke the Tool Manager and install the UI Painter (if you forget how to install a tool using the Tool Manager, review the first section of this chapter).
30 Once the UI Painter has been installed, move the mouse cursor to the desktop (make sure that you don't have any icons selected).
31 Hold down the menu button and execute Create~Tools~
UI Painter~Default Gray.
A VI Painter icon called "Default Gray," as shown in Figure 11, appears on the desktop in an animated state.
CHAPTER 2: CUSTOMIZING THE DESKTOP 25
32 Move the icon to the right side of the desktop and click the select button.
33 While the icon is still selected, execute Open.
The VI Painter window opens on the desktop, as shown in Figure 12.
• DESKTOP ... ·1
• ICONS
• POPUPS
• WINDOWS
• DOCUMENTWINDOWS ...
. ... ··· .. ···1
• PROPERTY SHEETS
... ···11• STICKUPS ... !
26 INTERLEAF TIPs AND TRICKS
34 Select the Desktop button in the UI Painter window.
The UI Painter Desktop window opens, as shown in Figure 13.
Figure 13
35 Select the word Desktop, as shown in Figure 13, and execute Color-7Edit.
The Color Editor window appears as shown in Figure 14.
36 Select the slider bar for Magenta, as shown in Figure 14, and execute Move-7Slide.
37 Move the slider to the right with the mouse.
Notice that as you move the slider, the color box to the right begins to tum various shades of purple.
CHAPTER 2: CUSTOMIZING THE DESKTOP 27
Color Editor
0.00% cYln, 0.00% magenta, 0.00% yellow, 50.00% black
Cyan
Yellow
Black
elect the "Magenta" slider
Figure 14
39 Individually select the sliders in the Cyan and Yellow color bars, and add these colors to create your own custom color. Use black to control the darkness of the color.
40 When you've mixed the color you want, execute Apply.
Notice that the Desktop in the UI Painter window changes to match the new color you just created.
41 Close the Color Editor window.
42 With the mouse inside the UI Painter window, execute Load.
Wow! Look what happens! Thur entire desktop changes to the custom color that you just created!
You can use the UI Painter to change the color of any object in Interleaf,
includ-ing the icons, the inside of documents, and the background in an open win-dows.
To close the UI Painter hold the menu button down while the mouse is in the
28 INTERLEAF TIPS AND TRICKS
What are all those other choices under the
Create~Tools~UlPainter
desktop menu?
Those are the "premixed" color palettes offered by Interleaf. If you don't want to mix your own colors, Interleafwas kind enough to provide you with a collec-tion of color palettes. These palettes have been designed by graphic artists, such that the colors in each palette are compatible and aesthetically pleasing.
The color palettes offered by the Interleaf 5 UI Painter are as follows:
II
CanyonII
Default GrayII
EgyptianII
LilacsII
MallardII
OceanII
SkyTo change the color of your desktop to one of the Interleaf-provided palettes, perform the following steps:
43 Once the UI Painter has been installed, move the mouse cursor to the desktop (make sure that you don't have any icons selected), hold down the menu button, and execute Create~Tools~
UI Painter~(pick a palette).
A UI Painter icon named after the palette you selected appears on the desktop in an animated state.
44 Move the icon to the right side of the desktop and click the select button.
45 While the icon is still selected, hold down the menu button and execute Custom~Load.
lVur desktop changes color to match the defaults specified by the pal-ette.
For example, to change your desktop color to the Mallard palette, you do the following:
CHAPTER 2: CUSTOMIZING THE DESKTOP 29
A UI Painter icon named Mallard, as shown in Figure 15, is created on your desktop.
Mallard
Figure 15
47 While the icon is still selected, hold down the menu button and
execute Custom-~Load.
Your desktop changes color to match the defaults specified by the Mal-lard palette.
Use the steps above to test all of the Interleaf-provided palettes to see which one you like the best.
Why doesn't the software retain my new desktop color when I exit and then reinvoke Interleaf?
Because you didn't tell the software that you wanted it to use a specific color palette every time you logged in to Interleaf. By default, Interleaf will always initially set up your desktop as Default Gray, regardless of what you loaded dur-ing your last Interleaf session.
To change your desktop back to the color you want, select the UI Painter icon for the palette that you want, and execute Custom-7Load. Your desktop will change back to your desired color.
Unfortunately, this color change is temporary (meaning that it's valid for the current session only). To permanently specify a new desktop color palette de-fault, perform the following steps:
48 Open the SystemS cabinet.
49 Open the Custom Cabinet.
50 Open the Profile drawer.
30 INTERLEAF TIPS AND TRICKS
Every time you invoke Interleaf, the software checks the Profile drawer for your desktop customizations. At login, the software loads whatever it finds in the Profile drawer. If your color palette icon is in the Profile drawer, it will auto-matically be loaded when Interleaf is invoked, which means you'll automati-cally see a colorful desktop when you log in.
To illustrate how to permanently add desktop color, let's look at an example. Let's say that you want to have the Canyon palette automatically loaded onto your desktop every time you invoke Interleaf. Here's what you do:
52 Install the UI Painter with the Tool Manager (if you forget how to install a tool using the Tool Manager, review the first section of this chapter).
53 Move the mouse cursor to the desktop (make sure that you·don't have any icons selected), hold down the menu button, and execute
Create~Tools~UI Painter~Canyon.
A UI Painter icon named Canyon appears on the desktop in an ani-mated state.
54 Move the icon to the right side of the desktop and click the select button.
55 Open the System5 cabinet.
56 Open the Custom Cabinet.
57 Open the Profile drawer.
58 Cut the Canyon UI Painter icon from the desktop and paste it into the Profile drawer.
The colors in the Canyon palette will appear on your desktop every time you log on to Interleaf.
Why would I want to change the color of my desktop in the first place?
Why wouldn't you want to change the color of your desktop? Why settle for gray when you can create any color imaginable?
CHAPTER 2: CUSTOMIZING THE DESKTOP 31
yourself more comfortable in the area in which you work. Your desktop is no different. Don't let anyone tell you that changing the color of your desktop is a trivial time-waster. If changing your desktop color to chartreuse makes your day a little more fun, then ultimately, you'll be more productive. Hey, no one ever said work had to be dull and colorless.
How do I add a shade pattern to my desktop?
Now you're getting brave. You've created custom colors with the palette editor and now you want to know if you can do the same with shade patterns. Is there a shade pattern editor in Interleaf? You bet there is, and I encourage you to use it, if for nothing more than to add interest to your desktop.
You create custom shade patterns much the same way you create custom col-ors, by opening a UI Painter icon.
To change the shade pattern of your desktop, perform the following steps:
59 Invoke the Tool Manager and install the UI Painter tool.
60 Move the mouse cursor to the desktop (make sure that you don't have any icons selected), hold down the menu button and execute
Create~Tools~UI Painter~Default Gray.
A UI Painter icon called "Default Gray" appears on the desktop, as shown in Figure 16.
· ..
';~~r;~,
Figure 16
61 Move the icon to the right side of the desktop and click the select button.
62 While the icon is still selected, execute Open.
32 INTERLEAF TIPS AND TRICKS
Deftlllit GrilY
•
• DESKTOP ... y
• ICONS
• POPUPS ...
,
• WINDOWS
• DOCUMENTWINDOWS ... ···11
• PROPERTY SHEETS ...
,
• STICKUPS ... ··· .. ·· .... · .. ···1
Figure 17
63 Select the Desktop button in the UI Painter window.
The UI Painter Desktop window opens, as shown in Figure 18.
64 Select the word Desktop, as shown in Figure 18, and execute
Pat-tern--'JEdit.
CHAPTER 2: CUSTOMIZING THE DESKTOP 33
Figure 18
Pattern Editor
t
....
34 INTERLEAF TIPs AND TRICKS
65 Inside the open Pattern Editor window, execute Paint-7White.
66 Move the mouse cursor over the black field and create the shade pattern shown in Figure 20. If you make a mistake, execute
Paint-7Black to paint over your error.
Pilttern Editor
Figure 20
tJ t:f:j t::t:H::t:H:tJ t::tH±H:tJ I
BB3B3B3B3B3B3B31 BB3B3B3B3B3B3B3I BB3B3B3B3B3B3B31 BB3B3B3B3B3B3B31 BB3B3B3B3B3B3B31 BB3B3B3B3B3B3B31 BB3B3B3B3B3B3B3I
t
67 When you've finished creating the shade pattern, executeApply.
Notice that the Desktop in the UI Painter window changes to match the new shade pattern you just created.
68 Close the Pattern Editor window.
69 With the mouse inside the UI Painter window, execute Load.
Can you believe your eyes? Your entire desktop changes to the custom shade pattern that you just created!
You can use the UI Painter to change the shade pattern of your desktop or the background shade pattern of an open window (also known as a container).
CHAPTER 2: CUSTOMIZING THE DESKTOP 35
Will my custom shade pattern still be on my desktop if I exit Interleaf and then reinvoke Interleaf?
Not unless you store the customized UI Painter palette icon in the Profile
draw-er of your SystemS cabinet.
To permanently save your desktop's custom shade pattern palette, perform the following steps:
70 Rename your customized UI Painter icon.
For this example, let's assume that you renamed the palette icon "My Shade Pattern. "
71 Open the SystemS cabinet.
72 Open the Custom cabinet.
73 Open the Profile drawer.
74 Cut the customized UI Painter icon, as shown in Figure 21, from
your desktop and paste it into the open Profile drawer window.
My Shade Pattern
Figure 21
Every time you invoke Interleaf, the software checks the Profile drawer for your desktop customizations. At login, the software loads whatever it finds in the Profile drawer. If your customized UI Painter icon is in the Profile drawer, it will automatically be loaded when Interleaf is in-voked (which means that you'll see your custom desktop shade pattern when you log in).
How do I add a clock to my Interleaf desktop?
To add a clock to your desktop, move the mouse to the desktop (make sure no icons are selected), hold down the menu button and execute
36 INTERLEAF TIPs AND TRICKS
Move the clock anywhere you want on the desktop and click the select button to set it down.
There are a couple of things you should know about the Interleaf desktop clock. First, the time displayed by the clock is inherited from the operating sys-tem clock. Therefore, if the operating syssys-tem clock is wrong, your Interleaf desktop clock will not display the correct time.
Second, the clock is a temporary display, meaning that when you exit the Interleaf desktop the clock goes away. If you were to reinvoke Interleaf, the clock would not be displayed on your desktop unless you once again executed
Custom~Mise~Cloek.
How can I keep the clock so that it appears on my desktop
every
time I invoke Interleaf?Remember our old friend the Profile drawer? Recall that anything you put in the Profile drawer is loaded when you invoke Interleaf. If, therefore, you wish to have the clock loaded every time you log in to Interleaf, then you must put the Lisp script that creates the clock into your Profile drawer.
To put the clock Lisp script in your Profile drawer, perform the following steps:
75 Open the System5 cabinet.
76 Open the Custom cabinet.
77 Open the Mise drawer.
78 Select the clock Lisp icon, as shown in Figure 22, and execute Copy.
[Uf)
~11J.~j;
Figure 2279 Close the Mise drawer.
80 Open the Profile drawer.
CHAPTER 2: CUSTOMIZING THE DESKTOP 37
A copy of the clock Lisp script is pasted inside of your Profile drawer. Make
sure you pasted the clock Lisp script to the right of the init Lisp script in the
open Profile drawer window.
Now every time you invoke Interleaf, the clock will automatically appear on your desktop.
Accessing Online Documentation
The only thing more frustrating than not being able to understand the docu-mentation is not being able to find the docudocu-mentation in the first place. If
you're like me, you can usually find all of the manuals except the one you need.
With Interleaf 5, however, you have most of the documentation you will ever need at your fingertips. There will still be times when you need to look at the written documentation that comes with the software, especially if you are de-veloping layered applications, modifying filters, or installing new options. Most of the user documentation, however, is online. Interleaf 5 provides a number of places that you can look for online documentation. Some of those places are obvious, some are not. In all cases, however, the online documenta-tion will prove to be an invaluable asset to you (especially when you need to look up something in a hurry, and you can't find your printed manual set).
Does Interleaf have an online tutorial?
Yes. It's one of the tools that you can install using the Tool Manager. To gain
access to the online tutorial, perform the following steps:
82 Invoke the Tool Manager and install the Online Tutorial tool (if you
forget how to install a tool using the Tool Manager, review the first
section of this chapter).
83 Once the Online Tutorial has been installed, move the mouse
cur-sor to the desktop (make sure that you don't have any icons se-lected), hold down the menu button, and execute
Cus-tom~ Tools~ Tutorial.
The Online Tutorial will begin.
The Online Tutorial is very basic and, therefore, is only helpful if you are new
38 INTERLEAF TIPS AND TRICKS
If the Online Tutorial has been installed on your desktop and you wish to re-move it, invoke the Tool Manager, change the one to a zero in the box associated with the Online Tutorial, and execute Apply.
How do I access Interleaf's Online Help facility?
The Online Help facility is one of those tools that you must install with the Tool Manager. Once the Online Help facility has been installed, you can access it at any time to get information about popup menu items. After you install Online Help, it is always available to you (at least until you use the Tool Manager to "de-install" it).
To illustrate how the Online Help facility works, let's look at an example. Let's say that you want more information about the Paste menu item. If you've never accessed Online Help before, the first thing you need to do is install the Online Help facility using the Tool Manager.
Once Online Help has been installed, you can obtain information about a par-ticular menu item by simultaneously pressing the select and extend buttons when the menu item is highlighted. For example, to get help about the Paste
command, you perform the following steps:
84 Hold down the menu button and highlight the Paste menu item.
85 While Paste is highlighted, press the extend button so that the menu button and extend buttons are down at the same time, then release.
Paste
. . . m m • • • • • • • •
CHAPTER 2: CUSTOMIZING THE DESKTOP 39
(desktop or window)
Execute Paste to paste icons on to the desktop or in to the active directory window .
..~
I
Stepsil ...
!!!!!! ... "", •... !!!!!! ••••• " " ... !!!!!! ... "", ... !!!!!! ... " " ... """"""""""""""""""""""""""""""""' .. !!!!! ... !!!!!! ... "", ... !!!!!! ... "", ... !!!!!! .••••. !!!!!! .... "", ... "", ... .5• • • • • • • • m • • • • • • • • ~
In books
Execute Paste, The item which was cut or copied and has been residing as a selected icon on the clipboard now appears in animation state on the desktop or in the active window, Click the Select button to fix the icon in place and leave it
selected, or execute Deselect on the popup menu to fix it in place and deselect it
Pasting a document into a book window can alter the page numbers and au ton umbers in subsequent documents in the book Page and au ton umbering for a document depends on its location in relation to the other documents in the book
The pasted document can also in trod uee new attributes and values in the book
If the book contains an active catalog, the con ten ts and properties of the pasted document may be altered by the catalog .
... , .... ~
Help © 1991 Inteneaf, Inc. Desktop-4
Figure 23
You can obtain help for any menu item by repeating the above steps (replacing the Paste menu item with the menu item for which you are seeking help).
To close the Online Help document, move the mouse cursor into the document name box, hold down the menu button and execute Close.
What is the Active Reference tool?
40 INTERLEAF TIPs AND TRICKS
The Active Reference also allows you to reformat the reference documents and send them to a printer. When formatting for a printer, you can specify whether you want to include the table of contents and index.
How do I access the Active Reference tool?
The Active Reference tool is another one of those tools that you must install with the Tool Manager. Like the Online Help facility, the Active Reference tool is always available to you after it has been initially installed with the Tool Man-ager. (You would also use the Tool Manager to remove the Active Reference tool from your desktop, if you no longer need to use it.)
To illustrate how theActive Reference tool works, let's look at an example. Let's say that you want to find out more information about print properties. If
you've never accessed the Active Reference tool before, then the first thing you need to do is install it using the Tool Manager.
Once the Active Reference tool has been installed, you can use it to find out more about print properties (or any other topic) as follows:
86 Move the mouse cursor to the desktop (make sure that you don't have any icons selected), hold down the menu button, and execute
Create~ Tools~Active Ref~Interleaf 5 Features Doc.
An Interleaf 5 Features Doc icon appears, as shown in Figure 24.
o·
:.~ .=== .
-=-..:. .
-
.. =.- .
.. . . -.-. .
Figure 24
87 Open the Interleaf 5 Features Doc icon.
CHAPTER 2: CUSTOMIZING THE DESKTOP 41
... III INTERLEAF 5 BASIOS .. . ... _,
III D..~.~.~.,..,.~.~!. ... ~.~~ ... ~.~ ... .
III T.~x.:r. ... ~~.~.~~.~.~".~.~ ... .
III PAGE MAKEUP ... ,' ... ··· ... ··· ... · ... · ... ···· ... ·1
III BOOKS ···· ... ····_··_···· ... 1···_··· ... ····_··· ... · ... .
III ,.".~.~~.~.I.~.~ ... ~.~.~.~.,..,.~.~!..~ ... _ ... .
III GRAPHIOS ... ,
III I.,..,.~.~.~.~ ... .
III T~~.~.~.~... ... ... ... ... ... ... . ... .
III E..~.~~!.I.~.~ ... ~.~.I.!.~.~ ... .
III G.L.~.~.~A..~.~ ... _ ... . III INDEX
Figure 25
88 Select the Document Basics button in the table of contents.
42 INTERLEAF TIPS AND TRICKS
III! INTER LEAF 6 BASICS
DOCUMENT BASICS
Overview <0>
III Document Commands
III \/law Commands
III Printing
Versions <0>
III structuring Documents
III Masters
Document Links <0>
III TEXT PROCESSING ...
,
III PAGE MAKEUP
. . . r . . . .
III BOOKS ... " ... ..
III! ~.~.~.~.~.I.~.~ ... I?.~.~.~.~.I!'.~!..I! ... .
III GRAPHICS .r, • ...
III I~.~.~.I!'.~ ... .
Figure 26
89 Select the Printing button in the table of contents.
CHAPTER 2: CUSTOMIZING THE DESKTOP 43
II! INTERLEAF 5 BASICS
II! DOCUMENT BASICS
Overview 0
II! Document Commands II! View Commands
11
PrintingOverview 0
Printing Documents 0
Print Properties 0
Printelieaf Files 0
Versions 0
II! structuring Documents II! Masters
Document Links 0 II! TEXT PROCESSING
... !
··· .. ··· .. ··1
t··· .... · .... ···· .. ·· .. ··· ... · .. ·.·· ... ·· ... 1 II! PAGE MAKEUP ... ···1
II! BOOKS ...
,
Figure 27
t
Notice that there's a little diamond symbol (as shown in Figure 28) immediately to the right of the Printing Documents entry. Selecting this symbol allows you to hyperlink to further documentation.