by Allen Wyatt
Cleaning
Windows
®
XP
FOR
Cleaning
Windows
®
XP
FOR
by Allen Wyatt
Cleaning
Windows
®
XP
FOR
About the Author
Allen Wyatt,an internationally recognized expert in small computer systems, is president of Discovery Computing, Inc., a computer and publishing services company located in Mesa, Arizona. He has worked in the computer and pub-lishing industries for almost two decades, writing more than 50 books and numerous magazine articles. Allen’s popular lectures and seminars have reached audiences throughout the United States, as well as throughout Mexico and Costa Rica.
Besides writing books and technical materials, Allen helps further the computer book industry by providing consulting, production, and project management services. He publishes two free weekly newsletters, WordTips and ExcelTips (www.VitalNews.com).
Author’s Acknowledgments
Publisher’s Acknowledgments
We’re proud of this book; please send us your comments through our online registration form located at www.dummies.com/register/.
Some of the people who helped bring this book to market include the following:
Acquisitions, Editorial, and Media Development
Project Editor:Nicole Sholly
Acquisitions Editor:Greg Croy
Copy Editor:Tonya Cupp
Technical Editor:Jim Kelly
Editorial Manager:Kevin Kirschner
Media Development Manager:
Laura VanWinkle
Media Development Supervisor:
Richard Graves
Editorial Assistant:Amanda Foxworth
Cartoons:Rich Tennant, www.the5thwave.com
Composition
Senior Project Coordinator: Nancee Reeves
Layout and Graphics:Andrea Dahl, Denny Hager, Joyce Haughey, Stephanie D. Jumper, Michael Kruzil, Lynsey Osborn, Heather Ryan
Proofreaders:Laura Albert, Brian H. Walls, TECHBOOKS Production Services
Indexer:TECHBOOKS Production Services
Publishing and Editorial for Technology Dummies
Richard Swadley,Vice President and Executive Group Publisher
Andy Cummings,Vice President and Publisher
Mary Bednarek,Executive Acquisitions Director
Mary C. Corder,Editorial Director
Publishing for Consumer Dummies
Diane Graves Steele,Vice President and Publisher
Joyce Pepple,Acquisitions Director
Composition Services
Gerry Fahey,Vice President of Production Services
Contents at a Glance
Introduction ...1
Part I: The Basics of Cleaning Your System...7
Chapter 1: First Things First: Why You Should Clean...9
Chapter 2: Determining What to Clean and When ...19
Part II: Programs and Data ...33
Chapter 3: Identifying What You Have...35
Chapter 4: Making Your Programs Run Faster...49
Chapter 5: Getting Rid of Old Programs ...63
Chapter 6: Data, Data Everywhere ...77
Chapter 7: Organizing and Archiving Data ...91
Part III: E-Mail and the Internet ...103
Chapter 8: Tackling E-Mail Overload...105
Chapter 9: Organizing Your E-Mail ...119
Chapter 10: Banishing Internet Villains ...135
Chapter 11: Managing Internet Information...151
Part IV: The Operating System...165
Chapter 12: Cleaning Up the User Interface...167
Chapter 13: Streamlining Windows ...183
Chapter 14: Speeding Up the File System...207
Chapter 15: Managing Windows Updates...219
Chapter 16: Getting a New System ...231
Part V: Advanced Cleaning for the Truly Brave ...243
Chapter 17: Memory and Storage...245
Chapter 18: Becoming Security Conscious ...255
Chapter 19: Cleaning House in a Networked Environment ...269
Chapter 20: Jumping Into the Registry ...279
Part VI: The Part of Tens ...307
Chapter 22: Ten Troubleshooting Ideas ...309
Chapter 23: Ten Software Cleaning Tools...313
Chapter 24: Ten Online Resources ...315
Chapter 25: Ten Cool Things in XP Service Pack 2 ...317
Table of Contents
Introduction...1
How to Read This Book ...1
Assumptions About You...2
A Word about Operating Systems and Service Pack 2 ...2
How This Book Is Organized...3
Part I: The Basics of Cleaning Your System ...3
Part II: Programs and Data ...4
Part III: E-Mail and the Internet...4
Part IV: The Operating System ...4
Part V: Advanced Cleaning for the Truly Brave...4
Part VI: The Part of Tens ...5
Customs and Practices...5
Icons Used in This Book...5
Where to Go from Here...6
Part I: The Basics of Cleaning Your System ...7
Chapter 1: First Things First: Why You Should Clean . . . .9
Telltale Signs of an Unclean Computer...10
The view from the desktop isn’t pretty ...10
Traversing the Start menu jungle is an adventure ...11
Your PC is slower than molasses...12
You have files older than your dog ...13
Your system tray looks like a parking lot ...14
Cleaning Up: The Pros and Cons ...14
The pros...15
The cons ...16
Balancing pros and cons ...16
Keeping Your House Tidy...17
Chapter 2: Determining What to Clean and When . . . .19
How to Eat an Elephant ...19
Precautions for Safety’s Sake...21
Finding the Right Tools ...23
Finding Windows tools ...23
Finding third-party tools ...25
Creating a Cleaning Schedule ...26
Now. Do it now — right now...26
Deleting E-Mail Regularly ...126
Determine a cutoff point for e-mails ...127
Empty the Deleted Items folder...127
Empty the junk mail folder...127
Watching Out for Attachments...129
Archiving Valuable E-Mail...130
Enabling built-in archives...130
Using the Mailbox Cleanup tool in Outlook ...132
Rolling your own archive process...132
Chapter 10: Banishing Internet Villains . . . .135
Uh-Oh! Do I Have a Virus? ...136
Finding viruses on your computer...136
Blocking viruses ...137
Sizing Up Spyware ...138
Identifying spyware ...139
Getting to know spyware...140
Eliminating spyware...142
Blocking Pop-Ups ...145
Employing pop-up blockers ...145
Blocking Flash ads...146
Non-Pop-Up Pop-Ups ...148
Resisting the Lure of Trinkets ...150
Chapter 11: Managing Internet Information . . . .151
Are Cookies a Reason for Worry?...151
Blocking cookies...152
Managing your cookies...154
Deleting all cookies ...154
Negotiating Newsgroups ...156
Organizing Web Favorites ...157
Taming Web Cache Files...158
Cleaning the cache ...159
Finding the cache ...160
Changing the cache size ...162
Part IV: The Operating System ...165
Chapter 12: Cleaning Up the User Interface . . . .167
Master of the Desktop ...167
Displaying the traditional desktop icons ...168
Renaming and deleting icons ...170
Running the Desktop Cleanup Wizard ...171
Part VI: The Part of Tens ...307
Chapter 22: Ten Troubleshooting Ideas . . . .309
Check Your Startup Files ...309
Install Windows Updates...309
Run a Spyware Removal Program ...310
Remove Unused Programs...310
See What Processes Are Running...310
Run the Disk Cleanup Utility...311
Defragment Your Disk Drives...311
Check File Sizes ...311
Check the Size of Your Registry ...311
Start Your System in Safe Mode ...312
Chapter 23: Ten Software Cleaning Tools . . . .313
Chapter 24: Ten Online Resources . . . .315
Chapter 25: Ten Cool Things in XP Service Pack 2 . . . .317
Windows Firewall ...317
Memory Protection ...318
Network Administration...318
Windows Media Player ...318
Automatic Updates ...318
Outlook Express ...319
Add or Remove Programs Filter...319
Security Center...319
Pop-Up Blocker...319
Internet Explorer Improvements...320
Introduction
A
computer is nothing but a tool. It’s bigger than a hammer (well, most hammers), heavier than a screwdriver, and generally less noisy than a cir-cular saw — but is nonetheless a tool. You can do more stuff with a computer than you can with a hammer and a screwdriver, but hammers and screwdrivers are simpler to use and easier to clean up. (Circular saws are another story; things can get messy really fast.)Your computer doesget messy; have no doubt about it. Programs load and unload, files pop into existence and then slither off to unknown parts of your hard drive, and spyware tries to adhere itself to your operating system. Every day your system changes, as information is added and new demands are placed on old programs.
All these things add to the unique clutter that comes to define and weigh down your system. You can redefine your system and free your system, all by identifying and removing the clutter. Cleaning Windows XP For Dummies shows you how.
How to Read This Book
I’m a firm believer that you should read this book out loud, while standing on the coffee table in your neighbor’s living room. It surely will make an impres-sion on the neighbors’ kids and free up time you previously spent going to dinner parties.
Whether you decide to read this book out loud or not, you should read the first two chapters before reading any others. Dire consequences won’t result if you decide not to, but those chapters lay a pretty good foundation for everything else you find in the book.
After that, read whatever strikes your fancy. You know your system better than I do. If your big problem is getting updates to Windows XP properly, skip to Chapter 15. If instead you want to focus on archiving your data, turn to Chapter 7.
Assumptions About You
Being the amazingly gifted and highly skilled author that I am, I can report that I’ve achieved every author’s ideal and made no assumptions about you in writing this book.
Well, I guess that’s not entirely true. I do assume that you read English. And that you’re using Windows XP. And that you know how to turn your com-puter on. And that you know how to navigate through your system using My Computer or Windows Explorer. And that you think your system might be cluttered. And that you want it to be less cluttered.
Nope; I make no assumptions at all other than those. Oh, and that you know how to use a Web browser. And an e-mail program. And that you aren’t afraid to try new things once in a while. And that you want your system to run like it did when it was new. And that you’re tired of menus longer than the want ads and file folders that go on forever.
That should be it. Except that I assume you’re tired of being deluged with e-mail. And that you want to protect yourself from spyware and viruses. And that you aren’t sure if cookies are a bad thing. And that you think you can do something to make your system cleaner.
Dang. I guess I do make some assumptions about you. But, being the some-what gifted and nominally skilled author that I am, I know that these assump-tions only identify you as a person who wants to use your computer better and recognizes that cleaning that computer can help toward that end.
Working together, we can make that happen. (That’s why assumptions can be a good thing.)
A Word about Operating Systems
and Service Pack 2
This book (as you can probably tell from the title) is about Windows XP. The examples in the book assume you have Windows XP and are comfortable — or at least conversant — with using it. If you and the operating system still don’t get along at all times, don’t worry — the examples in this book will help you show it who’s really the boss.
Windows. You’ll need to do your own “translations” of examples so they will work on your system, and you may need to do some digging to find out how to make the detailed steps work properly, but it shouldn’t be a huge job.
While discussing operating systems, a word or two is in order about
Windows XP Service Pack 2 (SP2 for short). The computing world is all atwit-ter about SP2. Many view it as much more than a run-of-the-mill service update to Windows. In fact, Microsoft is pushing heavily for every computer that has XP to upgrade to SP2. (Chapter 25 can help you determine whether you want to upgrade.)
SP2 introduces a set of “security technologies” (Microsoft’s wording) that should improve the ability of Windows XP to withstand attacks from viruses and worms. That’s a good thing — if you think about it for a couple of nanosec-onds. By installing SP2, you can help fortify XP so that it turns away the bad guys.
Will SP2 help to unclutter your system? No, not really. It strengthens the secu-rity of your system, which can stop it from getting cluttered in the first place, but if your system is already cluttered, SP2 won’t magically make it unclut-tered. You still need to go through the “deep cleaning” process required of all cluttered computer owners. SP2 helps keep bad things (worms, viruses, and so on) off your system, but if there are bad things on your system already, you still need to take steps to get them off. This book can help you do that.
How This Book Is Organized
My editor tells me that organizing a book into parts is a good thing. It helps keep the chapters from running into each other. (Apparently having unre-lated chapters freely associating with each other is unhealthy.) To keep with longstanding tradition and to keep my editor from yelling at me, I’ve organized Cleaning Windows XP For Dummiesinto the following parts.
Part I: The Basics of Cleaning Your System
Part II: Programs and Data
Programs and data are the two great components of any computer system — including yours. Part II focuses on identifying what programs you have, how to make them run faster, and how to get rid of programs you no longer need.
You also find out how to identify all the data on your hard drive, as well as targeting and deleting the data you no longer need. I’ve dedicated a full chapter to concepts about organizing and archiving your important data.
Part III: E-Mail and the Internet
E-mail and the Internet are, for better or worse, a part of most people’s daily lives. This part zeroes in on how you can manage the glut of e-mail you get daily. You discover how to deal with spam and organize the e-mail you keep.
You also find out the telltale signs of virus and spyware infections, as well as how to get rid of these troublesome pests. Finally, you discover how to deal with information (not related to e-mail) that you may receive when using the Internet.
Part IV: The Operating System
Windows XP is nothing if not flexible and configurable. Part IV discusses how to clean up the user interface so using Windows is easier than ever before. You discover how to streamline Windows so it runs faster, as well as how to speed up the file system.
Microsoft wants you to have the most up-to-date system possible, and Windows XP makes it easy to stay updated with automatic downloads. You’ll understand how to use the update system and find out when it makes sense to get a new system rather than clean up the old one.
Part V: Advanced Cleaning
for the Truly Brave
An entire chapter covers the ins and outs of working with the Registry, your computer’s central nervous system. You find out how to edit the Registry and use special software to keep it in tip-top shape.
The final chapter in this part explains different ways to fix a corrupted Windows XP installation. You even find out how to start all over by wiping out your computer system and installing Windows anew.
Part VI: The Part of Tens
Ahhh! The Part of Tens. Here’s where you find small, bite-sized tidbits that can help get your system cleaned up and keep it that way. You find troubleshooting ideas, software tools for cleaning, and a multitude of online resources to help you tidy up.
Customs and Practices
I followed a few conventions that you might be interested in. Why? Because then you know why I chose to do something, and we can understand each other better.
First, if I talk about clicking the mouse, I mean clicking the left button. If I want you to click the right button, I specifically talk about right-clicking. (Quite a bit of right-clicking goes on in Windows.)
If a procedure takes more than a couple of discrete steps to complete, I try to detail those steps as much as I can. It’s frustrating as heck to read “do this” in a book, and when you do it, the steps don’t work for you. The steps should work if you’re using Windows XP; I’ve tried them out, as have my editor and my technical editor. (Three heads are better than one.)
Finally, if you must make a series of choices with the mouse, I separate the choices with an arrow. For example, if you see “Choose Start➪All Programs➪ Accessories➪Notepad,” that means you should click the Start menu, then the All Programs option, then Accessories, and finally Notepad.
Icons Used in This Book
expert negotiating and gave in to my demand. (I hope the other For Dummies series authors appreciate all my hard work in this area.)
With that in mind, you see the following icons sprinkled liberally throughout this book. Pay attention to this; you’ll have a test later!
If something is really short and really cool, I used this icon. Tips are bite-sized nuggets of information that can — hopefully — make your life easier and more fulfilling. (They should at least make you feel better about cleaning your Windows system.)
This icon alerts you to the gotchas of cleaning your Windows system. Ignore these tidbits at your own risk. (Ohh . . . that sounds ominous!) Warnings are given for a reason: primarily to help you avoid problems that can cause you grief and a whole lot of extra work.
This icon doesn’t mean you can forget everything else in the book. Nope; I included it so that you can make special note of something you need later. Or it could be a piece of information designed to jog your memory about some-thing you should have picked up earlier in the book. Remember — the remem-ber icon can help you rememremem-ber what you need to rememremem-ber.
A few of these icons are thrown into the mix so that the geeks among us feel comfortable. If geekiness scares the bejeebers out of you, ignore anything with this icon. If you really want a moment of technical clarity, you might find anything with this icon very illuminating.
Where to Go from Here
I think the best place to go is to the next page, but it doesn’t matter what I think. You can use or abuse this book in any way you see fit. If something on page 153 strikes your fancy, then go for it! You can always return to page 152 (or any other page) at a later time, when the need arises.
You see, that’s the really cool thing about cleaning your system and For Dummiesbooks — they don’t have to be done or read in any particular order. And the sky is the limit in Cleaning Windows XP For Dummies. You can start reading anywhere you like, on any topic you like. When you tire of that topic, move to one that strikes your fancy.
The Basics of
Cleaning Your
In this part . . .
Chapter 1
First Things First: Why
You Should Clean
In This Chapter
Determining whether your system needs cleaning Balancing the pros and cons of cleaning
Focusing your cleaning efforts
M
y system isn’t messed up, is it? (What? Me worry?)Yes, you should worry. Or, you should at least be aware that you may need to worry. Computer systems easily and quickly become untidy and messed up. If you don’t clean yours, you run the risk of big problems down the road.
Do I really need to point out the benefits of a clean computer system? (I do — a little later in this chapter.) Does someone need to come into your house and point out why you need to pick up your clothes, dust the furniture, wash the dishes, and tend to the dog? Probably not; you know that a clean house is healthful, inviting, and safe.
It’s the same with computers. Over time, your computer can become clut-tered with unused programs, unknown data, and unwanted visitors. With a little effort, you can clean your system so that it runs at top form, and you can breeze through your work faster and easier than you can in an unclean system. In addition, clean systems are more reliable, less prone to failure, and easier to protect from attack by malicious programs.
Telltale Signs of an Unclean Computer
How can you know if your system needs cleaning? I’ve compiled a list of sev-eral sure-fire signs that you need help (envision Jeff Foxworthy standing in front of your computer):You know you have a messed-up computer . . .
If you have to leave a trail of breadcrumbs so you don’t get lost finding your way through the options in your Start menu
If every pop-up on your computer apologizes for bothering you and qui-etly closes on its own
If you try to install a new program and the installation program reports your system to the Board of Health
If you think Defragmentis the name of a new rap song by Eminem (Yo!) If the only way to add more icons to your desktop is to get a larger
desktop
If you start the program to balance your checkbook, only to find that your son’s illegal copy of Splinter Cell ate the last month’s worth of transactions
If someone mentions “backup” and chills run up and down your spine If virus software refuses to install itself on your system
Perhaps such observations aren’t worthy of Jeff Foxworthy, but this list high-lights those things that really are good indicators your computer needs clean-ing. The next few sections detail some other obvious signs that you need help.
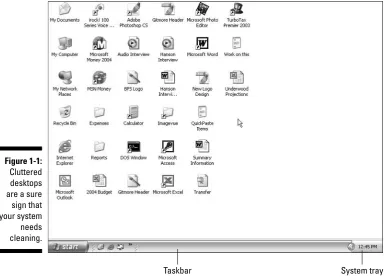
The view from the desktop isn’t pretty
Does your desktop look like the one shown in Figure 1-1? If so, you have prob-lems. Maybe you bought into the old adage that a clean desk is a sign of a sick mind, and in the process lost your ability to effectively use your system. Whatever got you to this point, you need your Windows cleaned. Badly.
A cluttered desktop is a good sign that your entire PC is cluttered. The solu-tion is to clean your system and rid yourself of all that mess.
If your desktop is as cluttered as the one shown in Figure 1-1 — and espe-cially if it’s even more cluttered — head to Chapter 12, where I give you some help regaining control.
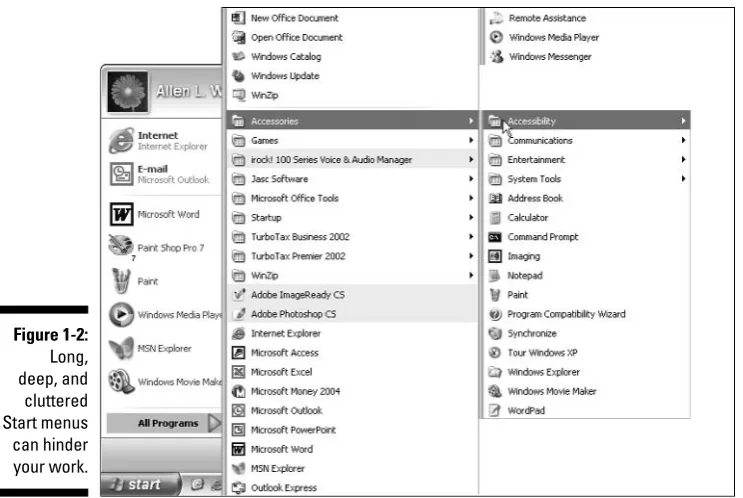
Traversing the Start menu
jungle is an adventure
Can you imagine running Windows without the Start menu? Neither can I. The Start menu is indispensable to quickly and easily finding the programs you want to run.
At least, that’s the way it’s supposed to be.
Taskbar System tray
On many systems that I’ve seen, the Start menu gets unorganized and clut-tered with lots of programs the user seldom, if ever, uses. Figure 1-2 shows one such Start menu, just itching to be cleaned.
The Start menu is supposed to provide a convenient path to all the programs installed on your system. Over time, some paths are used more than others, and some paths become completely unused. Removing unused items from the Start menu and organizing what is left can make your system easier to use.
As you remove unused programs from your computer (which I show you how to do in Chapter 5), your Start menu will look better and better. When you really need to give your Start menu a makeover, Chapter 12 (where I discuss taking back control of the user interface) will be invaluable.
Your PC is slower than molasses
I remember shortly after microwave ovens first came out (yes, I’m that old) watching my grandma use one to bake some potatoes. She would anxiously look through the oven’s door and mumble “hurry up, hurry up.”
Figure 1-2: Long, deep, and
I chuckled about it then, but years later I find myself doing the same thing with my computer. When I got the computer, it seemed really, really fast. Now, after using it for a year or so, it seems to be slower than I remember it. Yes, it is still faster than doing things “the old way” (sort of like baking potatoes in a conventional oven), but I find myself talking to the computer, begging it to “hurry up.”
If your PC seems slower than it should — particularly if it seems slower than when you first got it — then your system is a prime candidate for cleaning. Over time, the detritus that’s collected during everyday use can start to bog down your computer. If you don’t periodically banish that junk, it can affect the work you do. The change is typically slowly, ever so slowly, until you notice one day that your computer just doesn’t run like it used to.
If you want to make your programs run faster, you’re in luck because I show you how to do that in Chapter 4. To make Windows itself hum right along, check out Chapters 13 and 14, which cover getting the cobwebs out of Windows and making your file system run faster, respectively.
You have files older than your dog
I’ve had my dog for just over eighteen months, which makes him ten or eleven years old in dog years, right? Does that mean he’s been chewing up my son’s shoes for eighteen months or eleven years? Hmmm. . . . Converting people years to dog years may be philosophically confusing, but there is nothing confusing about examining the age of the files on your computer. If you use My Computer or the Windows Explorer to look at the files on your computer, I’ll bet you could find some that are three, five, or even ten years old.
I can hear you now: “Not on my system. I just got it a year ago, so I don’t have anything as old as your dog.” Wrong, bucko! Computer files tend to follow you around, over the years, without you even realizing it. For instance, com-puter files are commonly transferred from an old system to a new system. When transferred, the files retain their old file dates — they are old files.
You may also share files with other people in your office, family, or circle of friends. Place the files on your computer, and you may quickly forget about them. But they are there, aging like a not-so-fine wine, taking up space and adding to the general clutter of your system.
Your system tray looks like a parking lot
The system tray is the area at the right side of your taskbar. Take a look at the bottom of your computer screen. Now, shift your eyes all the way to the right. You probably see the current time, and you may see a few icons. Even if you don’t realize it, that’s the system tray (refer to Figure 1-1).
In Windows XP, the system tray is a little deceiving because it hides some of the icons. Perhaps the folks in Redmond don’t want you to be consciously aware of how cluttered this area can become. Don’t let that stand in your way, however. If you click the small left-pointing arrow at the left side of the system tray, you see the entire contents of the system tray.
Each icon in the system tray represents a utility program that is currently running in your system. You may see icons for any number of programs. How many do you see? Five? Ten? More? Some programs that you install on your computer are a bit egotistical. They think they’re so important that they deserve a place of honor in your system tray. When you install one of these egotistical programs, besides adding itself to your Start menu and your desk-top, it stakes out prime ground in your system tray.
Clutter, clutter, clutter. If you have a bunch of icons in your system tray, your system is a prime candidate for cleaning. Get rid of a few of these babies, and you may find your system running leaner and faster than before.
Don’t try to delete any of the system tray icons yet. Some of the icons will go away as you remove old programs. You also find out how to reclaim this prime area of your system by controlling what programs are run when your computer starts; Chapter 13 provides this important information.
Cleaning Up: The Pros and Cons
If your system needs cleaning, you’ve come to the right place. Cleaning Windows For Dummiesis a great resource that you can use to get your system back to near-new condition. If you’re not convinced that your computer needs a good cleaning, then you’re obviously a discerning person who needs to examine all the ins and outs of an issue before making a commitment. (That, or you’re in denial and won’t make a change until you’re operating in crisis mode. Don’t clean, and, I promise you, the crisis will come soon enough.)
The pros
You’ve finally reached the big time — the pros! Oh, sorry, wrong homonym. . . . In this instance, “the pros” mean benefits. Specifically, the benefits of cleaning up your system, which I list here:
Speed: A clean system runs faster than one that needs cleaning. Do you remember when you first got your PC? You probably thought it ran very fast. If your system stays clean, you shouldn’t notice it running any slower over time. Unfortunately, most systems don’t stay clean and require your attention. Give it that attention — that is, do the cleaning — and your system can run just as fast as it did the day you got it.
Efficiency: If you’re using a clean system, you can get through your work faster, and you are therefore more efficient. A clean system doesn’t make you immensely more efficient — if it did, the self-help publishing market would shrink dramatically. You can still get sidetracked playing games or arguing religion and politics on various message boards, but with a clean system you can do even those things more efficiently.
Reliability: A huge benefit of a clean system is that it is more reliable than one that isn’t. If you fail to clean your system, over time it goes from clean to cluttered to messed-up to unstable. Unstable systems crash. Unstable systems have a tendency to lose data. Unstable systems are a real pain. Clean your system, and you should see stability jump dramatically. No pain, big gain.
Stress reduction: Do you like to sleep at night? Do you prefer having no worry? Believe it or not, having a clean system can reduce anxiety and provide peace of mind. How so? Consider the worry you would have if a virus infected your system, or if you weren’t sure that the financial data on it was safe, or if you didn’t know what programs were running on the system, or . . . . You get the idea. Worry comes in all shapes and sizes. If you clean your computer, you have a better handle on what’s on your computer and how it’s being used.
The cons
Every coin has two sides, and unless you’re a bunko victim, the two sides aren’t the same. I’m no bunko artist, so I’m pleased to point out that doing a cleanup also has its negatives. You need to be aware of those negatives, right from the get-go:
Time-consumption: Cleaning your computer takes time. You probably feel strapped for time right now, don’t you? (Most people do.) Cleaning your computer can take anywhere from a trivial amount to a substantial amount of time. I’ve cleaned some systems — completely — in as little as two hours, while I’ve spent days cleaning other systems. How much time will your clean-up take? I can’t answer that, but I can say be pre-pared for a time commitment and be patient — your time will pay off in the end when your computer is running more smoothly.
Fortunately, you have some control over how and when to spend that time. You don’t have to spend it all in a single block, although you could. You can spend the time over a period of days or weeks, as the time becomes available. Check out chapter 2, where I discuss setting up a cleaning schedule, which can help you manage your cleaning time. The learning curve: Part of the time required to do the cleanup is
rooted in another drawback: the learning curve. Figuring out how to use some of the tools you use to clean takes time. If you’re already comfort-able with your computer and the cleaning tools, then your learning curve is lower than for those who are unfamiliar.
The bother: I won’t lie to you — cleaning up your computer can be a bother. If you approach the task as a chore, then it will be bothersome. But I encourage you to fight the urge to procrastinate cleaning; don’t put it off as you might other bothersome tasks. To borrow a phrase, remember that it’s not just a job — its an adventure. Try to overcome the “bother factor” by looking on it as a learning experience. If necessary, spread out the cleanup over several days so that you don’t max out your stress level in a single session.
Balancing pros and cons
focus on cleaning up your programs or making them run faster (the focus of Chapters 3, 4, and 5), you immediately increase the value of your system.
Your data:Chances are good that your programs eat, sleep, and breathe data. Programs need data to run, to fulfill their purpose in life. If your data is messed up, then your programs may just refuse to work properly. Managing data can be a monumental task, but doing so effectively will free up space on your hard drive and allow your programs to run faster. Head to Chapters 6 and 7 to find out more.
Your e-mail:We live in a well-connected world. If you use e-mail (and who doesn’t), then you can clutter up your system without even realiz-ing it. Spam and viruses routinely bombard your system through e-mail. If you better manage your e-mail (I show you how in Chapters 8 and 9), you lessen clutter and make your system more secure.
Your Internet use:E-mail isn’t the only use for your Internet connection. As you browse around the Web, your system is routinely filled up with files you don’t even know about. Whether these files are benign or harm-ful, they all add to the clutter of your system. If you pay attention to what’s stored on your system, you can reduce the clutter and improve overall performance. Chapters 10 and 11 can help you tackle the Internet beast.
The operating system:Ah, Windows. What can be said about Windows? Actually, quite a lot can be said — and not all of it bad! Windows is a great operating system, and one of its biggest strengths is its configura-bility. In Part IV, I show you ways to tweak and prod Windows into run-ning faster than it ever did before.
There are also some advanced things you can do, such as tweaking your hardware (or adding new hardware), improving your security profile, and [shudder] diving into the Registry. Such endeavors (which I cover in Part V) are usually relegated to the last, after you have worked through the other cleaning areas. I recommend that you proceed into these areas with extreme caution.
Chapter 2
Determining What to
Clean and When
In This Chapter
Practicing safe cleaning so you don’t get burned Locating just the right cleaning tools
Scheduling your cleaning tasks
Answering the cleaning conundrum with new hardware
W
hen you think about cleaning your Windows system, do you feel the walls closing in? Do you find it hard to breathe? Does everything start spinning and go dark?If so, you’ve been sitting at the computer too long. Or maybe someone has spiked your drink. Or you sat in one position so long that you’ve cut off oxygen to your brain. Stand up. Stretch a bit. Go outside for a breath of fresh air.
You see, cleaning your computer is neither rocket science nor something even harder (like assembling your kids’ Christmas toys after one-too-many egg nogs on Christmas Eve), but it involves multiple steps: creating lists, taking precau-tionary measures, finding helpful tools, making a cleaning schedule, and asking yourself (and then answering) tough questions, such as “Should I just wipe out the system and start anew?” or “Do I need new hardware?” After the fresh air and helpful stretch, read on and discover how you can approach these steps to get your computer back to its pre-messed-up glory.
How to Eat an Elephant
If you really have some time to kill — or you just fancy yourself a masochist — you can wade into the murky waters of the Windows Registry.The Registryis the centralized database that controls virtually everything that happens in the operating system. It is mind-numbingly complex and staggeringly obtuse for normal humans to deal with. However, you can do things in the Registry that you cannot do in any other way. An entire chapter of this book (Chapter 20) deals with this very topic.
Working in the Registry is not for the faint-of-heart. Make sure you double-check every action before you take it. One wrong step and you can bring your system to its knees. (Don’t be overly worried; Chapter 20 explains how to make backups of the Registry in case of problems.)
After you’ve tackled the elephant that is your Windows system, you will undoubtedly look back and be glad you went through the process. (You’ll also be glad you’re done, but that’s another story.)
Precautions for Safety’s Sake
It’s a jungle out there. (It’s too bad you ate your elephant; you could use it to help you get through the jungle.) In the jungle, bad things can happen to good people. Because you are good people, you may be interested in some things to help stave off or completely avoid the bad things.
Cleaning a Windows system necessarily involves moving things, adding things, deleting things, and sometimes renaming things. Any of these tasks, while nec-essary, can have unintended consequences. Heaven forbid you should delete a critical system file or wipe out the wrong data key in the Registry. (Refer to the previous bulleted list, where I define the Registry and explain its importance.)
These precautions help you avoid the bad things:
Don’t delete files without knowing what you are deleting.If you are in doubt, simply move the file to a different directory or rename it. Then, if you restart your system (or the program) and find out you made a mis-take, you can always move the file back or restore its original name. Make periodic backups of your system.(You’ve heard this before,
right?) If you’re getting ready to do a huge cleaning session, you might want to make a backup right before you start. If you want to rely on an older backup, you might want to have it close by, in case you need it when you start your cleaning session.
Finding the Right Tools
The Right Tools. Man, I loved that movie. Sam Shepard, Scott Glenn, Ed Harris, and Dennis Quaid were amazing. It had me on the edge of my seat, especially when . . . no, wait — that was The Right Stuff.(Dang it. The Right Toolswould probably star Tim “the tool man” Taylor in a 1965 Ford Mustang convertible. Guess I’ll have to wait for that one.)
You don’t have to blast off into space to find the right cleaning tools. In fact, many of the proper tools are already on your system, provided with
Windows. Others are third-party tools that you have to find on the Internet.
Finding Windows tools
You probably don’t know about the tools already on your system because Microsoft just throws them in without any fanfare. In fact, on Windows XP these tools are downright hard to find.
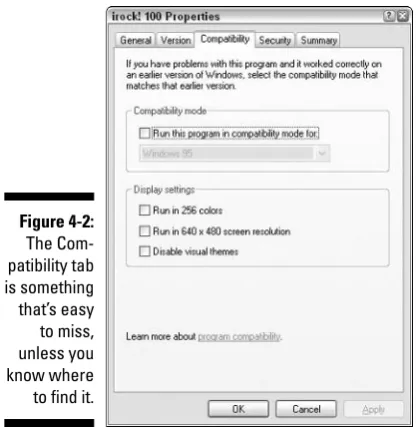
Think I’m kidding? Follow these steps and you see what I mean:
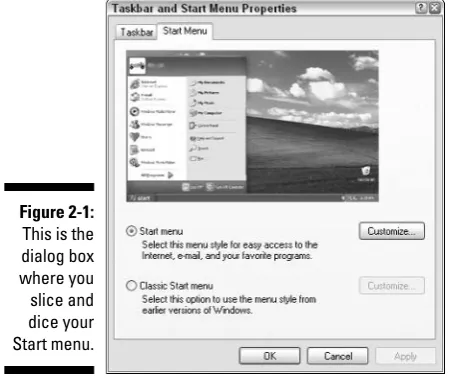
1. Right-click on any blank area of the taskbar and choose Properties from the Context menu that appears.
The Taskbar and Start Menu Properties dialog box appears.
2. Select the Start Menu tab.
As shown in Figure 2-1, a nice, idyllic scene appears, reminiscent of when you first got Windows XP and you ran through the lush, green grass in your bare feet. (That whole scene reminds me of some bother-some anti-allergy pharmaceutical commercial.)
3. Select the Start Menu option and click Customize.
The Customize Start Menu dialog box appears.
4. Click the Advanced tab.
Windows displays a plethora of options, as shown in Figure 2-2.
5. Scroll to the bottom of the Start Menu Items list.
You’re looking for a section of the list titled System Administrative Tools. Notice, when you find it, that the Don’t Display This Item option is selected. (Told you Microsoft made this hard.)
7. Close all the dialog boxes.
All you need to do is click OK a few times. This saves your change.
Now when you click your Start menu button, you should notice that a new Administrative Tools option appears, right below the Control Panel option. This option — which Microsoft hides because someone in Redmond feels you aren’t ready for the responsibility — can help you clean up your system and access many helpful-yet-geeky tools. Some of these tools are explained later in this book, in various chapters. Other tools accessible through Administrative Figure 2-2:
Ah ha! The
Tools are designed for heavy-duty system administration, and aren’t terribly useful when cleaning your system. Feel free to explore the tools to see whether they’re beneficial to you.
Many other Windows tools are accessible only from the Run menu; I detail those at the appropriate places throughout this book. (I wouldn’t want you to get too much power right away, without a proper explanation. There could be cosmic consequences.)
Finding third-party tools
Third-party tools are those provided by people or companies other than Microsoft. (You’re the first party, Microsoft is the second party, and everyone else is third-party.) Many, many tools are available in your local computer store or on the Internet, each one promising to help you run your system faster, safer, smoother, and with less chaffing than ever before. Some work well; some don’t. You need to be careful that you don’t fall for all the adver-tising glitz, however. The old adage that “if something sounds too good to be true, it probably is” readily applies here.
With that caveat in mind, you can go searching for tools in several places, if you’re so inclined. I recommend trying these:
Tucows.Once just a straight download site, Tucows has become much more. For that reason, I generally jump right to the Windows-specific section at www.tucows.com/windows.html. For most folks, this site is the gold mine of downloadable software.
CNET.One of those megasites (www.cnet.com), it includes not only down-loads, but also all sorts of reviews of products they want you to buy.
Shareware.com.This site, at www.shareware.com, is actually run by the folks at CNET. You get many of the same results here that you do at CNET.
Major Geeks.An interesting site with a military motif, www.majorgeeks. comis a site for, well, people who are geeks in a major way. Lots of differ-ent downloads help you do everything from benchmarking(testing your system’s speed and performance) to multimedia.
SysInternals.Top-notch freeware utilities for Windows systems can be found at www.sysinternals.com. The utilities here are hard-core and totally geeky by definition. Real good stuff, though.
These examples are just a portion of what’s in store for you when it comes to third-party software. The point is, lots of good third-party software is out there and new stuff is rising to the top of the heap all the time. With a little looking around and checking it out, you can find different tools that will help you clean your Windows system and keep it clean.
For a more detailed list of my favorite tools, check out Chapter 23. For a really cool bunch of online resources you can use, refer to Chapter 24.
Creating a Cleaning Schedule
I’ve said it before and I’ll say it again: Cleaning your Windows system doesn’t need to be intimidating. Sure, cleaning can take some time to accomplish, but you don’t need to do the cleaning all at once. You can break up the big job of cleaning into smaller, more manageable tasks, doing a little here and a little there until you’re done cleaning completely.
Or are you?
In reality, cleaning is never done completely — it should be an ongoing endeavor. If you set up a schedule for your cleaning, your system can remain clean and you lessen the chance of having a messed-up computer. Plus, your life will be happier, your kids smarter, and the sun shine brighter on your home. (I threw that in for the movie version of this book. It doesn’t hurt to think ahead.)
So what type of schedule should you set up for cleaning? Well, the next few sections detail things you can do now (as in today), things you can do once a week, once a month, and every year. I’m sure you will find enough info here to create your own schedule.
Now. Do it now — right now.
Got some spare time on your hands today? The following list explains just five things that you can do in as little as 10 or 20 minutes to help make your system cleaner:
Clean out the root directory: The root directory is a special place on each hard drive; it represents prime real estate in the file-storage world. Unfortunately, root directories also have a tendency to become cluttered easily. If you take a look at them once a week and clean them out as nec-essary it helps keep your operating system happier. You probably don’t want to delete files willy nilly; Chapter 7 contains the details on how to keep root directories in tip-top shape.
After you get good at completing these weekly tasks, they won’t take you long at all. Plus, your system will be cleaner and your data more secure. Don’t you feel better now? Is it quitting time yet?
It’s the end of the month already!
The months click by, and the older you get, the faster they click by. You do different things every month, like clockwork. You turn a page on the calendar. You reconcile your checkbook with the bank statement. You pay your mort-gage or rent. You rake the gravel in your front yard. (Okay, so I’m weird. It comes naturally; my sun-baked brain lives in Arizona.)
Add a few tasks to your monthly routine and your computer system will remain clean and tidy:
Clean up your desktop: The dreaded “icon creep” can result in more icons on your desktop today than there was a month ago. Identify the ones you don’t need and delete them. Chapter 12 has all the grungy details.
Archive project data: If you’re a project-oriented type of person, you probably finished up a few projects this past month. Why not archive the data associated with those projects so that it no longer clutters your hard drive? I discuss archiving data details in Chapter 7.
Eliminate spyware: Spywareis a growing plague on many computer systems. Spyware started as a way for unethical marketers to track what you do with your computer. Not cool. Now it has grown to include all sorts of pop-ups that sprout like crabgrass on your monitor. Very uncool. Your pop-up blocker may suppress the symptoms, but the underlying problem — spyware — is still there. Read Chapter 10 and eradicate spy-ware at least once a month.
Defragment your hard drive: One thing you really benefit from every month is defragmenting your hard drive. As you add, change, rearrange, and delete files, information stored on the hard drive can become dis-combobulated. (Yes, that is a valid technical term — trust me, I know these things.) Information is stored in bits and pieces here and there so that Windows has to grab data from all over your hard drive when you open a file. That slows down the system. You can knock things back into whack by defragmenting your hard drive, which essentially puts pieces of individual files back together. When done, Windows can more easily and quickly access your files. Want to find out more about defragment-ing? (Nod your head. Good.) Turn to Chapter 14 for all the nitty-gritty defragmenting details.
Defragment your hard drive at the end of the day. You can leave the program running while you run home to decompress from the day.
Now that your system is cleaner and tidier and your bank account is recon-ciled, aren’t you glad that the month is over? Now you get to start all over again. . . .
Time for the annual clean-a-fest
Should old acquaintance be forgot, and never brought to mind, we’ll fill the hard drive with our drafts and sing of auld lang syne.
With appropriate apologies to Robert Burns, over the course of a year many computer acquaintances can be forgotten. Or dropped. Or misplaced. Or whatever. Creating an annual checklist to keep your Windows system lean, mean, and clean is a good idea:
Review all data files on your computer and archive as necessary: Perhaps the biggest annual task is doing a comprehensive review of the data files on your computer. If you have been doing monthly archives, you can now add other files to the annual pile and shuffle them off to archive media. Chapter 7 tells how to do everything you ever wanted to do with archives. (Well, almost everything.)
Visit manufacturers’ Web sites to check for updates: Take some time to visit the Web sites for the manufacturers of you system hardware. Check for new drivers for printers, scanners, cameras, and so on, that have been released during the previous 12 months. Updating your dri-vers can improve speed and reliability. Chapter 13 discusses how to update (or remove) drivers.
Review your security precautions and update them as necessary: It’s a cruel, cruel world out there, and some of the perpetrators of cruelty are not content to remain “out there.” Some of them want to get up close and personal with your computer. Your job is to stop them. Believe me — you don’t want to encourage such relationships. You should, at least on an annual basis, make sure that you review your security precautions. Make sure you do your review with an eye toward major security changes in the past year and how you can be prepared for the coming year. Chapter 18 can help get you started.
Update your program inventory: I recommend doing this on an annual basis. Work habits change; tools come and go. You need to make sure that your Windows system always reflects the way you currently use your computer. Chapter 3 walks you through the process of developing your program inventory and the benefits it offers.
Time for an Overhaul?
I know one technician whose standard answer to cleaning a Windows system is to reformat the hard drive and start all over again with a clean slate. While that’s one way to tackle the problem, it isn’t necessarily the best way. It’s akin to using a bazooka to swat a mosquito: effective but overkill.
Is a complete system overhaul advisable? Sure; there are times when it’s a good idea. But doing so should be your lastresort and then only after you’ve thought through all the ramifications.
For instance, after you’ve cleaned systems for a while you get a feel for how long it takes to do the cleaning. You know what it takes to look through folder after folder, weeding out the files you no longer need. You know how long it takes to identify and remove programs, update drivers, and track down errant files. When you add up all those hours, you have a good idea of what it takes — time-wise — to clean your system.
Compare the two time estimates. If the cleaning is within 10 percent of the estimate for an overhaul, go for the overhaul. Even if it takes a bit longer, you doend up with a “fresher” machine. You get the complete skinny on overhaul-ing your system in Chapter 21.
The kicker is that overhauling your system (or cleaning it thoroughly) does no good if you don’t change the behavior that resulted in the messed-up system in the first place. Make sure that in the future you make cleaning an integral part of your everyday computing.
Is New Hardware the Answer?
You’ve got that gleam in your eye. I can see it; yep, that’s it. You want a new computer, don’t you? I can see you thinking that getting a new computer would sure make the job of cleaning up much easier — after all, the new system starts clean.
That’s the problem, though — it only startsclean. If you don’t change how you use your computer, then your new system will be a sullied twin of your current system in short order. You need to know that it’s behavior that messes up computers. (Have you heard this before?) If you keep the same behavior, you keep the same consequences of that behavior.
The same is true of adding individual hardware components to your system. Running out of hard drive space? If you add a hard drive without changing how you use the hard drive, you will fill the new one up as well.
You might be thinking that I am saying that new hardware is not the answer; I’m not. I’m just saying it isn’t the easy answer you may assume it is. In fact, in Chapter 16 I describe how to justify, select, and implement a brand new system. Take a look at that information before deciding that getting a new system is the cure for your ills.
Part II
In this part . . .
Chapter 3
Identifying What You Have
In This Chapter
Determining what programs you really need Discovering what is really installed
Figuring out when programs are running automatically Uncovering what programs are running right now Using the information you uncover
D
o you know what programs are on your computer? Do you reallyknow? Most people don’t. Instead, they make assumptions. The problem with assumptions, of course, is that they can get you into trouble.The first step toward cleaning your Windows system is to figure out what programs should be on your computer, compare that to what is actually on your computer, and determine what to do with the discrepancies.
This chapter helps you through this process. By the end of this chapter you will be well on your way to regaining control over a computer system that is probably more out of control than you know.
Creating a Program Inventory
If you run a warehouse, you need to know what you have in stock; you need an inventory. When you have an inventory, you are better able to manage everything within the warehouse walls. Without the inventory, every day is a bigger chore than it needs to be and probably full of unwelcome surprises. (Running an uninventoried warehouse isn’t just a job — it’s an adventure! And if you do it on roller skates, it’s a zippy adventure.)
When figuring out your program inventory, you are probably tempted to click the Start menu and see what you have installed on your system. Don’t! That comes later, after you figure out what the heck you do with your computer. (If you start by looking through the Start menu, what you find will improperly color your inventory. Trust me; you get better results by ignoring the Start menu for the time being.)
You can take either of two approaches to putting your inventory together: the think-tank approach and the laid-back approach. Read through the following sections and figure out which one you want to use. There is no right answer; just pick the one that appeals to you the most, and then do it.
The think-tank approach
The best way to put together a program inventory is to think through how you use the computer. I call this the think-tank approachbecause you are putting your list together in one fell swoop, using sheer brain power to hammer out an inventory that reflects the way you use your computer. (Plus, you can impress the heck out of your know-nothing friends by telling them you belong to a think-tank. If you tell them in a snobby voice, it sounds very impressive, indeed.)
To create an inventory using the think-tank approach, follow these steps:
1. Turn off your computer, unplug the phone, grab a cold drink, and clear a place on your desk.
You can’t think effectively if you are interrupted. (Despite what the per-sonal productivity gurus try to sell us, multitasking is for computers, not for people.) Now you are ready; this is think-tanking at its best.
2. On a fresh sheet of paper, start listing all the programs you need on your computer in order to do your work.
Think through the tasks you do on a regular basis and write down the names of the software you use to do those tasks. Do you do a lot of writ-ing? Chances are good your inventory should include a word processor, such as Word or WordPerfect. Do you crunch numbers for a living? Then your inventory probably includes a spreadsheet program. Do you design Web pages? You probably have a page design program in your inventory. Write them all down.
3. Include tasks that are easy to overlook, such as balancing your check-book or entertaining your mind.
4. Check your bookshelves and write down what you find, but only if what you find is what you really use.
Chances are good that you have software manuals or installation disks stored somewhere. (Of course, they may be buried under a half-inch of dust, but rediscovering these old, dust-buried friends can be exciting.)
If you find items on your bookshelves that you no longer use, gently toss them into a corner. You can always donate them or maybe even sell them at eBay. Plus, you free up valuable space on your bookshelves.
Creating your inventory should take you about an hour only. If you find your-self taking more time than that, you are probably allowing youryour-self to become distracted. If you take much less time, then you are not successfully navigat-ing the think tank and are probably missnavigat-ing some items.
The laid-back approach
If you like a more leisurely approach to life and your Windows system is not so bollixed up that you can’t use it effectively, you can put together your pro-gram inventory another way: Keep a journal.
Yep, you read right — keep a journal. A program diary. The steps for creating an inventory the laid-back way are, well, laid back:
1. Put a small notebook next to your computer.
2. Over the course of a typical week, write down every program you use.
If you start the program, write it down. You don’t have to write times and dates for using the programs, just the program name.
3. At the end of the week, admire what should be a nice long list of programs.
4. If you find duplicates on the list, remove them.
For instance, you may have written a program name down on Friday, for-getting that you already wrote it down on Tuesday. When you are done, your inventory should contain nothing but a unique list of programs you use in your work.
If you decide to take this laid-back approach, you’ve got some time on your hands. After all, you shouldn’t move forward with the rest of your cleaning tasks until you have your inventory done. If your inventory takes a week to put together, what will you do with your free time?
Instead, bookmark this page so that you can come back in a week, after a few leisurely walks or a better understanding of Detective Lenny Briscoe’s acer-bic wit. You should be ready to move along then.
Finding Out What Programs
Are Installed
When you are done with your inventory, congratulate yourself and get another cold drink. Put the inventory away for a while, but don’t forget where you put it. (You will need it shortly.)
Grab another sheet of paper and start writing down what programs are actu-ally installed on your computer. You can look in lots of places to put this list together. All of them involve your computer, so make sure you are comfort-ably seated in front of it as you work through the following sections. To find out what is installed on your system, look in these four main places: the desk-top, the Start menu, the Control Panel, and your program folders.
You are doing nothing right now except exploring your system and document-ing what you find. Resist the temptation to start removdocument-ing programs, regardless of how strong that temptation is. You have plenty of time to remove programs later; Chapter 5 covers that task very nicely.
Inspecting your desktop
Does your desktop look like the public bulletin board at your neighborhood Piggly Wiggly? Do you have icons crowded together so tightly that it’s hard to see the wallpaper in the background? If so, you have problems. Don’t worry, though — help is coming!
Every program you installed on your system probably asked (in a very helpful manner) if you wanted a program icon placed on your desktop. If you said yes, it is no wonder your desktop is a mess. Even though it is a mess, it is also a good indicator of what is installed on your system. This is good.
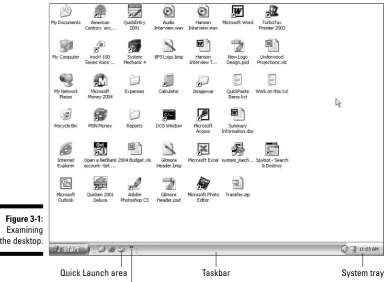
Take a quick look at each area of your desktop; it contains important clues to the programs installed on your system. Pay particular attention to the follow-ing areas:
Taskbar: Taskbars are typically full of all sorts of icons, each associated with some installed program. Pay particular attention to the Quick Launch area, just to the right of the Start menu icon. See Figure 3-1 for the taskbar. If there is an expansion icon to the right of the Quick Launch area, click it to see other icons in the area. Jot down the names of the programs responsible for these icons.
System tray: The system tray, sometimes called the notification area, is to the right of the taskbar (refer to Figure 3-1). Again, each icon here is related in some way to a program on your system. Write them down. If you don’t know what program they belong to, hover the mouse pointer over the icon until you see a helpful reminder. If you see a left-pointing arrow at the left side of the system tray, click it to see all the icons stored therein.
You find out more about cleaning up your desktop in Chapter 12.
Quick Launch area
Click to see more icons in the Quick Launch area
Taskbar System tray
Scrutinizing the Start menu
The Start menu is the gateway to your system. Unless your system is a Gateway, and then the Start menu is the gateway to your Gateway. (Sorry; I wax philosophic sometimes.) Displaying the Start menu can tell you quite a bit about what is installed on your system. Spend some time clicking the various options in the Start menu to find out what is installed.
As you look through your Start menu, don’t worry about visiting the Control Panel just yet. (I cover that in the next section.) Instead, focus on what you see when you click All Programs. This option presents a whole new world of menus, possibly several levels deep. (See Figure 3-2.) Look through them all and write down the names of the programs you find.
If you find the options available in your Start menu overwhelming, don’t despair. Part of the reason you clean Windows is to reduce those feelings and help you get back in control of your system. You’ll make it; hang in there!
Checking the Control Panel
Have you ever spent time in the Control Panel on your system? It’s analogous to the cockpit of an airplane, giving you access to all the controls that make your computer work.
One area of the Control Panel specifically designed to help you figure out what’s installed is the Add/Remove Programs applet. (Appletis geekspeak for a small program. The term is traditionally used to describe the various pro-grams available through the Control Panel.)
1. Open the Control Panel.
2. Click (or double-click, depending on how you are viewing the Control Panel) the Add or Remove Programs option.
Shortly you see a list of the programs that Windows XP thinks is installed on your system, as shown in Figure 3-3.
3. Scroll through the list of programs and write them all down.
Chances are good that there are quite a few programs listed here, but you should not be fooled into thinking that the list represents every pro-gram installed on your system. It doesn’t; that is why you are looking in places besides the Control Panel for installed programs.
4. Close the Add or Remove Programs dialog box and the Control Panel.
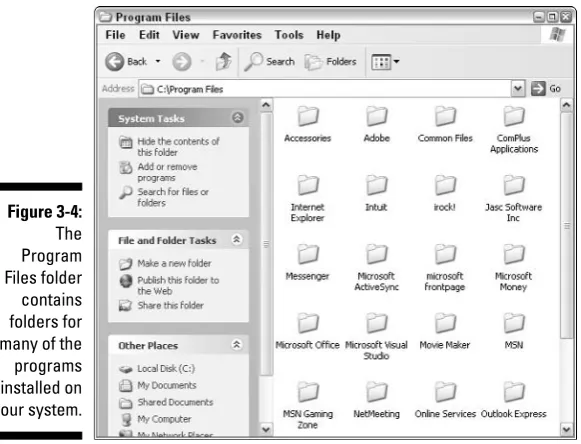
Peering in program folders
You should look in one final place to see what programs are installed on your system — the program folders. When you install a program on your system, the common convention is to install it in a folder called Program Files. This folder can contain dozens or hundreds of other folders, each of which is related in some way to a program installed on your system.
1. Using My Computer, navigate to the Program Files folder and take a look at it.
On most systems, the Program Files folder is in the root directory of the C: drive. Figure 3-4 shows an example of a typical Program Files folder.
2. Examine the name of each folder you see.
Most folders represent either the name of the program that uses the folder, or the name of the publisher of a program you installed. For exam-ple, folders named ATI Technologies, Intel, and Intuit contain additional folders for programs from those companies. Folders named Microsoft Office, Microsoft Works, and Microsoft FrontPage all refer to individual programs. (Microsoft is really good at spreading its programs through lots of folders in the Program Files folder.)
3. Look through the folders in the Program Files folder, writing down the names of any programs not already on your list.
4. Close all the folder windows.
When you are through looking around and taking notes, tidy up your screen by closing all the open folder windows.
Over time, the Program Files folder can start to look like an old garbage dump, strewn about with folders that are no longer used. This happens because even though you delete old programs, the folders used by those programs could remain in the Program Files folder. Chapter 3 explains how to identify and remove these pesky left-behind folders.
Discovering What Programs Run When
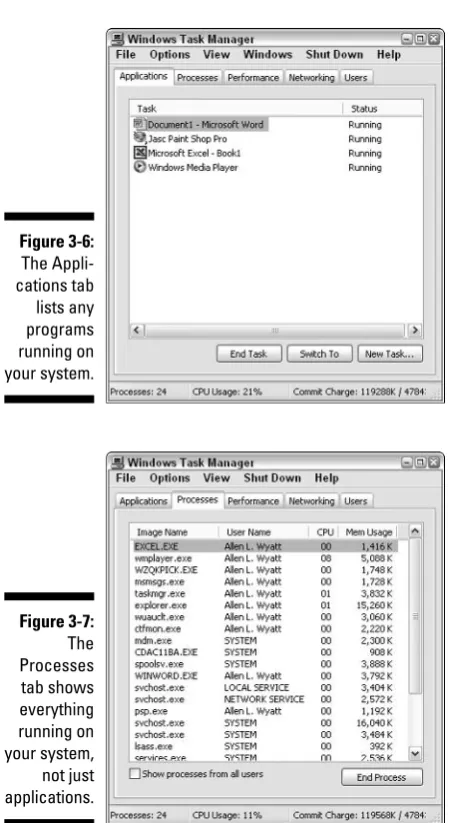
Were you surprised by anything you found as you were putting together your program inventory? You find out shortly what to do with these lists, but first figure out what programs run at various times on your computer.Most programs that you use are started whenever you choose to start them, such as through the Start menu or a desktop icon. A large number of pro-grams run automatically when you start Windows. Sometimes, you may not even be aware that they are starting, since they may run behind the scenes.
Programs that run automatically on your computer — especially those that don’t make themselves known to you — are some of the biggest speed thieves in any system. Every program uses resources(memory and drive space). The more programs loaded at the same time, the more resources are used for those programs.
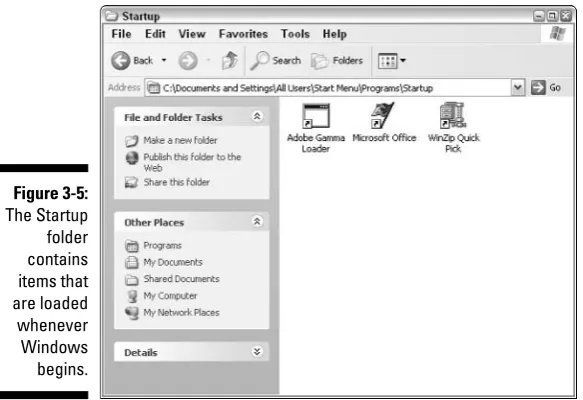
You can configure programs to start automatically in Windows a couple of ways. Some of those ways are pretty technical; I cover them a bit later in this book (in Chapter 11). For right now, I examine a typical way that programs run: through the Startup folders on your system.
Starting up for all users
When Windows is first installed, one of the things it does is create a special Startup folder applicable to all the users on the computer. Anything placed in this folder is run and/or opened when you first start Windows. Sometimes real programs are stored in the Startup folder and sometimes it is just a shortcut to a program elsewhere on your system.
To open the Startup folder for all users, follow these steps:
1. Right-click the Start button (at the left side of the taskbar).
2. Choose Open All Users from the context menu that appears.
Word opens a folder window called Start Menu. Each item in the folder represents an entry in the Start menu. This folder is nothing more than a directory on your hard drive, the same as any other folder.
3. Double-click the Programs folder and then double-click the Startup folder.
As you examine the items in the Startup folder, check them against your installed program list. You may discover additional programs that you didn’t know you had. If so, add them to your list. If they are already on your list, mark down on the list that the program is part of the Startup folder.
Starting up for just you
Windows creates another folder — a Startup folder — just for your user account. Anything in this folder is started whenever you log in to your Windows XP account.
Figure 3-5: The Startup folder contains items that are loaded whenever Windows begins.
Of menus and folders
The items in your two Startup folders appear in your Start menu — just choose Start➪All Programs➪Startup.
You may be wondering why you weren’t just directed to the Startup menu in the first place, rather than opening the individual folders. The primary reason is because as you get ready to
On a single-user system, the Startup folder for all users and the Startup folder for your account are basically them same. Windows still maintains two sepa-rate Startup folders, and the contents of both are loaded and run whenever you start Windows and log in.
You can explore the contents of your Startup folder by following these steps:
1. Right-click the Start button (at the left side of the Task bar).
2. Choose Open from the context menu.
Open should be the very first option on the Context menu. Word opens a dialog box called Start Menu. Each item in the folder represents an entry in the Start menu. This folder is nothing more than a directory on your hard drive, the same as any other folder.
3. Double-click the Programs folder and then double-click the Startup folder.
These steps look very much like the steps required to open the Startup folder for all users, which I describe in the previous section. The key difference, however, is that you choose a different option from the context menu. This opens a different Start Menu folder — one just for your user account — from the Start Menu folder opened in the previous secti