OPEN SOURCE FORENSIC TOOLS FOR LINUX HARD DISK INVESTIGATION
BASHAR (MOH'D WALID) AMIN MAREE
A project report submitted in partial fulfillment of the requirements for the award of the degree of Master of Computer Science (Information Security)
Faculty of Computer Science and Information Systems Universiti Teknologi Malaysia
iii
ABSTRACT
iv
ABSTRAK
v
TABLE OF CONTENTS
CHAPTER TITLE PAGE
DECLARATION ii
ABSTRACT iii
ABSTRAK iv
TABLE OF CONTENTS v
LIST OF TABLES viii
LIST OF FIGURES ix
LIST OF ABBREVIATIONS xiv
LIST OF APPENDICES xv
1 INTRODUCTION 1
1.1 Preface 1
1.2 Digital Forensics 2
1.3 Linux 2
1.4 Forensic Role of the Hard Disk 4
1.5 The Problem Background 4
1.6 Objectives 5
1.7 Scope 6
1.8 Project Aim 7
1.9 Requirements 7
2 LITERATURE REVIEW 9
2.1 Hard Disks 9
2.2 Device and Partition Names 10
2.2.1 Cryptographic Hashes 11
vi
2.4 Data Layers 13
2.5 Device Files 15
2.6 Unused Disk Areas 15
2.7 Host Protected Area 15
2.8 The Extended File System 16
2.9 Existing Guidelines 18
2.9.1 Guide to Integrating Forensic Techniques into
Incident response 19
2.9.2 Forensic Examination of Digital Evidence:
A Guide for First Responders, Second Edition 20 2.9.3 Forensic Examination of Digital Evidence:
A Guide for Law Enforcement 21 2.9.4 Good Practice Guide for Computer-Based
Electronic Evidence v4 22
2.9.5 New Technologies Incorporated, Computer
Evidence Processing Steps 23 2.9.6 Computer Security Incident Handling Guide 24
2.9.7 SWGDE Guidelines 25
2.10 Linux Forensic Tools 26
2.10.1 General Command Line Utilities 26
2.10.2 The gparted Command 28
2.10.3 The hdparm Command 28
2.10.4 The badblocks Command 28
2.10.5 The dd Command 28
2.10.6 The fdisk Command 29
2.10.7 The mawk Command 30
2.10.8 The md5sum, sha1sum and sha256sum Commands 30
2.10.9 The grep Command 31
2.10.10 The find Command 32
2.10.11 The ls Command 32
2.11 The Sleuth Kit Tools 32
2.11.1 Non-categorized Tools 33
vii
2.11.3 The Content Layer Tools 34
2.11.4 The Metadata Layer Tools 35
2.11.5 The File Name Layer Tools 36
2.11.6 The Application Layer Tools 36
2.11.7 The sigfind Tool 37
2.12 Caine Live Cd 37
3 RESEARCH METHODOLOGY 38
3.1 Topic Material 38
3.2 The Experiments 39
3.3 The Procedures 39
4 IMPLEMENTATION 41
4.1 Forensic Machine Preparation 41
4.2 Listing Contents 41
4.3 Hardware Integrity 44
4.4 Wiping Storage Media 45
4.5 Imaging and Verifying 48
4.6 Searching and Verifying 49
4.7 Loopback Device 51
4.8 String Searches 57
4.9 Determining File Types 59
4.10 Searching Raw Images for Text 61
4.11 Displaying Hard Disk Information 63
4.12 Setting the HPA 65
4.13 The sorter Tool 68
4.14 Data Carving 70
4.14.1 File Signatures 70
4.14.2 Conversion Calculator 71
4.14.3 Carving 72
4.15 Browsing the Image for Deleted files 76
4.16 Physical Level Search 84
viii 4.18 Finding Signatures in Unallocated Blocks 95
5 CONCLUSION 102
5.1 Linux Investigation Procedures 102
5.1.1 Preparation Stage 102
5.1.2 Duplication Stage 103
5.1.3 Volume Analysis Stage 105
5.1.4 File System Analysis Stage 105
5.2 Contribution 108
5.3 Limitations and Future Work 110
REFERENCES 112
ix
LIST OF TABLES
TABLE NO. TITLE PAGE
2.1 Linux device and partition names 11
2.2 General Linux commands used in the forensic experiments 26
2.3 Common fdisk options 29
2.4 Examples of typical mawk command statements 30
2.5 Common grep syntax 31
2.6 Some TSK tools listed by category 33
2.7 TSK tools that are not categorized 34
2.8 TSK Content Layer Tools 35
2.9 TSK Metadata Layer Tools 35
2.10 TSK File Name Layer Tools 36
4.1 Basic options of the ls command 43
x
LIST OF FIGURES
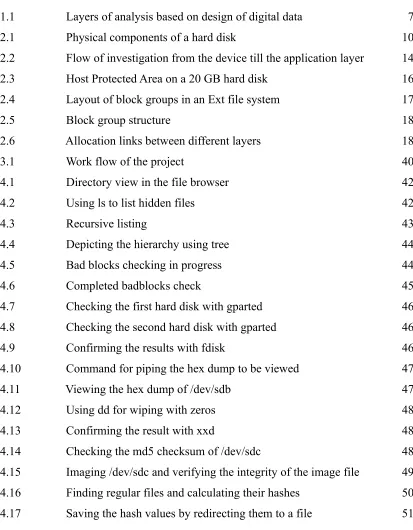
FIGURE NO. TITLE PAGE 1.1 Layers of analysis based on design of digital data 7 2.1 Physical components of a hard disk 10 2.2 Flow of investigation from the device till the application layer 14 2.3 Host Protected Area on a 20 GB hard disk 16 2.4 Layout of block groups in an Ext file system 17
2.5 Block group structure 18
2.6 Allocation links between different layers 18
3.1 Work flow of the project 40
4.1 Directory view in the file browser 42
4.2 Using ls to list hidden files 42
4.3 Recursive listing 43
4.4 Depicting the hierarchy using tree 44
4.5 Bad blocks checking in progress 44
4.6 Completed badblocks check 45
4.7 Checking the first hard disk with gparted 46 4.8 Checking the second hard disk with gparted 46
4.9 Confirming the results with fdisk 46
4.10 Command for piping the hex dump to be viewed 47
4.11 Viewing the hex dump of /dev/sdb 47
4.12 Using dd for wiping with zeros 48
4.13 Confirming the result with xxd 48
xi 4.18 Successful confirmation of matching hash values 51
4.19 Detection of the modified file 51
4.20 find mismatch notification 51
4.21 Calculating sha1 checksum for /dev/sdc 52 4.22 Using fdisk on /dev/sdc to get partition information 53 4.23 Imaging the sdc device in 2 ways and comparing the hashes 54 4.24 The hash value of /dev/sdc has not changed 54 4.25 Creating the /mnt/CaseViewer directory 54 4.26 Mounting the image with loopback device and browsing 55 4.27 Navigation of the hidden directories till a hidden file is found 56
4.28 Unmounting the raw image 56
4.29 The hash values after mounting 57
4.30 Lines matching the pattern keyword returned by grep 57 4.31 Using a text file for the source of patterns 58
4.32 Determining actual file types 59
4.33 Determining partition file system type with file 60 4.34 File failed to identify the partitions or the device directly 60 4.35 Reading the fstab contents for /dev/sda 61 4.36 The image is viewed then deleted on /dev/sda4 62 4.37 The suspect partition is imaged with dd 62
4.38 Using grep for the keyword search 62
4.39 Using xxd to make a dump of the text around the offset 62
4.40 The entire message is found 63
4.41 The hdparm output for /dev/sda 64
4.42 The hdparm output for /dev/sdc 64
4.43 Checking the presence of an HPA 65
4.44 Temporary setting of the HPA 66
4.45 HPA is temporarily set on /dev/sdd 66
4.46 Disk status after restart 66
4.47 Permanent setting of the HPA 67
4.48 HPA is set on /dev/sdd 67
4.49 Imaging in the presence of an HPA and the ensuing error 67
xii
4.51 Listing of the files to be sorted 69
4.52 The sorter command syntax 69
4.53 Results saved in the output directory 70
4.54 Using xxd to read the image header 71
4.55 The camera brand is embedded in the header 71
4.56 Using the bc calculator 72
4.57 An image and a pdf file saved on to the partition 73
4.58 Imaging the partition with dd 73
4.59 Converting the header and footer into hexadecimal 74
4.60 A hit is found by grep 74
4.61 Converting the header offset to decimal 74
4.62 The footer offset is also found 75
4.63 Converting the footer offset to decimal 75 4.64 Calculating the length of the pdf file 75
4.65 Copying the pdf from the raw file 75
4.66 The pdf file is restored 76
4.67 Directory containing images 77
4.68 Copying recursively 77
4.69 Imaging the partition 78
4.70 Viewing the image contents with fls 78
4.71 Deleting the food sub-directory 78
4.72 Deleting two more images 79
4.73 The alps image is moved out of the directory 79 4.74 Each deleted item is marked by an asterisk 79 4.75 Using istat to obtain inode information 80 4.76 Creating a small file and imaging again 80
4.77 Viewing testfile with fls 81
4.78 Same result with the smaller file 81
4.79 Browsing directory 116016 using fls 82 4.80 Using istat to get inode 116020 information 82 4.81 Using ffind to view names associated with inode 116020 83 4.82 Using icat to retrieve the file contents 83
xiii
4.84 Viewing the image and deleting it 85
4.85 Using fdisk to determine the partition layout on /dev/sdd 86 4.86 Using mmls to determine the partition layout on /dev/sdd 86 4.87 Imaging the active partitions on the device 87 4.88 grep fails to detect the keyword on the whole disk 87 4.89 Imaging /dev/sdd8 and the finding the keyword using grep 87 4.90 Offset sector of partition /dev/sdd8 88 4.91 The fsstat tool used on the whole image 88
4.92 The block size from fsstat 89
4.93 Using blkstat to find the allocation status of the block 89 4.94 Using ffind to find the inode associated with the block 6657 89 4.95 Using istat to get the inode information 90
4.96 The deleted message is revealed 90
4.97 The output of fdisk from /dev/sdc 91
4.98 The output of fdisk from the image 91
4.99 The blkls extraction and the grep search 92
4.100 The fsstat command 93
4.101 The block size on /dev/sdc8 93
4.102 The block number calculations 93
4.103 Finding the actual block address and allocation confirmation 94 4.104 Using blkcat to display the block content 94 4.105 The deleted message has been retrieved 95 4.106 Obtaining partition information using fdisk 96 4.107 Copying an image into /dev/sdd8 and removing it 96 4.108 Imaging the partitions without the volume slack 96 4.109 Layout is reported unchanged by mmls 97 4.110 Extracting the unallocated blocks using blkls 97
4.111 The hexadecimal value of JFIF 97
4.112 The offset to a jpg signature is 6 bytes 98 4.113 Using fsstat with less to control the output 98
4.114 Block size of /dev/sdd8 98
xiv 4.117 The original inode is found using ifind 99 4.118 The file name could not be retrieved using ffind 100 4.119 The icat output is saved and file is used to determine the file type 100 4.120 Using eog to attempt to open the file 100
4.121 The deleted image revealed 101
5.1 The imaging process chart 104
5.2 Image browsing techniques 106
5.3 Conducting a physical search 107
xv
LIST OF ABBREVIATIONS
AFF - Advanced forensic format
BIOS - Basic input/output system BTRFS - B-tree file system
CCTV - Closed-circuit television
CD - Compact disk
Ext2 - The second extended file system Ext3 - The third extended file system Ext4 - The fourth extended file system
FAQ - Frequently asked questions
GPS - Global positioning system
HPA - Host protected area
JPEG - Joint photographic experts group
MBR - Master boot record
MD5 - Message-digest algorithm 5
NIST - National institute of standards and technology
NTI - New Technologies Incorporated
OS Operating System
PDA - Personal digital assistant
PDF - Portable document format
RAID - Redundant array of independent disks
RAM - Random access memory
SHA1 - Secure hash algorithm 1
SHA256 - Secure hash algorithm 256
SOP - Standard Operating Procedure
SWGDE - Scientific working group on digital evidence
xvi
LIST OF APPENDICES
APPENDIX TITLE PAGE A Disabling 3D visual effects on the forensic platform 115
B Installation of gparted on Ubuntu 116
C Mounting a partition using the GUI on Ubuntu 117
D Hard Disk Manufacturer's Labels 118
CHAPTER 1
INTRODUCTION
This chapter will give an overview of the problem statement that lead to this project. It will also set the course of work by defining the objectives and scope.
1.1 Preface
There is increasing dependance on utilizing digital technology to perform daily activities. Despite their popularity, computers by virtue of their design have a very complicated structure. These powerful devices went through decades of development for the purpose of making them usable for the nonspecialist. Layer after layer of abstraction has been added to their functionally in order to hide the complexity that lies within. Consequently, many people are not aware of the inner workings of these devices that they heavily rely upon.
2
1.2 Digital Forensics
Digital or computer forensics is a relatively new field under computer science (Jones and Valli, 2009). The drive behind its recent popularity is mainly the global adoption of digital technologies.
“Computer forensics involves the preservation, identification, extraction, documentation and interpretation of computer media for evidentiary and/or root cause analysis”.
(Kruse and Heiser, 2002:1)
The science of computer forensics is concerned with understanding the core functionality of software and hardware for the purpose of tracking the flow of data, of evidentiary value, within these systems. Any software or hardware that could be used as part of an end user computational platform is subject to forensic scientific inquiry. Research in this field might occasionally give popular platforms priority but this is not to be taken as a limiting boundary.
1.3 Linux
Linux is an open source operating system that was initially coded in 1991. According to Shelly and Vermaat (2009), Linux is one of the faster growing operating systems.
“Over the past years, Linux has grown from an operating system used primarily by computer techies who disliked Microsoft to a widely accepted operating system with strong support from mainstream companies, such as IBM, HP, Dell and Novell”
3
“Oracle database 11g was developed on the Linux platform, and that's why the Linux based version was the first to be released for production use. Oracle has certified and supports Red Hat Enterprise Linux AS and ES (either the 4.0 or the 5.0 version), SUSE LINUX Enterprise Server 10, Asianux 2 and 3, and the Enterprise Linux versions 4 and 5.”
(Alapati, 2008:44)
Even as a personal operating system, Linux has achieved huge visibility. Currently IBM, Intel and Oracle are amongst the top ten contributors to the Linux Kernel (The Linux Foundation, 2009). The following are some market indicators on the increasing popularity of this platform:
1. In France, the French Parliament (Guillemin, 2006) and the National Police Force (Paul, 2009a) have migrated to Ubuntu Linux. The latter's complete migration covering 90.000 workstations is planned to finish by 2015.
2. The Andalusian Regional Government, Spain, has implemented 220,000 Ubuntu-based workstations in more than 2,000 schools throughout the region (Canonical Ltd., 2009).
3. Wikimedia, the organization behind the Wikipedia site runs Ubuntu exclusively on all of its 300 plus servers (Paul, 2008).
4. Amazon the online seller runs entirely on Linux (Shankland, 2004).
5. The Chicago Mercantile Exchange, an American financial and commodity derivative exchange uses Linux entirely on all its platforms (Paul, 2009b).
4 percent annually. This expectation carries the possibility of substantial market presence within a few years.
For an operating system to be of forensic value, it should provide a few capabilities. The following list gives some of these capabilities that were originally stated by Mandia (2003):
• Supports a wide variety of file systems. • Recovers file slack and unallocated space.
• Provides an efficient, effective and accurate undelete utility. • Provides keyword search capabilities.
• Performs all functions in a read-only state on the file system being processed. • Provides extensive auditing and logging of all forensic activities.
• Provides for data validation and integrity.
1.4 Forensic Role of the Hard Disk
As stated earlier, the arsenal of forensic practitioners should include all the necessary skills and tools to counter any forensic situation. This includes the ability to deal with all types of operating systems, software, hardware and hardware configurations such as RAID, clusters and server setups.
Personal computers and laptops are clearly two of the most widely used computer equipment. In these devices, the hard disk is the most valuable component for a forensic investigation. The reason is that this component is, generally, where most evidence can be found.
5 As stated earlier forensic science is a field that is constantly developing in order to cover the many domains which the information technology industry is producing. This growth in addition to the increase of complexity in both hardware and software will eventually lead to the emergence of specializations within this field. Specialization is a strategy for dealing with complexity. Not only does it minimize the required analytical load on individuals but it can also improve the quality of their work. This also applies to the forensic science and practice. As a matter of fact, this trend has already started to emerge in the forensic practice. For example, it is noticeable that commercial forensic services providers usually have teams with each member specializing in a certain field within this domain such as storage devices, network and RAM. In fact, expensive professionals such as RAM analysis experts are usually outsourced when necessary and not employed. Some of the interesting and newly emerging specializations include satellite forensics, GPS forensics and even pdf document forensics.
The move towards specialization is also apparent in publications of some of the most prominent standardization bodies in the field. The National Institute of Standards and Technology, for example, has a guideline on PDA forensics. The Scientific Working Group on Digital Evidence has a guideline for peer to peer file sharing technologies. Nevertheless, despite the importance of guidelines in educating forensic practitioners and also maintaining quality at the workspace a recognized publication for dealing, specifically, with a hard disk of a Linux installation does not seem to exist. Reasons for this may include the rarity of finding such a device but the above mentioned indicators seem to show that this is not likely to remain the situation for long.
1.6 Objectives
The project has the following objectives:
6 2. To demonstrate the use of tools that are needed to perform the investigative
processes using the latest Ubuntu Linux distribution as a forensic platform and as a target platform.
3. To outline the general procedures for the hard disk investigation of a Linux target system utilizing the introduced tools.
1.7 Scope
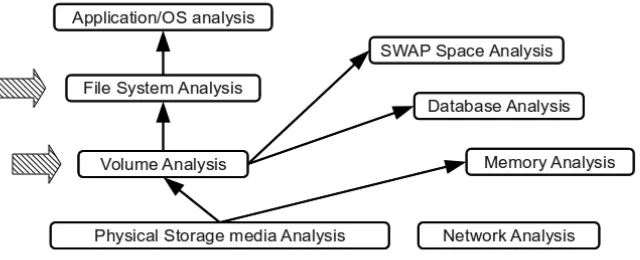
This project basically revolves around the forensic handling of hard disk that has a Linux operating system installed. It focuses on data searches and extraction. The practical examples and experiments given will all be run on the Ubuntu Linux distribution as a target system in a postmortem analysis. Ubuntu Linux will also be the forensic platform that is mostly used. Details of live acquisitions will not be discussed. The procedures will be restricted to the use of open source tools either from the core Linux utilities or separate specialized tools. Legal issues will not be dealt with as a primary focus but might be mentioned if a procedure has very direct implications on the legal value of evidence. The focus is mainly on the volume and file system levels. Application level data such as specific application formats, SWAP and database data will not be dealt with. RAM and network forensics lie out of the scope of this project.
The main focus is on extraction techniques. Therefore, high level analysis components such as allocation strategies and event reconstruction will not be covered.
7
1.8 Project Aim
The aim of this project, eventually, is to set the path for standardizing forensic examinations of Linux systems. This might be the future development of guidelines and SOPs that facilitate the task of a forensic practitioner when investigating a hard disk of a Linux operating system.
The tools used in this work are not the most sophisticated. In fact, most of the used tools are simple single task applications. The purpose of using such tools is to gain a better understanding of the underlying concepts rather than just accomplishing a certain task. A deeper understanding of the core principals of digital forensics will always be a merit for the digital investigator. Moreover, the project aims at having some academic value that might promote further research on the topic. Highly skilled forensic practitioners are not simply end users of sophisticated software but rather fully comprehend the fundamentals of computer functionality in regards to their domain.
1.9 Requirements
8 The experiments for this project were conducted on one dedicated personal computer with the following specifications:
1. Intel Pentium(R) Dual-Core Processor E5200 with 2.5 GHz frequency and 2 MB L2 Cache.
2. Intel DG35EC motherboard. 3. 4 GB DDR2 RAM.
4. 2 Western Digital hard disks 320 GB on /dev/sda and /dev/sdb. The /sda was where the forensic platforms were installed. The former was a storage space of the forensic images.
5. 2 Maxtor hard disks 40 GB on /dev/sdc and /dev/sdd. These hard disks were used to install the target operating system that were forensically investigated. 6. All installations for the forensic platforms and the target machines were