Intuity™ CONVERSANT® System
Version 7.0
Copyright and Legal Notices
Copyright Copyright © 2000 by Lucent Technologies.
All rights reserved. Printed in the USA.
This material is protected by the copyright laws of the United States and other countries. It may not be reproduced, distributed, or altered in any fashion by any entity (either internal or external to Lucent Technologies), except in accordance with applicable agreements, contracts or licensing, without the express written consent of the Business Communications Systems (BCS) Global Learning Solutions (GLS) organization and the business management owner of the material.
Acknowledgment This document was prepared by the GLS organization of the BCS division of Lucent Technologies. Offices are located in Denver CO, Columbus OH, Middletown NJ, and Basking Ridge NJ, USA.
Trademarks Lucent Technologies has made every effort to supply the following trademark information about company names, products, and services mentioned in the Intuity CONVERSANT documentation library:
• Adobe Systems, Inc. — Trademarks: Adobe, Acrobat.
• AT&T — Registered trademarks: Truevoice.
Copyright and Legal Notices
• Hayes Microcomputer Products, Inc. — Trademarks: Hayes, Smartmodem.
• Intel Corporation — Registered trademarks: Pentium.
• Interface Systems, Inc. — Trademarks: CLEO.
• International Business Machines Corporation — Registered trademarks: IBM, VTAM.
• Lucent Technologies — Registered trademarks: 5ESS, AUDIX,
CONVERSANT, DEFINITY, Voice Power. Trademarks: FlexWord, Intuity, Lucent.
• Microsoft Corporation — Registered trademarks: Excel, Internet Explorer, Microsoft, MS, MS-DOS, Windows, Windows NT.
• Minnesota Mining and Manufacturing — Trademarks: 3M.
• Netscape Communications — Trademarks: Netscape Navigator.
Copyright and Legal Notices
• UNIX System Laboratories, Inc. — Registered trademarks: UNIX.
• Veritas Software Corporation — Trademarks: VERITAS.
• Xerox Corporation — Trademarks: Ethernet.
Limited Warranty Lucent Technologies provides a limited warranty on this product. Refer to the “Limited Use Software License Agreement” card provided with your package. Lucent Technologies has determined that use of this electronic data delivery system cannot cause harm to an end user's computing system and will not assume any responsibility for problems that may arise with a user's computer system while accessing the data in these document.
Every effort has been made to make sure that this document is complete and accurate at the time of release, but information is subject to change.
United States FCC Compliance Information
Part 15: Class A statement. This equipment has been tested and found to comply with the limits for a Class A digital device, pursuant to Part 15 of the FCC Rules. These limits are designed to provide reasonable protection against harmful interference when the equipment is operated in a commercial environment. This equipment generates, uses, and can radiate
radio-frequency energy and, if not installed and used in accordance with the instructions, may cause harmful interference to radio communications. Operation of this equipment in a residential area is likely to cause harmful interference, in which case the user will be required to correct the
Copyright and Legal Notices Canadian Department of Communications (DOC) Interference Information
This digital apparatus does not exceed the Class A limits for radio noise emissions set out in the radio interference regulations of the Canadian Department of Communications.
Le Présent Appareil Nomérique n’émet pas de bruits radioélectriques dépassant les limites applicables aux appareils numériques de la class A préscrites dans le reglement sur le brouillage radioélectrique édicté par le ministére des Communications du Canada.
European Union Declaration of Conformity
Lucent Technologies Business Communications Systems declares that the Lucent Intuity CONVERSANT system equipment specified in this document conforms to the referenced European Union (EU) Directives and Harmonized Standards listed below: EMC Directive 89/336/EEC Low-Voltage Directive 73/23/EEC. The “CE” mark affixed to the equipment means that it conforms to the above directives.
Telecom New Zealand Ltd Warning Notices
Copyright and Legal Notices
IMPORTANT NOTICE: Under power failure conditions, this device may not operate. Please ensure that a separate telephone, not dependent on local power, is available for emergency use.
AUTOMATIC RE-ATTEMPTS TO THE SAME NUMBER: Some parameters required for compliance with Telecom’s Telepermit requirements are dependent on the equipment (PC) associated with this device. The associated equipment shall be set to operate within the following limits for compliance with Telecom specifications:
• There shall be no more than 10 call attempts to the same number within any 30 minute period for any single manual call initiation, and,
• The equipment shall go on-hook for a period of not less than 30 seconds between the end of one attempts and the beginning of the next attempt. AUTOMATIC CALLS TO DIFFERENT NUMBERS: Some parameters required for compliance with Telecom’s Telepermit requirements are dependent on the equipment (PC) associated with this device. In order to operate within the limits for compliance with Telecom specifications, the associated equipment shall be set to ensure that automatic calls to different numbers are spaced such that there is not less than 5 seconds between the end of one call attempt and the beginning of the next attempt.
Copyright and Legal Notices
CALL ANSWERING (AUTOMATIC ANSWERING EQUIPMENT): Some parameters required for compliance with Telecom’s Telepermit requirements are dependent on the equipment (PC) associated with this device. In order to operate within the limits for compliance with Telecom specifications, the associated equipment shall be set to ensure that calls are answered between 3 and 30 seconds of receipt of ringing.
Toll Fraud Toll fraud is the unauthorized use of your telecommunications system by an unauthorized party, for example, persons other than your company’s employees, agents, subcontractors, or persons working on your company’s behalf. Note that there may be a risk of toll fraud associated with your telecommunications system and, if toll fraud occurs, it can result in substantial additional charges for your telecommunications services.
Your Responsibility for Your System’s Security
Copyright and Legal Notices
Lucent Technologies Fraud Intervention and Corporate Security
If you suspect that you are being victimized by toll fraud and you need technical support or assistance, call the Lucent Technologies National Customer Care Center Toll Fraud Intervention Hotline at 1 800 643-2353. Aside from whether immediate support is required, all toll fraud incidents involving Lucent products or services should be reported to Lucent Corporate Security at 1 800 821-8235. In addition to recording the incident, Lucent Corporate Security is available for consultation on security issues,
investigation support, referral to law enforcement agencies, and educational programs.
Documentation Ordering Information
To order a document, contact the Lucent Technologies Publications Center and specify the 9-digit document number, the issue number, and the issue date.
Write, Call, or Fax
Lucent Technologies Publications Center 2855 N. Franklin Road
Indianapolis, IN 46219
Copyright and Legal Notices
World Wide Web
Use a web browser to reach one of the following sites. Click Documents and follow the instructions at the site.
• Organizations within Lucent Technologies
http://www.cic.lucent.com
• Lucent Technologies customers and others
http://www.lucentdocs.com
Standing Orders
Contents
Copyright and Legal Notices
ii
About This Book
xxxiii
Overview . . . xxxiii
Intended Audiences . . . xxxiii
How This Book is Organized. . . xxxiv
Conventions Used in This Book . . . . xxxv
Safety and Security Alert Labels . . . . xlii Getting Help . . . xliii Technical Assistance. . . xliv Related Resources. . . . xlv Using the CD-ROM Documentation . . . xlvii How to Comment on This Book . . . . l
1 Troubleshooting
1
Overview . . . 1Repairing Power-Up Troubles . . . 3
Repairing System Installation, Upgrade, or Setup Troubles . . . . 10
Repairing Application-Related Troubles . . . . 12
Repairing Script Builder Troubles . . . 16
Repairing Script Builder FAX Actions Troubles . . . 19
Repairing Administrative Troubles . . . . 24
Repairing Operational Troubles . . . . 26
Repairing Feature Licensing Troubles . . . . 28
Repairing Other Voice System Troubles . . . . 29
Repairing Call-Transfer Troubles . . . 30
Repairing Performance Troubles . . . 32
Repairing Diagnostics Troubles . . . 32
Repairing Touch-Tone Input Troubles . . . 33
Repairing Report Troubles. . . 33
Repairing Channel/Card State Troubles . . . 34
Reducing Load . . . . 36
Identifying Performance Problems. . . 36
Reducing Disk Usage . . . 53
Reducing Memory Usage . . . 54
2 Diagnostics
56
Overview . . . . 56Circuit Card Diagnostics . . . . 57
Checking Cable Connections for Cables Other Than the TDM Bus Cable . . . 57
Checking the Terminating Resistors . . . 60
Checking the Backplane Slot. . . 62
Checking the Switch Settings . . . 63
Checking the Circuit Cards . . . 66
Checking a Circuit Card Using the Intuity CONVERSANT Windows . . . 66
Checking an EQUINOX Multi-Port Serial Circuit Card. . . 78
Displaying Port Stats. . . . 82
Port Status . . . 83
Termio . . . 84
Register Dump. . . 85
Diagnostics. . . . 87
Serial Port External Loopback Test . . . 87
Serial Port Internal Loopback Test. . . 88
Checking a Speech and Signal Processor Circuit Card . . . 91
Database Diagnostics . . . . 95
ORACLE Network Diagnostics. . . . 99
TDM Bus Diagnostics . . . 102
Using the Command Line . . . 102
Using the System Windows . . . 106
Voice Port Loop Around Test. . . 107
ASAI Trace Utility . . . 112
Low Detail . . . 113
Normal Detail . . . 115
High Detail . . . 120
LAN Trace Utilities . . . 124
Using the arp Command . . . 125
Using the netstat Command . . . 126
Using the ping Command . . . 128
Using the traceroute Command. . . 129
Using the tcpdump Command . . . 130
Simple Network Management Protocol . . . 132
3 Common System Procedures
155
Overview . . . 155
About Cartridge Drives and Tapes . . . 156
Inserting and Removing Cartridge Tapes . . . 156
Formatting Cartridge Tapes . . . 160
About Diskette Drives and Diskettes. . . 163
Types of Diskettes . . . 163
Inserting and Removing Diskettes . . . 163
Formatting Diskettes . . . 164
Backing Up the Intuity CONVERSANT System . . . 166
Backing Up the System Using QuickStart . . . 169
Backing Up the System Using BRU. . . 175
Backing Up the System Using mkimage . . . 183
Backing Up Speech Files and ORACLE Database Tables Using a LAN. . . 192
Restoring the Intuity CONVERSANT System . . . 199
Restoring the System Using QuickStart . . . 200
Performing a Full Restore Using BRU . . . 203
Performing a Differential Restore using BRU . . . 205
Restoring the System Using mkimage. . . 206
Restoring Speech Files and ORACLE Database Tables Using a LAN . . . 210
Administering the Voice System . . . 214
Starting the Voice System . . . 214
Shutting Down the Voice System. . . 220
Administering the Operating System. . . 221
Shutting Down the Operating System . . . 222
Rebooting the UNIX System . . . 225
Administering the Database System . . . 225
Starting the Database System . . . 226
Stopping the Database System . . . 227
Dropping a Database Table . . . 228
Recreating the System Traffic Tables . . . 230
Verifying the Date and Time . . . 231
Checking the UNIX Date and Time Window . . . 231
Changing the UNIX Date and Time Window . . . 233
4 Alarms and Log Messages
239
Introduction . . . 239ADM Alarms and Log Messages. . . 240
ADMIN004 . . . 245
ADMIN005 . . . 246
ADMIN006 . . . 246
ADMIN007 . . . 247
ADMIN 008 . . . 248
ADMIN 009 . . . 249
ALERT Alarms and Log Messages . . . 250
ALERT001 . . . 250
ALERT002 . . . 250
ALERT003 . . . 251
ALERT004 . . . 251
ALERT005 . . . 252
ALERT006 . . . 252
ALERT007 . . . 252
ASAI Alarms and Log Messages . . . 253
ASAI001. . . 253
ASAI002. . . 253
ASAI003. . . 254
ASAI004. . . 255
ASAI005. . . 256
ASAI006. . . 257
ASAI007. . . 257
ASAI008. . . 258
ASAI009. . . 259
ASAI011. . . 261
ASAI012. . . 261
ASAI013. . . 262
ASAI014. . . 263
ASAI015. . . 263
ASAI016. . . 264
ASAI017. . . 265
ASAI018. . . 266
ASAI019. . . 267
ASAI020. . . 267
ASAI021. . . 268
ASAI022. . . 268
ASAI023. . . 269
ASAI024. . . 269
ASAI025. . . 270
ASAI026. . . 270
ASAI027. . . 271
BRDG003 . . . 276
BRDG004 . . . 277
BRDG005 . . . 277
CGEN Alarms and Log Messages . . . 278
CGEN001 . . . 278
CGEN002 . . . 279
CGEN003 . . . 281
CGEN004 . . . 281
CGEN005 . . . 282
CGEN006 . . . 283
CGEN007 . . . 285
CGEN008 . . . 286
CGEN009 . . . 286
CGEN010 . . . 287
CGEN011. . . 288
CGEN012 . . . 289
CGEN013 . . . 290
CGEN014 . . . 291
CGEN015 . . . 292
CGEN016 . . . 293
CGEN017 . . . 294
CGEN018 . . . 294
CGEN019 . . . 295
CGEN020 . . . 296
CGEN022 . . . 298
CGEN023 . . . 299
CGEN024 . . . 300
CGEN025 . . . 301
CGEN026 . . . 302
CGEN027 . . . 303
CGEN028 . . . 303
CGEN029 . . . 303
CGEN030 . . . 304
CGEN031 . . . 304
CGEN032 . . . 305
CGEN033 . . . 306
CGEN034 . . . 307
CGEN035 . . . 307
CGEN036 . . . 308
CGEN037 . . . 308
CGEN038 . . . 309
DB Alarms and Log Messages. . . 314
DB001 . . . 314
DB002 . . . 316
DB003 . . . 319
DB004 . . . 320
DB005 . . . 322
DB006 . . . 323
DB007 . . . 325
DB008 . . . 326
DB009 . . . 327
DB010 . . . 329
DB011 . . . 330
DB012 . . . 331
DB013 . . . 332
DB014 . . . 334
DB015 . . . 336
DB016 . . . 337
DIP Alarms and Log Messages . . . 337
DIP001. . . 337
DSKMG Alarms and Log Messages . . . 338
DSKMG001 . . . 338
DSKMG002 . . . 339
DWIP Alarms and Log Messages . . . 340
FFE Alarms and Log Messages . . . 341
FFE001 . . . 341
FFE002 . . . 342
FFE003 . . . 342
FFE004 . . . 343
FFE005 . . . 344
FFE006 . . . 345
FFE007 . . . 345
FFE008 . . . 346
FFE009 . . . 346
FTS Alarms and Log Messages . . . 347
FTS001 . . . 347
FTS002 . . . 347
FTS003 . . . 348
FTS004 . . . 349
FTS005 . . . 349
FTS006 . . . 350
VROP015. . . 541 VROP016. . . 542 VROP017. . . 543 VROP018. . . 544 VROP019. . . 544 VROP020. . . 546 VROP020, #2. . . 547 VROP021. . . 548 VROP022. . . 548 VROP023. . . 549 VXMDI Alarms and Log Messages . . . 549 VXMDI001 . . . 549 VXMDI002 . . . 550 VXMDI003 . . . 550 VXMDI004 . . . 551 VXMDI005 . . . 552
Glossary
553
About This Book
Overview
This book contains information on basic troubleshooting procedures for the most common Intuity CONVERSANT system problems, diagnostics procedures, common system procedures, as well as a listing of system alarms and messages.
Intended Audiences
This book is intended primarily for the:
• On-site service technician
About This Book How This Book is Organized
How This Book is Organized
This book contains the following sections:
• Chapter 1, Troubleshooting — Covers some basic troubleshooting procedures for the most common system problems.
• Chapter 2, Diagnostics — Describes diagnostic procedures for the Intuity CONVERSANT system.
• Chapter 3, Common System Procedures — Describes procedures for cartridge tape and diskette drive operation, backup and restore, voice system administration, and operating system administration.
• Chapter 4, Alarms and Log Messages — Lists the system alarms and log messages and repair procedures for system troubles.
• Glossary — Defines the terms, abbreviations, and acronyms used in system documentation.
About This Book Conventions Used in This Book
Conventions Used in This Book
Understanding the typography and other conventions used is this book is necessary to interpret the information.
Terminology • The word “type” means to press the key or sequence of keys specified. For example, an instruction to type the letter “y” is shown as
Type y to continue.
• The word “enter” means to type a value and then press the E N T E R key on the keyboard. For example, an instruction to type the letter “y” and press E N T E R is shown as
Enter y to continue.
About This Book Conventions Used in This Book
Note: Screens shown in this book are examples only. The screens you see on your machine will be similar, but not exactly the same.
Figure 1. Example of Intuity CONVERSANT Menu
About This Book Conventions Used in This Book
Figure 3. Example of Intuity CONVERSANT Window Requesting Information
Figure 4. Example of Intuity CONVERSANT Screen Showing Information
UnixWare Installation Primary Hard Disk Partitioning
In order to install LINCS, you should reserve a UNIX system partition (a portion of your hard disk’s space) containing 100% of the space on your primary hard disk. After you press ’ENTER’ you will be shown a screen that will allow you to create new partitions, delete existing partitions or change the active partition of your primary hard disk (the partition that your computer will boot from).
About This Book Conventions Used in This Book
Figure 5. Screen Requesting Information
Keyboard and Telephone Keypad Representations
• Keys that you press on your terminal or PC are represented as small capitalized B O L D text. For example, an instruction to press the enter key is shown as
Press E N T E R.
• Two or three keys that you press at the same time on your terminal or PC (that is, you hold down the first key while pressing the second and/or third key) are represented in small capitalized B O L D text. For example, an instruction to press and hold the Alt key while typing the letter “d” is shown as
Press A LT + D.
UNIX System Installation Set Slice Sizes
Please select whether you would like the recommended slice sizes or would like to customize the slice sizes.
Your choices are:
About This Book Conventions Used in This Book
• Function keys on your terminal, PC, or system screens, also known as soft keys, are represented as small capitalized B OL D text followed by the function or value of that key enclosed in parentheses. For example, an instruction to press function key 3 is shown as
Press F 3 (Choices).
• Keys that you press on your telephone keypad appear in small capitalized B O L D text. For example, an instruction to press the first key on your telephone keypad is shown as
Press 1 to record a message.
Cross References
and Hypertext Blue underlinedyou to another location in the document when you click on it with your mouse. type indicates a cross reference or hypertext link that takes
About This Book Conventions Used in This Book
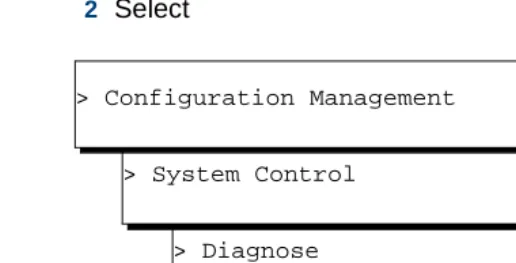
• The sequence of menu options that you must select to display a specific screen or submenu is shown as follows.
Start at the Voice System Administration menu and select:
In this example, you would access the Voice System Administration menu and select the Reports menu. From the Reports menu, you would then select the Message Log Report option.
> Message Log Report
About This Book Conventions Used in This Book
Other Typography • Commands and text you type in or enter appear in bold type, as in the following examples:
Enter change-switch-time-zone at the Enter command: prompt. Type high or low in the Speed: field.
• Command variables are shown in bold italic type when they are part of what you must type in, and in blue italic type when they are referred to, for example:
Enter ch ma machine_name, where machine_name is the name of the call delivery machine you just created.
• Command options are shown inside square brackets, for example: Enter connect switchname [-d] [-b | -w]
Cross References
About This Book Safety and Security Alert Labels
Safety and Security Alert Labels
This book uses the following symbols to call your attention to potential problems that could cause personal injury, damage to equipment, loss of data, service interruptions, or breaches of toll fraud security:
!
CAUTION:
Indicates the presence of a hazard that if not avoided can or will cause minor personal injury or property damage, including loss of data.
WARNING:
!
Indicates the presence of a hazard that if not avoided can cause death or severe personal injury.
!
DANGER:
Indicates the presence of a hazard that if not avoided will cause death or severe personal injury.
!
SECURITY ALERT:
About This Book Getting Help
Getting Help
The Intuity CONVERSANT system provides online help to assist you during installation, administration, and application development tasks.
To use the online help:
• Press F 1 (Help) when you are in a menu or window.
The first time you press F 1, the system displays information about the currently active window or menu.
~ When you are in a window, the help explains the purpose of the window window and describes its fields.
~ When you are in a menu, the help explains how to use menus. If you press F 1 again, the system displays a General Help screen that explains how to use the online help.
About This Book Technical Assistance
Technical Assistance
Web Site The following customer support web site contains resources where you can find solutions for technical problems:
http://support.lucent.com
Contact Numbers Technical assistance on the Intuity CONVERSANT product is available through the following telephone contacts:
• In the United States, call 1-800-242-2121.
• In Canada, call one of the following numbers, depending on your location:
~ 1-800-363-1882 for assistance in Quebec and eastern Canada
~ 1-800-387-4268 for assistance in Ontario and western Canada
About This Book Related Resources
Related Resources
Additional training material and documentation is available for you to learn more about the Intuity CONVERSANT product.
Training To obtain training on the Intuity CONVERSANT product, contact the BCS Education and Training Center at one of the following numbers:
• Organizations within Lucent Technologies (904) 636-3261
• Lucent Technologies customers and all others (800) 255-8988 You can also view information on Intuity CONVERSANT training at the Global Learning Solutions (GLS) web site at one of the following web links:
• Organizations within Lucent Technologies
http://training.gls.lucent.com
• Lucent Technologies customers and all others
About This Book Related Resources
• For technicians and administrators
~ BTC344M, Intuity CONVERSANT V7 Administration Overview (CD-ROM)
• For application developers
~ BTC128H, Introduction to Script Builder
~ BTC166H, Introduction to Voice@Work
~ BTC204H, Intermediate Voice@Work
~ BTC301H, Advanced CONVERSANT Programming
Documentation Appendix A, “Documentation Guide,” in Intuity CONVERSANT System Version 7.0 System Description, 585-313-204, describes in detail all books included in the Intuity CONVERSANT library and referenced in this book. Note: Always refer to the appropriate book for specific information on
planning, installing, administering, or maintaining an Intuity CONVERSANT system.
Additional Suggested Documentation
It is suggested that you also obtain and use the following book for information on security and toll fraud issues:
About This Book Using the CD-ROM Documentation
Obtaining Printed Versions of the Documentation
See Documentation Ordering Information on page viii of Copyright and Legal Notices for information on how to purchase Intuity CONVERSANT
documentation in printed form. You can also print documentation locally from the CD-ROM (see Printing the Documentation on page xlix).
Using the CD-ROM Documentation
Lucent Technologies ships the documentation in electronic form. Using the AdobeAcrobat Reader application, you can read these documents on a Windows PC, on a Sun Solaris workstation, or on an HP-UX workstation. Acrobat Reader displays high-quality, print-like graphics on both UNIX and Windows platforms. It provides scrolling, zoom, and extensive search capabilities, along with online help. A copy of Acrobat Reader is included with the documents.
About This Book Using the CD-ROM Documentation
Adjusting the Window Size
On HP and Sun workstations, you can control the size of the reader window by using the -geometry argument. For example, the command string acroread -geometry 900x900 mainmenu.pdf opens the main menu with a window size of 900 pixels square.
Hiding and Displaying Bookmarks
By default, the document appears with bookmarks displayed on the left side of the screen. The bookmarks serve as a hypertext table of contents for the chapter you are viewing. You can control the appearance of bookmarks by selecting View | Page Only or View | Bookmarks and Page.
Using the Button Bar
The button bar can take you to the book’s Index, table of contents, main menu, and glossary. It also lets you update your documents. Click the corresponding button to jump to the section you want to read.
Using Hypertext
Links Hypertext links appear in other sections or books. blue underlined text. These links are shortcuts to
Navigating with Double Arrow Keys
The double right and double left arrows ( and ) at the top of the Acrobat Reader window are the back and forward functions. The go-back button takes you to the last page you visited prior to the current page. Typically, you use to jump back to the main text from a cross reference or illustration.
Searching for
About This Book Using the CD-ROM Documentation
Displaying Figures If lines in figures appear broken or absent, increase the magnification. You might also want to print a paper copy of the figure for better resolution.
Printing the
Documentation Note: For information on ordering printed copies of the documents, see Obtaining Printed Versions of the Documentation on page xlvii.
If you would like to read the documentation in paper form rather than on a computer monitor, you can print all or portions of the online screens.
Printing an Entire Document
To print an entire document, do the following:
1 From the documentation main menu screen, select one of the print-optimized documents. Print-print-optimized documents print two-screens to a side, both sides of the sheet on 8.5x11-in or A4 paper.
2 Select File | Print.
About This Book How to Comment on This Book
Printing Part of a Document
To print a single page or a short section, you can print directly from the online version of the document:
1 Select File | Print.
2 Enter the page range you want to print, or select Current. The document prints, one screen per side, two sides per sheet.
How to Comment on This Book
While we have tried to make this document fit your needs, we are interested in your suggestions for improving it and urge you to send your comments to us.
Comment Form A comment form, available in paper and electronic versions, is available via the documentation CD-ROM. To use the comment form:
1 Select Comments from the Main Menu of the CD-ROM.
2 Follow the instructions provided on the CD-ROM to do one of the following:
~ Print the paper version of the form, complete it, and either fax or mail it to us.
About This Book How to Comment on This Book
Contact Us Directly If you prefer not to use the comment form, you can contact us directly at the following address or fax number.
Note: Direct your correspondence to the attention of the Lucent Technologies Intuity CONVERSANT writing team. Be sure to mention the title of the book on which you are commenting. Lucent Technologies
GLS Information Development Division Room 22-2H15
1
Troubleshooting
Overview
This chapter describes some basic troubleshooting procedures for the on-site technician or system administrator with repair procedures for the most common system procedures. These procedures are contained in troubleshooting tables, each of which includes a column describing the trouble indication and a column describing the corrective action. Note: This information is in addition to the repair procedures provided
for system alarms in Chapter 4, Alarms and Log Messages. Topics covered include:
• Repairing Power-Up Troubles on page 3
• Repairing Boot-Up Troubles on page 6
• Repairing System Installation, Upgrade, or Setup Troubles on page 10
• Repairing Application-Related Troubles on page 12
• Repairing Administrative Troubles on page 24
1
Troubleshooting Overview• Repairing Feature Licensing Troubles on page 28
• Repairing Other Voice System Troubles on page 29
• Reducing Load on page 36
The following assumptions are made in this chapter:
• You have checked the Message Log for any relevant messages. See “Message Log Report,” in Chapter 7, “Common Administration” of Intuity CONVERSANT System Version 7.0 Administration, 585-313-501, for the procedure to run the report.
• The corrective action procedures are intended to provide a starting point to isolate a problem and may not be exhaustive.
• The corrective action procedures assume general editing knowledge and script familiarity, as most of the commands and procedures are performed from the command line.
1
Troubleshooting Repairing Power-Up TroublesRepairing Power-Up Troubles
Power-up troubles are those that occur when first turn the system on. Table 1 on page 3 lists the indications related to power-up troubles.
Table 1. Repairing Power-Up Troubles
Indication Corrective Action
The system does not power up.
1 Verify that the platform is receiving power.
2 Verify all external system connections (power cords and monitor cables) are correct (for example, the blue cable connects to the 3270 card and not to the system parallel port).
3 Verify all external system connections are secure.
1
Troubleshooting Repairing Power-Up TroublesDuring start-up, the system displays the following message: Shared memory is marked as invalid. cvis_menu exiting.
1 Stop the voice system. See Stopping the Voice System on page 217 in Chapter 3, Common System Procedures.
2 Start the voice system. See Starting the Voice System on page 214 in Chapter 3, Common System Procedures.
3 Enter cvis_menu
4 If the problem persists, do the following:
a Stop the voice system.
b Enter cp /vs/shmem/devtbl vs/shmem/devtbl.old
c Enter rm /vs/shmem/devtbl
d Start the voice system.
Table 1. Repairing Power-Up Troubles
Indication Corrective Action
1
Troubleshooting Repairing Power-Up TroublesThe start_vs command takes a long time to initialize on a system with many analog lines.
1 Starting at the Switch Administration screen, set Dial-Tone Training to “No.” See Chapter 4, “Switch Interface
Administration,” of Intuity CONVERSANT System Version 7.0 Administration, 585-313-501.
Note: If dial-tone training is “no,” you should specify the dial-tone frequency to be used with a particular switch (350 and 440 is the default for the DEFINITY switch).
2 Verify that the transfers being performed in the application are still functioning properly.
When the system boots, it displays messages in the message log report or on the console similar to the following:
Unable to attach shared memory, Bad DEVTBL, and/or VROP respawning too rapidly.
1 Stop the voice system. See Stopping the Voice System on page 217 in Chapter 3, Common System Procedures.
2 Enter cp /vs/shmem/devtbl /vs/shmem/devtbl.old
3 Enter rm /vs/shmem/devtbl
4 Start the voice system. See Starting the Voice System on page 214 in Chapter 3, Common System Procedures.
Table 1. Repairing Power-Up Troubles
Indication Corrective Action
1
Troubleshooting Repairing Boot-Up TroublesRepairing Boot-Up Troubles
Boot-up troubles are those that occur when the system crashes and reboots itself or when you reboot the system. Table 2 on page 6 lists the indications and possible repair procedures related to boot-up troubles.
Table 2. Repairing Boot-Up Troubles
Indication Corrective Action
Cards are not recognized during boot up.
1 Enter pkginfo | pg
2 Make sure the driver software is installed (SSP, Tip/Ring, or T1).
3 Check the circuit cards. See Checking the Circuit Cards on page 66
in Chapter 2, Diagnostics.
4 Make sure that cards have the proper switch settings.
1
Troubleshooting Repairing Boot-Up TroublesWhen the system boots, it displays messages in the message log report or on the console similar to the following:
Unable to attach shared memory, Bad DEVTBL, and/or VROP respawning too rapidly.
1 Stop the voice system. See Stopping the Voice System on page 217
in Chapter 3, Common System Procedures.
2 Enter cp /vs/shmem/devtbl /vs/shmem/devtbl.old
3 Enter rm /vs/shmem/devtbl
4 Start the voice system. See Starting the Voice System on page 214
in Chapter 3, Common System Procedures.
Table 2. Repairing Boot-Up Troubles
Indication Corrective Action
1
Troubleshooting Repairing Boot-Up TroublesThe system displays the following message: Non-system disk or disk error. Replace and hit any key to continue.
1 Check the diskette drive and confirm that it is empty.
2 Check the cartridge tape drive and confirm that it is empty.
3 Check the power connections.
4 Reboot the system. See Rebooting the UNIX System on page 225 in
Chapter 3, Common System Procedures.
The system passes run level four then reboots
continuously (rolling reboot).
1 Power off the platform immediately after the system reboots.
2 Remove one optional circuit card (for example, SSP, T1, or Tip/Ring).
3 Reboot the system. See Rebooting the UNIX System on page 225 in
Chapter 3, Common System Procedures.
4 Repeat step 1 through step 3 until the system reboots properly.
Table 2. Repairing Boot-Up Troubles
1
Troubleshooting Repairing Boot-Up TroublesA file system check shows a file system with 0 files, 0 blocks, or 0 free.
1 Verify the disk partition was adequate. See “Recommended Disk Partitions” in Chapter 5, “Installing Base System Software,” the maintenance book for your platform.
2 Remove unnecessary data files.
3 If the problem persists, restore the system software from the backup tape. See Restoring the System Using mkimage on page 206 in
Chapter 3, Common System Procedures.
If no backup is available, reload the system software. See the following chapters the maintenance book for your platform:
~ Chapter 5, “Installing Base System Software”
~ Chapter 6, “Installing Intuity CONVERSANT System Software”
~ Chapter 7, “Installing the Optional Feature Software”
Table 2. Repairing Boot-Up Troubles
Indication Corrective Action
1
Troubleshooting Repairing System Installation, Upgrade, or Setup TroublesRepairing System Installation, Upgrade, or Setup
Troubles
Repair procedures are available for some troubles that occur during initial installation of the voice system, while upgrading either hardware or software, The system hangs
after a reboot and the screen is blank.
1 Check the diskette drive and confirm that it is empty.
2 Check the power connections.
3 Check the hard disk drive indicator light for activity.
4 Reboot the system. See Rebooting the UNIX System on page 225 in
Chapter 3, Common System Procedures.
Table 2. Repairing Boot-Up Troubles
Indication Corrective Action
1
Troubleshooting Repairing System Installation, Upgrade, or Setup TroublesTable 3. Repairing System Installation/Upgrade/Set-Up Troubles
Indication Corrective Action
The system cannot initialize the IPCI card.
1 Check for possible conflict with memory and I/O addresses or interrupt conflicts.
2 Log in as root.
3 Enter crash
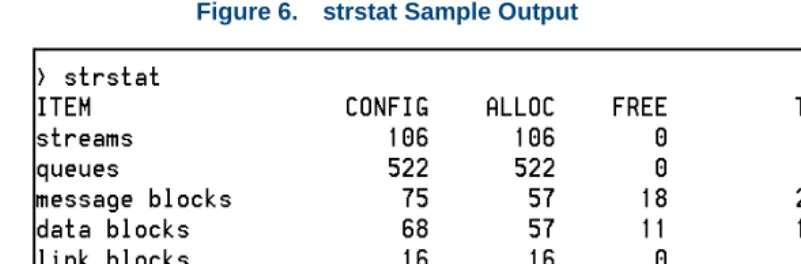
4 Enter strstat
The system displays a screen listing the tunable parameters similar to the screen shown in Figure 6 on page 12.
a Increase the values to slightly higher than what is listed in the CONFIG column.
b If anything other than 0 is listed in the FAIL column, use the
/etc/conf/bin/idtune command to increase the tunable parameter. The parameters to tune are NSTREAM, NQUEUE (should be 4 X
NSTREAM), NBLK4, NBLK16, NBLK64, NBLK128, NBLK256, NBLK512, NBLK1024, NBLK2048, and NBLK4096.
c After you have changed the tunable parameters, use the /etc/conf/bin/idbuild command to rebuild the UNIX kernel.
5 Reboot the system. See Rebooting the UNIX System on page 225 in
1
Troubleshooting Repairing Application-Related TroublesFigure 6. strstat Sample Output
Repairing Application-Related Troubles
1
Troubleshooting Repairing Application-Related TroublesTable 4. Repairing Application-Related Troubles
Indication Corrective Action
The voice system rings but does not answer the telephone or the voice system is busy.
1 Enter display card all
2 Check the status of all the circuit cards.
3 Make sure PLAY/CODE, and/or TTS, is assigned to an INSERV SSP card (in service).
4 Check if the application is properly assigned to the channel(s).
5 Make sure the application contains an action to answer the phone.
6 Check the Message Log Report for messages indicating that TSM is respawning due to too many channels in the system.
If so, do the following:
a Use /etc/conf/bin/idtune to increase NCHANNELS tunable parameter.
b Use /etc/conf/bin/idbuild -B to rebuild the kernel.
c Reboot the system.
1
Troubleshooting Repairing Application-Related TroublesThe voice system answers the call, but does not play any speech.
1 Scan the Message Log Report for messages related to the trouble.
2 Enter display card all
3 Verify that the spadm script is not assigned to any channels.
4 Check the status of all the circuit cards.
5 If spadm is assigned, reassign the channel to the correct script name. See Chapter 3, “Voice System Administration,” of Intuity CONVERSANT System Version 7.0 Administration, 585-313-501.
6 Place test calls to determine if this is occurring on every channel.
7 If this occurs only on certain channels, it could be a hardware problem. Place the problem channels in a MANOOS state until the card can be replaced.
8 Enter trace tsm chan all | tee /tmp/trace.out
Table 4. Repairing Application-Related Troubles
1
Troubleshooting Repairing Application-Related TroublesAll calls are dropped.
1 Scan the Message Log Report for messages related to the trouble.
2 Enter hstatus all
This will allow you to check the status of the host if this feature is being used. If all sessions are recovering or logging in, this could explain the trouble.
3 Enter who -rpb
4 Search for different time stamps on the processes.
A recent date different from most of the others may indicate the process respawned.
5 Record the scenario that caused the problem.
6 If the process is specific to a feature package, see the trouble table for that feature package in this chapter.
Table 4. Repairing Application-Related Troubles
Indication Corrective Action
1
Troubleshooting Repairing Application-Related TroublesRepairing Script Builder Troubles
Table 5 on page 16 provides information on troubles related to the Script Builder package.
Table 5. Repairing Script Builder Troubles
Indication Corrective Action
Messages are cut off.
Add a few seconds of initial silence (0.2 to 0.5 seconds) to the beginning of the message to be played.
Another way to avoid missing any segment of a message is to construct a phrase consisting of a few seconds of silence and play that phrase first. The terminal
is locked up.
Use the following key sequence to release your keyboard: CO N T RO LJ stty sane C ON T R O L J
Host sessions recover repeatedly.
1 Scan the Message Log Report for messages related to the trouble.
1
Troubleshooting Repairing Application-Related TroublesThe system displays the following message: No Space On Root File System.
1 Press E X I T from Script Builder.
2 Clean up the root file system.
Try to free a minimum of several hundred blocks.
3 Re-enter Script Builder with your application.
You may find that everything is functioning properly with your application. You may be able to continue right where you left off and just retype any previous changes that were not saved. However, depending on where you were in the application when root ran out of space, some files may be corrupted.
4 If Script Builder fails completely with this application, do the following:
a Remove the transaction part of the application by pressing REMOVE in the Script Builder Applications screen.
b Restore it from a backup. See Intuity CONVERSANT System Version 7.0 Application Development with Script Builder, 585-313-206.
Table 5. Repairing Script Builder Troubles
Indication Corrective Action
1
Troubleshooting Repairing Application-Related TroublesThere is no speech output.
1 Make sure the phrase actually exists. If it does not, record it. See the Speech Administration screen in Chapter 7, “Producing Speech,” of Intuity CONVERSANT System Version 7.0 Application Development with Script Builder, 585-313-206.
2 Make sure the OVOL and IVOL parameters are correctly set in the Switch Interface screen. See Chapter 5, “Switch Interface Administration,” of Intuity CONVERSANT System Version 7.0 Administration, 585-313-501.
3 Enter display card sp
4 Check the status of the SSP cards. A ring no
answer occurs for an
application
1 Scan the Message Log Report for messages related to the trouble.
2 Check the host timeout value and verify that the host response time is not exceeded.
Table 5. Repairing Script Builder Troubles
1
Troubleshooting Repairing Application-Related TroublesRepairing Script Builder FAX Actions Troubles
Table 6 on page 19 provides information about trouble related to the Script Builder FAX Actions package. See this table for appropriate corrective action if a trouble with Script Builder FAX Actions arises.
Note: The most most frequent reasons for a failure to send a fax is that the remote fax machine is busy or out of paper or that there is no fax machine at the remote number.
Table 6. Repairing Script Builder FAX Actions Troubles
Indication Corrective Action
The fax cover page process failed.
The script request to join two files into a single fax file (possibly for use as a cover page) failed. For this operation to be completed, file conversions are performed to get the information into a form suitable for transmission. Most likely, one or both of the files requested are not suitable for
transmission. Make sure the files requested are either text files or fax files entered through the FAX Loading and Printing screen.
1
Troubleshooting Repairing Application-Related TroublesThe execute UNIX command failed.
The script request to execute a UNIX command or shell script failed. Most likely, the problem is with the command or shell script. Check that the command or shell script that was attempted works when executed
manually. If it does, make sure that its full path name is provided to the script.
Table 6. Repairing Script Builder FAX Actions Troubles
Indication Corrective Action
1
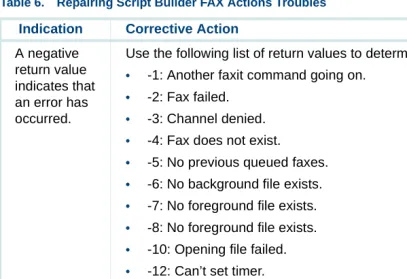
Troubleshooting Repairing Application-Related TroublesA negative return value indicates that an error has occurred.
Use the following list of return values to determine the cause of the error:
• -1: Another faxit command going on.
• -2: Fax failed.
• -3: Channel denied.
• -4: Fax does not exist.
• -5: No previous queued faxes.
• -6: No background file exists.
• -7: No foreground file exists.
• -8: No foreground file exists.
• -10: Opening file failed.
• -12: Can’t set timer.
• -13: File not specified.
• -14: System error.
• -15: Destination not supplied.
• -17: Command not supplied.
• -18: Return string not supplied.
Table 6. Repairing Script Builder FAX Actions Troubles
Indication Corrective Action
1
Troubleshooting Repairing Application-Related TroublesFax file or text file not found.
The script request to transmit a fax file to the caller failed because the fax file or text file requested could not be found. Verify that the fax file exists either in the Fax Loading and Printing screen or at the full path specified in the script.
The caller did not receive the fax requested. Consider manually transmitting the fax message requested by the caller using the delivery number
contained in the error message. The Out of Call
Fax Report or output from the faxlog or faxrpt command indicates that
Corrective actions for the causes of failure are described below:
• NoProtocol (no protocol) — The destination number may not be a fax device or a connection cannot be made to the number. Check the number.
• Remote-DCN (remote disconnect) — The remote fax device was most likely disconnected before transmission was complete. Manually resend
Table 6. Repairing Script Builder FAX Actions Troubles
1
Troubleshooting Repairing Application-Related TroublesThe Out of Call Fax Report or output from the faxlog or faxrpt command indicates that fax transmission failed (con’t.).
• Loopback — The destination number is likely the same as the Intuity CONVERSANT system. Check the number. Due to loop prevention, a fax may not be able to be transmitted to another line on the same system but must be forwarded instead.
• FTT (failure to train) — The transmission training tone was not recognized. Check the line conditions.
• ProtoTmout (protocol timeout) — The destination number may not be a fax device, the transmission training tone may not have been recognized, the remote fax device may have a protocol incompatibility or
nonconformance, there may have been problems with the retraining tone, service disruption may have affected the line, or there is noise on the line. Manually resend the fax, if necessary.
• Halted — The fax was most likely cancelled by the Intuity
CONVERSANT system before the remote fax device hung up. Manually resend the fax, if necessary.
• ProtoError (protocol error) — The remote fax device may have a protocol incompatibly or nonconformance. If possible, investigate the remote fax device or try another number.
• RTN (retrain negative) — Problems with the retraining tone indicate an excess of transmission errors. Partial transmission of the fax may have been successful. Check the line conditions.
Table 6. Repairing Script Builder FAX Actions Troubles
1
Troubleshooting Repairing Administrative TroublesRepairing Administrative Troubles
Administrative troubles sometimes occur when the system performs a task you have initiated (for example, a trouble arises while performing a backup of the system software). Table 7 on page 24 contains troubles related to administrative tasks.
Table 7. Repairing Administrative Troubles
Indication Corrective Action
UNIX commands are failing or the disk reported failures.
Scan the Message Log Report.
Using the vi editor causes a core dump.
To split the file into multiple segments, enter split -nfilenamename
1
Troubleshooting Repairing Administrative Troublesccasum never finishes its cron job.
1 Determine if you are transferring to more than 100
numbers. If you are, kill the cron job by doing the following:
a Enter ps -ef | grep ccasum
b Search for the parent process id (PID) for ccasum (located in the second column from the left).
c Enter kill -9 pid# where pid# is the PID number.
2 Create an index for ccasum by doing the following:
a Log in to SQL*Plus as sti/sti
b Enter create index cca_idx on cca(phone_num);
c Enter :quit to exit the SQL*Plus Utility.
3 When the call traffic is light, enter /vs/bin/util/ccasum
4 Enter /vs/bin/util/ccadel when ccasum is finished.
Table 7. Repairing Administrative Troubles
Indication Corrective Action
1
Troubleshooting Repairing Operational TroublesRepairing Operational Troubles
Operational troubles are experienced with the physical components of the voice system, such as a blank monitor or an inoperable modem. These troubles can occur at any time. Table 8 on page 26 contains troubles related to operational tasks.
Table 8. Repairing Operational Troubles
Indication Corrective Action
The alarm buzzer on the TAM is sounding.
Enter alarm_cutoff at the UNIX system prompt.
The shutdown and init
1
Troubleshooting Repairing Operational TroublesThe monitor screen is blank, but the voice system is still taking calls.
1 Check the power on the voice system.
If the power is on, place a test call to the system.
2 Check the LED on the monitor.
If the LED is on, check the contrast and brightness controls on the monitor.
3 Check the monitor connection to the voice system.
4 Unplug/plug in the monitor cable to the voice system.
5 Check the on/off switch on the monitor.
6 Log in remotely to check out the system and see if the voice system is taking calls.
7 If the problem persists, replace the monitor and/or the video controller module on the IOB.
Table 8. Repairing Operational Troubles
Indication Corrective Action
1
Troubleshooting Repairing Feature Licensing TroublesRepairing Feature Licensing Troubles
Feature Licensing troubles are those that occur when the user is unable to access certain features of the system. Table 9 on page 28 contains troubles related to operational tasks.
Table 9. Repairing Feature Licensing Troubles
Indication Corrective Action
Feature licensing is no longer active.
1
Troubleshooting Repairing Other Voice System TroublesRepairing Other Voice System Troubles
The following tables contain some general trouble areas that do not fall into the other classes listed above. Specifically, these troubles include:
• Repairing Call-Transfer Troubles on page 30
• Repairing Performance Troubles on page 32
• Repairing Diagnostics Troubles on page 32
• Repairing Touch-Tone Input Troubles on page 33
1
Troubleshooting Repairing Other Voice System TroublesRepairing Call-Transfer Troubles
Table 10 on page 30 lists the repair procedures for repairing call-transfer troubles.
Table 10. Repairing Call Transfer Troubles
Indication Corrective Action
Voice System not transferring calls properly (cont.).
1 Scan the Message Log Report.
2 Verify the values on the Switch Administration screen as described in Chapter 4, “Switch Interface Administration,” of Intuity CONVERSANT System Version 7.0 Administration, 585-313-501.
If this screen has changed, do the following:
a Save the values.
b Stop the voice system. See Stopping the Voice System on page 217 in
Chapter 3, Common System Procedures.
1
Troubleshooting Repairing Other Voice System TroublesVoice System not transferring calls properly.
3 Try to transfer a call manually, by completing the following steps: Note: You need an analog telephone for this test.
a Plug the line going into the voice system into the telephone.
b Place the call to this telephone.
c Answer the call.
d Try to transfer to another extension.
4 Assign the feature test script to the channel and place test calls.
5 Enter trace tsm chan all trip | tee /tmp/trace.out
6 Check the logic of the application that is doing the transfer.
Table 10. Repairing Call Transfer Troubles
Indication Corrective Action
1
Troubleshooting Repairing Other Voice System TroublesRepairing Performance Troubles
Table 11 on page 32 lists the repair procedure for performance troubles.
Repairing Diagnostics Troubles
Table 12 on page 32 lists the repair procedures for repairing diagnostics troubles.
Table 11. Repairing Performance Troubles
Indication Corrective Action
The system is slow or delayed in speaking. Reduce the load. See Reducing Load on page 36.
The system performance is degraded. For example:
• Speech breaks are occurring.
1
Troubleshooting Repairing Other Voice System TroublesRepairing Touch-Tone Input Troubles
Table 13 on page 33 lists the repair procedures for repairing touch-tone input troubles.
Repairing Report Troubles
Table 14 on page 34 lists the repair procedures for repairing report troubles.
Table 13. Repairing Touch-Tone Input Troubles
Indication Corrective Action
User touch-tone input is not being correctly interpreted by the system.
1 Verify the action to collect data from the caller matches the intended use in the script.
2 If this is channel related (that is, the trouble only appears on a particular channel) and you have another card, see if the trouble occurs on the other card.
1
Troubleshooting Repairing Other Voice System TroublesRepairing Channel/Card State Troubles
Table 15 on page 34 lists the repair procedures for repairing channel/card state troubles.
Table 14. Repairing Report Troubles
Indication Corrective Action
Call data reports are not accurate or they are not complete.
1 Determine if there is any additional free space in the database by entering dbfrag
2 Scan the Message Log Report.
Table 15. Repairing Channel/Card State Troubles
Indication Corrective Action
1
Troubleshooting Repairing Other Voice System TroublesChannel/card is in FOOS state.
Enter display channel channel_number
If T1.5, PRIB, or PRID is displayed, check the error log for a message in the range TWIP013–TWIP018. Follow the recommended repair procedure for that message.
If VRS6, IVP4, or IVP6 is displayed:
1 Enter diagnose card card_number.
2 If the channel remains Foos, check the telephone connection to the card. Channel/card
is in BROKEN state.
Follow the repair procedure for message MTC003 on page 428 in Chapter 4, Alarms and Log Messages.
Table 15. Repairing Channel/Card State Troubles
Indication Corrective Action
1
Troubleshooting Reducing LoadReducing Load
This repair procedure is provided to enable application developers and system administrators to troubleshoot the root cause of system problems. Problems related to performance depend on a wide range of variables. Understanding the nature of the problem requires a good understanding of the attributes of the system that affect performance.
Note: Every system must have a minimum of 128 Mbyte of memory. The information provided in this section is platform related. Rule out application-related performance problems first before proceeding with this procedure.
Identifying Performance Problems
1
Troubleshooting Reducing Load• Delays in custom database interface processes (DIPs) or customer IRAPI processes
• Large, complex applications
An application rarely experiences unacceptable delays because of voice processing (playing and coding phrases and recognizing touch tones) without alarms in the alarm log. Voice processing shows little change in response time as system load increases. Typically, if load increases to a point where the system cannot serve voice processing requests in real time, alarms are logged.
Reports of System
Inaccessibility Typically, if load increases to a point where the system cannot serve voice processing requests in real time, alarms are logged. However, if the system
is inaccessible, the alarms logged are also inaccessible. UNIX interprocess communication (IPC) message queues may indicate that the system may be nearing its load threshold.
Load-Related Messages in the Alarm Log
Load-related messages in the alarm log indicate that voice processing cannot be carried out in real time because of excessive system load. Components of the system which affect voice processing include:
• CPU complex
• Memory
1
Troubleshooting Reducing LoadIdentifying Load Culprits
Before attempting to analyze the application for load liabilities, it is important to remember that processing external to the application may be the cause of load related problems. Check that none of the following occur at times when load-related alarms are reported:
• Use of the Intuity CONVERSANT Script Builder application generator on a production machine during peak load hours
• Excessive use of call data event tracking
• Excessive requests to the 3270 host interface
• Reading of large (more than 500 records) database tables that are not indexed
• Reading of and writing to database tables exclusively
• Use of the system monitor program with a fast refresh rate
1
Troubleshooting Reducing Load• ASCII-to-fax conversions when using Script Builder FAX Actions
• System cron jobs
Note: Every day at 12:15 a.m. all call data is summarized. If this coincides with even low voice processing activity, alarms may be reported. A possible solution is to modify the crontab entry for a time with less load.
If sources of external load have been ruled out, continue with the procedures in Checking CPU Resources on page 39, Checking Disk Resources on page 41, and Checking Memory Resources on page 42.
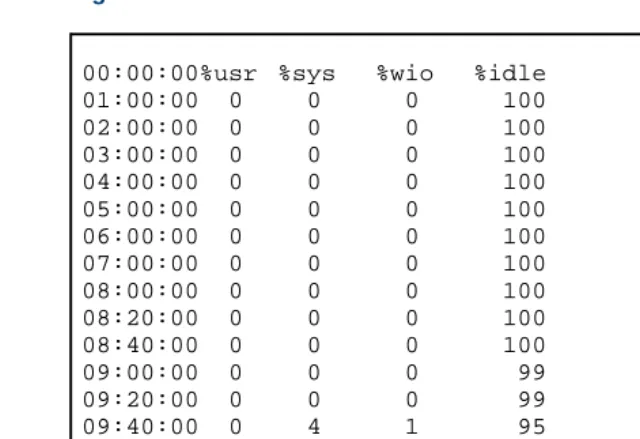
Checking CPU
Resources To check the CPU resources, enter sar
Note: To display current CPU usage every 5 seconds for 50 seconds, enter sar 5 50
1
Troubleshooting Reducing LoadFigure 7. CPU Resources Screen
00:00:00%usr %sys %wio %idle
01:00:00 0 0 0 100
02:00:00 0 0 0 100
03:00:00 0 0 0 100
04:00:00 0 0 0 100
05:00:00 0 0 0 100
06:00:00 0 0 0 100
07:00:00 0 0 0 100
08:00:00 0 0 0 100
08:20:00 0 0 0 100
08:40:00 0 0 0 100
09:00:00 0 0 0 99
09:20:00 0 0 0 99
09:40:00 0 4 1 95
10:00:00 9 43 3 45
10:20:00 10 36 2 52
10:40:00 10 23 2 65
11:00:00 9 23 2 65
1
Troubleshooting Reducing LoadThe output of the second command should only be considered during the busy hour and CPU usage should again be below 60 percent. If either of these tests show CPU utilization consistently over 60 percent it is likely that the CPU is the problem.
See Reducing Load on the CPU on page 52.
Checking Disk
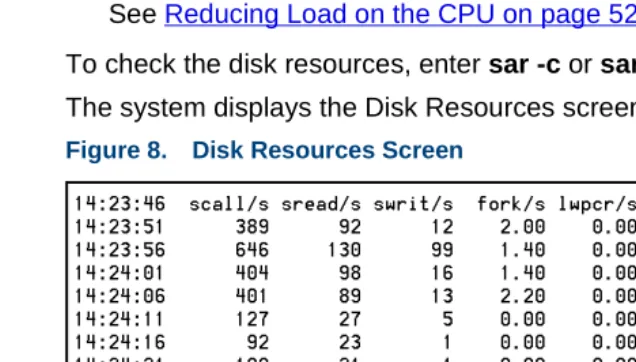
Resources To check the disk resources, enter sar -c or sar -c 5 50
The system displays the Disk Resources screen (Figure 8 on page 41).
Figure 8. Disk Resources Screen
Note: If the sum of the rchar/s and wchar/s columns is consistently greater than 320000 during the busy hour, then it is likely that the disk is the problem. See Reducing Load on the CPU on page 52
1
Troubleshooting Reducing Load