ABSTRACT
MOSER, CARRIE ALISON. Consumer Response to Design Elements within Digitally Printed Apparel Products. (Under the direction of Dr. Cynthia L. Istook)
As an emerging technology in the textile industry, digital printing allows the capability to print photo-realistic images on fabric that were never before possible with traditional textile printing methods. The possible consumer response to apparel products with digitally printed imagery is a largely unexplored topic that may be vital to the success of digital printing in the textile industry.
The intent of this research was to determine what demographic
characteristics, if any, may affect a general consumer’s preferences concerning apparel products with digitally printed patterns. Eight photographic patterns were created and validated by design professionals concerning their representation of four basic design elements (line, shape, value, texture). An internet survey tool was developed to collect demographic data and determine general consumers’ preferences for specific patterns when applied to six different gender specific apparel products. The subjects’ choices were evaluated based on their pattern choices, the garments on which they were chosen, and subject demographics.
The results of this research indicated that certain consumers prefer specific design elements within a printed pattern when purchasing apparel products, as well as specific garment styles in combination with these design elements. Some
CONSUMER RESPONSE TO DESIGN ELEMENTS WITHIN DIGITALLY PRINTED APPAREL PRODUCTS
by
CARRIE ALISON MOSER
A thesis submitted to the Graduate Faculty of North Carolina State University
in partial fulfillment of the requirements for the Degree of
Master of Science
DEPARTMENT OF TEXTILE AND APPAREL TECHNOLOGY AND MANAGEMENT
Raleigh 2004
APPROVED BY:
____________________________ ___________________________
Professor Nancy B. Powell Professor Charles E. Joyner
____________________________ Dr. Cynthia L. Istook
ii
DEDICATION
This work is presented in honor of my mother and father, Mr. James Henry and Mrs. Dorothy Fox Moser. Their support, encouragement and love have been above and beyond anything I could imagine for all my life.
iii
BIOGRAPHY
Carrie Alison Moser was born June 24, 1979 in Charlotte, North Carolina to James H. and Dorothy F. Moser. Growing up in Concord, North Carolina, Carrie graduated from Central Cabarrus High School in June 1997.
After being accepted to North Carolina State University for the fall of 1997, Carrie entered the College of Textiles in her freshman year. She completed her Bachelor of Science degree in Textile Technology and Design with a minor in Art and Design in May 2002. Upon completion of her B.S., Carrie was accepted into the M.S. program in the College of Textiles at NC State. She is currently pursuing a Master of Science degree in Textile and Apparel Technology and Management with a Design Concentration, to be completed in August 2004.
Carrie has participated in many different activities during her educational career. She was Executive Chair of the planning committee for the 2003
International Textile and Apparel Association (ITAA) Fashion Exhibition in
Savannah, Georgia, under the direction of Dr. Cindy Istook. Carrie also exhibited her own original textile and apparel designs in the show.
Since being inducted into the Brotherhood of Phi Psi National Textile
Fraternity in the spring of 1998, Carrie has served as both the Recording Secretary and Media Representative for the organization.
iv
ACKNOWLEDGEMENTS
There are a number of people that I would like to thank for their role in my educational career at NC State and also in my personal successes and growth.
• Susan Brandeis, R. Alan Donaldson, Charles Joyner, Vita Plume, Nancy Powell, Kathleen Rieder, Ann Roth, and Georgia Springer: The 8 Design Professionals who lent me their time and expertise in evaluating the patterns used in this research.
• Ming Xiong: For the statistical analysis of data in this research.
• Shawn Dunning, Instructional Consultant and Webmaster, College of
Textiles: For his invaluable expertise and work in building the internet survey tool, and for his patience with me and my thoughts and ideas.
• Chuck and Donna Stewart, Tumbling Colors, Inc.: For giving me the chance to be a part of your lives at work and at home, for your encouragement in my future, and above all, for your friendship.
• Genevieve L. Garland, Instructor, College of Textiles: For your invaluable advice and help in my design capabilities, for many late nights designing, cutting and sewing, and for just being a friend.
v • Charles E. Joyner, Professor, College of Design, Committee Member: For
your patience with and encouragement of my artistic abilities, for introducing me to the world of photography, and for welcoming the challenge of
integrating photography and textiles for my research.
• Dr. Cindy L. Istook, Associate Professor, College of Textiles, Committee Chair: For introducing me to the world of apparel design with the
development of my very first pattern and garment, for your undying patience with my work, for your ability to be critical and motivational simultaneously, for your trust in me, and for being as much of a friend as you have been a
teacher.
• Jim and Dot Moser, mom & dad: For never letting me believe there was anything I could not accomplish, for knowing when to say yes and no, for teaching me to value and appreciate all the blessings in my life, and for being the number one blessing in my life…
vi
TABLE OF CONTENTS
LIST OF FIGURES...XI
LIST OF TABLES ... XIV
CHAPTER ONE: INTRODUCTION ... 1
PURPOSE OF STUDY...2
RESEARCH STATEMENTS...3
RATIONALE...3
LIMITATIONS...4
CHAPTER TWO: LITERATURE REVIEW ... 6
ELEMENTS OF DESIGN...6
Basic Design Elements...6
Line ... 7
Line in apparel aesthetics... 8
Shape... 8
Shape in apparel aesthetics. ... 9
Value... 10
Texture ... 11
Texture in apparel aesthetics... 12
Color ... 12
Color in apparel aesthetics. ... 13
Use and Evaluation of Design Elements...14
PHOTOGRAPHY...15
Photography as an Art Form ...15
vii
Why Black and White? ... 17
Image and Subject Choice... 18
Black in Apparel ... 18
REPETITION AND PATTERN...20
Repetition ...21
Pattern ...21
Patterns Designed for Printed Textiles ...21
MODULES...22
Creating Modules...23
Creating Patterns with Modules ...23
Modules Derived from Photographs...26
Photographic Patterns ...28
EARLY PHOTOGRAPHY IN TEXTILES AND APPAREL...29
Transfer with Printing Plates...29
Wet Rubbing...30
Release Method and Skimming ...32
Thermal Transfer Paper ...33
Contact Paper ...33
Transfer Medium...34
Transparent Base...35
Acrylic Medium...36
Solvent Transfer...36
Copy Machines, Typewriters and Paper Printers...37
Silk-Screen Printing ...38
Photo-emulsion Screen Printing ...39
viii
Light-Sensitive Printing ...41
Stamp Printing ...43
PATTERNS DESIGNED FOR USE IN APPAREL...43
DIGITAL PRINTING TECHNOLOGY...46
The Future of Textile Digital Printing ...47
CHAPTER THREE: METHODOLOGY ... 49
PHOTOGRAPHIC PATTERN GENERATION...49
Final Pattern Choices ... 50
DESIGN ELEMENTS WITHIN PHOTOGRAPHIC PATTERNS...59
Chosen Design Elements... 59
Validation of Design Elements by Design Professionals ... 60
GARMENT FLATS...61
Male Flats ... 62
Female Flats ... 69
ONLINE SURVEY STRUCTURE...76
Assessment of Current Trends in Internet Website Functions... 76
Survey Design... 80
Visual Simplicity. ... 80
Ease of Use. ... 81
Anonymity for Subjects and Administrator. ... 81
Demographics ... 81
General Categories... 82
States and Regions. ... 84
Occupation and Education. ... 86
Annual Household Income. ... 87
Clothing and Accessories Expenditure. ... 87
ix
Placement and Scale of Patterns. ... 88
Subject Comments ... 88
SURVEY ADMINISTRATION...89
Establishing a Domain ... 89
Publicizing the Survey ... 90
Duration of the Survey ... 91
DATA ANALYSIS...92
SAS Testing Methods ... 92
CHAPTER FOUR: RESULTS AND FINDINGS... 93
SUBJECT SAMPLE SUMMARY...93
MALE SUBJECT SUMMARY...95
Research Statement Findings: Male Subjects... 95
Research Statement 1... 95
Research Statement 2... 98
Research Statement 3... 99
FEMALE SUBJECT SUMMARY...106
Research Statement Findings: Female Subjects ... 106
Research Statement 1... 106
Research Statement 2... 107
Research Statement 3... 108
CHAPTER FIVE: DISCUSSION ... 113
SURVEY SUBJECT COMMENTS...113
TOPICS FREQUENTLY ADDRESSED BY SUBJECTS...117
Scale of Patterns... 117
Pattern Placement on Garments ... 117
Survey Choice Options ... 117
x
Data Collection ... 118
BASIC DESIGN ELEMENT EVALUATION BY DESIGN PROFESSIONALS...119
SUMMARY OF DATA...119
CHAPTER SIX: RECOMMENDATIONS ... 121
REFERENCES ... 124
APPENDICES ... 127
APPENDIX A: DESIGN ELEMENT EVALUATION SHEET... 128
APPENDIX B: DESIGN ELEMENT EVALUATION RESULTS... 130
APPENDIX C: LIST OF FIELD SELECTIONS FOR INTERNET SURVEY TOOL ... 132
APPENDIX D: SAMPLE PAGES FROM INTERNET SURVEY TOOL... 135
xi
LIST OF FIGURES
FIGURE 1: GREYSCALE ... 11
FIGURE 2: ASSORTED FABRIC TEXTURE DETAILS... 12
FIGURE 3: BLOCK OR TILE... 22
FIGURE 4: BRICK... 22
FIGURE 5: HALF DROP... 22
FIGURE 6: DIAMOND... 22
FIGURE 7: PACKED TRIANGLES... 24
FIGURE 8: PACKED SQUARES... 24
FIGURE 9: PACKED HEXAGONS...24
FIGURE 10: SEMI-REGULAR 1 ... 25
FIGURE 11: SEMI-REGULAR 2 ... 25
FIGURE 12: SEMI-REGULAR 3 ... 25
FIGURE 13: SEMI-REGULAR 4 ... 25
FIGURE 14: SEMI-REGULAR 5 ... 25
FIGURE 15: SEMI-REGULAR 6 ... 25
FIGURE 16: SEMI-REGULAR 7 ... 25
FIGURE 17: ORIGINAL PHOTOGRAPH ... 27
FIGURE 18: TRIANGLE & HEXAGON MODULES TAKEN FROM PHOTOGRAPH AND FITTED TOGETHER TO CREATE LARGER TRIANGLE MODULE... 27
FIGURE 19: FOUR OF THE LARGER TRIANGLE MODULES FLIPPED, ROTATED AND PACKED TO FORM A REPEAT UNIT... 27
FIGURE 20: PATTERN CREATED FROM REPEAT UNIT ... 28
xii
FIGURE 22: CAPE, LATE 1600’S, FRENCH... 45
FIGURE 23: AFTERNOON DRESS, CA. 1855, FRENCH ... 45
FIGURE 24: “MAY” BALL GOWN, SPRING/SUMMER 1953, CHRISTIAN DIOR, FRENCH ... 45
FIGURE 25: DIGITALLY PRINTED APPAREL PRODUCTS ... 47
FIGURE 26: PATTERN 1... 51
FIGURE 27: PATTERN 2... 52
FIGURE 28: PATTERN 3... 53
FIGURE 29: PATTERN 4... 54
FIGURE 30: PATTERN 5... 55
FIGURE 31: PATTERN 6... 56
FIGURE 32: PATTERN 7... 57
FIGURE 33: PATTERN 8... 58
FIGURE 34: MALE FLAT 1 ... 63
FIGURE 35: MALE FLAT 2 ... 64
FIGURE 36: MALE FLAT 3 ... 65
FIGURE 37: MALE FLAT 4 ... 66
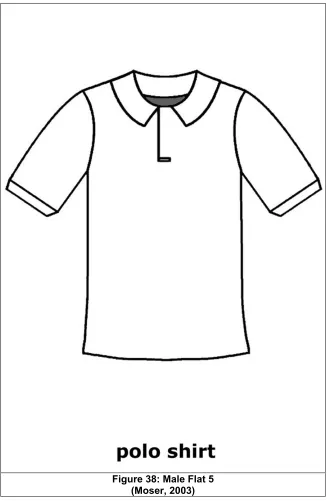
FIGURE 38: MALE FLAT 5 ... 67
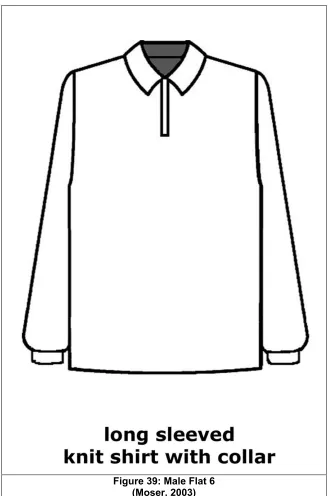
FIGURE 39: MALE FLAT 6 ... 68
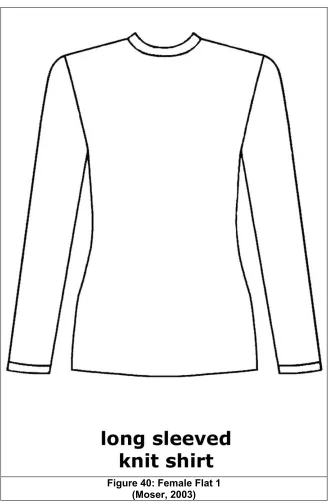
FIGURE 40: FEMALE FLAT 1... 70
FIGURE 41: FEMALE FLAT 2... 71
FIGURE 42: FEMALE FLAT 3... 72
FIGURE 43: FEMALE FLAT 4... 73
FIGURE 44: FEMALE FLAT 5... 74
FIGURE 45: FEMALE FLAT 6... 75
FIGURE 46: J.JILL™ COLOR SELECTION 1, PETAL PINK... 78
xiii
FIGURE 48: CENSUS REGIONS AND DIVISIONS OF THE UNITED STATES... 85
FIGURE 49: JTATM PRESS RELEASE ... 91
FIGURE 50: MALE GARMENT 1, PATTERN 8 ...103
FIGURE 51: MALE GARMENT 2, PATTERN 7 ...103
FIGURE 52: MALE GARMENT 3, PATTERN 3 ...104
FIGURE 53: MALE GARMENT 4, PATTERN 5 ...104
FIGURE 54: MALE GARMENT 5, PATTERN 3 ...105
FIGURE 55: MALE GARMENT 6, PATTERN 5 ...105
FIGURE 56: FEMALE GARMENT 1, PATTERN 5...110
FIGURE 57: FEMALE GARMENT 2, PATTERN 6...110
FIGURE 58: FEMALE GARMENT 3, PATTERN 3...111
FIGURE 59: FEMALE GARMENT 4, PATTERN 8...111
FIGURE 60: FEMALE GARMENT 5, PATTERN 3...112
FIGURE 61: FEMALE GARMENT 6, PATTERN 6...112
FIGURE 62: SAMPLE SELECTION OF SUBJECT COMMENTS ...116
FIGURE 63: DESIGN ELEMENT EVALUATION SHEET ...129
FIGURE 64: INTERNET SURVEY TOOL, HOME PAGE...136
FIGURE 65: INTERNET SURVEY TOOL, DEMOGRAPHICS PAGE...137
FIGURE 66: INTERNET SURVEY TOOL, MALE GARMENT WITH NO PATTERN APPLIED...138
FIGURE 67: INTERNET SURVEY TOOL, MALE GARMENT WITH PATTERN APPLIED ...139
FIGURE 68: INTERNET SURVEY TOOL, COMMENTS PAGE ...140
xiv
LIST OF TABLES
TABLE 1: AGE DISTRIBUTION OF SUBJECTS BY GENDER ... 94
TABLE 2: GEOGRAPHIC DISTRIBUTION OF SUBJECTS BY GENDER ... 94
TABLE 3: DESIGN PROFESSIONALS’ EVALUATION CHOICE TOTALS...131
TABLE 4: PRIMARY AND SECONDARY CHOICES, PERCENT OF ALL DESIGN
PROFESSIONALS’ CHOICES FOR EACH INDIVIDUAL IMAGE ...131
1
CHAPTER ONE: INTRODUCTION
As an emerging technology in the textile industry, digital printing has allowed the application of never before seen images on fabrics. The color range and quality of digital printers can produce photo realistic images that are not possible with traditional methods of textile printing such as screen printing.
However, there are many negative production aspects of digital printing that are still being tested and developed, including slow production times and color quality. These drawbacks have limited the prosperity of commercial production of digitally printed textile and apparel products (Boston, 2003).
A related area of digital printing that has yet to be explored in depth is the possible consumer response to images that are, in fact, photo quality. Until now, most fabrics were printed with imagery that was obviously not photo realistic. Geometric prints, patterns designed in traditional media, and illustrated images are most common in printed textile products. All of this will change with the
establishment of digital printing in the textile industry.
Also important to the future of textile digital printing is the consumer’s preference as related to basic design elements within a digitally printed textile pattern. Are there specific design elements that may be more appealing or
2 Will consumers view photo realistic patterns differently than traditionally printed patterns?
These research questions evolved from a semester study in creating repeat patterns for textiles by utilizing photographic modules. The patterns designed during this study were ultimately employed in a final garment. The variation in viewer’s responses to the garment led to an interest in why consumers prefer specific types of repeat patterns in textiles and apparel.
This research focuses on the future of digital printing in apparel design and production by assessing consumer response to patterns created from photographic modules used in specific garments. Surveying a sample of U.S. consumers (with no limits on their demographic characteristics) to determine their preferences for basic design elements within a textile pattern led to an initial consideration of what would be most accepted or desired by a population.
Purpose of Study
3
Research Statements
The following principal research statements were used as the focal points of analyzing the data gained from this research.
1. What demographic or other related factors are influential in a typical U.S.
male/female consumer’s choices concerning digitally printed repeat patterns
for textile apparel products?
2. What are a typical U.S. male/female consumer’s preferences concerning
basic design elements within digitally printed repeat patterns for textile
apparel products?
3. What demographic factors are influential in a typical U.S. male/female consumer’s choices concerning the combination of a specific garment style
and a digitally printed textile repeat pattern?
Rationale
Though it is still far from being a mainstream technology seen in apparel design and production, the advancement of digital printing in the textile industry is inevitable. Improvements are constantly being made to push the technology further towards becoming a common method of commercial production. However, there is little published information available concerning the expected response of the most important role in the long-term success of digital printing: the consumer.
4 with a look that appears realistic and true to life. Photographs on fabric can
materialize into actual people, places and objects. Images will seem real enough to touch. The quality of these images and fascination of the consumer will verify the certain success of digital printing in textiles.
Limitations
The photographs, patterns and images used in this research were the original works of one designer. Therefore, they do not represent the entire availability of patterns and images for digital printing.
Only U.S. consumers were surveyed in this research. This restriction was an attempt at acquiring more precise data in the research. The survey was only
created in the English language so it would not accommodate any international consumers who did not speak or read English. Additionally, the sample would not have been as narrowed or specific if other countries were included.
Subject matter was also a limitation. Although most of the imagery is hidden or disguised in the repeat patterns, the individuals surveyed may have been affected by a shape or image they recognized within a pattern (Hunt, 2002).
5 In this study, the subjects surveyed made choices based only on images of digitally printed apparel products and were not shown actual physical garments. Their responses or choices may have been different if they had seen a tangible object rather than an image on a computer monitor.
Finally, the designer’s choice of apparel products for pattern application may have had an influence on the opinions of those surveyed. The flat sketches of the garments were chosen based on their intended classic simplicity to appeal to a wider audience, as they were typical garment shapes which appear in technical flat
6
CHAPTER TWO: LITERATURE REVIEW
The following chapter is a review of all previously written and/or published literature that is relative to the research conducted in this study. The areas of investigation include the elements of design, photography, repetition and pattern, modules, early photography in textiles and apparel, and textile digital printing.
Elements of Design
Design means many things to many people. In her book, Design: Elements and Principles, Dorthea C. Malcolm defines the act of designing as “relating
elements, whether they are similar or contrasting, and visually arranging an
interesting unity with them”, or, in short, “arranging things to create a single effect” (Malcolm, 1972, p. 7). Wucius Wong states, “Design is a process of purposeful visual creation”, in his book, Principles of Form and Design (Wong, 1993, p. 41). Wong also believes that design is a visual language, and that in order for someone to use design to solve a problem, it is important to grasp this visual language. The first step in understanding the language is to understand the aforementioned elements of design.
Basic Design Elements
7 different resources, the elements of focus in performing this research were line, shape, value and texture. Color was also evaluated in the initial research, but was
not chosen as one of the final elements used in the Methodology.
Line
A line can be represented in many different ways. It can be no more than a simple mark created with any instrument or tool. A line indicates direction, as it leads to another point or location. Many lines may be used together to create multiple directions or directional changes (Malcolm, 1972).
Lines have many qualities which affect the way they are perceived. The length of a line can influence the viewer’s assessment. Short, quick lines divide the flow of vision, while long, flowing lines allow the eye to travel along the line smoothly. The width of a line, or its thickness, and the weight of a line can have an effect on the viewer’s perception. Line uniformity is also influential in a line’s appearance. Lines which are arranged in a very uniform fashion can communicate a sense of control or organization to the viewer (Fiore & Kimle, 1997). The direction of a line is also important. Lines may travel in many directions, including up, down, around, back, forward, or diagonally. There may be direction changes within one line. Lines may curve or contain sharp points where the direction changes suddenly (Malcolm, 1972).
8
Line in apparel aesthetics. The human body is an example of line in a natural form. Lines are apparent in the face, body, and hair. Lines on a body are constantly changing as the body is in motion. During movement, the shape and length of garments on a human body are also changing and moving. The physical effects on a garment while sitting are much different than the effects on the same garment while running (Fiore & Kimle, 1997).
Outer lines in apparel create a frame around the body, separating it from the environment. Inner lines in apparel divide the garment and the body into smaller parts. Apparel designers may carefully consider all the lines that will be apparent in a garment when worn on the body in order to achieve the most flattering fit on a human form.
Line can be used to complement the objective of a garment. For example, smooth, flowing lines on a long evening gown can enhance the femininity of the garment (Fiore & Kimle, 1997).
Shape
When lines are used to completely enclose an area, that area becomes a shape. A shape is considered positive and occupies positive space. The area
around a shape is considered the background and occupies negative space. Shapes may be created with unclear lines or boundaries, making it difficult to
9 Shapes can be regular, as in a square or circle, or they can be very irregular. Multiple flat shapes, or planes, may be represented separately or they may overlap to create other shapes. Shapes can utilize many different elements of design working together (Malcolm, 1972).
Shapes can typically be described as either geometric or organic. Geometric shapes are characterized by angular lines or simple forms. Organic shapes are more likely to have curved lines with more of a free form (Fiore & Kimle, 1997).
Shape in apparel aesthetics. Shape in apparel aesthetics is commonly referred to as a silhouette, which defines either the outer shape of a garment on a human form or the shape of the human form itself. The variation in silhouettes of the human body has recently been reviewed by many researchers in the area of apparel sizing standards and fit. The defined female silhouettes in recent dissertation
research at North Carolina State University by Dr. Karla Simmons include hourglass, oval, triangle, inverted triangle, rectangle, spoon, diamond, bottom hourglass, and
top hourglass (2002).
10
Value
Value refers to the range of lightness and darkness between true black and
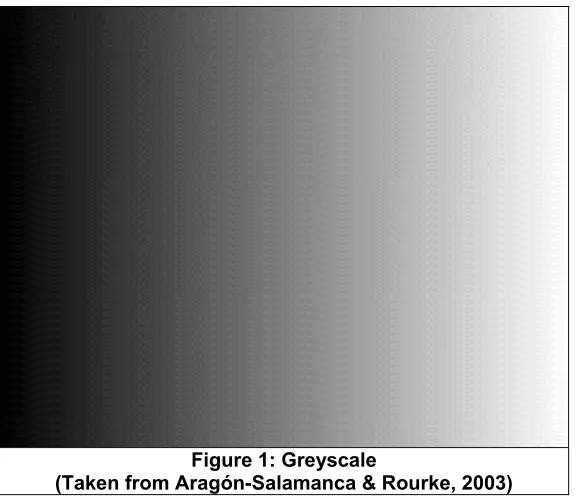
true white. Value may also represent the lightness or darkness of any color. The measure of value can be determined by evaluating the contrast, or “the difference in darkness or density between one tone and another” (London, Upton, Kobré & Brill, 2002, p. 411) between different colors. For example, the level of contrast between true black and true white is extremely high. However, the level of contrast between true white and a very light grey is not as high (Malcolm, 1972).
11 Figure 1: Greyscale
(Taken from Aragón-Salamanca & Rourke, 2003)
Value is directly affected by the value or values of darkness or lightness surrounding it. Dark values typically appear to come forward out of an image while light values appear to draw back into an image (Malcolm, 1972).
Texture
The physical quality of a surface is called texture. Textures can be described as smooth, rough, shiny or dull, just to name a few. Texture can be evaluated through both touch and sight. Sometimes texture is more easily felt than seen. Other times, texture may only be evaluated through sight, such as in a photograph.
12
Texture in apparel aesthetics. Texture has a significant effect on the aesthetic satisfaction of a textile or apparel product (Eckman, Damhorst & Kadolph, 1990). Tactile texture in apparel and garments is primarily influenced by the
garment’s fabric construction (Figure 2). Fabric finishes, fiber content and yarns used can give the fabric a specific hand. Details in the garment construction, such as a seam type or pleating effects, can create new surfaces and textures. Trims or notions, such as buttons or piping, can also alter the surface and texture of a
garment.
Figure 2: Assorted Fabric Texture Details (Moser, 2004)
Texture can also be implied or visual, meaning it is not validated through touch, but rather it is seen. This can be made possible by certain design effects within a pattern that cause the fabric to appear to have an uneven surface (Fiore & Kimle, 1997).
Color
Color can be described as “a sensation which causes stimulation of the eye”
13 which “light is reflected to and perceived by the eye from the surface of a shape or form” (Wong, 1993, p. 345). Color is perhaps the most dynamic of all design
elements, having the most powerful expressive potential and the greatest impact on one’s perception (Fiore & Kimle, 1997).
A person’s reaction to color is essentially psychological. The reaction varies depending on the color in question and the viewer. Many peoples’ association with color stems from their experiences with color as a child. Emblematic
representations in color can determine the way a color might be interpreted. For example, concerning the birth of a child, light blue usually symbolizes a baby boy while pink symbolizes a baby girl. Holidays are represented by certain standard colors, such as red for Christmas and green for Saint Patrick’s Day. Foods are traditionally certain colors, such as brown chocolate or purple grapes. Color
conditioning, or the way a color has been presented throughout history, can also be a factor (Malcolm, 1972). Colors may mean very different things among different cultures. For example, black is the traditional color worn to symbolize mourning in many Western cultures when someone has passed away. However, white is the color traditionally worn when mourning a death in many Eastern cultures (Mahnke, 1996).
14 viewer and most likely appeal to different consumers. Additionally, many
consumers’ perception of color is extremely different. Two people’s ideas of the color avocado are unlikely to be exactly the same. This is because color names are not specific or systematic enough to be defined in exactly the same manner by different people (Fiore & Kimle, 1997).
Color forecasting is an important step in planning and producing a line of garments in the apparel industry. Assessment of current trends is important for apparel designers to create products that will appeal to a specific consumer.
Designers in all stages of the apparel production chain should be up to date on color trends in the market (Fiore & Kimle, 1997).
Use and Evaluation of Design Elements
15
Photography
Besides its appreciation as an incomparable art form, photography has historically been used as a communication tool and resource, and has been established as a distinctive way of expressing ideas and emotions (Kemp, 1973). Photographs convey an exact instant in time. Viewers of a photograph can, in a sense, experience a moment in time as if they were actually there.
There are many types of photographic processes, but the focal point of this research involves black and white printed media.
Photography as an Art Form
The word photography is derived from the Greek and means “writing with light.” First appearing in 1839, photography has become one of the most impartial means of reproduction and representation in today’s society. Daval (1982)
maintains that photographic representation in art implies a series of choices, including subject choice and how the subject will be visually realized. From a positive outlook, these choices will ultimately define the symbolic element of the image to the viewer. On the downside, viewers are usually content accepting a picture as real life. Humans see only what they are capable of seeing, depending on their cultural background and their own life experiences (Daval, 1982).
16 those 10 pictures and remember how something appeared, or how it happened. Photographs seize the instant in time and allow viewers to recollect and store the image in their mind, exactly as it was at that moment.
Daval reacts, “But if photography amounted to no more than the act of taking pictures which reduce all realities to the same level and the same format, the quality of a photograph would be limited to the quality of the subject represented and to the technical competence of the operator” (Daval, 1982, p. 10).
Two distinct characteristics of photography have had a great impact on society: its power to expose things which are invisible to the naked eye, and its power of confronting viewers with images of unfamiliarity (Daval, 1982). Before photographs, peoples’ life experiences were limited to what they had seen with their own eyes or heard from others about the unknown world beyond personal
experiences or relationships. Unlike looking at a painting or drawing, viewing a photograph translated objects or scenes into a realistic experience (Daval, 1982).
Basics of Black and White Photography
A technically successful black and white photograph relies on the exposure of the film that is being used. Exposure is controlled by the aperture of the
photographic lens (or how much light is allowed to reach the film) and the shutter speed (or the length of time that light is allowed to reach the film). Metering is the
17 would produce the overall light level as a middle grey tone in a black and white photograph (London, Upton, Kobré and Brill, 2002). This process of metering
ensures that the photograph has an even range of the greyscale, from black to white and every shade in between. In most cases, this balanced range is the goal of the photographer. However, metering can also be used to achieve harsh contrast in a photograph, or to increase the greyness of an image, depending on the artistic or visual intentions of the photographer.
Why Black and White?
Despite the achievement of color photography in 1861, and its commercial introduction in 1907, the fascination with black and white photographs still endures today (London, Upton, Kobré and Brill, 2002). Black and white images seem to distance themselves from everyday, colorful life, creating a mysterious and nostalgic feeling within the viewer. They can generate a sense of retrospect, as they remind one of earlier, more simple times. Black and white photographs are often associated with documentation of historical events and journalism, giving them a factual aspect and evoking a sense of truth in the viewer (Larg & Wood, 1999).
18
Image and Subject Choice
Choosing a subject to photograph is the first step towards a successful
image. Photographers may first decide what the photograph will be about, or what it should say to the viewer. Should it evoke a certain feeling or emotion? Is there a piece or part of the subject that should be highlighted?
Before making an exposure, it is important to visualize the way a subject will look as a print, confined within the viewfinder of the camera. Photographers may move around the subject or scene to evaluate it from all angles.
It is also important to notice how the subject matter is being communicated, and how a three-dimensional image will look when transferred onto a 2-dimensional surface. What the photographer sees with their own human eye is more realistic than how the print will ultimately appear since they are actually experiencing that moment as a part of the environment (London, Upton, Kobré and Brill, 2002).
Black and white photography is a popular choice for portraiture. The absence of color can impose a certain timeless quality, where a person’s character or real self shows through above all else in the photograph. Color can often date a portrait or detract from the subject matter (Larg & Wood, 1999).
Black in Apparel
19 aristocrats of the sixteenth and seventeenth centuries and only the daring American and European women of the late nineteenth and early twentieth centuries. In the early twentieth century, Parisian and British designers began to create black pieces for their wealthiest clients, which were considered very bold and extravagant for that time (Mendel, 1999).
In the early 1900’s, designer Coco Chanel made her mark as a designer when she authenticated black as a pivotal point for fashion. While many raved at her exploitation of black in women’s clothing, other critics referred to her style as “poverty de luxe” or “poor girl fashion”, implying that Chanel’s creations allowed even the most average women ‘to walk around like millionaires’. Many other designers, including Christian Dior and Balenciaga, followed suit into the 1950’s, developing entire collections in black and receiving a positive response from the fashion world (Mendel, 1999).
Black and white movies, featuring stars like Marlene Dietrich and Rita
Hayworth dressed in valiant black gowns and shiny black frocks, gave black another runway to display its power and worth in fashion. The image of Audrey Hepburn in the black Givenchy gown in 1961’s Breakfast at Tiffany’s is an enduring cultural icon of the twentieth century (Mendel, 1999).
20 1999, p. 13). Besides the prevalent use of black in evening wear, a well-tailored black suit, when worn in a predominantly male business environment, created a certain authority and power for women and was a preview to the 1980’s power suit (Mendel, 1999).
In the youth revolution of the 1960’s, the black attire formerly dominated by a mature group of women, aged 25 and over, was seized by a younger, more
expectant group of sophisticates. The birth of the Pop Art movement, with its bright colors and creamy pastels, competed with black in the new short skirts and basic styles. However, when black teamed up with white, the Op Art movement
reintroduced the extreme use of black in fashion trends (Mendel, 1999).
In the 1970’s, black emerged in the discos and dance clubs in the new body-hugging dresses and clinging evening wear. Following into the early 1980’s, black outsold every other color despite the continual blows by critics. Many maintained that black was boring and merely a safety net for women who were too afraid to be fashionably daring and original. However, consumers didn’t agree and black remained a staple into the twenty-first century (Mendel, 1999).
Repetition and Pattern
21
Repetition
Repetition occurs within a design when similar elements are repeated in a regular or an irregular fashion, often creating a rhythm or harmony within the design (Malcolm, 1972; Wong, 1993). Repetition can also be represented through the recurring use of a unit form. The consistent presence of a unit form can create unity within a design. Unit forms should be fairly simple so the unity of the forms within a repetitive design is not jeopardized (Wong, 1993).
Repetition is a common method used in various types of design. Structural elements of architecture and rhythm seen in fabrics or interior coverings are familiar examples of repetition. Considerations such as the size of a unit form or the number of times it is used can influence the resulting repetition (Wong, 1993).
Pattern
A pattern can be created by arranging many shapes or units together. Patterns can be ordered or random. Ordered patterns, such as a check or plaid, include shapes or units that are placed at regular distances from each other.
Random patterns, such as abstract tie dyes, have no consistency in their placement or distance from each other (Fiore & Kimle, 1997).
Patterns Designed for Printed Textiles
22 techniques… Repetition of the basic unit should create a rhythmic flow over the whole fabric” (Johnston & Kaufman, 1981, p. 56).
The size of the repeat should be considered, as it will greatly affect the outcome of the fabric. Larger repeats may require more fabric to fully display the repeat as a continuous pattern. Smaller repeats may become lost or
indistinguishable when repeated over a large area of fabric. The size of the repeat may also determine the resulting fabric’s appropriate end use (Johnston & Kaufman, 1981).
There are many ways in which the repeat can be arranged to create a pattern. Four examples are shown below.
Figure 3: Block or Tile (Moser, 2004)
Figure 4: Brick (Moser, 2004)
Figure 5: Half Drop (Moser, 2004)
Figure 6: Diamond (Moser, 2004)
Modules
23
Creating Modules
Patterns can also be created by using a module. A module is “a single basic unit that is repeated to produce a pattern” (Joyner, 1992). A module may also be referred to as a motif or unit form. Modules are usually smaller parts extracted from a larger work or image. A basic single module appears as one of three equilateral geometric shapes: triangle, square, or hexagon. Repetition of a module can create a sense of unity within a whole. Modules are most effective when the imagery within it is simple, the positive and negative spaces are similarly distributed, and they are asymmetrical (Joyner, 1992). Asymmetrical implies that if an object or image was divided into two equal halves, they would not be mirror images of each other (Wong, 1993).
Choosing which specific piece or part of an image will be a module is
important when considering how the module will interact with itself when replicated as a pattern.
Creating Patterns with Modules
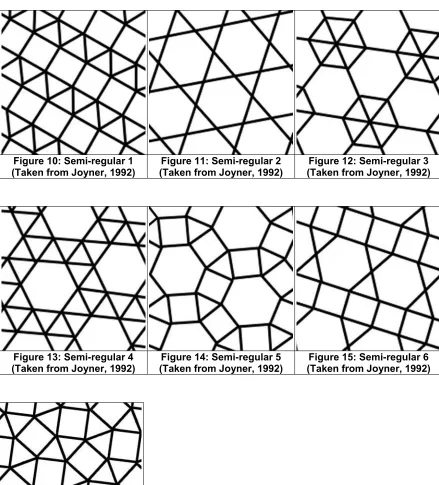
Patterns are normally repeated and distributed in such a way that the entire space in question is filled with no voids or spaces. Completely filling a
24 packed together with more shapes of their exact kind, can create patterns with no voids (Joyner, 1992).
Figure 7: Packed Triangles
(Taken from Joyner, 1992) (Taken from Joyner, 1992) Figure 8: Packed Squares Figure 9: Packed Hexagons (Taken from Joyner, 1992)
25 Figure 10: Semi-regular 1
(Taken from Joyner, 1992) (Taken from Joyner, 1992) Figure 11: Semi-regular 2 (Taken from Joyner, 1992) Figure 12: Semi-regular 3
Figure 13: Semi-regular 4
(Taken from Joyner, 1992) (Taken from Joyner, 1992) Figure 14: Semi-regular 5 (Taken from Joyner, 1992) Figure 15: Semi-regular 6
26
Modules Derived from Photographs
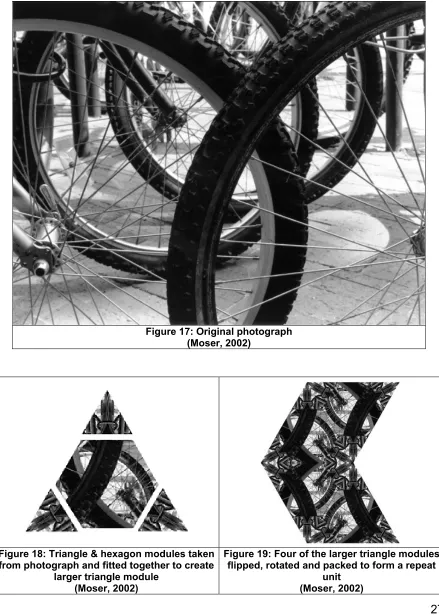
Modules can be created from photographs by choosing a piece or part of the image and extracting it in the shape of an equilateral triangle, square or equilateral hexagon (Joyner, 1992). Because of the wide range of tones in a photograph, and the infinite possibilities for color and gradient, modules derived from photographs can be very dynamic. As previously mentioned, asymmetrical modules usually yield patterns that are more energetic and seem to take on a life of their own (Joyner, 1992). This is especially true in modules taken from photographs. The module can be flipped or rotated within the pattern to create more diverse patterns.
27 Figure 17: Original photograph
(Moser, 2002)
Figure 18: Triangle & hexagon modules taken from photograph and fitted together to create
larger triangle module (Moser, 2002)
Figure 19: Four of the larger triangle modules flipped, rotated and packed to form a repeat
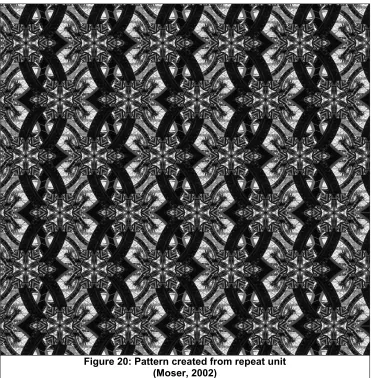
28 Figure 20: Pattern created from repeat unit
(Moser, 2002)
Photographic Patterns
29 multiple copies of the module will look when packed together. How will the
outstanding design elements within the module interact with each other? Where will lines meet? Will new shapes emerge? What new colors or tones will be created?
It is up to the designer as to whether the imagery in the original photograph will still be distinguishable in the resulting pattern. It is possible to choose a module which will allow the original photograph to be recognizable, but one may also choose a module that, when packed together, disguises the photographic image. The
resulting pattern can even create a new image.
Early Photography in Textiles and Apparel
There following methods explain simple, non-technical ways of printing photographs directly onto fabric.
Transfer with Printing Plates
30 Using the iron on a “steam” setting, the iron-on mending fabric is pressed onto the photocopy. Then the mending fabric is peeled away. The adhesive on the mending fabric should pick up the image from the photocopied paper, but in reverse. The mending fabric now acts as a “printing plate”. Applying the image and removing the mending fabric in this way is called the release method (Croner, 1989).
Next, the mending fabric printing plate is ironed onto the final fabric. The mending fabric is then peeled away, leaving the adhesive with the photographic image on the final fabric, facing the direction in which the photograph originally appeared (Croner, 1989).
The transfer sheet and printing plate method can also print text created with inked typing ribbons, colored and lead pencils, crayons, chalk, pastels, and acrylics. This is beneficial for printing images that have been drawn or written (Croner, 1989).
Wet Rubbing
31 Materials should be prepared as they are for the dry method of transfer
printing, only the iron should be on a dry “wool” setting. The mending fabric is
heated onto the image for one minute, with the iron tilted and rubbing the edge of the plate. The fabric should be allowed to cool completely (Croner, 1989).
The following supplies should be assembled for the next step: soap solution (one part dishwashing liquid, 4 parts warm water) in a shallow bowl, warm (not hot) rinse water in a wide bowl, and old bath towel, and a cotton rag. All these supplies should be arranged close to one another near a sink (Croner, 1989).
To remove the top paper layer, dip the cooled plate, paper side up, in the soap solution and remove the paper before it is well soaked. Next, put the plate, image side up, on the folded towel and remove any leftover bits of paper by scraping with fingertips or a fingernail. The transferred image should be recognizable through a fuzzy, soapy layer of paper fibers. Do not rub the plate with fingers or against the bottom of the bowl, as the image is soft when it is warm and wet (Croner, 1989).
The printing plate is then submerged, image side up, in the warm rinse water to remove any remaining paper fibers with fingers. The rinse water should be
32
Release Method and Skimming
Skimming is another way of transferring an image onto the final fabric when using dry transfer plates or wet rubbing. The release method as described in the two previous sections is called “release” because it transfers the entire image, including any color on the plate, as well as the adhesive from the mending fabric (Croner, 1989).
The strength and stiffness of the transferred adhesive can be beneficial, in that it makes sewing easier and helps the printed image hold its shape. However, the stiffness of the remaining adhesive can also be a drawback if the fabric is
intended for uses that require softness such as pillows, quilts or clothing. The fabric can be slightly softened by stretching it on the bias to break the adhesive bond. Constantly working with the print and manipulating it by hand will also soften it (Croner, 1989).
Alternatively, skimming is another technique that does not transfer the
adhesive to the final fabric. Though it is slightly more difficult and unpredictable than the release method, skimming can produce one medium-dark print or multiple prints from one printing plate. This process works best with black and white photocopies (Croner, 1989).
33 There is another skimming method that works best for images that will later be painted, embroidered, or embellished in some manner. Using the “wool” setting on the iron, iron the final fabric alone until it’s hot. Place the printing plate face down on the final fabric and rub the back of the plate by the heel of the hand, with a rolling pin, or another cool, hard object. Peel up a tiny corner of the plate to inspect the transfer. If the entire image does not transfer, quickly and lightly run the iron over the plate and then peel away the plate (Croner, 1989).
Thermal Transfer Paper
Thermal transfer paper can be used to print images on fabric. This type of paper can be bought in sheets at many copy stores or office supply stores, and is used in laser copiers. This paper is coated with a polymer emulsion that can be heat set onto fabric. The process is similar to transfer printing with a printing plate (Laury, 1992).
The image is copied onto the thermal transfer paper through the laser copier, in color or black and white. The paper is then heat set onto the final fabric, image side down, for 10 to 20 seconds on a high iron temperature with high pressure. The paper is then peeled away and the image is left on the fabric (Laury, 1992).
Contact Paper
34 from its backing and pressed to the inked side of the photocopy. A rolling pin or the heel of the hand can be used to press firmly and ensure a good contact between the photocopy and contact paper. Next, the excess photocopy paper and contact paper can be cut away to minimize the area of the image to be printed. The photocopy is then peeled from the contact paper, leaving the inked image on the sticky side of the contact paper. The contact paper is pressed firmly onto the final fabric and pressed firmly with the heel of the hand or a rolling pin (Laury, 1992).
The fabric with the contact paper still attached should then be taken outdoors and placed paper side down onto the glass or masonite. Wearing rubber gloves, a small cloth moistened with acetone should be dabbed over the fabric until it is moist. After pressing with the rolling pin once more, the fabric is allowed to dry completely for several hours, and may then be heat set with a medium-hot iron with the printed side placed down on clean paper. Continue pressing until all the emulsion is
removed from the fabric (Laury, 1992).
Transfer Medium
35 Place the final fabric over wax paper or clear plastic wrap on a flat surface and pin it down to prevent slippage. Cut out the photocopied image that is to be transferred and place it face up on another piece of wax paper. Paint the photocopy with an even, thick layer of the medium (about 18 inch thick). Lift the wet print and
place the coated side down on the fabric. Cover the fabric and print with wax paper and press firmly with a rolling pin or by hand from the center out to the edges to remove air bubbles, and press with hands or the rolling pin again. Allow the fabric and print to dry for 24 hours, or longer in high humidity. Cover the fabric and print with a press cloth and heat set with an iron on a medium setting. Remove the photocopy paper by sponging with a wet cloth or sponge and rubbing. When the print is clean, meaning all the paper has been rubbed off and the image is clear, a few more drops of the transfer medium can be rubbed on the image to seal it (Laury, 1992).
Transparent Base
36 sides should be wiped away. Next, peel the photocopy away steadily while it is still hot to leave an evenly colored image on the fabric. Allow the fabric to dry for 24 hours (Laury, 1992).
Acrylic Medium
Acrylic or polymer mediums can be used to lift color from smooth or clay-coated magazines or newspaper and transfer to fabric. The ink is lifted from the image within a thin film of the medium and it can be applied to the fabric using more of the medium to secure the image (Laury, 1992).
First, the image to be transferred should be brushed with a thin layer of the medium and allowed to dry. This coating is them repeated anywhere from four to eight times using different brush strokes in each application. Next, the paper is soaked in warm to hot water for a few minutes. After being removed from the water, the paper can be rubbed away, leaving a thin film of acrylic containing the image. The medium will take on a white foggy look while wet, but will turn clear again when it dries. To transfer the image to fabric, coat the back of the film again and place on the fabric while it is still wet. Press firmly with a rolling pin to remove air bubbles and allow it to dry (Laury, 1992).
Solvent Transfer
37 gloves and masks. Solvents that can be used include turpenoid (odorless paint thinner), mineral spirits, or acetone (Laury, 1992).
A photocopy of the intended image should be made, with the final fabric cut slightly larger than the image and placed right side up on a large piece of cardboard. Fabric edged can be taped down to prevent slippage. The photocopy is then placed face down on the fabric and taped only at the top. Saturate a small cloth with a little of the solvent and wipe over a small section of the photocopy, allowing the paper to soak up the solvent. Quickly press firmly on the saturated area of the paper to assist the transfer of the image onto the fabric. Pull up a small corner of the paper to
ensure the image has been transferred. If the image looks blurry, use less solvent. Continue with the solvent over the entire image, and then remove the paper from the fabric. Allow at air dry for 24 hours, and heat set with an iron (Laury, 1992).
Copy Machines, Typewriters and Paper Printers
38 typewriter or printer, fabric can be stiffened with a spray fixative, spray adhesive, spray starch or sodium alginate (Laury, 1992).
Though it may appear much easier and less involved than some of the previously described processes, copy machines, printers and typewriters don’t generally cooperate well when printing on fabric. It is easy to jam a printer or copier, especially when the fabric is laminated (Laury, 1992).
Silk-Screen Printing
Silk-screen printing by hand allows the direct printing of images onto fabric using a mesh polyester screen stretched across a rectangular wooden or metal frame, or screen. Images can be printed using water-based paints, acrylics, and other substances (Laury, 1992).
Preparation of the screen for printing is a tedious and fairly expensive process. Screens can be purchased pre-stretched with the mesh, or they can be built by the user (Laury, 1992). Mesh comes in many different sizes defined by the space between the holes in the weave structure. Mesh can be purchased in
monofilament polyester or multifilament polyester (Dick Blick, 2004).
Monofilament polyester mesh is woven of a single thread and is very uniform
in weave, allowing a smooth ink flow when printing. The mesh count of
39 Multifilament polyester is woven with a strand of many filaments twisted
together. It is less uniform in weave than monofilament mesh. The coarseness of the mesh is designated by a number followed by an XX. Smaller numbers mean the mesh is finer (Dick Blick, 2004).
Prior to printing, the mesh on the screen is pre-treated with a degreaser or other cleaner and allowed to air dry (Laury, 1992). A degreaser can greatly reduce the risk of failure in the stencil or screen making process and can extend the stencil longevity and endurance through multiple printings. Degreasing helps remove oily ink residue and solvents from prior printings and prepares it for the application of a photo-emulsion chemical (see next section) if being used (Ulano, 2004).
There are various ways of using silk-screens for printing, including photo-emulsion printing, thermal imagers and light-sensitive printing, which are explained in the following three sections.
Photo-emulsion Screen Printing
40 expose the emulsion. The screen is then stored in a light-safe area until it is ready to use (Laury, 1992).
The screen can be exposed using a timed light source which coincides with the specific emulsion with which the screen is coated (Ulano, 2004). The intended image for the screen should be an opaque image which does not allow light to pass through it. The opaque image is placed between the light source and the coated screen. The screen is exposed for a set amount of time, and then removed from the light source. The areas which were not exposed (or covered by the opaque image) can then be washed out of the screen by spraying water on the screen, and the areas which were exposed will leave an outline or stencil of the image. Inks or paints can then be pushed through the screen with a squeegee (Laury, 1992). A squeegee is a tool that is comprised of an upper handle (usually wood or aluminum) and a lower blade made of rubber or a rubber-like material. The squeegee is
passed across the screen and pushes the ink or paint through the mesh (Dick Blick, 2004).
41
Thermal Imagers
Thermal imagers, traditionally used to produce stencils and thermal copies, can be used to create very detailed stencils for thermal screen printing. Thermal imagers work particularly well for printing text and lettering, photographs, sketches, and very linear drawings or images. The drawn or photocopied image used to create the stencil must contain carbon for the process to work correctly (Laury, 1992).
The process for creating a thermal screen is similar to creating a silk-screen as described in the previous section. The original image is placed face up and centered between the backing sheet and the polyester stencil of the thermal screen. The stencil is bonded with a fine film of plastic. The screen, with the image still placed, is exposed by inserting the three layers (screen, image and backing) into the thermal copy machine. The machine burns the image into the plastic film, leaving an etched copy of the image. After the original image is removed from the copier, the screen can be peeled away to reveal the etched image. The screen is then attached to a frame, if it is not already, and used as in regular screen printing (Laury, 1992).
Light-Sensitive Printing
42 are left unexposed, thus leaving the negative image on the fabric. There are a few different methods for creating a light-sensitive print, including Cyanotype (blueprint), Van Dyke (brownprint), Kwik-print and Inko print (Laury, 1992).
Cyanotype, or blueprinting, uses a chemical solution to coat the fabric. When exposed to ultraviolet light, the areas that are uncovered are exposed and turn blue. Color may range from a light blue-green to deep blue. Fabrics can be treated with slightly different chemical solutions to achieve other colors in this process, such as browns and violets (Laury, 1992).
Van Dyke or brownprinting is very similar to Cyanotype. The color of the exposed areas ranges from a pale brown to a deep brown. Brownprinting is especially effective when used to print portraits, as it gives an added depth to the image (Laury, 1992).
A wide range of color can be achieved when using a Kwik-print, as several colors can be painted onto fabric at once. With Kwik-print, there is no need for mixing chemicals. The product is packaged as a pre-mixed emulsion that is brushed onto fabric to make it light-sensitive, and then the fabric is exposed (Laury, 1992).
43
Stamp Printing
Stamps for fabric printing can be created commercially using a personal photograph. Laury (1992) maintains that deeply-etched stamps work best on fabrics since fabrics are typically not as smooth as paper. The stamp is simply coated with ink or paint, using a brush or stamp pad, and pressed onto the fabric. The fabric can then be heat set after drying to secure the image (Laury, 1992).
Patterns Designed for Use in Apparel
Designing repeat patterns for use in apparel end products is very different from designing patterns for other artistic or creative media. In art applications such as ceramics, a decorative pattern is typically incorporated during or after the
construction of the piece. However, in fabric pattern design, the pattern is usually applied to the garment parts (or fabric) before the garment is actually constructed. The pattern to be used in a garment is an integral part of its entirety and the ultimate relationship between the pattern and garment shape (Knight, 1972).
44 be considered when designing for a specific garment shape and/or construction (Knight, 1972).
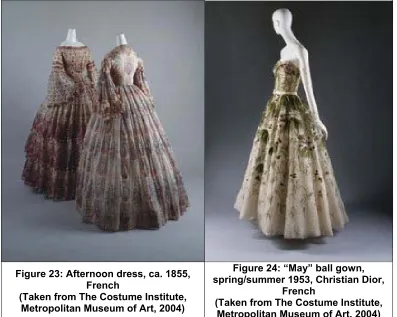
Patterns are designed for apparel applications for a number of reasons. Historically, patterns have often been used for religious or cultural symbolism, communication of a thought or idea, drawing attention to a specific part of the body, or symbolize a social rank (Knight, 1972).
45 Figure 21: Jacket, ca. 1616, Great Britain
(Taken from The Costume Institute, Metropolitan Museum of Art, 2004)
Figure 22: Cape, late 1600’s, French
(Taken from The Costume Institute, Metropolitan
Museum of Art, 2004)
Figure 23: Afternoon dress, ca. 1855, French
(Taken from The Costume Institute, Metropolitan Museum of Art, 2004)
Figure 24: “May” ball gown, spring/summer 1953, Christian Dior,
French
46
Digital Printing Technology
Frank Cost (1997) defines a digital printer as “any printing device that inputs a digital data stream and outputs printed pages” (p. 79). He has organized the current digital printing processes into four categories: silver halide, thermal, ink jet and electrostatic. Most digital printing applications for textiles are ink jet, and are categorized as either a continuous process or drop-on-demand process. Drop-on-demand is the most commonly used of these two methods.
The ink jet printing process uses vibrations to deposit individual “drops of ink in a precisely controlled manner onto a substrate to create an image” (Fralix, 2000, p.58). Important factors to consider in ink jet printing are the intended image resolution, production speed of the printer and the width of the substrate (Fralix, 2000).
47
The Future of Textile Digital Printing
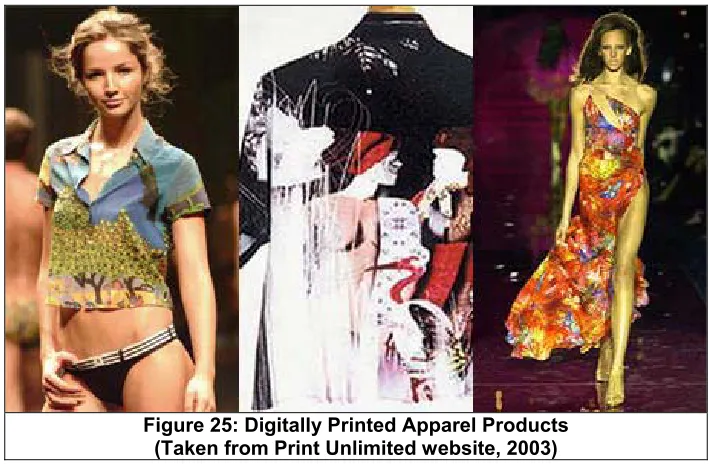
A market research study released in 2003 by Web Consulting, a leader in the consultation of digital and analog printing and imaging companies, estimates that the worldwide volume of digitally printed textiles will surpass 44 million square meters by 2005, based on current trends in the industry. This production level would be almost a 50% increase over the volume produced in the year 2000 (Byrne, 2003).
Figure 25: Digitally Printed Apparel Products (Taken from Print Unlimited website, 2003)
The report also estimates that the number of digital textile printers will
increase from 833 units sold worldwide in 2000 to almost 1,400 units sold worldwide in 2005 (Byrne, 2003). The digital textile printing market is becoming largely
48 The inevitability of digital textile printing’s success lies in recent technological advances such as the DReAM® digital textile printing machine. Created through collaboration between Reggiani Macchine S.p.A., Aprion Digital and Ciba Specialty Chemicals, the DReAM® combines Reggiani’s substrate-covering system, Aprion’s six-color inkjet heads and Ciba’s newly developed reactive inks to perform claimed production runs of up to 150 m²/hour on fabric up to 1.6 meters in width
(Reggiani/Aprion/Ciba SC, 2003). The DReAM® can produce prints at resolutions up to 600 dpi at these high speeds (Ciba Specialty Chemicals, 2003). If
implemented successfully, this technology could be an enormous advance from the current printing speeds of only 10-50 m²/hour on sample strike-offs and short
49
CHAPTER THREE: METHODOLOGY
The purpose of this research was to investigate general U.S. consumer response to patterns created for digitally printed apparel products and what basic design elements are most commonly preferred within a repeat pattern. Related areas of investigation included the basic design element choices as related to the garment style and shape, and specific demographic assessment of the consumer groups and their top design element choices.
Data was collected through an internet survey targeting general U.S. consumers. The survey employed a function which allowed various photographic patterns to be modeled on garment flats; consumers were then asked to choose which patterns they preferred on specific garments. Their choices were then
analyzed statistically for patterns and outstanding characteristics within the acquired data.
This chapter explains the steps taken to choose and design the internet survey material, the structure of the survey, how the survey was administered, and how the acquired survey data was analyzed.
Photographic Pattern Generation
50 modules from the photographs, including the rectangular marquee tool, the crop tool, the rectangle shape tool and the polygon shape tool. The modules that were
extracted were placed on a blank canvas and evaluated for placement, including rotation and flipping of the module. Some patterns were created using only one type of module, as in the three regular patterns (Figures 7-9, p. 24), and some modules with different shapes were combined to create a pattern, as in the seven semi-regular patterns (Figures 10-16, p. 25).
The initial development of the photographic patterns began with an in-depth study in producing patterns using these modules derived from photographs. After many patterns were created and recreated, and the patterns were evaluated together, eight final patterns were chosen to ultimately represent the basic design elements used in this research.
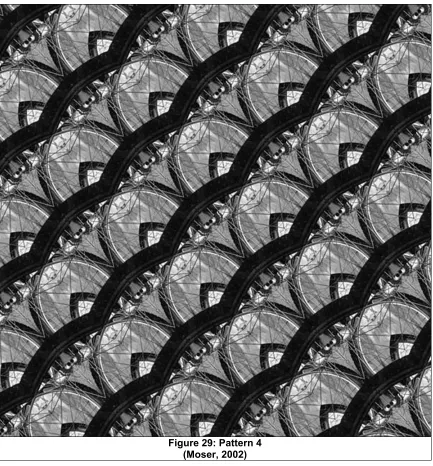
Final Pattern Choices
51 Figure 26: Pattern 1
52 Figure 27: Pattern 2
53 Figure 28: Pattern 3
54 Figure 29: Pattern 4
55 Figure 30: Pattern 5
56 Figure 31: Pattern 6
57 Figure 32: Pattern 7
58 Figure 33: Pattern 8
59
Design Elements within Photographic Patterns
In order to evaluate the eight photographic patterns for their representation of basic design elements, the intended design elements had to be chosen and then validated for use in this research.
Chosen Design Elements
After reviewing several resources on basic design elements and principles, four of the five previously reviewed design elements were chosen to be represented by the patterns in this research: Line, Shape, Value and Texture.
The exclusion of the element color was due, first and foremost, to the fact that all of the photographs used in generating the photographic patterns were made with black and white film. Secondly, color was eliminated because of its extreme
dynamic qualities, including the variation in color interpretation among individuals, and its varying effect on viewers.
60 struggle to communicate color effectively to manufacturers and producers of textile products (Chapman, 2002).
Validation of Design Elements by Design Professionals
In order to assign the four chosen design elements to each of the eight photographic patterns, the representation of the elements within the patterns was first validated by a panel of eight design professionals. The defining aspects for each person to be considered a design professional included their background and education in design, as well as the current utilization of their design knowledge. Each of the professionals is presently an educator in Design Fundamentals and/or Textile Design at the university level. A survey tool was developed, which included an individual “Design Element Evaluation Sheet” for each of the professionals (see Appendix A).
Each of the eight patterns was digitally printed on a Hewlett Packard
Designjet, mounted as a 6”x6” square on 8.5”x11” white cardstock, and labeled as Images 1 through 8 (Figures 26-33). Each 6”x6” square was large enough to
contain eight or more repeat units within the pattern. The scale of each pattern was considered before surveying the professionals, including the clarity of the imagery and details of each pattern. However, this would not necessarily be the final scale used in the internet survey tool.
61 patterns, evaluators were to assign the two elements that were best represented in that pattern. The assignments were to be made in such a way that each element was used only four (4) times, and each pattern was assigned only two (2) elements. This would allow each element to be equally represented among the patterns, which would be important for data analysis of the internet survey tool.
Each professional was surveyed individually, and was not allowed to consult with anyone else about their assignments. They were only allowed to ask the administrator logistical questions which were relative to the survey format and completion of the survey.
After all eight professional subjects had completed the survey, their answers were statistically evaluated to determine which design elements would be
represented by each of the eight photographic patterns. Since the professionals chose two elements for each pattern, their choices were combined and evaluated so that each pattern had a 1st choice and a 2nd choice variable. The 1st choice was the element that was chosen the greatest number of times among all the subjects. The 2nd choice was the element that was chosen the next greatest number of times among all the subjects (see Appendix B).
Garment Flats