by Frederic Jones
Digital
Photography
Just the Steps
™
FOR
DUMmIES
‰Introduction...1
Part I: Acquiring Digital Photos ...3
Chapter 1: Selecting a Camera and Accessories ...5
Chapter 2: Setting Up and Using the Camera ...25
Chapter 3: Snapping Digital Pictures ...35
Chapter 4: Viewing and Transferring Images ...49
Chapter 5: Digitizing Existing Pictures ...59
Part II: Editing and Enhancing
Digital Photos ...69
Chapter 6: Manipulating Image Attributes ...71
Chapter 7: Fixing Common Image Problems ...81
Chapter 8: Repairing Digital Images ...89
Chapter 9: Adding Photo Editor Special Effects ...99
Chapter 10: Adding Photoshop Elements Effects ...109
Chapter 11: Using Layers ...117
Part III: Keeping and Sharing
Your Photos ...131
Chapter 12: Choosing and Using a Printer ...133
Chapter 13: Organizing and Sharing Photos ...143
Part IV: Special Projects ...153
Chapter 14: Taking Close-Up Photos for eBay ...155
Chapter 15: Restoring Old Photos ...165
Chapter 16: Documenting Your Travels ...173
Chapter 17: Creative Mini-Projects ...181
Index...197
Contents at a Glance
Polar Coordinates
The image is bent around the inside or outside of a sphere. This is an extreme effect. The step-by-step procedure to employ this effect can be found in “Distort a Photo Around an Axis” in Chapter 10.
Chrome Filter
This filter gives images an embossed, chromed look. Choose an image that has bold objects rather than fussy detail for best results. The step-by-step procedure to employ this effect can be found in “Give a Photo a Chromed Metallic Look” in Chapter 10.
Colored Pencil Filter
This is a lovely fine art filter. Print the image on matte grey or off white paper for a spectacular print. The step-by-step procedure to employ this effect can be found in “Change a Photo to a Colored Pencil Drawing” in Chapter 10.
Lighting Effect
This is just one of many lighting effects that can dramatically improve a dull composition. The step-by-step procedure to employ this effect can be found in “Change Photo Lighting” in Chapter 10.
Wind Effect
The effect is in the medium range. Light “wind” can give the sense of motion and direction to an image. Try it on a moving bike or car. The step-by-step procedure to employ this effect can be found in “Blow Motion into Images” in Chapter 10.
Posterize Effect
Silk screen prints are evoked with this popular effect. Print the image on oversized white paper and add text for your own travel poster. The step-by-step procedure to employ this effect can be found in “Posterize an Image” in Chapter 7.
Color to Black and White
Conversion
One of the key strengths of digital photo-graphy is that the type of film can be changed after the photo has been taken. Print on sepia toned digital photo paper for an art photography look. See “Convert a Color Photo to Grayscale” in Chapter 8 for the step-by-step procedure.
Adjust Image Values
Don’t let poor photo-taking conditions make for unusable digital photos. With image editing software, you can easily adjust color hue and saturation, as well as brightness and contrast. Chapters 7 and 8 give you some insight into the tools and techniques available in Adobe Photoshop Elements.
Invert Positive to Negative
This filter can be used for a dramatic effect or it can be used to change scanned negatives to positive images for printing. To employ this effect, con-sult the steps in “Invert an Image’s Colors” in Chapter 6.
Lightened Image
A good example of an image rescued from the darkness. Digital photos capture more information than is first apparent. Procedures for fixing brightness problems in an image can be found in most image editing software. Check out the simple steps in “Adjust Image Brightness or Contrast” in Chapter 7.
Mosaic Tile Effect
The Mosaic Tile effect is a simple one to use for art prints. It prints well on large paper. Combine this with color enhancement filters for more dramatic prints. For the steps to implement this effect, see “Make a Photo Look Like a Mosaic” in Chapter 10.
Note Paper Effect
The Note Paper effect resembles a fine etching. Print it on rich matte paper and add a deeply matted frame. Check out the steps for achieving this effect in “Make an Image Resemble Textured Paper” in Chapter 9.
Adding a New Sky
The sky can make the difference between a tossed-away photo and a picture postcard. Print the image on glossy postcard paper and mail it to friends. Find out how to add a new sky with “Add a Background Element from Another Photo” in Chapter 11.
Difference Clouds Effect
This is a dramatic effect that works well on images with interesting and rich textures. It can also be applied to skies for drama. The step-by-step instructions for this effect can be found in Chapter 10 in the task titled “Use the Difference Clouds Effect.”
Move People to a New Image
You can visit San Francisco without ever leaving Cleveland when you use Photoshop Elements to combine multiple images. Chapter 11 explains using layers to achieve effects like this.
Retouch a Damaged Photo
Photoshop Elements can be a first aid kit for favorite photos that have met with disaster. Some patience and practice are required to become expert at photo retouching. Don’t be afraid to use the Undo command. Chapter 8 provides tasks to repair image problems in Adobe Photoshop Elements.
Part I
Acquiring Digital Photos
Choose a Camera Form Factor
Style Comments Cost
Ultra Compact Size of a credit card, depth <1", $300–$1400 (average $400) fits comfortably in front jeans
pocket.
Subcompact Fits comfortably in shirt pocket. $200–$800 (average $300)
Point and Shoot Normal size automatic camera $40–$600 (average $300) that has more features for the
price than compacts (requires a camera bag).
Prosumer Size similar to SLR cameras. $600–$1200 (average $500) Usually lacks detachable lenses.
Single Lens For serious hobbyists and $800–$15,000 (average $1400) Reflex (SLR) professionals. High quality
cameras that look and function like 35mm cameras, including detachable lenses.
Buy the most camera your budget allows, but budget for the type and frequency of use. Buying a $5000 digital camera to take the occasional snapshot makes no sense. On the other hand, don’t trust a $15 throwaway to take the wedding or first baby pictures except in an emergency, in which case you should buy a throwaway film camera instead.
Figure 1-1:Subcompact camera
Figure 1-2:SLR camera
➟
6Chapter 1: Selecting a Camera and Accessories
Choose Camera Resolution
Megapixels What You Can Do with It Cost
<1 Acceptable Web graphics $30–$100
1-2 Very good Web graphics. Acceptable prints up $50–$350 to 4"×6"
2-3 Excellent Web graphics. Good prints up to 5"×7" $150–$400 3-4 Excellent prints up to 4"×6". Very good prints $200–$500
up to 10"×12"
4-5 Excellent prints up to 5"×7". Very good prints $250–$600 up to 11"×14"
5-6 Excellent prints up to 8"×10". Very good prints $400–$750 up to 16"×20"
>6 Excellent prints up to 16"×20" and beyond $800–$15,000 Bigger is better when it comes to resolution. You can always set your camera to take smaller resolution photos, but you can’t increase the camera’s maximum resolution. Buy the highest resolution camera you can afford that also has the other features you desire. On the other hand, balance is the watchword. Many professional photographers use 4 to 6 megapixel cameras on a daily basis.
Figure 1-3:An 8"×10" print taken from a 1-megapixel camera
Figure 1-4:An 8"×10" print taken from a 5-megapixel camera
➟
7Choose Camera Resolution
Evaluate Lens Features
Lens Feature Comments
Focal length The focal length of a lens is the distance between the optical cen-ter of the lens and the place where it focuses its image (film or digital CCD chip) and is expressed in millimeters. This determines the area of coverage from narrow to wide. Digital cameras gener-ally rate their focal lengths as equivalent to 35mm film camera lenses.
20mm or less = Extreme Wide Angle
24mm to 35mm = Wide Angle
50mm to 80mm = Normal
100mm to 300mm = Telephoto
400mm and above = Super Telephoto
Macro mode or lens This enables close-up photos of small objects. Good cameras have a macro mode built into their lenses.
Normal lens Usually a 55mm focal length equivalent and is the most com-monly used fixed lens.
Wide angle A lens less than 35mm focal length equivalent. It allows shooting a more inclusive image in tight spaces. Lenses much wider than 28mm are referred to as fish-eye lenses because of their image distortion.
Telephoto Lenses with more than 55mm focal length equivalent. These usu-ally range from 75mm to over 1000mm and are used to snap photos of subjects at a distance.
Zoom Zoom lenses have variable focal lengths and can be changed from wide angle to normal to telephoto. Digital cameras feature both optical and digital zooms. Optical zooms result in highest quality.
Figure 1-5:A shot taken with a lens with a wide focal length
Figure 1-6:The same shot taken with a lens with a narrow focal length
➟
8Chapter 1: Selecting a Camera and Accessories
Lens Feature Comments
Interchangeable Prosumer and professional cameras permit the use of different lenses lenses. These can range from wide angle to telephoto. Some
digi-tal cameras allow the use of the same manufacturers film camera lenses for flexibility.
Lens extenders These are available to multiply the magnification of zoom or macro lenses. They attach to the camera’s lens. Some cameras don’t accept extenders.
Filters Better quality cameras allow the use of filters on the end of the camera lens. These can compensate for light color differences and can create special effects.
Most digital cameras, from consumer to prosumer, come with non-changeable optical zoom lenses. Most also have digital zoom fea-tures. Buy the camera with the largest zoom ratio you can afford. They range from 1.2x to 10x or more.
To see more examples of the effect of different focal lengths, point your browser to www.usa.canon.com/html/ eflenses/lens101/focallength/.
Figure 1-7:A variety of detachable lenses
Figure 1-8:A lens extender goes between the camera and lens
➟
9Evaluate Lens Features
Evaluate Picture Storage Solutions
Media Type Sizes Available Comments
Floppy Disk 1.44MB Sony made floppy disk-based cameras for a while. These have generally been replaced by CD-ROM or memory cards.
CD-ROM 156MB Some cameras have onboard CD-ROM burners. These are slow to save images.
Compact Flash 16, 32, 64, 128, Most common memory storage for digital Card Type I & II 256, 512MB; 1GB cameras and PDAs. This is the largest format.
Memory Stick 32, 64, 128, 256, Sony’s memory solution that is interoperable 512MB; 1GB with a wide range of Sony products.
Smart Media 32, 64, 128, Olympus and Fuji primarily use this memory Card 256MB type. They have started to use XD memory.
MMC Card 32, 64, 128, They lack security facilities and are usually 256MB compatible with devices using SD cards.
SD Card 64, 128, 256, These are also a widely used storage card 512MB; 1GB format.
XD Card 32, 64, 128, 256, XD are recent innovations and store images 512MB faster than earlier formats. This memory type is
largely specific to Olympus and Fuji cameras.
Some camera models, Sony for example, use floppy disks or CD-ROMs as alternative storage systems for digital photos. Many of these cameras now also support memory cards or sticks of at least one format. Some cameras accept more than one memory card for-mat. Both of these alternatives can add flexibility in the field. Storage media can store approximately 25 pictures at 1600–1200 resolution per 16MB. So a 128MB card can store approximately 100 pictures.
Figure 1-9:Typical card storage devices
Figure 1-10:Inserting storage card in camera
32
MB16
MB➟
10Chapter 1: Selecting a Camera and Accessories
Evaluate Zoom Lenses
Feature Comments
Optical Optical zoom uses the lens mechanism to change the focal length of the lens and allows the lens to zoom closer or farther away from the subject. Optical zoom maintains its quality at all levels. This is the most important type of zoom in a digital camera. A 10x zoom on a digital camera is roughly the equivalent of a 28mm to 200mm zoom lens on a 35mm film camera. The zoom factor of most optical zoom lenses ranges from 1.2x to 10x.
Digital Digital zoom does much the same thing as zoom in Photoshop. The camera selects part of the digital image and saves only that part of the photo. Digital zoom reduces the actual resolution of your image, increases noise, and emphasizes shaky camera syndrome. Avoid using digital zoom if possible. If you need to accomplish a digital zoom effect, cropping the best photo you can get in Photoshop later is best. Digital zooms range from 2x to 10x.
Zoom Ratio The difference between the size of the image that is projected onto the film at the widest (or smallest focal length) setting of a zoom lens and the size at the narrowest (or longest focal length). A 10x zoom lens magnifies the image in the narrow end of the lens exactly 10 times as much as the image at the wide-angle end.
Figure 1-11:Subject at normal range
Figure 1-12:Same subject at 9x optical zoom
➟
11Evaluate Zoom Lenses
Choose a Tripod
Type Weight Comments
Still photo A tripod designed for still photography is designed to position the camera and then lock it into place. Stability and durability are key factors.
Light Good for point-and-shoot cameras.
Medium Good for all weight cameras.
Pro Good for pro and prosumer cameras. Has extra features, such as levels and fancy angle adjustments.
Video A video tripod is designed to
steady the camcorder and allow smooth pans and other camera movements as well as a stable platform when the camera is locked down.
Table top Good for subcompact and for
close-up photography.
Monopod Light to Heavy The monopod is a single tripod leg that you can attach a cam-era to. It doesn’t stand by itself but works well to stabilize a shot and is ultra portable.
Figure 1-13:A lightweight tripod
Figure 1-14:A monopod
➟
12Chapter 1: Selecting a Camera and Accessories
Evaluate Camera Power Solutions
Battery Type Comments
Alkaline Alkaline batteries come in all standard sizes. If your camera uses a standard sized battery, it’s probably AA. Alkaline batteries in cameras used with a flash last only a few photos. This is an expen-sive solution for frequent use.
Lithium Disposable batteries. These may be called “photo batteries.” They last well but are very expensive. The are available in most formats.
Nickel Cadmium Rechargeable. These must be fully discharged before recharging to avoid “charge memory” and poor performance. Be careful not to overcharge.
NiMH (Nickel-Metal Nickel-Metal Hydride are excellent batteries and are rechargeable. Hydride) These are the best value. They come in all standard sizes. Many
proprietary batteries used in digital cameras are NiMH. These are powerful batteries and last about 400 charges.
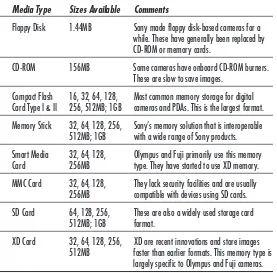
Lion (Lithium Ion) Lithium ion batteries are a good choice. They don’t have “charge memory” and they last twice as long as NiMH batteries. These are usually after-market optional batteries and are purchased as extras. These are newer and not as widely available. They last about 400 charges.
External battery You can power some cameras through the AC power socket using packs external battery packs. These come in many of the previous
for-mats. These can be much larger with greater storage capacity. Clip them to your belt with a wire running to the camera. These are great on vacations or long shoots like weddings.
More expensive cameras may use proprietary batteries rather than standard AA, AAA, and so on. This means that you must purchase the manufacturers’ batteries or after-market batteries designed for your camera when you need extras or replacements.
Figure 1-15:Loading a lithium ion battery
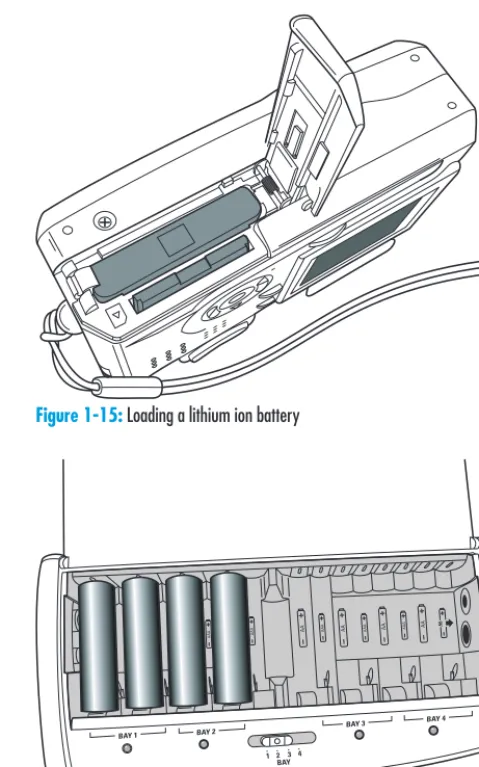
Figure 1-16:Loading batteries into a camera with AA batteries
➟
13Evaluate Camera Power Solutions
Evaluate Supported Output Formats
Format Compression Comments
JPEG Lossy This file format is the most common. It’s universally recognized. You can select the amount of compres-sion and subsequent quality or loss of quality in the camera or in the computer.
TIFF Lossless TIFF is a standard photo or digital publishing format. It can be somewhat compressed but in order to lose no quality, the amount of compression is limited. This is a good finished file format and retains high image quality. You can select to shoot TIFF photos with many cameras.
CCD RAW Lossless You can set the more expensive prosumer and pro-fessional cameras to save the data directly from the CCD chip in the camera. This saves a huge amount of image information and is used by professional pho-tographers and graphic artists to gain maximum image quality and flexibility. It’s a very large file and severely limits the number of images that can be stored on common memory cards.
When a lossless compression image is uncompressed, its quality matches the original source. Lossy compression degrades images to some degree, and more compression equals more image loss. Use the least compression you can for the original image. You can always compress it more with editing software.
Figure 1-17:A JPEG stored without compression
Figure 1-18:The same shot with high compression
➟
14Chapter 1: Selecting a Camera and Accessories
Review Image Statistics
Image Type Image Size File Print # on # on Size Size 32MB Card 1GB Card
RAW 2272x1704 3.3MB 11x8.5 10 359
TIFF 2272x1704 3.3MB 11x8.5 10 359
Super Fine JPEG 2272x1704 2.2MB 11x8.5 14 512
Fine JPEG 2272x1704 1.4MB 11x8.5 27 910
Normal JPEG 2272x1704 .76MB 11x8.5 54 1726
Fine JPEG 1600x1200 .76MB 8x6 54 1726
Fine JPEG 1024x768 .28MB 5x4 94 2981
Fine JPEG 640x480 .12MB 3x2.5 196 5466
Use this table to determine the amount of memory required to store images of various sizes. You can easily plan memory needs for a vacation or photo shoot.
Figure 1-19:Choose a low resolution, such as 640x480 if you only want to e-mail your photo
Figure 1-20:Choose a high-resolution setting with no (or low) compression for photos that you want to print and frame
➟
15Review Image Statistics
Evaluate Camera Functions
Function (Mode) How to Use It Comments
Automatic Both aperture and shutter speed are set automatically.
Exposure A dial or control that allows This is used to lighten or Compensation you to increase or decrease darken an image.
the exposure one or two stops.
Shutter Priority The shutter speed is set Good for sports shots. manually and the camera
automatically sets the aperture.
Aperture priority The aperture is set Good to control the depth manually and the camera of field in close-up shots. automatically sets the
shutter speed.
Burst mode Shoots a “burst” or group Good when you need to of photos rapidly and take several shot to assure automatically. one is good as in a
wedding or sport events.
Time-lapse mode Sets the camera to Good for nature photos. automatically shoot an
image at a set interval.
Video mode Allows the recording of short limited resolution video clips.
Manual Allows you to set all the controls manually.
Figure 1-21:Exposure compensation can clean up overexposed photos like this
Figure 1-22:Aperture priority allows you to shorten depth of field in a close up
➟
16Chapter 1: Selecting a Camera and Accessories
Function (Mode) How to Use It Comments
Fixed Focus Simple camera lenses that Found only in inexpensive can’t be manually or and disposable cameras. automatically focused.
Automatic Focus The camera adjusts the Better cameras allow you focus automatically. to turn off this feature to
allow manual focus.
Manual Focus You manually focus the Good for busy pictures and camera. patient photographers.
Focus & Exposure The camera automatically Lock sets the focus and exposure
when you hold down the shutter button while pointing to the subject.
White Balance The camera adjusts the Maintains color accuracy in image to compensate for daylight, fluorescent, and differences in light. incandescent lighting
situations.
Sport Automatically presets the camera for sports photos.
Portrait Automatically presets the camera for portraits.
Landscape Automatically presets the camera for landscape shots.
Choosing a camera is always a compromise. Choose the feature set that addresses most of your needs or those you anticipate.
Figure 1-23:Shutter priority allows you to stop the action
Figure 1-24:Manual focus enables you to focus on something not in the
center of the picture
➟
17Evaluate Camera Functions
Evaluate Image Transfer Solutions
Mode Rate Comments
Direct Transfer from 150Kbsec–2Mbsec This is easy but the slowest way to memory cards transfer large numbers of photos. A
full 128MB memory card takes 2–4 minutes to transfer to your hard drive.
Infrared Connection 4Mbsec This is a faster connection but most cameras don’t support it. A full 128MB memory card takes 30 seconds to transfer to your hard drive.
USB cable 12Mbsec This is the most common connection USB 2.0 = and as fast as most people need. A 480Mbsec full 128MB memory card takes 10
seconds to transfer to your hard drive.
IEEE 1394 (Firewire) 100–400Mbsec This is the fastest connection but depends on the network speed.
File transfer speeds in real life are slower because of the nature of opening and transferring individual files by Microsoft Windows.
Figure 1-25:A card reader
Figure 1-26:A USB cable connecting the camera and computer
1.0
➟
18Chapter 1: Selecting a Camera and Accessories
Evaluate Supported Camera
Technologies
Technology What It Does Comments
PictBridge Allows a camera to plug directly Becoming available in new into a supported printer. cameras and printers. It can be
handy for portable printers.
Exif 2.1 The current standard physical Stores additional camera and file format used in most digital other information beyond the cameras. JPEG image information. The
physical file format is read by the software used to view and edit the photos.
Exif 2.2 The newest physical file format. Includes a file header portion Not yet widely used. specifically designed to be
inter-preted by printer drivers and printers, which enables them to synchronize before printing.
PIM Print Image Matching. Saves A proprietary Epson technology image information that assists that’s not yet widely available printing more accurately. outside Epson products. Exif 2.2
is a new industrywide standard addressing the same issues.
PictBridge and PIM are the only two of these technologies that you need to consider in choosing a camera. The others are a function of the state of the art at the time you purchase a camera. Because of the rapid development of new technology, choosing a new camera and a recent model is always best when purchasing digital cameras.
Figure 1-27:PictBridge allows you to print directly to a printer
Figure 1-28:Exif 2.2 and PIM give the printer better information about the photo
➟
19Evaluate Supported Camera Technologies
Choose Flash Features
Feature What It Does Comments
Flash range Maximum range in which the Expressed in feet or meters. flash is effective.
Auto mode Turns the flash on when it’s Good feature. needed.
Auto mode off Allows you to override auto Important feature for better
flash. cameras.
Fill or forced mode Flash fires even when there is Good for portraits. enough light to fill in shadows.
Slow sync mode Allows the adjustment of relative This is an advanced tool. brightness of foreground subject
with the background.
Red-eye reduction Fires an initial flash to close the This is great for portraits and subjects iris before taking the group shots.
photo to prevent red eye.
Hot shoe connector Allows the use of external flash. This allows for maximum flexibility.
The more expensive the camera, the more features you find. Choose the minimum set for your needs and budget.
Figure 1-29:An external flash
Figure 1-30:A hot shoe connector
➟
20Chapter 1: Selecting a Camera and Accessories
Choose Other Features
Feature Comments
Size and weight A heavier camera is easer to hold steady, but a lighter camera is easier to store and carry. Prosumer cameras split the difference between size and features.
Panoramic Some digital cameras can capture a single-image panorama; others feature multiple-image panorama that you can assemble in the computer later.
Multiple exposures Takes a preset number of images when you hold the button.
Tripod mount Allows you to attach a tripod to the camera.
Self-timer Camera automatically shoots after a set period of time.
Remote control Camera may be set and operated from a distance.
Date/time indicators Stamps the header of images with the time and date the photo was shot. This information doesn’t show up on the image but the camera or software displays it while being viewed.
Sound recording Enables the recording of audio notes or comments with the camera’s built-in microphone.
(continued)
Figure 1-31:A prosumer camera splits the difference between size, cost, and performance
Figure 1-32:A tripod mount is necessary to use a tripod
➟
21Choose Other Features
Feature Comments
Software Most digital cameras are bundled with editing and other software. The software supplied might be a factor when choosing a camera.
LCD viewfinder Better cameras include these. Choose the largest available. These use battery power.
Eyepiece viewfinders Most cameras have these even if they have LCD viewfinders. These work best in bright light. They also increase battery life.
Through the lens viewing Single lens reflex professional cameras allow view-ing directly through the camera lens. This is the most accurate view.
No ultimate camera exists for everyone. In the end, you must choose the camera that you like best and that does what you want it to do.
Figure 1-33:An LCD viewfinder allows you to see exactly what the picture will look like
Figure 1-34:How you view the object through the lens of an SLR camera
MENU SET
DISP 101-0124
5/5
AWB
CM
17/05/2000 12:22
1 3
➟
22Chapter 1: Selecting a Camera and Accessories
Choose Other Accessories
Accessory What It’s Used For Comments
Camera bag To carry and protect camera. Don’t get one too large or small; waterproof is good.
Lens cloth Clean the lens without scratches.
LCD shield Shield the LCD viewfinder from Not available for all bright sunlight. cameras.
Battery charger Charge rechargeable batteries. Comes with cameras that use rechargeable batteries. If your camera uses AA or similar batter-ies you may need to supply your own recharger.
Card reader Attaches to a computer via USB Most work with multiple card port and copies images from formats. Make sure you choose memory cards onto a computer. one that includes the card or
cards you use. Many new com-puters come with these built in.
Straps Prevents dropping your camera. Usually supplied with cameras. You might purchase heavier duty straps or more comfortable ones.
Many of us enjoy the study, acquisition, and occasional use of photo stuff. You don’t need to get carried away with unnecessary acces-sories to become a good digital photographer. You can always use an old briefcase as a camera case!
Figure 1-35:A camera bag is necessary for larger cameras
Figure 1-36:An LCD shield blocks out sunlight to reduce glare
➟
23Choose Other Accessories
➟
24Chapter 1: Selecting a Camera and Accessories
Set Up Your Camera
1. Install batteries in the camera according to the camera’s instruction manual. Figure 2-1 shows a typical lithium ion battery and a AA battery.
The decision as to the kind of battery that your camera takes is an important one. Rechargeable AA batteries don’t hold a charge as long as lithium ion batteries, particularly in flash photography, but the ability to buy AA batteries almost anywhere can be important on vacations if your battery runs out.
2. Install memory in the camera according to the camera’s instruction manual. See Figure 2-2 for an example of installing memory and a lithium ion battery in a typical camera. Figure 2-3 shows the battery and memory card installed.
3. Using the camera’s menu, set the time and date of your camera.
4. Set compression settings to meet your needs. Most cam-eras have three or more settings:
• Best:Uses the least possible compression for the best possible image quality. Requires more memory to store each image.
• Standard:Splits the difference between image size and quality.
• Economy: Highest amount of compression results in more noise in the image but allows for storage of more pictures.
5. Set resolution settings to meet your immediate needs.
Figure 2-1:Typical memory and battery
Figure 2-2:Installing a battery and memory
➟
26Chapter 2: Setting Up and Using the Camera
Zoom In on an Object
1. Activate the zoom button or lever on your camera to zoom in or out to change your optical zoom level. The quality of the photo is identical whether the lens is zoomed or not when you use optical zoom. Figures 2-5 and 2-6 show a shot before and after using optical zoom.
2. If you want to zoom further using digital zoom, turn the digital zoom feature on in your camera’s setup menu.
Most cameras that support both optical and digital zoom first zoom as far as they can optically, as indicated by a message in the view-finder or on the LED screen. When the extent of the zoom has reached optically, the message indicates the digital zoom is taking effect and continues to zoom beyond the optical limits.
Adjust Brightness in Program Mode
1. Set the mode dial (or buttons) on your camera to the Program mode.
In Program mode, your camera adjusts both the shutter speed and aperture based on the brightness of the key object in the viewfinder. The white balance, light meter, and exposure compensation is gener-ally adjustable. See your user manual for instructions on adjusting these settings for your particular camera.
2. Compose your shot in the viewfinder or by looking at the LED screen.
3. Press the shutter button down halfway to allow the cam-era to adjust. The camcam-era provides an audible or visible signal that it’s ready to take your picture.
4. Press the button down fully to take your photo.
Figure 2-5:A shot with lens zoomed out
Figure 2-6:The same shot with lens zoomed in
➟
28Chapter 2: Setting Up and Using the Camera
Snap a Portrait Using
Automatic Settings
1. Set the mode dial or buttons on your camera to the Portrait mode.
In Portrait mode, your camera automatically adjusts the shutter speed and aperture setting to make people stand out and to keep the background in focus. In addition, cameras equipped with a red-eye reducing flash employ that setting in Portrait mode.
2. Compose your shot in the viewfinder or using the LED screen.
3. Press the shutter button down halfway to allow the cam-era to adjust.
4. Press the button down fully to take your photo. Figure 2-7 shows a portrait taken in this fashion.
Stop Action Using Automatic Settings
1. Set the mode dial or buttons on your camera to the Sport mode.
In Sport mode, your camera automatically adjusts the shutter speed and Aperture setting to work best with fast-moving subjects and the prevailing light conditions.
2. Compose your shot in the viewfinder or using the LED screen.
3. Press the shutter button down halfway to allow the cam-era to adjust.
4. Press the button down fully to take your photo. Figure 2-8 shows a stop-action photo.
Figure 2-7:A portrait
Figure 2-8:A sports action photo
➟
29Stop Action Using Automatic Settings
Reduce Battery Usage
1. To set your camera in battery saving mode, access the camera setup menu. Most cameras have settings for the following options:
• LED on and off:Shuts the LED display off. You can shoot in this mode using the viewfinder and save power.
• LED brightness:If you turn the brightness down, it conserves energy.
• Flash on and off:The flash takes a lot of power. Turn it off if you’re shooting outdoors.
• Auto power shut-off:Automatically turns the camera power off after an interval to save power.
2. Choose the settings for your situation and save them to memory.
Turn off your camera’s power whenever you’re not using it. Also remember to carry spare, recharged batteries with you.
Use a Tripod
1. Most tripods include a quick connect plate. Attach the camera to the quick connect plate.
2. Adjust the legs of the tripod to the height you wish to use.
3. Adjust the head and camera angle until you achieve the view you want and snap your photos, as shown in Figures 2-10 and 2-11.
Figure 2-10:Shooting a horizontal picture on a tripod
Figure 2-11:Shooting a vertical picture on a tripod
➟
31Use a Tripod
Use a Flash Attachment
1. Select the appropriate flash for your needs. Virtually all digital cameras, except the most professional, come with a built-in flash. Midrange and professional cameras usu-ally allow the addition of external flashes, as illustrated in Figure 2-12.
Built-in flashes are easy to use and convenient. The down side is their limited range and fixed position. Pointing an external flash slightly away from the subject can eliminate red eye, washed-out shadows, and flattened textures. Use these larger flashes when the shot requires more light or more control of the light. Reposition flashes when you need to; if it’s connected with cables, hold the flash by hand for more flexibility.
2. Attach the flash to your camera. Several attachment options on those digital cameras are capable of using external flashes. They are
• Hot shoe:The top of most better cameras comes with an accessory shoe, illustrated in Figure 2-13, that has a power and control connection when the flash is snapped into the shoe. Cameras with “cold” or unpowered accessory shoes require the use of a cable from the flash to the camera.
• Sync Connector:Most cameras with external flash capability can accept a flash mounted on a special bracket that fastens to the tripod socket on the bot-tom of the camera. Connect these flashes to power and the camera controls with a supplied cable.
3. Adjust the camera setting to recognize and adjust for the use of external flash attachments.
4. Take photos as you normally do.
Figure 2-12:A typical consumer flash attachment
Figure 2-13:A connector for an external flash
➟
32Chapter 2: Setting Up and Using the Camera
Use Attachment Lenses
1. Select attachment lenses to meet your needs.
The normal zoom lenses that come with digital cameras have limi-tations. Inexpensive consumer cameras leave you nothing to do about this but to upgrade to a better camera. More expensive cam-eras allow you to use lens extenders or to exchange lenses to expand the limits, as shown in Figure 2-14.
The types of attachment lenses are
• Wide angle lenses:These attachments change the “normal” focal length lenses into wide angle lenses. These are not true wide angle lenses, but expand the width perspective of digital cameras.
When using a wide angle extender, make sure that you set the nor-mal zoom to the widest setting to maximize the effect.
• Telephoto lenses:These change “normal” lenses into telephoto lenses. They function as telephoto lens adapters. They narrow the frame of the lens and bring distant objects closer.
When you use telephoto adapters, set the normal zoom lens to the longest setting to maximize the telephoto effect.
• Close-up lenses:These enable macro or super– close-up shots. They screw on the front of cameras with lens extension features. In many cases multiple adapters can be ganged to adjust the macro capacity of the camera.
2. Attach the lens extender to the normal lens, as shown in Figure 2-15, and shoot photos normally.
Figure 2-14:Typical add-on lenses
Figure 2-15:A lens attached to a camera
➟
33Use Attachment Lenses
➟
34Chapter 2: Setting Up and Using the Camera
Compose Your Photograph
1. Decide on your main point of interest and try to frame your picture to eliminate elements that may distract from your subject (unless the picture is of a general landscape or crowd scene where everything is part of the subject, as shown in Figure 3-1).
Signs, extra people, trash, or bright colors are especially distracting elements that you should try to eliminate. In essence, your photo is a mini-story — make sure the story you’re telling comes through to the viewer. Edit as you shoot!
2. Hold the camera to take best advantage of the subject: • Horizontal subject:If you’re shooting a horizontal subject such as a landscape, group of people, and so on, hold the camera horizontally.
• Vertical subject: If you’re shooting a tall tree or building, the picture is much more dramatic if you turn the camera so that it’s vertical.
3. Adjust the picture’s composition by shifting the camera from side to side or up or down. Don’t hesitate to stand on something to get a higher shot or squat down to get a lower one. Just don’t do anything dangerous!
Change your position and viewpoint so that your picture follows the rule of thirds. Imagine a tick-tack-toe grid superimposed over your picture frame. Make sure that your main point of interest is not in the center square, but rather is placed at one of the intersections of the grid as shown in Figure 3-2.
Figure 3-1:A crowd scene has no particular focus of interest
Figure 3-2:If you point to the center of this image, you find that everything of interest is off-center
➟
36Chapter 3: Snapping Digital Pictures
4. Look through the camera’s viewfinder or look at the LCD screen to compose your photograph. Keep the fol-lowing general composition rules in mind:
• Aim for the eyes.When you’re taking pictures of peo-ple, shooting at the subject’s eye level is usually best, even if you must stoop down or climb up to do so.
• Avoid bull’s-eyes.Pictures are much more interesting and dramatic if the main point of interest is off-center, as shown in Figure 3-3.
• Avoid the center horizon line.In landscapes, angle the camera so the horizon line is not in the center of the picture. A horizon above center makes the scene appear close. A horizon below center emphasizes the sky or the distance.
• Use leading lines to create movement and establish mood.See Figure 3-4. Fences, roads, lines of trees, railroad tracks, and even lines of people can lead the viewer’s eye toward the point of interest.
• Establish scale in a photograph, such as a land-scape, by including a person or object in the fore-ground.Frame a scene by including a visible doorway or gate, or show overhanging branches at the edge of the scene to create depth and drama.
• Get in close.The most common mistake of begin-ning photographers is failing to get close to the subject.
• Fill the frame.Make sure that the most important object or person, the one that you are taking the pic-ture of, is the most prominent in the frame.
Figure 3-3:The subject is on the right one-third line in the rule of thirds
Figure 3-4:Leading lines add focus and drama
➟
37Compose Your Photograph
Frame a Stationary Subject
1. Frame a stationary shot by pointing your camera at a subject and looking through the viewfinder. (You can also use the LCD viewer.)
2. Locate the marks around the edge of the frame in the viewfinder, indicating exactly what part of the image is in the picture (what the camera lens sees differs a little from what the viewfinder sees). If you see a second set of frame lines, they are for closeup photos.
The problem of the wandering image is called parallax, and it’s most noticeable when you take a close-up. The viewfinder of most digital cameras is placed above or on the side of the lens. The image in the viewfinder does not always accurately reflect the actual image you’re capturing. The inner frame marks compensate for closeup photography. Try some test shots and adjust the view-finder to compensate for the slight shift. Doing so assures that the picture you take is the one you want. The LCD screen reflects the actual image being captured.
3. Shift the camera position until the subject appears within the framing marks.
4. Pause and make sure that the image is in focus and that the lighting is appropriate.
5. Snap the picture and review it to make sure the subject is completely in the picture.
If the image is badly positioned, as shown in Figure 3-5, delete the picture from memory. Then shift the subject’s position in the view-finder by moving the camera or by moving your own position and try again until you get a well-placed image, as shown in Figure 3-6.
Figure 3-5:A poorly framed subject
Figure 3-6:A well-framed subject
➟
38Chapter 3: Snapping Digital Pictures
Focus the Camera
1. Most digital cameras have autofocusing. And a few are
fixed focusmodels, which can’t be adjusted but are prefo-cused for subjects at distances from about five feet to infinity. Other cameras have manual focus settings, which usually are for infinity, mid-distance, and closeup. The mid-distance setting is safe for most picture taking.
In lieu of a mid-distance setting, your camera may offer a Landscape setting.
2. Choose the subject of the photo. The mid-distance set-ting is effective for shots such as a street sculpture, a house, or a field with horses.
If your camera has a manual focus feature, then you can use it to manually set the focus. Select the Manual Focus feature according to your camera’s instruction manual.
3. Take your picture and review it for focus. If the main part of the image is fuzzy, as shown in Figure 3-7, the subject is either too far or too near for the mid-distance setting.
4. To adjust the focus, change your position relative to the subject as necessary until what you want to take a pic-ture of is in focus, as seen in Figure 3-8.
Most manual focus camera lenses focus either by rotating a focus ring on the lens or moving the lens tube in or out. Use the proper method to focus the camera. For another way to outwit autofocus, see the next task.
5. Take your shot.
Figure 3-7:The subject is too far away to be in focus
Figure 3-8:Moving in brings the subject into focus
➟
39Focus the Camera
Move the Subject Out of the
Center with Focus Lock
1. Select the Autofocus feature according to your camera’s instruction manual. Use this setting for close-ups and for near subjects, as shown in Figures 3-9 and 3-10, respectively.
Autofocus cameras choose the dominant object or person in the cen-ter of the screen. People at the edge of the photo may not be in focus. You can overcome this deficiency using focus lock. This feature allows you to point the camera at a subject outside of the picture center to focus the lens and then hold or lock that focus when you reframe the camera to include more dominant subjects in the pic-ture center.
2. Frame your subject in the viewfinder and note the auto-focusing target in the center of the viewfinder (usually an Xor a cross).
3. Depress the shutter release button halfway and wait until the camera adjusts its focus on the subject. When the image is focused, the camera either beeps or a light appears.
4. Keep the shutter button halfway depressed and reframe your picture with the subject anywhere in the frame.
5. When the picture is properly framed, depress the shutter button fully to snap the photo and review your picture.
Figure 3-9:A close-up shot
Figure 3-10:A near distance shot
➟
40Chapter 3: Snapping Digital Pictures
Shoot a Portrait Indoors
1. Set your camera to Portrait mode.
2. Choose a subject — a person or object.
3. Place your subject to eliminate the kind of background clutter shown in Figure 3-13. You can also change your own position so the clutter is not visible.
Any photo with a subject is improved if the background is uniform and contrasting rather than busy and confusing.
4. Reposition yourself so that no small area of bright light, such as a reflection from a window or from a shiny sur-face like the subject’s eyeglasses (called a hot spot), is vis-ible in the frame.
If you can’t move to eliminate the hot spot, use something to block the glare — a shade or curtain, for example.
5. Take the picture and review it for adequate lighting. If the picture’s too dark, turn the flash feature on and take the picture again using the flash to fill in detail. Because elec-tronic flash and daylight are the same color light, they can be used together for natural-looking illumination.
When using a flash to fill in details, be careful not to photograph a subject who wears glasses directly from the front. Photographing from an angle, as shown in Figure 3-14, avoids creating a hot spot with the flash.
Figure 3-13:Background clutter distracts from the subject
Figure 3-14:Use the flash to fill in detail for a portrait, being careful to avoid hot spots
➟
42Chapter 3: Snapping Digital Pictures
Shoot a Portrait Outdoors
1. Set your camera to Portrait mode.
A common problem when shooting people outdoors is lighting. When the sun or a bright background, such as a light colored build-ing is behind a subject, the automatic aperture frequently adjusts to the background rather than the face, as shown in Figure 3-15.
2. If possible, position your subjects so that the available sunlight falls on their faces. Doing so helps to assure that the face stands out in the picture. However, if the sun is directly overhead it may produce unattractive dark eye sockets.
Try using side light from the sun or other strong source. This can result in dramatic shadows or a soft halo effect. Avoid midday light-ing if possible. Strong sunlight is a time to try side or backlightlight-ing.
3. If the light is strong behind your subject, use the flash to brighten your subject’s face, as shown in Figure 3-16. The flash helps to avoid the common problem of a dark foreground in backlit pictures.
Using the flash is particularly good for head-and-shoulders por-traits, since the flash fill in the face plus the sunlight produces an attractive halo around the subject’s hair. If your camera has a
cen-ter spotlight meter mode, use it for flash-fill portraits.
Your flash may be automatic, but in Automatic mode, it flashes only when the camera calculates that you need more light. When using a flash outdoors or in a brightly lit room, you likely need to turn it on manually rather than depending on the Automatic Flash function.
4. Make sure your subjects don’t squint at the sun.
5. Take the picture!
Figure 3-15:The camera calculates the aperture based on the background lighting, leaving the subjects in the dark
Figure 3-16:The flash compensates for the lighting problem
➟
43Shoot a Portrait Outdoors
Snap a Landscape Picture
1. Set your camera to Landscape mode.
2. Shoot landscape pictures early morning or late in the afternoon as the lighting is best at these times for attrac-tive landscape pictures.
Keeping the sun behind you at about a 45-degree angle is usually best. This results in good shadows and modeling of faces. On the other hand, you can shoot great dramatic photos with the sun in the photo. Find ways to screen or block the direct image of the sun with foliage, people, buildings, and so on. This results in a dramatic halo effect.
3. Hold the camera horizontally, in general.
Normally, landscapes call for a horizontal picture, but you may want to hold the camera vertically if your subject is a tall tree or something similar, as shown in Figure 3-17.
4. Choose a main point of interest in the scene, such as a cow in a field or a red barn.
5. If leading lines are available — fences, lines of trees, or roads that lead toward the point of interest — place yourself so these lines direct the eye toward the subject.
6. Following the rule of thirds, move the camera until the point of interest falls along one of the imaginary lines, being careful it does not occupy the center square of your grid.
7. Lift or lower the camera until the horizon line is either above or below the center of the frame, as shown in Figure 3-18.
8. Take the picture! Review it to make sure your composi-tion follows all the main composicomposi-tional rules and is pleasing to the eye.
Figure 3-17:Most landscapes are horizontal, but tall trees call for holding the camera vertically
Figure 3-18:A scene with the horizon line above the midpoint of the photo
➟
44Chapter 3: Snapping Digital Pictures
Photograph Pets and Animals
1. Get as close as possible to the animal.
Use a zoom or telephoto lens for photographing wild animals. Extremely small animals, such a birds, require the use of a strong telephoto lens (such as a 200mm or greater focal length) to fill the frame from 20 feet away. Bird photographers can expect to spend more money on equipment because of the need for an interchange-able zoom lens and a camera body and tripod that can support it.
2. Snap photos that show something characteristic of the animal. A kitten playing with yarn or ribbon, as shown in Figure 3-19, or a cat stalking a bug shows off the pet and speaks volumes about its personality.
3. Aim for an appropriate background. A shot of a cat stalking a bug is much more effective in the backyard than in the kitchen.
4. Frame the pet as the dominant subject of the composi-tion, as shown in Figure 3-20.
Outdoor animal photography is a combination of planning, luck, and patience. Choose locations where you have a high probability of seeing the animal you want to photograph. Take the proper gear (such as a tripod and flash). Then wait patiently for that lucky shot to happen.
The photo is more interesting if it’s natural rather than artificial. Animals in a zoo cage can be compelling, but shots in zoo areas that replicate a natural environment tell more about the animal. Pets, on the other hand, photograph well in a domestic setting. A kitten play-ing under the edge of bedclothes or a dog sleepplay-ing at the master’s feet make great images.
Figure 3-19:A kitten playing with ribbon makes a great personality shot
Figure 3-20:A cat in the arms of its owner makes a natural context, but the subject here is definitely the pet
➟
45Photograph Pets and Animals
Shoot Scenic Nature
1. Decide whether your composition works better as a landscape, subject photo, or close-up and follow the composition rules for that particular type of photo.
Flower photos are the most popular outdoor close-ups. If you’re shooting flowers, choose the best and most interesting blossoms. Beautiful flowers make beautiful photos.
2. Pay attention to the background of your primary sub-ject. Avoid excessive leaves, your feet, or other distract-ing elements, as shown in Figure 3-21.
If you’re allowed, using a pair of clippers judiciously can improve a composition.
3. Use diffuse lighting to the greatest possible extent. If the daylight alone is not adequate, or if you have unwanted shad-ows, have a friend focus a reflector of white cardboard or foam core on the subject, as shown in Figure 3-22. If you need sharper light to accent shadows, cover the cardboard with aluminum foil for a budget reflector. Also available are small, wireless slave flash units that will fire at the same moment the camera’s built-in unit flashes. Professionals use these too!
4. Ensure that the background is uniform and doesn’t dis-tract from the subject.
If you need a background to accent or isolate a particular object or blossom, have someone hold a neutral color poster board behind the subject while you frame the shot.
Figure 3-21:The background of this photo is simplified to set off the subject
Figure 3-22:Using a homemade reflector to provide diffuse lighting
➟
46Chapter 3: Snapping Digital Pictures
5. Pay attention to depth of field ( that is, the size of the area that appears with acceptible sharpness in your framed subject).
You can increase the depth of field on automatic cameras by increas-ing the light on the subject. The automatic camera decreases the aper-ture opening accordingly.
6. Frame the subject.
When framing a shot, consider shooting from below. A flower against the sky can be a dramatic image.
7. Check the focus. If you’re using autofocus, prefocus the shot by holding the shutter release button halfway down for a second to allow autofocus to work, and then take advantage of focus lock to reframe the subject. Use manual focus if possible.
When shooting a group of flowers or objects, focus on one or two key subjects and let some be out of focus to form a background or texture for the composition.
8. Shoot close-ups of petals or leaves and create an abstract image, as shown in Figure 3-23.
Shoot a series of ultra-close-ups and create a set of framed abstract images for your home. Choose deep and lush mattes to surround the images. Try enhancing the images with Photoshop effects to accent the textures or shapes, as shown in Figure 3-24.
9. Bracket your shot by choosing the -2, 0, and +2 expo-sure value (EV) settings, if your camera is so equipped.
The world is composed of an infinite number of images. Go find and tame them — or at least, record them with your digital camera. It will open your eyes, mind, and heart!
Figure 3-23:An ultra close-up shot of a flower
Figure 3-24:The watercolor effect changes a close-up into abstract art to grace your walls
➟
47Shoot Scenic Nature
➟
48Chapter 3: Snapping Digital Pictures
Connect Your Camera or Card Reader
to a Computer
1. Connect the USB cable supplied with your camera or card reader to one of your computer’s USB ports.
If you receive a message stating that the port does not have enough power to sustain the camera connection, then you must connect the cable directly to the computer’s USB port rather than via a USB hub or USB port extension cord (which is shown in Figure 4-2). USB 2 is faster than USB 1.1.
If your computer does not have a USB port, then you can obtain a serial cable to use with your computer’s serial port.
2. Connect the USB cable to your camera, as shown in Figure 4-3, or to your card reader.
Each manufacturer has its own idea of the type of cables and con-nector formats to use. These cables may not be interchangeable among different products. Be sure to use the specified cable and refer to your equipment manuals for more detailed information.
3. If the Windows drivers for your camera or card reader are not installed on your computer, you must install them before your computer can recognize these devices.
You must switch some cameras to Connect mode or an equivalent mode before Windows recognizes the camera.
Figure 4-2:A USB cable connected to a USB hub
Figure 4-3:A USB cable connected to the camera
➟
51Connect Your Camera or Card Reader to a Computer
Install Camera or Card Reader Drivers
1. To install the drivers that enable your camera to work with Windows, choose Start➪Control Panel➪Printers and Other Hardware➪Scanners and Cameras➪Add an Imaging Device. The Scanner and Camera Installation Wizard opens with the Welcome screen.
For Windows XP to recognize your camera or card reader and allow you to access the photos on the memory card, you have to install the drivers that Windows needs to control the hookup. Windows generally recognizes and installs USB drivers for your digital camera or card reader automatically when you run the Scanner and Camera Installation Wizard.
2. Connect your camera or card reader to your computer (placing your camera in Connect mode if necessary) and then select the Automatic Port Detection option from the Available Ports list, as shown in Figure 4-4.
3. Click Next to open the Camera Selection window.
4. Search the Camera Manufacturer and Model lists and select your model; then click Next.
If your camera or card reader isn’t listed, then you need to install the driver from the disk supplied with your device. Place the disk in the appropriate drive and click the Have Disk button. The wizard walks you through the process.
5. Plug your digital camera’s or card reader’s USB cable into a USB-2 port on your computer and, if connecting to a camera, turn your camera’s power switch on. Click Next.
6. Type a name for your camera or device, as shown in Figure 4-5. Click Next.
7. To complete the Windows installation process, click Finished.
Figure 4-4:Choose the option to automatically scan all ports
Figure 4-5:Naming the camera driver icon
➟
52Chapter 4: Viewing and Transferring Images
Transfer Digital Images
to a Computer
1. To move the photos from your camera or card reader to the computer, plug your device’s USB cable into a USB-2 port.
2. Turn your camera’s power switch on (and place the camera in Connect mode, if necessary). Most card read-ers power up automatically.
3. Choose Start➪My Computer.
4. Choose the drive that represents the digital camera’s memory card storage, as shown in Figure 4-6.
Some memory cards show up with a device name; others show up, as in Figure 4-6, as a numbered external drive. You may need to check your indicated external drives by clicking the drive icon that contains the DCIM (Digital Camera Internal Memory) folder.
5. Double-click the DCIM folder and then double-click the appropriate folder containing your photos. The photos in this folder appear just as if they were in a directory on your hard drive, as shown in Figure 4-7.
6. Select the image you want to transfer to your computer. You can select multiple images by holding down the Control key and selecting more than one image to copy. To select all images, press Ctrl+A.
7. Choose Edit➪Copy to copy the image to the Clipboard. You can use the Move to Folder command to copy the images to your computer and delete them from the memory card at the same time.
8. Navigate to the folder you wish to transfer the file to and paste the image into the folder.
Figure 4-6:Your memory card drive may appear exactly like your other hard drives (though it’s usually last drive assigned)
Figure 4-7:Memory card picture folder
➟
53Transfer Digital Images to a Computer
Delete Camera Images from Windows
1. To delete unwanted photos from your camera or card reader by using the Windows interface, plug your digital camera’s or card reader’s USB cable into a USB-2 port on your computer.
2. Turn your camera’s power switch on (and place the camera in Connect mode, if necessary).
3. Choose Start➪My Computer to open the My Computer window.
4. Double-click the drive identified as the digital camera or card reader.
5. Open the DCIM folder and then open the appropriate folder containing your images. The photos on the mem-ory card display just as if they were on a directmem-ory on your hard drive.
Different cameras name the folder containing their images differ-ently. In Figure 4-8, my camera displays the folder as 100_PANA.
6. Select the image you wish to delete from your memory card folder, as shown in Figure 4-8.
You can select multiple images by holding down the Ctrl key and selecting more than one image to delete.
7. Choose File➪Delete to delete the image or images, as shown in Figure 4-9.
In Windows XP, you can also delete a file or files by clicking the Delete This File task within the File and Folder Tasks pane. The task is clearly marked with a bright red X. For all versions of Windows, you can delete pictures by highlighting them and pressing the Delete key on the keyboard.
Figure 4-8:Select a picture or pictures that you want to delete
Figure 4-9:Deleting an image by choosing File➪Delete
➟
54Chapter 4: Viewing and Transferring Images
Rename Photos
1. Renaming images is a frequent requirement as you work with an increasing collection of photos. In order to rename an image, select a photo in your photo folder, as shown in Figure 4-10.
2. Select the Rename This File task from the File and Folder Tasks pane, as shown in Figure 4-11. The filename under the image icon turns into a type-in box.
3. Type the new name for the file in the type-in box.
4. Click outside the type-in box (or press the Enter key) to lock in your change.
If you make a mistake while typing the new name, you can press the Escape key to return to the original name. This works only while the type-in box is active.
Windows XP also contains a simple (though limited) batch-renaming function, which automatically adds a serial number to the end of a group of files. To use it, choose File➪My Documents and navigate to the folder containing the photos. Select all the photos that you want to rename by Ctrl+clicking each file. Choose File➪Rename. Type in your convention (such as 20031125_thanksgiving) and press the Enter key. The files are renamed 20031125_thanksgiving (1), 20031125_thanksgiving (2), 20031125_thanksgiving (3), and so on.
To exert even more control over managing your pictures, see Chapter 12, which tells you how to use Adobe Photoshop Album to name, organize, and search for your pictures.
Figure 4-10:Selecting a file to rename
Figure 4-11:Type a new name here
➟
55Rename Photos
View and Manage Photos
1. Open any folder on your computer that contains pho-tos. You can have a folder on your hard drive or on a memory card plugged into the computer.
2. Choose View from the menu bar, as shown in Figure 4-12. A number of viewing options are available in the menu that appears. The options that specifically apply to displaying photos are:
• Filmstrip:This option, as shown in Figure 4-13, presents the photos in the directory as a filmstrip at the bottom of the screen with the selected photo in a window above. You can click through the slide-show using the forward and reverse buttons. You can also rotate the image using the left and right rotate button.
• Thumbnails:This option, as shown in Figure 4-14, presents the images as thumbnail representations of the photos. You can easily select images to open or move from thumbnails instead of relying exclusively on filenames.
3. Manage your photos using the Picture Tasks pane. This menu, located on the left side of the folder, contains a number of file management tools. Whenever photos are contained in the folder you are viewing, the Picture Tasks pane displays (refer to Figure 4-13). The tool options are:
• Get Pictures from Camera or Scanner:The Camera and Scanner Wizard opens, which assists you in scan-ning images or transferring images from your camera.
Figure 4-12:The View menu enables you to decide how to browse your photos
Figure 4-13:The Filmstrip view shows you the picture you’re viewing and its neighbors
➟
56Chapter 4: Viewing and Transferring Images
• View as a Slide Show:Creates a full-screen slideshow, as shown in Figure 4-15, from the images present in the open directory.
• Order Prints Online:This wizard guides you through the process of ordering prints from an online printing service that advertises with Microsoft.
• Print Pictures:This wizard guides you through the process of printing pictures on your printer.
• Copy All Items to CD:This wizard assists you in the process of burning a CD-ROM containing the pictures in the open directory.
From an open directory containing photos, you can rename the photos, create new directories to store photos, move photos into other directories, move to other folders on your computer, and per-form any other Windows file management function.
Find a naming convention that works for you and then use it con-sistently. If you don’t already favor a particular convention, try this one: Enter six digits for year and month (if you’re a real shutter-bug, then add two more digits for the day) and then a keyword or keywords. Separate the date and words with underscores, for example, 200311_thanksgiving. Using this convention, your photos are listed in date order when you view the filenames as a list, and the keyword can help you remember the occasion of the photos. Having your photos arranged in this way makes finding a photo easier than it is when you use the camera or scanner default nam-ing convention. If you don’t start usnam-ing a consistent method for naming your images, they soon become very difficult to find.
Figure 4-14:The Thumbnail view enables you to browse all the photos in a folder
Figure 4-15:The Slideshow view lets you see a slideshow of the photos in a folder
➟
57View and Manage Photos
➟
58Chapter 4: Viewing and Transferring Images
Scan a Photo Using Windows
Scanner Wizard
1. Place the photograph you wish to scan face up on your scanner glass plate and close