WORD PROCESSING
WORD
PROCESSING
O,N
THE
XEROX® 860
Jacklyn M. Williford
A Wiley Press Book John Wiley & Sons, Inc.
Xerox and 860 are registered trademarks of Xerox Coporation.
Copyright © 1984 by Jacklyn Williford
All rights reserved. Published simultaneously in Canada.
Reproduction or translation of any part of this work beyond that permitted by Section 107 or 108 of the 1976 United States Copyright Act without the permission of the copyright owner is unlawful. Requests for permission or further information should be addressed to the Permissions Department, John Wiley & Sons, Inc.
Library of Congress Cataloging in Publication Data Williford, Jacklyn.
Word processing on the Xerox 860.
"A Wiley Press book." Includes index.
1. Word processing. 2. Xerox 860 (Word processor) I. Title.
Z52.5.X47W54 1984 652 83-16713 ISBN 0-471-88257-7
Printed in the United States of America
To my husband, Doug, and
CoNTENTS
Preface ix
1
INTRODUCTION AND START-UP 1Introduction
1
Equipment Description
2
Floppy Diskettes
3
Equipment Start-Up
4
ACTIVITY PAGE 9
Command Line
9
Instruction Blocks
10
Equipment Status Line
10
Active List
10
Index
10
CREATING A NEW DOCUMENT 13
Creating a Document
13
Highlighting Keys
14
Document Status Line
19
Graphic Symbols
20
SETTING THE DOCUMENT FORMAT SPECIFICATIONS 23
Recordable Format Page
26
Non-recordable Format
32
DOCUMENT CREATION FUNCTIONS 37
Automatic Carrier Return
37
Automatic Centering
38
Automatic Underlining
40
Deunderlining
42
Insert
42
Superscript and Subscript
43
Required Space
43
Page Ending
44
Required Page End
44
Bold Printing
45
Input Practice Documents
47
STORING A DOCUMENT
59
Storing a New Document
60
viii
I
Word Processing on the Xerox 860Storing an Old Document Clearing the Active List
Clearing the Entire Active List
DOCUMENT EDITING
Marking Information Delete Copy Move Character Transposition Search Replace
Assisted Search and Replace Search and Replace
Pagination
Editing Practice Documents
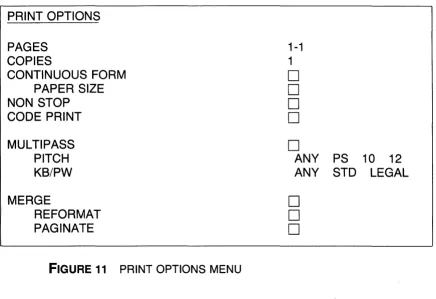
DOCUMENT PRINTING
Pages Copies
Continuous Form Paper Size Non-stop Code Print
Multi-pass and Merge
Printing Practice Documents
SYSTEM SHUTDOWN
PREFACE
Word processing is at present an exciting and ever-changing field. The machine user has little time to become bored when every month manufacturers are marketing new types of functions, making the machine increasingly valuable in the business world. The primary reason for writing this book is to make the reader aware of the word-processing functions available on the Xerox 860 and to explain in an under-standable manner how to perform various operations.
This book may be used by those who have no word-processing experience. It should be made clear to those readers, however, that the functions listed in this book are not totally geared toward a first-time user. A brief description of each operation is given, however; and if the reader is willing to spend extra time and effort at the machine slowly and carefully following the instructions given, this book may be used as a word-processing training manual.
The reader should be aware that this book was written primarily for those with some experience in word processing. The function keys to be used in the various operations have been typeset in bold print. This enables the more experienced reader to follow the instructions without reading the fine print required by those not so familiar with word processing.
At first, following the instructions and carrying out the operations may seem cumbersome and frustrating. Many of my students have remarked during their first weeks of training that the work could be done faster on a typewriter, and that is probably true for the new user of a word processor. When I first learned to type, writing seemed to achieve the desired end much more quickly than typing did. In a similar way, the operations involved in word processing, like those of any other skill, will quickly become automatic. Ask any of those same students today and they will say that it is amazing business ever functioned without word processing.
It is my hope that those using this book will have fun as they practice creating, editing, and printing documents. I have always found using the equipment a plea-sure, which is why, after ten years of being involved with word processing, my interest in the field continues to grow.
I should like to thank several people, without whose help this book would have been much more difficult to create:
Nicki Biggs and the staff at Metro Careers Institute made their office facilities and equipment available for my use numerous times during the creation of this book. Fernando Sequi graciously reviewed my final manuscript, and his knowledge and tactfully phrased constructive criticisms have proved invaluable.
x
I
PrefaceMy editor at John Wiley & Sons, Mr. Theron Shreve, has always been available to provide answers and editorial help whenever needed.
INTRODUCTION
AND
START-UP.
INTRODUCTION
T
he Xerox 860 is a stand-alone word-processing system, which means that information created on this system can be used by only one operator at a time. All machine instructions that operate the equipment must be retrieved from a magnetic storage medium called a floppy diskette each time the system is turned on. All text input using the keyboard must be stored on the same type of diskette or it will be lost when the system is turned off.21
Word Processing on the Xerox 860EQUIPMENT DESCRIPTION
The Xerox 860 consists of three pieces of equipment: a workstation, a disk drive, and a printer. These are shown in Figure 1 and described on the following pages. The keyboard, which the operator uses to input text and to give the system commands, and the screen, which allows the operator to view the text, combine to form what is called the workstation. Xerox offers its customers two types of worksta-tion screens. The partial-page screen allows the operator to view 24 lines at a time. The full-page screen displays 66 lines at a time, so that a whole page of a document may be seen at once. There is no difference in the keyboard operation of the two types of workstation. Both types of workstation can be used in the same way to access, input, edit, and print information, so no distinction is made in this text regarding the screen size.
The second piece of equipment that the operator uses is the printer. There are several different printers that may be used on the system. The major differences between the various printers are the speed (measured in characters per second) and the quality of the printing. In Chapter 8 the printing options available are described and how to print a document is explained.
Introduction and Start-Up
13
The third piece of equipment is the unit that controls the power to the workstation and printer and houses the floppy diskettes. This is called a controlleror a disk drive.
On the front of the disk drive are openings into which floppies are inserted. Each opening is covered by a door. At the base of the doors, on the front right-hand side, is the "on-off" switch. This switch must always be in the "on" position before you insert a diskette into the disk drive. Failure to do so could render the diskettes unusable.
To open the doors on the face of the disk drive so·that the disks may be inserted, press the button on the face of the door you want to open. The door springs open, exposing a slot where a floppy may be inserted. When inserting a diskette, always make sure that the label on the diskette is facing the right. Slide the diskette all the way into the slot, and close the door by pulling it (using the open button) to the left until the door snaps shut.
FLOPPY DISKETTES
The
Xerox 860 Word Processor is operated by floppy disks (or diskettes). The name floppy was given to this type of storage medium because the diskettes are soft and bendable. Floppy diskettes resemble 45-RPM records that have been encased in cardboard squares (see Figure 2). Certain portions of the cardboard casing have been cut away so that information may be placed on the diskette and operating instructions may be retrieved from it to run the equipment properly.Two main types of floppy diskettes are used on the Xerox 860. The first type is the system diskette, which contains the operating instructions for the system. The
instructions from this diskette turn on the terminal and the printer and make available such programs as word proceSSing and math functions.
The second type of diskette is a data or regular diskette. Letters, memos,
Exposed area
41
Word Processing on the Xerox 860reports, and any other type of document may be stored on this diskette. A data diskette does not contain operating instructions, so both types of diskettes are needed in order to use the system.
When handling or storing diskettes, a few guidelines must be followed.
1
Never touch or scratch the exposed portions of the disk-ette (the areas on the diskdisk-ette where the cardboard casing has been cut away). This could cause documents re-corded on the diskette to be damaged or ruined.Do not bend or crease the floppy diskette.
Do not expose the floppy diskette to any object that is highly magnetized. Magnetization is the means by which the system deletes unwanted documents from the disk-ette. When a diskette is exposed to any type of magnetic material, information may be erased from the floppy dis-kette.
Do not expose the floppy diskette to extremely high temperatures. Just like a 45-RPM record, the diskette will warp and become unusable.
EQUIPMENT START-UP
Now that the parts of the system have been described, you are ready to start up the system and begin working. To do this, you must perform the following procedures:
1
Turn the "on-off" switch on the disk drive to the "on" position.Insert the system diskette in the slot on the right-hand side of the disk drive (using the instructions given on page 3), and close the drive door.
A large copy of the Xerox logo appears on the screen.
In a few seconds the words "LOADING-PLEASE WAIT" appear at the top of the screen.
Introduction and Start-Up
15
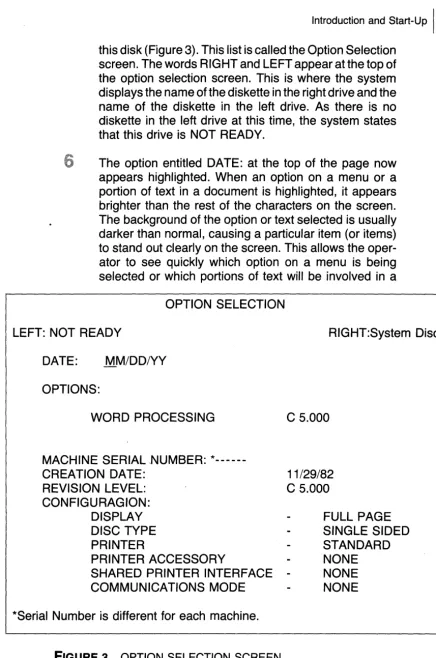
this disk (Figure 3). This list is called the Option Selection screen. The words RIGHT and LEFT appear at the top of the option selection screen. This is where the system displays the name of the diskette in the right drive and the name of the diskette in the left drive. As there is no diskette in the left drive at this time, the system states that this drive is NOT READY.
The option entitled DATE: at the top of the page now appears highlighted. When an option on a menu or a portion of text in a document is highlighted, it appears brighter than the rest of the characters on the screen. The background of the option or text selected is usually darker than normal, causing a particular item (or items) to stand out clearly on the screen. This allows the oper-ator to see quickly which option on a menu is being selected or which portions of text will be involved in a
OPTION SELECTION
LEFT: NOT READY RIGHT:System Disc
DATE: MMIDDIYY
OPTIONS:
WORD PROCESSING
MACHINE SERIAL ,NUMBER: *---CREATION DATE:
REVISION LEVEL: CONFIGURAGION:
DISPLAY DISC TYPE PRINTER
PRINTER ACCESSORY
C 5.000
11/29/82
C 5.000
FULL PAGE SINGLE SIDED STANDARD NONE SHARED PRINTER INTERFACE
-COMMUNICATIONS MODE
NONE NONE
*Serial Number is different for each machine.
61 Word Processing on the Xerox 860
particular function being carried out. The message "EN-TER DATE" now appears at the top of the screen, and a dark solid line is under the first M in the MM/DD/YY section. Type in the date using two digits each for the month, day, and year. The system accepts only numeric characters in this section. If the words "Unacceptable Characters" appear at the top of the page while you are typing in the date, check to make sure the SHIFT key (#11 on the keyboard drawing, Figure 4) has not been locked in place by accident. If the shift key has been placed in the locked position, release the shift key and type in the date once again.
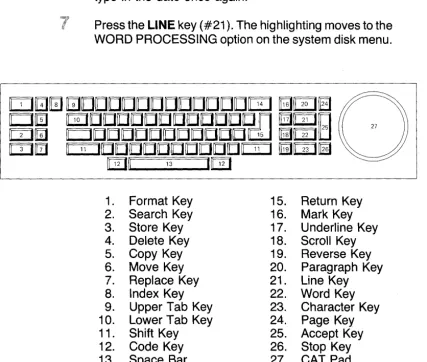
Press the LINE key (#21). The highlighting moves to the WORD PROCESSING option on the system disk menu.
1 . Format Key 2. Search Key 3. Store Key 4. Delete Key 5. Copy Key 6. Move Key 7. Replace Key 8. Index Key 9. Upper Tab Key 10. Lower Tab Key 11 . Shift Key 12. Code Key 13. Space Bar 14. Backspace Key
FIGURE 4 KEYBOARD DRAWING
1
2
3
4
5
1
2
DISPLAY
INDEX
LEFT:
Introduction and Start-Up
17
Press the
ACCPT
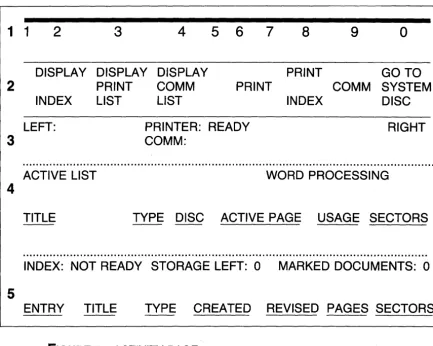
key (#25). From the system disk, the system now loads the word processing program so that the operator may create, edit, and print documents. Dur-ing this loadDur-ing process the message "LOADING-PLEASE WAIT" appears at the top of the screen.An activity page (Figure 5) now appears on the screen.
Insert the data disk in the left-hand side of the disk drive and close the drive door.
After the system has checked the new diskette according to various criteria, it places the name of this diskette next to the word LEFT at the top of the activity page and the name of the system diskette next to the word RIGHT.
3
4
5
6
7
8
9
0
DISPLAY DISPLAY PRINT GO TO
PRINT COMM PRINT COMM SYSTEM
LIST LIST INDEX DISC
PRINTER: READY RIGHT
COMM:
ACTIVE LIST WORD PROCESSING
TITLE TYPE DISC ACTIVE PAGE USAGE SECTORS
INDEX: NOT READY STORAGE LEFT: 0 MARKED DOCUMENTS: 0
ENTRY TITLE TYPE CREATED REVISED PAGES SECTORS
8
I
Word Processing on the Xerox 860This allows the operator to see at a glance which floppy diskettes are being used by the system at the present time.
NOTE: The first time a floppy diskette is used on the Xerox 860 system, it is assigned a name by the operator. For details on this procedure, refer to the Xerox 860 Reference Manual.
ACTNITY
PAGE
All activities performed on the Xerox 860 begin on the activity page (Figure 5). This menu appears immediately after the system start-up procedures have been per-formed, and the system returns to this page whenever document creation, editing, or printing is completed. Below are listed the various elements of this page and their functions.
COMMAND LINE
10
I
Word Processing on the Xerox 860INSTRUCTION BLOCKS
The instruction blocks are numbered squares with the appropriate system mands listed below. Only certain numbers on this line have been assigned com-mands. Numbers 1 , 5, and 6 have not been used for this purpose. This is a reminder to the operator of various functions (printing, document index printing, etc.) that are performed by pressing the CODE key (#12) and certain numeric keys on the keyboard.
EQUIPMENT STATUS LINE
The status line informs the operator which diskette is in the left disk slot (this information appears next to the word LEFT:), which diskette is in the right disk slot (this information appears next to the word RIGHT:), and whether or not the printer is ready to receive print instructions (PRINTER READY).
ACTIVE LIST
The active list describes the documents that have been made ready for editing or printing. The document title (name), type (word processing or statistical), the disk name it resides on, the total number of pages in this document, what it is being used for (edit, print, etc.), and how many sectors of space this document requires are listed in this section. It is necessary to place any document needed for editing in the active list. For details concerning this procedure, see the section entitled "Document Editing" (page 63). A total of ten documents (for editing and/or printing) may be placed on the active list at one time.
NOTE: To move the highlighting from the active list to the index section (and vice versa) so that documents may be accessed, stored, or printed, the PAGE key (#24) must be pressed. The highlighting will move from the active list section of the activity page to the index section below. This is necessary when moving items from the index to the active list for editing or printing.
INDEX
The index lists in detail the documents that reside on a floppy diskette. The operator may view the index for either the left or right diskette, but only one index can appear on the screen at a time.
Activity Page
111
active list, the PARA key (#20) should be pressed. The name next to the word "INDEX:" will change, and the index for the alternate floppy diskette will be display-ed. If no name appears after the PARA key is pressed, the operator will know this disk station is empty. Each time the operator wishes to switch from one disk index to another, the PARA key must be pressed.
Storage Left
The second item on the first line of the index section tells how much disk space is
currently available on this floppy diskette. If there is not enough room for the document the operator is about to create, another diskette should be used.
Marked Documents
The third item on the first line of the index section states how many documents have
been marked for the active list or for printing. Document marking will be explained in both the "Document Editing" section (page 63) and the "Document Printing" section (page 93).
Document Listing
The document information contained in the second line of the index section includes
CREATING A NEW
DOCUMENT
CREATING A DOCUMENT
Creating a new document on the Xerox 860 is as simple as typing the name of the document. In order to create a new document, the system must be turned on and the activity page must be visible on the terminal screen. Once these procedures have been carried out, follow the steps on page 14.
141
Word Processing on the Xerox 8601
Start typing the name of the document. There is no need to move the highlighting to any particular section of the activ-ity page. Once you press a letter or number key on the keyboard, the system automatically begins creating a new document for you. The document title (or name) may con-tain up to 20 letters, digits, spaces, and punctuation char-acters.As the name is being typed, the message 'Name: " " , appears on the command line at the top of the screen. Each time a letter is typed, it will be added to the name inside the quotation marks.
When typing of the name has been completed, press the
ACCPT
key (#25). This informs the machine that the operator has finished naming the document.The message "New Document?" appears in the upper right-hand corner of the screen.
Press the
ACCPT
key (#25). This informs the system that this is in fact a new document and places the document name under the active list option on the activity page (Figure 5).Press the
ACCPT
key (#25) again. This alerts the system that the operator would like to work on this document at this time.The first blank working space of the document will now be brought up on the screen for the operator to work on.
HIGHLIGHTING KEYS
There are many keys on the Xerox 860 that aid the operator in moving through the options of a menu or various pages of a document for viewing or editing. The keys listed in this chapter are referred to in the following chapters where document creation and editing are explained.
Text Keys
Creating a New Document
115
viewing text. The TEXT KEYS (#20-#24) also provide the operator with a way to move quickly throughout the document, highlighting characters, words, lines, para-graphs, or pages of text. This means of highlighting can be used for carrying out such functions as copy, move, delete, and replace or as a means of viewing text in a document. Still other functions may be accomplished by using the TEXT KEYS in conjunction with other keys. The results listed below are what occurs when the operator uses the text key for highlighting.
PARA key (#20)
This key, when pressed by itself, highlights the nearest paragraph and the return graphic symbols following it. When pressed again, the highlighting moves to the next paragraph and its subsequent return.
LINE key(#21)
This key, when pressed by itself, highlights the nearest line. When pressed again, the highlighting moves to the next line in the document.
WORD (#22)
This key, when pressed by itself, highlights the nearest word and the space following that word. When pressed again, the highlighting moves to the next word and space in the text.
CHAR (#23)
This key, when pressed by itself, highlights the nearest character. When pressed again, the highlighting moves to the next character in the text.
CODE (#12)
+
PAGE (#24)When the CODE key (#12) is held down and the PAGE key (#24) is pressed, the entire page is highlighted.
Cat and Cat Pad
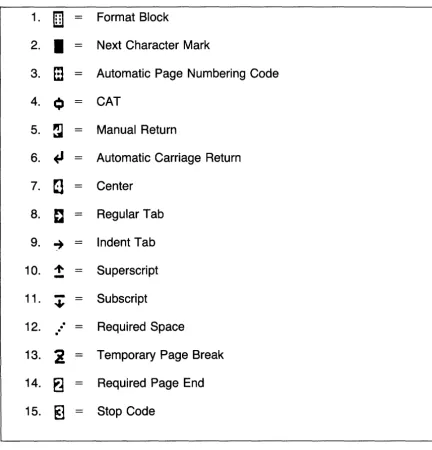
The CAT (item #4, Figure 6) is a square symbol that is an alternative method of locating specific portions of text to be involved in a copy, move, delete, or insert operation. This symbol is located in the upper left-hand corner of the screen (sometimes called the "home" position).
16\ Word Processing on the Xerox 860
you move your fingers toward the left across the CAT PAD, the cursor will move to the left on the screen. If you move your fingers up the CAT pad,the cursor will move up toward the top of the page. The speed at which the cursor moves depends on how hard your fingers are pressing on the CAT pad.
If you have experimented with the CAT and find that you no longer wish to use it on the screen, press the STOP key (#26) twice and it will return to the home (or top-of -screen) position.
When using the CAT in a function such as delete or copy, the CAT must be placed (using the CAT PAD (#27)) on top of the first letter, number, or punctuation mark that will be affected by that function. The CAT cannot highlight text by itself. It can quickly locate only the first letter or word to be used in the function; the text keys
1.
[U]
00o.
=
Format Block2.
I
=
Next Character Mark3.
m
=
Automatic Page Numbering Code4.
Q
=
CAT5.
~
=
Manual Return6.
+'
=
Automatic Carriage Return7.
~
=
Center8.
e
=
Regular Tab9. ~
=
Indent Tab10.
-
+
=
Superscript11.
-
=
Subscript•
12.
.
.
.
.
=
Required Space13.
i
=
Temporary Page Break14.
~
=
Required Page End15.
~
=
Stop CodeCreating a New Document
117
must then be used to highlight the text involved in that specific function. If the operator is going to use the CAT to locate quickly a portion of text to be highlighted, the STOP key (#26) should be pressed once (to clear out any previous highlighting done with the TEXT KEYS) before the CAT PAD is used to bring the CAT onto the screen. The CAT will not be effective if the text keys have been used to highlight a word, line, or paragraph before the CAT was brought down onto the screen.
It is easier when first learning this system to use the text keys when moving through the document for viewing or for highlighting portions of text for use in a given operation. For this reason, all creating and editing functions in this book use the TEXT KEYS (#20-#24) rather than the CAT and CAT PAD when instructing the operator on how to carry out the operations required.
Using the CAT may seem cumbersome at first, but once you have learned the basic operations of this system, you should experiment with this option as it can become a quick and accurate word-processing tool.
Next Character Mark
The next character mark (item #2, Figure 6) shows where the last typed character (or bottom) of the page is located. Whenever you need to locate the last typing space on a page, hold down the CODE key (#11) and press the ACCPT key (#25). The next character mark (item #2, Figure 6) immediately appears at the end of the page, and you may proceed with inputting further information.
Other Highlighting Keys
RVRSE (#19)
When the RVRSE key is held down, it reverses the action of the next key pressed. When the RVRSE key is held down and the LINE key (#21) is pressed, highlighting moves upward through the text toward the top of the page. When the RVRSE key is held down and the PARA key (#20) is pressed, highlighting moves upward by paragraphs toward the top of the page rather than toward the bottom of the page.
SCROLL (#18)
high-181 Word Processing on the Xerox 860
lighting jumps from line to line toward the page end. When the SCROLL key is used in a document, the system moves the out-of-sight text at the bottom of a page up into view, one line at a time. Each time a line from the bottom of the page is brought into view, a line at the top of the screen disappears as only a certain number of lines may appear on the screen at a time. Scrolling will not bring the next page of the docu-ment to the screen. The PAGE key (#24) must be pressed or the search-for-page function (page 19) must be used in order to bring a different page of the document to the screen for viewing or editing. Holding the RVRSE key (#19) down and pressing the SCROLL key cause the scrolling operation to move in the opposite direction toward the top of the screen.
NOTE: Pressing the SCROLL key (#18) or holding the
RVRSE key (#19) down and pressing the SCROLL key will
not move the highlighting to the next page or the previous page in the document. Scrolling can only be done within a given page.
MARK (#16)
The MARK key informs the system that the operator intends to highlight more than just one word, line, or paragraph.
BACKSPACE (#14)
The BACKSPACE key is used to move highlighting back-ward through the document. The backspace function de-letes whatever it encounters. Each time the BACKSPACE key is pressed, the character encountered is deleted, and the operator has the opportunity to type in the correct char-acter.
PAGE (#24)
The PAGE key when pressed by itself will bring the next page of the document onto the screen for viewing or editing.
SEARCH (#2)
Creating a New Document
119
To move to a specific page in the document:
Press the SEARCH key (#2).
The message 'FORWARD TO: " " , appears on the status line at the top of the screen.
Press the SEARCH key (#2) again.
The message 'REVERSE TO: " " , now appears on the status line at the top of the screen.
Press the SEARCH key (#2) again.
The message "TO PAGE NUMBER:" and a flashing num-ber 1 now appear on the status line at the top of the s?reen.
Type the number of the page desired. The number at the top of the page reflects this change.
Press the ACCPT key (#25).
The page requested now appears on the screen.
DOCUMENT STATUS LINE
The document status line (Figure 7) is the first line of information located at the top of the screen throughout a word-processing document. This line informs the operator where the CAT (item #4, Figure 6), highlighting, or next character mark (if the operator has pressed CODE and ACCPT to locate the end of the document [item #2, Figure 6]) is currently located. The line number and character position of the status line will not appear on the screen unless the operator presses the CHAR key (#23). When these keys are pressed, this information appears along with the name and page of the document currently being viewed by the operator.
1
The first item on the status line tells you the name of the document currently being viewed by the operator on theI
PRACTICE DOC. PAGE 1 LINE12 CHAR 2520
I
Word Processing on the Xerox 860screen. This information is located at the top of every page whether or not the CODE key (#12) and CHAR key (#23) are pressed.
The second location listed is which page of the document is currently being viewed by the operator. You should note this information when exiting the document before editing is completed or when looking at information on other pages of the document, to aid in quickly finding the desired char-acter position again. This information is located at the top of every page whether or not the CODE key (#12) and the
CHAR key (#23) are pressed.
The third item listed is the number of the line on which the CAT (item #4, Figure 6), highlighting, or next character mark (if the operator has pressed CODE and ACCPT to locate the end of the document [item #2, Figure 6]) is currently located. This is essential to the operator for pag-ing purposes. Since the Xerox 860 automatically begins a new page when the requested page length is reached (see Recordable Format Information, page 29), it is sometimes convenient for the operator to look ahead to see if a new paragraph should be started on this page, or if the
RE-TURN key (#15) should be pressed until a new page is
brought to the screen by the system.
The CHAR or character position is the final location listed on the status line. It allows you to see which space the CAT (item #4, Figure 6), highlighting, or next character mark (if you have pressed CODE and ACCPT to locate the end of the page [item #2, Figure 6]) is located on. This is similarto the function performed by the space indicator needle on the spacing ruler at the front of a typewriter. This informa-tion is vital when lining up pieces of informainforma-tion and in figuring the settings for tab stops. For further information on character pitch, see the pitch section on recordable format information (page 28).
GRAPHIC SYMBOLS
Creating a New Document
121
the way it is. For instance, if the UPPER TAB key (#10) (see explanation of upper tab on page **) is pressed too often, text will appear farther to the right of the page than the operator intended. Without the tab symbols (#8 and #9, Figure 6) to demonstrate how often this key had been pressed, the operator would be unsure why the text was out of alignment. These symbols do not appear on the printed version of the document unless the operator chooses the CODE PRINT option on the print options menu (Figure 11). Each time the CAT or highlighting reaches a position in the document where the RETURN key (#15), TAB keys (#9 and #10) and so on were pressed, the symbols for these functions (see Figure 6) appears at that position on the screen. Once the CAT or highlighting moves to another position in the document, this symbol disappears from view. If you would like the graphic symbols to appear on the screen at all times, the CODE DISPLAY section of the non-recordable format page (Figure 9) must be selected.
To select the code display option:
1
Press the FORMAT key (# 1 ). The recordable format page (Figure 8) now appears on the screen.Press the FORMAT key (# 1 ). The non-recordable format page (Figure 9) now appears on the screen.
Press the PARA key (#20) until the cursor reaches the DISPLAY OPTIONS category.
Press the LINE key (#21) until the CODE DISPLAY option is reached.
Press the CHAR key (#23) until the rectangle appearing next to this option is turned "on" (appears in black).
Press the ACCPT key (#25). The system immediately returns to the position where the CAT or highlighting was located when the FORMAT key (#1) was pressed in step 1. The symbols for the various keys pressed are now visible on the screen where they were inserted throughout the entire document.
NOTE: To remove the symbols from the screen, the
SETTING THE
DOCUMENT FORMAT
SPECIFICATIONS
The first character found on the first typing line of each page on the screen is a white block containing six black dots. This symbol is called a format block (#1, Figure 6). The format block allows the operator to see where the format specifica-tions have been set up in the document.
241
Word Processing on the Xerox 860operator a choice (as menus do for patrons in restaurants). The operator chooses the option required for carrying out a specific task. The first menu is the Recordable Format page (Figure 8). Line spacing, margins, tab stops, and so on are determined on this menu. The information on this menu will not change unless the operator changes it. Formats in a document are much like the margin and tab ruler on the front of a typewriter. They determine the text line length, where the tab stops should be located, the pitch (10 characters per inch, 12 characters per inch, etc.) of the printing element that will be used, line spacing (number of blank lines between each line of text), and so on. You may want to use different format settings throughout a document. Paragraphs of text may be located at the top of a page while a table with completely different margins and tabs is located at the bottom. Each time the operator creates a new set of format specifications, the recordable format page must be completed.
The second type of format menu found on this system is the Non-Recordable Format page (Figure 9). This menu must be completed only if you are changing an existing format specification. If you created a document using single spacing and after completing the document would now like it to be double-spaced, both the recordable and non-recordable format pages have to be completed to reflect this change.
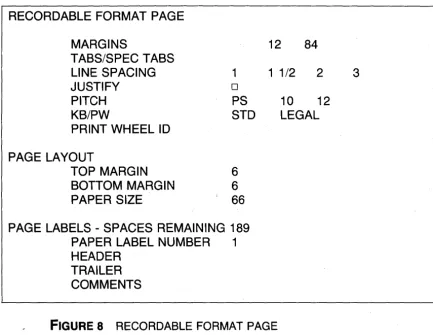
RECORDABLE FORMAT PAGE
12 84
MARGINS
TABS/SPEC TABS LINE SPACING JUSTIFY
1 1 1/2 2
o
PITCH PS 10 12
KB/PW STD LEGAL
PRINT WHEEL 10 PAGE LAYOUT
TOP MARGIN 6
BOTTOM MARGIN 6
PAPER SIZE 66
PAGE LABELS - SPACES REMAINING 189
PAPER LABEL NUMBER 1 HEADER
TRAILER COMMENTS
FIGURE 8 RECORDABLE FORMAT PAGE
Setting the Document Format Specifications
125
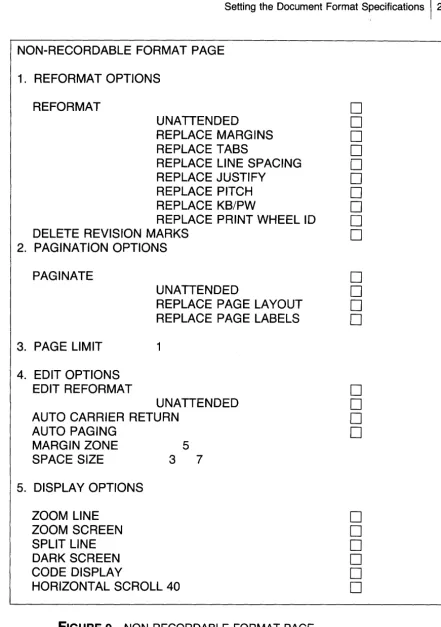
NON-RECORDABLE FORMAT PAGE
1. REFORMAT OPTIONS
REFORMAT
D
UNATTENDED
D
REPLACE MARGINS
D
REPLACE TABS
D
REPLACE LINE SPACING
D
REPLACE JUSTIFY
D
REPLACE PITCH
D
REPLACE KB/PW
D
REPLACE PRINT WHEEL ID
D
DELETE REVISION MARKS
D
2. PAGINATION OPTIONS
PAGINATE
UNATTENDED
REPLACE PAGE LAYOUT REPLACE PAGE LABELS
3. PAGE LIMIT 1
4. EDIT OPTIONS EDIT REFORMAT
UNATTENDED AUTO CARRIER RETURN
AUTO PAGING
MARGIN ZONE 5
SPACE SIZE 3 7
5. DISPLAY OPTIONS
ZOOM LINE ZOOM SCREEN SPLIT LINE DARK SCREEN CODE DISPLAY
HORIZONTAL SCROLL 40
FIGURE 9 NON-RECORDABLE FORMAT PAGE
261 Word Processing on the Xerox 860
You can easily tell where the format settings have been changed in a document. Each time the CAT or highlighting reaches a format command in the document, the format block (item #1, Figure 6) is displayed on the screen. The code display option on the non-recordable format menu may also be selected so that the format blocks may be easily spotted.
If you press the FORMAT key (#1), you are informing the system that you wish to make a format change. A format block (item #1, Figure 6) appears at the position where the CAT (item #4, Figure 6) or highlighting was located when the FORMAT key was pressed, and the recordable format page will now be visible on the screen. It is for this reason that the operator must pay close attention to where highlighting is located in the document whenever the FORMAT key (#1) is pressed.
The LINE key (#21) is used to move the highlighting down the recordable format page through the various options (margins, tabs/spec tabs, etc.) allowing the operator to change the settings of the various options. The CHAR key (#23) is used to determine the various options for these line items.
If the highlighting is located on the last option in this menu and you would like to change an option located at the top of the menu, hold down the RVRSE key (#19) and press the LINE key (#21) until the highlighting reaches the option to be changed.
Listed below are the format categories that may be changed and the results that each will produce.
RECORDABLE FORMAT PAGE
Format Options
MARGINS:
To set the margins of a document:
1. Using the LINE key (#21), move down through the format options until the MARGINS option is highlighted. 2. Press the CHAR key (#23). The left margin option is now highlighted. Type in the number that indicates the spaces desired for the left margin.
3. Press the CHAR key (#23). The right margin option is now highlighted. Type in the number that indicates the spaces desired for the right margin.
4. Press the LINE key (#21) to move to the next option.
TABS/SPEC TABS:
Setting the Document Format Specifications
127
1. Using the LINE key (#21), move down through the format options until the TABS/SPEC TABS option is highlighted.
2. Press the DEL key (#4) if there are any previous tab settings that you would like to clear off the recordable format page.
3. Press the CHAR key (#23).
4. Type in the position number of the required tab setting and press the LOWER TAB key (#10). This number now appears on this line.
5. Continue with steps 3 and 4 until all tab settings are recorded.
6. Press the LINE key (#21) to move to the next format option.
LINE SPACING:
The line spacing option allows the operator to determine the spacing to be used in the document. This system allows the operator to use single, one and a half, double, and triple spacing.
1. Using the LINE key (#21), move down through the format options until the LINE SPACING option is high-lighted.
2. Press the CHAR key (#23) until the desired spacing is highlighted.
3. Press the LINE key (#21) to move to the next format option.
JUSTIFYING LINES:
When the justify option is selected, the right-hand margin on the printed copy of the document is even: the ends of all lines are aligned from the top to the bottom of the page. Extra spaces are inserted between words in order to achieve lines all of the same length. To select this option:
1. Using the LINE key (#21) move down through the format options until the JUSTIFY option is highlighted. 2. Press the CHAR key (#23). This darkens the rectangle next to the justify option. If this rectangle is
not
dark-ened, the document will not be justified when printed. 3. Press the LINE key (#21) to move to the next format281 Word Processing on the Xerox 860
PITCH:
Using this option the operator tells the system what pitch is desired, that is, spacing to use within words (10 characters per inch, 12 characters per inch, or proportional spacing). To select the pitch:
1. Using the LINE key (#21), move down through the format options until the PITCH option is highlighted. 2. Press the CHAR key (#23) until the required pitch is
highlighted.
3. Press the LINE key (#21) to move to the next format option.
KB/PW:
This option stands for keyboard/printwheel. It allows the operator to choose between a standard and legal-sized printwheel.
1. Using the LINE key (#21), move down through the format options until the KB/PW option is highlighted. 2. Press the CHAR key (#23) until the required print
set-ting is highlighted.
3. Press the LINE key (#21) to move to the next format option.
PRINT WHEEL ID:
Each type of print wheel (just like each typewriter character element) has the letters of the alphabet and numbers arranged in different positions on the wheel and produces various sizes and styles of type. Each print wheel has been assigned certain initials by the person in your company or organization who is responsible for the supervision of word-processing functions, so that the equipment will recognize where numbers and letters are located on this type of wheel. If the wrong print-wheel initials are specified, the printout will be a mass of jumbled letters, numbers, and symbols. Numerous initials are assigned to the various types of print wheels used by this system. If the operator is unsure of the correct print-wheel
10
for the printer attached to the system, this option should be left blank.Setting the Document Format Specifications 1 29
format options until the PRINT WHEEL ID option is highlighted.
2. Press the CHAR key (#23). Type in the appropriate initials for the print wheel to be used.
3. Press the LINE key (#21) to move to the next format option.
Page Layout
TOP MARGIN:
This option tells the printer how many lines to leave blank at the top of each page before the printed text begins.
BOTTOM MARGIN:
This option tells the printer how many lines to leave blank at the bottom of each page.
PAPER SIZE:
This option explains to the printer how many lines long the paper is. The system subtracts the top margin lines and the bottom margin lines from the number of lines for that paper size in order to figure out how many lines of text should be printed on each page. Standard paper sizes are
at
x 11"=
66 lines 11" xat
=
51 lines14tx11"= 66 lines
To make changes to any of the page layout options:
1. Using the LINE key (#21), move down through the format options until the correct page layout option is highlighted.
2. Type in the number for the new line amount for whichever category is being changed.
3. Press the LINE key (#21) to move to the next format option.
Page Labels
30
I
Word Processing on the Xerox 860operator wishes for the printer to number the pages of the document automatically,
headers and trailers should be used. Headers and trailers fall in the category of page labels, since usually they automatically number the pages of a document or define the name of the memo or letter that a given page belongs to.
When using a header or trailer (known as headers and footers on other brands of systems), the information must be typed only once. It will then be printed on each specified page of the document.
The page label option also includes a category entitled "Comments". The comment section is used as a means for the operator to keep various notes concerning the document. These notes will not be printed with the document unless the code print option on the print menu is selected (see page 97).
The page labels (or headers and trailers) may contain up to a total of 189 characters. A counter on the recordable format will subtract the correct amount of characters used as information is typed in under these categories. If you would like to use 180 characters for the creation of a header, the nine remaining spaces can be used in the trailer or comment sections. The operator decides how these characters will be split up and used in the various categories. The number of remaining spaces available for use can always be found on the page label heading line, next to the words "SPACES REMAINING".
The page label number instructs the system which number to start with when numbering the pages.
To change the options of this category:
USing the LINE key (#21), move down through the format
options until the correct page label option is highlighted.
Type in the information to be used as a header, a trailer, or under the comment section.
Press the LINE key (#21) to move to the next format
option.
Automatic Page Numbering
If
you would like the system to number the pages automatically, you must place a page numbering code in the header or the trailer. To create this code, you must make sure that the desired page label option (header or trailer) is highlighted. Hold down the CODE key (#12) and type a number 2 on the keyboard. This results in anautomatic page numbering symbol (item #3, Figure 6) being placed on the header or the trailer.
Setting the Document Format Specifications
131
Once all the recordable format options have been changed to meet the require-ments of the document being created, press the ACCPT key (#25). This records all the selections you made on the recordable format page. The page of the document that you were viewing when the FORMAT key (# 1) was pressed now appears on the screen.
NOTE: If you are changing an existing format setting and completion of the non-recordable format page is required, the FORMAT key (#1) should be pressed in place of the ACCPT key (#25). When this is done, the non-recordable format page will appear on the screen and you can make the appropriate selections.
To create a new format specification within a document:
Press the FORMAT key (#1). The recordable format page (Figure 8) now appears on the screen.
Using the LINE key (#21) and the CHAR key (#23), change the recordable format page settings to meet the requirements of the text being input.
Press the FORMAT key (#1). The non-recordable format (Figure 9) now appears on the screen.
Using the LINE key (#21) and the CHAR key (#23), turn "on" the appropriate non-recordable format settings that correspond to the changes made in step 2, i.e., if the line spacing was changed on the recordable format, the RE-PLACE LINE SPACING option should be turned "on" in the non-recordable format page in step 4.
NOTE: When a change is made to one of the items located under the reformat, paginate or edit options, the block located next to reformat, paginate, or edit reformat must also be highlighted or the document will
not
be revised as you have requested.When all changes have been made, press the ACCPT key (#25). The system returns to the CAT or highlighting posi-tion it was on in the document when the FORMAT key (#1) in step 1 was performed.
321
Word Processing on the Xerox 860NON-RECORDABLE FORMAT
The non-recordable format page (Figure 9) must be filled in each time the operator is changing a format setting (not creating a new format but changing an already existing one). The non-recordable format page allows the operator to reformat and paginate the document using the changes made to the recordable format.
Before making changes to this menu, you must first locate the format block of the format setting that should be changed. This can be done by moving the highlighting through the document (using the TEXT KEYS (#20-#24) searching out the format blocks, or by putting the system in the CODE DISPLAY mode (see page 21). Next, highlight the correct format block. Press the FORMAT key (#1). The recordable format page will appear on the screen. Make all the necessary changes to this menu and press the FORMAT key (# 1 ). The non-recordable format page will now appear on the screen.
Many of the options listed on the non-recordable format page (Figure 9) are self-explanatory and will not be explained here in detail. Still others (marked in this text with an asterisk) are for the advanced operator and will not be reviewed in this book.
The LINE and CHAR keys are used for the same purpose on this menu as they are on the recordable format page. Whenever a change is to be made to this page, the operator must first highlight the line item using the LINE key (#21) and then change the option by pressing the CHAR key (#23).
1.
Reformat
2.
Paginate Options
If
any of the options listed in sections 1 and 2 of Figure 9 were changed on the recordable format page, the rectangle located next to those options (found under the Ref9rmat or Paginate headings) on the non-recordable format page must appear darkened in order for the changes to take place.To blacken (turn "on") or lighten (turn "off") a particular option:
Using the LINE key (#21), move through the non-recordable format settings until the required option is high-lighted.
Setting the Document Format Specifications
I
33wishes to turn an option "off", the CHAR key (#23) should be pressed until the option once again appears white.
3.
Page Limit
It
the operator does not want the entire document reformatted, the page limit option (section 3, Figure 9) must be filled in. The operator should type in the number of the last page to be reformatted. The system will reformat up to and including that page number only, and the remainder of the document will remain as it is.4.
Edit Options
The options listed under this category (section 4, Figure 9) should not be revised until the operator is quite experienced with the operations of the Xerox 860. These options control the automatic carriage return, text rearrangement during editing, automatic page ending, the number of extra spaces inserted between words when an operator selects a justified format, and so on. When the operator feels comfort-able with the system and needs to change these options, check the Xerox 860 Reference Manual for the non-recordable format page definitions.
5.
Display Options
These options are listed in section 5, Figure 9.
ZOOM SCREEN:
When this option is blackened or turned "on", all the text on the screen will appear twice its normal size.
SPLIT LINE:
341
Word Processing on the Xerox 860this until all lines of text are visible on an 80 character line. It is necessary to turn this option "off" before printing.
DARK SCREEN:
When this option is blackened or turned "on", the operator will see the text displayed in white characters on a black screen rather than black characters on a white screen. Highlighting will appear white rather than black.
CODE DISPLAY:
When this option is blackened or turned "on", all codes such as the centering symbol and page end, as well as all return and tab graphics, will be displayed on the screen for the operator.
HORIZONTAL SCROLL: *
When all of the non-recordable page information has been filled in correctly, press the ACCPT key (#25). The portion of the document designated will im-mediately be reformatted. The bottom of the last page reformatted apppears on the screen. To move to the top of the page, press the STOP key (#26) two times. If you wish to move to another page in the document, follow the search for page instruc-tions on page 19.
To change the format settings in already created text (document reformatting):
Using the TEXT KEYS (#20-#24) highlight the format
block of the format specification to be changed.
Press the FORMAT key (# 1). The recordable format page (Figure 8) now appears on the screen.
Using the LINE key (#21) and the CHAR key (#23), change the recordable format page settings to meet the requirements of the text being input.
Press the FORMAT key (# 1). The non-recordable format (Figure 9) now appears on the screen.
Setting the Document Format Specifications
135
REPLACE LINE SPACING option should be turned on in step 4.
When all changes have been made, press the ACCPT key (#25). The portion of the document designated will im-mediately be reformatted. The bottom of the last page reformatted appears on the screen. To move to the top of the page, press the STOP key (#26) two times. If you wish to move to another page in the document, follow the search for page instructions on page 19.
The new format setting now governs all text located below this cursor position, until a different set of format instruc-tions is encountered.
NOTE: You should fill in the non-recordable format page
DOCUMENT
CREATION
FUNCTIONS
AUTOMATIC CARRIER RETURN
It
is not necessary to press the RETURN key (#15) at the end of each line whenusing a Xerox 860 word processor. This is because Xerox uses the automatic carrier
381 Word Processing on the Xerox 860
return function. With this function, if the system cannot fit the entire word and a space at the end of a line, it automatically brings that word down to the next line. For this reason, it is not necessary for the operator to watch the screen to see if the cursor is close to the right-hand margin. The machine automatically monitors and controls this function. Each time the system uses this function, an Automatic Carriage Return symbol (item #6, Figure 6) is placed at the end of the line. If the operator has selected the CODE DISPLAY option on the non-recordable format page (Figure 6) this symbol is visible at all times. If the CODE DISPLAY option has not been selected, the symbol appears on the screen each time highlighting reaches this exact character position. An operator should use the RETURN key (#15) only for ending paragraphs, ending a row of figures, or separating groups of information. When you press the RETURN key as you are inputting text, a Manual Return symbol (item #5, Figure 6) is placed at that character position. The next character mark (item #2, Figure 6) then moves to the left margin.
AUTOMATIC CENTERING
The Xerox 860 has many keys whose functions change when used in conjuction with the CODE key (#12). The function for each of these is listed in writing on the keyboard just above its corresponding key. The center operation is one of the functions that is accomplished with the help of the CODE key.
Information can be easily centered by holding down the CODE key (#12) and pressing the key for the number 4 on the typewriter keyboard. Each time this combination of keys is pressed, a Center symbol (item #7, Figure 6) appears in the middle of the screen. This symbol appears only briefly if the CODE DISPLAY option on the non-recordable format page has not been selected. All text typed after this code is centered between the margins set on the recordable format page (see page 26) and appears to the right of the center symbol. The text does not appear to be centered on the screen if the right margin of the format line is longer than 80 spaces, but when printed, it will be correct.
To center a line automatically:
Position the CAT or highlighting at the left-hand margin of the line where centering should take place.
Hold down the CODE key (# 12) and press the key for the number 4. A centering symbol appears in the middle of the screen where the information is to be centered.
Document Creation Functions [39
It moves to the left one space for every two letters of text being centered.
After the information for that line has been typed, press the
RETURN key (#15). This stops the centering function so that normal typing may resume.
The Xerox 860 also gives you the option of centering text between left- and right-hand margins that are different from those programmed on the recordable format page. To do this, the following operations must be performed:
1
Position the CAT or highlighting one space to the right of the left-hand margin on the line where centering should take place.Hold down the CODE key (# 12) and press the key for the number 4. The message "CENTER BETWEEN" now appears at the top of the screen. Two numbers appear next to this message. The first is the number for the current left margin and the second is the number for the current right margin.
The number for the left margin will be flashing. Type in the number of the left margin you desire and press the CHAR key (#23). This number now appears at the top of the screen.
The number for the right margin will now be flashing. Type in the number of the right margin you desire and press the
ACCPT key (#25). This number now appears at the top of the screen.
Type in the information to be centered between the alternative margins designated above.
After the information for that line has been typed, press the
40
I
Word Processing on the Xerox 860TABS
Two basic types of tabs are found on this system. Other tabs may be used, but they are beyond the scope of this book. If further information is required on tabs, see the manufacturer's operation manual for this system. Each type of tab follows the tab stops set on the recordable format page (see page 27). However, each tab uses these stops in a different way.
Regular Tabs
A
regular tab acts just like a tab on a typewriter. When the UPPER TAB key (#9) is pressed, a tab graphic (item #8, Figure 6) appears at the left margin. The cursor moves to the position number of the first tab. Each time the UPPER TAB key is pressed, the cursor jumps to the next tab. Regular tabs are used for indenting the first line of a paragraph and also for creating columns in reports, charts, and so on.Indenting Tabs
The indent tab also follows the tab stops. Each time the LOWER TAB key (#10) is pressed an indent tab graphic (item #9, Figure 6) appears. All text typed after this key is pressed will be indented to that particular tab stop until the RETURN key (#15) is pressed. Indented text looks like the following paragraph:
Indented text extends to the right margin and from there returns to the tab stop where the indent function began.
NOTE: If there are four tab stops prior to the tab stop where indenting should begin,
the operator must press the LOWER TAB key (#10) five times in order for the information to be indented correctly. If there are five tab stops prior to the appropriate indention tab, the operator must press the LOWER TAB key six times in order for information to be indented correctly. If the tab key is pressed more often than the amount of tabs designated on the recordable format page (Figure 8), the screen moves to the last possible typing position on that line. To remedy this situation and to move the highlighting back to the proper typing position, press the BACKSPACE key (#14) until the desired typing position is reached. The system moves slowly when following the backspace command, so perform this function slowly. Do not press the backspace key more time than are necessary or required text may be accidentally deleted.
AUTOMATIC UNDERLINING
Document Creation Functions
I
41underline a word, a line, a paragraph, or a whole page if the operator so desires. There are three ways automatic underlining can be accomplished:
Underlining One Word
Type the word to be underlined. Do not space after the word.
Immediately after typing the word press the
UNO
key (#17).The word will be underlined, and the operator may proceed with typing the remainder of the text. These steps should be repeated whenever one word is to be underlined.
Underlining Groups of Words
Press the
UNO
key (#17) before typing the first word to be underlined.The system will respond by placing the words "UNO BOLD OVER" on the status line at the top of the screen with the word UNO highlighted.
Type in the text to be underlined. Press the
UNO
key (#17) after the last word to be underlined has been typed. This shuts the underline function off and allows the operator to type the remainder of the text normally. These steps should be repeated whenever groups of words are to be underlined.Underlining Previously Created Text
To
underline text created earlier in a document or text in an old document, the following steps must be followed:Using the TEXT KEYS (#20-#24) highlight the first word to be underlined.
Press the MARK key (#16) to letthe system know that this is where the underline function is to begin.
421
Word Processing on the Xerox 860Press the UNO key (#17).
All text that was marked will now be underlined.
NOTE: This function can be used to underline a word, a
sentence, a paragraph, or an entire page, depending on what the operator has marked.
DEUNDERLINING
INSERT
Using the TEXT KEYS (#20-#24) highlight the first word to be deunderlined.
Press the MARK key (# 16) to let the system know that this is where the deunderlining is to begin.
Using the TEXT KEYS (#20-#24) highlight all text to be deu nderl i ned.
Hold down the RVRSE key (#19) and press the UNO key (#17).
All text that was marked will now be deunderlined.
NOTE: This function can be used to deunderline a word, a
sentence, a paragraph, or an entire page, depending on what the operator has marked.
The insert feature on Xerox 860 is different from that on most other word processing systems. No insert button is found on the keyboard. This system is always in the insert mode. In order to insert a letter, space, paragraph, or page, use the following instructions:
Using the TEXT KEYS (#20-#24) highlight the letter or space where information is to be inserted.
Document Creation Functions
143
right of the original highlighted position and automatically wraps around when the right-hand margin is reached. While being inserted, this information appears to be one line higher and in larger print than the rest of the text.
Type in the information to be inserted.
Press the ACCPT key (#25). The inserted text now appears in the proper place and all other text surrounding it will be correctly arranged according to the page format set up by the operator. The characters of the inserted informa-tion will now be the same size as the remainder of the document.
NOTE: When inserting characters in the middle of text
that was automatically underlined, the text being inserted will also be automatically underlined. At any time during this operation before the ACCPT key (#25) has been
pressed, the BACKSPACE key (#14) may be used to delete the unwanted characters.
SUPERSCRIPT AND SUBSCRIPT
The INDEX key (#8) is used whenever a superscript or subscript number or letter is needed for a footnote or a formula. This key operates in the same fashion as the top row of a typewriter keyboard. The buttons on the top row of a typewriter keyboard contain more than one character on each key. If you hold down the shift key and press one of these number/symbol keys, the top character on the key will be typed on your paper. If you press the number/symbol key by itself, the bottom character on the key will be printed on your paper. When the CODE key (#12) is held down and the INDEX key (#8) is pressed, an up-arrow or superscript (item #10, Figure 6) will appear. If the CODE key is not held but just the INDEX key (#8) is pressed, a down-arrow or subscript (item #11, Figure 6) will appear. Superscript raises the printing a half space. In order for the printing to be brought back down to the normal typing line, a subscript must be typed at the end of all superscripted information. A superscript must end all subscripted information for the same reason.
REQUIRED SPACE
441
Word Processing on the Xerox 860person's name or the date on two different lines while applying the automatic carrier retu rn fu nction. If the operator wou Id Ii ke an enti re name, date, or any other pieces of information to remain together on one line, the following instructions should be followed:
When typing words or phrases that should be kept together, hold down the CODE key (#12) and press the SPACE BAR (#13) in between each of the words or numbers involved rather than typing a regular space be-tween each word.
A dotted slash mark (item #12, Figure 6) appears each time the required space function is used. This slash will not appear on the printed document. Instead, a regular space will appear in place of each slash, but the entire piece of information will remain on one line.
NOTE: If the length of the information using required
spacing is longer than one entire text line, this function will not perform properly.
PAGE ENDING
The Xerox 860 will automatically end one page and begin another (according to the paper size specified by the operator on the recordable format page, Figure 8). To do this, the operator must first inform the system that automatic paging is required. This is done by selecting or turning "on" the auto paging option on the non-recordable format page (Figure 9). Instructions for auto paging may be found on page 32. When this option is selected, each time the cursor reaches the last available line on a page, the message "Last Line" appears on the document status line to alert the operator that a new page is about to be created. When this line of type is completed, the system inserts a Temporary Page Break symbol (item #13, Figure 6) at this position on the page, and a new page is brought up on the screen for the operator's use.
REQUIRED PAGE END
Document Creation Functions
145
Using the TEXT KEYS position the highlighting where the page should end.
Hold down the CODE key (# 12) and press key for the number 2 on the keyboard.
The required page end symbol (item #14, Figure 6) will be placed at this position, and a new page will be brought up on the screen.
NOTE: The pagination function will
not
remove requiredpage ends when reassembling document pages. When a required page end is encountered, the system will move to the next page and proceed with the pagination process.
BOLD PRINTING
When an operator want