Research in a flash
Research in a flash
Geneious 7.0
Biomatters Ltd September 3, 2013Contents
1 Getting Started 7
1.1 Downloading & Installing Geneious . . . 7
1.2 Using Geneious for the first time . . . 8
2 Retrieving and Storing data 13 2.1 The main window. . . 13
2.2 Importing and exporting data . . . 23
2.3 Searching . . . 32
2.4 Public databases . . . 35
2.5 Storing data - Your Local Documents . . . 41
2.6 Agents . . . 47
2.7 Filtering and Similarity sorting . . . 51
2.8 Meta-Data . . . 51
2.9 Preferences . . . 55
2.10 Printing and Saving Images . . . 59
2.11 Back up . . . 60
3 Document Viewers 61 3.1 General viewer controls . . . 61
3.2 The Sequence (and alignment) Viewer . . . 61
3.3 Annotation Viewer . . . 78
3.4 Dotplot viewer . . . 78
3.5 RNA/DNA secondary structure fold viewer . . . 80
3.6 3D structure viewer . . . 81
3.7 Tree viewer. . . 83
3.8 Info Viewer. . . 86
3.9 Parents and Descendants . . . 86
3.10 The Chromatogram viewer . . . 91
3.11 The PDF document viewer. . . 92
3.12 The Journal Article Viewer . . . 92
4 Analysing Data 95 4.1 Literature. . . 95
4.2 Sequence data . . . 95
4.3 Dotplots . . . 96
4.4 Sequence Alignments . . . 97
4.5 Building Phylogenetic trees . . . 104
4.6 PCR Primers . . . 110
4.7 Contig Assembly . . . 123
4.8 Saving operation settings (option profiles) . . . 136
4.9 Results of analysis. . . 137 5 Custom BLAST 139 5.1 Setting Up . . . 139 6 COGs BLAST) 143 6.1 Setting Up . . . 143 6.2 BLASTing COGs. . . 144 7 Pfam 147
CONTENTS 5
7.1 Setting up the Pfam databases . . . 147
7.2 Pfam Document Types . . . 148
7.3 Pfam Operations . . . 149
8 Geneious Education 151 8.1 Creating a tutorial. . . 151
8.2 Answering a tutorial . . . 152
9 Collaboration 153 9.1 Managing Your Accounts . . . 154
9.2 Managing Your Contacts . . . 156
9.3 Sharing Documents . . . 158
9.4 Browsing, Searching and Viewing Shared Documents . . . 158
9.5 Chat. . . 159
10 Cloning 161 10.1 Find Restriction Sites . . . 162
10.2 Digest into fragments . . . 163
10.3 Insert into Vector . . . 165
10.4 Gateway®Cloning . . . 168
10.5 Gibson Assembly . . . 169
10.6 TOPO®Cloning . . . 171
11 Shared Databases 173 11.1 Supported Database Systems . . . 173
11.2 Setting up . . . 174
11.3 Removing a Shared Database . . . 175
11.4 Administration . . . 175
12.1 Activate License . . . 177
12.2 Install FLEXnet . . . 177
12.3 Borrow Floating License . . . 178
12.4 Release License . . . 178
12.5 Buy Online . . . 178
13 Geneious Server 179 13.1 Introduction to Geneious Server. . . 179
13.2 Accessing Geneious Server. . . 179
13.3 Running jobs and retrieving results. . . 181
13.4 Geneious Server enabled plugins . . . 183
14 Administration 185 14.1 Default data location . . . 185
14.2 Change default preferences . . . 185
14.3 Specify license server location . . . 186
14.4 Deleting plugins. . . 186
14.5 Max memory . . . 187
15 Troubleshooting 189 15.1 Local database issues . . . 189
15.2 Network issues . . . 193
15.3 Geneious is slow . . . 196
15.4 Importing and exporting data . . . 198
15.5 BLAST issues . . . 200
15.6 Primers . . . 202
15.7 Assembler . . . 205
Chapter 1
Getting Started
One of the best ways to get an introduction to Geneious, its features and how to use them is to watch our online video demonstration: http://desktop-links.geneious.com/ demonstration.
1.1
Downloading & Installing Geneious
Geneious is free to download fromhttp://desktop-links.geneious.com/download. If you are using Geneious for the first time you will be offered a free trial. If you have already purchased a license you can enter it when Geneious starts up.
To download Geneious, click on the internet address above (or type it in to your internet browser) to open the Geneious download page, enter your details, then choose your operat-ing system and click ‘Download’. Then choose the version of Geneious you want to download and click ”Download” again.
Geneious has some minimum system requirements. It is compatible with the three most com-mon operating systems: Windows, Mac, and Linux. Check that you have one of the following OS versions before you launch Geneious:
Operating System System requirements Windows XP/Vista/7/8 Mac OS 10.6/10.7/10.8 Linux
Geneious also needs Java 1.6 or higher to run. If you do not have this on your system already, please download a version of Geneious that includes Java. This involves downloading a larger file.
Once Geneious has downloaded, double left-click on the Geneious icon to start installing the program. While this is happening, you will be prompted for a location to install Geneious. Please check that you are satisfied with the location before continuing.
If you are using Mac OS X you will only have to double click on the disk image that is down-loaded then drag the Geneious application to your Applications folder. Don’t run Geneious from the mounted disk image as there are no write permissions on this. You must drag the icon into your Applications folder and run it from there.
1.1.1 Choosing where to store your data
When Geneious first starts up you will be asked to choose a location where Geneious will store all of your data. The default is normally fine. Although it’s possible to store your data on a network or USB drive so you can access it from other computers, this is not recommended because it can have adverse effects on performance. Please do not use a DropBox folder to store your data. This may corrupt your data.
To store your data somewhere different to the default, simply click the ‘Select’ button in the welcome window and choose an empty folder on your drive where you would like to store your data.
The data location can also be changed later by going to the “General” tab under “Tools” →
“Preferences...” in the menu and changing the “Data Storage Location” option. Geneious will offer to copy your existing data across to the new location if appropriate.
1.1.2 Upgrading to new versions
To upgrade existing Geneious installations, simply download and install the new to the same location. This will retain all your data.
1.2
Using Geneious for the first time
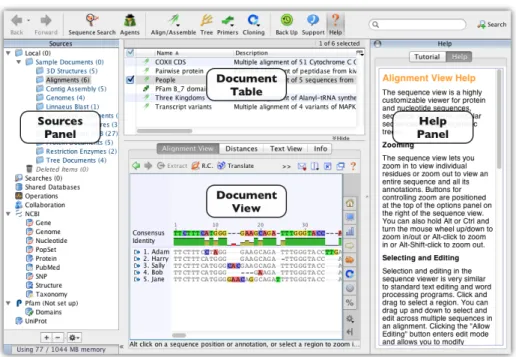
Figure1.1shows the main Geneious window. This has six important areas or ‘panels’.
1.2.1 The Sources Panel
The Sources Panel contains the service Geneious offers for storing and retrieving data. These in-clude your local documents (including sample documents), Shared Databases, UniProt, NCBI, Pfam and Collaboration. All these services will be described in detail later in the manual. For more information see section2.1.1.
1.2. USING GENEIOUS FOR THE FIRST TIME 9
1.2.2 The Document Table
The Document Table displays summaries of downloaded data such as DNA sequences, protein sequences, journal articles, sequence alignments, and trees. By clicking on the search icon you can search data for text or by sequence similarity (BLAST). You can enter a search string into the “Filter” box located at the right side of the toolbar; this will hide all documents that do not contain the search string. For more information, see section2.1.2.
1.2.3 The Document Viewer Panel
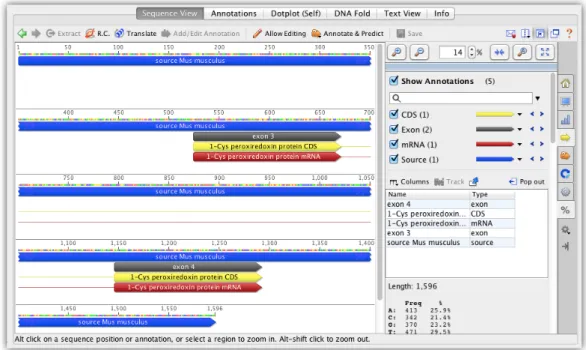
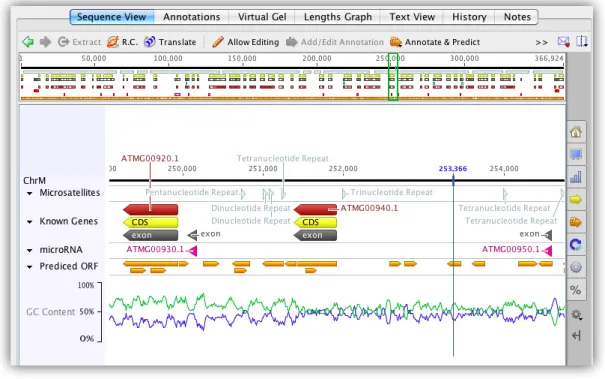
The Document Viewer Panel is where sequences, alignments, trees, 3D structures, journal ar-ticle abstracts and other types of documents can be shown graphically or as plain text. Many document viewers allow you to customize settings such as zoom level, color schemes, layout and annotations (nucleotide and amino acid sequences); three different layouts, branch and leaf labeling (tree documents); and many more. When viewing journal articles, this panel in-cludes direct link to Google Scholar. All these options are displayed on the right-hand side of the panel (Figure1.2). For more information see section2.1.3
(a) Nucleotide sequence (b) Journal Article (c) Phylogenetic tree
Figure 1.2: Three document viewers
1.2.4 The Help Panel
The Help Panel has two sections: “Tutorial” and “Help”. The tutorial gives you hands-on experience with some of the most popular features of Geneious. The Help section displays a short description of the currently selected service or document viewer. This panel can be closed at any time by clicking the button in its top corner, or by toggling the ‘Help’ button in the Toolbar.
If you are new to Geneious, working through the tutorial is a great way to familiarize yourself with Geneious.
1.2. USING GENEIOUS FOR THE FIRST TIME 11
1.2.5 The Toolbar
The toolbar gives quick access to commonly used features in Geneious including Sequence Search(eg. BLAST),Agentsthat search databases for new content even while you sleep,Align/Assemble, Treebuilding, andHelp. For more information on the toolbar, see section2.1.5.
Figure 1.4: The Toolbar
1.2.6 The Menu Bar
The Menu Bar has seven main menus “File”, “Edit”, “View”, “Tools”, “Sequence”, “Annotate & Predict” and “Help”. For details on the menu bar, see section2.1.7.
1.2.7 Popup Menus
Many actions can be quickly accessed for data items, services and sometimes selections in a viewer via popup menus (also known ascontext menus). To invoke a popup menu for an item, simply right-click (Ctrl+click on Mac OS X). The popup menu will contain the actions which are relevant to the item you clicked.
Chapter 2
Retrieving and Storing data
Geneious is a one-stop-shop for handling and managing your bioinformatic data. This chapter summarizes the different ways you can use Geneious to acquire, update, organize and store your data.
By the end of this chapter, you should be able to:
• Know the purpose of each panel in Geneious • Import/Export data from various sources • Organize your data into easily accessible folders • Automatically update your data
• Know about the advantages of the “Meta-Data” functionality • Customize Geneious to meet your needs.
• Export and print images from Geneious • Back up your data
2.1
The main window
This section provides more information on each of the panels in Geneious (Figure2.1).
Figure 2.1: Geneious main window
2.1.1 The Sources Panel
The Sources Panel shows a tree that concisely displays sources of data and your stored docu-ments. The plus (+) symbol indicates that a folder contains sub-folders. A minus (-) indicates that the folder has been expanded, showing its sub-folders. Click these symbols to expand or contract folders.
Geneious Sources Panel allows you to access:
• Your Local Documents.
• NCBI databases - Gene, Genome, Nucleotide, PopSet, Protein, Pubmed, SNP, Structure and Taxonomy.
• An EMBL database - Uniprot. • Your contacts’ Geneious databases.
You can view options for any selected service with the right mouse button, or by clicking the Options button at the bottom of the Sources Panel in Mac OS X.
2.1. THE MAIN WINDOW 15
2.1.2 The Documents Table
The Document Table displays your search results or your stored documents. While search results usually contain documents of a single type, a local folder may contain any mixture of documents, whether they are sequences, publications or other types. If you cannot see all of the columns in the document table you may want to close the help panel to make more room. This information is presented in table form (Figure2.2).
Figure 2.2: The document table, when browsing the local folders
Selecting a document in the Document Table will display its details in the Document View Panel. Selecting multiple documents will show a view of all the selected documents if they are of similar types, e.g. selecting two sequences will show both of them side-by-side in the sequence view.
The easiest way to select multiple documents is by clicking on the checkboxes down the left-hand side of the table. Standard keyboard controls can also be used (Shift and Ctrl/ click). Double-clicking a document in the Document Table displays the same view in a separate win-dow.
To view the actions available for any particular document or group of documents, right-click (Ctrl+click on Mac OS X) on a selection of them. These options vary depending on the type of document.
The Document Table has some useful features.
Editing. Values can be typed into the columns of the table. This is a useful way of editing the information in a document. To edit a particular value, first click on the document and then click on the column which you want to edit. Enter the appropriate new information and press enter. Certain columns cannot be edited however, eg. the NCBI accession number.
Copying. Column values can be copied. This is a quick method of extracting searchable infor-mation such as an accession number. To copy a value, right-click (Ctrl+click on Mac OS X) on it, and choose the “Copyname” option, wherenameis the column name.
Sorting. All columns can be alphabetically, numerically or chronologically sorted, depending on the data type. To sort by a given column click on its header. If you have different types of documents in the same folder, click on the “Icon” column to sort then according to their type. Managing Columns. You can reorder the columns to suit. Click on the column header and drag it to the desired horizontal position.
You can also choose which columns you want to be visible by right-clicking (Ctrl-click on Mac OS X) on any column header or by clicking the small header button in the top right corner of the table. This gives a popup menu with a list of all the available columns. Clicking on a column will show/hide it. Your preference is remembered so if you hide a column it will remain hidden in all areas of the program until you show it again.
As well as items to show/hide any of the available columns, there are a few more options in this popup menu to help you manage columns in Geneious.
• Lock Columns locks the state of the columns in the current table so that Geneious will never modify the way the columns are set up. You can still change the columns your self however.
• Save Current State... allows you to save the the current state if the columns so you can easily apply it to other tables. You can give the state a name and it will then appear in the Load Column State menu.
• Load Column State contains all of the columns states you have saved. Selecting a column state from here will immediately apply that state to the current table and lock the columns to maintain the new state. Use Delete Column State... to remove unwanted columns states from this menu.
Note. New columns can be added to the document table by adding Meta-Data to documents. (see2.8- Meta-Data).
2.1.3 The Document Viewer Panel
The Document Viewer Panel shows the contents of any document clicked on in the Document Table. To view large documents, it is sometimes better to double click on them. This opens a view in a new window. In the document viewer panel there are two tabs that are common to most types of documents: “Text view” and “Info”. “Text view” shows the document’s infor-mation in text format. The exception to this rule occurs with PDF documents where the user needs to either click the “View Document” button or double-click to view it.
2.1. THE MAIN WINDOW 17
Some document types such as sequences, trees and structures have an options panel occupying the right of the document viewer. The options in the options panel have an arrow which can be used to expand or hide a group of related options.
See the next section on document viewers for more information about operating the various viewers in Geneious.
Most viewers have their own small toolbar at the top of the document viewer panel. This always has five buttons on the far right:
• “Share” which allows you to share the current visualization on Twitter, Facebook or email.
• “Split View” which opens a second viewer panel of the same document. Selection is synchronized between these two views.
• “Expand Document View” which expands the viewer panel out to fill the entire main window. Clicking again will return the viewer to normal size.
• “Open Document in New Window” will open a new view of the selected document in a new, separate window.
• “Help” opens the Help Panel and displays some short help for the current viewer.
2.1.4 The Help Panel
The Help Panel has a “Help” tab and a “Tutorial” tab.
The Help tab provides you information about the service you are currently using or the viewer you are currently viewing. The help displayed in the help tab changes as you click on different services and choose different viewers.
The Tutorial is aimed at first-time users of Geneious and has been included to provide a feel for how Geneious works. It is highly recommended that you work through the tutorial if you haven’t used Geneious before.
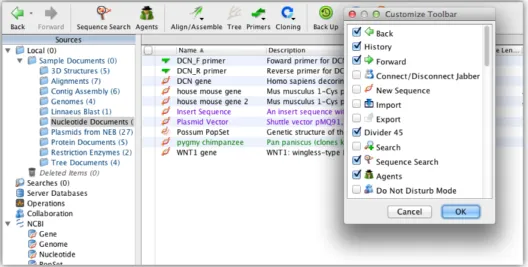
2.1.5 The Toolbar
The toolbar contains several icons that provide shortcuts to common functions in Geneious. You can alter the contents of the toolbar to suit your own needs. The icons can be displayed small or large, and with or without their labels. The Help icon is always available.
The “Back” and “Forward” options help you move between previous views in Geneious and are analogous to the back and forward buttons in a web browser. TheOoption shows a list of
previous views. The other features that can be accessed from the toolbar are described in later sections.
The toolbar can be customized by right-clicking (Ctrl-click on Mac OS X) on it. This gives a popup menu with the following options:
• “Show Labels” Turn the text labels on or off.
• “Large Icons” Switch between large and small icons.
• “Customize” which lists all available toolbar buttons. Selecting/deselecting buttons will show/hide the buttons in the toolbar.
2.1.6 Status bar
Below the Toolbar, there is a grey status bar. This bar displays the status of the currently selected service. For example, when you are running a search, it displays the number of matches, and the time remaining for the search to finish.
2.1.7 The Menu bar
File Menu
This contains some standard “File” menu items including printing and “Exit” on Windows. It also contains options to create, rename, delete, share and move folders and Import/Export options.
Edit Menu
Here you will find common editing functions including “Cut”, “Copy”, “Paste”, “Delete” and “Select All”. These are useful when transferring information from within documents to other locations, or exporting them. This menu also contains “Find in Document”, “Find Next” and “Find Previous” options. Find can be used to find text or numbers in a selected document. This is useful when looking for annotated regions or a stretch of bases in a sequence. This opens a “Find Dialog”. The shortcut to this is Ctrl+F.Nextfinds the next match for the text specified in the “Find” dialog. The shortcut keys are F3 or Ctrl+G. Geneious then allows you to choose another document and continue searching for the same search word. Prevfinds the previous match. The shortcut keys for this are Ctrl+Shift+G or Shift+F3. There are also the useful “Find Duplicates...” and “Batch Rename...” features in this menu.
2.1. THE MAIN WINDOW 19
View Menu
This contains several options and commands for changing the way you view data in Geneious: • “Back”, “Forwards” and “History” allow you to return to documents you had selected
previously.
• “Search” is discussed in section2.3. • “Agents” are discussed in section2.6.
• “Next unread document” selects the next document in the current folder which is unread. • “Table Columns” contains the same functionality as the popup menu for the document
table header. See section2.1.2for more details.
• “Open document in new window” Opens a new window with a view of the currently selected document(s).
• “Expand document view” expands the document viewer panel in the main window out to fill the entire main window. Selecting this again to return to normal.
• “Split Viewer Left/Right” creates a second copy of the document viewer with the two views laid out side by side.
• “Split Viewer Top/Bottom” creates a second copy of the document viewer with one on top of the other.
• “Document Windows” Lists the currently open document windows. Selecting one from this menu will bring that document window to the front.
Tools Menu
• “Align/Assemble” - see section4.4and section4.7respectively • “Tree” - see section4.5
• “Primers” - see section4.6
• “Cloning” - see section10
• “Sequence Search” - Perform a sequence search (such as NCBI Blast) using the currently selected sequence as the query. See section2.4.4
• “Add/Remove Databases” - see section5.1.3
• “Linnaeus Blast” - Perform a blast search and display the results using the Linnaeus viewer. Evolutionary trees are built for hits within the same species. These are then displayed inside boxes nested according to the NCBI taxonomy.
• “Extract Annotations” - Search the selected sequences or alignments for annotations which match certain criteria then extract all of the matching annotations to separate sequence documents. Includes the option to concatenate all matches in each sequence into one sequence document. Useful for extracting a certain gene from a group of genomes. • “Strip Alignment Columns” - creates a new alignment document with some columns (for
example all identical columns or all columns containing only gaps) stripped
• “Concatenate Sequences or Alignments” - Joins the selected sequences or alignments end-on-end, creating a single sequence or alignment document from several. After selecting this operation you are given the option to choose the order in which the sequences or alignments are joined. You can also choose whether the resulting document is linear or circular, and, if one or more of the component sequences was an extraction from over the origin of a circular sequence, you can choose to use the numbering from that sequence, thus producing a circular sequence with its origin in the same place as the original circular sequence. Overhangs will be taken into account when concatenating.
• “Generate Consensus Sequence” - Generates a consensus sequence for the selected se-quence alignment and saves it to a separate sese-quence document. After selecting this operation you are given options for choosing what type of consensus sequence you wish to generate - see section3.2.6for more details on the options.
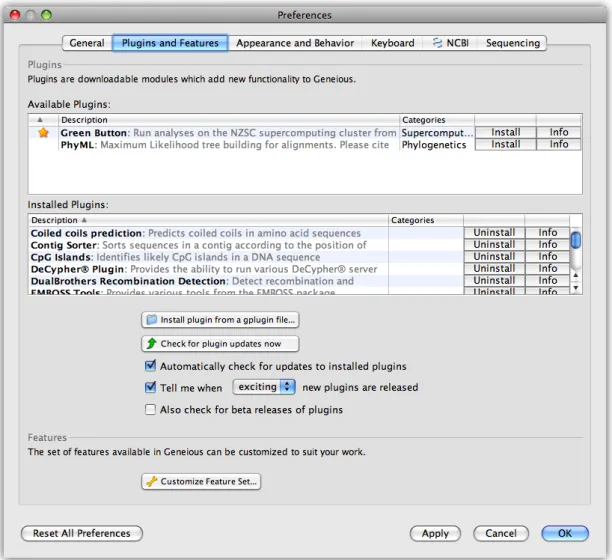
• “Plugins” - Jump directly to the plugins preferences. • “Preferences” - see section2.9
2.1.8 Sequence Menu
This contains several operations that can be performed on Protein and Nucleotide sequences as well as Sequence Alignments in some cases.
• New Sequence create a new nucleotide or protein sequence from residues that you can paste or type in.
• Extract Region,Reverse Complement,Translate. Sometimes a selection in the sequence viewer is required before performing these.
• Back Translatecreates an ambiguous nucleotide version of the selected protein document. • Circular Sequencessets whether the currently selected sequences are circular. This effects the way the sequence view displays them as well as how certain operations deal with the sequences (eg. digestion).
2.1. THE MAIN WINDOW 21
• Free End Gaps Alignmentsets whether the currently selected alignment has free end gaps. This effects calculation of the consensus sequences and statistics.
• Change Residue Numbering... changes the “original residue numbering” of the selected sequence. On a linear sequence, this is used to indicate that a sequence is a subsequence of some larger sequence. On a circular sequence, this is used to shift the origin of the sequence.
• Convert between DNA and RNA changes all T’s in a sequence to U’s or vice versa, de-pending on the type of the selected sequence. Once this is performed, click “Save” in the Sequence View to make the change permanent.
• Set Paired Readssets up paired reads for assembly. See section4.7.4
• Set Read Directionmarks sequences as forward or reverse reads so the correct reads are reverse complemented by assembly.
• Separate Reads by Barcodeseparates multiplex or barcode data (e.g. 454 MID data).
• Group Sequences into a Listcreates a sequence list containing copies of all of the selected sequences. Lists can make it easier to manager large numbers of sequences by keeping related ones grouped in a single document.
• Extract Sequence from Listcopies each sequence out of a sequence list into a separate se-quence document.
• Generate Mutated Sequencesmutates a sequence using the EMBOSS tool msbar
• Generate Shuffled Sequencesrandomly shuffles a sequence using the EMBOSS tool shuffle-seq
2.1.9 Annotate & Predict Menu
This menu contains many tools for finding, predicting and annotating regions of interest in sequences and alignments.
• Trim EndsSee section4.7.3.
• Annotate from DatabaseAnnotates sequences with similar annotations from your database. • Find ORFsFinds all open reading frames in a sequence and annotates them
• Search for Motifssearches for motifs in PROSITE format. Uses “fuzznuc” and “fuzzpro” from EMBOSS.
• Find Low/High Coveragefinds regions with low or high read coverage in assemblies • Download Annotation Tracksannotates chromosomes with tracks from the Broad Institute • Search for Transcription Factors searches for transcription factors from the TRANSFAC
database in a nucleotide sequence. Uses “tfscan” from EMBOSS
• Predict Antigenic Regionspredicts potentially antigenic regions of a protein sequence, us-ing the method of Kolaskar and Tongaonkar. Uses “antigenic” from EMBOSS
• Predict Secondary Structureuses the original Garnier Osguthorpe Robson algorithm (GOR I) for predicting protein secondary structure. Uses “garnier” from EMBOSS
• Predict Signal Cleavage Sitespredicts the site of cleavage between a signal sequence and the mature exported protein. Uses “sigcleave” from EMBOSS
Help Menu
This consists of the standard Help options offered by Geneious.
• Helpshows and hides the Help panel • Tutorialshows and hides the Tutorial panel
• Online Resourcesgives access to a variety of resources on our website • Check for Updateschecks for new versions of Geneious
• Contact Supportallows you to contact our Support team through Geneious • Activate Licenselets you activate a license or connect to a license server
• Install FLEXnetinstalls the FLEXnet licensing service which is necessary to use FLEXnet licenses
• Borrow Floating Licenselets you borrow a license from a FLEXnet server, if the maintainer of the server has provided you with a Borrow File
• Release Licensesreleases any floating license you are currently holding and returns any local FLEXnet licenses to our server so they can be activated on a difference machine • Buy Onlinesends you to our online store
• About Geneiousgives details about the version of Geneious you are running, and licensing information
2.2. IMPORTING AND EXPORTING DATA 23
2.2
Importing and exporting data
Geneious is able to import raw data from different applications and export the results in a range of formats. If you are new to bioinformatics, please take the time to familiarize yourself with this chapter as there are a number of formats to be aware of.
2.2.1 Importing data from the hard drive to your Local folders
To import files from local disks or network drives, click “File”→“Import”→“From file”. This will open up a file dialog. Select one or more files and click “Import”. If Geneious’ automatic file format detection fails, select the file type you wish to import (Figure2.3). The different file types are described in detail in the next section.
2.2.2 Data input formats
Geneious version 7.0 can import the following file formats:
Format Extensions Data types Common sources
BED *.bed Annotations UCSC
Common Assembly Format *.caf Contigs Sequencher
Clustal *.aln Alignments ClustalX
CSFASTA *.csfasta Color space FASTA ABI SOLiD DNAStar *.seq, *.pro Nucleotide & protein sequences DNAStar
DNA Strider *.str Sequences DNA Strider (Mac program), ApE Embl/UniProt *.embl, *.swp Sequences Embl, UniProt
Endnote (8.0) XML *.xml Journal article references Endnote, Journal article websites FASTA *.fasta, *.fas, etc. Sequences, alignments PAUP*, ClustalX, BLAST, FASTA FASTQ *.fastq, *.fasq Sequences with quality Solexa/Illumina
GCG *.seq Sequences GCG
GenBank *.gb, *.xml Nucleotide & protein sequences GenBank Geneious *.xml, *.geneious Preferences, databases Geneious Geneious Education *.tutorial.zip Tutorial, assignment etc. Geneious
GFF *.gff Annotations Sanger Artemis
MEGA *.meg Alignments MEGA
Molecular structure *.pdb, *.mol, *.xyz, *.cml,
*.gpr, *.hin, *.nwo 3D molecular structures 3D structure databases and programs Newick *.tre, *.tree, etc. Phylogenetic trees PHYLIP, Tree-Puzzle, PAUP*, ClustalX Nexus *.nxs, *.nex Trees, Alignments PAUP*, Mesquite, MrBayes & MacClade PDB *.pdb 3D Protein structures SP3, SP2, SPARKS, Protein Data Bank PDF *.pdf Documents, presentations Adobe Writer, LATEX, Miktex
Phrap ACE *.ace Contig assemblies Phrap/Consed
PileUp *.msf Alignments pileup (gcg)
PIR/NBRF *.pir Sequences, alignments NBRF PIR
Qual *.qual Quality file Associated with a FASTA file Raw sequence text *.seq Sequences Any file that contains only a sequence Rich Sequence Format *.rsf Sequences, alignments GCGs NetFetch
Comma/Tab Separated Values *.csv, *.tsv Spreadsheet files Microsoft Excel
SAM/BAM *.sam, *.bam Contigs SAMtools
Sequence Chromatograms *.ab1, *.scf Raw sequencing trace & sequence Sequencing machines
VCF *.VCF Annotations 1000 Genomes Project
Vector NTI sequence *.gb, *.gp Nucleotide & protein sequences Vector NTI Vector NTI/AlignX alignment *.apr Alignments Vector NTI, AlignX Vector NTI Archive *.ma4, *.pa4, *.oa4, Nucleotide & protein sequences,
*.ea4, *.ca6 enzyme sets and publications Vector NTI Vector NTI/ContigExpress *.cep Nucleotide sequence assemblies Vector NTI Vector NTI database VNTI Database Nucleotide & protein sequences,
enzyme sets and publications Vector NTI
BED format
The BED format contains sequence annotation information. You can use a BED file to anno-tate existing sequences in your local database, import entirely new sequences, or import the annotations onto blank sequences.
CLUSTAL format
The Clustal format is used by ClustalW [24] and ClustalX [23], two well known multiple se-quence alignment programs.
Clustal format files are used to store multiple sequence alignments and contain the word clustal at the beginning. An example Clustal file:
2.2. IMPORTING AND EXPORTING DATA 25 seq1 ---KSKERYKDENGGNYFQLREDWWDANRETVWKAITCNA seq2 ---YEGLTTANGXKEYYQDKNGGNFFKLREDWWTANRETVWKAITCGA seq3 ----KRIYKKIFKEIHSGLSTKNGVKDRYQN-DGDNYFQLREDWWTANRSTVWKALTCSD seq4 ---SQRHYKD-DGGNYFQLREDWWTANRHTVWEAITCSA seq5 ---NVAALKTRYEK-DGQNFYQLREDWWTANRATIWEAITCSA seq6 ---FSKNIX--QIEELQDEWLLEARYKD--TDNYYELREHWWTENRHTVWEALTCEA seq7 ---KELWEALTCSR seq1 --GGGKYFRNTCDG--GQNPTETQNNCRCIG---ATVPTYFDYVPQYLRWSDE seq2 P-GDASYFHATCDSGDGRGGAQAPHKCRCDG---ANVVPTYFDYVPQFLRWPEE seq3 KLSNASYFRATC--SDGQSGAQANNYCRCNGDKPDDDKP-NTDPPTYFDYVPQYLRWSEE seq4 DKGNA-YFRRTCNSADGKSQSQARNQCRC---KDENGKN-ADQVPTYFDYVPQYLRWSEE seq5 DKGNA-YFRATCNSADGKSQSQARNQCRC---KDENGXN-ADQVPTYFDYVPQYLRWSEE seq6 P-GNAQYFRNACS----EGKTATKGKCRCISGDP---PTYFDYVPQYLRWSEE seq7 P-KGANYFVYKLD---RPKFSSDRCGHNYNGDP---LTNLDYVPQYLRWSDE CSFASTA format
ABI .csfasta files represent the color calls generated by the SOLiD sequencing system.
DNAStar files
DNAStar .seq and .pro files are used in Lasergene, a sequence analysis tool produced by DNAStar.
DNA Strider
Sequence files generated by the Mac program DNA Strider, containing one Nucleotide or Pro-tein sequence.
EMBL/UniProt
Nucleotide sequences from the EMBL Nucleotide Sequence Database, and protein sequences from UniProt (the Universal Protein Resource)
EndNote 8.0 XML format
EndNote is a popular reference and bibliography manager. EndNote lets you search for journal articles online, import citations, perform searches on your own notes, and insert references into documents. It also generates a bibliography in different styles. Geneious can interoperate with EndNote using Endnote’s XML (Extensible Markup Language) file format to export and import its files.
FASTA format
The FASTA file format is commonly used by many programs and tools, including BLAST [1], T-Coffee [17] and ClustalX [23]. Each sequence in a FASTA file has a header line beginning with a “>” followed by a number of lines containing the raw protein or DNA sequence data. The sequence data may span multiple lines and these sequence may contain gap characters. An empty line may or may not separate consecutive sequences. Here is an example of three sequences in FASTA format (DNA, Protein, Aligned DNA):
>Orangutan
ATGGCTTGTGGTCTGGTCGCCAGCAACCTGAATCTCAAACCTGGAGAGTGCCTTCGAGTG >gi|532319|pir|TVFV2E|TVFV2E envelope protein
ELRLRYCAPAGFALLKCNDADYDGFKTNCSNVSVVHCTNLMNTTVTTGLLLNGSYSENRT QIWQK >Chicken CTACCCCCCTAAAACACTTTGAAGCCTGATCCTCACTA---CTGT CATCTTAA FASTQ format
FASTQ format stores sequences and Phred qualities in a single file.
GenBank files
Records retrieved from the NCBI webiste (http://www.ncbi.nlm.nih.gov) can be saved in a number of formats. Records saved in GenBank or INSDSeq XML formats can be imported into Geneious.
2.2. IMPORTING AND EXPORTING DATA 27
Geneious format
The Geneious format can be used to store all your local documents, meta-data types and pro-gram preferences. A file in Geneious format will usually have a.geneious extension or a .xmlextension. This format is useful for sharing documents with other Geneious users and backing up your Geneious data.
Geneious Education format
This is an archive containing a whole bundle of files which together comprise a Geneious ed-ucation document. This format can be used to create assignments for your students, bioinfor-matics tutorials, and much more. See chapter8for information on how to create such files.
GFF format
The GFF format contains sequence annotation information (and optional sequences). You can use a GFF file to annotate existing sequences in your local database, import entirely new se-quences, or import the annotations onto blank sequences.
MEGA format
The MEGA format is used by MEGA (Molecular Evolutionary Genetics Analysis).
Molecular structure
Geneious imports a range of molecular structure formats. These formats support showing the locations of the atoms in a molecule in 3D:
• PDB formatfiles from the Research Collaboratory for Structural Bioinformatics (RCSB) Protein Database
• *.mol formatfiles produced by MDL Information Systems Inc • *.xyz formatfiles produced by XMol
• *.cml formatfiles in Chemical Markup Language • *.gpr formatghemical files
• *.hin formatfiles produced by HyperChem • *.nwo formatfiles produced by NWChem
Newick format
The Newick format is commonly used to represent phylogenetic trees (such as those inferred from multiple sequence alignments). Newick trees use pairs of parentheses to group related taxa, separated by a comma (,). Some trees include numbers (branch lengths) that indicate the distance on the evolutionary tree from that taxa to its most recent ancestor. If these branch lengths are present they are prefixed with a colon (:). The Newick format is produced by pro-grams such as PHYLIP, PAUP*, ClustalW [24], ClustalX [23], Tree-Puzzle [8] and PROTML. Geneious is also able to read trees in Newick format and display them in the visualization win-dow. It also gives you a number of display options including tree types, branch lengths, and labels.
Nexus format
The Nexus format [13] was designed to standardize the exchange of phylogenetic data, in-cluding sequences, trees, distance matrices and so on. The format is composed of a number of blocks such as TAXA, TREES and CHARACTERS. Each block contains pre-defined fields. Geneious imports and exports files in Nexus format, and can process the information stored in them for analysis.
If you want to export a tree in a format that preservesbootstrap values for example, Nexus is the choice. Make sure you export with metacomments enabled though otherwise the boot-straps will be lost.
PDB format
Protein Databank files contain a list of XYZ co-ordinates that describe the position of atoms in a protein. These are then used to generate a 3D model which is usually viewed with Rasmol or SPDB viewer. Geneious can read PDB format files and display an interactive 3D view of the protein structure, including support for displaying the protein’s secondary structure when the appropriate information is available.
PDF format
PDF stands for Portable Document Format and is developed and distributed by Adobe Systems (http://www.adobe.com/). It contains the entire description of a document including text, fonts, graphics, colors, links and images. The advantage of PDF files is that they look the same regardless of the software used to create them. Some word processors are able to export a document into PDF format. Alternatively, Adobe Writer can be used. Currently, you can use Geneious to read, store and open PDF files and future versions will have more options for storing and manipulating PDF.
2.2. IMPORTING AND EXPORTING DATA 29
Phrap Ace files
Ace is the format used by the Phrap/Consed package, created by the University of Washington Genome Center. This package is used mainly to assemble sequences.
PileUp format
The PileUp format is used by the pileup program, a part of the Genetics Computer Group (GCG) Wisconsin Package.
PIR/NBRF format
Format used by the Protein Information Resource, a database established by the National Biomedical Research Foundation
Qual file
Quality file which must be in the same folder as the sequence file (FASTA format) for the quality scores to be used.
Raw sequence format
A file containing only a sequence
Rich Sequence format
RSF (Rich Sequence Format) files contain one or more sequences that may or may not be related. In addition to the sequence data, each sequence can be annotated with descriptive sequence information.
Comma/Tab Separated Values
Sequences such as primer lists are often stored in spreadsheets. Geneious has an importer that can be given the field values for a spreadsheet file exported in CSV or TSV format, and it will import them and convert them to documents as well as preserving the additional field contents. It can handle nucleotide and amino acid sequences, as well as primers and probes. For more information on importing primers from a spreadsheet, see the PCR Primers section.
SAM and BAM format
SAM and BAM format are produced and used by SAMtools. SAM/BAM files contain the results of an assembly in the form of reads and their mappings to reference sequences.
Sequence Chromatograms
Sequence chromatogram documents contain the results of a sequencing run (the trace) and a guess at the sequence data (base calling).
Informally, the trace is a graph showing the concentration of each nucleotide against sequence positions. Base calling software detects peaks in the four traces and assigns the most probable base at more or less even intervals.
VCF format
The VCF format contains sequence annotation information. You can use a VCF file to anno-tate existing sequences in your local database, import entirely new sequences, or import the annotations onto blank sequences.
Vector NTI®formats
Geneious supports the import of several Vector NTI formats:
• *.gb and *.gp formatsThese formats are used in Vector NTI for saving single nucleotide and protein sequence documents. They are very similar to the GenBank formats with the same extensions, although they contain some extra information.
• *.apr format This format is used for storing alignments and trees made with AlignX, Vector NTI’s alignment module.
• *.ma4, *.pa4, *.oa4, *.ea4 and *.ca6 formatsThese are the archive formats which Vector NTI uses to export whole databases.
• *.cep format This format is produced by the ContigExpress module and Geneious will import sequences (including the positions of the base calls), traces, qualities, trimmed regions, annotations and editing history for individual reads and contigs.
2.2. IMPORTING AND EXPORTING DATA 31
2.2.3 Where does my imported data go?
The above formats can be all imported into Geneious from local files. Geneious also enables you to download certain types of documents directly from public databases such as NCBI and EMBL. The method used to retrieve a particular piece of data will determine where in Geneious it is stored.
Data imported from local files. This is imported directly into the currently selected local folder within Geneious. If no folder is selected, Geneious will open a dialog which lets you specify a folder.
Data from an NCBI/EMBL/Contacts search. Data downloaded from public databases within Geneious will appear in the Document Table when that database is selected and can be dragged from there into a local folder of your choice.
Important: if you don’t drag the documents from a database search into your local folders the results will be lost when Geneious is closed.
2.2.4 Data output formats
Each data type has several export options. Any set of documents may be exported in Geneious native format.
Data type Export format options
DNA sequence FASTA, Genbank XML, Genbank flat, Geneious Amino acid sequence FASTA, Genbank XML, Genbank flat, Geneious Chromatogram sequence ABI, Geneious
Sequence with quality FastQ, Qual, Geneious Annotation GFF, BED, Geneious
Multiple sequence alignment Phylip, FASTA, NEXUS [13], MEGA3 [12], Geneious Assembly Phrap ACE, Geneious, SAM/BAM
Phylogenetic tree Phylip, FASTA, NEXUS [13], Newick, MEGA3 [12], Geneious PDF document PDF, Geneious
Publication EndNote 8.0, Geneious Graphs, CSV, WIG
Document Properties CSV, TSV, Geneious
Additionally, documents imported in any chromatogram or molecular structure format can be re-exported in that format as long as no changes have been made to the document.
2.2.5 Export to comma separated values (CSV) file
The value displayed in the document table can be exported to csv file which can be loaded by most spread sheet programs. When choosing to export in csv format Geneious will also present a list of the available columns in the table (including hidden ones) so you can choose which to export. Data can be exported to TSV (tab separated values) format too.
There is also a CSV importer. It is often useful to export your data to a spreadsheet to do bulk modifications to fields and then reimport.
2.2.6 Batch Export
Batch export takes the selected documents and exports each to its own file. E.g. select several chromatograms to export them all to ab1 format files. The options for batch export let you specify the format and folder to export to as well as the extension to use. Each file will be named according to the Name column in Geneious.
2.3
Searching
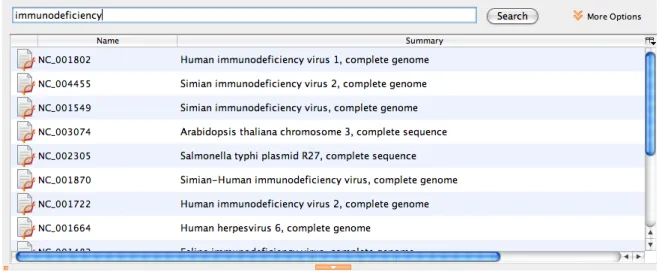
Searching is designed to be as user-friendly as possible and the process is the same if you are searching your local documents or a public database such as NCBI. To search the selected database or folder click the “Search” button from the toolbar. For non-local folders search will be on by default and cannot be closed. This applies to NCBI and EMBL databases. For local folders search is off by default.
When search is first activated the document table will be emptied to indicate no results have been found. To return to browsing click the “Search” button again or press the Escape key while the cursor is in the search text field.
To initiate a search enter the desired search term(s) in the text field and press enter or click the adjacent “Search” button. Once a search starts the results will appear in the document table as they are found. The “Search” button changes to a “Cancel” button while a search is in progress and this may be clicked at any time to terminate the search. Feedback on a search progress is presented in the status bar directly below the toolbar (see Figure2.4).
2.3.1 Advanced Search options
To access advanced search click the “More Options” button inside the basic search panel. To return to basic search click the “Fewer Options” button. Switching between advanced and basic will not clear the search results table.
2.3. SEARCHING 33
Figure 2.4: The Search tab of the Document Table
This feature provides more search options to select from. Geneious allows you to search with a range of criteria; however, these depend on the database being searched. All the fields in the NCBI public databases can be searched in any combination. Each database has a specific list of fields and it is important to familiarize yourself with these fields to make full use of the Advanced Search. The fields available for a search can be found in the left-most drop-down box after enabling the advanced search options.
When searching in your local documents, ’?’ can be used to represent any single character and ’*’ can be used to represent a series of 0 or more unknown characters. For example, searching for CO*I matches COI and COXI.
Note. When searching the Genome, Gene or PopSet databases, the documents returned are only summaries. To download the whole genome, select the summary(s) of the genome(s) you would like to download and the click the “Download” button inside the document view or just above it. There are also “Download” items in the File menu and in the popup menu when document summary is right-clicked (Ctrl+click on Mac OS X). The size of these files is not displayed in the Documents Table. Be aware that whole genomes can be very large and can take a long time to download. You can cancel the download of document summaries by selecting “Cancel Downloads” from any of the locations mentioned above.
Advanced Search also provides you with a number of options for restricting the search on a field depending on the field you are searching against. For example, if you are using numbers to search for “Sequence length” or “No. of nodes” you can further restrict your search with the second drop-down box:
• “is less than” (<)
• “is greater than or equal to” (≥) • “is less than or equal to” (≤)
Likewise if you are searching on the “Creation Date” search field you have the following op-tions
• “is before or on” • “is after or on” • “is between”
When searching your local folders you have the option of searching by “Document type”. The second drop-down list provides the options “is” and “is not”. The third drop-down lists the various types of documents that can be stored in Geneious such as “3D-Structure”, “Nucleotide sequence”, and “PDF” (see Figure2.5).
Figure 2.5: Document type search options
And/Or searches
The advanced options lets you search using multiple criteria. By clicking the “+” button on right of the search term you can add another search criteria. You can remove search criteria by clicking on the appropriate “-” button. The “Match all/any of the following” option at the top of the search terms determines how these criteria are combined:
Match “Any”requires a match of one or more of your search criteria. This is a broad search and results in more matches.
2.4. PUBLIC DATABASES 35
Match “All”requires a match all of your search criteria. This is a narrow search and results in fewer matches.
Figure 2.6: Advanced Search
2.3.2 Autocompletion of search words
Geneious remembers previously searched keywords and offers an auto-complete option. This works in a similar way to Google or predictive text on your mobile phone. If you click within the search field, a drop-down box will appear showing previously used options.
2.4
Public databases
Geneious allows you to search several public databases in the same way that you can search your local documents. The search process is described in section2.3.
Geneious is able to communicate with a number of public databases hosted by the National Centre for Biotechnology Information (NCBI) as well as the UniProt and Pfam databases. You can access these databases through the web at http://www.ncbi.nlm.nih.gov, http: //www.uniprot.org/andhttp://www.sanger.ac.uk/Software/Pfam/respectively. These are all well known and widely used storehouses of molecular biology data.
When viewing data from a public database such as NCBI the data can not be modified. This is demonstrated by the small padlock icon which appears in the status bar. When this icon is present items cannot be added or removed from the table and they cannot be modified in any way. To modify an item you must first move it to your local folders.
2.4.1 Pfam See chapter7.
2.4.2 UniProt
This database is a comprehensive catalogue of protein data. It includes protein sequences and functions from Swiss-Prot, TrEMBL, and PIR.
2.4.3 NCBI (Entrez) databases
NCBI was established in 1988 as a public resource for information on molecular biology. Geneious allows you to directly download information from nine important NCBI databases and perform NCBI BLAST searches (Table2.1).
Table 2.1: NCBI databases accessible via Geneious Database Coverage
Genome Whole genome sequences Nucleotide DNA sequences
PopSet sets of DNA sequences from population studies Protein Protein sequences
Structure 3D structural data
PubMed Biomedical literature citations and abstracts Taxonomy Names and taxonomy of organisms
SNP Single Nucleotide Polymorphisms
Gene Genes
The Entrez Genome database. The Entrez genome database has been retired. For backwards compatibility Geneious simulates searching of the old genome database by searching the Entrez Nucleotide database and filtering the results to include only genome results.
The Entrez Nucleotide database. This database in GenBank contains 3 separate components that are also searchable databases: “EST”, “GSS” and “CoreNucleotide”. The core nucleotide database brings together information from three other databases: GenBank, EMBI, and DDBJ. These are part of the International collaboration of Sequence Databases. This database also contains Ref-Seq records, which are NCBI-curated, non-redundant sets of sequences.
The Entrez Popset database. This database contains sets of aligned sequences that are the result of population, phylogenetic, or mutation studies. These alignments usually describe evolution
2.4. PUBLIC DATABASES 37
and population variation. The PopSet database contains both nucleotide and protein sequence data, and can be used to analyze the evolutionary relatedness of a population.
The Entrez Protein database. This database contains sequence data from the translated coding regions from DNA sequences in GenBank, EMBL, and DDBJ as well as protein sequences sub-mitted to the Protein Information Resource (PIR), SWISS-PROT, Protein Research Foundation (PRF), and Protein Data Bank (PDB) (sequences from solved structures).
The Entrez Structure database. This is NCBI’s structure database and is also called MMDB (Molecular Modeling Database). It contains three-dimensional, biomolecular, experimentally or programmatically determined structures obtained from the Protein Data Bank.
The PubMed database. This is a service of the U.S. National Library of Medicine that includes over 16 million citations from MEDLINE and other life science journals. This archive of biomed-ical articles dates back to the 1950s. PubMed includes links to full text articles and other related resources, with the exception of those journals that need licenses to access their most recent issues.
Entrez Taxonomy. This database contains the names of all organisms that are represented in the NCBI genetic database. Each organism must be represented by at least one nucleotide or protein sequence.
Entrez Gene. Entrez Gene is NCBI’s database for gene-specific information. It does not include all known or predicted genes; instead Entrez Gene focuses on the genomes that have been completely sequenced, that have an active research community to contribute gene-specific in-formation, or that are scheduled for intense sequence analysis.
Entrez SNP. In collaboration with the National Human Genome Research Institute, The Na-tional Center for Biotechnology Information has established the dbSNP database to serve as a central repository for both single base nucleotide subsitutions and short deletion and insertion polymorphisms.
The scope and depth of these databases make them critical information sources for molecu-lar biologists and bioinformaticians alike. However, a library is only as good as its librarian. Geneious is your librarian, allowing you to search for, filter and store, only the data that you care about.
2.4.4 Accessing NCBI BLAST through Geneious
BLAST [1] stands for Basic Local Alignment Search Tool. It allows you to query the NCBI sequence databases with a sequence in order to find entries in the public database that contain similar sequences. When “BLAST-ing”, you are able to specify either nucleotide or protein sequences and nucleotide sequences can be either DNA or RNA sequences. The result of a BLAST query is a table of “hits”. Each hit refers to a GenBank accession number and the gene or protein name of the sequence. Each hit also has a “Bit-score” which provides information
about how similar the hit is to the query sequence. The bigger the bit score, the better the match. Finally there is also an “E-value” or “Expect value”, which represents the number of hits with at least this score that you would expect purely by chance, given the size of the database and query sequence. The lower the E-value, the more likely that the hit is real.
Geneious can perform seven different kinds of BLAST search:
• blastn: Compares a nucleotide query sequence against a nucleotide sequence database. • Megablast: A variation on blastn that is faster but only finds matches with high similarity. • Discontiguous Megablast: A variation on blastn that is slower but more sensitive. It will
find more dissimilar matches so it is ideal for cross-species comparison.
• blastp: Compares an amino acid query sequence against a protein sequence database. • blastx: Compares a nucleotide query sequence translated in all reading frames against a
protein sequence database. You could use this option to find potential translation prod-ucts of an unknown nucleotide sequence.
• tblastn: Compares a protein query sequence against a nucleotide sequence database dy-namically translated in all reading frames.
• tblastx: Compares the six-frame translations of a nucleotide query sequence against the six-frame translations of a nucleotide sequence database. Please note that the tblastx program cannot be used with the nr database on the BLAST Web page because it is too computationally intensive.
Geneious is able to run NCBI BLAST on many different databases. Some of these databases are non-redundant in order to reduce duplicate hits. The databases that can be searched are shown in the following tables.
You can quickly and easily BLAST against any of these databases using any of the available BLAST programs via the Sequence Search operation. This operation can be accessed by going to the Tools menu or by right-clicking (Ctrl+click on Mac OS X) on a sequence document and choosing “Sequence Search”. This will bring up the sequence search options.
Geneious gives you the option of searching against a database using either your currently se-lected sequence documents or a sequence you enter manually. If you choose to enter your sequence manually, then Geneious will display a large text box in which you can enter your query sequence as either unformatted text or FASTA format.
Select your database using the first drop-down box. Databases are grouped together under their respective services. The available programs in the second drop-down box will depend on the database you have chosen.
Geneious also allows you to specify most of the advanced options that are available in BLAST. To access the advanced options click the “More Options” button which is in the bottom left
2.4. PUBLIC DATABASES 39
Table 2.2: Nucleotide sequence searches in the BLAST databases
Database Nucleotide searches
nr All non-redundant GenBank+EMBL+DDBJ+PDB sequences( no EST, STS, GSS or HTGS sequences) genome Genomic entries from NCBI’s Reference Sequence project
est Database of GenBank + EMBL + DDBJ sequences from EST Divisions est human Human subset of est
est mouse Mouse subset of est
est others Non-Human, non-mouse subset of est
gss Genome Survey Sequence, includes single-pass genomic data, exon-trapped sequences, and Alu PCR sequences. htgs Unfinished High Throughput Genomic Sequences: phases 0, 1 and 2 (finished, phase 3 HTG sequences are in nr) pat Nucleotide sequences derived from the Patent division of GenBank
PDB Sequences derived from the 3D-structures of proteins from PDB
month All new/updated GenBank+EMBL+DDBJ+PDB sequences released in the last 30 days. RefSeq NCBI-curated, non-redundant sets of sequences.
dbsts Database of GenBank+EMBL+DDBJ sequences from STS Divisions
chromosome A database with complete genomes and chromosomes from the NCBI Reference Sequence project. wgs A database for whole genome shotgun sequence entries.
env nt This contains DNA sequences from the environment, i.e all organisms put together
Table 2.3: Protein sequence searches in the BLAST databases Database Protein searches
env nr Translations of sequences in env nt
month All new/updated GenBank coding region (CDS) translations +PDB+SwissProt+PIR released in last 30 days nr All non-redundant GenBank coding region (CDS) translations+PDB+SwissProt+PIR+PRF
pat Protein sequences derived from the Patent division of GenBank PDB Sequences derived from 3D structure Brookhaven PDB
RefSeq RefSeq protein sequences from NCBI’s Reference Sequence Project SwissProt Curated protein sequences information from EMBL
of the Sequence Search options. The available options vary depending on the kind of BLAST search you have selected. For details on each of the options you can hover your mouse over the option to see a short description or refer to the NCBI BLAST documentation at http: //www.ncbi.nlm.nih.gov/blast/blastcgihelp.shtml.
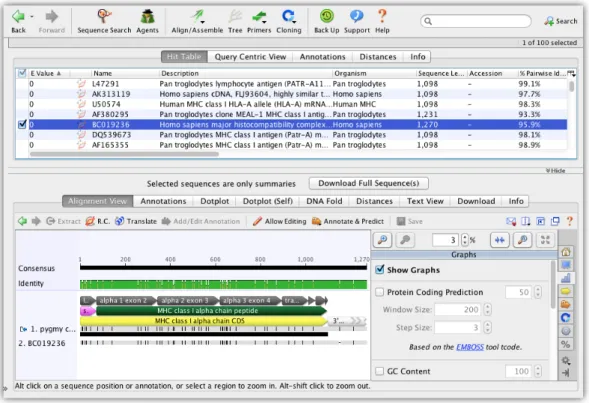
Once a search has started, a results folder will be created under the Searches folder in the Sources panel. Search progress is shown in the document table. The search can be cancelled by clicking on the red square labelled “Stop” (See Figure2.8).
When using the “Standard” search type, each search hit is displayed separately in the docu-ment table sorted by “E value”. As well as standard columns like “Name”, search hits can also be sorted by “Coverage” and a special “Grade” column which is calculated by Geneious. The “Grade” column is a percentage calculated by combining the query coverage, e-value and identity values for each hit with weights 0.5, 0.25 and 0.25 respectively. This allows you to sort hits such that the longest, highest identity hits are at the top.
Figure 2.7: Sequence Search Options
Once the search has completed the results can be moved to your local database at your conve-nience. If your query sequence was annotated then any annotations that cover the hit region will be transfered to the BLAST hit document.
You can also download the full database sequence that corresponds to a BLAST hit. To retrieve the full sequence select a BLAST alignment and go to “File”→“Download Documents” or click theDownload Full Sequence(s)button located above the viewer tabs. The full sequence will be available in the “Sequence View” tab once the download has completed. In addition the annotations from the full sequence will be transfered over to the BLAST alignment (see Figure
2.10).
If you have a mirror of the NCBI BLAST databases you can set Geneious to use this by going to “Tools”→“Add/Remove Databases”→“Set Up Search Services”. This will bring up a dialog that allows you to change the setup for various search services in Geneious. Choose NCBI using the service drop-down box at the top of the dialog. Enter the URL for the mirror and click ‘OK’ to apply the new settings. You can also edit the databases that show up in Geneious by clicking on Edit Databases. This will only change the databases that Geneious displays and will not have any effect on the actual databases on the BLAST server.
2.5. STORING DATA - YOUR LOCAL DOCUMENTS 41
Figure 2.8: Sequence Search in Progress
2.5
Storing data - Your Local Documents
Geneious can be used to store your documents locally. Under the “Local” folder in the Services Panel you are able to create sub-folders to organize and store a variety of document types (Table
2.4).
This is also where you can set up special folders to receive documents that are downloaded by a Geneious agent. To create a new folder in Geneious, select the “Local” folder or a sub-folder icon in the services panel and right-click (Ctrl+click on Mac OS X). This will pop up a menu. Clicking on “New folder...” opens a dialog that will prompt you to name the folder. The named folder is then created as a sub-folder of the folder that you originally right-clicked on.
Important. Search results will be lost when you exit Geneious unless the downloaded docu-ments have been copied or moved to one of your local folders.
In Geneious you can create new folders, rename existing folders, delete and export folders. All these choices are available by either right-clicking on the folder, clicking on the action menu (Mac OS X), or by holding down the Ctrl button and clicking (Mac OS X). Also in Mac OS X, you can also use the plus (+) and minus (-) buttons located at the bottom of the service panel to create and delete folders.
2.5.1 Transferring data
It is quick and easy to transfer data to your local folders from either a Geneious database search or from your computer’s hard drive. Please check you have already set up your destination folders before continuing.
Figure 2.9: Sequence Search Complete
Moving documents from Geneious searches to your Local folders
There are a number of ways to do this.
Drag and drop. This is quickest and easiest. Select the documents that you want to move. Then, while holding the mouse button down, drag them over to the desired folder and release. If you dragged documents from one local folder to another, this action will move the documents – so that a copy of the document is not left in the original location. In external databases such as NCBI the documents will be copied, leaving one in its original location.
Drag and copy. While dragging a document over to your folder, hold the Ctrl key (Alt/Option key on Mac OS X) down. This places a copy of the document in the target folder while leaving a copy in the original location. This is useful if you want copies in different folders. Folders themselves can also be dragged and dropped to move them but they cannot be copied.
The Edit menu. Select the document and then open the Edit menu on the menu bar. Click on “Cut” (Ctrl+X/ +X), or “Copy” (Ctrl+C/ +C). Select the destination folder and “Paste” (Ctrl+V/ +V) the document into it.
2.5. STORING DATA - YOUR LOCAL DOCUMENTS 43
(a) Complete Database Sequence
(b) Annotations Transfered to Alignment
Table 2.4: Geneious document types Document type Geneious Icon Nucleotide sequence Oligo sequences Enzyme Sets Chromatogram Contig Protein sequence Pfam domain sequence Phylogenetic tree 3D structure Sequence alignment Journal articles PDF Other documents
2.5.2 Deleting Data and “Deleted Items”
When a folder or document is deleted, Geneious moves the data to the “Deleted Items” folder instead of erasing it immediately. This means the data can be recovered if it was deleted by mistake. Pressing the Delete key is the easiest way to move the selected folder or documents to the “Deleted Items” folder.
To recover documents or folders from “Deleted Items” you can either move them manually to another location or use “Restore from Deleted Items” (“Put Back from Deleted Items” on Mac OS) in the File menu to automatically move them to folder they were deleted from.
The “Deleted Items” folder should be cleared periodically to keep hard drive space free. This can be done by selecting “Erase All Deleted Items“ from the File menu. Geneious will warn you if “Deleted Items” contains a large amount of data.
2.5. STORING DATA - YOUR LOCAL DOCUMENTS 45
To erase a document immediately without moving it to “Deleted Items”, use “Erase Document Immediately” in the File menu (or press Shift+Delete).
Many of these actions can also be accessed by right clicking on a folder or document.
2.5.3 Document History
When a document is created or modified information regarding this change is also saved. This data can be viewed in the History Viewer, described in section3.8. Saving document history can be disabled for performance or privacy reasons by going to the Appearance and Behaviour tab in Preferences, see section2.9.
2.5.4 Searching your Local folders
The “Services Panel” allows you to browse your Local folder hierarchy. Next to each folder name in the hierarchy is the number of documents it contains in brackets. When the Local folder or a sub-folder is collapsed (minimized), the brackets next to the folder shows how many files are contained in that folder as well as all of its sub-folders. In addition, if some of the documents in a folder are unread, the number of unread documents will also appear in the brackets.
You can search the Local folder (and sub-folders) the same way you search the public databases by clicking on the “Search” icon. If you have defined a new type of meta-data in Geneious, and that meta-data has been added to a document, it will also be added to the “Advanced Search” criteria. Look at an example of a new meta-data type called “Protein size”, which takes a text value for the protein in kDa (kiloDaltons) (see Figure2.11).
Important: You must use quotation marks (“”) if “!”, “@”, “$”, and blank spaces (“ ”) are part of your search criteria. No quotation marks lead to unreliable results.
Wild card searches
When you are looking for all matches to a partial word, use the asterisk (*). For example, typing “oxi*” would return matches such as oxidase, oxidation, oxido-reductase, and oxide. This is useful for performing generic searches. You can also place asterisks (*) in the middle of the word or at the beginning. This feature is available only for local documents.
Similarity (“BLAST-like”) searching
It is possible to search your local documents not only for text occurrences but by similarity to sequence fragments. Click the small arrow at the bottom of the large T to the left of the
Figure 2.11: Searching the local documents on a user-defined field
search dialog, select “Nucleotide similarity search” or “Protein similarity search” and enter the sequence text. Geneious will try to guess the type of search based on the text, so that simply entering or pasting a sequence fragment may change the search type automatically.
The search locates documents containing a similar string of residues, and orders them in de-creasing order of similarity to the string. The ordering is based on calculating an E-value for each match. You can read more about the E-value insubsection 2.4.4.
For the search to be successful, you need to specify a minimum of 11 nucleotides and 3 amino acids. Note that search times depend on the number and size of your sequence documents, and so may take a long time to complete.
2.5.5 Checking and changing the location of your Local folders
To check where your Local folders are being stored on your hard drive, open the Tools menu in the Menu Bar. Click “Tools”→“Preferences”→“General”. Your documents are stored at the location specified by the “Data Storage Location” field (see Figure2.12). You can change this location by clicking the “Browse” button and selecting a new location. Geneious will remember this new location when you exit.
Warning: Do not place your local database on a network share, or use a synchronization tool such as DropBox. Geneious accesses the local database frequently so performance will be very poor and your data will get corrupted.