Printer and software
installation instructions
Please read this document before any installation or use.
Before any installation we strongly recommend to download from the
following web address:
http://www.swactivation.com/Abb/home.php
the latest version of the HTS500 software and notes in order to get the
latest evolutions and to print the latest created markers.
To access to this download area, please use the codes indicated on the
included CD label.
2 HTP500 – Installation instructions SNC160012M0201-V4 Index
Table of Contents
1 Introduction... 3 1.1 Computer requirements ... 31.2 Computer User rights requirements ... 3
1.3 Software activation requirements ... 3
2 Recommendations... 3
2.1 Safety instructions ... 4
2.2 Warranty ... 4
3 Storage handling and unpacking ... 5
4 Installation of the cleaning cassette ... 8
5 Installation of the ribbon cassette ... 10
6 Connection of the cables ... 11
6.1 Connection of the power cable ... 11
6.2 Connection of the parallel and USB cables ... 12
7 Software HTS500 installation... 13
7.1 Windows 7 Seven 64bits ... 13
7.2 Windows 2000 and XP and Vista/Wind 7 32 bits ... 13
8 Software Activation procedure ... 14
8.1 Activation on Windows Seven ... 14
8.2 Activation on other Windows systems ... 14
8.3 Activation – general instructions ... 14
9 Printer Driver Installation in Windows... 16
9.1 Installation ... 17
9.2 Recognition of the port to use for communication ... 17
9.3 From Windows: ... 17
10 Printer Driver Configuration... 19
10.1 For Windows 2000, NT, XP ... 19
10.2 For Windows Vista/Seven ... 23
10.3 Summary table of the installed printers drivers and of the printing modes ... 26
3
HTP500 – Installation instructions SNC160012M0201-V4
1 Introduction
We thank you to have chosen the HTP500 Marking system.
With the HTP500 printer, the identification of your electrical installation is quick and easy.
HTP500 is a printer using the thermal transfer technology for the marking of Terminal Blocks marker plates and of several other electrical devices.
To properly install and use the HTP500 system, it is strongly recommended to follow the step by step instructions described in this document.
This document shows the operations to perform to install and configure correctly the printer HTP500 and the software HTS500.
The system HTP500 is made of the printer HTP500 and the software HTS500 used to drive the printer. 1.1 Computer requirements
In order to use this device your computer must have the following equipments:
- Windows operating system 32 bits : Windows 2000, XP, NT version 6, or Windows Vista/Seven
- a CD-ROM reader or an internet connection (to download latest Software and Drivers version)
- an available USB port or a parallel port
- a RAM memory of at least 512 Mo
- a free space on your hard disc of 15 Mo minimum
- a screen resolution of 800 x 600 pixels 1.2 Computer User rights requirements
You must imperatively have the administrator rights of the chosen computer to install the HTS500 software.
This installation has to be performed by a well informed person (computer specialist…) and authorized to install software, printer drivers ….
You have to own the HTS500 software in order to use your equipment. 1.3 Software activation requirements
An Internet connection is needed in order to receive the activation codes for the software.
This activation may be done from any another computer with an Internet connection.
In order to do this activation, please check the paragraph describing the activation procedure of the software.
The HTS500 software activation must be imperatively done within 40 days maximum from the delivery date of the HTP500 system. The ABB Company can’t be hold responsible of software activation problems if the activation is not done within this time limit.
2 Recommendations
Before any installation we strongly recommend to download from the following web address:
http://www.swactivation.com/Abb/home.php
the latest version of the HTS500 software and notes in order to get the latest
evolutions and to print the latest created markers. (Installation procedure => chapter 7) To access to this download area, please use the codes indicated on the included CD label.
4
HTP500 – Installation instructions SNC160012M0201-V4
Please read this note attentively. It is very important to follow the given instructions. The whole content must be communicated to every concerned person.
ABB declines all responsibility in case of damages caused to persons or goods due to non respect of the instructions given in this note and in the other documents provided with the equipment.
Dismantling or modification of the printer is prohibited and will disclaim the builder from his responsibility.
Only accessories and spare parts recommended and coming from the manufacturer must be used with this printer.
Manufacturer data ABB France
Division Produits Automation 10, rue Ampère Z.I. - B.P. 114 F-69685 Chassieu cedex / France Tel. : +33 (0)4 72 22 17 22
Fax : +33 (0)4 72 22 19 35
For any question regarding the HTP500 system and to order spare parts, please contact the closest ABB local sales office.
ABB sales offices list available on the following web site: www.abb.com/lowvoltage
2.1 Safety instructions
Do not touch or move any part of your body close to: the moving parts, the under stress parts and the high temperature parts as the printing head (risk of serious injury).
Keep away from the under stress parts. Danger of death.
Before any intervention on the printer, any opening of the protection covers and for any replacement and handling of accessories, it is mandatory to switch off the printer.
Please, be sure that no one could be in danger during the handling and the switch on and the using of the printer.
2.2 Warranty
The warranty is valid for 12 months from the delivery date of the HTP500 system. The warranty covers only the manufacturing defects.
As for the accessories (ribbon cassette, cleaning cassette, cleaning roller…), the printing head is not covered by the warranty because it is considered as a consumable component.
5
HTP500 – Installation instructions SNC160012M0201-V4
3 Storage handling and unpacking
Each printer is provided in its own packaging.Storage and handling has to be done with the packaging, away from bad weather, shocks and vibrations, in a dry place, clean and non corrosive.
Working environment – temperature: 15 to 32,5°C, humidity : 15 to 80 % HR Storage – temperature: 5 to 35°, humidity: 35 to 85% HR
Respect position “up” and “down” indicated on the packaging, and the indications of the different pictograms.
Please unpack the printer carefully.
Your printer is packed with cardboard and recyclable wood; please keep this packaging until the end of the warranty.
Your parcel is made of: 1 envelope containing:
- Installation note for the printer and the software
- CD containing the software HTS500 and the following notes: - Instructions for the use of the software HTS500 - Instructions for the use of the printer HTP500
- Instructions for the installation of the printer and the software. The components listed below:
Description Type Ref. commerciale
HTP500 Heating transfer printer HTP500
Software for the HTP500 printer HTS500 1SNA235702R0300
HTP500 Support table HTP500-BAS 1SNA235706R0700
Universal feeder for markers HTP500-FEED 1SNA235703R0400 Plate for ABB terminal blocks markers HTP500-PL2 1SNA235705R0600 Universal plate for wire markers HTP500-PL 1SNA235704R0500
Black ribbon cassette RIB-B 1SNA235710R0600
Cleaning cassette HTP500-CLEAN 1SNA235714R2600
Power cable for HTP500 printer HTP500-PW 1SNA235709R1200 Parallel cable for HTP500 printer HTP500-LPT 1SNA235708R1100 USB/parallel adapter cable HTP500-USB 1SNA235719R0300
Before installation, your printer has to be stored in a tempered place during 24 hours in order to avoid condensation which could be harmful to its functioning.
Support plates and feeder:
HTP500-PL2
6
HTP500 – Installation instructions SNC160012M0201-V4
The device is delivered on a pallet. First, cut the straps and remove the cover Remove gently the wedging around the printer Remove the immobilization ribbons from the cover
Raise the auxiliary cleaning roller by pushing on the lever.
7
HTP500 – Installation instructions SNC160012M0201-V4
Remove gently the wedging of the cleaning roller.
8
HTP500 – Installation instructions SNC160012M0201-V4
The printer must not be connected for all the following operations.
4 Installation of the cleaning cassette
HTP500 has a special cleaning cassette purposely designed to clean up the cleaning roller. To load the cleaning cassette, perform the following steps:
1. Lift up the cassette cover. 2. Take out the ribbon cassette.
Note
Never use the printer without the cleaning cassette. Using the printer when the cleaning roller is dirty can damage the print head.
Before loading the cleaning cassette, take out the ribbon cassette. Trying to load the cleaning cassette while the ribbon cassette is still in its place could cause a bad cleaning cassette loading.
3. Push down the locking lever of the cleaning cassette to lift the auxiliary cleaning roller.
4. Open the new cleaning cassette pulling out the tape until the cleaning tape comes out. Peal off the tape.
Locking lever
Pull
9
HTP500 – Installation instructions SNC160012M0201-V4
5. Set the cleaning cassette along the guides passing the cleaning cassette tape around the cleaning auxiliary roller.
Note
THE CLEANING TAPE MUST NOT BE LOOSE!
THE CLEANING TAPE MUST ALWAYS ADHERE TO THE CLEANING ROLLER.
6. Raise the setting lever to lower the cleaning auxiliary roller into place.
Note
After loading the cleaning cassette, make sure that the guide tabs are safely fixed in the notches of the cassette.
Correct position of cleaning tape and Auxiliary Cleaning roller
Raise the setting LEVER IN set
10
HTP500 – Installation instructions SNC160012M0201-V4
5 Installation of the ribbon cassette
Load a ribbon cassette performing the instructions shown in the pictures below.
1. Remove the ribbon cassette stopper and wind the ribbon until it is tighten.
2. Install the cleaning cassette first, then insert the ribbon cassette and close the cassette cover.
The ribbon has to go under the printer head.
Note
Make sure that the cartridge does fit correctly and that the ribbon is tight.
The printer can’t detect the ribbon if the ribbon cassette or the ribbon itself is loose. When inserting the ribbon cassette ensure the ribbon is not loose and push the cassette until it touches its mount.
If this is not the case, the printer may not detect the ribbon.
Wind the tape until the tape is tighten
Make sure the ribbon cassette touches its mount
11
HTP500 – Installation instructions SNC160012M0201-V4
6 Connection of the cables
6.1 Connection of the power cableMake sure that the printer power switch is off (0).
1. Connect the power cable to the power cable socket on the rear of the printer.
2. Plug the other end of the power cable into the power outlet (tension must be between 100 V and 240 V AC).
WARNING
Take care to follow carefully the safety instructions set forth in chapter 2.1).
Don’t connect the printer to a power source that provides other than the rated voltage (100V to 240V AC, 50/60Hz). Using any other voltage could cause a fire or electric shock.
Don’t pull the power cable when it is connected to the power cable socket on the rear of the printer or otherwise apply undue force to the power cable connector. Doing so could damage the wiring and cause a short, fire, or electric shock.
When unplugging the power cable from the power outlet or the socket on the rear of the printer, always grasp the plug or connector.
12
HTP500 – Installation instructions SNC160012M0201-V4
6.2 Connection of the parallel and USB cables
Make sure that the parallel cable and the USB cable are compatible with the connectors located in the back of the computer.
Make sure that printer and computer power switches are off.
Connection of the parallel cable
1. Connect the adapted end of the parallel interface cable to the parallel interface port (36-pin connector) on the rear of the printer and secure the connector with the locking clips
2. Connect the other end of the parallel interface cable to the parallel interface port on the computer
Connection of the USB cable
The HTP500 Printer is supplied with a Parallel Port.
In case the PC has only one USB PORT, it will be necessary to connect in series the parallel cable HTP500-LPT and the USB adapter cable USB HTP500-USB.
1) Connect the adapted end of the parallel interface cable to the parallel interface port (36-pin connector) on the rear of the printer and secure the connector with the locking clips
2) Introduce the other end of the parallel cable into the connector of the USB adapter cable 3) Plug the USB connector of the USB adapter cable into the USB port of the computer
Caution
Use an IEEE1284-compliant printer cable less than 2 meters long for the parallel interface cable. Failure to do so could cause electronic noise or radio interference.
Before connecting the parallel interface cable, perform the procedure described below: 1) Turn off the printer and unplug its power cable from the power outlet.
2) Turn off the computer and unplug its power cable from the power outlet.
Note
This equipment has been tested to comply with EMC Directive technical requirements. Shielded cables have to be used in compliance with EMC Directive technical requirements.
The USB adapter cable HTP500-USB does not need any driver to be used.
For more information concerning the installation or use of the printer, please seek advice from the” instructions for use” on the included CD .
For any questions, please contact your local ABB sales office.
13
HTP500 – Installation instructions SNC160012M0201-V4
7 Software HTS500 installation
To install the HTS500 software, there are 2 possibilities:
- Either you download and install the latest software version in order to get the latest evolutions and to print the latest created markers.
After clicking on the “Download” link please select the “Save” button, please select a directory in which the file will be saved for example in the temporary directory “C:\Temp”.
- Either you use the CD of the HTS500 software which is including the previous software version
but which is not including the latest evolutions and the latest created markers.
Solution not advised.
Insert the CD of Software HTS500; the installation program should automatically start.
If the installation program doesn’t automatically start, open your browser, click on the CD drive, open the folder “HTS500”, Double-click on the file “SETUP.EXE”.
Follow the instructions and press “Next” until the program completes the execution and the shortcut of the HTS500 Software is created in the folder ABB - HTS500 located in the program menu.
7.1 Windows 7 Seven 64bits
The software is not prepared to work on Windows Seven 64 bits version. Microsoft provides an emulator that allows using software designed for systems 32bits. Only the professional versions of these operating systems allow the emulator’s installation. Emulator is not compatible with “Starter” and “Family edition”
This is generally pre-installed on the 64bits computers (identified as “Virtual PC”) If this is not preinstalled, please go on Microsoft web site and install this tool.
http://www.microsoft.com/windows/virtual-pc/download.aspx
Then you can continue on the following chapters.
7.2 Windows 2000 and XP and Vista/Wind 7 32 bits
After saving the file containing the HTS500 setup program, please double-click on the file and unzip the concerned files in the wished directory.
Then, please double-click on the file « SETUP.EXE » and please follow the setup procedure. This file contains the complete HTS500 setup program.
The drivers are not included in this file.
- If it is the first installation of the HTS500 software on your computer, please preferably install the program in the suggested default directory: “C:\ABB\HTS500”.
Before installation we strongly recommend to download from the following web address:
http://www.swactivation.com/Abb/home.php
the latest version of the HTS500 software and notes in order to get the latest evolutions and to print the latest created markers.
14
HTP500 – Installation instructions SNC160012M0201-V4
- If a previous version of the HTS500 software is already installed in your computer, the new HTS500 program version must be installed in the directory containing the previous HTS500 software version. After installation, the new version of the program will overwrite the old version by preserving the projects previously created and the old parameters saved. It is thus not useful to uninstall the previous HTS500 software version.
8 Software Activation procedure
8.1 Activation on Windows SevenIn the previous chapters, you installed the software on your computer. Now you just need to activate it online (you can use another computer if your actual computer does not have access to the Internet)
Do a right click on the HTS500 Software (icon is on your desk), and run
it as an administrator
Note: running the program as an administrator is a security imposed by Microsoft. This helps identifying that you’re running the program and agrees data modifications it will do to your system.
8.2 Activation on other Windows systems Simply run the HTS500 Program.
8.3 Activation – general instructions The software activation window will then appear.
Please make sure this window stays opened, until the activation is completed (codes are generated each time you open the activation window)
Please note the original codes of the software: “Pre-code and code”, they are essential to activate the HTS500 software.
15
HTP500 – Installation instructions SNC160012M0201-V4
To activate the HTS500 software, please follow the activation procedure below. You must have:
- Login and password written on the CD label of the software HTS500 - Printer’s serial number indicated on the label on the back of the printer
- “Pre-code and code” of the software indicated in the activation window of the software (see picture above)
- Complete name and address of your company
- Name and e-mail address of the person to contact in order to send software updates.
This activation can be performed from any computer connected to the internet.
Connect yourself on the following Internet page:
http://www.swactivation.com/abb/attr_abb/atts2000.php
In order to register and activate your software HTS500, please entirely complete the form.
The login and the password must be completed with the correct case. These are the Login and PW written on the CD provided with the HTP500 package.
The HTP500 serial number corresponds to the identification number of the printer indicated on the label located on the back of the printer.
At the end of the form, please complete the code and pre-code without blank spaces that are shown on the software installer.
If one digit is wrong or is missing, the activation won’t be done.
To avoid typing errors, we recommend to copy the codes in the software’s activation window and to paste them on the internet page.
Then, please press the button “Apply”.
If some information is missing or is wrong, an error message will appear.
In this case, go back to the form by clicking on the back arrow of your web browser, complete and correct the wrong or missing information, complete again the password and click on the button “Apply”.
Another window appears and shows the information to enter in the software’s activation window.
You now have all the elements to activate the software. Please note the codes indicated on the internet page. Please complete the software activation window by strictly writing the same codes.
For example:
If one digit is wrong or is missing, the activation won’t be done.
To avoid typing errors, we recommend to copy the codes on the internet page and to paste them into the software’s activation window by respecting the blank spaces for the code.
16
HTP500 – Installation instructions SNC160012M0201-V4
Company (please enter it the exact same way you entered it on the Web site) :
Web activation Pre-code : Web activation Code : Software Serial Number :
Please write this data in the HTS500 software activation window.
Exit / Sortie
HTS500 activation data
HTS500 données d’activation
HTS500 activation web page HTS500 software activation window
After having filled in all the blanks in the software’s activation window, please click on the “OK” bottom to activate the software.
If the user has filled out the right information in the activation window, the HTS500 software will open and the user could start working.
If the software does not open, please start again the entire activation procedure from paragraph 8 and complete very carefully the software’s activation window from the information indicated in the activation web page.
Be careful, in the software’s activation window the original pre-codes and codes change with every new activation attempt.
After the software activation, you will have to install the HTP500 printing drivers.
9 Printer Driver Installation in Windows
Printing driver: control program translating the software demands in order to allow the computer to communicate with the printer.
The Printer works through the Printer Drivers: they must be installed the first time on the computer. Each type of printing support (marking for cables or terminal blocks, adhesive strips, labels …) needs a different Printer driver, allowing later on to not reconfigure every time when changing the printing support.
This installation has to be done correctly even if at the beginning it seems tiresome, but it will allow to win a lot of time later on, when using the printer.
Every printing driver has to have different parameters for each different support to be printed on (material, size, density, orientation …)
These parameters are mentioned on the table :
Tab-Conf-01 for Win2000, WinNT, WinXP and the Table Tab-Conf-02 for Windows Vista. You will find them on the following pages.
The installation of the Printer Driver follows the Standard Installation of any Hardware Driver for any Windows Operative Systems
17
HTP500 – Installation instructions SNC160012M0201-V4
9.1 Installation
Insert the CD HTS500 but do not launch the program. Cancel the installation program of the HTS500 by clicking on the “Cancel” button.
The computer has to be connected to the printer HTP500 with the parallel cable if you are using the parallel port of your computer, or with the assembly of the parallel cable and the USB adapter cable connected in series if you are using the USB port of your computer.
9.2 Recognition of the port to use for communication From Windows:
1. Start
2. Settings 3. Printers
4. Add printer (you will surf through the Guided Installation of a New printer) : - select “A local printer…”
- do not select “Automatically detect…” - Click on “next” button
- select “Use the following port…”
- if you are using the USB port of your computer with the adapter cable “HTP500-USB”, select in the displayed list the USB virtual port in which you have connected the USB adapter cable (for example: USB001 or USB002).
For example: Or
- if you are using only the parallel port of your computer with the parallel cable “HTP500-LPT”, select in the displayed list the LPT1 port.
Click on the button “Disk…”
5. Select the “HTS500 CD” in the Disco Drivers folder (Letter may be ‘D’ or ‘E’, ….) select the “Drivers” folder
(If you have downloaded on internet the HTS500 driver update, please unzip the downloaded file in the wished folder. Then, please come back to the driver installation procedure and instead of selecting the CD, please select the « Drivers » folder located in the folder in which you have unzipped the files.)
select the HTP500 folder
• Select the WinNT2kXP if you are installing for Win2000, WinNT, Win XP
• Select the WinVista if you are installing for Win Vista Select the (*.inf) file
6. Add the proposed printer ‘PLATE PRINTER’ - click on the “Next” button
Answer to the questions :
- Do you want to: set the printer by default? => select “NO” - click on the “Next” button
- Share the printer => select “NO” - Print a test page => select “NO” - Click on the ”Finish” button => The driver is now installed.
7. When you will install the second driver, please repeat the previous operations and do not select “overwrite”, keep the existing driver.
8. Confirm untill the end by clicking 4 times on the “Next” button and click on “Finish” button. 9.3 From Windows:
From Windows:
18
HTP500 – Installation instructions SNC160012M0201-V4
2. Settings 3. Printers
4. Select the ‘PLATE PRINTER’ device 5. Press the right button of the mouse 6. Select ‘Rename’
7. Modify the printer name ‘PLATE PRINTER’ to the New Device Name as established in the following device table below as for example “ABB Terminal blocks” to print the ABB Terminal blocks markers. And confirm.
If you only want to use the HTP500 printer to print only the ABB Terminal blocks and that you will nether print any other label and maker types, then you don’t need to install the other printer devices.
Otherwise, repeat the (9.2-9.3) operations since all the 6 Printer devices will be installed. New Device name Items Typology Description
ABB Terminal
blocks The user can change the name of the devices to recognize it easily. Other Terminal blocks marks Horizontal Methacrylate label Horizontal PVC label Vertical PVC label Cables
19
HTP500 – Installation instructions SNC160012M0201-V4
10 Printer Driver Configuration
10.1 For Windows 2000, NT, XPAs we have created 6 Printer devices, we have to configure all of them.
Here are the instructions on how to configure for example the ‘ABB Terminal blocks’ Printer Device. These configurations should be memorized in the driver for the correct printer functioning.
Printing formats configuration
First of all, you have to create two new formats for the size of the items which will be used by the drivers previously created.
These 2 new formats could be created by opening the “Settings” menu of any driver previously created. For the first Format 80mmx 110mm (terminal blocks markers plates)
From Windows:
1. Start
2. Settings 3. Printers
4. Select for example the ‘ABB Terminal blocks’ driver 5. Press the right button of the mouse
6. Select and Press ‘Properties’
Screen shot example of the format configuration (with the cable device)
7. Select in the driver the function ‘Device setting’
20
HTP500 – Installation instructions SNC160012M0201-V4
select and press the button ‘Properties’
in Plate Name (N) Field insert ‘HTP500 80X110’
In Width (W) insert 80
In Length (L) insert 110
Press OK
In Format you will find HTP500 80X110
Press ok
For the Second Format 80mmx 500mm (long plates like MCLH for example)
This new format could be created by opening the “Settings” menu of any driver previously created.
1. From Windows: 2. Start
3. Settings 4. Printers
5. Select for example the ‘Horizontal Methacrylate label’ device 6. Press the right button of the mouse
7. Select and Press ‘Property’
8. Select in the driver the function ‘Device setting’
select ‘New plate size
select and press the button ‘Properties’
in Plate Name (N) Field insert ‘HTP500 80X500’
In Width (W) insert 80
In Length (L) insert 500
Press OK
In Format you will find HTP500 80X500
Press ok
Printer drivers configuration
ABB proposes 6 different formats of marking supports. For each type of format, you need to configure one printer driver per format type.
Please refer to the table here after, and install the printer drivers you need to
1. From Windows:
2. Start 3. Settings 4. Printers
5. Select for example the ‘ABB Terminal blocks’ device select Advanced
select Printing defaults select Layout
select Portrait (Vertical) Press Button Advanced
In Paper/Output Format select HTP500 80X110 Number of copies 1 Dithering None Density 3 Option Mirror No Press OK Select Paper/Quality
21
HTP500 – Installation instructions SNC160012M0201-V4
Material Support: Rigid Plastic(Polyacrylate) ; if you configure the drivers for the PVC labels, please select « Rigid plastic(PVC) »
Check Monochrome
Press OK
Check that the parameters indicated in the “Advanced” tab are in accordance with the following parameters indicated and selected in the image below.
- Select the “Ports” tab
- if you are using the USB port of your computer with the adapter cable “HTP500-USB”, select in the displayed list the USB port in which you have connected the USB adapter cable (for example: USB1 or USB2).
Or
- if you are using only the parallel port of your computer with the parallel cable “HTP500-LPT”, select in the displayed list the LPT1 port.
22
HTP500 – Installation instructions SNC160012M0201-V4
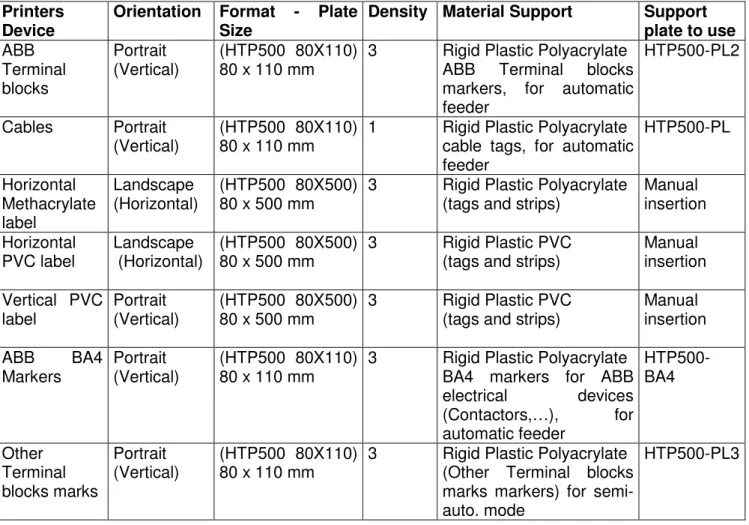
Repeat the configuration as shown in the chapter 10.1 instructions to configure the Devices you may need. Enter the data as shown in the following table the following table.
Summary table of the possible devices:
Printers
Device Orientation Format - Plate Size Density Material Support Support plate to use
ABB Terminal blocks
Portrait
(Vertical) (HTP500 80X110) 80 x 110 mm 3 Rigid Plastic Polyacrylate ABB Terminal blocks markers, for automatic feeder
HTP500-PL2
Cables Portrait
(Vertical) (HTP500 80X110) 80 x 110 mm 1 Rigid Plastic Polyacrylate cable tags, for automatic feeder HTP500-PL Horizontal Methacrylate label Landscape
(Horizontal) (HTP500 80X500) 80 x 500 mm 3 Rigid Plastic Polyacrylate (tags and strips) Manual insertion Horizontal
PVC label Landscape (Horizontal) (HTP500 80X500) 80 x 500 mm 3 Rigid Plastic PVC (tags and strips) Manual insertion Vertical PVC
label Portrait (Vertical) (HTP500 80X500) 80 x 500 mm 3 Rigid Plastic PVC (tags and strips) Manual insertion ABB BA4
Markers Portrait (Vertical) (HTP500 80X110) 80 x 110 mm 3 Rigid Plastic Polyacrylate BA4 markers for ABB electrical devices (Contactors,…), for automatic feeder HTP500-BA4 Other Terminal blocks marks Portrait
(Vertical) (HTP500 80X110) 80 x 110 mm 3 Rigid Plastic Polyacrylate (Other Terminal blocks marks markers) for semi-auto. mode
HTP500-PL3
Tab-Conf-01 – Summary Table of the installed Printers/devices for W2000, WNT, WXP Operative System.
23
HTP500 – Installation instructions SNC160012M0201-V4 ---For Windows Vista/Seven---
10.2 For Windows Vista/Seven
The following instructions concern only the Windows Vista system. If you don’t use Windows Vista, please directly go to the chapter 10.3).
Please find below the step by step instructions for the installation of the Drivers for Windows Vista Operative System.
1. Insert the CD HTS500 but do not launch the program. Cancel the installation program of the HTS500 by clicking on the “Cancel” button.
2. From Windows Select “Start” and “Control Panel” 3. Select the Icon “Printers”
4. Select “Add new Printer” -> Add Local Printer Select the parallel port and Press “Next”.
Press the push-button “Browse” and Select from the Software HTS500 Installation CD the folder “\Drivers\HTP500\WINVISTA.
Select the File “*.inf” (ppvte.inf). Press “Open”.
Select the Driver ‘Plate Printer” and press “Next”.
Rename the Name of the Printer “Plate Printer” to the Virtual Name that is used in the HTS500 Software for example “ABB Terminal blocks”.
Note: Virtual names used in HTS500 Software are listed in the following table. TabInst01 At the end of the Driver installation Press “End”
Repeat the operations described in this chapter 10.2 up to the end of the process.
If you only want to use the HTP500 printer to print only the ABB Terminal blocks and that you will nether print any other label and maker types, then you don’t need to install the other printer devices.
Otherwise, repeat the operations indicated in the paragraph b2) since all the 6 Printer devices will be installed.
New Device name Items Typology Description
ABB Terminal
blocks The user can change the name of the devices to recognize it easily. Other Terminal blocks marks Horizontal Methacrylate label Horizontal PVC label Vertical PVC label Cables
24
HTP500 – Installation instructions SNC160012M0201-V4 ---For Windows Vista/Seven---Step by Vista/Seven---Step Instructions for setting the Drivers.
From Windows, Select “Start”, “Control Panel”, “Printers”, select the Printer “Cables”. Press the Right key of the Mouse and Select “Property”,
Select the folder “Advanced”.
Set the “Window Advanced” settings.
The settings of this Window can be customized according to the use of each User. Press the push button “Predefined” .
Select the folder “Custom Paper” Set Printing Format:
Digit in the box the media Name: “HTP500 600X1100” Insert the sizes
• Width 600
• Length 1100
Press the push button “Save Form” Press the push button “Apply” Select “Main”:
Note on Creation of Printer Format
Two different printer formats exist: HTP500 600X1100 and HTP500 600X5000 according to the Families of Items to print. See Tab-Conf-02 – Summary Table of the installed Printers/devices for Windows VISTA/Seven Operating System.
For the creation of the Size Format HTP500 600X5000
Set printing Size.
Digit in the box the media Name: “HTP500 600X5000” Insert the sizes:
• Width 600
• Length 5000
Press the push button “Save Form” Press the push button “Apply” Select the folder “Main”: Proceed with the installation Set
Media Size : HTP500 600X5000
Number of copies: 1
Orientation: “Portrait”
Media Type: “Rigid Plastic (Polyacrylate)”
Feeding: “Plate” Press “OK”. Press “Ports” Select parallel port.
25
HTP500 – Installation instructions SNC160012M0201-V4 ---For Windows
Vista/Seven---Repeat the Operations from B3) and Set the devices/printers previously created with the parameters.
Printers
Device Orientation Format - Plate Size for WIN VISTA
Density Material Support Support plate to use ABB Terminal blocks Portrait (Vertical) 600 x 1100 (0,1 mm) HTP500 600x1100
3 Rigid Plastic Polyacrylate ABB Terminal blocks markers, for automatic feeder
HTP500-PL2
Cables Portrait
(Vertical) 600 x 1100 (0,1 mm)
HTP500 600x1100
1 Rigid Plastic Polyacrylate cable tags, for automatic feeder HTP500-PL Horizontal Methacrylate label Landscape (Horizontal) 600 x 5000 (0,1 mm) HTP500 600x5000
3 Rigid Plastic Polyacrylate
(tags and strips) Manual insertion Horizontal
PVC label Landscape (Horizontal) 600 x 5000 (0,1 mm)
HTP500 600x5000
3 Rigid Plastic PVC
(tags and strips) Manual insertion Vertical PVC
label Portrait (Vertical) 600 x 5000 (0,1 mm)
HTP500 600x5000
3 Rigid Plastic PVC
(tags and strips) Manual insertion ABB BA4
Markers Portrait (Vertical) 600 x 1100 (0,1 mm)
HTP500 600x1100
3 Rigid Plastic Polyacrylate BA4 markers for ABB electrical devices (Contactors,…), for automatic feeder HTP500-BA4 Other Terminal blocks marks Portrait (Vertical) 600 x 1100 (0,1 mm) HTP500 600x1100
3 Rigid Plastic Polyacrylate (Other Terminal blocks marks markers) for semi-auto. mode
HTP500-PL3
26
HTP500 – Installation instructions SNC160012M0201-V4
10.3 Summary table of the installed printers drivers and of the printing modes Data valid for: Windows 2000, XP, NT version 6, Vista and Seven
Printers
Device Orientation Format - Plate Size* Density Material Support Option « Acryl Mode » Option « Feeder Mode » Support plate to use ABB Terminal blocks Portrait (Vertical) 80x110 or 600x1100* 3 Rigid Plastic Polyacrylate ABB Terminal blocks markers, for automatic feeder No Stack Feed (Automatic mode with feeder) HTP500-PL2 Cables Portrait (Vertical) 80x110 or 600x1100* 1 Rigid Plastic Polyacrylate cable tags, for automatic feeder No Stack Feed (Automatic mode with feeder) HTP500-PL Horizontal Methacrylat e label Landscape (Horizontal) 80x500 or 600x5000* 3 Rigid Plastic Polyacrylate (tags and strips) Yes None (manual mode) Manual insertion Horizontal
PVC label Landscape (Horizontal) 80x500 or 600x5000* 3 Rigid Plastic PVC (tags and strips) No None (manual mode) Manual insertion Vertical
PVC label Portrait (Vertical) 80x500 or 600x5000* 3 Rigid Plastic PVC (tags and strips) No None (manual mode) Manual insertion ABB BA4
Markers Portrait (Vertical) 80x110 or 600x1100* 3 Rigid Plastic Polyacrylate BA4 markers for ABB electrical devices (Contactors, …), for automatic feeder No Stack Feed (Automatic mode with feeder) HTP500-BA4 Other Terminal blocks marks Portrait (Vertical) 80x110 or 600x1100* 3 Rigid Plastic Polyacrylate (Other Terminal blocks marks markers) for semi-auto. mode No Single Feed (Semi-automatic mode with HTP500-PL3 plate) HTP500-PL3
Tab-Conf-03 – Summary table of the installed Printers/devices. * Remark: the maximum dimensions of the elements to print are:
• 80x110, 80x500 for W2000, WNT, WXP
27
HTP500 – Installation instructions SNC160012M0201-V4
Remarks
• The Density value could be modified from 1 to 5 (5 for the a very dark printing; 1 for a bright printing)
• The initial density value should not be modified for the cable tags driver.
11
Device creation in HTS500 software
Once created the devices in Windows, the same devices should be checked and created in the HTS500 Software.
1. Open the HTS500 software
2. Select the ‘File’ menu 3. Select ‘Printer/Setup’
4. The devices windows will appear
There are ten rows of available devices that could be created. To create one device:
5. Press the left button of the first device line that is available.
6. Select and add one by one the 6 printer devices previously created: ABB Terminal blocks
Cables
Horizontal Methacrylate label Horizontal PVC label
Vertical PVC label
28
HTP500 – Installation instructions SNC160012M0201-V4
7. A Print setup window will appear.
8. By using the “Tab-conf-03- “table of the previous page, please check that all the settings (previously set in the Windows corresponding printer devices) are well complete the Print settings window (driver name, orientation, paper size (dimensions),…).
If the settings are not correct, please correct them.
For the paper “Feeder” mode, please select systematically the “Manual” mode. Press the button “Properties”
Check that all the settings for the Printer Devices are correctly set as shown in “Tab-conf-03- “ table of the previous page
- Paper feeder mode : Manual
- Material : Rigid Plastic (Polycarbonate) or Rigid PVC in function of the material indicated in the table Tab-conf-03- :
=> Rigid Plastic (Polyacrylate) for the items in Polyacrylate. => Rigid Plastic (PVC) for the items in PVC.
- Coulour : Monochrome
- Orientation: Portrait or Layout in accordance with the information of the table Tab-conf-03- - In the “Advanced” tab : Paper size, Density… to be checked
Press OK to confirm.
Repeat these operations for all the printer devices.
Add the 6 Devices ‘Cables’, ‘ABB Terminal blocks’, ‘Horizontal Methacrylate label’, ‘Horizontal PVC label’, ‘Vertical PVC label’ , ‘Other Terminal blocks marks’ and verify that the configuration is correct as shown in ““Tab-conf-03- “ table“
Now, you have configured your HTS500 software and your printer is ready to be used. Before starting printing, please read the software and the printer manuals.
If the printing text is not perfectly centred, please follow the instructions indicated in the software manual.
For any question, please contact your local ABB sales office. We wish you a good use of your HTP500 system.
Before clicking on the « OK » button, please check that the Paper size is correct.
ABB France
Division Produits Automation Département Export
10, rue Ampère Z.I. - B.P. 114 F-69685 Chassieu cedex / France Tel. : +33 (0)4 7222 1722
Fax : +33 (0)4 7222 1935
As part of its on-going product improvement, ABB reserves the right to modify the characteristics or the products described in this document. The information given is not-contractual. For further details please contact the ABB company marketing these products in your country. HT
P 50 0 – In st al la tio n in st ru ct io ns 1S N C 16 00 12 M 02 01 -V 4 - P D F