Web design 2: creating
web pages and site
management using Dreamweaver
MX
Practical workbook
Aims and Learning Objectives
When you have completed these exercises you should be able to:
• create and edit pages;
• create a website;
• use tables for page layout;
• link to and modify external Cascading Style Sheets (CSS);
• produce a site map for graphical representation of a site;
Document information
Course documents and files
If you are working in the training room the files you need are in C:\User\WWW\Web Design 2\Resources.
If you want to work through the practical tasks shown in this document on your own system, obtain the necessary files from:
www.bristol.ac.uk/is/learning/documentation/docs-current.html#web-t7.
You will see a link to Practice files. This contains the files you need to work through the course notes. In Internet Explorer you extract the files as follows:
• Click on Practice files;
• Choose Save.
• Browse to where you want to save the file and click on Save (the practice files are grouped together, and you need to extract them to be able to use the individual files);
• Go to the file you have just saved, and Open or Run it to show the Self-extracting Archive
box;
• Select where to extract (save) the files on your system using the browse button (as shown opposite);
• Click Start to save the files.
Related documentation
Other related documents are available from the web at:
Introduction
Dreamweaver is a powerful WYSIWYG (What You See Is What You Get) editor for creating web content. Besides being a visual HTML tool, it incorporates all the state-of-the-art features to produce effective static and dynamic pages to a professional
standard. It is user-friendly and intuitive enough to make it useable by people with little experience of web design. However, those with some web design experience and wanting to tackle more ambitious web projects will appreciate its more advanced features: multiple views (code view, design view or both), Roundtrip HTML
(Dreamweaver preserves your code), excellent CSS support, site management (link checking, search-and-replace), templates, etc.
Dreamweaver is aimed at high-level and frequent users. It is suitable for people who are responsible for the creation and/or maintenance of medium to large size websites (eg, departmental websites).
Prerequisites
This document assumes that you are familiar with the use of a computer keyboard and mouse, and Microsoft Windows based products. Also, an elementary knowledge and understanding of HTML and web design principles are desirable before starting with Dreamweaver MX.
Contents
Document information
Task 1 Getting started ...1
Task 2 Customising Dreamweaver ...5
Task 3 Setting up a website ...8
Task 4 Creating a layout table ...10
Task 5 Creating a template ...13
Task 6 Using a style sheet ...15
Task 7 Using templates ...18
Task 8 Creating a Site map ...19
Task 9 Link checking...20
Task 1 Getting started
Objectives To get familiar with the Dreamweaver MX workspace.
Starting Dreamweaver
1.1 Click on the Start button (bottom left corner of the screen) and then select
Programs / Macromedia / Macromedia Dreamweaver MX.
The Dreamweaver MX workspace layout
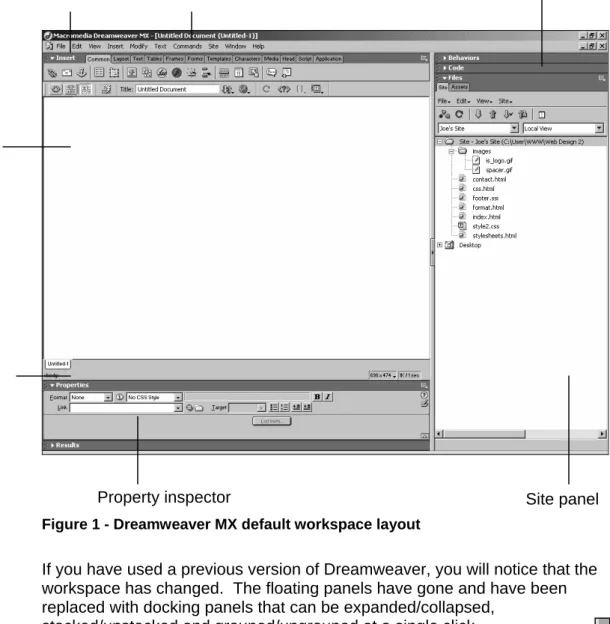
1.2 Figure 1 shows the default workspace layout in Dreamweaver MX.
Property inspector
Figure 1 - Dreamweaver MX default workspace layout
If you have used a previous version of Dreamweaver, you will notice that the workspace has changed. The floating panels have gone and have been replaced with docking panels that can be expanded/collapsed,
stacked/unstacked and grouped/ungrouped at a single click – click on the small arrows (as shown opposite).
¾ Try to collapse/expand some of the panels to see for yourself.
Note See Appendix A to find out how to change the workspace layout. Insert bar Menu bar Panel groups Site panel Document window Status bar
Dreamweaver's Document window
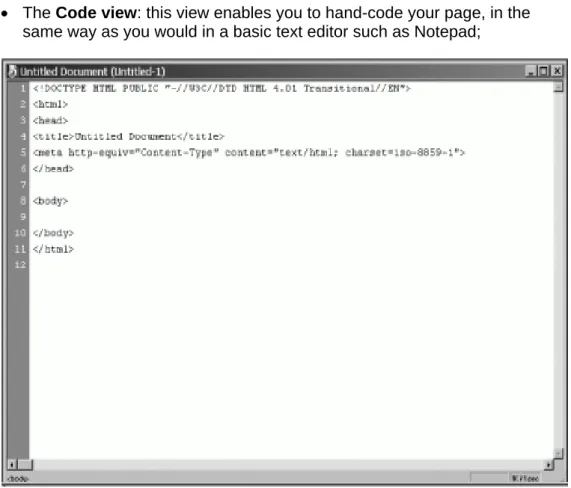
1.3 The Document window shows the current document and offers a choice of three views:
• the Design view: this is the What You See Is What You Get (WYSIWYG) view. In this view, Dreamweaver displays a fully editable, visual
representation of the document, similar to what you would see viewing the page in a browser;
• The Code view: this view enables you to hand-code your page, in the same way as you would in a basic text editor such as Notepad;
Figure 2 - the document window in code view
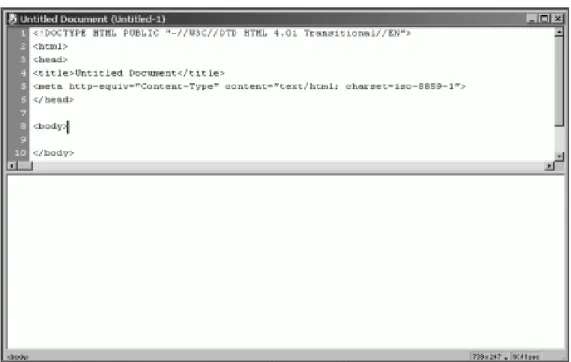
• The Code and Design view: allows you to see both Code view and
Design view for the same document in separate horizontal panes but in a single window.
Figure 3 - the document window in code and design view
You can resize the panes by click and dragging up or down the line separating them.
The easiest way to switch between views is to use the three buttons to the left of the Document toolbar:
¾ Try to switch between the different views.
Dreamweaver's Insert bar
1.4 The Insert bar allows you to insert "objects" such as images, tables, form elements, etc into a document. These objects are organised into different categories represented by tabs; the default objects are listed under the
Common tab (Figure 4):
Figure 4 - the insert bar showing common objects
¾ To find out what each of the Common objects is, place your cursor on the corresponding icon and read the roll-over text.
¾ Explore the following object categories by clicking on the corresponding tab:
Text, Tables, Forms, Characters and Head.
To insert an object, position your cursor within the document (whether in the
Code view or in the Design view) and click on the icon representing the object you wish to insert (alternatively you can use the Insert menu).
Dreamweaver's Property inspector
1.5 The Property inspector allows you to examine and edit properties for the currently selected object (eg, an image or a table) or text. Therefore the Property inspector changes depending on what is selected, as illustrated in Figures 5 and 6:
Figure 5 - the property inspector showing the attributes of a text selection
You can expand/collapse the Property inspector by clicking on the white down/up arrow in the bottom right corner.
Figure 6 - the property inspector showing the attributes of an image
You can select page elements either in the Code view or in the Design view
by clicking on them, or by using the Tag selector in the status bar at the bottom of the Document window (Figure 7).
Figure 7 - the status bar in the document window
Click here to expand the Property inspector
Tag selector window document size and download
Task 2 Customising Dreamweaver
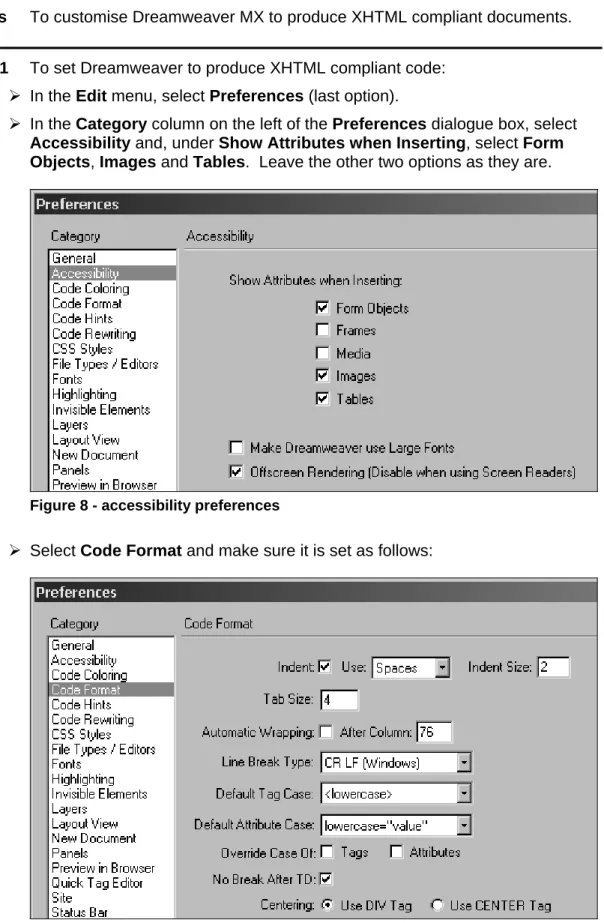
Objectives To customise Dreamweaver MX to produce XHTML compliant documents.
2.1 To set Dreamweaver to produce XHTML compliant code:
¾ In the Edit menu, select Preferences (last option).
¾ In the Category column on the left of the Preferences dialogue box, select
Accessibility and, under Show Attributes when Inserting, select Form Objects, Images and Tables. Leave the other two options as they are.
Figure 8 - accessibility preferences
¾ Select Code Format and make sure it is set as follows:
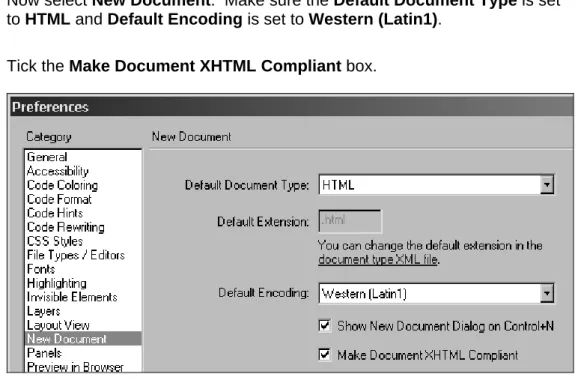
¾ Now select New Document. Make sure the Default Document Type is set to HTML and Default Encoding is set to Western (Latin1).
¾ Tick the Make Document XHTML Compliant box.
Figure 10 - new document preferences
¾ Finally, select Validator and choose XHTML 1.0 Transitional.
¾ Click on OK to close the Preferences dialogue box.
2.2 Close the current document:
¾ Go to File / Close (click No if prompted to save it) – alternatively, you can click on the Close icon (as shown opposite) in the top right corner of the document window (be careful not to click on the one above, this would close the whole program).
2.3 Create a new document:
¾ Go to File / New.
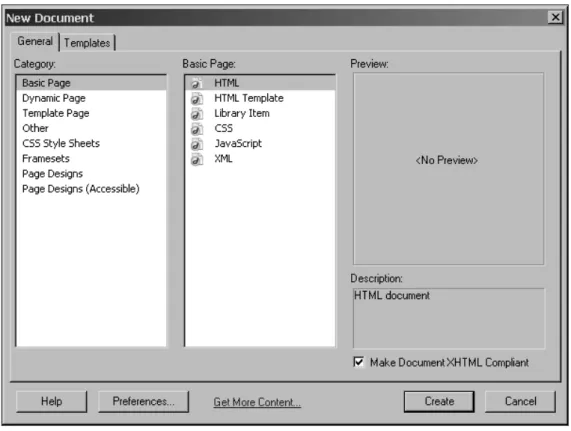
¾ Accept the default settings (Basic page; HTML, Make Document XHTML Compliant) in the New Document dialogue box (Figure 11), and click on the
Figure 11 - new document dialogue box
¾ Select the Code view to see the basic 'skeleton' of a new, XHTML compliant web page as created by Dreamweaver MX (Figure 12).
Figure 12 - code view of a new document in Dreamweaver MX
Note If you have inherited a site created by someone else a while ago, it is likely that it has been written in HTML rather than XHTML. If this is the case, you do not need to change the default preferences as explained above.
Task 3 Setting up a website
Objectives To create a new website.Comments Many of the more advanced features of Dreamweaver can only be used once a website has been defined.
Creating a new site 3.1 To create a new site:
¾ Go to Site / New Site to open the Site Definition for… dialogue box (Figure 13).
Error! Objects cannot be created from editing field codes.Figure 13 - the site definition for... dialogue box
Make sure the Advanced options are displayed (if not click on the Advanced
tab) and that, under Category (left hand side column), Local Info is highlighted.
¾ In the Site Name box type Joe’s website (substituting your own name for Joe).
¾ Click the Folder icon (as shown opposite) to the right of the Local Root Folder box to select the folder (C:\User\WWW\Web Design 2\). Leave the Default Images Folder blank, this will be set up later.
¾ Click the OK button.
¾ When prompted by the alert box shown in Figure 14, click OK. Dreamweaver will now begin storing all the information needed to manage your site as you build it.
Figure 14 - the create cache box Creating a new folder
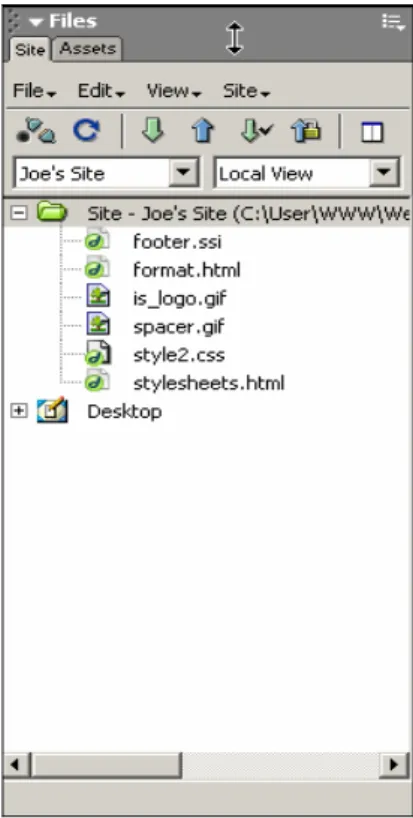
In the Panel groups, on the right side of the workspace, the Site panel will automatically open and display all the files within your newly defined
website (Figure 15).
Highlight your equivalent of Joe’s Site folder in the right hand window and, from the File menu, select New Folder. When prompted rename this folder images.
Drag the files spacer.gif and
is_logo.gif on to the images folder icon. This will place them in the
images folder.
Task 4 Creating a layout table
Objectives To create a web page layout table within the Dreamweaver Design view.
Comments Using tables for controlling the layout of your pages is an old trick used by web designers. Although page layout can be controlled in a stylesheet (CSS), not all browsers support it well. So it is still common to use tables (or a
combination of tables and CSS) for this purpose.
4.1 If a blank page is not currently displayed, create a new one (see Task 2.3) and select the Show Code and Design Views.
¾ Go to File / Save As and in the File name box, save your file as page1.html.
4.2 Create a table:
¾ Click the Table icon (as shown opposite) on the Insert bar to add a table into your web page. Set the values as shown in Figure 16 and click OK.
Figure 16 - insert table panel
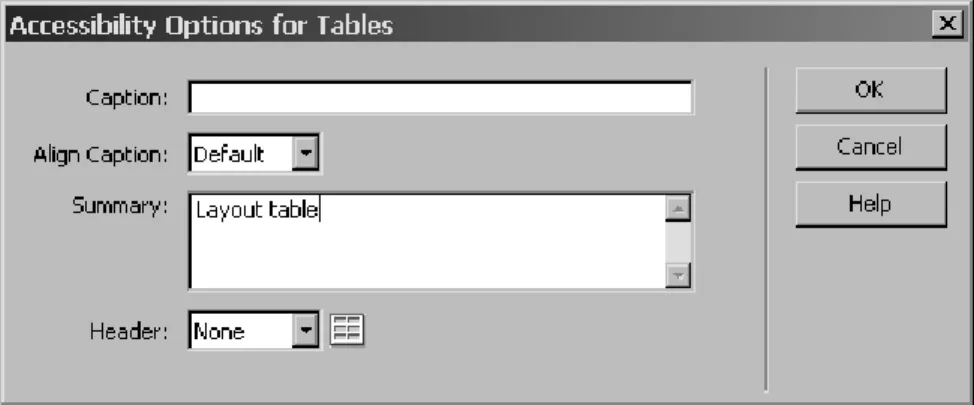
In the Accessibility Options for Tables dialogue box type Layout table in the Summary box and leave the other options as they are, as in Figure 17:
Figure 18 - a table comprising two rows and two columns
The border has been set to 1. This will clearly display the structure of the page layout when previewing in a browser, and can be turned off (set to 0), when the desired layout has been achieved.
4.3 You are now going to edit your table.
Dreamweaver has a useful selection feature - the Tag selector - which can be found on the status bar at the bottom of the Document window (see Task 1.5).
The Tag selector displays the hierarchical structure of the page, in relation to whichever element is selected (shown in bold). It is particularly useful when elements are hard to distinguish between, eg, images within table cells. By clicking on the desired object within the Tag selector, it is easy to ensure accurate selection.
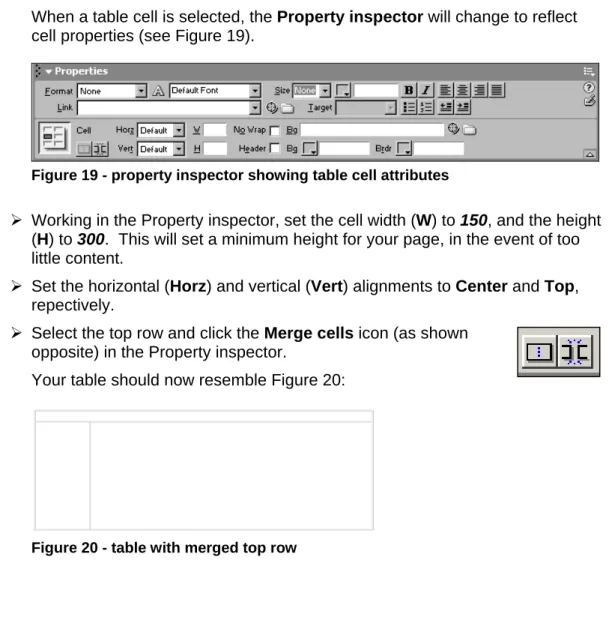
¾ Select the bottom left cell by clicking once within it. Looking at the Tag selector, make sure the cell has been selected as opposed to the row or whole table.
When a table cell is selected, the Property inspector will change to reflect cell properties (see Figure 19).
Figure 19 - property inspector showing table cell attributes
¾ Working in the Property inspector, set the cell width (W) to 150, and the height (H) to 300. This will set a minimum height for your page, in the event of too little content.
¾ Set the horizontal (Horz) and vertical (Vert) alignments to Center and Top, repectively.
¾ Select the top row and click the Merge cells icon (as shown opposite) in the Property inspector.
Your table should now resemble Figure 20:
Whereas Dreamweaver's Design View will display the table as above, browsers interpret HTML code in different ways. For this reason, it is essential to perform a workaround to ensure browser consistency.
We are aiming for a table with a lower, left hand navigation cell fixed at 150px – this will become our Navigation bar – and a right hand Main content window, which will always occupy the rest of the width of the Browser window. This will expand and contract as necessary, according to the window size. Even though the width of the left hand cell has been set, we cannot guarantee that it will neither expand, nor collapse, when we set the size of the right hand cell.
To achieve the desired result we will insert a transparent image that will act as a 'wedge' and keep the width of the left hand navigation fixed:
¾ Place the cursor in the lower left-hand cell, click the Image icon (as shown opposite) in the Insert bar, browse and select spacer.gif.
¾ In the Image Tag Accessibility Attributes dialogue box, type two double quotes ("") in the Alternate Text box, with no space in between (Figure 21):
Figure 21 - image tag accessibility attributes
Note The alternative text for the image will read alt="", indicating that there is an image but that it does not contain any information and performs no relevant function.
You will notice that the Property inspector now displays the image properties.
¾ While it is selected, set the width to 142, and height to 4 (the width value takes into account the 4px cellpadding on either side of the image).
If you lose it, then you will have go into the code view to change the width and height by hand.
¾ Now select the right hand cell and set its width to 100% and the horizontal and vertical alignment to Left and Top, respectively.
These measures will ensure the left hand cell cannot reduce in size, as the spacer keeps it ‘propped open’, and the right hand cell always occupies 100%
Task 5 Creating a template
Objectives To build a template on which to base subsequent pages. This will ensure consistency.
Comments Although Dreamweaver MX has its own template format, this course uses standard.html files, which are universally supported.
5.1 To insert a logo in your web page do the following:
¾ Place the cursor within the top cell of your table and, using the Insert bar, insert image is_logo.gif.
¾ Enter Bristol University Information Services logo in the Alternate text
box when prompted.
¾ Click once on the logo to select it and click the right arrow, to place the cursor to the right of the image.
We wish to insert two spaces after the image. However, within HTML, all white space is recognised as a single space. For this reason, we need to insert a non-breaking space from the extended character set:.
¾ Select the Characters tab in the Insert bar and click twice on the
Non-Breaking Space icon. Notice the insertion of two non-breaking spaces ( ) in the HTML code.
¾ Type Joe Bloggs’ website. There is no need to format the text at this point.
¾ Place your cursor in the bottom left cell making sure you don't select the spacer image – if this happens, press the <Æ> key to move the cursor after the spacer – and press the <Return> key.
¾ Add the following lines of text, starting a new line (press the <Shift + Return / Enter> keys) for each:
Introduction;
CSS;
Contact;
Accessibility;
UoB Home.
¾ Highlight each line, and using the Link box in the Property inspector, add the following links, respectively:
index.html;
css.html;
contact.html;
www.bristol.ac.uk/is/selfhelp/websupport/accessibility.html; www.bristol.ac.uk.
¾ The text will become blue and underlined. Check the link syntax in the Code View.
Note The last two links contain absolute URLs as they refer to external pages.
5.2 Examine and insert a Server Side Include (SSI).
Note that the file consists of a portion of HTML, usually found within the body of a document, but that the <body> </body> and all other structural tags are omitted.
¾ Locate the code: mailto:[email protected] and change it to your own email address.
¾ Close the file and return to file page1.html in the Design View.
¾ Place the cursor in the Main content window (bottom right) and press the
<Return> key to begin a new paragraph.
¾ Choose the Script tab in the Insert bar and select the Server SideInclude
icon (as shown opposite) and browse to file footer.ssi, to insert a bottom navigation bar.
¾ Look at the HTML in the code view, and note the syntax:
<!--#include file="footer.ssi" -->.
Note The SSI instruction looks very similar to an HTML comment. It orders the server to display the SSI file (rather like the insertion of an image), as
opposed to the code being included in the actual page. The advantage of this is that whenever the SSI is updated, the latest version will always be
displayed – a very useful feature if the file appears on a large, multiple page site.
¾ Return to the Design View and save your page1.html document. It should now resemble Figure 22.
Task 6 Using a style sheet
Objectives To explore the use of style sheets.Comments This exercise requires some work within the code view, as Dreamweaver MX pre-dates some of the required style sheet (CSS) code.
6.1 Whereas the setting up of the layout table involved a small amount of
formatting alignment, width etc), the rest of the formatting will be controlled by a style sheet. For this reason, the Property inspector should be switched to CSS mode:
¾ Click the HTML Mode icon (as shown opposite, top) in the Properties Inspector (it should change to the CSS Mode icon, as shown opposite, bottom). This will remove HTML formatting options (other than simple bold and italic variants).
¾ Expand the menu labelled No CSS Style (see Figure 23) and select Attach Style Sheet.
Figure 23 - style sheet menu
¾ When prompted, browse for file style2.css and select Add As: Import (see Figure 24). Press the <Return> key.
Figure 24 - using the properties inspector to attach a style sheet
Note The purpose of CSS is to separate content from formatting, keeping the actual HTML as clean as possible. This makes the content more universally
accessible and facilitates the easy editing of a website’s look and feel. The Import style sheet option is used because older browsers, which don’t provide comprehensive CSS support, do not recognise this command. This means unformatted content will be displayed. For this reason, it is essential that the unformatted content is usable. Before publishing pages, check them in such a browser (eg, Netscape 4.*), or temporarily remove the style sheet before previewing.
You will notice some immediate changes to the body text and background colour.
¾ Place your cursor in the main content cell, above the footer. Type your name and press the <Return> key to begin a new paragraph. Repeat until you have five lines.
¾ Highlight the first line, and, working in the Property inspector, from the
Format menu, select Heading 1.
¾ In the same way, set subsequent lines to Headings 2 – 4, and the final line to
Paragraph.
Your page should now resemble Figure 25.
Certain HTML elements have been redefined within the style sheet; eg, all paragraphs and headers and links will assume a consistent style.
Figure 25 - HTML elements redefined by style sheet
¾ Open file style2.css and examine the syntax. You will notice that each element to be redefined is listed alongside a set of properties, contained within curly brackets. These styles will be applied automatically throughout any page linked to this style sheet.
¾ Change the color property of element h2, from #999933 to #CC0000 and save the style sheet. Return to page1.html and note the change.
The standard redefinition of elements, whilst applying consistency, poses a problem where some degree of flexibility is required. For example, a typical web page will have a set of navigation links rendered in a different format to standard text links within the document. For this reason, it is necessary to create different classes of elements:
¾ Return to your style2.css and scroll down to the code:
.banner {font-size: 200%;
font-weight: bold;
color: #990000;
background-color: inherit;}
The dot preceding the name banner, specifies it as a class. The style is then defined as above. Classes can be applied to any element, in the following way:
Figure 26 - style menu displaying classes
¾ Select banner and note the change to the text. It should now be large and dark red.
¾ Look in the code view and note how the class has been applied:
<span class=”banner”>Joe…</span>.
¾ In the Design View, use the Tag selector, select the top table cell <td> and select the class palecell. The cell colour should turn to cream.
¾ Repeat for the bottom left hand cell.
¾ Using the method above, select the first link in the left hand cell, and apply the class nav.
¾ Repeat for each of the other links in the cell. You will notice a change in colour and thickness, and the underline should have disappeared. This manipulation of text decorationis one way in which style sheets can expand the functionality of HTML.
¾ Double-click within the footer text on the page. When prompted by the
Property inspector, select Edit to open the file footer.ssi.
¾ Apply the class footer by adding the text shown in bold:
<div class="footer">.
¾ Save the file and close it.
¾ Look at page1.html and you should notice the navigation bar is now centred.
¾ Return to file style2.css and examine the syntax of the class .footer, before closing the file.
¾ Select the whole layout table in page1.html (hint:: use the Tag selector).
¾ Set the table border to 0, and preview the page in a browser, noting changes.
Task 7 Using templates
Objectives To create new pages from a template.
Comments Templates enable pages to be produced with a common look hence enabling users to identify pages as belonging to your site.
7.1 Working in the Design View of template.html, highlight the sample content (above the navigation bar). Use the backspace key to delete it (this may take two or three clicks) and press the <Return> key to start a new paragraph.
¾ Open the file format.html. Make sure you are working in the Design View, and from the Edit menu, select Select All and then, again from the Edit
menu, select Copy.
¾ Paste the contents of format.html into your template, by selecting Paste from the Edit menu.
¾ Using the title box below the top menu, change the title of your page by replacing the text Page title with Introduction (see Figure 27).
Figure 27 - title box
¾ Save the file as index.html.
7.2 Repeat Task 7.1, copying and pasting the contents of the file
stylesheets.html into your template to create a file called css.html. Give the page an appropriate title before saving it.
7.3 Create your own Contact page from your template (hint: include your name, department, email address and any other information you feel is relevant. Experiment with different heading formats). Title the page Contact me and when happy, save as contact.html.
7.4 Preview the file index.html in a browser and navigate your site, making sure navigation links match your file names.
Task 8 Creating a Site map
Objectives To create a map of your website and examine some functions available from this view.
Comments The visual representation provided by the Site map is particularly useful for large sites comprising many pages.
8.1 In the Site window:
¾ Select index.html and use the Context menu to Set as Home Page (hint:: right-click to open the Context menu).
Note A home page must be specified in order to build a Site map.
8.2 From the top menu, select Site / Site Map.
The Site window will display the Site map, as in Figure 24.
Figure 28 - site map
8.3 The Site map automatically shows two levels: the home page and one lower level. More levels can be opened up by clicking the plus sign (+) beside a file. The minus sign (-) closes levels.
You will be alerted if the site has no default home page (typically index.html).
¾ In the Local Folder, right-click on the file you wish to set as your home page and select Set as Home Page from the dropdown menu.
¾ Use the Site map to explore your site.
Task 9 Link checking
Objectives To validate local pages and to list external links and orphaned pages (pages that have no incoming links).
Comments External links cannot be validated but will be listed and should then be validated manually.
9.1 The Link Checker enables you to check for broken links within your site:
¾ In the Site window use the Site menu and select Check Links Sitewide. The links will be checked and the results displayed in the Link Checker
window. Local links are verified and any that do not exist will appear in the
Broken Links.
Figure 29 - checking for broken internal links
¾ You should see one broken link to contacts.html (instead of contact.html) in
index.html.
¾ Click once on contacts.html and change to contact.html.
9.2 In the Link Checker:
¾ Select External Links from the dropdown menu at the top.
This lists all links to external sites, but Dreamweaver does not verify these links.
9.3 Any files that have no incoming links are listed under Orphaned Files:
¾ Select Orphaned Files from the Show dropdown menu in the Link Checker.
¾ Click the down arrow above the link checker to close it (see Figure 31).
Figure 31 - arrow above link checker
In Windows, the first time you start Dreamweaver, a dialogue box appears that lets you choose a workspace layout. The default is the new Dreamweaver MX
Workspace layout. If you change your mind later, you can switch to a different workspace using the Preferences dialogue box.
¾ Go to Edit / Preferences and in the Preferences dialogue box, under Category,
select General (first in the list).
¾ Then, on the right side, click on the Change Workspace button under Document Options (Figure 32).
Figure 32 - changing the workspace layout
The option on the left is the new default Dreamweaver MX workspace, the one we will be using on this course. You can also customise this option to emulate the workspace of HomeSite (a powerful code-only website editor favoured by professional developers and included with Dreamweaver MX) by ticking the
HomeSite/Coder-Style checkbox.
The option on the right will change the workspace to be like Dreamweaver 4 and is useful for previous users of Dreamweaver who like working with floating panels.