Parallels
Parallels Operations
Automation 2.9
Hosted Exchange Deployment Guide
Revision 6.45 (31 July, 2009)
Parallels 660 SW 39th Street Suite 205 Renton, Washington 98057 USA Phone: +1 (425) 282 6400 Fax: +1 (425) 282 6444 © Copyright 2009, Parallels, Inc. All rights reserved
Distribution of this work or derivative of this work in any form is prohibited unless prior written permission is obtained from the copyright holder.
{ Patented technology protected by U.S.Patents 7,328,225; 7,325,017; 7,293,033; 7,099,948; 7,076,633.
Patents pending in the U.S.}
Product and service names mentioned herein are the trademarks of their respective owners. Parallels Operations Automation is a registered trademark of Parallels.
Contents
Preface
8
Documentation Conventions ... 8 Typographical Conventions ... 8 General Conventions ...10 Feedback ...10Deploying Hosted Exchange 2003
11
Overview of Hosted Exchange Deployment ...13Network Architecture ...13
Hosted Exchange and Active Directory ...15
Hosted Exchange and Clustering ...16
Number of Global Catalog Servers ...16
Limitations ...17
Configuring Active Directory ...17
Configuring Windows Server 2003 on Nodes ...18
Creating Exchange Mailbox Cluster ...19
General Configuration of Exchange Mailbox Cluster ...19
Creating ClusterAdmin Account ...20
Installing Windows Server 2003 Server Cluster ...21
Adding Nodes to a Server Cluster ...23
Preparing Cluster Nodes for Exchange 2003 Installation ...23
Installing First Exchange Mailbox Server ...25
Preparing Node for Exchange 2003 Installation ...25
Installing All Windows Components Required by Exchange Server ...27
Running Microsoft Exchange Installation Wizard ...28
Checking Successful Installation of ForestPrep and DomainPrep ...29
Installing SP2 for Exchange 2003 ...30
Installing Additional Exchange Mailbox Servers ...31
Creating Exchange Virtual Servers for Clustered Configuration ...32
Creating Group to Host Exchange Virtual Server ...33
Creating IP Address Resource ...34
Creating Network Name Resource ...36
Creating Disk Resource ...37
Creating Exchange 2003 System Attendant Resource ...38
Starting POP3 and IMAP4 Services ...40
Creating POP3 Cluster Resource ...41
Creating IMAP4 Cluster Resource ...42
Configuring Exchange Mailbox Servers ...42
Configuring Administrative Groups to be Shown in Exchange System Manager ...42
Configuring HTTP Virtual Server in Exchange System Manager ...43
Configuring Mailbox Deletion Settings ...45
Configuring 'Internet Newsgroups' Public Folder ...46
Configuring and Starting IIS Service ...46
Securing Default Global Address List ...47
Installing and Configuring Exchange Client Access Server ...47
Removing Public Stores ...50
Removing Mailbox Stores ...53
Disabling Exchange Information Store ...54
Enabling Network Protocols ...57
Configuring and Start IIS Service on Protocols Front-End Servers ...60
Enabling Outlook Web Access ...61
Customizing Outlook Web Access ...67
Enabling Outlook Mobile Access ...70
Enabling Exchange ActiveSync Support ...70
Configuring Security Settings for Mobile Devices ...73
Verifying External DNS for SMTP Virtual Server ...75
Installing and Configuring Exchange SMTP Servers ...78
Deploying RPC-over-HTTP for Exchange 2003 Server ...80
Configuring Global Catalog Servers ...80
Installing RPC-over-HTTP Windows Component ...81
Configuring Exchange Mailbox Servers as Targets for RPC Proxy Servers ...84
Configuring Exchange Client Access Server as RPC Proxy Server ...85
Configuring RPC Virtual Directory on RPC Proxy Server ...85
Checking that RPC Proxy Server Uses Specified Ports ...88
Installing SSL Certificate on RPC Proxy Server ...89
Configuring Network Load Balancing for Exchange 2003 Servers ...96
Configuring Network Load Balancing ...96
Creating Default SMTP Connector ...100
Configuring Firewall for Exchange 2003 Services ...101
Deploying Exchange Provisioning ...101
Configuring ClusterAdmin Account for Clustered Exchange ...101
Configuring MPS Server ...102
Installing MPF Exchange Provider ...107
POA-Related Installation Steps ...108
Creating DNS Records for Exchange Client Access Servers ...108
Registering Exchange Mailbox Servers in POA ...111
Registering Exchange SMTP Servers in POA ...118
Registering Exchange Client Access Servers in POA ...121
Installing Exchange OAB Service ...123
Creating Resource Type ...125
Creating Service Template ...130
Checking Readiness of Exchange Servers to Provide ...130
Configuring AUTD Notification on Windows Mobile Smartphones ...132
Deploying BlackBerry™ Messaging Service for Microsoft Exchange 2003 ...134
Overview ...135
System Requirements ...136
Network Requirements ...139
Preparing Node for BES ...139
Configuring Proxy Server ...140
Deploying Microsoft SQL Server for BlackBerry™ Configuration Database ...141
BlackBerry™ Enterprise Server Pre-Installation Steps...142
Creating Exchange Mailbox ...147
Installing BlackBerry™ Enterprise Server Software ...148
Installing BlackBerry™ Enterprise Server Resource Kit ...150
Testing BlackBerry™ Service Account ...153
Registering BlackBerry™ Enterprise Servers in POA ...153
Installing POA Packages ...153
Importing Existing BlackBerry Accounts into POA ...154
Overview ...154
System Requirements ...156
Networks Requirements ...157
Preparing Node for GMS ...157
Configuring Proxy Server ...157
Good Messaging Server Pre-Installation Steps ...158
Creating Exchange Mailbox ...163
Installing GMS Server Software ...165
Adding MPFServiceAcct Account to GMS ...166
Testing GMS Service Account ...166
Registering GMS Servers in POA ...166
Installing POA Packages ...166
Importing Existing GMS Accounts into POA ...168
Deploying Postini Email Security Service ...169
Installing Postini Email Security Service ...169
Registering Postini Account in POA...170
Exchange 2003 to Exchange 2007 Transition
171
Overview ...171Transition Procedure ...172
Deploying New Hardware ...175
Deploying Hosted Messaging and Collaboration 4.0 Server ...175
Deploying and Configuring Exchange 2007 Servers ...179
Updating Exchange 2003 Servers ...180
Reconfiguring Wireless Services ...180
Registering and Configuring New MPS and Exchange 2007 Nodes ...181
Switching Provisioning from HMC 3.5.to HMC 4.0 ...181
Moving / Upgrading System Objects...183
Switching Client Access and SMTP Traffic to Exchange 2007 Servers ...183
Migrating Exchange Subscriptions...184
Removing HMC 3.5 and Exchange 2003 ...187
Deploying Hosted Exchange 2007
189
Deployment Overview ...190Exchange Server 2007 ...190
Deployment Architectures ...203
Supported Storage Technologies ...204
High Availability for Exchange Mailbox Servers ...204
High Availability for Exchange Hub, Edge and CAS Servers ...208
Deploying Hosted Exchange 2007 ...208
Overview ...208
Exchange 2007 Server Installation ...209
Configuring Active Directory ...213
Preparing Servers for Exchange 2007 ...216
Deploying Exchange Server 2007 Roles ...219
Upgrading to Exchange 2007 Service Pack 1 ...257
Installing Update Rollup 1 for Exchange Server 2007 SP1 ...262
Configuring Exchange 2007 Servers ...262
Integrating with External AS/AV Mail Gateway ...285
Deploying Exchange Provisioning ...298
Installing Exchange Server 2007 Management Tools ...298
POA-Related Installation Steps ...304
Overview ...304
Installing Exchange CP Package on UI Servers ...305
Configuring POA Administrator Account as Exchange Organization Administrator ...305
Registering and Configuring Mailbox Servers ...305
Registering and Configuring Client Access Server ...308
Registering and Configuring Hub Transport Servers ...313
Registering and Configuring Edge Transport Server ...316
Configuring Exchange 2007 Branding ...317
Deployment and Installation Troubleshooting ...321
Problems with Mail Delivery to Newly Created Recipient ...321
Deploying BlackBerry™ Enterprise Server for Microsoft Exchange 2007 ...321
Overview ...321
Hardware Requirements ...323
System Requirements ...326
Network Requirements ...326
Deploying Database for BES ...327
BlackBerry Enterprise Server Pre-Installation Steps ...327
Installing BlackBerry Enterprise Server Software ...330
Installing BlackBerry Resource Kit ...332
Testing BES Service Account Proper Functioning ...335
Registering BES Servers in POA ...335
Installing POA Packages for BlackBerry ...335
Importing Existing BlackBerry Accounts in POA ...336
Deploying Good™ Messaging Server for Microsoft Exchange 2007 ...338
Overview ...338
Hardware Requirements ...339
System Requirements ...340
Network Requirements ...340
Good Messaging Server Pre-Installation Steps ...341
Installing Good Messaging Server and Good Management Server Software ...344
Testing GMS Service Account Proper Functioning ...345
Registering GMS Servers in POA ...345
Installing POA Packages for Good Messaging ...345
Importing Existing Good Accounts in POA ...347
Managing Messaging Services ...349
Deploying Postini Email Security Service ...349
Deploying MessageLabs Email Security Service ...351
Deploying MX Logic Email Security Service ...355
Deploying Global Relay Email Archiving Service ...360
Common Operations
372
Configuring Windows Node ...372Configuring Network Interfaces ...372
Reducing Metric of Private Network Interface ...373
Renaming Computer ...374
Joining Windows Node to Domain ...375
Enabling DHCP Client Service ...376
Performing DNS Registration ...378
Checking Highest Priority of Private Network Interface ...379
Installing QoS Packet Scheduler ...379
Checking Presence of Sysnative Directory ...381
Upgrading to Windows Server 2003 R2 ...389
Windows Updates Compatibility ...392
Installing PPM Packages ...404
Adding a Package ...405
Installing a Package on the Host ...409
Index
414
In This Chapter
Documentation Conventions ... 8 Feedback ... 10
Documentation Conventions
Before you start using this guide, it is important to understand the documentation conventions used in it.
Typographical Conventions
The following kinds of formatting in the text identify special information.
Formatting convention Type of Information Example
Special Bold Items you must select, such
as menu options, command buttons, or items in a list.
Navigate to the QoS tab.
Titles of modules, sections, and subsections.
Read the Basic Administration module.
Italics Used to emphasize the
importance of a point, to introduce a term or to designate a command line placeholder, which is to be replaced with a real name or value.
These are the so-called shared VEs.
To destroy a VE, type vzctl destroy VEid.
Important An important note provides information that is essential to the completion of a task. Users can disregard
information in a note and still complete a task, but they should not disregard an important note.
Important: The device drivers installed
automatically during Setup are required by your system. If you remove one of these drivers, your system may not work properly.
Note A note with the heading ―Note‖ indicates neutral or positive information that emphasizes or supplements important points of the main text. A note supplies information that may apply only in special cases—for example, memory
limitations, equipment configurations, or details that apply to specific versions of a program.
Note: If Windows prompts you for a network password at startup, your network is already set up and you can skip this section.
Monospace The names of commands,
files, and directories. Use vzctl start to start a VE. Preformatted On-screen computer output
in your command-line sessions; source code in XML, C++, or other programming languages.
Saved parameters for VE 101
Preformatted Bold What you type, contrasted
with on-screen computer output.
# rpm –V
virtuozzo-release
CAPITALS Names of keys on the
keyboard. SHIFT, CTRL, ALT
KEY+KEY Key combinations for which
the user must press and hold down one key and then press another.
General Conventions
Be aware of the following conventions used in this book.
Modules in this guide are divided into sections, which, in turn, are subdivided into subsections. For example, Documentation Conventions is a section, and General Conventions is a subsection.
When following steps or using examples, be sure to type double-quotes ("), left single-quotes (`), and right single-single-quotes (') exactly as shown.
The key referred to as RETURN is labeled ENTER on some keyboards.
Commands in the directories included into the PATH variable are used without absolute path names. Steps that use commands in other, less common, directories show the absolute paths in the examples.
Feedback
If you have found a mistake in this guide, or if you have suggestions or ideas on how to improve this guide, please send your feedback using the online form at
http://www.parallels.com/en/support/usersdoc/. Please include in your report the guide's title, chapter and section titles, and the fragment of text in which you have found an error.
Microsoft Exchange Server is the Microsoft software for integrated collaborative
messaging features such as scheduling, contact, and task management capabilities. With this easy to manage software, clients can send and receive electronic mail and other forms of interactive communication through computer networks.
Exchange Server interacts with the following software client applications:
Microsoft Outlook Express - the e-mail client that is designed for home users who require only Internet e-mail and newsgroup functionality.
Microsoft Office Outlook - the e-mail client that is designed for business users who need Internet standards-based e-mail and discussion group functionality, integrated personal calendars, group scheduling, task, and contact management
Other e-mail client applications.
E-mail messages are sent and received through a client device such as a personal computer, workstation, or a mobile device including mobile phones or Pocket PCs. The client typically connects to a network of centralized computer systems comprised of servers where the e-mail mailboxes are stored.
Exchange Server 2003 runs on Microsoft Windows Server 2003 and Microsoft Windows 2000 Server operating systems. Exchange Server 2003 communicates with e-mail clients through Messaging Application Programming Interface (MAPI) that includes powerful messaging and rich collaboration capabilities. Exchange Server also accommodates other client access through the protocols: POP3, IMAP4, SMTP.
POA makes the Hosted Exchange usage easier. POA Service Controller responsible for Exchange automatically chooses a less loaded storage for new customer provisioning. POA UI helps Providers perform their tasks in managing Hosted Exchange, while Customers can use their POA Control Panel for handling their mail.
C
H A P T E R2
In This Chapter
Overview of Hosted Exchange Deployment ... 13
Configuring Active Directory ... 17
Configuring Windows Server 2003 on Nodes ... 18
Creating Exchange Mailbox Cluster ... 19
Installing First Exchange Mailbox Server ... 25
Installing Additional Exchange Mailbox Servers ... 31
Creating Exchange Virtual Servers for Clustered Configuration... 32
Configuring Exchange Mailbox Servers ... 42
Installing and Configuring Exchange Client Access Server ... 47
Installing and Configuring Exchange SMTP Servers ... 78
Deploying RPC-over-HTTP for Exchange 2003 Server ... 80
Configuring Network Load Balancing for Exchange 2003 Servers ... 96
Creating Default SMTP Connector ... 100
Configuring Firewall for Exchange 2003 Services ... 101
Deploying Exchange Provisioning ... 101
POA-Related Installation Steps ... 108
Configuring AUTD Notification on Windows Mobile Smartphones ... 132
Deploying BlackBerry™ Messaging Service for Microsoft Exchange 2003 ... 134
Deploying Good™ Messaging Server for Microsoft Exchange 2003 ... 154
Overview of Hosted Exchange Deployment
Network Architecture
Before starting to deploy Hosted Exchange, you need to deploy elementary Windows Infrastructure following the steps at POA Windows Hosting Infrastructure Deployment guide. As a result, you will have:
Two Domain Controllers;
Microsoft Provisioning System Engine server.
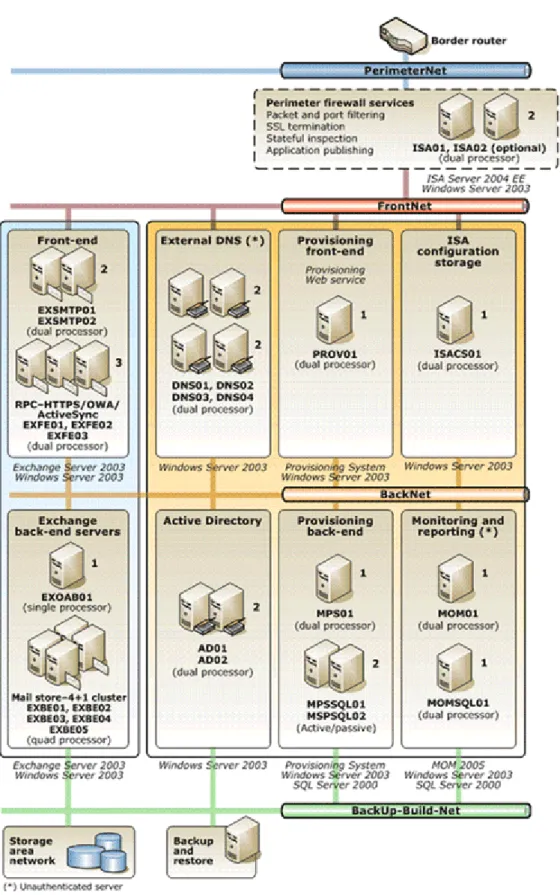
Typical Hosted Exchange architecture is designed to distribute Exchange hosting tasks among several servers of the following types:
Exchange Client Access servers (Front-End servers). These servers accept requests from clients and proxy the requests to appropriate Exchange Mailbox servers for processing. Exchange Client Access servers run Exchange mailbox access services, like RPC Proxy, OWA, OMA, RPC-over-HTTPS, ActiveSync, POP3, IMAP.
Exchange Mailbox servers (Back-End servers). These servers host mailbox stores, public folder stores, and OAB.
The following sample names are used in this chapter:
EXBE01 – Exchange Mailbox server.
EXFE01 – Exchange Client Access server.
EXSMTP01 – Exchange SMTP server.
EXVS01 – Exchange virtual server.
EXCL01 – Exchange Mailbox cluster.
AD01 – First Domain Controller.
AD02 – Second Domain Controller.
MPS01 – Microsoft Provisioning System Engine server.
DOM – Active Directory domain where Exchange and BlackBerry™ are deployed.
DOM.local – FQDN name of Active Directory domain where Exchange and BlackBerry™ are deployed.
HostedExchange – Exchange organizational unit.
Hosted Exchange and Active Directory
For Hosted Exchange, you can use one of two Active Directory (AD) models:
1 Single-Forest (Single-Domain) Model
The Single-Forest model is the only AD model supported by Microsoft Provisioning System and is recommended for shared and dedicated hosting environments.
2 Multiple-Forests (Super Admin Forest) Model
The Multiple-Forests model enables you to implement security policies specially for the Admin forest. These policies will differ from those implemented in the hosted
companies and the rest of your organization. In addition, this model ensures data isolation by deploying a different and isolated global catalog in the Admin forest. In practice, the Multiple-Forests model is popular among large hosting companies. Usually, the forests at the service provider are separated according to the
organizational lines. One forest is maintained by internal IT organization for the hosting company's internal IT requirements. The other forest, at the hosting company, is maintained by the business unit that is responsible for supporting hosted companies. The Multiple-Forests model provides:
Security – In the Single-Forest model, the administrators and users share the same forest, so that the compromising of the forest by a user leads to the compromising of the entire network. In the Multiple-Forests model, the administrators and users are in different forests. Therefore, if the security of the shared domain is
compromised, the damage is contained.
Data isolation – The administrators do not share a common global catalog. Therefore, the information disclosure is reduced in the shared domain.
Hosted Exchange and Clustering
You can extend the capacity of your Exchange server just by adding a new hardware (computer and/or storage). It‘s the cheapest solution, but it has a grave disadvantage: if a server goes down, customers who are hosted on it will not be able to get access to the system.
Clustering helps achieve high availability and high scalability for Exchange server
applications. This technique allows to deploy several Exchange Mailbox servers into one cluster. It is recommended to use a five-node server cluster that consist of four active nodes and one passive node. Each active node is configured as an Exchange Virtual Server (EVS); the passive node remains in stand-by mode as a failover server in the event an active node will go offline. Disks are shared among the nodes. Maximum number of nodes in one cluster is eight.
The primary benefit of server clusters is that they provide the failover support. If one server in a cluster stops functioning, the failover process automatically shifts the workload of the failed server to another server in the cluster, ensuring continuous availability of Exchange data.
Clustering decreases server downtime which can be especially critical when Service License Agreements (SLA) are in place. A failure to meet a specified level of data
availability can result not only in financial penalties, but have a long-term negative impact on your reputation as a service provider. Decrease of server downtime is the best solution in this situation.
After the POA Agent installation, only active cluster nodes are registered in POA.
Number of Global Catalog Servers
One global catalog can support about 4000 users. In order to support a bigger number of users, Active Directory is usually installed with two global catalogs.
So, theoretically, Exchange Server can support up to 8000 users at a time. But if one of your global catalogs goes down, you can again support only up to 4000 users.
Limitations
A single Exchange organization cannot exceed the following limits:
1000 Exchange servers
1000 administrative groups
100 domains
150 routing groups.
Microsoft generally recommends that you use Direct Access Storage (DAS) or Storage Area Network (SAN) storage array solutions, because this configuration optimizes performance and reliability for Exchange.
Microsoft does not support Network-Attached Storage (NAS) solutions.
Configuring Active Directory
The default configuration of the Global Address Lists (GAL) class object allows only 1000 address lists. To extend this limit, perform the following steps:
1 Log on to AD01 and copy the MakeGalLinked.exe file to a local directory.
2 Execute the following command from the directory to which you have copied
MakeGalLinked.exe:
makeGalLinked.exe /dc:%computername% /operation:makeGalLinked
If the above command fails, try to use the following extended form:
makeGalLinked.exe /dc:<domain_controller_name> /domain:<domain_name> /admin:<ExchangeFullAdminAccountName> /adminpwd:PROMPT
/operation:makeGalLinked
3 Wait until the following message indicates the success of the operation:
"globalAddressList" schema object is a linked attribute with linkId: 4048
Or, you will see two green highlighted areas of text and the LOG_PASS line will read "100%".
Important: It is strongly recommended to complete the configuration of the Active Directory schema update before you start to deploy the first Exchange Mailbox server. Otherwise, you may have to rebuild your Hosted Exchange environment again from clean servers.
Configuring Windows Server 2003 on Nodes
This section describes the actions you need to perform on each node designated to be an Exchange server. Prepare the node so that it can meet the requirements explained at Network Architecture (on page 13) and make the following configurations:
1 Configure the server's registry:
a On Windows Server 2003, create the new file updateThreshold.reg.
b Into updateThreshold.reg, enter the following text:
REGEDIT4
[HKEY_LOCAL_MACHINE\SYSTEM\CurrentControlSet\Control\Session Manager]
"HeapDeCommitFreeBlockThreshold"=dword:00040000
c Save updateThreshold.reg and execute it to apply registry changes.
2 If the Exchange 2003 server contains more than 1 GB of physical memory, modify the
boot.ini file in the following way (example):
[boot loader] timeout=3
default=multi(0)disk(0)rdisk(0)partition(1)\WINDOWS [operating systems]
multi(0)disk(0)rdisk(0)partition(1)\WINDOWS="Windows Server 2003, Enterprise" /fastdetect /NoExecute=OptOut /3GB /USERVA=3030
After the boot.ini is modified, restart the server.
3 Configure the DNS client. In the BackNet network properties dialog box, do the following:
Type the IP address of DC01 server Back-Net interface address into the Preferred DNS server field.
Type the IP address of DC02 server Back-Net interface address into the Alternate DNS server field.
Creating Exchange Mailbox Cluster
General Configuration of Exchange Mailbox Cluster
An Exchange Mailbox cluster requires the following resources:
One network IP address from the BackNet pool – the IP of the Cluster;
Additional hub/switch for the HeartBeat network used by physical nodes of the cluster;
Note: The HeartBeat network is a special isolated network to which all cluster nodes are connected. With the help of this network, the Cluster Service periodically checks cluster nodes for availability. If one of the cluster nodes stops responding on the HeartBeat network interface, the node is marked as offline and failover starts on an available passive cluster node.
One shared cluster storage (Quorum disk).
Each physical node of the cluster requires the following resources:
One network IP address from the BackNet pool;
One network name that should be the same as in not clustered environment;
One network IP address from the HeartBeat pool.
Each virtual server node of the cluster requires the following additional resources:
One "virtual" network IP address from the BackNet pool. This IP address will be used in the all services requests instead of the real server IP;
One ―virtual‖ network name that is resolved in the ―virtual‖ IP. This name will be used in the all services requests instead of the real server name;
One shared storage to store mailboxes.
For example, if you are deploying a three-node cluster that includes one passive and two active nodes, you need the following:
Six NetBIOS names:
EXCL01 – cluster name
EXBE01, EXBE02, EXBE03 – names of physical nodes
EXVS01, EXVS02 – names of Exchange virtual servers
Three IP addresses from the HeartBeat IP pool: one IP for each physical node.
Six IP addresses from the BackNet IP pool:
One IP address for cluster EXCL01
One shared storage for the cluster – Quorum Disk.
Two shared storages for Exchange virtual servers – one per virtual server. Mailboxes will be stored here.
Creating ClusterAdmin Account
1 Log on to AD01.2 Run dsa.msc from the command line.
3 Right-click Users, point to New, and then click User.
4 In the New Object-User dialog box, type "ClusterAdmin" as the First name and enter the
User logon name. Click Next to continue.
5 In the New Object – User dialog box, click to clear the User must change password at next logon check box. Type the password (twice), and select Password never expires. Click
Next to continue.
Note: The service account cannot have a blank password or a password that will expire.
6 Check the information you have typed, and then click Finish.
7 From the Start Menu, go to Start > Settings > Control Panel > Administrative Tools > Domain Security Policy.
8 In the left frame, expand the following nodes: Security Settings > Local Policies > User Rights Assignment.
9 In the right frame double-click Add workstations to domain policy name.
10 In the dialog-box opened, select the Define these policy settings checkbox and click on the Add User or Group button.
11 Click Browse and type ―ClusterAdmin‖. Click on the Check Names button and, if the name becomes underlined, click OK three times.
Installing Windows Server 2003 Server Cluster
Steps for cluster installation are performed on an Exchange Mailbox physical node (in our example, EXBE01) with at least two network cards: one plugged into the BackNet network, and the other - into the HeartBeat network.
Note: It is possible to use Back-Net network instead of HeartBeat, but it is not recommended for production environments.
This condition is met, you can follow these steps:
1 Log on to EXBE01. Use an account that is a member of the Domain Administrators group.
2 In Disk Administrator, format (if needed) the shared storage for Quorum Disk as NTFS. Mount the storage as the ―Q:‖ letter.
3 Format (if needed) other shared storages as NTFS.
4 From the Start Menu, go to Start > Settings > Control Panel > Administrative Tools > Cluster Administrator.
5 In the Open Connection to Cluster dialog box, select Create New Cluster.
6 Click OK to launch the New Server Cluster Wizard.
7 Click Next.
8 On the Cluster Name And Domain page, confirm the domain name, and enter the unique name for the cluster (EXCL01). Click Next.
9 On the Select Computer page, enter the name of the new computer in the Computer Name
field. Click Next.
10 On the Analyzing Configuration page, confirm that the progress bar is displayed,
indicating that there are no significant problems. If there are any problems, you should resolve them before you proceed with the cluster creation.
Note: If there are some problems at this step, click View Log for detailed information.
11 Click Next.
12 On the IP Address page, assign a new unique IP address (from the BackNet IP pool) to the cluster that will be used by management tools during connecting. Click Next.
13 On the Cluster Service Account page, enter ClusterAdmin for the account name. Enter the account password, and confirm the domain name. This account will be granted local admin privileges on all nodes in the cluster. Click Next.
14 On the Proposed Cluster Configuration page, confirm the information and click Next to start creating the cluster.
15 On the final page of the Cluster Creation Wizard, click Finish to exit the Wizard. The
Cluster Administrator application appears, displaying the newly created cluster.
18 Check that the Quorum disk (Q:) resource is included in Cluster Group. If not, move the resource.
Adding Nodes to a Server Cluster
1 Log on to EXBE01. Use an account that is a member of the Domain Administrators group.
2 In the Cluster Administrator application, right-click the root cluster container with the name of your cluster (EXCL01). Click New and then click Node. The Add Node wizard starts.
3 Click Next.
4 On the Select Computer page, do the following:
a Type EXBE02 in the Computer Name field.
b Click Add to add the name to the Selected Computers list.
c Click Next.
5 On the Analyzing Configuration page, confirm that the progress bar is displayed,
indicating that there are no significant problems. If there are any problems, you should resolve them before you proceed with the cluster creation.
Note: If there are some problems at this step, click View Log for detailed information.
6 Click Next.
7 On the Cluster Service Account page, type the password set for the ClusterAdmin account. Make sure that your domain is selected. Click Next to go on with the Wizard.
8 On the final page of the Cluster Creation Wizard, click Finish to exit the Wizard. Repeat the above steps for other nodes of the cluster.
Preparing Cluster Nodes for Exchange 2003 Installation
Each node included into the Cluster must meet the following requirements:
The Cluster service is running.
The Microsoft Distributed Transaction Coordinator (MSDTC) Windows component is installed (the Distributed Transaction Coordinator Windows service is present).
Moreover, the following requirements must be met:
Your account is a member of a group that has the Exchange Full Administrator role applied at the organization level.
Installation drive cannot be the cluster‘s shared drive. However, you can use this drive as target.
The node's FQDN does not match the SMTP proxy domain of any recipient policy. In a cluster with two nodes, one node should be active, the other - passive. If you have more than two nodes, at least one of the nodes must be passive.
2 From the Start Menu, go to Start > Administrative Tools > Cluster Administration.
3 In the Open Connection to Cluster dialog box, do the following:
a In the Action drop-down list, select Open connection to cluster.
b In the Cluster or server name field, enter the cluster name you created previously (in our case, EXCL01). You can select the name in the drop-down list or navigate to the required cluster after clicking on the Browse button.
c Click OK.
4 In the Cluster Administrator dialog box, in the Details pane, under State, make all of your cluster nodes Online.
Create MSDTC cluster resource:
1 Log on to a cluster node.
2 From the Start Menu, go to Start > Administrative Tools > Cluster Administration.
3 Under Groups, right-click Cluster Group, point to New, and then click Resource.
4 In the New Resource dialog box, in the Name field, type Distributed Transaction Coordinator.
5 In the Resource type list, select Distributed Transaction Coordinator.
6 In the Group list, ensure Cluster Group is selected, and then click Next.
7 Verify that all nodes appear in the Possible owners list, and then click Next.
8 Select Quorum disk (Q:) and Cluster Name resources, and then click Add to add them to the Resource dependencies list.
9 Click Finish.
Installing First Exchange Mailbox Server
The first installation of Exchange Server performs initial Active Directory modification and creates the first Exchange Organization (for example, HostedExchange). All next Exchange Servers installations will use this organization and do not require any parameters.
Microsoft Exchange Server 2003 setup requires that the following components and services are installed and enabled on the server:
.NET Framework;
ASP.NET;
IIS;
World Wide Web Publishing Service;
SMTP;
NNTP.
If you install Microsoft Exchange Server 2003 in a native Windows Server 2003 forest or domain, none of these services is enabled by default. You must enable the services manually before running Exchange Server 2003 Installation Wizard.
If you install Exchange on a new server, only the required services are enabled. For example, POP3, IMAP4, and NNTP services are disabled by default on all of your
Exchange 2003 servers. You should enable only services that are essential for performing Exchange 2003 tasks.
Installing Exchange 2003 on a cluster is similar to installing Exchange 2003 on non-clustered servers.
Important: Install Exchange 2003 completely on one node before you install it on another node.
Preparing Node for Exchange 2003 Installation
Prepare a computer that you want to function as an Exchange Mailbox server. This computer must meet the following requirements:
Server Names EXBE
Description Exchange Back-End Server. Can be deployed as 4+1 cluster. Runs Exchange mailbox and public folder stores.
Density 5,000 mailboxes
Depends on the usage profile
Software To be installed by the Customer: OS
To be installed by Parallels:
Exchange Server 2003 Enterprise Edition SP2 (Distribution to be provided by the Customer)
Supported
Virtualization Not supported
CPU 2 core (3GHz or higher)
RAM 4GB
Disks Array 1:
OS and software - 2 x 36, SCSI RAID 1 Array 2:
Exchange databases and logs - SAN:
28 x 72GB, SCSI, RAID 1+0 - or -
14 x 146GB, SCSI, RAID 1+0
Disk Partitioning Array 1:
C: 36GB - for OS and software Array 2:
E:\Exchsrv (VMP) - 20GB - SMTP Queue, Tracking Log E:\ - 350GB - SG01 Data (5 Mailbox Stores for
2,500 mailboxes of 100MB size limit filled with content to 50-80%) E:\SG1_Logs(VMP) - 55GB - SG01 Transaction Log
F:\ - 350GB - SG02 Data (5 Mailbox Stores for 2,500 mailboxes of 100MB size limit filled with content to 50-80%) F:\SG2_Logs(VMP) - 55GB - SG02 Transaction Log
G:\ - 110GB - SG03 Data (Public Store providing 5-10MB of public space per mailbox and system space for 1,000 OABs). G:\SG3_Logs(VMP) - 35GB - SG03 Transaction Log Q:\ - 3GB - Quorum and MSDTC * VMP - Volume Mount Point
* SG - Storage Group
NICs BackNet
1 Log on to the Windows Server 2003 node you want to install Exchange 2003 on.
2 Make sure that this node has one network card plugged into the Back-Net (see Configuring Windows Server 2003 (on page 18) for details).
Important: For clustered configuration, you also need an additional network card for HeartBeat network.
3 Give a name to the node (for example, EXBE01). Refer to the related topic (on page 374).
4 Give an internal IP to the node.
5 Join the node to your Active Directory domain. For this purpose, follow the steps of the related topic (on page 375) (replacing the server name where necessary).
Installing All Windows Components Required by Exchange Server
1 Log on to the node.2 Create the file %TEMP%\prepare_for_exchange.bat with the following content:
@echo off
echo [Components]>%TEMP%\exch.inf echo netfx = on>>%TEMP%\exch.inf echo aspnet = on>>%TEMP%\exch.inf echo iis_common = on>>%TEMP%\exch.inf echo iis_inetmgr = on>>%TEMP%\exch.inf echo iis_smtp = on>>%TEMP%\exch.inf echo iis_www = on>>%TEMP%\exch.inf echo iis_nntp = on>>%TEMP%\exch.inf echo Starting the installation...
start /w %SystemRoot%\System32\sysocmgr.exe
"/i:%SystemRoot%\inf\sysoc.inf" "/u:%TEMP%\exch.inf" /w && echo Installation done...
3 Run %TEMP%\prepare_for_exchange.bat using cmd.exe with at least Local Administrator's credentials.
During the installation, you will be prompted to provide the path to the Windows Server 2003 CD-ROM. In this case, browse for the CD-ROM files folder and click OK.
Important for clustered installation! Exchange Server 2003 must be installed in the same directory location on all nodes. It means that after you designate the location for the first node, the same location is used for all other nodes. By default, the Exchange program files are installed on the Windows boot drive. For example, if your Windows boot files are on drive C:\, the Exchange Server 2003 will be installed to C:\Program Files\Exchsrvr.
Running Microsoft Exchange Installation Wizard
1 Insert the Microsoft Exchange Server 2003 CD into your CD-ROM drive.
2 From the Start Menu, go to Start > Run.
3 Run the following command:
E:\setup\i386\setup
where E is your CD-ROM drive.
4 On the Welcome to the Microsoft Exchange Installation Wizard page, click Next to go on.
5 On the License Agreement page, read the agreement. If you agree to the terms, click I agree, and then click Next.
6 On the Product Identification page, type your 25-digit product key, and then click Next.
7 On the Component Selection page, in the Action column, use the drop-down arrows to specify the appropriate action for each component, and then click Next.
Figure 2: Component Selection
9 On the Organization Name page, in the Organization Name box, type your new Exchange organization name.
The name must contain at least 1 character, but no more than 64 characters. You can use the following characters in your new Exchange 2003 organization name:
A through Z;
a through z;
0 through 9;
space;
hyphen or dash. Click Next to go on.
10 On the License Agreement page, read the agreement. If you agree to the terms, click I agree that I have read and will be bound by the license agreements for this product, and then click Next.
11 On the Component Selection page, in the Action column, use the drop-down arrows to specify the appropriate action for each component, and then click Next.
12 On the Installation Summary page, confirm that your Exchange installation choices are correct, and then click Next.
13 On the Completing the Microsoft Exchange Wizard page, click Finish.
Now, as you have installed the first Exchange 2003 server, you can install the subsequent Exchange servers.
Checking Successful Installation of ForestPrep and DomainPrep
Extend the Microsoft Active Directory Schema in order to save Exchange 2003 attributes and classes. For this purpose, you need to run two utilities:
ForestPrep. This utility replicates the schema extensions throughout all the domains and sub-domains in your Exchange Organization.
DomainPrep. This utility performs the following actions in the domain:
Creates Exchange Domain Servers and Exchange Enterprise Servers groups.
Nests the global Exchange Domain Servers into the Exchange Enterprise Servers local group.
Creates the Exchange System Objects container, which is used for mail-enabled public folders.
Sets permissions for the Exchange Enterprise Servers group at the root of the domain, so that Recipient Update Service has the appropriate access to process recipient objects.
Modifies the AdminSdHolder template where Windows sets permissions for members of the local Domain Administrator group.
Compatible Access group.
Performs Setup preinstallation checks.
During the installation of the first Back-End server, ForestPrep and DomainPrep are automatically installed. To check that the utilities are installed successfully, follow these steps:
1 Run:
<CD-ROM Drive Letter>:\support\exdeploy\exdeploy.exe /gc: <global catalog server name> /t:orgprepcheck
for example:
D:\support\exdeploy\exdeploy.exe /gc:dc01.he.local /t:orgprepcheck
2 View the EXDEPLOY.LOG file in C:\EXDEPLOY LOGS folder to see if the setup completed successfully.
In the case of successful setup, you will see two strings with successful results.
Installing SP2 for Exchange 2003
With Exchange Server 2003 Service Pack 2 (SP2), you can take advantage of updates and improvements to Exchange Server 2003 such as:
Enhanced security;
Updated deployment tools to make Exchange Server 5.5 upgrades and site consolidation even easier;
New language support for Microsoft Outlook Mobile Access and Microsoft Outlook Web Access spelling checkers;
Enhancements to the Outlook Mobile Access user interface that include out-of-office modification, a larger text entry field, search folder support, and improved menu navigation;
Co-existence and migration support in a new Active Directory Connector and IBM Lotus Notes R6 Connector;
Updates and improvements based on your feedback.
To install Service Pack 2 for Microsoft Exchange Server 2003, follow these steps:
1 Log on to the node using an account that is a member of the Domain Administrators
group.
From the Exchange 2003 SP2 installation media, run E:\setup\i386\update.exe, where E is your CD-ROM drive.
2 On the Welcome page, click Next.
3 On the Component Selection page, make sure that in the Action column, the action is set to Update, then click Next.
4 On the Installation summary page, confirm that your Exchange installation choices are correct, and click Next.
5 When the upgrade completes, click Finish.
6 Click Yes when you are prompted to restart the computer.
Installing Additional Exchange Mailbox Servers
To install an additional Exchange Mailbox server, follow these steps:
1 Install Windows Server 2003 Enterprise Edition SP1 with one Network card plugged into the back-net (see the Configuring Windows Server 2003 (on page 18) topic for details).
2 Give a name to the computer (for example, EXBE02, EXBE03, EXBE04, etc).
3 Join the host to the Active Directory domain.
4 Log in to the new server as the domain administrator.
5 Run setup.exe of Exchange Server 2003 installation kit and follow the instructions of the Installing Microsoft Exchange Server 2003 (on page 25) section.
6 Install Exchange 2003 Service Pack 2. See the Installing Service Pack 2 for Exchange 2003 (on page 30) topic for details.
Creating Exchange Virtual Servers for Clustered
Configuration
The final step in configuring Exchange 2003 on a cluster is to create Exchange Virtual Servers (EVS) for all the active nodes in your cluster. Creating an EVS includes the following tasks:
1 Creating the group to host the EVS.
2 Creating an IP Address resource.
3 Creating a Network Name resource.
4 Creating Disk resources.
5 Creating an Exchange 2003 System Attendant resource.
6 Creating POP3 and IMAP4 resources.
You need to repeat these tasks for each EVS you want to add to your cluster. Before creating an EVS, make sure that the following requirements are met:
If you are creating the first Exchange server in the organization or in the domain, your account belongs to a group that has the Exchange Full Administrator role applied at the
organizational level. Otherwise, the Exchange Full Administrator role is applied at the
administrative group level.
The MDBDATA folder is empty.
Creating Group to Host Exchange Virtual Server
1 Log on to any cluster node.2 From the Start Menu, go to Start > Settings > Control Panel > Administrative Tools > Cluster Administrator. If you are prompted to specify a cluster, type the cluster name, or browse and select the cluster in which you want to create an EVS.
3 In the Cluster Administrator console tree, right-click Groups, point to New, and then click
Group. The New Group Wizard starts.
4 On the New Group Wizard page, in the Name field, type a name for this Exchange cluster group (for example, EXVS01). Click Next to continue.
them to the Preferred owners list. Click Finish.
You will see this new group displayed under Groups in Cluster Administrator.
Creating IP Address Resource
Each EVS must have its own dedicated static IP address, separate from all other
resources (including the quorum disk resource) that are defined in Cluster Administrator. To assign an IP address to your EVS, follow these steps:
1 In the Cluster Administrator console tree, right-click the Exchange cluster group you created in the previous procedure (EXVS01). In the opened menu, point to New, and then click Resource. The New Resource Wizard starts.
2 On the New Resource Wizard page:
a Into the Name field, enter the resource name (for example, EXVS01 IP Address).
b From the Resource type list, select IP Address.
c Check that in the Group list, the name of your EVS (EXVS01) is selected.
3 On the Possible Owners Wizard page, check that all cluster nodes are listed in the
Possible owners field. Click Next to continue.
4 On the Dependencies Wizard page, check that no resources are listed in the Resource dependencies field. Click Next to continue.
5 On the TCP/IP Address Parameters Wizard page:
a In the Address field, type the static IP address of the EVS. It must be a new IP address from the BackNet‘s IP pool.
b In the Subnet mask field, type the correct subnet mask for the EVS. This subnet mask must be the same as the IP mask of already existing BackNet interface of
EXBE01 server.
c Check that in the Network list, BackNet is selected.
d Make sure that the Enable NetBIOS for this address check box is selected
Creating Network Name Resource
The network name identifies the EVS on your network. After you create the System Attendant resource, the EVS will be displayed under this network name in Exchange System Manager.
Important: Carefully select the network name, because after creating the EVS, you will not be able cannot rename it.
To create the Network Name resource, follow these steps:
1 In the Cluster Administrator console tree, right-click the Exchange cluster group you created (EXVS01). In the opened menu, point to New, and then click Resource. The New Resource Wizard starts.
2 On the New Resource Wizard page:
a Into the Name field, enter the resource name (for example, EXVS01 Network Name).
b From the Resource type list, select Network Name.
c Check that in the Group list, the name of your EVS (EXVS01) is selected.
3 On the Possible Owners Wizard page, check that all cluster nodes are listed in the
Possible owners field. Click Next to continue.
4 On the Dependencies Wizard page, in the Available resources field, select the EXVS01 IP Address resource, and click Add. Click Next to continue.
Important: When you are creating an EVS, ensure that the network name resource is dependent on a single IP address resource. If you want to associate additional IP addresses with this network name, you can add dependencies after the EVS is created.
5 On the Parameters Wizard page:
a In the Name field, type a unique network name for the EVS (for example, EXVS01).
b Select the DNS Registration Must Succeed check box.
c Select the Enable Kerberos Authentication check box. As a result, clients will be able to use the Kerberos version 5 authentication protocol when making an authenticated connection to this EVS's Network Name resource.
Click Finish.
Creating Disk Resource
You must add a disk resource for each disk that you want to associate with the EVS. To create a new disk resource, follow these steps:
1 Ensure that shared disks you are going to use in the cluster are formatted as NTFS and are accessible on the node (visible in explorer). If a disk is not accessible, check that other Windows servers are not using the disk. Shutdown temporarily all the nodes that currently own shared disks you need.
2 In the Cluster Administrator console tree, right-click the Exchange cluster group you created (EXVS01). In the opened menu, point to New, and then click Resource. The New Resource Wizard starts.
3 On the New Resource Wizard page:
a Into the Name field, enter a descriptive name (for example, Disk R: Mailbox Storage, or Disk G: Log Files).
b From the Resource type list, select Physical Disk.
c Check that in the Group list, the name of your EVS (EXVS01) is selected.
d Click Next to continue.
4 On the Possible Owners Wizard page, check that all cluster nodes are listed in the
Possible owners field. Click Next to continue.
5 On the Dependencies Wizard page, check that no resources are listed in the Resource dependencies field. Click Next to continue.
cannot find the required disk in this list, two reasons are possible:
a Another group already has a resource for the disk. In this case, check all groups in Cluster Admin to see if the required disk is listed in one of them.
b The disk was not installed successfully. Click Finish.
Creating Exchange 2003 System Attendant Resource
1 In the Cluster Administrator console tree, right-click the Exchange cluster group you created (EXVS01). In the opened menu, click Bring Online.
2 Right-click EXVS01. In the opened menu, point to New, and then click Resource. The New Resource Wizard starts.
3 On the New Resource Wizard page:
a Into the Name field, type a descriptive name (for example, Exchange System Attendant - EXVS01).
b From the Resource type list, select Microsoft Exchange System Attendant.
c Check that in the Group list, the name of your EVS (EXVS01) is selected.
4 On the Possible Owners Wizard page, check that all nodes that are running Exchange 2003 are listed in the Possible owners field. Click Next to continue.
5 On the Dependencies Wizard page, under Available resources, select both the Network Name and all Physical Disk resources for this EVS, and then click Add. Click Next to continue.
6 On the Exchange Administrative Group Wizard page, in the Name of administrative group list, select the administrative group that you want the EVS to join. Click Next to
continue.
Note: This option is available only when you create the first EVS in a cluster. All EVSs must reside in the same administrative group.
7 On the Exchange Routing Group Wizard page, in the Name of routing group list, select the routing group in which you want the EVS created. Click Next to continue.
Note: This option is available only when you create the first EVS in a cluster. All EVSs must reside in the same routing group. If a group does not already exist, you are prompted to create one.
8 On the Data Directory Wizard page, check that the data directory location in the Enter path to the data directory field points to the shared clustered physical disk resource assigned to this EVS. Exchange will use the drive you select in this step to store the following files:
transaction log files;
default public store files;
mailbox store files. Click Next to continue.
9 On the Summary Wizard page, read the summary of the action you are about to perform. Click Finish to create the EVS.
If the operation was successful, a dialog box appears indicating that you have successfully created the EVS. The EVS you created will now appear in Exchange System Manager.
However, if the operation was not successful, a dialog box appears indicating why the process failed. The New Resource Wizard remains open, so it is possible to go back in the wizard, remedy any problems, and then click Finish again.
After you successfully create the Exchange System Attendant resource, Exchange System Attendant automatically creates the following additional resources for the EVS:
Exchange Information Store Instance;
Exchange Message Transfer Agent Instance;
Exchange Routing Service Instance;
SMTP Virtual Server Instance;
Exchange HTTP Virtual Service Instance;
added to a cluster. All EVSs in the cluster share the single Message Transfer Agent Instance resource.
10 Right-click the Exchange virtual server Cluster Group EXVS01, and then click Move. Move the virtual server Group to the node that matches the physical server number based on the following rule:
EXBE01 => EXVS01.
EXBE02 => EXVS02.
…
EXBEnn => EXVSnn.
11 Right-click the EVS Group, and then click Bring Online.
Note: Due to the directory replication latency, some resources may not come online at your first attempt. In this case, wait for the replication to occur, and then bring the resources online again. If you want to add resources to the dependencies list when creating the Exchange System Attendant resource, first ensure that the resources you want to add are online.
Starting POP3 and IMAP4 Services
By default, the POP3 and IMAP4 services are disabled in Exchange 2003. So, before creating the POP3 and IMAP4 cluster resource, you need to start the services on all the cluster nodes.
1 Log on to an active cluster node.
Note: You will not be able to start the POP3 service on passive cluster nodes.
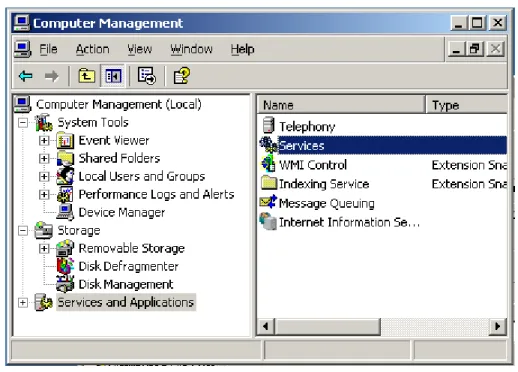
2 From the Start Menu, go to Start > Administrative Tools > Services.
3 Right-click the Microsoft Exchange POP3 service, and then click Properties.
4 In the Properties dialog-box, in the Startup type drop-down box, select Manual, and then click Apply.
5 Click Start. Click OK.
6 Go to Start > Administrative Tools > Services.
7 Right-click the Microsoft Exchange POP3 service, and then click Properties.
8 In the Properties dialog-box, in the Startup type drop-down box, select Manual, and then click Apply.
9 Click Start. Click OK.
10 Enable IMAP4 by performing the same steps and replacing "POP3" by "IMAP4" where necessary.
Creating POP3 Cluster Resource
Once the POP3 service is started on all the Exchange Mailbox servers in the cluster, you can create the POP3 resource:
1 In the Cluster Administrator console tree, right-click the Exchange cluster group (EXVS01). In the opened menu, point to New, and then click Resource. The New Resource Wizard starts.
2 On the New Resource Wizard page:
a Into the Name field, enter a descriptive name (for example, EXVS01 POP3).
b From the Resource type list, select Microsoft Exchange POP3 Server.
c Check that in the Group list, the name of your EVSr (EXVS01) is selected.
Exchange servers are listed in the Possible owners field. Click Next to continue.
4 On the Dependencies Wizard page, under Available resources, select the Exchange System Attendant resource for the EXVS01 Cluster Group, and then click Add. Click Next to continue.
5 On the Server Instance Wizard page, in the Name list, select Default POP3 Virtual Server. Click Finish.
6 Right-click the EXVS01 POP3 resource, then click Bring Online. Repeat these steps with all other EVSs.
Creating IMAP4 Cluster Resource
Once the IMAP4 service is started on all the Exchange Mailbox servers in the cluster, you can create the IMAP4 resource. Follow the steps at Creating POP3 Cluster Resource (on page 41), replacing "POP3" by "IMAP4" everywhere.
Configuring Exchange Mailbox Servers
In this section, all references to EXBE01 as sample name of Exchange Mailbox server should be replaced by EXVS01 (Exchange Virtual Server) in case of clustered Exchange Mailbox configuration.
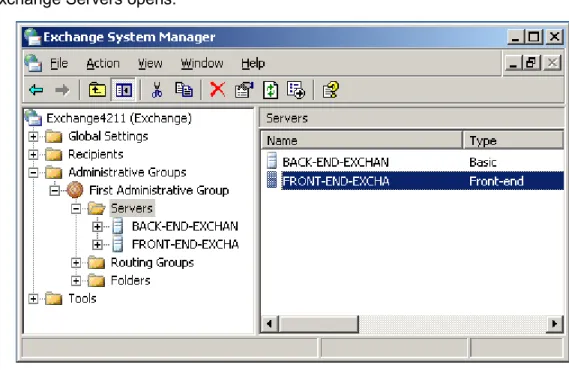
Configuring Administrative Groups to be Shown in Exchange System
Manager
By default, the Administrative Groups item is not shown in the Exchange System Manager snap-in. But you need this item for configuring Exchange Mailbox servers.
To enable the item, follow these steps:
1 Log on to EXBE01.
2 From the Start Menu, go to Start > Programs > Microsoft Exchange > System Manager. The
Exchange System Manager snap-in opens.
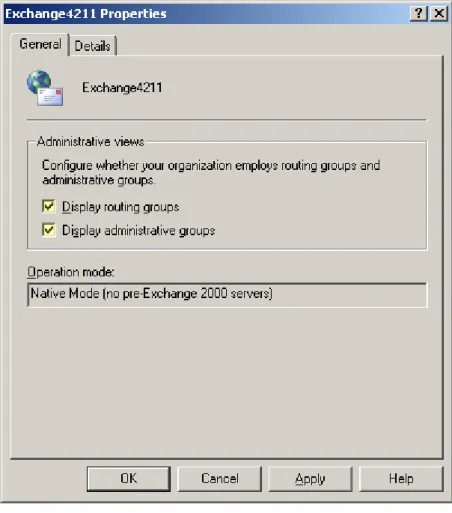
3 Right-click the root node of the tree. In the menu, click Properties.
4 On the panel opened, select Display routing groups and Display administrative groups
Figure 3: Exchange Properties 5 Switch Operation Mode from default Mixed to Native.
Restart Exchange System Manager.
Configuring HTTP Virtual Server in Exchange System Manager
To support login with the UPN user ID, you need to configure the Exchange and Public
default virtual directories. For this purpose, follow these steps:
1 Log on to EXBE01.
2 From the Start Menu, go to Start > Programs > Microsoft Exchange > System Manager. The
Exchange System Manager snap-in opens.
3 In the Exchange System Manager snap-in, go to Administrative Groups > First Administrative Group > Servers. Expand EXBE01, go to Protocols > HTTP > Exchange Virtual Server.
4 Right-click the Exchange virtual directory. In the opened menu, select Properties.
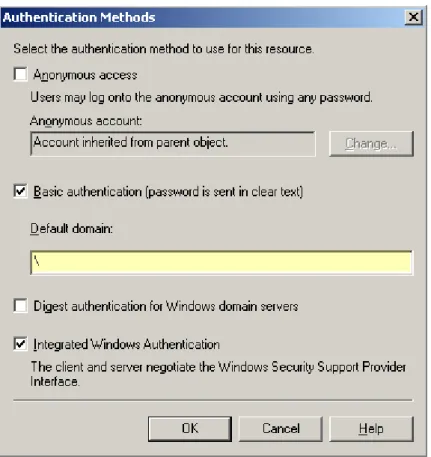
5 Switch to the Access tab, and then click on the Authentication button.
Figure 4: Setting Authentication Methods 7 Click OK to close the Properties dialog box.
8 In the Exchange System Manager snap-in, right-click the Public virtual directory, then click
Properties.
9 Switch to the Access tab, and then click on the Authentication button.
10 In the Default domain field, enter a backslash "\" character, and then click OK.
11 Make sure that the Integrated Windows Authentication option is selected.
12 Click OK to close the Properties dialog box.
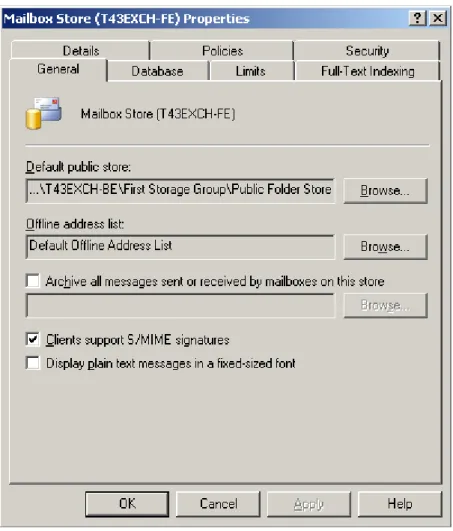
Configuring Mailbox Deletion Settings
By default, deleted mailboxes keep functioning for seven days after the moment of deletion. To delete mailboxes at one stroke and forever, you need to configure mailbox deletion settings. For this purpose, follow these steps:
1 Log on to EXBE01.
2 From the Start Menu, go to Start > Programs > Microsoft Exchange > System Manager. The
Exchange System Manager snap-in opens.
3 In the Exchange System Manager snap-in, navigate to Administrative Groups > First
Administrative Group > Servers. Then expand the Exchange Mailbox server and navigate to First Storage Group > Mailbox Store.
4 Right-click Mailbox Store. In the opened menu, select Properties.
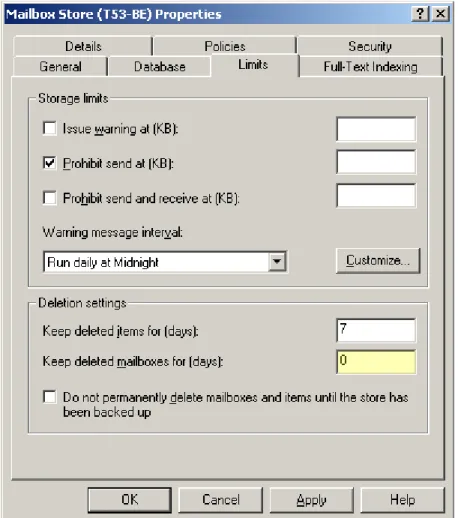
5 In the Properties dialog box, select the Limits tab.
6 In the Deletion settings area, type 0 (zero) in the Keep deleted mailboxes for (days) field.
Configuring 'Internet Newsgroups' Public Folder
1 Log on to EXBE01.2 From the Start Menu, go to Start > Programs > Microsoft Exchange > System Manager. The
Exchange System Manager console opens.
3 Expand Administrative Groups > First Administrative Group > Folders > Public Folders.
4 Right-click the Internet Newsgroups folder and select Properties.
5 In the Internet Newsgroups Properties dialog box, select the Permissions tab and click on the Client permissions button.
6 In the Clients list, select the group with the name Default and uncheck permissions
Folder Visible and Read Items.
7 Click OK to close the Properties dialog box.
Configuring and Starting IIS Service
Note: This procedure described in this section is related to the Back-End servers deployed on the VZWin nodes
On the VZWin nodes, the default start type of the IIS service is Manual. You should reconfigure IIS service start type and start it.
1 Log in to the EXBE01 server using the account with administrative privileges.
2 Run windows command shell (cmd.exe).
3 Execute following commands:
sc config W3SVC start= auto sc start W3SVC
Securing Default Global Address List
To defend names in Outlook from resolving by users and customers from other organizations, you need to configure security of Global Address List.
Note: Perform this operation if you use the version of HMC before 3.5.
To set security policies for your Default Global Address List, follow these steps:
1 Log on to EXBE01.
2 From the Start Menu, go to Start > Programs > Microsoft Exchange > System Manager. The
Exchange System Manager snap-in opens.
3 Browse to Recipients, expand All Global Address Lists, right-click Default Global Address List, and then click Properties.
4 Open the Security tab, click on the Advanced button.
5 Make sure that the Allow inheritable permissions from parent to propagate to this object option is cleared. If the option is not cleared, click Copy.
6 Click OK to return to the Security dialog box, and then click Yes twice in the security warning dialog boxes.
7 Under Group or user names, select Authenticated Users (if this group exists in list), click
Remove.
8 Under Group or user names, select Everyone (if this group exists in list), click Remove. Click OK to close the Properties dialog box.
Installing and Configuring Exchange Client
Access Server
This section describes configurations you need to do with each of your Exchange Client Access servers in order to make it proper for Exchange Hosting.
Note: For the configuration of Exchange SMTP servers, refer to Configuring Exchange SMTP Front-End Servers (on page 78).
Installing Exchange Client Access Server
Prepare a computer that you want to function as an Exchange Client Access server. This computer must meet the following requirements: