Declaration of
Conformity
DYMO Corporation 44 Commerce Road Stamford, CT 06902-4561 Phone: (203) 355-9000 Fax: (203) 355-9090 Equipment Information
Description: Direct Thermal Printer
Models: LabelWriter 300 (90791), 330 (90792), 330 Turbo (90793), EL40 (90644), EL60 (90645), Turbo (90737)
This equipment has been tested and found to comply with the limits for a Class B digital device, pursuant to Part 15 of the FCC (Federal Communications Committee) rules. These limits are designed to provide reasonable protection against harmful interference in a residential installation. This equipment generates, uses, and can radiate radio frequency energy, and, if not installed and used in accordance with the instructions, may cause harmful interference to radio communications.
However, there is no guarantee that interference will not occur in a particular installation. If this equipment does cause harmful interference to radio or television reception, which can be determined by turning the equipment off and on, the user is encouraged to try correcting the interference by one or more of the following measures:
! Reorient the receiving antenna.
! Increase the separation between the equipment and the receiver.
! Connect the equipment to an outlet on a circuit different from that to which the receiver is con-nected.
! Use shielded cables to connect this device to computers.
! Consult the dealer or an experienced radio/TV technician for help.
You may find helpful the following booklet, prepared by the FCC: Interference Handbook. This booklet is available from the U.S. Government Printing Office, Superintendant of Documents, Washington, DC 20402-9325.
"
WARNING: Changes or modifications to this unit not expressly approved by the party responsible forcompliance could void the user’s authority to operate the equipment and void the manufacturer’s warranty.
CE
Certification
This device has been tested and complies with the requirements of:
The EMC Directive
EN55022: Radiated and Conducted Emissions B EN50082-1: Generic Immunity ESD, RF, and Transient Susceptibility and Low Voltage Directive Product Safety EN60950
Copyright
Copyright © 2001 DYMO Corporation. All rightsreserved. Printing 3/01
Trademarks
LabelWriter is a registered trademark of DYMOCorporation. DYMO is a registered trademark of Esselte Corporation. All other trademarks are properties of their respective holders.
Contents
Introduction
. . . 1Features. . . 1
Registering the Software. . . 2
Help and Internet Shortcuts. . . 3
Chapter 1
Getting Started
. . . 5DYMO Label Window . . . 5
Creating Your Own Label. . . 6
Chapter 2
Using the Label Designer
. . . 13Object Definitions. . . 13
Starting the Designer. . . 16
Creating a New Label File . . . 16
Opening an Existing Label File. . . 16
Adding an Object . . . 17
Moving and Resizing Objects. . . 18
Saving Your Label to a File . . . 20
Chapter 3
Working with Templates
. . . 21Using the Template Manager . . . 21
Creating a New Template . . . 22
Editing an Existing Template . . . 23
Chapter 4
Using The List Manager
. . . 25Chapter 5
Setting Preferences
. . . 29User Information. . . 29
General Settings . . . 30
Functional Settings . . . 31
Chapter 6
Using LabelWriter with Other Applications
. . . 35Add-In for Microsoft Word . . . 35
Add-In for Microsoft Outlook . . . 40
Add-In for Palm Desktop. . . 45
Using the ACT! and GoldMine Add-Ins . . . 48
Using the Database Add-In . . . 48
Using the LabelWriter Printer Driver to Print from Microsoft Word and Access . . . 49
Using AddressFixer . . . 49
Chapter 7
Maintenance and Troubleshooting
. . . 51Maintenance. . . 51
Troubleshooting . . . 52
Technical Support. . . 53
Warranty. . . 53
Appendix A
Networking the LabelWriter
. . . 55Connecting to a LabelWriter Over a Windows Network. . . 55
Other Networking Solutions. . . 56
Appendix B
Labels & Accessories
. . . 57Labels. . . 57
Accessories. . . 58
Appendix C
Technical Specifications
. . . 59Printer Specifications . . . 59
Introduction
Congratulations on purchasing the DYMO LabelWriter. After a short time, you will realize how many of your daily tasks will be simplified by using the DYMO LabelWriter.Your LabelWriter will help you label file folders, diskettes, video cassettes, mail packages, name tags, and print Internet postage. With a little imagination, you will think of hundreds of ways to use the LabelWriter to make your job easier and more efficient.
Features
Software
The DYMO Label Software includes manyfeatures that make it flexible and easy to use. You can set your default return address so that you do not have to enter your address every time you print a label. You can import graphics to use with your labels, and select a default logo file so you don’t need to import your logo each time you create a new label. Of course, you can easily override these default values at any time. DYMO is integrated into Microsoft® Word,
Outlook®, Palm™ Desktop, GoldMine®, and
ACT!™ software. Other popular software
vendors, such as TeleMagic® and CardScan™,
have also integrated printing with the LabelWriter into their software.
Hardware
Your LabelWriter printer does not use toner, ink cartridges, or a ribbon to print. The LabelWriter uses advanced thermal printing technology to print on specially treated labels.Introduction
Thermal printing is based on the principle of heat transfer from the thermal print head inside the LabelWriter printer to the label. A row of miniature heating elements on the print head is pressed against the thermal labels. As a specific element generates heat, a thermal reaction takes place at that point on the label and the label becomes discolored.
Labels
The only supplies you will ever need for this printer are the labels. We recommend you only use DYMO brand labels.How long your labels will last depends on how the labels are used. Thermal labels are susceptible to fading in two ways:
! Exposure to direct sunlight or fluorescent light for an extended period of time will cause fading.
! Contact with plasticizers (for example labels placed on plastic ring binders) will cause fading.
In the original packaging, the label shelf life is 18 months. When used for short-term applications (envelopes, packages, etc.), fading has never been reported as a problem. When used to label files in a file cabinet, fading is very gradual over many years. When applied to the edge of a notebook that is then placed on a shelf in the sun, fading begins within a few months.
When not in use, keep the labels stored in a cool dry place and in the black bag in which they were shipped to prolong label life.
Registering the
Software
The first time you start the DYMO Label Software application, you will be asked to register the software. If you choose not to register the software at this time you will be prompted the next four times you start the program. You can register the software at any time by selecting
Register your LabelWriter from the Help
Help and Internet Shortcuts
To register the software:
1. Complete at least the required fields of the registration form.
2. Choose to register over the Internet or print the registration form for mail or fax registration.
If you choose to register over the Internet, wait a few seconds while your information is
transmitted to DYMO.
3. To register by mail or fax, print the completed registration form, and mail or fax the form to the location given on the form.
Help and
Internet
Shortcuts
Before making labels you should be aware of the various help resources available to you. DYMO Label Software comes with extensive Help. At times in this manual, you will be directed to the Help for more detailed discussion or instructions on various topics.
To access the Help:
1. Click on the Start button, point to Programs >
DYMO Label and then click Help with DYMO
Label Software.
2. Select the topic you want to read.
Help can also be accessed within DYMO Label Software using the Help menu item or by pressing F1 in most windows and dialog boxes for context-sensitive help.
The DYMO Label menu also includes Internet Shortcuts thataccess specific areas of the DYMO Web site, including label ordering, technical support, and more.
These shortcuts are also available from the Help
Chapter 1
Getting Started
DYMO Label Software is a general-purpose label printing program that is specifically designed to help you get the most out of your LabelWriter printer. The program includes:! Many ready-to-use templates for common labels.
! A built-in Designer you can use to create your own templates.
! A built-in List Managerthat lets you save addresses or other types of lists.
! Add-ins to print directly from Microsoft Word, Outlook, Palm Desktop, ACT!, and GoldMine. Many of DYMO's partners have also integrated label printing into their software including CardScan, TeleMagic and eGrabber's add-in for Quick Books®.
This chapter will introduce the DYMO Label Software features and show you how to customize a label template.
DYMO Label
Window
The following figure introduces the features available from the DYMO Label Software main window.
The first time you open DYMO Label Software, you are prompted to register the software. You are also asked to enter your return address and select a default logo. See "User Information" on page 29 for instructions on how to define your return address and select a default logo file.
Creating
Your Own
Label
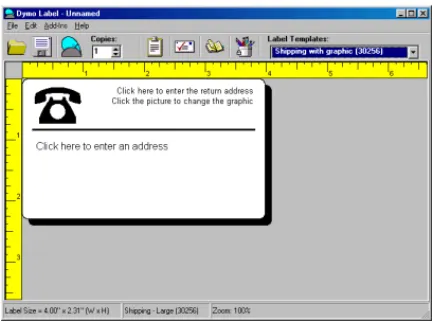
This tutorial guides you through the steps necessary to create, print, and save a customized label. The best way to start is to learn how to modify one of the label templates included with the software. In this tutorial, you will customize a shipping label.
"
You can only print this shipping label on wide print-head printers. Although the LabelWriter EL40 andLabelWriter 300 cannot print this shipping label, we recommend that you follow along. This tutorial will give you valuable information on how to access the various text and design objects and change their attributes.
Choose a
Template
The first step is to choose a label template as the basis for your new label.1. Click the Start button, point to Programs > DYMO
Label,and then click DYMO Label to start the software. The DYMO Label window is displayed containing a blank label.
2. In the Label Templates box, select the Shipping with
Creating Your Own Label
"
The 30256 label is shipped with the EL60, Turbo, 330, and 330 Turbo model printers. If you have an EL40 or 300 model printer, select this label anyway, and follow along with the exercise.Notice that all templates are listed with the label type first, then any important objects on the template, and finally the part number of the label.
The Shipping with graphic (30256) template is displayed.
Changing the
Graphic
The next step in this tutorial is to customize the graphic. As you will see, to modify an object’s attributes, you simply click the object. A dialog box appears that you can use to change the object’s attributes.To change the logo:
1. Click the telephone graphic that appears on the label. The Graphic Settings dialog box appears.
The Insert Image button changes to read Select File.
3. Click Select File.
The File open dialog box is displayed listing the contents of the default clipart directory which contains the
Business, Miscellaneous, and Sign folders.
4. Select the Miscellaneous folder and click Open. The contents of the Miscellaneous folder are displayed.
5. Select the Comput1.bmp file.
A preview showing the contents of the Comput1.bmp graphic file is displayed.
6. Click the Open button.
The Comput1.bmp graphic is displayed in the Graphic
Settings dialog box.
7. Click OK.
The computer graphic is displayed on the label replacing the telephone graphic.
Creating Your Own Label
Changing the
Return
Address
Next, you change the return address. To enter the return address:
1. Click the text in the label’s upper-right corner. The Text Settings dialog box is displayed.
2. Type the following text: CompuDoctor’s Fix It Service 1234 Hardware Way
Livermore, CA 94550
3. Click OK.
The return address is displayed on the label.
Changing the
Recipient
Address
Next, you enter DYMO’s address as the recipient. To enter the recipient’s address:
To help you identify objects, the program displays a hint when you position the pointer over an object.
2. Click the address object.
The Address Settings dialog box is displayed.
3. Type the following address into the Address Settings dialog box:
DYMO Corporation 44 Commerce Road Stamford, CT 06902-4561
4. Click OK.
Changing the
Font
You may want to modify the font used for the recipient address or return address. You can use the same font for all the lines in your address or make the first line different from the rest. For this tutorial, you’ll use the same font for all the lines.Creating Your Own Label
To change the font for the address:
1. Click the recipient address object.
The Address Settingsdialog box is displayed.
2. Click the Fontbutton and select All Linesfrom the drop-down menu.
The Fontdialog box is displayed.
3. If Arial is not selected, select Arial from the Font list and
Bold from the Font Style list.
4. Click OK to close the Font dialog box.
5. Click OKto close the AddressSettings dialog box. The address is now formatted with Arial Bold type on the label. Also, a POSTNET bar code encoding the address appears above the address.
Printing the
Label
Now that you have customized the label, you are ready to print."
You can only print this shipping label on EL60, Turbo, 330, and 330 Turbo printers. If you have an EL40 or 300 printer, skip this section.Before you print the label, make sure:
! The LabelWriter printer is connected to your computer and turned on.
! You have properly loaded shipping labels in the printer. If necessary, see the Quick Start Card for information on how to set up your printer.
To print the label:
Saving the
Label as a
Template
Now that you have created your shipping label, you can save it as a label template. Labels saved as template files will automatically appear in the Label Templates drop-down list.
To save the label as a label template:
1. Click the Save button on the Main toolbar. TheSave File dialog box is displayed. By default, LabelWriter Templates (*.LWT) is selected as the file type.
2. Type the name MyShip in the File name box and click
Save.
Notice that your new label template, MyShip, is added to the top of the Label Templateslist as the most recently used template and also alphabetically in the template list below.
To use a template file you created, simply choose it from the Label Templates list and the label template is displayed with all the information you placed on the template.
"
To access your label templates from the Label Templates list, you must store them in the label file directory. A default Label Files directory is created for you, under the DYMO Label installation folder, when you first install the software.Now that you can open, edit, print, and save a shipping label, you are ready to use and/or modify most other label templates. Note that there are several different methods of saving your changes. In this tutorial you saved your label as a template and it will appear in the Label Template drop-down list. You can also save your label to a file. See "Saving Your Label to a File" on page 20 for more information on this option.
Chapter 2
Using the Label Designer
DYMO Label Software allows you to easily design labels for your specific needs using a simple-to-useLabel Designer. You can also modify any of the label templates included with the software.
The Label Designer allows you to change the appearance and content of labels. You can add or modify text (including addresses), bar codes, sequential numbers, date-time stamps, lines, and rectangles. The following are examples of custom label designs.
Object
Definitions
A label created in DYMO Label Software can contain various text and design objects. Each object has certain attributes, such as: size, position, font, etc. You can edit an object’s attributes, simply by clicking the object (or double-clicking if the Designer is active). You can then select the attributes that you want in the dialog box that is displayed. For more information on modifying object attributes, see the Help.
Below you will find a description of each of the objects available in DYMO Label Software.
Text
The text object is useful for displaying information that remains unchanged every time you print a new label (for example, “Hello my name is” on name badges or your return address on shipping labels). By defining the text you are using as a preference setting and then copying the text into text objects, you are able to print labels withinformation on them that is static. (See "Default Return Address" on page 29.)
For convenience, DYMO Label Software includes a button to quickly insert the return address you entered when you first ran the program. Text objects can also be used for text that changes from label to label. This is useful for part numbers, book titles, and many other non-address items you might save in the List Manager. For more information on variable text, see the Help.
Address
Address objects are designed to display addresses. They are similar to text objects, but are designed to print information that changes with each label printed, such as names and addresses. Address objects can also display POSTNET bar codes. You can change the font settings (font, size, style, and so on) for text in address objects and control the text’s position. DYMO Label Software also lets you apply special effects to the text.Graphic
The graphic object enables you to add your company logo and other favorite graphics to labels. You can import many popular graphic formats, position them anywhere on the label, resize them, and even specify one as the default graphic. You can also copy a graphic from a graphics application (such as Microsoft Paint or CorelDRAW) and then paste it into DYMO Label Software. You can import a graphic directly from a file or capture an image from a video device connected to your computer. After you insert a graphic, you can add a border of a specified size and color around the object."
If you defined a default logo file, the graphic file you specified is displayed in any new graphic objects you place. See "Default Logo File" on page 29 for information about defining a default logo file.Lines
You can use horizontal and vertical line objects to improve a label’s appearance. Horizontal lines also function well as visual dividers on labels (for example, between the sender and recipient’s address on shipping labels). You can specify various shades of gray and the thickness of the lines. You can also hide lines that appear on labels.Object Definitions
Rectangle
Rectangle objects, like line objects, are primarily design elements you can use to enhance a label’s appearance. Rectangles can be used to create borders around objects. You can specify shades of gray to fill the rectangle. You can also specify the thickness of the rectangle border.Bar Code
Bar code objects display and print bar codes on your labels. You can use bar code objects to display fixed information that you enter or variable information obtained from another object. When you link a bar code object to another object, the bar code object encodes the information contained in the linked object. Furthermore, if you change the information in the linked object, the program automatically updates the bar code object to encode the new information.For example, you may want to link the bar code object to a part number text object on a label. When you update the part number text object on the label, the bar code object is automatically updated.
You can choose from many standard bar code symbologies including Code 39, Code 128, Codabar, UPC A/E, EAN 8/ 13, ITF-14 and Interleaved 2 of 5 bar codes.You can choose to include or exclude human readable text (alphanumeric information) and specify the font settings for the text. You can also select the bar code size and position.
Counter
You can use counter objects to automatically number a series of labels. For example, you could use a counter object to automatically serialize a bunch of raffle tickets. You can also specify text you want to appear in front and behind the counter (for example, “Disk # of ten”), as well as the starting number and the increments for counting (1,10,100, and so on). DYMO Label Software will also let you specify the font settings for the counter information, as well as other attributes.Date-Time
You can use date-time objects to stamp the current date and/or time on labels using any one of a number of predefined formats. As with counter objects, you can specify the text you want to appear in front of and/or behind the date-time (for example, “Today’s date is”). DYMO Label Software offers a variety of date formats,including European formats. You can include or exclude the time and use the 24-hour time format (13:00, 22:00, and so on). You can control the font settings and other attributes for the date-time information.
Starting the
Designer
When the Label Designer is active, the Design toolbar is displayed below the Main toolbar.
In addition, the mousepointer displays as a pencil object. You can start the Label Designer in several ways:
! Open a new or existing Label file.
! Click the Open Label Designer button on the Main toolbar
! Click View Design Toolbar from the Edit menu.
Creating a
New Label
File
DYMO Label Software includes a blank label template for every type of available label. When you create a new label, you select one of these blank labels as a starting point. To create a new label:
1. On the File menu, click New Label. The New Label dialog box is displayed.
2. Select a label from the list that most closely matches the label you wish to create and click OK.
The blank label opens in the window and the Design toolbar is displayed below the main toolbar.
Opening an
Existing
Label File
Whenever you want to use a label file you have saved to disk, you simply open it. For convenience, the last four saved label files appear at the bottom of the File menu. You can then print the label as is, or modify it to suit your needs.
To open an existing label file:
1. On the File menu, click Open or click the Open button. Main Toolbar
Adding an Object
The Open File dialog box is displayed.
2. Select the file you wish to open and click Open.
The label opens in the window and the Design toolbar is displayed below the Main toolbar.
Adding an
Object
When you place a new object on a label, the new object displays certain default settings. For example, new address and text objects display text describing how to modify the objects.
Although the various types of objects are quite different, the steps for placing all the objects on a label are nearly identical. The only difference is the tool button you select from the Design toolbar to place the desired object. To add an object:
1. Click object that you wish to add on the Design toolbar.
2. Place the object where you want it on the label using the cursor.
If you select one of the object tool buttons, and then change your mind about placing the object, click the
Cancel/Select Object button on the Design toolbar. This cancels object placement.
"
If you defined a default logo file, the graphic file you specified appears in all new graphic objects you place. See"Default Logo File" on page 29 for information about defining a default logo file.Defining an
Object’s Name
The program automatically assigns default names to the objects you place on labels. The default names reflect the object’s type. For example, new address objects are namedAddress. The name appears in the hint when you place the pointer over an object. Also, you can select objects by name for certain DYMO Label Software features (for example, when you link bar codes to objects and when you need to select the object into which you want to paste text).
You can change the names of objects to make it easier to identify specific objects.
To change the name of an object:
1. Right-click the object.
The Object Properties dialog box is displayed.
2. Type the name for this object in the Reference Name box and click OK.
Now, when you place the cursor over the object, the new name is included in the hint.
Moving and
Resizing
Objects
DYMO Label Software gives you control over the size and position of objects on labels. When you activate the Designer, you can use the mouse to drag objects where you want them to appear, and increase or decrease their size. You can also rotate most types of objects. (See the on-line help for information on how to align objects, resize multiple objects at the same time, and move objects in front of and behind each other.)
Moving
Objects
You can change the position of objects on labels. DYMO Label Software gives you the option of using the mouse to move objects, or, for more precision, you can specify the exact position of an object.Moving an
Object to a
Precise
Location
For precise positioning, use theObject Properties dialog box to position an object. This option lets you specify the position of the left and top sides of the object’s bounding box (the box that appears around a selected object) as well as its width and height. The position values you enter are measured relative to the label’s upper-left corner. You can specify position values in precise increments, depending on the current units of measure: English (inches) or metric (millimeters).
Moving and Resizing Objects
Resizing
Objects
You can change the sizes of objects on labels. DYMO Label Software gives you the option of using the mouse to resize objects, or, for more precision, you can specify the exact size of an object.Resizing an
Object Using
the Mouse
You can use the small black squares or Edit Handles on a selected object to change its size. An edit handle appears on each corner of all selected objects except horizontal and vertical line objects, which only have edit handles on the ends.
"
An object’s size affects the size of text within the object. If you reduce an object’s size too much, the text inside the object may no longer fit inside the object. The program automatically decreases the size of the text to allow it to fit inside the reduced object. If you want to display the text at the original size, you need to increase the object’s size, or select Disable Shrink to Fit on the object’s Properties dialog box for the object.Precisely
Resizing
Objects
You can specify the exact size of an object using the
Object Properties dialog box. The size values you specify depend on the current units of measure. (See "Units of Measure" on page 30 for information on the units of measure.)
About
Unprintable
Areas on
Labels
As with most printers, there is a narrow border around the edige of each label in which your LabelWriter cannot print. If you try to move or place an object within this unprintable area, the pointer will appear as a circle with a slash until you move it to the printable area of the label. The software will also prevent you from moving objects into these areas, stopping the movement when you reach the edge of the unprintable area.
Address Label Shipping Label
Top 0.04" 0.04"
Bottom 0.1" 0.11"
Left 0.21" 0.21"
The margins listed above apply to labels viewed in landscape orientation. Most labels will have similar margins to those above.
Rotating
Objects
You can rotate objects (except lines and rectangles) in 90-degree increments. This option is useful for designing labels with vertically oriented text and graphics."
WMF and EMF graphic files cannot be rotated. Tip: If you rotate an object that contains text, you might need to resize the object to make all the text in the object appear at the correct font size.Deleting
Objects
If you no longer need an object on a label, you can delete it. When you delete an object, the object’s contents (text, graphic, bar code, and so on) are also deleted.Saving Your
Label to a
File
After you design a label, you should save it to a file on the computer’s hard disk for future use.
To save changes you have made to a label file:
! Click the Save button on the Main toolbar or click Save from the File menu.
The program overwrites the contents of the file with your changes.
To save the changed label as a new label file:
1. On the File menu, click Save As. The Save File dialog box is displayed.
2. Type the name of your new label in the File name box.
3. Select the LabelWriter Labels (.LWL) file type from the
Save as type list.
Your label design is saved as the new file name with the .lwl extension.
If you prefer, you can save a label as a label template or a LabelWriter add-in template as described in "Saving the Label as a Template" on page 12. LabelWriter add-in templates are available when you use the Word, Outlook, and Palm Desktop Add-ins.
Chapter 3
Working with
Templates
DYMO Label Software works with two types of template files: LabelWriter Templates and LabelWriter Add-in Templates.! LabelWriter Templates have a file extension of .LWT and are listed in the Label Templates list on the DYMO Label Software Main toolbar.
! LabelWriter Add-in Templates have a file extension of .LWA and are listed in the Label Templates list in the Microsoft Word, Outlook, and Palm Desktop Add-ins. When you installed the DYMO Label Software, a number of LabelWriter and LabelWriter Add-in template files were also installed. However, templates were not included for every label that DYMO sells.
This chapter describes how to create a new template and how to select which templates are displayed in the Label Templates lists.
Using the
Template
Manager
The Template Manager makes it easy to select which templates are displayed in the Label Templates list that appears in DYMO Label Software and in the Microsoft Word, Outlook, and Palm Desktop Add-ins.
To add/remove templates:
The Template Manager dialog box is displayed listing all of the Templates that were installed with the DYMO Label Software and any templates that you have created.
The check boxes in the first column under Supplied
Templates are used to determine what templates are available for use within DYMO Label Software. These are the templates that appear in the Label Templates list on the Main toolbar.
2. To add a template to the list, check the first check box.
3. To remove a template from the list, clear the first check box.
The check boxes in the second column are used to determine which templates are available for use with the Microsoft Word, Outlook, and Palm Desktop Add-ins.
4. To make a template available from within these add-ins, check the second check box.
5. To remove a template, clear the second check box. When you create a new LabelWriter Template (*.LWT), it will be automatically added to the Label Templates list. The same scenario applies to LabelWriter Add-in (*.LWA) templates.
Creating a
New
Template
You create a new template in the same manner as you design a new label. However, you save the newly designed label as a template file with the .LWT file extension. You can either use one of the existing templates as a basis for your new template or you can design the template from a blank label.
Editing an Existing Template
To create a new template:
1. Create a new label using the tools described in Chapter 2,
Using the Label Designer.
2. Click Save As from the File menu. The Save File dialog box is displayed.
3. Type the name for your new label template in the File
name box.
4. Click LabelWriter Templates (*.LWT) or LabelWriter
Add-In Templates (*.LWA) in the Save as type box.
5. Click Save.
The new template is automatically included in the appropriate Label Templates list the next time you start the DYMO Label Software or one of the Add-ins.
Editing an
Existing
Template
You can edit any of the existing templates using the Label Designer tools described in Chapter 2, Using the Label
Designer.
To edit a label template from the DYMO Label Software:
1. Click the desired template in the Label Templates box.
2. Click the Label Designer tool.
3. Change the label using the tools described in Chapter 2,
Using the Label Designer.
4. Click Save from the toolbar or click Save from the File menu.
The existing template is overwritten with the changes you just made.
To edit a label template from the Word, Outlook, or Palm Desktop Add-ins:
1. Click the DYMO Label button on the toolbar.
2. Click the desired template in the Label Templates box.
3. Click the Edit button next to the Label Templates box. The template is displayed in the Label Designer dialog box.
4. Change the label using the tools described in Chapter 2,
5. Click Save from the toolbar or click Save from the File menu.
The existing template is overwritten with the changes you just made.
"
If you reinstall the DYMO LabelWriter Software. All of the supplied templates are also reinstalled. If you have made any changes to the supplied templates and not saved the changes with a new file name, copy the changed templates to another location before you reinstall the software so you don’t lose your changes. Then once the installation is complete, copy the templates back into the Labels folder.Chapter 4
Using The List Manager
This chapter describes how to use theList Manager to create, edit, and print entries on labels.
To display the List Manager:
1. Click the Open List Manager button, or click List
Manager and then Open from the Edit menu.
The last List Manager file you opened appears on screen. The first time you open the List Manager, a sample address list appears.
You can use the List Manager to enter information into variable objects (address, variable text, or bar code) on the current label. If the current label does not contain address objects, but contains more than one other type of variable object, you need to select the object into which you want the selected List Manager entry to appear. In this case, when you open the List Manager, a dialog box appears listing the available objects. Select the object you want to link to the List Managerand then click the Close button. If the current label does not contain a variable object (address, variable text, or bar code), the program prompts you to open a label that contains one of these objects. This prompt appears because the program automatically links the List Manager to these types of objects. You can still work on the List Manager without a variable object on the current label, but the List Manager will not link to the current label.
Using the
Check Address
Option
If you have installed DYMO’s Address Fixer software, DYMO Label Software can automatically check your address against the USPS database of addresses for accuracy and add the ZIP+4 information. DYMO Label Software offers several ways for you to check your address for accuracy; you can click on the Check Address icon in
List Manager, or you can select Edit from the menu bar, then List Manager/Check Address. ACheck Address
button is also available with the Add-Ins for Microsoft Word, Outlook, and the Palm Desktop.
"
Though AddressFixer uses the most up-to-date address data available from the US Postal Service, it is not a CASS-certification software package. CASSCertification programs enable you to receive discounts on your postage and are generally used by organizations doing large mailings.
Rotating
Names in
Address Lists
In address lists, List Manager automatically sorts addresses by the last name. For example, if you enter the following address:
Harrison Schreppel 5040 El Cantada
Berkeley, CA 94720-3828
The program displays Schreppel, Harrison in the Entries list.
In some cases, the program cannot correctly identify the last name or incorrectly identifies a company name as a person’s name. In such cases, you can rotate the words in the entry’s first line to display the words in the correct order.
Printing an
Entry
Typically, you’ll store addresses in an address list and then print selected addresses on address labels. Once you select the entry you want,List Manager will automatically copy the address information to the label. If no address or other variable object is defined on the label you will beprompted to add one.
To select multiple entries, click the first entry and then CTRL+CLICK any additional entries you want to select. To select a range of entries, click the first entry you want and then SHIFT+CLICK the last entry in the range.
You can also use the List Manager to store information other than addresses. This information (for example, a list of product numbers or video titles) can also be linked to a variable text object or bar code object (for example, to print a bar code label of every product number you carry). To select multiple entries to print, click the first entry and then CTRL+CLICK any additional entries you want to select. To select a range of entries, click the first entry you want and then SHIFT+CLICK the last entry in the range. Refer to the Help for detailed information on this topic.
Creating a
New List
DYMO Label Software lets you create either address or data list files. For address lists, the program automatically sorts entries using the first line of the address. If this is a person’s name, it will sort by their last name. However, if the first line is a company name, it will sort by the company name. For data lists, the program automatically sorts entries by the first few characters of each entry’s first line.When you create a new file, you have the option of importing addresses or data (for new address lists or data list files, respectively) into the new file.
The program creates a new file with the specified name and stores the file in the default list file directory. The specified file name appears at the top of the List Manager dialog box. The program appends the extension .dal (DYMO address list), to the end of address list file names and the extension .ddl (DYMO data list), to the end of data list files.
Opening an
Address or
Data List
If you have more than one address list or data list file, you can open the one you want to use to create labels. Also, if you want to import addresses or data into a file, you must first open the file into which you want to import the information.
Importing
Addresses or
Data Into List
Manager
To use an address or data list created in another application, you must be able to export it to a Comma Separated Values (CSV) file, with a *.csv or *.txt extension. For more information on how to import addresses or data into the List Manager, see the Help.
"
When you create a new List Manager file, the program displays a prompt asking if you want to import addresses or data into the file now. Follow the directions in the Help to import information into the new file.Exporting
Data from List
Manager
If you want to use information you have entered into List Manager in other applications, you can export it to a CSV file. Once in a CSV file, you can then import the data into a personal information management (PIM) database or other type of application. When you export data from the DYMO Label Software, the program exports each entry as a single record and each line as a single field. You can save the exported data in a CSV or text file.
Printing
Internet
Postage
The DYMO LabelWriter EL60, Turbo, 330, and 330 Turbo printers are approved by the US Postal Service to print Internet Postage. Currently these printers can be used in conjunction with Stamps.com™ Internet Postage
software. To learn more about Internet Postage, visit
www.stamps.com. If you are already a Stamps.com user, you can print postage using the Stamps.com software from within DYMO Label Software. For more information on postage, refer to the Help.
Chapter 5
Setting Preferences
This chapter describes how to define preferences that allow you to customize certain DYMO Label Software settings. The preference settings you select remain in effect until you change them.
The sections below are organized according to the tabs available in the Preferencesdialog box.
User
Information
The User Information options are described below.
Default Return
Address
If you enter your return address in the tab, DYMO Label Software can automatically insert your User Information Return Address information when you click on the InsertReturn Address button, available in the Text Settings
dialog.
Click in theDefault Return Address field and enter your return address. (If this field already contains an address, edit the address currently shown.)
Default Logo File
If you use a certain graphic over and over (such as your company’s logo), you can specify the file containing the graphic as a preference setting. Then, when you place a new graphic object on a label, the specified default graphic automatically appears in the new graphic object.General
Settings
The General Settings options are described below.
Units of Measure
Select the English (Inches) button to use inches as the units of measure in the DYMO Label Software; selectMetric to use millimeters. The units you select are used for the rulers you can display on screen, label dimensions, and the position and size values displayed in the Object
Properties dialog box. See "Moving an Object to a Precise Location" on page 18 for information.
Display Rulers
Select Display Rulers to display horizontal and vertical rulers next to the label. The rulers are in inches or millimeters, depending on the Units of Measure you have chosen. To remove the rulers, uncheck this option.Show Shadows
Select Show Shadows to display a shadow around thecurrent label; uncheck the box if you don’t want to display a shadow. The shadow does not print on labels.
Show Print
Progress Dialog
The copies printed and the remaining number of copies to Print Progress dialog box shows the number of print. The Print Progress dialog box appears each time you print labels; if you hide it, the dialog box will not appear.Select Show Print Progress Dialog to display the Print
Progress dialog box during printing; uncheck this box if you don’t want the dialog box to appear.
Functional Settings
Use POSTNET
Bar Codes for 9
Digit ZIP Codes
Check the Use POSTNET Bar Codes for 9-Digit ZIP
Codes Only box to suppress POSTNET bar codes for addresses with five-digit ZIP codes; uncheck the box if you want to print bar codes for addresses with five-digit ZIP codes.
This preference setting does not apply to POSTNET bar codes you define for bar code objects.
Optimize Graphic
& Bar Code
Printing for Best
Quality
Select Optimize Graphic & Bar Code Printing for Best
Quality to optimize the driver settings when printing graphics or bar codes. DYMO Label Software will automatically switch the printer into Barcode and Graphics mode when printing a bar code that is small or medium in size, or when printing a detailed graphic.
Default Number
of Copies
You can specify the default number of copies you want to print. DYMO Label Software automatically prints the specified default number of copies unless you specify the number of copies for the current label.To change the default number of copies, click the up/down
Default Number of Copies buttons. When you close the
Preferences dialog box, the specified default number of copies appears in the Copies field at the top of the DYMO Label Software window.
Functional
Settings
Paste Button
Automatically
Prints
You can extend the use of the Paste From Clipboard button by selecting the Paste Button Automatically
Prints option in the Preferences Functional Settingstab. Each time you click on the Paste From Clipboard button, DYMO Label Software will paste the text from the clipboard into the current label and print the label automatically. This option simplifies the printing of labels when you have copied the information from other programs.
Minimize to
System Tray
Check the shrink the program to an icon and place the icon in the Minimize to System Tray box to automatically Windows system tray when you minimize the program. To restore the main DYMO Label Software screen:! Double-click the DYMO printer icon or right-click on the
LabelWriter icon and then select Restore.
You can also use this option in conjunction with the
Enable Quick Print from System Tray option (described below) to quickly paste information into a label and print the label.
Enable Quick
Print from
System Tray
With this option, you can print text you’ve copied to the clipboard directly to a label. Here is an example. After minimizing DYMO Label to the system tray, copy an address from any letter to the clipboard. Then double-click on the LabelWriter icon in the system tray. Your address will be automatically printed on a label.
Suppress “Save
File” Prompt
By default, DYMO Label Software displays a prompt asking if you want to save changes to a modified label when you attempt to open another label or exit from the program. If you don’t save the changes you’ve made to the file, the changes will be discarded. However, if you’d prefer not to be prompted to save changes, you can choose a preference setting to suppress the save file prompt. Select Suppress “Save File” Prompt to prevent the program from prompting you to save changes; uncheck the box if you want to be prompted to save changes.Directories
Start Program in
System Tray
Select minimize DYMO Label Software to the system tray when Start Program in System Tray to automatically you start the program. This option is useful if you commonly use DYMO Label Software to print labels containing information you transfer from other programs; it saves you the step of minimizing DYMO Label Software after you start it. The Start Program in System Tray option takes effect the next time you start the DYMO Label Software.Open Last Saved
Label File
If you prefer, each time you start the program, you can automatically display the last saved label file. Click OpenLast Saved Label File if you want to open this file each time you start the program.
Always Start
With This
Template
You can specify a label template to be opened when you start DYMO Label Software. Click Always Start with
this Template and select the desired template from the pull-down list.
Directories
TheDirectories tab is described below:You can specify the default directories for all label-related files (label files, label templates, add-in templates),List Manager lists, and graphics (clipart). The directories you specify are used to store and open these three types of files.
Although default directories are set when the software is first installed, this feature is particularly useful when you store these files on a network. You can store label templates and graphic files on a file server, for example. All users that specify the directories on the server as their
default directories will be able to access the files stored in the directories (assuming the users have access to the file server).
In most cases, you can use the default directories defined in DYMO Label Software. These default directories are automatically created on your PC when you install DYMO Label Software. You only need to change the default directories if you want to use other directories. The default directories you can specify are described below.
Label File
Directory
Specify the directory in which you want to store label files, label templates, and add-in templates. DYMO Label Software automatically selects the directory you specify when you save or open any of these label-related files. It’s important that you store all your label templates in the label file directory. DYMO Label Software only displays label templates located in the label file directory in theLabel Templates drop-down list.
List File
Directory
Specify the directory in which you want to store List Manager lists (address and data lists). DYMO Label Software automatically selects the directory you specify when you save or open List Manager lists.Clipart Directory
Specify the directory in which you want to store graphics. DYMO Label Software automatically selects the directory you specify when you place graphics on labels and define a default logo file.Chapter 6
Using LabelWriter with
Other Applications
This chapter describes how to use your LabelWriter with other application programs. The chapter covers:
! Printing labels from Microsoft Word and Outlook using the LabelWriter Add-ins.
! Printing labels from Palm Desktop using the LabelWriter Add-in.
! Printing labels from ACT! and GoldMine and other databases using the LabelWriter Add-ins.
! Printing labels from Microsoft Access
! Using the LabelWriter printer driver to print labels directly from other Windows programs.
! Using AddressFixer to check, correct, and add the ZIP+4 to addresses before printing labels.
Add-In for
Microsoft
Word
DYMO Label Software includes an add-in program that enables you to quickly print mailing labels from a Microsoft Word document. You access the add-in using an icon the LabelWriter software installs on the Word toolbar. The add-in works with Microsoft Word 97 and 2000.
Installing the
Word Add-In
The Microsoft Word Add-In is normally installed at the same time that you install the main DYMO Label Software. If it is already installed, you will see a small LabelWriterbutton in the main toolbar of Microsoft Word. If you don’t see this icon, and it cannot be enabled using the instructions below, you will need to reinstall your DYMO Label Software making sure that the Add-In forMicrosoft Word box is checked.
"
When you reinstall the DYMO LabelWriter Software, all of the supplied templates are also reinstalled. If you have made any changes to the supplied templates and notsaved the changes with a new file name, copy the changed templates to another location before you reinstall the software so you don’t lose your changes. Then once the installation is complete, copy the templates back into the Labels folder.
When the Word Add-in is properly installed, you will see the LabelWriter button in the main toolbar of Microsoft Word.
Using the
Word Add-In
1. To start using the Word Add-in:Open Microsoft Word and type an address.2. Click the LabelWriter button on the Word toolbar or select the DYMO LabelWriter command from the Tools menu.
After a few seconds, the DYMO LabelWriter dialog box appears on the screen with the address from your
document automatically placed in the Recipient Address field.
If your letter contains more than one address and you want to make sure the Word Add-In uses the correct one, select (highlight) the address in your Word document before you click on the LabelWriter icon.
Editing and
Printing the
Address
Once the DYMO LabelWriter dialog box appears, you can select from a number of different address and shipping label templates, depending on how you want the label to look.
To print the label:
1. Select the desired label template from the Label Template box.
Add-In for Microsoft Word
Only the templates that have been saved with the *.LWA extension will appear.
2. Click the Print Label button to print the label.
If you need to make some changes to the address, simply edit the address inside the Recipient Address box and then click the Print Label button. If you are printing a Shipping Label template, it will include the return address that’s already been defined for the template. See "Editing the Label Templates" on page 37.
Checking the
Recipient
Address
If the DYMO AddressFixer software has been installed on your system, you can check the recipient’s address against a database of US Addresses, correct any mistakes, and add the complete nine-digit ZIP+4 code.
To check the address:
1. Click the Check Address button.
"
AddressFixer is a separate utility. Please visit www.dymo.com for more information.Printing
POSTNET Bar
Codes
The DYMO LabelWriter dialog box also gives you the option of printing POSTNET bar codes on the label, either above or below the recipient address. The POSTNET bar code option only works for US addresses and should only be used for addresses with a complete nine-digit ZIP+4 code.
Editing the
Label
Templates
The Word Add-In comes with pre-defined label templates for the most commonly used address and shipping labels. You can modify these templates to suit your needs. The
following example provides step-by-step instructions for modifying an existing shipping label template.
1. Choose a template from the Label Templatesbox in the DYMO LabelWriter dialog box.
2. Click theEdit Label Template button which appears next to the Label Template box.
DYMO Label Software opens the selected template.
Add-In for Microsoft Word
The Text Settings dialog box is displayed.
4. Enter your return address.
5. Use the Justification, Vertical Alignment, and Font options to customize the return address block.
6. When finished, click OK to close the Text Settings dialog box.
7. To modify the width of the horizontal line dividing the Return Address from the Recipient Address, click the line. The Line Settings dialog box is displayed.
8. Select the line width you want, and clickOK.
9. Click the Recipient Address block to change the appearance of the Recipient address.
The Address Settings dialog box is displayed.
Use the Justification, Vertical Alignment, and Font options to customize the address block to suit your needs.
10.When finished, click OK to close the Address Settings dialog box.
11.Select Save from the Filemenu.
The program saves the changes that you’ve made to the template. Use the Save As command to save the modified shipping label with a new name, preserving the layout of the original template.
The template you just saved does not appear in the Word Add-in Label Templates list until you quit and restart the Word Add-in.
"
The Word Add-In uses label templates with the .LWA extension. For a complete description of the way DYMO Label saves and manages templates, please see the Help.Add-In for
Microsoft
Outlook
DYMO Label Software includes an add-in program that allows you to quickly print mailing labels and name badges directly from Microsoft Outlook. You access the add-in using a button installed on the Outlook toolbar. Instructions for enabling the add-in in Outlook 97, 98, and 2000 are outlined below. The Outlook Add-in works with the Contacts view in Outlook. The Outlook Add-In does not work with Outlook Express.
Add-In for Microsoft Outlook
Installing the
Outlook
Add-In
The Microsoft Outlook Add-In is normally installed at the same time that you install the main DYMO Label
Software. If it is already installed, you will see a small LabelWriterbutton in the main toolbar of Microsoft Outlook.
If you don’t see this icon, and it cannot be enabled using the instructions below, you will need to reinstall your DYMO Label Software making sure that the Add-In for
Microsoft Outlook (98/2000 or 97) box is checked.
"
When you reinstall the DYMO LabelWriter Software, all of the supplied templates are also reinstalled. If you have made any changes to the supplied templates and not saved the changes with a new file name, copy the changed templates to another location before you reinstall the software so you don’t lose your changes. Then once the installation is complete, copy the templates back into the Labels folder.When you see the LabelWriter button in the main toolbar of Outlook 98/2000 or Outlook 97, you know the installation was a success.
Enabling the
Outlook 98/
2000 Add-In
If the LabelWriter button appears in your Outlook toolbar automatically, you can skip to the “Printing Labels from Outlook” section. If an icon is not present, you’ll need to enable the Outlook Add-In. First, you must open the Outlook Add-In Manager and then select the DYMO LabelWriter option.
To enable the LabelWriter Outlook Add-In in Microsoft Outlook 98/2000:
1. Choose the Options command from the Tools menu in Outlook.
The Options dialog box is displayed.
2. Click the Other tab.
3. Click the Advanced Options button.
The Advanced Options dialog box is displayed.
4. Click theAdd-In Manager button.
5. Check the DYMO LabelWriter item in the Add-In
Manager list (you might have to scroll down the list to display this item.)
If DYMO LabelWriter does not appear, click the Install button and then select from the list of files. Click OK.
6. Click OK in each of the dialog boxes you opened.
7. Exit from Outlook and then restart the program. The Outlook Add-In automatically adds a LabelWriter button to each of the Outlook 98 and 2000 toolbars and adds the DYMO LabelWriter command to all the Tools menus. You click the DYMO LabelWriter button to print labels.
Enabling the
Outlook 97
Add-In
To enable the Outlook 97 Add-In:
1. Click Options from the Tools menu in Outlook 97. TheOptions dialog box is displayed.
2. Click the General tab.
3. Click Add-In Manager.
4. Check the DYMO LabelWriter item in the Add-In
Manager list.
You might have to scroll down the list to display this item. If DYMO LabelWriter does not appear, click the Install button and then select Dymo LabelWriter.ecf from the list of files. Click OK.
5. Click OK in each of the dialog boxes you opened.
6. Quit the Outlook 97 program and then restart it.
The Outlook 97 Add-In automatically adds a LabelWriter button to each of the Outlook 97 toolbars and adds the DYMO LabelWriter command to all the Tools menus.
Printing Labels
from Outlook
You can use the Outlook Add-In to print the addresses of one or more contacts in your Outlook database. To print labels in Outlook:1. Click Contacts in the Outlook toolbar or clickContacts from the Go menu to display the Contacts section in the Outlook program.
2. Select one or more contacts or a contact folder to print. To select multiple contacts, click the first contact and then CTRL+CLICK any additional contacts you want to select.
Add-In for Microsoft Outlook
To select a range of contacts, click the first contact you want and then SHIFT+CLICK the last contact in the range.
3. Click the DYMO LabelWriter button on the toolbar. The DYMO LabelWriter dialog box is displayed.
The Outlook Add-In supports printing labels for the current contact, the currently selected contacts, all of the contacts in a specified folder, or all of the contacts in the Outlook database.
4. Click one of the following options in the Print Label For box:
Current Contact prints the currently selected contact’s address. If you don’t select a specific contact before you start the Outlook Add-In, the first contact listed in your current view is printed.
All Contacts prints the addresses of all the contacts stored in the Outlook database.
Current Selection prints the addresses of the currently selected contacts in Outlook.
All Contacts in Current Folder prints all of the contacts in the current selected folder, as well as the contacts in all the sub-folders in the current folder.
5. Click the desired label template from the Label
The Outlook Add-In ships with several pre-defined label templates for address and shipping labels. The address labels include a field for the recipient’s address. The shipping label templates also include a field for your return address.
"
The Outlook Add-In uses label templates with the .LWA extension. For a complete description of how templates are managed, please see .You can change the type specifications and graphics that appear on the currently selected label template by clicking the Edit button, which appears beside the Label Template field. "Editing the Label Templates" on page 37 describes how to modify the label templates using the Word Add-In. You can use these instructions as guidelines for modifying the label templates in the Outlook Add-In.
6. Click the desired fields from the Contact Format box. The Outlook Add-In provides numerous options you can use to select how the data in your Outlook database is formatted and printed on your label. For example, if you choose Contact w/ Title Address, the name, title, and address of the selected contact(s) are printed. You can use this option to print address and shipping labels as well as name badges, file folder labels, and Rolodex labels or cards. You cannot change the fields the Outlook Add-In selects for printing.
7. Click Print Label to print your labels.
Printing
POSTNET Bar
Codes
The DYMO LabelWriter dialog box also gives you the option of printing the POSTNET bar code on the label, either above or below the recipient address. The POSTNET bar code option only works on US addresses and should only be used for addresses with a complete nine-digit ZIP+4 code. You can choose to print the POSTNET bar code above or below the address or not to print it at all.
Checking the
Recipient
Address
If the DYMO Address Fixer software has been installed on your system, you can check the recipient’s address against a database of US Addresses, correct any mistakes, and add the complete nine-digit ZIP+4 code.