User Management / Directory Services
using LDAP
Benjamin Wellmann
[email protected]
May 14, 2010
1
Introduction
LDAP or Lightweight Directory Access Protocol is a protocol for querying and modifying data using directory services over TCP/IP.
A directory is a set of objects with attributes organized in hierarchical manner. (i.e. a bioinformatics lab, which consists of multiple groups for different projects or work units and persons which have different functions)
The schema of a Directory Server defines a set of rules that govern the kinds of information that the server can hold. It has a number of elements, including attribute syntaxes, matching rules, attribute types, object classes, content rules, structure rules, etc.
An LDAP directory tree is often constructed to reflect various political or or-ganizational boundaries, depending on the services’ usage. LDAP uses Domain Name System (DNS) names for structuring the topmost levels of the tree hi-erarchy. Further down or inside the directory entries represent organizational units, people, documents, etc. a given tree entry.
We will use OpenLDAP, which is an open source implementation of LDAP. From a technical perspective, LDAP directory consists of a set of hierarchically organized entries. Each entry belongs to certain Object Classes and contains various key=value pairs called attributes. In contrast to a regular database, LDAP is extremely read optimized.
Each entry is uniquely identified by aDistinguished name(”DN”). DN is formed as a list of components, separated by commas, that provide ”full path” to the entry, starting from the top of the tree.
For example, the german company Example AG would have the root of the tree in dc=example,dc=de. A person employed by Example, Inc. would then have a corresponding LDAP entry with DN cn=person,ou=People,dc=example,dc=de. Which attributes may or may not be present under an entry is then governed by the entry’s objectClasses.
The individual components are formed as key=value pairs. The ”keys”, cn, ou and dc, stand forCommon Name,Organizational UnitandDomain Component.
ObjectClasses, attributes, matching rules and other elements of the tree struc-ture are loaded at startup by reading the schema files.
dc=example,dc=de
ou=groups
ou=people
cn=employees
cn=guests
cn=Peter Pan
cn=Joe Average
Figure 1: Hierarchical tree structure of LDAP directory2
LDIF-format
The LDAP Data Interchange Format (LDIF) is the format used by LDAP to represent directory content and update requests (ie. setting tree structure, importing users, etc.).
Example for the two organizational units People and Group: dn: ou=People,dc=example,dc=de
ou: People
objectClass: organizationalUnit dn: ou=Group,dc=example,dc=de ou: Group
objectClass: organizationalUnit Example for a user-account averageJoe:
dn: uid=averageJoe,ou=People,dc=example,dc=de uid: averageJoe
cn: Average Joe objectClass: account objectClass: posixaccount objectClass: top
userPassword:: e2NyeXB0fXg= loginShell: /bin/bash uidNumber: 1001 gidNumber: 1001
homeDirectory: /home/averagejoe gecos: Average Joe,,,
3
Standard SLAPD OpenLDAP Tools
• ldapadd - add LDIF entries to an LDAP directory
• ldapauth - add LDIF entries to an LDAP directory
• ldapdelete - delete LDAP entries
• ldapmodify - modify existing LDAP entries
• ldapmodrdn - modify an LDAP entry’s DN
• ldappasswd - modify an entry’s password
• ldapsearch - search LDAP entries
• ldapwhoami - perform an LDAP Who Am I operation of a server
• slapacl - verify access to attributes by inspecting configuration of a DIT
• slapadd - add LDAP entries to a database - STOP SLAPD FIRST
• slapauth - verify SASL data against a DIT
• slapcat - export an LDIF from an LDAP database - STOP SLAPD FIRST
• slapd - stand-alone LDAP daemon
• slapdn - verify a DN against a DIT configuration
• slapindex - re-index an LDAP database - STOP SLAPD FIRST
• slappasswd - generate password
• slaptest - verify a slapd.conf file or a cn=config directory (slapd.d)
4
Steps to setup a OpenLDAP-Server
First of all install the stand-alone OpenLDAP daemon (slapd) and further ldap-utilities (ldap-utils) using:
aptitude install slapd ldap-utils
(Futhermore, aptitude or apt-get installs 11 dependent packages)
To reconfigure the just installed slapd-package iniatially to our needs use, so we do not need to edit /etc/ldap/slapd.conf:
sudo dpkg-reconfigure slapd
Omit OpenLDAP server configuration? -> No DNS domain name: -> example.de
Organization name? -> example.de Administrator password: -> password Confirm password: -> password
Database backend to use: ->HDB (default)
Do you want the database to be removed when slapd is purged? -> No Allow LDAPv2 protocol? -> No
Furthermore, it is possible to use own, customized schema, which need to be included in /etc/ldap/slapd.conf. While we just want to transfer our adressbook and user-management to LDAP, we use the default set schemas:
core.schema cosine.schema nis.schema
inetorgperson.schema
At this point we should check the slapd.conf, to ensure that everything went right in the package reconfiguration.
The ’suffix’ (base) should be ”dc=example,dc=de”, it is also useful to set a higher ’loglevel’ for example 256, to get some debugging information about the server.
To define the a simple tree structure for user management, we can now use a LDIF-file containing the two organizational units People and Group mentioned in Section 2 (ou.ldif).
Command lines to add the LDIF file, using the offline tool,slapdadd: sudo invoke-rc.d slapd stop #stops server
sudo slapadd -c -v -l /var/tmp/ou.ldif #adds ou.ldif sudo invoke-rc.d slapd start #starts the server
It is also possible to add structures / entries, while the server is running using
ldapadd. Command line for ldapadd:
ldapadd -c -x -D cn=admin,dc=example,dc=de -W -f /var/tmp/ou.ldif To fill the structure with entries, we can use another LDIF-file containing user-accounts for example the LDIF-file of user averageJoe in Section 2. The adding of the LDIF-file happens in the same way as the tree-structure above using slapadd or ldapadd. Both tools ask for the admin-password and confirm the modification to the database with an output like:
adding new entry "cn=Average Joe,ou=People,dc=example,dc=de" We should now check the client-configuration-file (/etc/ldap/ldap.conf): BASE dc=example,dc=de #suffix / base of server
URI localhost #ip-adress of server, in our case the localhost To check the entries of the LDAP-databse we can use ldapvi as follows:
ldapvi -d --host localhost
We now add a few more ’People’-entries to our directory, connect the Thunderbird-Addressbook to our server and perform a search-query. In Thunderbird we add a ’ldap dictionary’, enter a desired name, the ip-adress of the server, the base-DN (dc=example,dc=de), the port number (default is 389) and press OK to confirm our new LDAP-dictionary. If the entries were correct, we are now connected to
the LDAP-server and can perform search-queries using the search-field in the upper-right. (For example enter ”joe”, to find the user Joe Average)
5
Migrating Debian User Management
The advanced challenge is to migrate the user management of our server to LDAP.
For this step we need the PAM (Pluggable Authentication Modules) and NSS (Name Service Switch, which are introduced in the following.
5.1
PAM
PAM frees applications from the requirement of dealing with authentication by providing an API that allows them to pass authentication requirements off to thePAM library. The main advantage of this is it is easy to configure applications to use different authentication modules by simply modifying the configuration files. For further information see the man-pages of PAM.
5.2
NSS
NSS is used by various functions contained in the C library to control where information was looked for (for example the login of our server). The configu-ration file, /etc/nsswitch.conf, specifies the sources for the databases, which are looked up during the process. There is also a order defined from left to right in the sources.
5.3
Steps taken to migrate User Management
Install the following packages:
libpam-ldap libnss-ldap nscd migrationstools
We can now migrate all of the users-accounts and groups of our existing debian configuration to the LDAP-server or just create a new account for the usage on LDAP. First can be done using the migrationtools-script by PADL.com, but as it is more safe to create just new user-accounts for LDAP usage I will describe the steps in doing this in this protocol.
New user-accounts are simply created as already mentioned in Section two using LDIF-files.
Now we check all /etc/pam.d/common-* files, for the following content (en-abled PAM-modules): (Normally, there has nothing to be changed, because the package configuration does the editing of the files)
account required pam_unix.so common-auth:
auth required pam_unix.so nullok_secure auth sufficient pam_ldap.so use_first_pass common-password:
password required pam_unix.so nullok obscure md5 common-session:
session required pam_unix.so
The last thing to do is to tell the NSS that it should also use the LDAP-server for user-authentication. We do this by editing the /etc/nsswitch.conf as follows: #local user-management will be used first, second the ldap-server passwd: files ldap
group: files ldap shadow: files ldap
This order should be used, so that it is still possible to login with the local accounts if they were not transferred to LDAP. In the above step we created a new user on the LDAP, which is not included in the local files. So we can easily test if the authentication over LDAP is working by trying to log in with this account.
A more safe way in doing this, is by logging in remote over SSH using the newly created account.
6
Securing the connection using TLS
To master the last challenge, we first install the packages ’tinyca openssl gnutls-bin’.
6.1
Brief Introductiont to TLS
To secure the connection to the server, OpenLDAP has the ability to enable Transport Layer Security, which is similar to the Secure Sockets Layer (SSL). We use TLS instead of SSL (which is also possible), because it seems to me that it works more hassle-free than SSL .
While SSL operates on a secure connection (ldaps://:636) and is a Netscape-defined protocol, TLS offers the same encryption on regular LDAP connections (ldap://:389) and is an industry standard (RFC 2830). Both types of secure connections are set up identically. It is only the URL that is different.
6.2
Steps taken to create a server certificate
To enable a TLS connection to the server, a server certificate is needed by the TLS protocol. Also, in an TLS handshake the server certificate only provides a secure, encrypted connection to the server. If client authentication is desired, then a client certificate and key pair must be presented to the LDAP server. There are two ways to create and install a server certificate. Both methods involve creating the server certificate, sending it to OpenLDAP clients, and making appropriate changes to the OpenLDAP configuration files. Also, both methods involve OpenSSL commands that query the user for information used to create the certificate.
IMPORTANT: When asked for a ’Common Name’, you must enter the fully-qualified distinguished name (dn) of the server, e.g. exam-ple.de, and not ’your name’ as is suggested by the OpenSSL prompt!
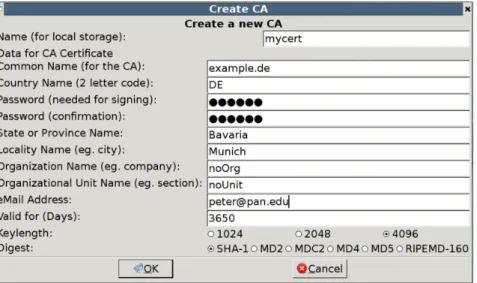
The first method is theSelf Signed Certificate which we will not discuss here. The problem with Self signed certificates is, that they cannot (by nature) be revoked, which may allow an attacker who has already gained access to monitor and inject data into a connection to spoof an identity if a private key has been compromised. CAs on the other hand have the ability to revoke a compromised certificate, which prevents its further use. For that reason we will now create such aCA Issued Certificate for server and client using the tool ’tinyca2’.
Figure 2: CA cert creation using tinyca2
After the creating window in Figure 2 a further ’CA Configuration’-tab occurs, where we leave all values as set default and press the OK-button.
We now have the CA entry created. To create a certifcate for client and server, we change the tab to ’Certificates’ and press ’New’. First step is to create a server certificate and then a client certificate. (Enter informations in popup-windows)
We then export both certificates and keys (select ’export’ – cert + key) to a desired directory.
6.3
Steps taken to configure LDAP for TLS usage
To configure our OpenLDAP server, there are three files to consider: slapd.conf (server) and ldap.conf (client).
Add the following lines to slapd.conf, to activate TLS: # CA signed certificate and server cert entries: TLSCipherSuite TLS_RSA_AES_256_CBC_SHA
TLSCACertificateFile /var/openldap-data/cacert.pem TLSCertificateFile /var/openldap-data/servercrt.pem TLSCertificateKeyFile /var/openldap-data/serverkey.pem # Use the following if client authentication is required TLSVerifyClient demand
# Or never desired #TLSVerifyClient never
Install the ca-certificates package and copy the ca-cert to /usr/share/ca-certificates. Then run sudo dpkg-reconfigure ca-certificates to update /usr/ssl/certs/ca-certificates.crt Change the ldap.conf to active TLS on the client:
#
# Global LDAP settings #
# See ldap.conf(5) for details
# This file should be world readable but not world writable. BASE dc=example,dc=de
URI localhost
#location where your cacert is on the machine TLS_CACERT /usr/ssl/certs/ca-certificates.crt TLS_REQCERT demand
To test the server, you should restart slapd and run a search with ldapsearch over TLS using: