The Lightning Experience Guide
How to Transition to the New Salesforce
© Copyright 2000–2015 salesforce.com, inc. All rights reserved. Salesforce is a registered trademark of salesforce.com, inc., as are other names and marks. Other marks appearing herein may be trademarks of their respective owners.
CONTENTS
WELCOME TO LIGHTNING EXPERIENCE
. . . 1Chapter 1: What Your Sales Reps Need. . . 1
Welcome to Lightning Experience. . . 2
What About the Previous User Experience?. . . 3
Chapter 2: What Makes Lightning Experience So Special. . . 5
Take a Tour of Lightning Experience. . . 6
So How Do I Decide if Lightning Experience is Right for Me?. . . 10
Chapter 3: Understanding Lightning Experience and Salesforce Classic. . . 12
Comparing Lightning Experience and Salesforce Classic. . . 13
But What About Visualforce and Apex?. . . 18
How to Assess the Impact. . . 18
Chapter 4: Enabling Lightning Experience. . . 19
Get Your Org Ready for Lightning Experience. . . 20
Set Up Users for Lightning Experience. . . 20
Turn Lightning Experience On!. . . 21
Switching Between Lightning Experience and Salesforce Classic. . . 21
WHAT'S NEW IN LIGHTNING EXPERIENCE
. . . 23Chapter 5: Navigation and Setup in Lightning Experience. . . 23
The Lightning Experience Navigation Menu. . . 24
The App Launcher in Lightning Experience. . . 24
Meet the New and Improved Setup. . . 26
Object Manager . . . 30
Global Search . . . 31
Lightning Experience Help Menu . . . 33
Chapter 6: Opportunities, Leads, and Selling in Lightning Experience. . . 34
Explore the Opportunity Workspace . . . 35
Opportunity Home . . . 37
Explore the Lead Workspace. . . 38
Chapter 7: Explore More of Lightning Experience. . . 40
The Home Page. . . 41
Object Home and List Views. . . 42
User Profile. . . 46
Tasks, Calendar, and Events . . . 46
Feeds in Lightning Experience . . . 48
Chapter 8: Reports and Dashboards in Lightning Experience. . . 50
Report and Dashboard Home Pages. . . 51
Create Beautiful Dashboards Using a New, Feature-Rich Editor. . . 51
Present and Share Information in Interactive Dashboards. . . 52
Get More Information from Interactive Charts and Filters on the New Report Run Page. . . 53
Reports and Dashboards: Compatibility Between Lightning Experience and Salesforce Classic . . . 56
HOW YOUR EXISTING CUSTOMIZATIONS AFFECT LIGHTNING
EXPERIENCE
. . . 58Chapter 9: Your Layouts Can Customize Lightning Experience Records. . . 58
Page Layouts in Lightning Experience. . . 59
Compact Layouts in Lightning Experience. . . 60
Chapter 10: Actions and Lightning Experience. . . 62
Actions in Lightning Experience . . . 63
How Actions Are Ordered in Lightning Experience. . . 66
ROLL OUT LIGHTNING EXPERIENCE
. . . 67Chapter 11: Welcome to Your Lightning Experience Rollout. . . 67
What It Takes to Go Live. . . 68
Educate Yourself About Lightning Experience. . . 68
Getting Hands-On with Lightning Experience. . . 69
Identify Stakeholders and an Executive Sponsor. . . 69
Educate Your Company About Lightning Experience . . . 70
How to Demonstrate Lightning Experience. . . 70
Revisit Your Processes. . . 70
Perform a Gap Analysis. . . 71
Present Your Findings. . . 72
When the Show Is a Go. . . 73
Chapter 12: All Systems Go. . . 74
Where to Start . . . 75
Plan Your Rollout . . . 75
Decide Who Gets Lightning Experience . . . 75
Unleash the Power of Super Users. . . 76
Create a Chatter Group for the Rollout Team. . . 77
Pick a Launch Date. . . 78
Create a Project Schedule . . . 78 Contents
Define Measures for Success. . . 79
Create a Marketing and Communication Strategy. . . 79
Create a Training Plan . . . 80
Test Your Customizations and Iterate. . . 81
Ready to Start. . . 81
Chapter 13: Go Live. . . 82
Engage with Super Users . . . 83
Measure Results . . . 84
Survey Your Users . . . 84
Use Reports and Dashboards in Salesforce. . . 85
Deliver an Executive Summary. . . 86
The Show Must Go On . . . 87
LIGHTNING EXPERIENCE DEVELOPMENT
. . . 88Chapter 14: User Interface Development Considerations. . . 88
Raising the Bar for Web App User Interfaces. . . 89
Classic Visualforce. . . 89
Visualforce as a JavaScript Application Container. . . 90
Lightning Components . . . 91
Choosing the Right Tool for the Job. . . 91
Choosing the Right Tool for Your Organization. . . 93
Migrating to Lightning Components . . . 93
Chapter 15: Visualforce and Lightning Experience. . . 95
What Works . . . 96
What Works, But Needs Updating and Testing. . . 96
What Doesn’t Work. . . 97
That Look-and-Feel Thing . . . 98
Chapter 16: Lightning Components in Lightning Experience. . . 99
Considerations for Use . . . 100
Chapter 17: ISVs, Packaging, and AppExchange. . . 101
ISV Tools in Lightning Experience. . . 102
Packaging Your Applications in Lightning Experience. . . 102
AppExchange and Lightning Experience. . . 102
Chapter 18: Understanding Changes to Other Development Tools. . . 103
Installed Packages in Lightning Experience. . . 104
The API and Apex in Lightning Experience. . . 104
Authentication and Security in Lightning Experience. . . 104
Canvas for Lightning Experience . . . 104
Salesforce1 for Lightning Experience. . . 104 Contents
Mobile SDK for Lightning Experience . . . 105
VISUALFORCE & LIGHTNING EXPERIENCE
. . . 106Chapter 19: Using Visualforce in Lightning Experience. . . 106
Where You Can Use Visualforce in Lightning Experience. . . 107
Chapter 20: Developing Visualforce Pages for Lightning Experience. . . 111
Set Up Your Editor . . . 112
Viewing Visualforce Pages During Development. . . 112
Reviewing Visualforce Pages in Multiple Environments . . . 115
Testing Your Visualforce Pages . . . 116
Chapter 21: Exploring the Visualforce App Container. . . 117
The Outer Lightning Experience Container. . . 118
The Visualforce iframe . . . 118
Impact of the New Container. . . 118
Visualforce Defaults and Environment Changes in Lightning Experience. . . 120
<apex:page> showHeader and showSidebar Attributes Are Always false. . . 120
The sforce.one JavaScript Utility Object. . . 120
Chapter 22: Sharing Visualforce Pages Between Classic and Lightning Experience. . 121
Detecting the User Experience Context. . . 122
Querying for Lightning Experience via SOQL and API Access. . . 123
Chapter 23: Managing Navigation . . . 124
Navigation in Lightning Experience . . . 125
Classic Visualforce Navigation . . . 125
Modern Visualforce Navigation. . . 125
Navigation Gotchas, and How to Fix Them. . . 126
Chapter 24: Understanding Important Visual Design Considerations. . . 128
Affecting the Styling of Standard Components. . . 129
Styling Strategies and Recommendations. . . 130
The Salesforce Lightning Design System . . . 131
Adapting the Lightning Design System for Standard Components. . . 131
Chapter 25: Knowing Which Features to Avoid in Lightning Experience. . . 134
Lightning Experience Header and Navigation Menu Can’t Be Suppressed. . . 135
Salesforce Classic Header and Sidebar are Always Suppressed. . . 135
Page Title Can’t Be Set. . . 135
<apex:relatedList> and Blacklisted Related Lists. . . 135
Avoid <apex:iframe> . . . 135
No, Really, Don’t Set window.location Directly. . . 136
sforce.one Is No Longer Salesforce1-Only. . . 136 Contents
Changes With Action Overrides. . . 136
Home Page Doesn’t Support Visualforce. . . 137
Visualforce Tabs and Apps Can’t Be Added to Lightning Experience Navigation Menu. . . 137
INDEX
. . . 138 ContentsWELCOME TO LIGHTNING EXPERIENCE
CHAPTER 1
What Your Sales Reps Need
Your sales reps have needs. They need good data in Salesforce so they can find just-in-time information about their customers and prospects. They need to work in Salesforce with as few clicks as possible, so In this chapter ...
• Welcome to Lightning
Experience they can sell faster and smarter. And they need the ability to do things themselves, without having tocome to you, the Salesforce admin, for every request.
• What About the Previous User Experience?
Your sales reps need these things so they can spend their time where it matters most: Selling your company’s product and crushing their numbers.
Welcome to Lightning Experience
Welcome to Lightning Experience! Lightning Experience is a modern, productive user experience designed to help you do more and be more efficient.
With the launch of Lightning Experience, we’ve focused on your sales reps, with a re-envisioned desktop experience to support your sales process. The result is a more productive interface, designed to support how sales reps work on a daily basis.
Although we’ve started with sales, Lightning Experience won’t end there. It’s really just the beginning! Lightning Experience will transform Salesforce CRM and extend to service, apps, platform, and more. No matter what department you're in, we understand that the way people work is changing.
All this change is greatly influenced by the rise of mobile. Sales reps at your company are already using mobile to research prospective customers, get directions to client meetings, connect socially with customers, and more. We get that. That’s why Lightning takes the cool stuff from the mobile experience and brings it to the desktop.
…becomes what sales reps love about desktop What sales reps love about mobile…
When we’re talking about Lightning Experience, we’re talking about pages in Salesforce optimized for sales use. We’re talking about new features that help your sales reps focus on the right deals and the right activities, every time they log in. We’re talking about flexible, interactive tools that sales reps can use to visualize data and work deals in flight.
But before we go any further, let’s talk about how Lightning Experience got its name, and why we built it in the first place.
Why We Built Lightning Experience
Let’s start with the name, and while we’re at it, the correct spelling of the name.
Or Lighting Not Lightening
It’s Lightning!
The method by which something is illuminated, like the soft glow of a lamp, by the light of which you read the release notes The act of becoming lighter, like when you
put down that swag-stuffed backpack you’re carrying at Dreamforce
A modern, productivity-boosting user experience designed to help sales reps close deals lightning fast (see what I did there?)
So why the name “Lightning?” Well, think for a moment about actual lightning, the kind you see during a storm. Think about how fast it strikes; if you blink, you might miss it. Think about how beautiful it is; lightning can be stunning to behold. Finally, think about how unique each lightning bolt is; no two are the same.
Welcome to Lightning Experience What Your Sales Reps Need
That’s a lot like Lightning Experience. It’s fast, it’s beautiful, and it’s unique to each sales rep. It’s a simpler user experience, designed to help sales reps sell faster, with personalized alerts and an interactive assistant to help each sales rep focus on what’s important. All of this drives improved productivity for your sales team.
Ultimately, we built Lightning Experience because of you, our customer. Lightning Experience is the result of everything we’ve learned from you over the past years and releases. Lightning Experience is the killer sales app you can deliver to your sales reps.
What About the Previous User Experience?
It’s still here, and for the purposes of clarity, let’s give this user experience a name: Salesforce Classic.
Salesforce Classic refers to the Salesforce user experience immediately predating Lightning Experience. It’s the one with the row of tabs across the top. If you haven’t customized your logo, you also see the seasonal Salesforce logo in the upper left corner when you’re looking at Salesforce Classic.
So that’s Salesforce Classic, and again, it’s still here. It has to still be here, because not all features are available in Lightning Experience, and besides, you might not be ready to move off Salesforce Classic yet. Depending on your company culture, change can take time, and we get that, too. We’ll talk more about change management and migration in another module, since that’s an important topic all on its own.
Back to Salesforce Classic and Lightning Experience. The first thing you need to know is how to tell when you’re in one or the other. If you see a row of tabs across the top, you’re in Salesforce Classic. If you see a vertical navigation menu, you’re in Lightning Experience.
The row of tabs across the top means you’re in Salesforce Classic
The vertical navigation menu on the left means you’re in Lightning Experience
What About the Previous User Experience? What Your Sales Reps Need
It’s important that you get comfortable with identifying which one you’re in. If you decide to enable Lightning Experience, you need to prepare for helping users with questions. As a Salesforce admin who has enabled Lightning Experience, one of the first things you’ll need to identify on a troubleshooting call with a user is, are you in Lightning or in Classic?
We mentioned earlier that some features are not yet available in Lightning Experience, and right about now you’re probably wondering exactly how that works. Let’s talk about that next.
What About the Previous User Experience? What Your Sales Reps Need
CHAPTER 2
What Makes Lightning Experience So Special
With over 25 new features and 50 redesigned pages, there are several key benefits to using Lightning Experience. We won’t cover everything here, but for each area of the product, we’ll highlight some of the neatest things.
In this chapter ... • Take a Tour of
Lightning Experience
To kick things off, let’s talk about some of the highlights: • So How Do I Decide
if Lightning • New record layouts that focus on what you can do instead of what you can view Experience is Right
for Me?
• Beautiful dashboards in a flexible layout with spanning columns that let you add more components in a row
Take a Tour of Lightning Experience
Why is Lightning Experience so special? We’ll show you!Home
We’ve reimagined the way you start your day with a brand new, intelligent page. Now your sales reps can monitor their performance to goal and get insights on their key accounts. Plus, we’ve added an Assistant, which is your users’ action list of things to do and places to be.
• Start your day fast with a new, intelligent page
• Use the Performance Chart to monitor how close you are to crushing your numbers
• Get insights fast with Account Insights and social highlights
• Use the Assistant to identify exactly what you need to be doing today
• Focus your selling activities on your Top Deals
Opportunity Workspace
We’ve taken your sales process and put it into an action-first workspace, designed to help your sales reps work their deals faster and smarter. You can customize coaching scripts for each step in the sales process, create records quickly with fewer clicks, and ultimately close deals faster.
• Showcase key record details in the new highlights panel at the top of the page
• Use the handy composer to quickly log calls, create tasks, send emails, and more
• Get key coaching details with a customizable sales path to support your sales process
• See a wealth of related information on hover using quick view, without ever leaving the opportunity page
• Add related records—like contacts—in context with minimal clicks
Take a Tour of Lightning Experience What Makes Lightning Experience So Special
Accounts and Contacts
Like with opportunities and leads, we’ve optimized the layout for accounts and contacts, organizing the content by their primary use case: reference. Now your sales reps can find information and gather insight at a glance.
• Get the latest news for your customers with integrated Twitter and Account Insights
• Work smarter and keep your data clean with field-level duplicate matching
• Locate important data efficiently with the redesigned Lightning page layout
• Review past and upcoming activities at a glance
Take a Tour of Lightning Experience What Makes Lightning Experience So Special
List Views
Now your sales reps can visualize any list view graphically with a handy chart.
• Visualize your data in seconds with list view charts
• Use type-ahead search to find a favorite list view fast
• Automatically open your list views created in Salesforce Classic using Lightning Experience
Take a Tour of Lightning Experience What Makes Lightning Experience So Special
The Opportunity Board
Introducing the Opportunity Board, a visualization tool for opportunities, where sales reps can visually review deals organized by each stage in the pipeline. With drag-and-drop functionality, sales reps can move deals from one stage to another, and get personalized alerts on key deals in flight.
• Visualize your deals at each stage in the sales cycle
• Move deals between stages using drag-and-drop functionality
• See alerts that notify you when action is needed on a key deal
Reports and Dashboards
Sales reps will love the ability to create their own filters on reports, and you will appreciate the updated dashboard editor, with spanning columns and a new, flexible layout.
• Create filters for reports
• Make visually awesome dashboards using flexible layout and spanning columns
• Enjoy sales rep-focused enhancements, including auto-hidden details on matrix reports and the ability to hide totals and subgroups on the report run page
• Easy migration from Salesforce Classic to Lightning Experience, with reports and dashboards automatically viewable and inheriting all permissions and sharing already defined
Take a Tour of Lightning Experience What Makes Lightning Experience So Special
Other Highlights
• Navigate through pages more easily with the space-saving, collapsible left navigation menu
• Take better notes with the new Notes feature, which includes autosave, rich text capabilities, and the ability to relate a note to multiple records
• Find your tasks on a new page for tasks, including the new Master-Detail view, which lets you see a single task and your entire list of tasks side by side
• Find records faster with improved search, allowing you to view recent records and top results
So How Do I Decide if Lightning Experience is Right for Me?
At this point, you’re probably starting to think about whether or not your company is a good fit for Lightning Experience. This is good, and part of the point of this content is to help you make that choice.
Ultimately, your decision comes down to this: does the rad stuff you get with Lightning Experience outweigh what you can’t do without Salesforce Classic?
So How Do I Decide if Lightning Experience is Right for Me? What Makes Lightning Experience So Special
So, let’s help you decide. Next, we’ll take you through the key differences between the two interfaces and help you figure out how to make that decision.
So How Do I Decide if Lightning Experience is Right for Me? What Makes Lightning Experience So Special
CHAPTER 3
Understanding Lightning Experience and Salesforce
Classic
Lightning Experience is a new, modern user interface for your sales reps to help them sell faster and smarter. Lightning Experience features 25 new features and 50 redesigned pages, but not every feature In this chapter ...
• Comparing Lightning Experience and Salesforce Classic
is supported in Lightning Experience. So the experience you’ve come to know in Salesforce, called Salesforce Classic, is still available for you, and the users you enable for Lightning Experience can switch between the two at will.
• But What About Visualforce and Apex?
As your company’s trusted advisor for Salesforce, you need to help your company decide when to enable Lightning Experience. So, we’ve got to start getting you educated on Lightning Experience features versus Salesforce Classic.
• How to Assess the Impact
Comparing Lightning Experience and Salesforce Classic
Let’s start with differences for specific products and features.Note: This isn’t a comprehensive list of supported and unsupported features. For a more detailed list, please see the Salesforce Help.
Salesforce Data
Salesforce Classic Lightning Experience
Feature
Accounts, Contacts, Leads,
Opportunities, Price books, Products Calendar, Events, Tasks
Cases (basic support) Custom objects
Chatter feeds, groups, and people Salesforce Files
Other Sales and Service objects
Home
In Lightning Experience, Home is a new, intelligent page filled with insights, a slick performance chart, and a helpful assistant feature, highlighting what’s most important each day.
Salesforce Classic Lightning Experience Feature Performance Chart Assistant Account Insights Feed and publisher Customizable dashboards Tasks
Items to Approve Calendar and Events* Recent Records Top Deals
Comparing Lightning Experience and Salesforce Classic Understanding Lightning Experience and Salesforce Classic
Salesforce Classic Lightning Experience
Feature
Customizable home page components
* Applies to Home only.
Calendar & Events
Calendar and events now have their own object home page in Lightning Experience with a streamlined look and feel. Salesforce Classic Lightning Experience
Feature
Enhanced calendar Events
Accounts and Contacts
Accounts and contacts in Lightning Experience have gotten a complete makeover, with a brand new layout designed to help sales reps find the information they need, fast.
Salesforce Classic Lightning Experience
Feature Account Insights
Contact Insights (Closed Pilot in Winter ’16) Highlights panel
Activity Timeline
Distinct ‘reference’ page layout Related lists
Enhanced Notes New Files Twitter highlights Quick View (hover)
Integrated email and templates Accounts and contacts hierarchy Collaborate
Person Accounts Account Teams
Comparing Lightning Experience and Salesforce Classic Understanding Lightning Experience and Salesforce Classic
Opportunities and Leads
Sales reps in Lightning Experience will find a turbo-charged workspace for managing opportunities and leads. View related information in the Quick View. Create tasks and events, log calls, and send emails, and track all those activities in the Activity Timeline.
Salesforce Classic Lightning Experience Feature Opportunities Opportunity Teams Opportunity Splits Add similar opportunities Big deal alerts
Leads
Find and merge duplicate leads Change lead owner to a queue Lead campaign history Create leads
Assign leads to campaigns Customize lead conversions via API Both Opportunities and Leads Customizable highlights panel Sales path
Create related records in context Quick view (hover)
* Composer
Integrated email and templates Workspace template page layout Activity timeline
Enhanced Notes New Files Collaborate
*Similar capabilities available in Classic with actions in the publisher.
Comparing Lightning Experience and Salesforce Classic Understanding Lightning Experience and Salesforce Classic
Opportunity Board
Sales reps can use the Opportunity Board, a visualization tool for opportunities, to review deals organized by each stage in the pipeline. With drag-and-drop functionality, sales reps can move deals from one stage to another, and get personalized alerts on key deals in flight.
Salesforce Classic Lightning Experience
Feature Charts Drag and drop Intelligent Alerts
Type-ahead list view search
* Sharing settings
* Only list views marked as “Visible only to me” or “Visible to all users” are supported. Sharing with certain groups of users isn’t supported.
List Views
List Views have gotten an upgrade in Lightning Experience.
Salesforce Classic Lightning Experience
Feature Charts
Type-ahead list view search Resizable columns
* Sharing settings
* Only list views marked as “Visible only to me” or “Visible to all users” are supported. Sharing with certain groups of users isn’t supported.
Reports
Sales reps who use reports in Lightning Experience will find a greatly improved user interface, including the ability to easily create filters and add enhanced charts. And Salesforce admins will find new features on the dashboard editor, including flexible layouts and spanning columns. However, some report features aren’t yet available in Lightning Experience, including feeds and scheduled reports.
Salesforce Classic Lightning Experience
Feature
Create interactive filters while viewing a report
Enhanced report charts See details of matrix reports
Comparing Lightning Experience and Salesforce Classic Understanding Lightning Experience and Salesforce Classic
Salesforce Classic Lightning Experience
Feature
Hide totals and subgroups from report view page
Table, funnel, and scatter chart types Schedule report refreshes
Follow reports
* Report folder sharing
Create report folders Report notifications Bucket fields
Custom summary formulas Joined reports
Report editing
* You can’t set up folder sharing in Lightning Experience; however, folders viewed in Lightning Experience that were created in Salesforce Classic inherit all permissions assigned in Salesforce Classic.
Dashboards
Salesforce Classic Lightning Experience
Feature
More than 3 columns supported Flexible layout
* Schedule dashboard refresh
Dynamic dashboards
Post dashboard components to feeds Follow dashboards
Dashboard filters
Enhanced dashboard list views Some visualization components
* Dashboards that are already scheduled in Salesforce Classic will run as scheduled.
Comparing Lightning Experience and Salesforce Classic Understanding Lightning Experience and Salesforce Classic
Other Features and Products
Salesforce Classic Lightning Experience
Feature
Create and edit records
Inline editing of fields (lists, records) Forecasting Territory Management Salesforce Communities Partner Portals Service Cloud Data.com Work.com
But What About Visualforce and Apex?
When we talk about customizing Salesforce “programmatically” we’re talking about using code to add new features. Most of the time, like when you’re using the API or writing Apex triggers, there isn’t an actual user interface to the feature. Guess what? All of that stuff
just works whether you’re in Salesforce Classic or Lightning Experience. Woohoo!
Other features do have a user interface. In that case, we’re mostly talking about Visualforce. Again, usually, Visualforce just works, although you may have to point your users at the new locations for custom actions, tabs, and so on.
There are some considerations for all Visualforce pages and apps, though, and we recommend that you review those. We created an entire Trailhead module just for Visualforce developers, and an entire trail for developing Lightning Experience apps. If you’re using Visualforce or other programmatic customizations in your organization, check those trails out as part of your Lightning Experience assessment process.
How to Assess the Impact
Now that you have a sense of the new features you gain by enabling Lightning Experience, and what isn’t supported, you can start to assess the impact of enabling it for your company. We recommend going through your Salesforce organization and assessing each potential area of impact as you prepare to decide when to enable Lightning Experience.
We’ve put together an enablement pack with sample documents you can download and customize, and it contains a sample gap analysis checklist. You can use this checklist to help guide your assessment.
But What About Visualforce and Apex? Understanding Lightning Experience and Salesforce Classic
CHAPTER 4
Enabling Lightning Experience
At this point, you’ve evaluated the benefits of Lightning Experience and are ready to deploy to some or all of your users. Next, we’ll walk you through the technical steps to enable Lightning Experience for your users.
In this chapter ... • Get Your Org Ready
for Lightning
Experience This chapter doesn’t cover your overall rollout strategy. We’ll cover that in depth in Welcome to Your
Lightning Experience Rollout on page 67. • Set Up Users for
Lightning Experience Let’s dive into the details. • Turn Lightning
Experience On!
Does My Organization Qualify for Lightning
Experience?
These criteria prevent you from enabling Lightning Experience in your org: • Switching Between
Lightning Experience and Salesforce Classic
• Person Accounts: Person Accounts aren’t supported in Lightning Experience. If your org uses Person Accounts, you can’t enable Lightning Experience.
• Editions: Contact Manager Edition, Personal Edition, Database.com Edition, and Chatter.com Edition aren’t supported for Lightning Experience. Customers on these editions can’t enable Lightning Experience.
Get Your Org Ready for Lightning Experience
If you haven’t already, consider enabling and setting up these supporting features before turning on Lightning Experience. These features ensure that the new user interface is fully optimized to help your sales reps sell faster and smarter. We’ll look at some of them in more depth later on.
All of these recommended features can be enabled from one place: the Lightning Setup page, which you can find in Salesforce Classic Setup by clicking Lightning Experience.
Related Files
Leverage the rich features and flexibility of Salesforce Files from standard Salesforce objects and your custom objects. Add the new Files related list to page layouts, so users can upload files to records, see files associated with records, and quickly page through files in the modern, visually rich preview player.
Enhanced Notes
Helps your users stay organized with our enhanced note-taking tool. It’s a breeze to create rich-text notes and quickly relate them to specific records. When you turn on Notes, remember to add the Notes related list to the appropriate page layouts.
Sales Path
Make it easy for sales reps to follow your organization’s sales process and get deals to closed. Customize opportunity stages and lead statuses, and the order you want them to appear in the sales path on the opportunity and lead workspaces. Then take it up another notch and add your own coaching steps for each stage or status in the sales path.
Duplicate Management
Create duplicate rules so users are alerted if they’re about to create a duplicate record. Craft your duplicate rules to control whether and when users can create duplicate records in Salesforce.
Lead Conversion
Keep your sales process moving by allowing your sales reps to convert qualified leads to contacts, accounts, or opportunities. Add the Lead Convert action to the Lead page layout.
Account Insights
Give your reps instant access to relevant, timely news articles about their accounts. This feature is available in English only, so if your organization uses a different primary language, you may not want this option. Industries sensitive to privacy issues should consider whether or not to implement this feature. For more information about the privacy issue around Account Insights, see the Salesforce Help.
Social Accounts, Contacts, and Leads
Keep the team up to date by letting reps link their accounts, contacts, and leads to matching Twitter profiles. Users can see Twitter user profiles and people in common in Salesforce and quickly access their tweets.
Shared Activities
Represent activity relationships more accurately by letting your sales reps relate multiple contacts to individual events and tasks. Shared Activities are forever. After they’re enabled, they can’t be disabled. For more information, see the Salesforce Help.
Set Up Users for Lightning Experience
Depending on the size of your rollout, you need to decide how to enable Lightning Experience for your users. If you’re piloting with a small group of users, or if you’re not sure whether you’ll keep Lightning Experience on for good, consider using Permission Sets. If you’re planning a mass rollout, consider updating Profiles.
New to permission sets? There’s a walkthrough for that! Walk Through It: Permission Sets
Worried about grumpy users? All users can switch back to Salesforce Classic if they’re having trouble in Lightning Experience.
Get Your Org Ready for Lightning Experience Enabling Lightning Experience
If you’re in Professional Edition or Group Edition, Lightning Experience is “all or nothing” for you. Once you turn it on, it’s on for all of your users.
If you’re in Enterprise Edition or above, consider these options:
• If you have users with standard profiles, consider moving them to custom profiles, because enabling Lightning Experience auto-enables it for any standard profile users.
• Create a permission set with the Lightning Experience permission. Apply the permission set directly to the pilot users, then enable Lightning Experience.
• Looking to mass enable? Adding the Lightning Experience user permission to the desired profiles is the fastest way to mass enable Lightning Experience. If you’re a data loader ninja, you can save time by updating many profiles at once, but remember, with great power comes great responsibility. Mistakes can inadvertently enable or disable other features.
Turn Lightning Experience On!
Are you ready? It’s easy. To enable Lightning Experience, go to the Lightning Setup page, which is accessible in Setup by clicking Lightning Experience. The slider button at the bottom of the Lightning Setup page enables Lightning Experience for your org.
Flip that switch, and your journey begins! The next time the users you’ve enabled log in, they automatically start enjoying Lightning Experience.
Note: Remember that access by specific users can be controlled with permission sets and profiles, depending on your edition.
Switching Between Lightning Experience and Salesforce Classic
Meet the Switcher. If you have Lightning Experience enabled, you can use this feature to switch back and forth between Lightning Experience and Salesforce Classic.The Switcher is smart. Anytime you switch, it remembers that user experience as your new default preference. So if you switch to Lightning Experience, it is your default user experience until you switch back to Salesforce Classic.
How do you get to the Switcher? In Salesforce Classic, click your name in the upper right corner, and select Switch to Lightning Experience from the menu.
Turn Lightning Experience On! Enabling Lightning Experience
In Lightning Experience, click your profile picture in the upper right corner and select Switch to Salesforce Classic from the menu.
Tip: See that image there at the bottom? Click it to go right to the release notes!
A Few Switcher Gotchas
Although the Switcher is smart when navigating in Salesforce, direct URL links can cause issues when shared between team members. This means you can run into snags if you enable Lightning Experience for only some members of a functional team, especially if those team members share direct links with each other.
If a user clicks a link to something that’s not supported in Lightning Experience, Salesforce switches to Salesforce Classic in a new tab while the original Lightning Experience window stays open.
Users who aren’t enabled for Lightning Experience can’t access Lightning Experience links, including links posted to Chatter or emailed from a Lightning Experience user.
Tip: Keep all members of a functional team on the same experience. If you have team members who often share links and work closely together, include them all in the pilot. You can roll out Lightning Experience to a specific set of users using profiles or permission sets.
Switching Between Lightning Experience and Salesforce Classic Enabling Lightning Experience
WHAT'S NEW IN LIGHTNING EXPERIENCE
CHAPTER 5
Navigation and Setup in Lightning Experience
Setup is where you make the magic happen. As a Salesforce admin or developer, you spend a lot of time using Setup. It’s where you customize and configure your organization, support users, build functionality, and more.
In this chapter ... • The Lightning
Experience
Navigation Menu One of the huge productivity upgrades that comes with the new Lightning Experience is the improved Setup. We’ve done a lot of usability testing and refactoring to revamp the Setup tree. We simplified it to • The App Launcher in
Lightning Experience have a logical and easy-to-navigate structure, using broad categories to make things more discoverable. In addition, child nodes are now in alphabetical order.
• Meet the New and
Improved Setup The navigation menu in Lightning Experience provides a streamlined and compact interface to navigate through your organization’s various apps and tabs. The Force.com App Menu and the tab bar that you’re used to in Salesforce Classic have been combined into one view to make navigation simpler and faster. • Object Manager
• Global Search
Ready to see them in action? • Lightning Experience
The Lightning Experience Navigation Menu
Users working in Salesforce Classic are used to seeing tabs across the top of their screen in Salesforce. In Lightning Experience, the primary navigation is now on the left, with a vertical bar and icons representing objects.
The navigation menu contains a set of standard objects predefined by Salesforce. The icons you see in the navigation menu are associated with the object’s or app’s tab. You can view the menu item’s name by hovering over its icon.
You can expand and collapse the menu by clicking . The Home menu item ( ), which you may recognize if you use Salesforce1, is the default home page for Lightning Experience. We’ll learn more about the Home page later.
Note: Coming Soon: Navigation Menu Customization
You can’t customize the navigation menu in Winter ’16, but with Spring ’16, that will all change. Not only will you be able to modify the navigation to include both standard and custom tabs, you’ll also be able to add apps!
You and your users can still get to custom apps and objects via the App Launcher, which we’ll look at next.
The App Launcher in Lightning Experience
In Salesforce Classic, your users commonly switch between apps in one of two ways: through the Force.com App Menu or the App Launcher.
The Lightning Experience Navigation Menu Navigation and Setup in Lightning Experience
However, in Lightning Experience, there is no Force.com App Menu.
Your users can find apps by searching for the app name or by using the App Launcher. You can click from any page to access it. Apps show up as large tiles, and you can find custom objects under the Other Items tile.
All your custom apps, connected apps, and custom object tabs are available through the App Launcher. You and your users can personalize the order of the apps on this page by dragging the tiles wherever you want.
Note: The apps that a user sees in the App Launcher varies depending on each app’s visibility settings and the user’s permissions. When you click into an app, you see all the items associated with it, separated into two sections. The top of the list contains items that are supported in Lightning Experience. The bottom of the list contains items that aren’t supported in Lightning Experience. Unsupported items open in Salesforce Classic in a new browser window.
The App Launcher in Lightning Experience Navigation and Setup in Lightning Experience
As an administrator, you can use the App Launcher to set the default sort order and visibility for the apps in your organization. From Setup, enter App Menu in the Quick Find box, then select App Menu.
This page shows all the organization’s apps. You can drag the apps into the order you want them and set each app’s visibility.
Meet the New and Improved Setup
A nip here? A tuck there? No, we’ve given Setup a whole new face!You can navigate to Setup from the top of any page in Lightning Experience by clicking > Setup Home.
Meet the New and Improved Setup Navigation and Setup in Lightning Experience
The Setup tree has been completely reorganized and recategorized. In Salesforce Classic, the Setup tree had a lot of specific node categories, often with several nodes as nested subcategories. Sometimes there were many different ways to get to a destination. You might have mastered the click paths after a while, but to new users, this structure was often an overwhelming hurdle. The new Setup provides a streamlined interface for viewing and managing your administrative setup tasks.
The new Setup includes these enhancements.
• The Quick Find (1) lets you quickly navigate to any node using a keyword. Quick Find is the best way to find what you’re looking for if you know its name. Quick Find is your power tool for getting where you need to go!
• The Create menu (2) gives you quick access to common Setup creation functions—including users, custom objects, custom tabs, apps, email templates, and processes—without having to drill down through the Setup tree to get the page. You can get to the Create menu from any page in Setup.
• A carousel of quick-access tiles (3) gives you instant access to important setup tools and information, as well as the release notes. The Lightning Experience tile and Setup Salesforce1 tile help you enable your company for the new and improved UI, and mobile data access. There’s also a link to download SalesforceA—which lets you do Salesforce administration from a mobile app—and a link to the System Status screen so you can view your organization’s performance and usage data.
• The Most Recently Used list (4) on the Setup Home page shows your most recently used records or customization features in Setup. You can quickly link back to what you were working on by clicking its name.
• The Object Manager (5) provides a one-stop shop for managing all objects in your organization, both standard and custom. We’ll look at the object manager in more detail shortly.
Meet the New and Improved Setup Navigation and Setup in Lightning Experience
Users can access their personal settings at the top of any page by clicking their profile image, then clicking Settings.
Administration, Platform Tools, and Settings, Oh My!
In the improved Setup, we’ve changed the five Setup tree sections from Administer, Build, Deploy, and Checkout to three sections: Administration, Platform Tools, and Settings. We completely reorganized all the child nodes to fit into these sections where appropriate, and added broader subcategories to make finding nodes easier, even if you don’t know the exact name you’re looking for.
Not only that, there are fewer child nodes to choose from, as many repetitive nodes in the tree have been removed. For example, there is no trace of the Manage Apps node from Salesforce Classic under the Administration section in the Lightning Experience Setup tree. Why? Because it is redundant to the settings you can customize under the Apps node in the platform section.
We reorganized the platform tools into a more process-oriented organizational structure rather than being feature-oriented. Now you can see pieces of the application life cycle broken up into subcategories: Apps, Objects and Fields, Process Automation, User Interface, Custom Code, and Environments.
At the bottom of the tree, in the Settings section, you can view company information or configure security.
Note: As you’re getting familiar with the Setup area, it’s important to keep in mind that navigating through Setup is not about memorizing click paths; it’s about understanding what you're looking for in order to get to your destination. Depending on your users’ profile and permissions, one user might see a different set of items in Setup than another. As a System Administrator, however, you see everything.
Meet the New and Improved Setup Navigation and Setup in Lightning Experience
Where Did Some of the Nodes Go?
You might have noticed that some of the nodes are missing altogether. Only nodes that are related to customizing the new Lightning Experience are included in the Setup tree. For example, the Service Cloud related nodes are gone, as well as some of the Sales Cloud features. And, we moved all the object-related nodes to the Object Manager, which we’ll look at shortly.
Don’t worry! From a customization and development standpoint, all of the tools are still there. And as the other features become supported in Lightning Experience, you’ll see them in Setup too.
Five Things You Shouldn’t Miss in the Improved Setup
Setup Lightning Experience • Your one stop for Lightning Experience customizations
• Learn best practices
• Enable/disable Lightning Experience and new features
• Setup permissions to give users access to Lightning Experience
Create Menu • On every page in Setup
• Quick access to create common items
Object Manager • All standard and custom objects now live in the Object Manager
• All objects now have a standard detail page
• You can filter the list of objects and also filter the contents of the detail page to find things quickly
Customization node in the Setup tree. Use it to: App Menu
• Reorder apps in the App Launcher
• Make apps visible or invisible in the App Launcher View Release Notes • Links to the most recent version of the release notes
• Great point of reference for new and existing features
Limitations
Advanced Setup Search isn’t available in Lightning Experience. The Setup tree in Lightning Experience is limited to:
• Pages that support Lightning Experience features
• Administration pages that apply across your organization, such as user management, security, and company settings Use Salesforce Classic to access administration pages for features that aren’t in Lightning Experience.
Meet the New and Improved Setup Navigation and Setup in Lightning Experience
Object Manager
The Object Manager is a one-stop shop for managing all objects in your organization, both standard and custom. Access all objects and their related functions—fields, validation rules, page layouts, and so on—from a single entry point.
To access the Object Manager, from Setup, enter Object Manager in the Quick Find box, then select Object Manager.
• To find an object, enter the first few characters of its label or name in the Find in page box.
• To edit a custom object, in the Actions column, select ... > Edit.
• To view more details about an object or to access its related functions, click the object label.
From the object detail page, you can view the object details and access all related functions, such as fields, validation rules, and page layouts.
• To quickly jump to a function or control, use the links at the top of the page.
• To find a function or control by name, enter it in the Find in page box.
• If an ellipsis (...) appears in the Actions column for an item, click it to perform an action, such as edit or delete, on that item.
Object Manager Navigation and Setup in Lightning Experience
Limitations
The Object Manager is limited to objects that support Lightning Experience features.
These object functions aren’t listed in the Object Manager. You can access them from elsewhere in Setup.
• Case Comment Triggers
• Feed Comment Triggers
• Feed Item Triggers
• Feed Item Layouts
• Group Layouts
• Group Triggers
• Group Member Triggers
• Group Record Triggers
• Publisher Layouts
• Topic Triggers
• Topic Assignment Triggers
Global Search
You’ve got so much data stored in Salesforce, sometimes the quickest way to your destination is through search. You can find the global search box at the top of any page in Lightning Experience.
When you click in the global search bar, you see a drop-down of all your recent items. This used to be in the navigation menu, but is now easily accessible from global search anywhere!
As you type, you see potential matches for your search.
Global Search Navigation and Setup in Lightning Experience
If none of these are what you’re looking for, press ENTER to see the full list of results. The result list returns your most frequently used objects and the top results for those objects at the top of the list, and less frequently used objects at the bottom of the list.
If you click into global search from an object-specific view, like from an Account page, global search looks for Accounts based on your search string. You can switch to Top Results for a federated search across your entire organization.
And, if you know the kind of record you’re looking for but aren’t on that object’s tab, you can search for that type of record by choosing an item from the list below the search bar. The items in this list are ordered by how frequently you use them.
If you don’t see the object you’re looking for in the list but you’re positive it exists, don’t panic! Click More at the end of the list to see all the objects. Currently the list is limited to Lightning Experience-supported objects.
Three Reasons You Might Not Find What You’re Looking for In Global Search
• It’s still getting added to the index. When you create or update a record, all the searchable content gets added to the index, which can take about 15 minutes—or longer if a lot of edits have been made to the record.
• You’re trying to find a record with a field that isn’t searchable, or an object that isn’t searchable. Make sure the object and field you’re searching for are stored in the index.
Global Search Navigation and Setup in Lightning Experience
• You don’t have access to the record. Global search only returns results you have permission to view.
Lightning Experience Help Menu
In Lightning Experience, each page has a contextual help menu with links to resources—help topics, walkthroughs, videos, developer guides, and PDFs—related to the specific tasks on that page.
On object pages, the menu replaces the “Help for this Page” link that you’re used to seeing in Salesforce Classic. The “Help for this Page” link still appears on many Setup pages, but we encourage you to use the help menu instead for a broader selection of useful information.
When you click a video link ( ), a video player appears, allowing you to watch without leaving Salesforce.
Walkthrough links ( ) take you to the first step of the walkthrough in your organization. Help, developer guide, and PDF links open in a new browser tab.
You can’t customize the items in the help menu. If you’ve created custom help links, those links still work from the “Help for this Page” links in the framed Salesforce Classic pages. However, your custom help links don’t appear in the new Help menu.
Lightning Experience Help Menu Navigation and Setup in Lightning Experience
CHAPTER 6
Opportunities, Leads, and Selling in Lightning
Experience
We’ve taken your sales process and put it into an action-first workspace, designed to help your sales reps work their deals faster and smarter. You can customize coaching scripts for each step in the sales process, create records quickly with fewer clicks, and ultimately close deals faster.
In this chapter ... • Explore the
Opportunity Workspace
• Opportunity Home
• Explore the Lead Workspace
Explore the Opportunity Workspace
Opportunities have been given a makeover! When you visit an opportunity record in Lightning Experience, you’ll see some great new enhancements that will help your sales users get the most out of their opportunities.
Here are just a few things your users can do from the Opportunity Workspace:
• Create and update tasks and meetings, log calls, and send email
• View key information for a deal, like its key players, account, close date, amount, owner, and stage
• Update an opportunity’s stage, close date, and amount
You don’t have to do anything to get opportunity workspace working for your users. However, as an administrator, you can enhance your sales users’ workflow by customizing the sales path and the activity timeline to match their needs.
Sales Path
If you haven’t used sales paths before, like in Salesforce1, you may not be familiar with what they do. Sales paths guide your sales users through each stage of your company’s sales process and help them stay focused on important sales tasks so they can close their deals quickly.
Explore the Opportunity Workspace Opportunities, Leads, and Selling in Lightning Experience
From Setup, enter Sales Path in the Quick Find box, then select Sales Path. You can modify the default sales path or create a new one.
You can enter sales stages, the key fields that sales reps must complete at each stage, and configure the Guidance for Success area to deliver relevant information for each stage, such as links to chatter posts and files, tips, or policy notes.
Sales Path Best Practices
• Provide guidance for success content, like links to Chatter posts and videos, tips, or policy reminders—anything that can help sales reps get closer to sealing the deal.
• Keep your system performance optimal by creating sales paths that have 20 or fewer stages.
• Consider labeling sales paths for regions or industries, like “North American Sales Path” or “Steel Industry Sales Path”.
• If you set up record types, you can have one sales path for each record type. For example, the record type New Business might include more prospecting-related fields, whereas the record type Existing Customer might include a field or stage for renewals.
Activity Timeline
With the activity timeline, your sales reps can keep a finger on the pulse of their deals. The timeline tracks meetings, tasks, calls, and emails. Reps can see what they’ve done and what they still have left to do for each opportunity, lead, account, and contact.
Explore the Opportunity Workspace Opportunities, Leads, and Selling in Lightning Experience
Activity Timeline Considerations
When working with the activity timeline, keep in mind that:The configuration of page layouts and record types affects the tabs in the activity composer
Don’t see the tabs for calls, tasks, events, or emails in the activity composer? See Configure the Call, Task, and Event Tabs in the Activity Composer in Lightning Experience and Configure the Email Tab in the Activity Composer in Lightning Experience for help configuring page layouts, record types, and user permissions so that the tabs are displayed.
The activity timeline replaces the Open Activities and Activity History related lists
On the detail page for objects that support activities, Lightning Experience doesn’t display Open Activities or Activity History along with other related lists. It displays the activity timeline instead. Objects that support activities include opportunities, leads, accounts, contacts, and any custom objects on which you enable activities. If you delete either activity related list from page layouts, Salesforce doesn’t display the corresponding timeline sections—Next Steps or Past Activity—on those pages.
You can customize the display and order of fields in the Activity Timeline
In the activity timeline, you can customize the display and order of fields for events, tasks, and logged calls using event and task compact layouts. However, even if you remove certain fields from a layout, they remain in the timeline because they contain critical activity information. For example, suppose that you remove the due date, the date and time, or the task status fields from the compact layouts. The event start date and time, the task checkbox, the task due date, and the call logging date still appear on activities in the timeline. The description field on events and the comments field on tasks also always appear in the timeline, although they aren’t available in the compact layout. The remaining fields visible in the timeline reflect the fields you include in the compact layout. The activity timeline icons aren’t customizable
You can’t customize the icons for activity types (events, tasks, calls, and email) in the timeline.
Opportunity Home
The Opportunity home page in Lightning Experience looks a lot like other object home pages at first glance. You might not notice it at first, but an awesome feature is waiting to be discovered there.
The Opportunity Board
The Opportunity Board is a visual representation of all of a sales rep’s deals, organized by each stage in the pipeline. You can get to the Board view by selecting it from the Displays menu on all list views except Recently Viewed.
Opportunity Home Opportunities, Leads, and Selling in Lightning Experience
Here, your users can manage their opportunities through all phases of the pipeline, dragging and dropping opportunities from one column to another. A yellow triangle on an opportunity card can indicate three types of alerts: overdue tasks, no open activities, or no activity for 30 days. Users can click the triangle to create tasks and events right from the card. Items on the board vary based on which list view is open.
Tip: The Opportunity Board can only show one record type at a time, so if your organization uses multiple record types, we recommend that you create different list views for each record type.
Explore the Lead Workspace
Qualifying and converting leads just got easier for your users. Lightning Experience includes a lead workspace—command central where your users can track, update, and convert leads into opportunities.
Just like with opportunities, the workspace for leads contains Sales Path. As an administrator, you can set up sales paths to include specific fields and guidance for success in each stage of the leads process.
Explore the Lead Workspace Opportunities, Leads, and Selling in Lightning Experience
To convert a lead, your users click the Converted stage in the sales path. Then, they either select an account or create a new one. They can also create an opportunity.
Explore the Lead Workspace Opportunities, Leads, and Selling in Lightning Experience
CHAPTER 7
Explore More of Lightning Experience
Opportunities and leads aren’t the only places we’ve made improvements. There are slick new features to discover elsewhere, like the Home page, calendar, enhanced list views, and revamped home pages for objects like acccounts, contacts, and cases.
In this chapter ... • The Home Page
• Object Home and List Views
• Accounts, Contacts, and Other Objects
• User Profile
• Tasks, Calendar, and Events
• Feeds in Lightning Experience
The Home Page
The Home page displays key items for each user’s day. From the Home page, your users can manage their day, including viewing their quarterly performance summary and the most relevant tasks and updates.
Give your users access to opportunity details so that they can get the most out of the Home page.
Performance Chart (1)
The performance chart displays data based on opportunities belonging to the user or the user’s sales team. Only opportunities for the current sales quarter that are closed or open with a probability over 70% are displayed. Multicurrency is supported in the performance chart.
Curious about the numbers at the top of the chart? Here’s what they mean.
• Closed—The sum of a user’s closed opportunities.
• Open (>70%)—The sum of a user’s open opportunities with a probability over 70%. The blue line in the chart is the combined total of the closed opportunities and open opportunities with a probability over 70%.
• Goal—A user’s customizable sales goal for the quarter. This field is specific to the performance chart and has no impact on forecast quotas or any other type of goals. Click to set the goal.
Assistant (2)
The Assistant shows your users things they need to address, including upcoming and overdue tasks, new leads, and activities related to opportunities.
Items in the Assistant appear in the following order:
• Tasks that are overdue
• Tasks due today
The Home Page Explore More of Lightning Experience
• Leads assigned to you today
• Opportunities with overdue tasks
• Opportunities with no activity in 30 days
• Opportunities with no open activity
If your users don’t have access to activities on opportunities or if the opportunity pipeline is off, they instead see opportunities that have close dates over the next 90 days.
Note: In Salesforce Classic, the Home page has a Chatter feed. In Lightning Experience, that feed isn't there. Instead, Chatter (the "Feed") is on the navigation menu, under the "Feed" icon. When you want to access Chatter on a record, go to the Collaborate tab.
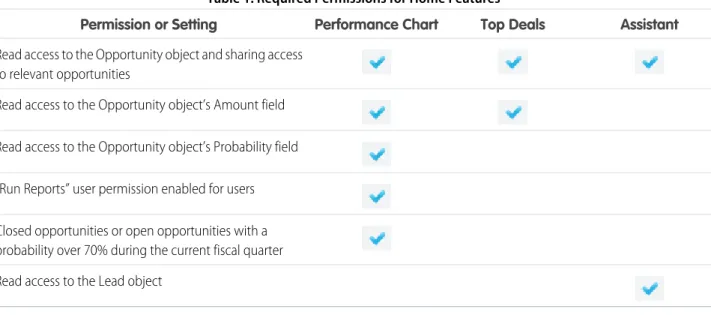
To populate the performance chart, Top Deals, and the Assistant, users must have:
Table 1: Required Permissions for Home Features
Assistant Top Deals
Performance Chart Permission or Setting
Read access to the Opportunity object and sharing access to relevant opportunities
Read access to the Opportunity object’s Amount field Read access to the Opportunity object’s Probability field “Run Reports” user permission enabled for users Closed opportunities or open opportunities with a probability over 70% during the current fiscal quarter Read access to the Lead object
Note: You can’t customize the layout of the Home page, add custom components, or move related lists.
Object Home and List Views
Salesforce Classic has a separate page for an object’s home and another for its list views. In Lightning Experience, we’ve combined them! Object Home and List Views Explore More of Lightning Experience
In the charts panel ( ), you can change the type of chart or create a new one.
The name of the recent records list that displays by default on the home page for standard and custom objects is different in Lightning Experience. It’s called Recently Viewed. There’s another list view available for most standard objects that has the object type specified in the name. For example, the list view for accounts is called Recently Viewed Accounts. These two list views, Recently Viewed and Recently Viewed Object, show the same records. Neither list is deletable, filterable, or editable.
As an administrator, you can configure an object’s Recently Viewed search layout for your users. The search layout controls what all users see when they land on that object’s home page. In Lightning Experience, from Setup, find the object in the Object Manager, then scroll to its Search Layout related list and edit the Search Results search layout.
Limitations and Differences
Some features and links that are available on object home pages in Salesforce Classic aren’t available on comparable pages in Lightning Experience. Here are a few examples. The rest can be found in Lightning Experience Considerations.
• Navigation through list views has changed. Because list views have infinite scrolling, you can’t specify the number of records to show per page. Also, you can’t navigate through pages with arrow buttons, and you can’t jump to a specific page of results. There’s no alphabet rolodex for list views.
• Your users can reorder the columns of the Recently Viewed Object list in Salesforce Classic and the changes are reflected in Lightning Experience.
• Custom buttons and custom actions aren’t supported for list views or list view items.
Accounts, Contacts, and Other Objects
Opportunities and leads have special workspaces. The other objects have a different structure. Some elements, like related lists and the Activity and Collaborate tabs, appear in different places than we saw on opportunities and leads.
For example, here’s a contact page.
Accounts, Contacts, and Other Objects Explore More of Lightning Experience
The highlights panel is in the same place across all objects. But here there’s no Sales Path, and the Activity and Collaborate tabs are together in the right hand column. Related lists are in their own tab in the main part of the page, alongside the Details tab. Some objects have special components that appear on their pages, but the overall structure remains the same across all of them.
Accounts
Accounts have the Account Insights feature, which also appears on the Home page. Account Insights displays up to 10 unique news articles per account, based on the account’s name and industry. Articles are selected based on recently viewed accounts and the accounts that are associated with attendees on a user’s upcoming calendar events.
Accounts, contacts, and leads have the Twitter component, which lets you associate a Twitter profile to an account, contact, or lead. The Twitter card shows the Twitter profile information and a count of how many "people in common" the Salesforce user has in common with the linked Twitter user.
Cases
Cases look a little bit different than other records. Cases display a feed first rather than record details or related information, because support agents mainly collaborate and work with activities in a feed. Details appear next to the feed. You don’t see Activities and Collaboration because they display directly in the feed.
Accounts, Contacts, and Other Objects Explore More of Lightning Experience
If you turn off Case Feed, cases look like other records. Activities and collaboration appear, but the feed-first design disappears and adds more clicks and context-switching to cases. You can use collaboration (Chatter) instead of feed, but collaboration doesn’t include useful case feed publishers, such as email, log a call, or change status.
To fully benefit from new feed-first design on cases, recreate the standard case feed publishers. The standard publishers aren’t available, but you can quickly recreate them as quick actions on the Case object. One benefit of recreating the publishers as quick actions is that they appear on mobile devices, whereas standard case feed publishers don’t.
Custom Objects
Custom objects are supported in Lightning Experience, and custom object home pages contain the same standard elements as other objects, such as details, related lists, highlights panel, activities and a feed (Collaborate).
Accounts, Contacts, and Other Objects Explore More of Lightning Experience