Avaya Solution & Interoperability Test Lab
Application Notes for TONE Software ReliaTel with Avaya
Aura® Communication Manager 6.2 Using SNMP – Issue
1.0
Abstract
These Application Notes describe the configuration steps required for TONE Software ReliaTel to interoperate with Avaya Aura® Communication Manager 6.2 using SNMP. ReliaTel is a monitoring and management solution that can monitor and maintain groups of telephone switches, PBX systems, and other devices from a single control point. In the compliance testing, ReliaTel used the SNMP interface from Avaya Aura® Communication Manager to provide alarm monitoring.
Information in these Application Notes has been obtained through DevConnect compliance testing and additional technical discussions. Testing was conducted via the DevConnect Program at the Avaya Solution and Interoperability Test Lab.
1. Introduction
These Application Notes describe the configuration steps required for TONE Software ReliaTel to interoperate with Avaya Aura® Communication Manager 6.2 using SNMP. ReliaTel is a monitoring and management solution that can monitor and maintain groups of telephone
switches, PBX systems, and other devices from a single control point. In the compliance testing, ReliaTel used the SNMP interface from Avaya Aura® Communication Manager to provide alarm monitoring.
Upon detection of a failure, Avaya Aura® Communication Manager can raise alarms and send SNMP traps to ReliaTel. ReliaTel collects and stores alarm information from SNMP traps, and presents the information on web-based alarm monitoring screen. The compliance testing used SNMP version 2c.
2. General Test Approach and Test Results
The feature test cases were performed manually. Different SNMP traps were generated on Avaya Server and Avaya Media Gateway and verified on the ReliaTel web-based alarm monitoring screen.
The serviceability test cases were performed manually by disconnecting/reconnecting the Ethernet cable to the ReliaTel server.
DevConnect Compliance Testing is conducted jointly by Avaya and DevConnect members. The jointly-defined test plan focuses on exercising APIs and/or standards-based interfaces pertinent to the interoperability of the tested products and their functionalities. DevConnect Compliance Testing is not intended to substitute full product performance or feature testing performed by DevConnect members, nor is it to be construed as an endorsement by Avaya of the suitability or completeness of a DevConnect member’s solution.
2.1. Interoperability Compliance Testing
The interoperability compliance test included feature and serviceability testing.
The feature testing focused on verifying the proper reporting of SNMP traps by ReliaTel. The SNMP traps generated and verified for Avaya Server included server reboot, test SNMP command, SNMP agent restart, and login failure. The SNMP traps generated and verified for Avaya Media Gateway included media module reset, VoIP engine reset, VoIP engine
busyout/release, and login failure.
The serviceability testing focused on verifying the ability of ReliaTel to recover from adverse conditions, such as disconnecting/reconnecting the Ethernet connection to ReliaTel.
2.2. Test Results
All test cases were executed and passed.
2.3. Support
Technical support on ReliaTel can be obtained through the following: Phone: (800) 833-8663
Email: [email protected]
Web: http://www.tonesoft.com/support/portal2.html
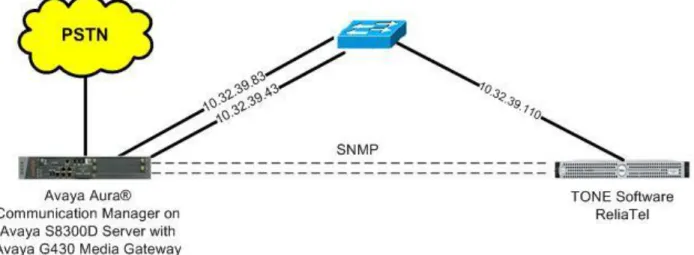
3. Reference Configuration
In the compliance testing, ReliaTel used the SNMP interface to monitor alarms on Avaya
S8300D Server and Avaya G430 Media Gateway. The results in these Application Notes should be applicable to other Avaya S8xx0 Servers and to the Avaya G450 Media Gateway.
Figure 1: Compliance Testing Configuration
4. Equipment and Software Validated
5. Configure Avaya Server
This section provides the procedures for configuring SNMP for the Avaya Server. The procedures include the following areas:
Launch maintenance web interface Administer SNMP traps
5.1. Launch Maintenance Web Interface
Access the Communication Manager web interface by using the URL “https://ip-address” in an Internet browser window, where “ip-address” is the IP address of Communication Manager. Log in using the appropriate credentials.
In the subsequent screen, select Administration > Server (Maintenance) from the top menu.
5.2. Administer SNMP Traps
Select Alarms > SNMP Traps from the left pane, to display the SNMP Traps screen. Click Add/Change to add a new trap destination.
The SNMP Traps screen is updated as shown below. In the SNMP Version 2c sub-section, configure the fields as shown, where “10.32.39.110” is the IP address of the ReliaTel server, and Community Name can be any desired string.
Note that Community Name is required to be configured on Communication Manager, although not used by ReliaTel.
6. Configure Avaya Media Gateway
This section provides the procedures for configuring SNMP on the Avaya Media Gateway. The procedures include the following areas:
Administer community string Administer SNMP traps Show SNMP
6.1. Administer Community String
Use the “snmp-server community” command shown below to set the desired community strings for read-only and read-write access, where “public” and “private” can be any desired community string. Note that the community strings are required to be set on the Media Gateway, although not used by ReliaTel.
G430-001(super)# snmp-server community read-only public read-write private
Done!
6.2. Administer SNMP Traps
Use the “snmp-server host” command shown below to enable SNMP traps and notifications to ReliaTel, where “10.32.39.110” is the IP address of the ReliaTel server, and “public” is the read-only community string from Section 6.1.
G430-001(super)# snmp-server host 10.32.39.110 traps v2c public udp-port 162 all
6.3. Show SNMP
The “show snmp” command can be used to display the list of SNMP receivers, as shown below.
G430-001(super)# show snmp
Authentication trap disabled
Community-Access Community-String --- --- read-only ***** read-write ***** SNMPv3 Notifications Status --- Traps: Enabled
Informs: Enabled Retries: 3 Timeout: 3 seconds
SNMP-Rec-Address Model Level Notification Trap/Inform User name --- --- --- --- --- --- 10.32.39.83 v1 noauth all trap ReadCommN UDP port: 162 DM
10.32.39.110 v2c noauth all trap ReadCommN UDP port: 162
7. Configure TONE Software ReliaTel
This section provides the procedures for configuring ReliaTel. The procedures include the following areas:
Launch web interface Administer centers Administer DAPs Administer entities
The configuration of ReliaTel is typically performed by TONE Software technicians. The procedural steps are presented in these Application Notes for informational purposes.
7.1. Launch Web Interface
Access the ReliaTel web interface by using the URL “http://ip-address:8080/ems/app” in an Internet browser window, where “ip-address” is the IP address of the ReliaTel server. Log in using the appropriate credentials.
The ReliaTel screen is displayed. Select Administration > General Administration from the top menu.
7.2. Administer Centers
The ReliaTel screen is updated as shown below. Select General > Centers in the left pane to display a list of centers in the right pane. Click New to add a new center.
In the lower portion of the screen, select the General tab. Enter a descriptive Name, and retain the default values in the remaining fields.
7.3. Administer DAPs
Select General > DAPs in the left pane to display the pre-configured DAPs. Select the
Scroll the lower pane to the bottom, and add entries shown below for connectivity to Avaya Server and Avaya Media Gateway.
In the examples shown below, “devconnect-s8300d” can be any desired string to denote the Avaya Server, and “devconnect-g430” can be any desired strings to denote the Avaya Media Gateway.
Use the values shown below for chanType, chanSystem, chanEmulator, and chanSilent. For account, use the IP address of the Avaya Server and Avaya Media Gateway respectively.
7.4. Administer Entities
From the ReliaTel screen, select General > Entities in the left pane to display a list of entities in the right pane. Click New to add a new entity.
In the lower portion of the screen, select the General tab. Enter a descriptive Name for Communication Manager. For Center, select the center name from Section 7.2, in this case “AvayaCert”. For Class, select “definity” from the drop-down list, as shown below.
In the lower portion of the screen, select the Logging tab. Check Log State. For Channel, enter the same string that denotes Communication Manager from Section 7.3. For Log Pattern, select “l-avayamdsrv” as shown below. Retain the default values in the remaining fields.
Repeat the procedures in this section to create another entity for the Avaya Media Gateway. In the compliance testing, the “Avaya-S8300D” entity shown below was created for the Avaya Server, and the “Avaya-G430” entity was created for the Avaya Media Gateway.
8. Verification Steps
This section provides the tests that can be performed to verify proper configuration of Avaya Server, Avaya Media Gateway, and ReliaTel.
Prior to verification, generate alarms on the Server and Media Gateway.
From the ReliaTel screen, select Monitor Alarms from the top menu. Select View > Avaya-Cert > Avaya-S8300D in the left pane, where Avaya-S8300D is the entity name for the Avaya Server from Section 7.4. Verify that the new alarms are displayed in the right pane, as shown below.
Select View > Avaya-Cert > Avaya-G430 in the left pane, where Avaya-G430 is the entity name for the Avaya Media Gateway from Section 7.4. Verify that the new alarms are displayed in the right pane, as shown below.
9. Conclusion
These Application Notes describe the configuration steps required TONE Software ReliaTel to successfully interoperate with Avaya Aura® Communication Manager 6.2 using SNMP. All feature and serviceability test cases were completed.
10. Additional References
This section references the product documentation relevant to these Application Notes.
1. Administering Avaya Aura® Communication Manager, Document 03-300509, Issue 7.0,
Release 6.2, July 2012, available at http://support.avaya.com.
2. CLI Reference Avaya Branch Gateway G430, Document 03-603234, Issue 3, February
2011, available at http://support.avaya.com.
3. ReliaTel Operator Guide, Release 4.1, Guide Version 1.0,October 2012,contact ReliaTel
©2013 Avaya Inc. All Rights Reserved.
Avaya and the Avaya Logo are trademarks of Avaya Inc. All trademarks identified by ® and ™ are registered trademarks or trademarks, respectively, of Avaya Inc. All other trademarks are the property of their respective owners. The information provided in these Application Notes is subject to change without notice. The configurations, technical data, and recommendations provided in these Application Notes are believed to be accurate and dependable, but are
presented without express or implied warranty. Users are responsible for their application of any products specified in these Application Notes.
Please e-mail any questions or comments pertaining to these Application Notes along with the full title name and filename, located in the lower right corner, directly to the Avaya DevConnect Program at [email protected].