Zetadocs for Microsoft Dynamics NAV
Advanced Configuration Guide
Version history
Version: 20/05/2009Equisys plc Equisys House
32 Southwark Bridge Road London SE1 9EU
United Kingdom
Tel + 44 (0)20 7203 4000 Fax +44 (0)20 7203 4005
Equisys Inc
30,000 Mill Creek Avenue Suite 335 Alpharetta GA 30022 USA Tel +1 (770) 772 7201 Fax +1 (770) 442 5789 www.equisys.com
Contact: Equisys Technical Support, [email protected]
Copyright Notice
Copyright © 2009 Equisys plc, London 1991 – 2009. All rights reserved.
No part of this document may be reproduced or transmitted in any form or by any means, electronic or mechanical, including photocopying, without the prior written permission of Equisys plc.
Zetadocs for NAV Configuration Guide
Zetadocs for NAV Advanced Configuration: The Advanced Configuration Process
Contents
1.
Zetadocs for NAV Advanced Configuration ... 3
1.1 The Advanced Configuration Process ...3
2.
Creating Document Templates ... 3
2.1 Standard Document Templates ...3
2.2 Creating New Document Templates ...3
3.
Creating Zetadocs for NAV Reports ... 6
3.1 Backup Reports ...6
3.2 Import the Zetadocs for NAV Report Template ...6
3.3 Global, Local and Text Constants ...6
3.4 Code Segments ...6
3.5 Version Code... 10
4.
Configuring Zetadocs for NAV ... 10
4.1 Basic Configuration... 10
4.2 Advanced Configuration ... 21
5.
Testing the Zetadocs for NAV Solution ... 27
5.1 Full Cycle Test Scenario ...27
5.2 Detailed Component Testing ... 31
6.
Introduction to NAV Customization ... 33
6.1 Microsoft Dynamics NAV Compatibility ...33
6.2 Glossary of Terms ...34
6.3 Overview of Zetadocs for NAV ...34
7.
Architecture Overview ... 36
7.1 Typeless Public and Private Code ...36
7.2 Data Processing Flow ...36
7.3 Summary ...38
8.
Send Any Report ... 39
8.1 Permissions ...39
8.2 Simply Send ...39
8.3 Configured Send ...40
8.4 Custom Send ... 41
9.
Bespoke Contacts and Company Types ... 44
9.1 Company Types ...44
9.2 Contacts ...46
10.
Zetadocs-Customize codeunit ... 47
10.1 OverrideSendResult ...47
10.2 GetAdditionalEmbComms ...50
11.
Advanced Zetadocs for NAV Report Writing ... 52
11.1 Zetadocs Report Code Overview ...52
11.2 Types of Reports ...53
11.3 Import the Zetadocs for NAV Report Template ...54
11.4 Global, Local and Text Constants ...55
11.5 Modifying the reports ...55
11.6 Copy Loop ...62
11.7 Modifications Necessary for the Role Tailored Client Reports ...62
12.
APPENDIX ... 63
12.1 Creating and Troubleshooting Zetadocs for NAV Reports ...63
– Step by Step ...63
Zetadocs for NAV Configuration Guide
Zetadocs for NAV Advanced Configuration: The Advanced Configuration Process
1.
Zetadocs for NAV Advanced Configuration
Due to the customizable nature of NAV it is clearly a challenge to ensure the Zetadocs integrates well with all system setups. For those systems which are not compatible the use of the Zetadocs for NAV Standard data import the Advanced Configuration guide provides a detailed description of how to configure your system. Even for those systems which can utilize the standard data import reading this guide may still prove useful as the standard configuration has been created with compatibility to a variety of circumstances in mind as such this guide will show you how to refine Zetadocs for NAV to mesh with your system
requirements. Further the Customization section will also shown you how to adapt Zetadocs for NAV to a variety of other purposes.
1.1
The Advanced Configuration Process
1. Creating the Default Document Templateo Create stationery that will be overlaid onto printed NAV documents, standard attachments and Zetadocs template.
2. Creating Zetadocs for NAV Reports o Setting up the reports. 3. Configuring Zetadocs for NAV
o Setup of system wide rules for archiving (Fileplan), default delivery methods and default templates.
4. Testing the Zetadocs for NAV Solution
o Verify the functionality end to end and gain customer acceptance.
2.
Creating Document Templates
Typically each document sent from NAV using Zetadocs will use a Zetadocs Template to apply a format to the report. This can include putting a company logo on each page of the document, appending additional pages to each document, adding additional addressing, and customizing the email message. At this point it is recommended that you create an initial Zetadocs template, to not only have a default sending format, but also to grasp the power and flexibility of the Zetadocs system, so that when you come to design greater customizations later in the installation process you will have a good understanding of what is possible and how to achieve it.
2.1
Standard Document Templates
Zetadocs for NAV includes as part of the standard configuration a series of Zetadocs Templates, these can be adjusted to match your needs and come complete with sample stationery for you to replace and a generic email message. You may find it quicker and easier to modify these than to create your own from the beginning, these templates should be located in the shared folder setup earlier in the install. For further details on adjusting the standard document templates please see the Standard Configuration guide located on your product CD.
2.2
Creating New Document Templates
Actions:1. Select the Create Document Template option from the Tools menu at the top of your program window.
2. The first edit screen of the document template wizard allows you to choose the attachments you would like to include in your document template. This allows you to add either single or multiple attachments. When you are happy with your selection, select the Next button to continue.
Zetadocs for NAV Configuration Guide
Creating Document Templates: Creating New Document Templates
Figure 1 - Document Template Wizard – Choose Attachments
3. The second edit screen that is displayed allows you to choose any stationery that you would like to automatically apply to any documents sent with this document template. You can choose a
stationery type, or opt not to apply stationery to your main document. To add stationery, select the type you wish to apply and select the add option. When you are happy with your selection, select the Next button to continue.
Zetadocs for NAV Configuration Guide
Creating Document Templates: Creating New Document Templates
4. The third screen allows you to add email addresses to the template. This may be useful in
situations where other members of staff will need to be notified of certain types of documents, for example invoices sent out by the accounts department that need to be seen by the Sales team.
Figure 3 - Document Template Wizard – Enter Email Properties
NOTE: Zetadocs for NAV passes a number of metadata fields as Zetadocs dynamic fields which can be used to customize the email message specified in a template. More fields can be passed from NAV by purchasing the Zetadocs Customization granule for NAV and implementing these fields in NAV. For more information see section Advanced Configuration.
5. Having ensured that you have added all the items that you wish to enclose in your template, use this screen to check the items are correct, leave class type empty as you will manage document typing from NAV.
Zetadocs for NAV Configuration Guide
Creating Zetadocs for NAV Reports: Backup Reports
6. Your template is now ready to import into NAV.
3.
Creating Zetadocs for NAV Reports
This section details the changes required to enable a typical NAV report to be sent using Zetadocs. If you are using the Zetadocs sample templates then you may not need to perform these steps unless you have reports which are not covered in the samples provided, or have specific amendments to make to them. To make the process simpler and faster there is a template report in the Zetadocs for NAV installation pack which contains only the elements that are to be added to an existing report to enable it for sending. It is recommended that you complete the previous sections of this installation document before attempting to create a Zetadocs for NAV report, because much of the code to be added to an existing report depends upon other Zetadocs for NAV objects.
Please follow each of the steps listed in the section below in the order they appear.
Note: This method works for most reports; however, due to the customizable nature of reports it may not fit all reports exactly. Therefore, the location of where to insert the code below may need to vary but the code will remain the same. For additional printing options in reports and troubleshooting the building of a report see the section on report building in the Appendix.
3.1
Backup Reports
In order to be able to uninstall the Zetadocs for NAV software it is necessary to backup the Navision reports you are editing before installing the Zetadocs for NAV objects. Alternatively, reports can be duplicated and saved with new report ID’s before adding the Zetadocs for NAV changes. Either way it is important to add the Version List EQ2.1 after saving the completed report.
Open the Navision client and connect to/open the Navision database. Open the Object Designer (ToolsObject Designer).
Click on Report button in the designer menu.
Select all the reports that you are going to edit for Zetadocs for NAV. Select Export objects in file menu (FileExport).
Export objects to a Backup of Reports before Zetadocs for NAV2.1.fob file. Keep the Backup of Objects before Zetadocs for NAV2.1.fob in a safe place.
3.2
Import the Zetadocs for NAV Report Template
Ensure that the Zetadocs for NAV report template has been imported into the object designer. Report 9009959
<CD Drive>:\Zetadocs NAV Server Components\ Zetadocs for NAV V2.1 Additions Report 9009959
We will refer to this report from now on as the template and to the report you are editing as the report. NOTE: The template is based on the ‚Sales Header‛ table.
3.3
Global, Local and Text Constants
Open the template in the Report Designer and view the C/AL Globals (ViewCA/L Globals). Select all global variables (Ctrl + A), right-click and select Copy.
Open the report and view the C/AL Globals.
Scroll to the bottom of any existing Globals in your report and select the blank global variable row, right-click and select Paste to paste the additional Zetadocs Globals into the report.
You must now repeat the above steps to copy and paste all the Text Constants from the template into your report.
3.4
Code Segments
Next you need to add code to your report. The code is provided here and is also available in the Zetadocs Additions Report as an example of its completed form to assist you. Some of the code requires you to insert
Zetadocs for NAV Configuration Guide
Creating Zetadocs for NAV Reports: Code Segments
the main data item name and the number of your report. These are indicated by <param description> in the pasted code.
(i)
Create Zetadocs Embedded Commands Data Item
In the report designer select an empty row and create a new data item of type Integer called
Zetadocs Embedded Commands.
Move the data item up to just below your main data item and indent once so that it will be the first page of output in your report and set the properties and code as below.
Open the template in the Report Designer and view the sections (ViewSections)
Select the three textboxes located in the Zetadocs Embedded Commands, Body(1) section
Copy and Paste the three textboxes to the same section in your report.(ii)
Code
Report - OnPreReport
//--EQ2.1—
ZetadocsSend := TRUE; noError := TRUE;
IF NOT ZetadocsSendResultGen.Initialize(<Report No.>) THEN BEGIN CLEAR(ZetadocsUtilities); CLEAR(ZetadocsSendResultGen); CLEAR(ZetadocsPrnRem); CurrReport.QUIT; END ELSE BEGIN
IF <Main DataItem Name>.FIND('-') THEN REPEAT
BEGIN
// Get the RecordID IF noError THEN BEGIN
RecRef.GETTABLE(<Main DataItem Name>);
IF NOT ZetadocsSendResultGen.AddRecord(RecRef.RECORDID) THEN BEGIN noError := FALSE; CLEAR(ZetadocsUtilities); CLEAR(ZetadocsSendResultGen); CLEAR(ZetadocsPrnRem); CurrReport.QUIT; END; END; END;
UNTIL <Main DataItem Name>.NEXT = 0; IF noError THEN
IF NOT ZetadocsSendResultGen.ResolveSendInfo() THEN BEGIN CLEAR(ZetadocsUtilities); CLEAR(ZetadocsSendResultGen); CLEAR(ZetadocsPrnRem); CurrReport.QUIT; END; END; //--EQ2.1—
Report – OnPostReport
//--EQ2.1-- CLEAR(ZetadocsUtilities);Zetadocs for NAV Configuration Guide
Creating Zetadocs for NAV Reports: Code Segments
CLEAR(ZetadocsSendResultGen); CLEAR(ZetadocsPrnRem); //--EQ2.1—
Primary Data Item – OnAfterGetRecord
(E.g. Sales Invoice Header data item as shown in Figure 5.) //--EQ2.1--
RecRef.GETTABLE(<Main DataItem Name>);
IF ZetadocsSendResultGen.IsToBeSkipped(RecRef.RECORDID) THEN BEGIN
CurrReport.SKIP; END;
//--EQ2.1--
Zetadocs Embedded Commands – OnPreDataItem
//--EQ2.1--
SETRANGE(Number,1,1); //--EQ2.1--
Zetadocs Embedded Commands – OnAfterGetRecord
//--EQ2.1--
RecRef.GETTABLE(<Main DataItem Name>);
ZetadocsEmbComms:= ZetadocsSendResultGen.GetRecordEmbComms(RecRef.RECORDID, ZetadocsEmbCommsAction); CASE ZetadocsEmbCommsAction OF ZetadocsEmbCommsAction::Error: BEGIN CLEAR(ZetadocsUtilities); CLEAR(ZetadocsSendResultGen); CLEAR(ZetadocsPrnRem); CurrReport.QUIT; END END; //CASE ZetadocsCustComms := ZetadocsSendResultGen.GetRecordCustComms(RecRef.RECORDID, ZetadocsEmbCommsAction); CASE ZetadocsEmbCommsAction OF ZetadocsEmbCommsAction::Error: BEGIN CLEAR(ZetadocsUtilities); CLEAR(ZetadocsSendResultGen); CLEAR(ZetadocsPrnRem); CurrReport.QUIT; END END; //CASE ZetadocsMultRecComms := ZetadocsSendResultGen.GetRecordMultRecComms(RecRef.RECORDID, ZetadocsEmbCommsAction); CASE ZetadocsEmbCommsAction OF ZetadocsEmbCommsAction::Error: BEGIN CLEAR(ZetadocsUtilities); CLEAR(ZetadocsSendResultGen); CLEAR(ZetadocsPrnRem); CurrReport.QUIT; END END; //CASE //--EQ2.1--
Zetadocs for NAV Configuration Guide
Creating Zetadocs for NAV Reports: Code Segments
Zetadocs Embedded Commands – OnPostDataItem
//--EQ2.1--
CurrReport.NEWPAGE; //--EQ2.1--
Zetadocs Embedded Commands , Body (1) - OnPreSection
//--EQ2.1—
CurrReport.PAGENO := CurrReport.PAGENO - 1; //--EQ2.1—
(iii) Properties
(Data Item) Zetadocs Embedded Commands – DataItemTableView: ‚SORTING(Number)‛ (Report) Report – ShowPrintStatus: No
Figure 5 – Adding Zetadocs Embedded Commands DataItem
(iv)
CopyLoop
If your report contains a copy loop data item that outputs more than one copy of the report per print, then you must edit the loop to only output one copy when sending using Zetadocs. An example of the standard copy loop with the additional logic is in the template. NOTE: THIS IS NOT THE EXACT CODE TO PASTE. YOU MUST EDIT YOUR COPY LOOP TO ONLY RUN ONCE WHEN (ZetadocsSend = TRUE)
IF (NoOfLoops <= 0) THEN NoOfLoops := 1;
IF (ZetadocsSend) THEN NoOfLoops := 1;
Zetadocs for NAV Configuration Guide Configuring Zetadocs for NAV: Version Code
(v)
Modifications Necessary for the Role Tailored Client Reports
To enable Role Tailored Client reports to be sent successfully using Zetadocs for NAV you will need to adjust the reports using the following steps.
Open the Navision client and connect to/open the Navision database. Open the Object Designer (ToolObject Designer).
Click on Report button in the designer menu.
Select the reports that you are going to edit for Zetadocs for NAV. Select Export in file menu (FileExport).
Export the report as a .txt file.
Open the file using a notepad.exe or another suitable program. Scroll down through the file until you reach the RDLDATA. Delete everything contained within the curly brackets {}. Save the changes to the file.
Go to NAV and open the Object Designer (ToolObject Designer). Click on Report button in the designer menu.
Select (FileImport) and re-import the modified report.
Repeat the process for any remaining reports you intend to use in conjunction with Zetadocs for NAV.
3.5
Version Code
Once you have saved the report add EQ2.1 to the Version List column in the Object Designer. Adding this value is essential to ensure easy identification of reports modified for Zetadocs for NAV, in particular, for uninstalling Zetadocs for NAV at a later point.
4.
Configuring Zetadocs for NAV
Configuration of Zetadocs for NAV has two phases, basic default settings to enable the system for
document sending and archiving (specific settings), followed by the development of customized rules based on your business logic (requires planning and design). In this section there are instructions on setting the default configuration of Zetadocs for NAV. The following sections take you through the Zetadocs Setup forms in order. If you have already installed or intend to install the Zetadocs SharePoint Site Template then remember to use the archive settings detailed in the Zetadocs for Microsoft Dynamics NAV SharePoint Components Installation Guide included on the product CD, if not please ignore any SharePoint related settings detailed below.
4.1
Basic Configuration
In this section the minimum required settings are presented and explained. They are listed in order and each sub section details the actions to be completed by the installer. It is recommended that the basic configuration is completed and verified as working before progressing to the Advanced Configuration section.
(i)
Zetadocs No. Series
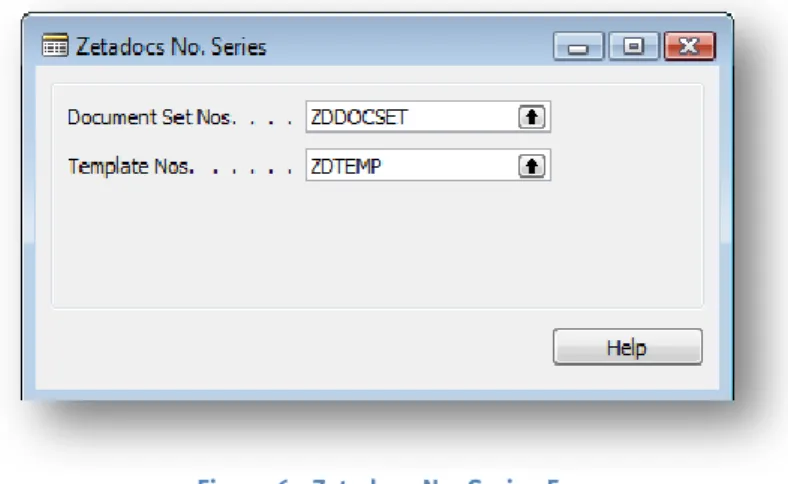
Zetadocs for NAV has tables which use auto generated series numbers as well as allowing the use of custom numbering. It is required that the installer create the no. series for use in these tables. The Zetadocs No. Series Card has two series which need creation.
Zetadocs for NAV Configuration Guide
Configuring Zetadocs for NAV: Basic Configuration
Figure 6 - Zetadocs No. Series Form
It is suggested that two number series are created with the following settings and selected from the Zetadocs No. Series Form. However, it is at the installer’s discretion to specify other number series as suits their client.
Actions:
1. Create and assign 2 number series for Zetadocs Document Sets and Templates.
(ii)
Zetadocs System Settings
The Zetadocs System Settings contains settings for enabling key Zetadocs for NAV features. Depending on the system that was purchased you should enable or disable the settings in NAV.
Actions:
1. Set the system settings which match your installation environment and purchased Zetadocs for NAV package.
Properties:
Archiving Enabled
o Enables archiving to Microsoft SharePoint (MOSS/WSS). When disabled, standard network folder archiving can be enabled via the Zetadocs Administration Configuration, however, this does not support any of the Zetadocs for NAV search features.
Fax Enabled
o Requires the installation of a Zetafax system. For instructions on Zetafax installation please refer to the Zetafax Setup guide located on the product CD. NOTE: When faxing is disabled on the Zetadocs System Settings form the system does not prevent the creation of rules including fax, however, attempts to use fax addressing may prompt warnings and during sending any documents that attempt to use fax addressing will be displayed in the Zetadocs Batch Delivery Settings Dialog as an error.
Logging Enabled
o To be used for troubleshooting installations and support issues. Enabling logging causes a text based log to be written to each NAV user Windows %Temp% folder
(ZetadocsNAV.log). The Log Level specifies the amount of detail in the log. Log Level
o ERROR – Only writes error information to the log
o WARNING – Writes any potentially problematic and error information to the log
o DEBUG- Writes all levels of detail for troubleshooting difficult problems. Recommended only when obtaining support or during installation and configuration.
Code Description Start No End No Default Nos. Manual Nos. ZDDOCSET Zetadocs Document Sets Series ZD00000 ZD99999 YES YES ZDTEMP Zetadocs Template Series ZT00000 ZT99999 YES YES
Zetadocs for NAV Configuration Guide
Configuring Zetadocs for NAV: Basic Configuration
SharePoint Site
o To be used in conjunction with Archiving Enabled, this setting should be the base URL address of your SharePoint installation should you be utilizing one.
Figure 7 - Zetadocs System Settings
(iii)
Zetadocs Templates
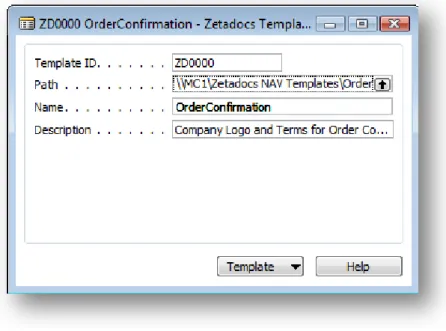
Zetadocs Templates combine stationery overlays and attachment documents as well as supplementary addressing for any document sent using that template from the Zetadocs Client. The templates can be created in the Zetadocs Client and saved to a shared network location. For more information on creating Zetadocs Templates and setting up Zetadocs Shared Network folders please consult the Zetadocs Client help. There is also an introduction to Zetadocs Templates in the previous section on document templates. Any Zetadocs Templates to be applied to documents sent from NAV have to have their location imported into NAV. Please note that any local drive templates that are referenced will not be available to all users and therefore it is strongly recommended that all templates are referenced from a shared network folder to which all NAV users have access. This is done automatically when using the standard configuration data. Actions:
Create a shared network folder for storing Zetadocs Templates for use with Zetadocs for NAV. All Zetadocs for NAV templates should be saved here including the stationery and attachments they use as they are referenced from a template not embedded in a template.
Create the required templates using the Zetadocs Client (See Zetadocs Client help for more information)
Import the template paths into NAV using this form.
Properties:
Template ID uses the Template No. Series created earlier. Custom ID’s can also be assigned for convenient grouping of templates.
Paths are browsed to and file existence is validated to complete a successful reference import. Name is taken from the template file name (minus the extension). This is in line with how templates
can be referenced in embedded commands sent to Zetadocs (however, full paths are used from Zetadocs for NAV).
You cannot import the same file from the same location more than once. That is to say that the ‘Path’ of imported templates must be exclusive.
Zetadocs for NAV Configuration Guide
Configuring Zetadocs for NAV: Basic Configuration
Figure 8 - Zetadocs Template Card
(iv)
Zetadocs Company Type
The Zetadocs Company Type provides the ability to define a relationship between a company reference and a table or some custom logic. This is primarily used on customized systems or for setting up the sending of reports to other recipients besides Customer and Vendors. For more information see Chapter 9 Bespoke Contacts and Company Types.
For the standard configuration: Actions:
1. Create the Customer and Vendor Company Types
Open the Zetadocs Company Types form and enter the following information NOTE: Code is Case sensitive
Code Description
CUST Sales & Marketing Customer recipients
VEND Purchase Vendor recipient
(v)
Zetadocs Document Sets
A document set is the joining reference between NAV reports and a Zetadocs rule definition. A document set is essentially a display name and archive document type for a rule which is defined in the Zetadocs System Rule card. The Zetadocs Document Sets form displays the list of all registered document sets, their names and Archive Document Types. Use this window to register a new document set. Then set the criteria for this rule on the Zetadocs System Rule card. Once a document set is registered and then defined in the system rule table a set of documents (NAV reports) can be instructed to use that document set rule definition when sending via Zetadocs. Hence a Zetadocs Document Set.
Actions:
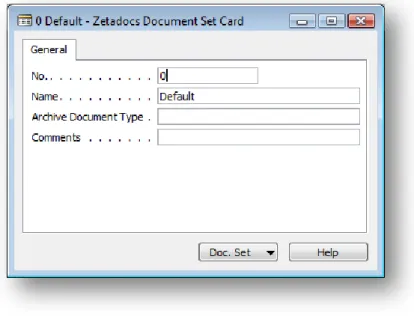
2. Create the default document set No. = 0 (zero)
Name = Default (or the localized equivalent) Archive Document Type = ‘’ (blank)
Properties:
There must always exist a document set with No. = 0. This is the default rule. No.
Zetadocs for NAV Configuration Guide
Configuring Zetadocs for NAV: Basic Configuration
o The No. field uses the ZDDOCSET number series we created earlier. Custom ID’s can also be assigned for convenient grouping of templates.
Name
o This is the display name for a document set as it is more descriptive for users. Archive Document Type
o All documents sent and archived from NAV using Zetadocs have a default document type of Zetadocs. Specifying an Archive Document Type overrides the default and means that any document which uses that document set will be archived as that document type and has the Zetadocs document type as a parent document type. This means that the new document type will inherit all the columns from its parent document type Zetadocs
Document types are useful for filtering views of documents in a SharePoint document library. For more information on using this property see the section on Archive Document Types in the SharePoint Components Installation Guide included on your product CD.
(vi)
Zetadocs System Rules
The Zetadocs System Rule card is where the Zetadocs Document Set rule is defined. It brings together the format (templates), delivery method (contact addressing) and archiving options (SharePoint document library, Archive Document Type and document library subfolder structuring).
Actions:
1. Define the default Zetadocs Document Set.
Select the default document set using the ‚Document Set‛ property lookup on the ‚General‛ tab.
Specify the desired delivery method failover order (remember to only specify Fax if you have Zetafax Server installed).
Choose a ‚Template‛ from your imported template references. Enter an email address that reports using this rule will be sent from.
On the Archiving tab enable archiving (remember only if you have SharePoint). Complete the remaining archive options if applicable.
On the Additional Recipients section, enter the contact information of any additional contacts that will receive a copy of the reports using this rule.
Properties:
Once you have selected the document set to define, it cannot be changed for that record.
Zetadocs for NAV Configuration Guide
Configuring Zetadocs for NAV: Basic Configuration
General Tab
Delivery Method Priority: Implies that if the contact information being used during the sending of a document that uses this rule is missing addressing information, the next highest priority method will be used. For example, if the Delivery Method Priority was ‚E-Mail, Fax, Hard-copy‛ and the contact information being used had no email information but did have fax information, then fax addressing would be used. Similarly, if there was neither email or fax information, then the document would be printed from Zetadocs to the local system default printer.
Template: Optional.
Email From: Optional. The user must have access to send emails using the address entered. If left blank the user’s default email account will be used.
Comments: Field for any additional information you may wish to add.
Additional Recipients: Optional. This field is available on both the general and archiving tabs. Enter additional recipients either by selecting a contact or by entering the information manually. The delivery methods available are E-Mail (To, CC or BCC) and Fax. You can enter a maximum of 5 additional recipients for a system rule. E-Mail distribution lists are supported but they must be entered as their full E-Mail address and not an alias (E.g. [email protected])
Figure 10 - Zetadocs System Rule Card – Archiving Tab
Archiving Tab
Archive Sent Documents: Determines whether Zetadocs for NAV will attempt to archive sent documents.
Archive Library: Only specify the SharePoint document library name, not the full URL.
Archive URL: Displays the full target archive library by concatenating the SharePoint Site from the Zetadocs System Settings and the Archive Library property.
Folder Name Structure: Subdivides archived documents into subfolders of the SharePoint document library based on information from the sent record. The Custom radio button allows you to specify new folder structuring values. Currently, no others have been implemented.
o COMPANY – The recipient NAV Customer name
o DATE – The Date with a format specified by the ‚Date Folder Naming‛ property
o DOCTYPE – The Archive Document Type as specified for the current Zetadocs Document Set, or its override in the Zetadocs Report Settings
Date Folder Naming– Allows you to specify the format of the date folder structure in the SharePoint archive. E.g. YYYY-MM-DD, DD-MM-YYYY, MM-DD-YYYY etc.Zetadocs for NAV Configuration Guide
Configuring Zetadocs for NAV: Basic Configuration
(vii)
Zetadocs Customer Rules and Zetadocs Vendor Rules
The Zetadocs Customer and Vendor Rules are generally accessed from the NAV Customer or Vendor card to setup the sending rules. They are made available from the Administration settings primarily for
management of existing rules, such as deleting or modifying invalid rules. For the basic setup, it is not necessary to add anything here at this point. We will look more at this table in section 4.2Advanced Configuration.
(viii)
Zetadocs Report Settings
The Zetadocs Report Settings is where Zetadocs enabled reports can be associated with a particular Zetadocs Document Set and therefore a rule definition for sending (template, delivery method, archiving settings, additional recipients). It is also where recipient information settings are specified. For the basic setup, it is necessary to add the correct field no.’s for the company and contact fields to this table.
Figure 11 - Zetadocs Report Settings Card – General Tab
Properties:
o A report can only be associated with one Zetadocs Document Set. o Many reports can be associated with one Zetadocs Document Set.
General Tab
Report ID: The Report ID is unique value given to identify each report. Report Name: This field is populated when the Report ID is selected.
Document Set No.: The Document Set No. corresponds to the key field of the Zetadocs System Rule Table linking the report to rules for its distribution.
Document Set Name: Contains the name of the rule that is being applied to the report, it is determined via the Document Set No. selection.
Archive Document Type: this Archive Document Type overrides the Archive Document Type specified in the Zetadocs Document Set for a particular report.
Default Batch Name: When a report prints a number of records to Zetadocs they are held in a batch in the Zetadocs Client. This field allows you to specify a name for the batch that will be visible in the Zetadocs Client document explorer.
Zetadocs for NAV Configuration Guide
Configuring Zetadocs for NAV: Basic Configuration
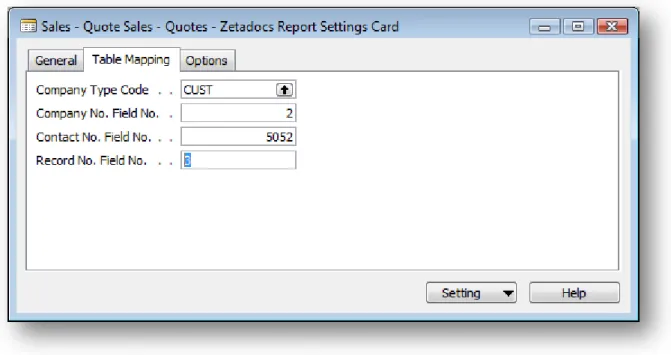
Figure 12 - Zetadocs Report Settings Card – Table Mapping Tab
Table Mapping Tab
Company Type Code: This specifies a table relation between the report record and the recipient. For example, the standard Sales Quote report is to be sent to a Customer. Therefore, we select ‘CUST’ for the Company Type Code from the Company Type Code List.
Company No. Field No.: Specifies the field no. of the field in the table the report is based on where the Company No. should be taken from. For example, the standard Sales Quote report is based on the Sales Header table. The Customer No. in the Sales Header table is the field ‚Sell-to Customer No.‛ field no. 2.
Contact No. Field No.: Specifies the field no. of the field in the table the report is based on where the Contact No. should be taken from. For example, the standard Sales Quote report is based on the Sales Header table. The Contact No. in the Sales Header table is field ‚Sell-to Contact No.‛ field no. 5052. Record No. Field No.: Specifies the field no. of the field in the table the report is based on where the
records No. should be taken from. This can be used as a dynamic field for writing the record no. into a template message as a reference to the recipient and also as a searchable field in the Zetadocs SharePoint archive.
Zetadocs for NAV Configuration Guide
Configuring Zetadocs for NAV: Basic Configuration
Figure 13 - Zetadocs Report Settings Card – Options Tab
Options Tab
Show Delivery Dialog: Controls the display of the delivery dialogs which allow run-time user overriding of send results.
Show Batch Delivery Dialog: Controls the display of the delivery dialog which allows the user to view and fix any send result errors.
Preview in Zetadocs Client: Controls the default value of previewing the Zetadocs documents in the Zetadocs Client before sending. If the delivery dialog is shown the default can be overridden by the user.
Test Mode: This field allows the administrator to prevent the report from printing the report results to Zetadocs. It is useful when troubleshooting problems on a live system. When the report is run it will run as normal up to the point of printing the report documents to Zetadocs.
The table shown below gives the standard field no. values to use for reports based on the following tables and the figure shows some example report settings.
Table No. Table Name Company Type Company No. Field No.
Contact No. Field No.
Record No. Field No.
18 Customer CUST 1 5049 1
36 Sales Header CUST 2 5052 3
112 Sales Invoice Header CUST 2 5052 3 114 Sales Cr.Memo Header CUST 2 5052 3 110 Sales Shipment Header CUST 2 5052 3 6660 Return Receipt Header CUST 2 5052 3 23 Vendor VEND 1 5049 1 38 Purchase Header VEND 2 5052 3 120 Purch. Rcpt. Header
VEND 2 N/A – leave as ‘0’ 3
122 Purch. Inv. Header
VEND 2 5052 3
124 Purch. Cr. Memo Hdr.
VEND 2 N/A – leave as ‘0’ 3
6650 Return
Shipment Header
VEND 2 N/A – leave as ‘0’ 3
(ix)
Zetadocs Sales Doc. Queue Setup
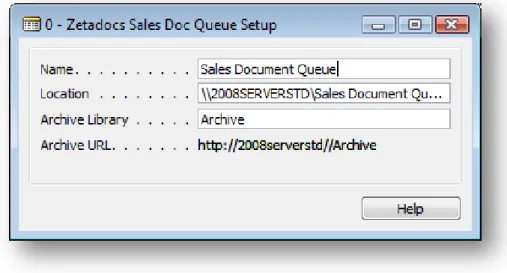
As explained before the Zetadocs Document Queue is a centralized location for processing inbound sales documents from, in essence a virtual in tray. This form specifies where to find the document queue files and where to archive them to once processed.
Actions:
1. Create a shared network folder with full control access for any users that will process sales documents using the Zetadocs Sales Document Queue.
2. Enter the network folder UNC Path to the shared network folder.
3. Specify the archive library and a subfolder on your SharePoint Site where copies of the processed documents should be archived after processing (e.g. Original Order Documents/2007).
Zetadocs for NAV Configuration Guide
Configuring Zetadocs for NAV: Basic Configuration
Figure 14 - Zetadocs Sales Doc Queue Setup Card
Properties:
Name: The name of the document queue. Name has little significance in this version as there is currently only one sales document queue allowed.
Location: Path to network accessible folder that will contain inbound sales documents. Archive Library: The SharePoint document library name only. NOTE: Unless you create the
document library in SharePoint before hand, the document library will be created the first time you archive from the document queue. The document queue has a default document type of Document Queue which has the Zetadocs document type as a parent. It is therefore crucial that the Zetadocs
document type is fully configured before archiving from the Zetadocs Document Queue. Archive Metadata Mapping This table shows how NAV data items are mapped to SharePoint
properties.
SharePoint Column Name Type NAV Value ZetadocsRecipientName Text Contact Name
ZetadocsOrganization Text Customer Name
ZetadocsArchiveID Text ‚Zetadocs Archive ID‛ from the generated record ZetadocsRecordType Text In Sales Order process only: Choice of {Order,
Quote, Invoice, Credit Memo, Blanket Order, Return Order} or ‚Posted Sales Invoice‛
ZetadocsRecordNo Text Record No.
ZetadocsCompanyNo Text Customer No.
ZetadocsDateReceived Date Contains the file’s last modified Date – i.e. the date that the item was stored in the document queue
(x)
Zetadocs Purch. Doc. Queue Setup
The Zetadocs purchase document queue is very similar to the sales document queue. It is used as a central location for all the inbound purchase documents.
Actions:
1. Create a shared network folder with full control access for any users that will process purchase documents using the Zetadocs Document Queue. Note that the shared network folder used for the purchase document queue must be different from the folder used for the sales document queue. 2. Enter the network folder UNC Path to the shared network folder.
3. Specify the archive library and a subfolder on your SharePoint Site where copies of the processed documents should be archived after processing (e.g. Archive/Documents/2007).
Zetadocs for NAV Configuration Guide
Configuring Zetadocs for NAV: Basic Configuration
(xi)
Report Selections
To have any Zetadocs enabled report, see section Creating Zetadocs for NAV Reports, operate from the ‚Print‛ button on the appropriate NAV card form, the report selections table must be updated. This is only applicable if you have created new versions of reports for Zetadocs with different ID’s to the normal versions.
Actions:
1. Set Zetadocs for NAV Reports for the appropriate usage in NAV:
In the NAV Navigation Pane, go to Administration\Sales & Marketing\Report Selections (for sales order process related reports).
For each usage that you want to enable for sending via Zetadocs, select the appropriate Zetadocs enabled version of the report.
Repeat the procedure for purchase order process related reports. In the NAV Navigation Pane, go to Administrator\Purchase\Report Selections
Figure 15 - Report Selection – Sales
(xii)
Printer Selections
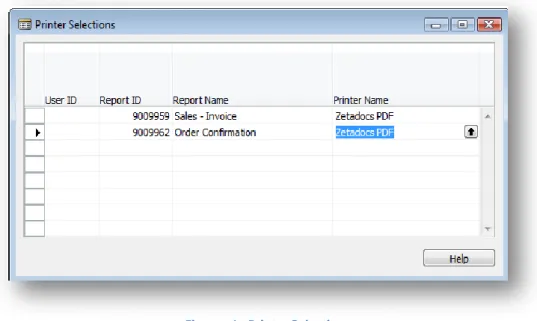
Any reports that have been Zetadocs enabled (see section Creating Zetadocs for NAV Reports) must have the Zetadocs printer selected in the printer selections to ensure that it is the default printer when sending a print job using Zetadocs.
Actions:
1. Set Zetadocs for NAV Reports printer selection to ‚Zetadocs PDF‛:
In the NAV Navigation Pane, go to Administration\General\Printer Selections Select the Zetadocs enabled reports.
Set the printer name to ‚Zetadocs PDF‛. (You must have the Zetadocs for NAV Client installed on the local machine to do this).
Zetadocs for NAV Configuration Guide
Configuring Zetadocs for NAV: Advanced Configuration
Figure 16 - Printer Selections
4.2
Advanced Configuration
In this section the advanced settings are presented and explained. It is recommended that the basic configuration is completed and verified as working before progressing to the Advanced Configuration section.
(i)
Zetadocs Document Sets
Once you have configured the basic Zetadocs for NAV system you can begin to consider designing more specific rules and templates to format specific types of sent documents. The Zetadocs Document Sets should be the starting point for your design. A document set identifies NAV reports (documents) which you want to send via Zetadocs with the same settings such as template formatting, delivery method (email, fax, hard-copy), archiving (location, grouping) and additional recipients. Quite often this set of documents will mirror the NAV table upon which the reports are based. For example, take the Sales Order Process in NAV. The Sales Header table can represent Quotes, Orders, and Invoices etc. However, we may like to send all reports based on these with the company logo and an attached terms and conditions page. This would represent a document set. The Quote report and Order Confirmation report would be 2 documents which we would then set up to use that document set. Conversely, reports based on Quotes, Orders and Invoices may be considered positive sales and Credit-Memo’s and Return Order reports viewed as negative sales and therefore they may constitute 2 document sets with different criteria for sending. The Zetadocs Document Set gives you this report level formatting control and offers convenient re-use capabilities.
Actions:
From your business requirements establish the reports which will be sent using Zetadocs Identify the commonalities between these reports and identify Zetadocs Document Sets Register these document sets
Proceed to create and import the Zetadocs Templates for each document set (Zetadocs Templates) Define the rule for the Document Set (Zetadocs System Settings)
Associate the reports with the respective document set (Zetadocs Report Settings)
(ii)
Zetadocs Templates
The templates are a key part in customizing your sent document sets. As you will know by now it is possible to add stationery and attachments in a template. We will now look at customizing the subject and message text.
Zetadocs for NAV passes a number of database values from the record being sent as a Zetadocs document. These are passed as dynamic fields, which, means that their value can be used in subject and message body text. Below is the list of available dynamic fields and an example of their use in a Zetadocs Template.
Zetadocs for NAV Configuration Guide
Configuring Zetadocs for NAV: Advanced Configuration
Name Value
Name Full name of the contact being sent to Organization The NAV Company name being sent to
ZetadocsRecordNo The ID of the record on which the report was printed
ZetadocsCompanyNo The ID of the company the report is being sent to. I.e. the Customer or Vendor No.
FirstName The contact first name, or if blank our best attempt at the first name from the full name. (All the names except the last which is presumed to be the surname. E.g. ‚James T. Kirk‛, first name would be ‚James T.‛)
Surname The contact surname name, or if blank our best attempt at the surname name from the full name. (The last word of the full name. E.g. ‚James T. Kirk‛, surname name would be ‚Kirk‛)
In Zetadocs dynamic fields are replaced in the subject and message text where they appear. Dynamic fields take the following format:
%%[<field name>]
Here is an example of setting the template subject and message and the resulting email message that will be sent by Zetadocs:
Zetadocs for NAV Configuration Guide
Configuring Zetadocs for NAV: Advanced Configuration
Result:
Figure 18 - Zetadocs Template Customized Message Result
(iii)
Archive Document Types
As discussed earlier, archive document types allow sent documents to be classified and grouped together in the SharePoint archive. The document type from Zetadocs for NAV maps onto the SharePoint content type. This means that if you are using the Zetadocs SharePoint site template you must ensure that the content types match those used with the site template. For an introduction to content types in SharePoint visit http://msdn2.microsoft.com/en-us/library/ms472236.aspx, for details on the site template see the SharePoint Components Installation Guide included on the product CD.
Zetadocs for NAV allows you to classify your document types in two ways, by document set or by individual report. In the Zetadocs Document Sets form you can override the default document type ‚Zetadocs‛ by specifying a value in the Archive Document Type column.
Figure 19 - Document Set Archive Type
This means that any NAV report which has been set up to use that document set will be archived with that document type. It may be advantageous to have a different Archive Document Types within one Zetadocs Document Set. This is achievable by specifying a value in the Archive Document Type in the Zetadocs Report
Zetadocs for NAV Configuration Guide
Configuring Zetadocs for NAV: Advanced Configuration
Settings. This value overrides the archive document type specified by the Zetadocs Document Set the report is associated with.
Figure 20 - Report Specific Archive Type
(iv)
Zetadocs System and Company Rules
The Zetadocs System Rules were explained in the Basic Configuration section as the ability to define how a message being sent is delivered (Email, Fax or Hard-Copy), how it is formatted (Zetadocs Templates), from which address the message is sent and where it is archived. By now you should realize each Zetadocs Document Set can have a separate definition of these sending settings.
Zetadocs for NAV also has Company Rules, these are the Zetadocs Customer Rules and the Zetadocs Vendor Rules which add another level of control. The sending rules are best explained as a set of override rule definitions. It can be viewed as a 4 level system which overrides particular rule settings dependent upon the document set, the company or a combination of both.
LEVELS:
1. The Default Rule
Allows you to specify a basic rule that can be used by any Zetadocs enabled report. 2. Per Document Set
Allows you to specify more specific settings for Zetadocs enabled documents by type. 3. Per Company
All Zetadocs enabled documents being sent to a particular company can have the following rule settings overridden (This includes documents which are being sent using either the Level 1 or a Level 2 rule settings):
i. The contact information to which the document will be sent
ii. The method of delivery by which the document will be sent (Email, Fax, Hard-Copy)
4. Per Company, per Document Set
All Zetadocs enabled documents being sent to a particular company and that are part of a particular document set can have the following rule settings overridden (this includes documents which are being sent using either the Level 1 or a Level 2 rule settings and has had some settings already overridden by a Level 3 rule settings)
i. The Zetadocs Template that will be applied to the document ii. The contact information to which the document will be sent
iii. The method of delivery by which the document will be sent (Email, Fax, Hard-Copy)
To visualize this, let’s look at the forms below to describe a use case. In this example the NAV Administrator has set up a document set for order confirmations. It has been set so that Order confirmations are sent via E-mail with the order confirmation template.
Zetadocs for NAV Configuration Guide
Configuring Zetadocs for NAV: Advanced Configuration
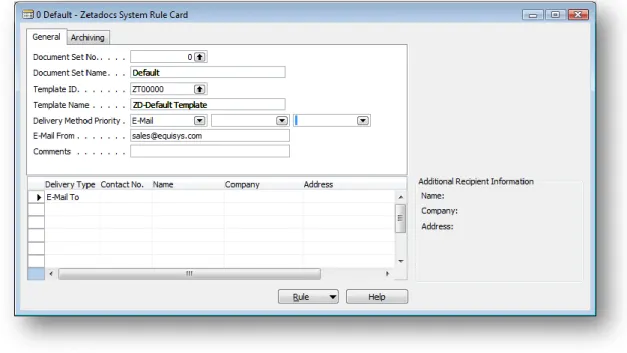
The Zetadocs System Rule card shows the level 1 rule that will apply to all documents by default unless overridden by a higher level rule. In this case documents are sent using email with the default template. We can also set the archiving options on the Archiving Tab, in this example we will set the system not to archive.
Figure 21 – Level 1 Zetadocs System Rule Card
The level 2 rule details shown below apply to all documents with the document set Order Confirmation, meaning that any Order Confirmation document will be sent using the ZD- Order Confirmation Template whilst the others will use the level 1 rule and thus the default template.
Figure 22 - Level 2 Zetadocs System Rule Card
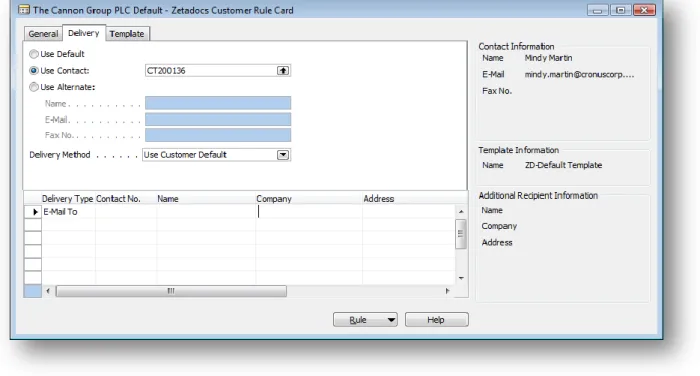
During discussions with the staff at the company in our example the sales staff have requested that all correspondence between us and them be sent to Mindy Martin, with the exception of Order Confirmations. So the Default document set has the contact details adjusted to contain the contact details of Mindy Martin.
Zetadocs for NAV Configuration Guide
Configuring Zetadocs for NAV: Advanced Configuration
Figure 23 - Level 3 rule shown on Customer Rule Card
They have requested that Order Confirmations should instead go to John Emory by fax. The figure below shows how this would be set up. This is done by adjusting the Order Confirmation rule set up for level 2 and adding that it should use the alternate contact John Emory and to deliver it by fax.
Figure 24 - Level 4 rule shown in the Customer Rule List
Starting from the top then, the internal processing determines the send settings by building the results from the lower level rules up. Assume we are sending an order confirmation and it uses the document set
ZD00006 – Orders Confirmations. This will determine from Level 1 & 2 above: Delivery Method: Email
Template: ZT00006 - Order Archiving Settings: Do not archive Contact: Use Default contact
Zetadocs for NAV Configuration Guide
Testing the Zetadocs for NAV Solution: Full Cycle Test Scenario
When we consult the Level 3 Rules we see that any document being sent to ‚The Canon Group PLC‛ (from the Level 3 figure above) will be sent to ‚Mindy Martin‛ instead of the contact specified in the record we are printing from. This would mean
Delivery Method: Email Template: ZD0000 - Default Archiving Settings: Do not archive Contact: Mindy Martin
However, the Order Confirmation document has been made part of ZD00006, therefore the Level 4 settings will be applied and it will be sent to John Emory and by fax. So the final settings will be
Delivery Method: Fax
Template: ZD0006 – Order Confirmation Archiving Settings: Do not archive Contact: John Emory
Additional Recipients
The additional recipients define in the system and company rules do not override those from the lower level rule as the other settings do. They are additive. If additional recipients are added for a document set (ZD00006 – Order Confirmations for example), any document sent using that document set will be addressed to these additional recipients, along with the additional recipients set at a higher level.
(v)
Zetadocs Report Settings
There are a number of fields in the Zetadocs Report Settings which can be left set to default but will then require that additional C/AL code be written to integrate a report with sending using Zetadocs.
5.
Testing the Zetadocs for NAV Solution
This section shows how to test all the components of the Zetadocs for NAV product are installed and configured correctly. First it covers a full cycle scenario to test the product as a whole and then some tests for individual components. As a minimum we recommend that you carry out the full cycle scenario testing to confirm that the system is correctly installed and configured.
5.1
Full Cycle Test Scenario
Before running through this test, please ensure that all the prerequisites have been met.
(i)
Prerequisites
Create a No. Series for the Document Sets and for the Templates and assign them through the Zetadocs No. Series form:
Zetadocs for NAV Configuration Guide
Testing the Zetadocs for NAV Solution: Full Cycle Test Scenario
Create a Zetadocs Template from the Zetadocs Client. The template should have some recipient information, an attachment, stationery and some text in the email body text. Name it Order Confirmation.
Create another Zetadocs Template and name it Invoice.
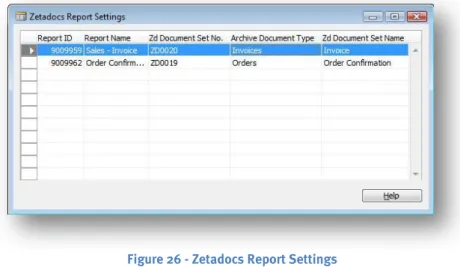
Create two custom Sales reports, one of Order Confirmations and one for Invoices Add those two reports to the Zetadocs Report Settings list:
Figure 26 - Zetadocs Report Settings
Set up some network folders to store and access the templates, the documents for the Document Queues etc.
(ii)
Test
For a full end-to-end scenario follow the steps below:
1. Set up a definition of the Document Set for a Sales Order by going to the Zetadocs Document Set Card form:
Figure 27 - Zetadocs Document Set Card
Zetadocs for NAV Configuration Guide
Testing the Zetadocs for NAV Solution: Full Cycle Test Scenario
Figure 28 - Zetadocs Template Card
3. Set up both the sales and purchase Document Queue locations using the Zetadocs Sales Doc Queue Setup / Zetadocs Purch. Doc. Queue Setup:
Figure 29 - Zetadocs Document Queue Setup
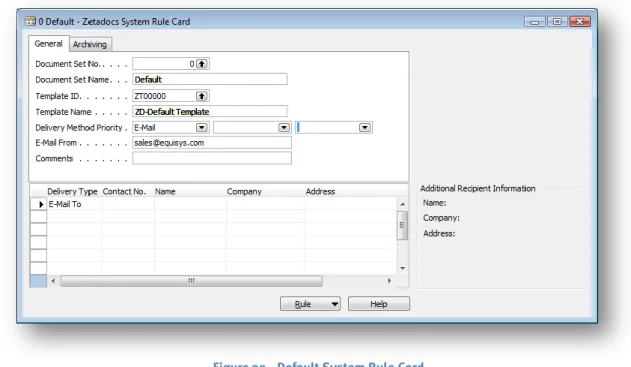
4. Set up a System Rule in the Zetadocs System Rule list using the System Rule Card – the default System Rule should cover the minimum information necessary and should include the email as the delivery method and should have a template selected. On the Archive tab the Archive Sent Documents option should be checked and you should also add a contact in the additional recipients tab:
Zetadocs for NAV Configuration Guide
Testing the Zetadocs for NAV Solution: Full Cycle Test Scenario
Figure 30 - Default System Rule Card
5. Create an original document in Microsoft Word that would represent an example Sales Order and place it into a shared network folder that the Sales Document Queue is setup to monitor.
6. View that original document from the Zetadocs Sales Document Queue form:
Figure 31 – Zetadocs Sales Document Queue
7. Create a NAV Sales Order based on the original document using the Create menu button on the Zetadocs Sales Document Queue form.
8. Archive the original document to SharePoint by closing down the Sales Order form (it will archive the document automatically).
9. Open the just created NAV Sales Order and add any further info needed. 10. Send the NAV Sales Order to the Zetadocs Client by printing it.
11. Confirm in the Zetadocs Client that the correct template has been applied to the printed Order. 12. Send the Order to the recipient.
13. Confirm that the sent document has been archived in SharePoint and can be associated with the original document.
Zetadocs for NAV Configuration Guide
Testing the Zetadocs for NAV Solution: Detailed Component Testing
5.2
Detailed Component Testing
This section contains instructions for how to test specific components of the Zetadocs for NAV system.
(i)
Document Queue
This section details how to test that the Document Queue is functioning correctly. The following tests are valid for both the Sales Document Queue and the Purchase Document Queue. The terminology ‚Zetadocs Document Queue‛ in this section is used to describe both document queues.
Check Scanning (Optional)
If a scanning device is connected, perform the following checks to ensure correct operation. 1. Click the Queue Scan... button to initiate scanning which uses the Zetadocs client settings. 2. Scan a document; once scan is complete the user should be prompted to name the document.
Figure 32 – Enter Scanned Document Name
3. Upon Save, the scanned document name should appear in the Zetadocs Document Queue as the latest entry. The file (typically ‚filename.pdf‛) should also be in the Zetadocs Document Queue shared folder location.
Check Shared Location Updating
1. Create an email with an attachment and save it as a .msgfile into the Zetadocs Document Queue’s shared folder location.
2. Select the QueueRefresh menu button and ensure that the saved email.msg file is now in the Document Queue converted into pdf format.
3. Select the entry in the Zetadocs Document Queue and click ItemView, ensure that the item is viewable in pdf format
4. Select the entry in the Zetadocs Document Queue and click ItemView Original, ensure that the item is viewable in its original format.
Check Printing
1. Select the scanned .pdf file and click ItemPrint, when prompted select a physical printer and click print. Ensure that the document prints to the printer.
2. Select the recently added email with attachment(s) now stored as a pdf file and click ItemPrint, when prompted select a physical printer and click Print. Ensure that the document prints to the printer and that the attachments are printed out also.
Check Delete
1. Select an entry in the Zetadocs Document Queue and click ItemDelete. Ensure that the document is removed from the Queue and also that it successfully deletes the file from the Zetadocs Document Queue network folder location.
(ii)
Send to Zetadocs Client
The Zetadocs Client can deliver your NAV documents by email or fax and it can also send them to a physical printer. You can setup the NAV Client to do that per Document Set and/or per Company (Customer or Vendor). Setting up the Zetadocs System Rules for each Document Set or setting up the Zetadocs
Zetadocs for NAV Configuration Guide
Testing the Zetadocs for NAV Solution: Detailed Component Testing
Customer/Vendor Rules for each Document Set you can test where each Document Set will be delivered and how.
Change the Delivery Address of the Default System Rule to Fax to test sending to a recipient by fax or change the Delivery Address to Hard Copy to test printing a hard copy through the Zetadocs Client where the template will be applied.
Zetadocs for NAV can send a batch of NAV documents to independent recipients. To test this feature create a number of Sales Orders and print them like in the previous example described in the Full Cycle Scenario section. This time you will see the batch document in the Zetadocs Client which it will include the Sales Orders from NAV Client with the templates applied. If you have the ‚Preview Documents in Zetadocs Client Before Sending‛ option unchecked the Zetadocs Client will begin sending all the documents in the batch automatically after loading the batch. It is suggested you leave it checked until familiar with the printing and sending.
(iii)
Zetadocs Rules
Zetadocs for NAV has the ability to create rules to determine the way a NAV document will be send and to whom depending on certain circumstances. Zetadocs System Rules are the Level 1 and 2 rules. Zetadocs Customer/Vendor Rules are the Level 3 and 4 rules. The Default System Rule set up for the Full Cycle Scenario section is Level 1 rule. Let’s test the rest of the rule levels.
Level 2 Rule Test
1. Create a Document Set and name it Invoice.
2. Add the Invoice template you created earlier in the Zetadocs Template List.
3. Create a Zetadocs System Rule and select the Document Set to be the new Invoice and set the Template to be the Invoice template:
Figure 33 - System Rule Invoice
4. Print a NAV Invoice and check in the Zetadocs Client that the Template Invoice has been applied.
Level 3 Rule Test
1. Go to the Customer Card with whom you have made an order. 2. Click the Customer Button and select Zetadocs Rules. 3. The Zetadocs Customer Rule Card will open.
Zetadocs for NAV Configuration Guide
Introduction to NAV Customization: Microsoft Dynamics NAV Compatibility
4. Select the Delivery Tab and select a sending option other than Use Default and/or change the delivery address (by changing any of those settings on that page you create a Level 3 Rule for that customer).
Figure 34 - Customer Card - Zetadocs Tab page
5. Send an Order to this customer and check that the NAV document has been delivered to the correct recipient.
Level 4 Rule Test
1. Go to the Customer Card whose Customer you have made an order. 2. Click the Customer Button and select Zetadocs Rules.
3. The Zetadocs Customer Rule Card will open.
4. Create a Customer Rule (Level 4 rule) for this particular customer.
5. Print a NAV document and check in the Zetadocs Client that the appropriate settings from that Customer Rule have been applied.
6.
Introduction to NAV Customization
In the Zetadocs for Microsoft Dynamics NAV Installation Guide you were guided through setting up the product for Sales and Purchase Order processes. However, the Zetadocs for NAV architecture is such that it can be adapted to be used in a multitude of situations. Understanding how Zetadocs for NAV works is paramount to unlocking the true potential of the product.
The aim of this document is to guide you through the development and integration of Zetadocs for NAV with highly customized systems, as well as guiding you through the use of the Zetadocs for NAV SDK granule. The document contains an overview of the Zetadocs for NAV objects architecture, provides some concrete examples of how to use the SDK granule to implement custom business logic and also gives some examples of how to integrate with some typical NAV customizations. It is recommended that you read the entire installation guide and are familiar with the Zetadocs for NAV Addin before continuing.
6.1
Microsoft Dynamics NAV Compatibility
This product has been developed and tested against Microsoft Dynamics NAV 4.0 , 5.0 and 6.0. It cannot be guaranteed that the NAV objects and NAV code in Zetadocs for NAV will be supported on other NAV
Zetadocs for NAV Configuration Guide
Introduction to NAV Customization: Glossary of Terms
6.2
Glossary of Terms
Term Description
Company An object in NAV which stores information about
an organization that your organization deals with. This can also be your organization. Example: Customer
Contact A person in a ‚Company‛ with whom your
organization has correspondence. This can also be a person in your organization. Example: Contact
Address Information a ‚Contact‛ has about how and where
correspondence should be sent. Example: e-mail: [email protected]
Object An NAV object which defines data or UI or
processing units. Examples: Table, Form, Codeunit
Report A document which displays information from NAV
Tables.
Document Any printable document that can be printed to the
Zetadocs printer. Typically refers to an NAV Report in this document.
6.3
Overview of Zetadocs for NAV
This diagram shows the main applications and components of Zetadocs for NAV and the flow of data from NAV to Document Recipients and SharePoint. The dashed line represents launching a SharePoint search for documents previously archived to SharePoint when sending a document from NAV using Zetadocs.
Microsoft Dynamics NAV Zetadocs Client Zetadocs API SharePoint Service Document Recipients
Zetadocs for NAV Configuration Guide
Introduction to NAV Customization: Overview of Zetadocs for NAV
To supplement this diagram we have provided a typical real world example of the data and its flow through the system.
Typical Send Use-Case
1. From within NAV, the user views a queue of documents to be processed. 2. One by one they view each order and input the details into NAV.
3. On finishing the order entry the original order document is copied to a persistent document library in SharePoint with associated metadata to bind it to the created record in NAV. This uses the Zetadocs API.
4. The user then sends an order confirmation document from NAV to the customer.
The Order Confirmation report in NAV is modified to contain formatting and delivery information (Email address of customer) as well as metadata to bind the document to the NAV record. Zetadocs Client loads the printed report, applies the formatting, converts the completed document to PDF and sends to customer.
5. A copy of the sent document is archived in SharePoint.
The Zetadocs Client passes a copy of the PDF to the SharePoint Service with the metadata for persistent storage.
(i)
Document Queue, Order Entry and Archiving
Currently focused on both the Sales Order Process and the Purchase Process in NAV, it allows the user to view documents for data entry and archives these documents, with metadata from the associated record that is created, to a SharePoint document library. It also sets up a reference for monitoring correspondence associated with the record over the course of the order process. This means that at any point during or after the sales or purchase process all documents associated with an order can be quickly found and reviewed on screen.
The Zetadocs Document Queue provides a simple user friendly interface for document processing. It displays a list of documents currently waiting to be processed from a centralized folder. The list shows you the name of the document, the date it was saved to the network folder, and the source which tells you whether the document was scanned in, or received by fax or email (based on file extension).
The document queue form allows you to quickly identify any document you are searching for. It also allows you to:
View, print and delete the item using the Item button.
Create a quote, an order, an invoice, a credit memo, a blanket order, a return order or link the document to an existing record (posted or otherwise).
Scan a newly received document.
(ii)
Sending Reports using Zetadocs
Any NAV Report can be printed to the Zetadocs printer, addressed in the Zetadocs Client and sent to that recipient. To take advantage of the automated addressing, formatting and archiving of Zetadocs for NAV the report must be edited to link in Zetadocs for NAV rules and output addressing, formatting and archiving data during the printing of the report. The Zetadocs Client then uses that information to format, send and archive the document. Zetadocs for NAV maintains a set of company-wide sending rules which determine the format, addressing and archiving settings for particular reports and customers. With very little work, Zetadocs for NAV makes the sending batches of fully formatted, customer specific documents with personalized messaging easy and manageable.
(iii)
Archiving to SharePoint
In a SharePoint enabled company, Zetadocs for NAV offers the ability to archive backup copies of
correspondence documents in a highly customizable archive. It does this by storing metadata against the archived document that make it easy to locate record or customer related documents, or to simply search based on your own criteria.