Data Domain, Inc.
2421 Mission College Boulevard, Santa Clara, CA 95054 866-WE-DDUPE; 408-980-4800
Version 1.0, Revision B September 2, 2009
CommVault Simpana Archive 8.0
Integration Guide
Copyright © 2009 Data Domain, Inc. All rights reserved.
Data Domain, the Data Domain logo and Global Compression are trademarks or registered trademarks of Data Domain, Inc. All other trademarks used or mentioned herein belong to their respective owners.
Data Domain products are protected by one or more of the following patents issued to Data Domain. U.S. Patents 6,928,526; 7,007,141; 7,065,619; 7,143,251; 7,305,532; 7,373,464; 7,424,498; 7,434,015 and other patents and patents pending in USA and other countries.
Disclaimer: The information contained in this publication is subject to change without notice. Data Domain, Inc. makes no warranty of any kind with regard to this manual, including, but not limited to, the implied warranties of merchantability and fitness for a particular purpose. Data Domain, Inc. shall not be liable for errors contained herein or for incidental or consequential damages in connection with the furnishing, performance, or use of this manual.
The instructions provided in this document by Data Domain are for customer convenience and are not warranted or supported by Data Domain, Inc. Data Domain expects users to integrate third-party software and arrays as needed, but Data Domain is not responsible for the usability of the third-party software or the arrays after installation.
CommVault Simpana Archive 8.0
Integration Guide
This document provides information about configuring Data Domain systems with CommVault® Simpana® Archive for Microsoft Exchange and Simpana® Archive for File Systems. This document does not cover integration with Lotus Notes or
Microsoft SharePoint.
This document covers the topics shown in the following table.
Related Documentation Page 4
Configuration Overview Page 5
Data Domain System Configuration Page 7
CommVault Data Archiver Configuration Page 9
Performing a Migration Archiving Operation Page 12
Related Documentation
Related Documentation
This document is a supplement to the Data Domain and CommVault Online documentation. This section describes how to access related documents.
CommVault Documentation
Here are links to some useful CommVault documentation:
• http://documentation.commvault.com/commvault/release_8_0_0/books_online_1/ english_us/html/da.html
• http://documentation.commvault.com/commvault/release_8_0_0/books_online_1/ english_us/prod_info/ma.htm
Data Domain Documentation
Specific documentation can be obtained online by logging into the Data Domain support site at: https://my.datadomain.com/
Product Documentation
On the main page, click Product Documentation, then
1. Select the Data Domain model from the Platform list and click View.
2. On the row for the correct Data Domain operating system (DD OS) version, click View under Documentation.
3. Click the desired title.
Integration Guides
1. On the main page, click Integration Documentation.
2. Select CommVault from the Vendor menu.
Configuration Overview
Configuration Overview
This section gives an overview of how to configure a CommVault Archiver server to work with the Data Domain system.
Prerequisites
Systems
• Data Domain system running minimum Data Domain OS version 4.7.1.0.
• A second optional Data Domain system if replication is desired
• One CommVault CommServe® server
• One server with CommVault MediaAgent installed and configured. MediaAgent can also be installed on the CommServe® server
• Archive sources – Exchange servers, Windows file servers, and UNIX file servers
Software
• CommVault Simpana 8.0 Archive software. Pre-requisites must be checked and configured (including SQL Server, the Windows Domain Controller, and so forth).
• Install the Archiver agent for Exchange Mailbox on all the Exchange servers and the File Archiver for Windows (or UNIX) agent on all of the file systems that are being archived
Settings
• Data Domain Replication licenses if replication is to be deployed
• Appropriate CommVault licenses
Considerations
Tape Marker Settings
CommVault tape marker cv1 will be detected automatically on the Data Domain system when marker type is set to auto mode.
Configuration Overview
Restrictions
• Stub creation will not happen on files tagged with extended attributes. This is because CommVault uses the native NTFS reparse point method to create a stub that points to a file that has been migrated to a Data Domain system.
This is an application restriction and is not related to the Data Domain file system. Extended attributes should be rare as they were created for legacy OS platform support, such as OS/2 on Windows.
• Compression rate varies with the DataArchiver Agent platform, but not with the Media agent.
Configuration Checklist
This is a brief list of configuration steps and settings that need to be set to avoid problems later on. For details, see the first sections of this document and the appropriate reference content.
1. Prepare and configure the Data Domain archive target subdirectories and shares for CIFS access under /backup. Create a folder under /backup to store
CommVault archive data, such as /backup/cvarchivedata.
2. (Optional) Enable and configure the Retention Lock feature on the Data Domain system with DD OS 4.5.x or later. Note that Retention Lock is an optionally licensed feature.
3. Create the CommVault shared magnetic libraries which are connected via CIFS to the appropriate CommVault iDataMedia agent.
4. Create a storage policy for Client systems to use under Polices. When using the Create Storage Policy Wizard, be sure to select Data Migrator/Archiver as the policy type.
5. (Optional) Enable the CommVault Write Once Ready Many (WORM) feature on the iDataMedia agent.
6. (Optional) Set up the storage policy for Retention Lock. The access time is based on the retention time established in the storage policy copy. Until this expiration date, the archived files cannot be modified or deleted by any user or application.
7. Install the CommVault Archive iDataAgents. Be aware of the CommVault licensing requirements.
8. Add and configure the CommVault archive subclients. Note that for most of the archive agents there is no default subclient.
9. Define the rules under which an archive job will take place.
10.Perform a test migration archive. After its completed, verify that the job has completed successfully.
Data Domain System Configuration
Data Domain System Configuration
The Data Domain system is presented to the CommVault CommServe server as a CIFS or NFS storage target depending on the media agent platform. For CIFS, the first consideration to address is what level of CIFS sharing is desired for the Data Domain storage.
For the following section, we will assume the following naming conventions (you may need to use the FQDN in your environment):
• The Data Domain system is named ddhostname.
• MediaAgent Server is named cv8.
By default, the entire Data Domain directory structure (\\ddhostname\backup) can
be shared via CIFS to all or selected hosts. Alternatively, subfolders can be created for explicit CIFS sharing. The choice will depend on the specific use case for the customer environment.
Enable Basic NFS Access on the Data Domain System
1. Log on to the Data Domain system as sysadmin or as a user with sysadmin privileges.
2. Determine the NFS access level currently defined by running command nfs show clients. The output in the example below shows the access for the Data Domain share /backup is open to all hosts as shown with ‘*’:
3. If the /backup path is not included, or the client list does not include the proper server then add the appropriate server access with the following Data Domain CLI command to allow access to MediaAgent host. In the example, access to
/backup is open to cv8 as the client name which is a MediaAgent server:
Note: * as a client name allows all servers access to the specified path on the Data Domain system.
4. Verify that the desired results were obtained:
# nfs show clients
path client - ---/backup * -
---# nfs add /backup cv8
# nfs show clients
path client - ---/backup cv8 -
---Data Domain System Configuration
Enable Basic CIFS Access on the Data Domain System
1. Log on to the Data Domain system as sysadmin or as a user with sysadmin privilege.
2. Determine the CIFS access level currently defined by running command
cifs show clients. The output in the example below shows the access for the Data Domain share /backup is open to all hosts as shown with ‘*’:
3. If the /backup path is not included, or the client list does not include the proper server, add the appropriate server access with the following Data Domain CLI command to allow access to MediaAgent host. In the example, access to /backup
is open to cv8 as the client name which is a MediaAgent server:
Note: * as a client name allows all servers access to the specified path on the Data Domain system.
4. Verify that the desired results were obtained:
You should now be able to map to the Data Domain share through usual Windows CIFS methods.
5. Repeat Step 3 for all MediaAgent servers to open access to appropriate Data Domain share.
Configure Folders on the Data Domain System
1. From the MediaAgent Server (or another authorized administrative server), map the Data Domain system as a local drive.
2. On this mapped drive, create the folder structure for the vault store
configuration. It is recommended to have a separate folder structure for File System Archiving and one for Exchange email archiving. Each leaf folder created is used as the destination folder for the archive device.
Note: The appropriate folder structure can be configuration and use case dependant, is outside the scope of this document, and should be reviewed with your storage team and CommVault resources.
# cifs show clients
path client - ---/backup * -
---# cifs add /backup cv8
# cifs show clients
path client - ---/backup cv8 -
---CommVault Data Archiver Configuration
Configure Explicit CIFS Shares on the Data Domain System
If you are using explicit CIFS shares to manage access to the folder structure on the Data Domain system then following these additional steps:1. Log on to the Data Domain system as sysadmin or as a user with sysadmin privilege.
2. Use the cifs share create command to create an explicit CIFS share for the
mount point from each Commvault media agent server. There will be one or more shares for Exchange and separate share(s) for file archiving. For example, to create a CIFS share called cvarchivedata in the Data Domain folder
/backup/cvarchivedata to be used as the archive storage location point for the
Commvault Archiver:
Note: The directory cvarchivedata should already exist as described in previous
steps for creating folders on the Data Domain system.
CommVault Data Archiver Configuration
It is assumed that the Data Domain system is ready to be configured as an archive target. An existing CommServe is required to manage the DataArchiver agents which are needed on each Exchange server or file server that contains data to be archived. These DataArchiver agents can be installed concurrently with the backup
iDataAgents. Please note that there is no default subclient for the Windows
DataArchiver agent. See the table under Subclients - Migration Archiver Agents for subclient creation and configuration requirement details specific to all DataArchiver Agents.
Note: DataArchiver for Windows File System requires a separate CommVault license. If it does not exist, the installation will fail with the message, DataArchiver for File System. There are not enough licenses for installation to continue.
Configuring CommVault for archive storage is essentially the same as creating disk storage resources on the Data Domain system for backups. The same MediaAgent can be shared between iDataAgent and DataArchiver. The steps on the CommVault iDA Media Agent entails creating a shared disk device and a shared magnetic library. The steps briefly describe an example of this using CIFS are below.
1. Create a directory on the Data Domain system in /backup for the mount paths
source. For example: \\dd.datadomain.local\backup\cvarchivedata.
2. Navigate to the Tools > Control Panel > Library and Drive Configuration window.
3. Select the appropriate MediaAgent and click Add.
# cifs share create cvarchivedata path
CommVault Data Archiver Configuration
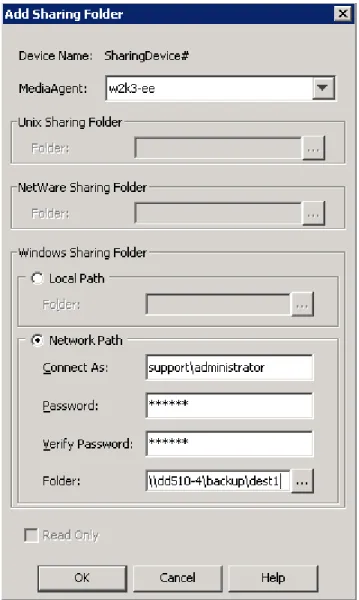
4. Create a shared disk device from the Library and Drive Configuration window under the Shared Disk Device tab.
5. Create a shared magnetic library which utilizes the above Shared Disk device on the Libraries tab. If on a domain, authenticate as a domain user when configuring the device.
Figure 1: Add Sharing Folder Dialog Box
6. Create a storage policy under Polices. Create a new Storage Policy using the Create Storage Policy Wizard and select Data Protection and Archiving as the type.
7. Follow the wizard and make sure to select Deduplication option to No.
CommVault Data Archiver Configuration
9. Create a Subclient under DefaultArchiveSet.
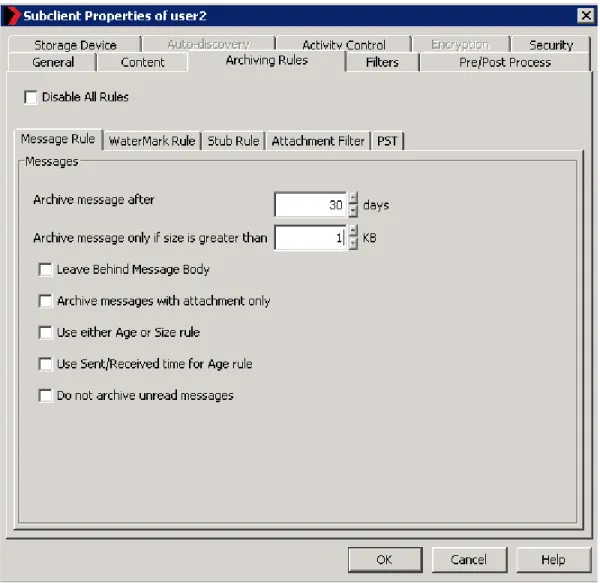
10.Perform the required Rules configuration steps. The rules are set on the Archiving Rules tab of the appropriate DataMigrator sub-client as shown in Step 2. Files or Messages are migrated based on disk capacity, size, or age.
Figure 2: Subclient Properties Dialog Box, Archiving Rules Tab
11.Once the migration rules are set correctly, stubs on the source will be created as soon as the migration job completes. A stub is just metadata that contains a reference to the file which is now located on the Data Domain system. Refer to the CommVault online documentation for more details and options.
Performing a Migration Archiving Operation
CommVault WORM Configuration (Optional)
To use a Data Domain system which has already been configured for Retention Lock, configure the Archive Files as read only using the CommCell Console management application. The steps below briefly describe the procedure. Refer to the CommVault online documentation set for details.
1. From the CommCell Browser, right-click the magnetic library for which you wish to create read-only archive files, and then click Properties.
2. From the General tab of Library Properties, click the Mark Archive Files as Read-Only option.
3. Click OK to save the changes.
Note: There are no explicit WORM instructions in the CommVault online
documentation for a Data Domain system as of CommVault Simpana 8.0. Since the Retention Lock WORM feature is compatible with the NetApp® SnapLock® feature, please refer to the appropriate information in the online documentation.
Note: When enabled, this option preserves archive files. The system saves these files with the read-only attribute and the expiration date set according to the Data Domain Retention Lock specifications in the file access time attribute. The access time is based on the retention time established in the storage policy copy. Until this expiration date, the archived files cannot be modified or deleted by any user or application. Enabling (or disabling) this option will only affect files that are subsequently created by data protection and auxiliary copy operations to this magnetic library. Permission to files that are already available in this magnetic library will not be affected.
Performing a Migration Archiving Operation
This section contains a brief discussion on how to initiate an unscheduled archive request called a Migration Archiving Operation using the CommCell Browser management GUI. The example assumes a client computer that has the appropriate Archiver agent installed for Files System or Exchange mailbox.
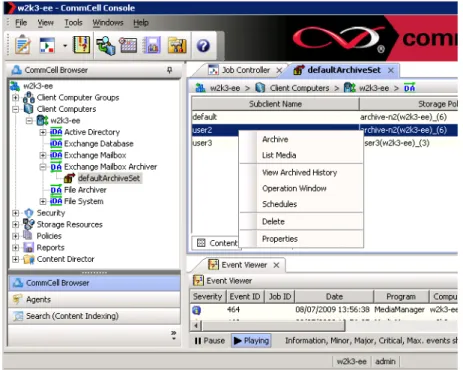
1. From the CommCell Browser select the appropriate Archive subclient under Client Computers DataArchiver Agent. The subclient archive source directories and rules need to be defined properly in order for an archive job to process properly.
2. To archive a subclient, right-click the subclient that you want to archive and click Archive. To archive an archive set, right-click the archive set that you want to archive, click All Tasks and click Archive All Subclients or Archive Default Archive Set.
Performing a Migration Archiving Operation
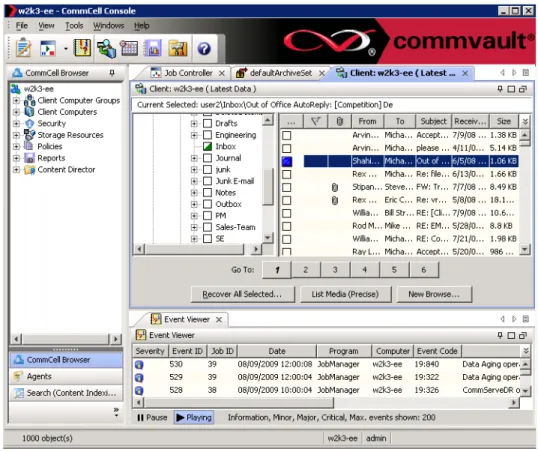
Figure 3: CommCell Console
3. From the Archive Options dialog box, select when you want to run the job by clicking Run Immediately.
4. After selecting when you want to run the job and any advanced options, click OK. A migration archiving operation is started for selected subclient or archive set and indicates its status in the Job Controller window.
5. When the migration archiving operation has completed, a confirmation message will be displayed in the Job Controller window.
6. Check that the migration archiving job completes properly. This is best
accomplished by looking at the archive client and ensuring the stubs are created properly.
Archive Retrieval
Archive Retrieval
There are two methods to retrieve an archived file or Exchange message. The first is to use the Browse & Recover tool from the CommCell Browser Console management application in a similar way to a file recovery from a backup set. The second method uses stubs to access the migrated files or Exchange message directly from the archive client host. Please consult the CommVault Archiver section in the online
documentation found on the CommVault Web site for more detail
The first method of retrieval involves performing a restore request using the CommCell Console by a CommCell admin account.
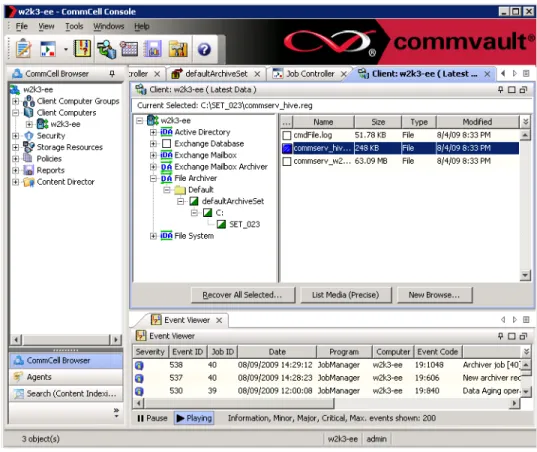
1. Use the Browse & Recover tool to select the archive set.
2. Drill down the directory structure and select files or messages from the archive set.
The process is nearly identical to recovering a file that has been backed up via a CommVault backup iDataAgent. Sufficient privileges for the CommCell Console user must exist in order to execute the retrieval request.
Archive Retrieval
Figure 5: Retrieval, Part 2
To retrieve a file or a Exchange email from a stub, open the stub file in read mode. This is usually performed by double clicking in Windows Explorer which will cause a read request to be issued on the file that has been migrated to the Data Domain system.