BEA
WebLogic
Portlets for
Groupware
Integration
™
WebLogic Exchange
Service Setup Guide
Version 3.0
Contents
1. Introduction
Prerequisites . . . 1-1 Documentation Conventions . . . 1-2
2. Installation
Installing the MAPI Subsystem . . . 2-1 Using Microsoft Exchange 2000 or 2003 System Manager . . . 2-1 Installing the WebLogic Exchange Service . . . 2-2 Installing Using Graphical-Mode Installation . . . 2-2 Installing Using Console-Mode Installation . . . 2-5 Verifying the Installation . . . 2-9
3. Configuration
Starting and Stopping the WebLogic Exchange Service . . . 3-1 Setting Process Rights . . . 3-2 Windows Domain Requirements . . . 3-2 Maintaining Application/Service Uptime . . . 3-2 Reporting a WebLogic Exchange Service Crash. . . 3-3
C H A P T E R
1
Introduction
This guide is intended for Microsoft Exchange administrators who need to install the WebLogic Exchange Service to provide connectivity from the WebLogic Portlets for Groupware Integration to Microsoft Exchange.
Note: Use of the WebLogic Exchange Service supports connecting to Microsoft
Exchange 2000 or 2003. If you are running Microsoft Exchange 2000 or 2003, you can use the WebDAV for connectivity to Microsoft Exchange; therefore, the WebLogic Exchange Service is not required to be installed.
Refer to the BEA WebLogic Portlets for Groupware Integration Setup Guide for more information on the differences between connecting to Microsoft Exchange via the WebLogic Exchange Service or via WebDAV.
This chapter contains the following sections:
z Prerequisites
z Documentation Conventions
Prerequisites
Before you install the WebLogic Exchange Service, perform the following steps:
1. The WebLogic Exchange Service installation program requires a Java run-time environment (JRE) to run. You must have an appropriate version of a Java 2 SDK installed on your system, and include the bin directory of the Java 2 SDK at the beginning of your PATH system variable.
I n t r o d u c t i o n
Note: It is important that you use an SDK because the installation process sets the JAVA_HOME and related variables to point to this directory.
2. The MAPI subsystem must be installed on the WebLogic Exchange Service machine. For more information, see Installing the MAPI Subsystem in Installation.
3. Refer to the WebLogic Portlets for Groupware Integration Supported Configurations Guide
for more information on specific platform and OS combinations of Microsoft Exchange.
Documentation Conventions
The Windows convention of “\” as a path separator is used wherever necessary. Since system software and configurations can vary from one system to another, portions of the command syntax displayed in this document may include sample parameters or variables that represent the actual command syntax you would need to enter.
Parameter Definition
BEA_HOME The location for the BEA Home directory containing the WebLogic Platform 9.2 with WebLogic Portal. For example, c:\bea.
GROUPWARE_PORTLETS_HOME The location for the WebLogic Portlets for Groupware Integration. For example, c:\bea\wlpgwi30. WEBLOGIC_EXCHANGE_SERVICE
_HOME
The location for the WebLogic Exchange Service installation. For example, c:\bea\wlpmapi43.
JAVA_HOME This location represents the full path to the Java 2 SDK directory.
C H A P T E R
2
Installation
This chapter describes how to install the MAPI subsystem and WebLogic Exchange Service.
Note: The BEA_HOME directory refers to the directory where products are installed and WEBLOGIC_EXCHANGE_SERVICE_HOME refers to the directory the WebLogic Exchange Service is installed.
This chapter contains the following sections:
z Installing the MAPI Subsystem
z Installing the WebLogic Exchange Service z Verifying the Installation
Installing the MAPI Subsystem
You can install the MAPI subsystem with the Microsoft Exchange 2000 or 2003 System Manager. Before installing the MAPI subsystem, be sure the machine satisfies the Windows Domain requirements. For more information, “Windows Domain Requirements” on page 2-2.
Using Microsoft Exchange 2000 or 2003 System Manager
Perform the following steps to install the WebLogic Exchange Service using the System Manager:1. Insert the Microsoft Exchange 2000 or 2003 Server CD.
I n s t a l l a t i o n
Note: Do not install Microsoft Exchange 5.5 Administrator. 3. Click Next and choose an installation path.
4. Click Finish to complete the installation.
5. Recommended: Install the latest Service Pack of Microsoft Exchange.
6. Set the Process Rights. For more information see “Setting Process Rights” on page 2-2.
Installing the WebLogic Exchange Service
The BEA installation program supports the following methods for installing the WebLogic Exchange Service software:
Graphical Mode
Graphical-mode installation is an interactive, GUI-based method for installing WebLogic Exchange Service. It can be run on both Windows and UNIX systems. For installation procedures, see “Installing Using Graphical-Mode Installation.”
Note: If you want to run graphical-mode installation, the console attached to the machine on which you are installing the software must support a Java-based GUI. All consoles for Windows systems support Java-based GUIs, but not all consoles for UNIX systems do. If you attempt to start the installation program in graphical mode on a system that cannot support a graphical display, the installation program automatically starts console-mode installation.
Console Mode
Console-mode installation is an interactive, text-based method for installing WebLogic Exchange Service, from the command line, on either a UNIX system or a Windows system. For instructions for using this method, see Installing Using Graphical-Mode Installation.
Installing Using Graphical-Mode Installation
Perform the following steps to install the WebLogic Exchange Service using the Graphical-Mode installation.
z Start Graphical-Mode Installation z Running the Installation Program
I n s t a l l i n g t h e W e b L o g i c E x c h a n g e S e r v i c e
Start Graphical-Mode Installation
If you are installing WebLogic Exchange Service on a Windows system that supports more than one monitor, you must disable all but one monitor before starting the installation program. To start the installation in graphical mode on a Windows system:
1. Log in to the Windows system.
2. Obtain the WebLogic Exchange Service installer. This installer is available from the WebLogic Portlets for Groupware Integration product bundle and can be found in the following directory:
GROUPWARE_PORTLETS_HOME/service/exchange_service
3. Go to the directory that contains the installation file and invoke the installation procedure by entering the following command:
java -jar wl_exchange_service_setup-43.jar
Here, wl_exchange_service_setup-43.jar is the name of the WebLogic Exchange Service installation file.
Note: To ensure that the hardware/software configuration on which you are installing the product is supported by WebLogic Exchange Service, see the WebLogic Portlets for Groupware Integration Supported Configurations Guide.
4. Proceed to Running the Installation Program.
Running the Installation Program
The installation program prompts you to enter specific information about your system and configuration. For instructions on responding to the prompts during installation, see Table 1-1.
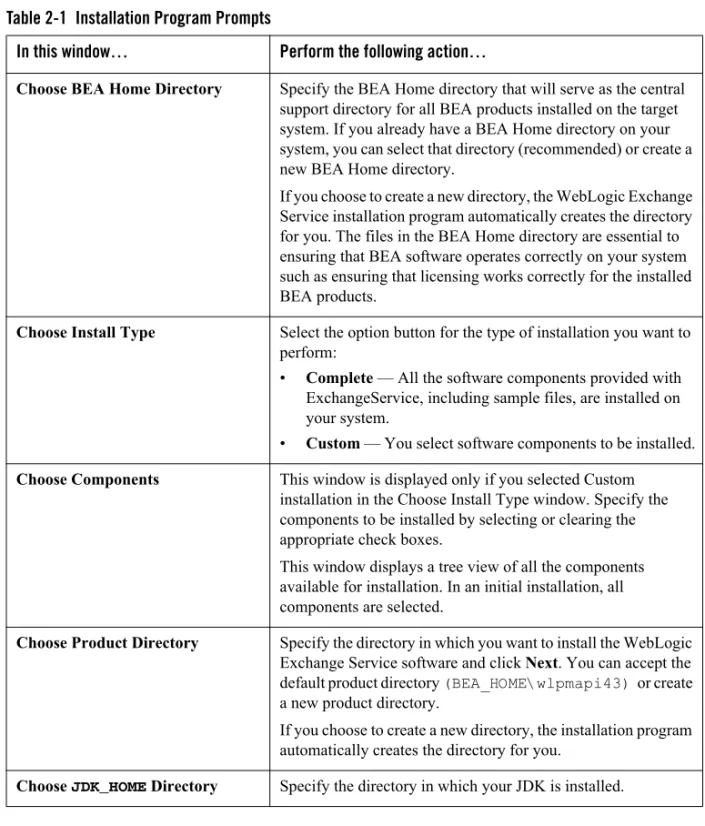
Table 2-1 Installation Program Prompts
In this window… Perform the following action…
Welcome Click Nextto proceed with the installation. You may cancel the installation at any time by clicking Exit.
BEA License Agreement Read the BEA Software License Agreement and indicate your acceptance of the terms of the agreement by selecting Yes. To continue with the installation, you must accept the terms of the license agreement and then click Next.
I n s t a l l a t i o n
Choose BEA Home Directory Specify the BEA Home directory that will serve as the central support directory for all BEA products installed on the target system. If you already have a BEA Home directory on your system, you can select that directory (recommended) or create a new BEA Home directory.
If you choose to create a new directory, the WebLogic Exchange Service installation program automatically creates the directory for you. The files in the BEA Home directory are essential to ensuring that BEA software operates correctly on your system such as ensuring that licensing works correctly for the installed BEA products.
Choose Install Type Select the option button for the type of installation you want to perform:
• Complete — All the software components provided with ExchangeService, including sample files, are installed on your system.
• Custom — You select software components to be installed. Choose Components This window is displayed only if you selected Custom
installation in the Choose Install Type window. Specify the components to be installed by selecting or clearing the appropriate check boxes.
This window displays a tree view of all the components available for installation. In an initial installation, all components are selected.
Choose Product Directory Specify the directory in which you want to install the WebLogic Exchange Service software and click Next. You can accept the default product directory (BEA_HOME\wlpmapi43) or create a new product directory.
If you choose to create a new directory, the installation program automatically creates the directory for you.
Choose JDK_HOME Directory Specify the directory in which your JDK is installed.
Table 2-1 Installation Program Prompts
I n s t a l l i n g t h e W e b L o g i c E x c h a n g e S e r v i c e
Installing Using Console-Mode Installation
Perform the following steps to install the WebLogic Exchange Service using the Console-Mode Installation. You can install on either Windows or UNIX.
z Start Console-Mode Installation on Windows z Start Console-Mode Installation on UNIX z Running the Console-Mode Installation
Start Console-Mode Installation on Windows
1. Obtain the WebLogic Exchange Service installer. This installer is available from the WebLogic Portlets for Groupware Integration product bundle and can be found in the following directory:
GROUPWARE_PORTLETS_HOME/service/exchange_service 2. Open an MS-DOS command prompt window.
3. Go to the directory that contains the installation file and invoke the installation procedure by entering the following command:
java -jar wl_exchange_service_setup-43.jar -mode=console
Here, wl_exchange_service_setup-43.jar is the name of the WebLogic Exchange Service installation file.
Note: To ensure that the hardware/software configuration on which you are installing the product is supported by WebLogic Exchange Service, see the WebLogic Portlets for Groupware Integration Supported Configurations Guide.
4. Proceed to Running the Console-Mode Installation.
Choose Shortcut Location Specify the location for the shortcuts to BEA product components.
Status Read the information displayed about BEA products and services.
Table 2-1 Installation Program Prompts
I n s t a l l a t i o n
Start Console-Mode Installation on UNIX
1. Obtain the WebLogic Exchange Service installer. This installer is available from the WebLogic Portlets for Groupware Integration product bundle and can be found in the following directory:
GROUPWARE_PORTLETS_HOME/service/exchange_service 2. Open a shell window.
3. Add the bin directory of the appropriate SDK to the beginning of the PATH variable definition on the target system. For example:
PATH=JDK_HOME/bin:$PATH export PATH
JDK_HOME represents the full path to the Java SDK directory.
4. Go to the directory that contains the installation file and invoke the installation procedure by entering the following command:
java -jar wl_exchange_service_setup-43.jar -mode=console
Here, wl_exchange_service_setup-XX.jar is the name of the WebLogic Exchange Service installation file.
Note: To ensure that the hardware/software configuration on which you are installing the product is supported by WebLogic Exchange Service, see the WebLogic Portlets for Groupware Integration Supported Configurations Guide.
5. Proceed to Running the Console-Mode Installation.
Running the Console-Mode Installation
To complete the console-mode installation process, respond to the prompts in each section by entering the number associated with your choice or by pressing Enter to accept the default. To exit the installation process, enter exit (or x, for short) in response to any prompt. To review or change your selection, enter previous (or p, for short) at the prompt. To proceed to the following window, enter next (or n, for short).
Note: The sample console text and directory pathnames in this section use Windows conventions (backslashes) for pathnames, for example C:\bea\wlpmapi43. When entering pathnames on a UNIX system, use the UNIX convention (forward slashes) in pathnames, for example, /home1/bea/wlpmapi43.
I n s t a l l i n g t h e W e b L o g i c E x c h a n g e S e r v i c e
The following procedure steps you through the installation program. Use this procedure after you have started the installation program in console mode as described in the previous sections. 1. At the Welcome prompt, type next (or n for short) or press Enter to continue with the
installation process. The BEA Systems License Agreement prompt is displayed.
2. Read the Agreement and indicate your acceptance or rejection of its terms by doing one of the following at the prompt:
z Type 1 to indicate your agreement with the terms of the license and proceed with the
installation. To review the entire agreement, press Enter or type Down several times. Type Up to scroll back through sections previously displayed.
z Type 2 if you do not agree with the terms of the license. If you type 2, the installation
process terminates.
The Choose BEA Home directory prompt is displayed.
3. Specify the BEA Home directory that will serve as the central support directory for all BEA products installed on the target system. The installation program displays the following prompt:
Choose BEA Home Directory: *BEA home choice
1¦Create a new BEA Home [C:\bea]
->2¦Use an existing BEA Home [D:\beahome1]
Enter index number to select OR [Exit][Previous][Next]>
Note: Instead of typing complete words when you want to enter [Exit], [Previous], and [Next], you can use the following one-letter shortcuts: x, p, and n, respectively.
4. Do one of the following:
z To use an existing BEA Home directory, type 2 or next (or n for short), or press Enter. If
you have more than one BEA Home directory on your system, an additional prompt will display the directories. Type the number associated with the desired BEA Home directory.
z To create a new BEA Home directory, type 1, then at the prompt, enter the full path of the
BEA Home directory, for example C:\beahome2. If you specify a directory that does not exist, the installation program creates it for you.
5. Whether you accept the existing BEA Home directory or choose to create a new BEA Home directory, you are prompted to confirm your selection, as shown in the following sample:
I n s t a l l a t i o n
Choose BEA Home Directory: ---*BEA home choice
->1¦Yes, Use this BEA home directory [C:\bea] 2¦No, return to BEA home directory selection
Enter index number to select OR [Exit][Previous][Next]>
6. On the command line, type 1 or press Enter to accept your selection. Otherwise, type 2 to return to the Choose BEA Home Directory panel where you can modify your entry.
7. After you have selected your BEA Home directory and confirmed your selection, the Choose Install Type prompt is displayed.
8. Specify the type of installation you want to perform by entering the number associated with the install type, as shown in the following text:
Choose Install Type: --->1¦Complete
2¦Custom Installation 9. Do one of the following:
z Type 1 or press Enter to choose a complete installation.
z Type 2 to choose a custom installation. The Choose Components prompt is displayed.
10. Specify the directory in which you want to install the WebLogic Exchange Service software. Select the default product directory (BEA_HOME\wlpmapi43) or create a new product directory. If you specify a new directory, the installation program automatically creates it for you. The choices displayed in this section are as follows:
Choose Product Directory:
---Product Installation Directory= [C:\bea\wlpmapi43]
Input new Product Installation Directory OR [Exit][Previous][Next]> 11. Do one of the following:
z Press Enter or type next (or n for short) to accept the current selection.
z Enter the full path to the directory in which you want to install the WebLogic Exchange
software and press Enter.
V e r i f y i n g t h e I n s t a l l a t i o n
Choose Product Directory:
--->1| Yes, use this product directory [C:\bea\wlpmapi43] 2| No, select another product directory
Enter index number to select OR [Exit][Previous][Next]>\ Verify that your entry is correct, then type 1 or press Enter to proceed with the
installation. Otherwise, type 2 to return to the Choose Product Directory panel where you can modify your entry.
12. Specify the JDK_HOME directory where your Java SDK is installed. 13. Specify the location for the shortcuts to BEA product components. 14. Press Enter or type Exit to exit the installation program.
Verifying the Installation
Perform the following steps to verify the installation:
1. Browse to Start > Settings > Control Panel > Administrative Tools > Services. 2. Confirm that the BEA WebLogic Exchange Service is installed.
What's Included
An installation of the the WebLogic Exchange Service includes the following directories:
Directory Description
WEBLOGIC_EXCHANGE_SERVICE The WebLogic Exchange Service installation files. For example,
c:\bea\wlpmapi43\exchange_service. WEBLOGIC_EXCHANGE_SERVICE\bin The WebLogic Exchange Service files and binary
executable files.
WEBLOGIC_EXCHANGE_SERVICE\lib The core WebLogic Exchange Service Java libraries including third-party components.
WEBLOGIC_EXCHANGE_SERVICE\ scripts
Scripts to facilitate starting and stopping the WebLogic Exchange Service Windows Service.
C H A P T E R
3
Configuration
This chapter describes how to configure the WebLogic Exchange Service. This chapter contains the following sections:
z Starting and Stopping the WebLogic Exchange Service z Setting Process Rights
z Windows Domain Requirements z Maintaining Application/Service Uptime z Reporting a WebLogic Exchange Service Crash
Starting and Stopping the WebLogic Exchange Service
The WebLogic Exchange Service runs as a Windows Service. You can start and stop the WebLogic Exchange Service from the Windows Control Panel or from the Windows Start Menu. This section contains the following topics:
z Starting and Stopping from the Control Panel z Starting and Stopping from the Windows Start Menu
Starting and Stopping from the Control Panel
Perform the following steps to start or stop the WebLogic Exchange Service from the Control Panel:
C o n f i g u r a t i o n
1. Browse to Start > Settings > Control Panel > Administrative Tools > Services. 2. Locate the BEA WebLogic Exchange Service.
z To start the service, right-click on the service and select Start. z To stop the service, right-click on the service and select Stop.
Starting and Stopping from the Windows Start Menu
Perform the following steps to start or stop the WebLogic Exchange Service from the Windows Start Menu:
1. Browse to Start > Programs > BEA WebLogic > Personal Messaging API > Exchange Service.
2. To start the service, select Start Service. To stop the service, select Stop Service.
Setting Process Rights
The machine that runs the WebLogic Exchange Service and the MAPI subsystem on behalf of users requires the “Act as Part of Operating System” privilege. This process actually logs the user accessing their Exchange mailbox into the Windows machine and the operating system calls required to do this needs “Act as Part of Operating System”. If WebLogic Exchange Service runs as LocalSystem (the default), no further action is required since this privilege is granted to the LocalSystem user.
To grant “Act as Part of Operating System” privilege, browse to Control Panel >
Administrative Tools > Local Security Policy > Local Policies > User Rights Assignment.
Windows Domain Requirements
The machine running the WebLogic Exchange Service must be in the same Windows domain as the Microsoft Exchange server(s), or on a Windows domain with a bidirectional trust relationship with the Microsoft Exchange Windows domain. Additionally, each user that will access their mailbox using the machine with the WebLogic Exchange Service must have “Log on Locally” rights to that machine.
Maintaining Application/Service Uptime
R e p o r t i n g a W e b L o g i c E x c h a n g e S e r v i c e C r a s h
Administrative Tools > Services > properties for the service you are running. Under the Recovery tab, set First Failure, Second Failure and Subsequent Failures to Restart the Service. You may want to set the Restart Service After time to 0 minutes, so that the service restarts immediately.
Note: In the event that the service does restart, all existing sessions will be lost.
Reporting a WebLogic Exchange Service Crash
This section includes steps to gather information to help debug a WebLogic Exchange Service crash. Provide as much of the following information when submitting your request to support:
z The contents of your Application Log in the Event Viewer – This can be obtained by
running eventvwr, right-clicking on the Application Log and choosing Save File As. Save the file in .evt format.
z What operation was being performed at the time of the crash, what mailbox was
being hit, and a PST file containing the contents of the mailbox against which the crash occurred – PST files may be exported from Outlook. This can be difficult to obtain, but given the data and a series of steps to reproduce a particular problem, support will be better able to solve any crash issue.
z The version information for cz_mapi.dll – In Windows Explorer, right click the cz_mapi.dll file and select the Version tab.
z A crash log from Java – When a crash occurs, frame information is written to an