Running COMSOL on the Amazon
™
Cloud
C o n t a c t I n f o r m a t i o n
Visit www.comsol.com/contact for a searchable list of all COMSOL offices and local representatives. From this web page, search the contacts and find a local sales
representative, go to other COMSOL websites, request information and pricing, submit technical support queries, subscribe to the monthly eNews email newsletter, and much more.
If you need to contact Technical Support, an online request form is located at
www.comsol.com/support/contact.
Other useful links include:
• Technical Support: www.comsol.com/support
• Product downloads: www.comsol.com/support/download
• Software updates: www.comsol.com/support/updates
• Online community: www.comsol.com/community
• Events, conferences, and training: www.comsol.com/events
• Tutorials: www.comsol.com/products/tutorials
• Knowledge Base: www.comsol.com/support/knowledgebase
Part No. CM020013
R u n n i n g C O M S O L o n t h e A m a z o n C l o u d
© 1998–2012 COMSOLProtected by U.S. Patents 7,519,518; 7,596,474; and 7,623,991. Patents pending.
This Documentation and the Programs described herein are furnished under the COMSOL Software License Agreement (www.comsol.com/sla) and may be used or copied only under the terms of the license agree-ment.
COMSOL, COMSOL Desktop, COMSOL Multiphysics, and LiveLink are registered trademarks or trademarks of COMSOL AB. Amazon, Amazon EC2, Amazon Elastic Compute Cloud, AWS, and EC2 are trademarks of Amazon.com, Inc. or its affiliates in the United States and/or other countries. Other product or brand names are trademarks or registered trademarks of their respective holders.
1
R u n n i n g C O M S O L
o n t h e A m a z o n ™ C l o u d
T
his guide describes how to run COMSOL on the Amazon Elastic Compute Cloud™ (Amazon EC2™).R u n n i n g C O M S O L o n t h e A m a z o n
C l o u d ( A m a z o n E C 2 )
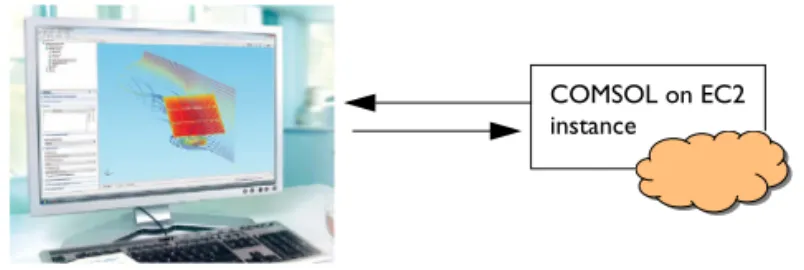
The Amazon Elastic Compute Cloud™, also known as the Amazon EC2™, allows you to dynamically allocate virtual computer resources at a small hourly fee. If you have access to a COMSOL Floating Network License (FNL), you can run one or several computations in the cloud. For this to work, the remote virtual computer in the cloud needs access to, and be able to check out, an FNL license key from an on-premise COMSOL license manager. This license manager should be running on a computer within your organization's network. In this way, the COMSOL session in the cloud is dialing back to your on-premise license manager..
This tutorial explains how to run COMSOL on the Amazon Elastic Compute Cloud (EC2™). The step-by-step instruction assume that you work from a Windows environment. Linux and Macintosh instructions, where needed, are available separately at the end of this guide.
In this section:
• Nomenclature
• Requirements
• Introduction
• Signing up for an EC2 Account and Logging In
• Launching and Using the Remote Instance
• Preparing the COMSOL License Management
• Installing COMSOL on the AMI
• Terminating the Instance
• Connecting a COMSOL Desktop GUI to a Remote Instance
• Connecting to an EC2 Instance from Linux and Macintosh without Java
• Connecting to an EC2 Instance from Linux and Macintosh without Java
The Floating Network License (FNL) option for COMSOL is required to run jobs on a remote computer or use cloud resources.
• Copying a Custom COMSOL Version to the EC2 Cloud
• Creating a Cloud Cluster Using the Starcluster Utility on Linux
• Using the Remote Access Functionality in COMSOL, using Linux
Nomenclature
These terms are used in this guide.
• EC2, Amazon Elastic Compute Cloud.
• AWS™, Amazon Web Services.
• AMI, An Amazon Machine Image is a special type of pre-configured operating system and virtual application software, which is used to create a virtual machine within the Amazon Elastic Compute Cloud (EC2). It serves as the basic unit of deployment for services delivered using EC2.
Requirements
The following requirements should be fulfilled to run COMSOL on the cloud.
• Access to a Floating Network License (FNL) of COMSOL Multiphysics 4.3a or later.
• Make sure your IT-department has configured your organization’s firewall to allow outbound traffic on port 22. This is required to access your Amazon virtual machine instance.
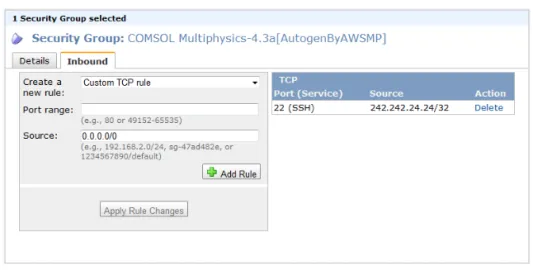
• For added security, the cloud firewall should be configured to only allow traffic to your on-site public ip address, see Figure 1-2.
Introduction
The following steps are needed to run COMSOL on EC2, and are detailed in this guide.
1 Sign up for an EC2 account.
2 Launch a remote instance (AMI).
3 Prepare the COMSOL license management.
4 Install COMSOL on the instance.
The last step is important since there is a fee charged for active instances.
Signing up for an EC2 Account and Logging In
Now create an account on Amazon.
1 Navigate to the Amazon web page http://aws.amazon.com and create an account. Then return to the account page to continue these steps.
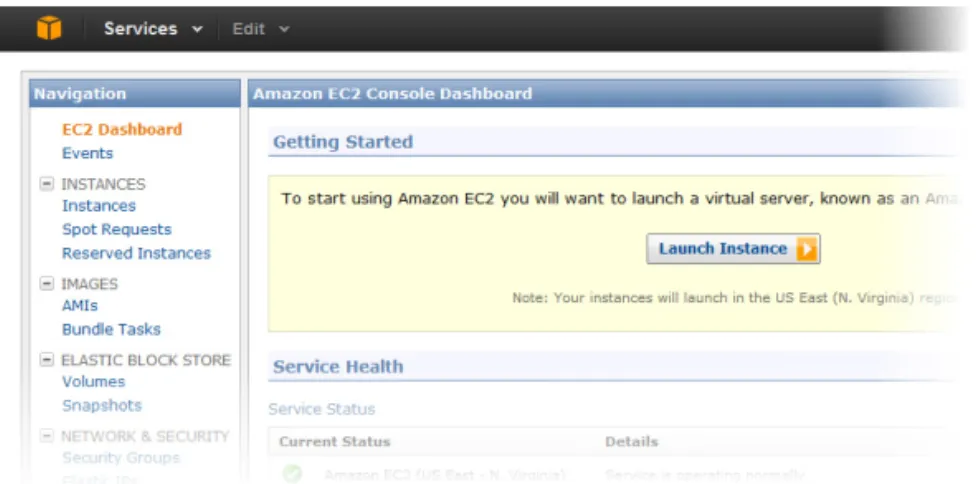
2 Select the menu My Account>AWS Management Console. Then click EC2 to get the EC2 Dashboard. you may also get there by selecting the Services>EC2 menu. This is where you will control most of your cloud activity.
Figure 1-1: EC2 Console Dashboard.
Step 4 is only needed the first time you run on EC2, since you can save the COMSOL installation between sessions, see further the section
Launching and Using the Remote Instance
S E T U P A N D P R O V I S I O N I N G
Search for COMSOL on the AWS marketplace (aws.amazon.com/marketplace). Go to the COMSOL page, which describes the base operating system and AWS products required to use COMSOL Multiphysics on EC2. Prices are also shown for the various instance types available to use. It is also required that you read the COMSOL Multiphysics End User License Agreement (EULA) at this stage. This can be accessed at the bottom of the page.
L A U N C H I N G
1 Click Continue. The EC2 launcher page shows the versions of COMSOL Multiphysics included in this AMI along with the region, instance type, firewall settings and key pair. The default instance type is High-Memory 4XL (m2.4xlarge). This instance type provides a good environment to run large simulations and/or cluster sweeps. Other instance types can be chosen if they are more suited to your application. An estimate of the charges are shown assuming this instance will run 24x7 for 1 month.
2 An autogenerated security group is provided in the Firewall Settings (Create new The best way to get updated information about launching the AMI is to follow the guide located at http://docs.amazonwebservices.com/ AWSEC2/latest/GettingStartedGuide. Also, a full set of PDF guides are located at https://aws.amazon.com/documentation/ec2/
Only some of the key steps from the online guide are detailed in this guide.
For a new user, Amazon provides micro instances free of charge (Free Usage Tier). These are useful for experimenting and verifying that everything works as expected.
You can also start the COMSOL AMI directly by clicking Launch Instance from the EC2 Dashboard as shown in Figure 1-1. Then select the AWS Marketplace Option and search for COMSOL.
your instance once running. However, you can select any security group you have defined on the EC2 Dashboard under Network&Security>Security Groups.
3 You can select the key pair you would like to use to securely connect to your instance from the Key Pair section. If you do not have any key pairs defined in the current region, you can create them from within your EC2 Dashboard, under
Network&Security>Key Pairs.
4 Click Launch with 1-click. In a few minutes your EC2 instance will be available for use.
5 For increased security, restrict access to only your public IP address. Find the Security Group under Network & Security in the EC2 Dashboard. Click your autogenerated security group and click the Inbound tab at the bottom. Select Create a New Rule: SSH. Enter your public IP address and click Add Rule and Apply Rule Changes.
Name, download and store the key in a safe place, for example in a protected working directory where it is named for example
johns_key.pem. The key can then be reused for future instances. Both the Security Groups and Key Pairs are unique per region selected.
To determine your public IP address, search Google for What is my IP-address?
Figure 1-2: Security group after successfully restricting the IP address to 242.242.24.24. To obtain the hostname of your new instance, open your EC2 Console Dashboard, select the new running instance and in the description section, the public hostname is given on the Public DNS line, for example
ec2-75-101-201-244.compute-1.amazonaws.com The username for this instance will be ec2-user.
C O N N E C T I N G T O T H E C O M S O L E C 2 I N S T A N C E
You can connect to your COMSOL EC2 instance via SSH, and transfer files via SCP. This section demonstrates how to do this in your web browser using the Java SSH Client. If you do not have Java installed, you can, however, use any SSH and SCP client you like, for example WinSCP, PuTTY, or Linux built-in SSH clients (see further
Connecting to an EC2 Instance from Linux and Macintosh without Java).
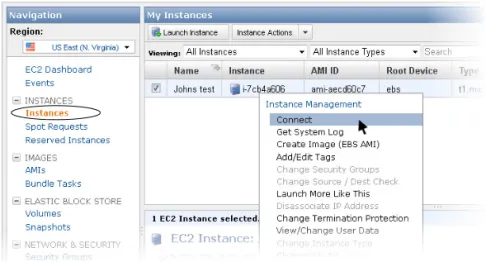
2 Right-click your instance and click Connect.
Figure 1-3: Find the instance in the dashboard. Right-click the instance and select “Connect”. A new window opens and you then select “Connect from your browser using the Java SSH Client (Java Required).”
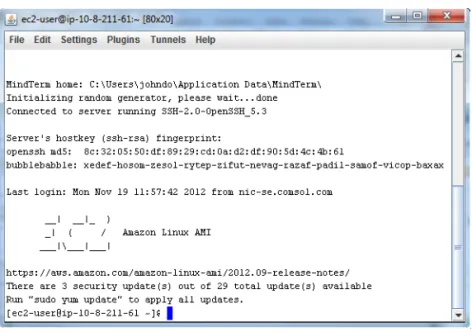
3 Select Connect from your browser using the Java SSH Client (Java Required).
- Fill in User name: ec2-user
- Fill in the private key path you defined in the Launching step.
- Click Launch SSH client.
You should now have a terminal (remote shell) up and running with access to the command prompt of the AMI.
Figure 1-4: Remote shell.
Now that you are logged in to the remote shell, you will want to work privately. Create a private directory by entering the commands:
mkdir Private chmod 700 Private
You can also confirm the resources you have using this command: df -h
T R A N S F E R I N G F I L E S
1 Transfer a small .mph file for later use. In the remote shell window, select
Plugins>SCP file transfer. In your local COMSOL installation directory, find the file models/COMSOL_Multiphysics/Equation-Based_Models/point_source.mph and transfer it to your remote Private directory by clicking the --> button.
Don’t have a local COMSOL installation? You can download it from
Figure 1-5: File transfer dialog box.
Preparing the COMSOL License Management
The COMSOL Multiphysics AMI is a “Bring Your Own License (BYOL)”. You need a valid COMSOL Multiphysics floating network license (FNL) to run the software. This license needs to be managed by a license manager running locally (on-premise). You will not be able use a license server on the EC2 instance.
Figure 1-6: Principle for License Management
To maintain high security, you need to forward TCP ports over encrypted tunnels to your on-premise license manager. This procedure is explained in the sections below.
V E R I F Y I N G T H E O N - P R E M I S E L I C E N S E S E R V E R
You need to make sure that your on-premise COMSOL license manager works before continuing.
On-premise license manager
COMSOL on EC2 instance License checks
Start the local COMSOL Desktop GUI. It should start without error messages. Check the menu Options>Licenses to verify that the license manager delivers all the add-on products you are licensed. If you have problems with this step, please contact your local COMSOL administrator.
O P E N I N G E N C R Y P T E D T U N N E L S T O T H E L I C E N S E M A N A G E R
You have already tested SSH and SCP to communicate with the remote instance. However, for the remote COMSOL installation to operate you need to also open up the appropriate encrypted tunnel ports back to your on-premise license manager from the EC2 instance.
1 Contact your local COMSOL license administrator to get the license file that was provided by your COMSOL sales representative.
2 The first few lines of the original license file should be similar to
#---# COMSOL 4.3a FNL License No: 12345678
# Visit www.comsol.com/install for latest installation instructions #---SERVER my_lic_server 012345678901 1718
USE_SERVER
VENDOR LMCOMSOL port=1719 FEATURE SERIAL...
Here, my_lic_server is the name of the on-premise COMSOL license server. You will need this name when opening the ports. The ports 1718 and 1719 are default port numbers used in all license files provided by COMSOL.
Now open the ports for the license management.
1 In the remote shell window, select the menu Tunnels>Setup, then Add
2 Enter:
- Type: Remote
- Bind address: localhost
- Bind port: 1718
- Destination: my_lic_server
Don’t have a local COMSOL installation? You can download it from
where my_lic_server is the name or ip-address of your license server in the original license.dat file, see the section Opening Encrypted Tunnels to the License Manager.
3 Click OK.
4 Repeat the steps above to add a second tunnel for port 1719, with all other settings equal. Then click OK and Dismiss.
Installing COMSOL on the AMI
Now you can proceed with the installation of COMSOL Multiphysics in the remote terminal. Enter:
cd ~/Private
1 Answer the following questions:
- Enter the installation directory: (press enter for default: /home/ec2-user/Private/comsol43a)
- Accept the license agreement (press the space bar to flip the pages until the last one, and answer yes to the question if you agree).
- Enter the path to the license file: (press enter for default: 1718@localhost) Continue with the installation by answering yes.
If you have problems with this step, go to the Troubleshooting section.
The installer installs the modules specified by your license, excluding the Model Library and documentation. A new comsol43a directory is created in your Private directory, containing the COMSOL Multiphysics installation.
V E R I F Y I N G T H E E C 2 C O M S O L I N S T A L L A T I O N
• Still standing in the Private directory, enter
comsol43a/bin/comsol batch -inputfile point_source.mph -outputfile out.mph
There should be a brief log printed in the terminal, and the prompt should be returned with no error messages.
If you get error messages starting with
Exception:
com.comsol.nativejni.FlNativeException: License error -15 Cannot connect to license server system
please refer to the Troubleshooting section.
You are now ready to run larger COMSOL jobs. Remember to transfer any results files back to your local machine before terminating the EC2 instance.
Terminating the Instance
When you are done with your session, it is recommended that you save your COMSOL installation and session configuration for later use. To do this, find the instance in the EC2 Dashboard>Instances, right click it and select Create Image (EBS AMI). When you start your next Amazon EC2 instance you will find the COMSOL installation under the Images section.
Terminate the instance by right-clicking it in the list and selecting Terminate.
When you have decided that you no longer need the instance, you can terminate it. Terminating an instance effectively deletes it. You cannot reconnect to the instance after it is terminated. This differs from stopping the instance; you are still charged for a stopped instance, and you can restart a stopped instance.
Connecting a COMSOL Desktop GUI to a Remote Instance
You can run COMSOL interactively on the cloud using a local COMSOL Desktop GUI.
Figure 1-7: Working with the COMSOL Desktop using cloud computational resources seamlessly
This can be done in two ways:
• Use the COMSOL Remote Access method. This method is based on file transfers between the local GUI and the remote instance. This is the recommended method since the COMSOL Desktop GUI performance is reliable and fast and
independently of the internet connection data throughput.
• Use the client-server architecture. This is the less recommended method since even for fairly fast internet connections, the GUI tends to be slow.
Remember, if you launched an instance in the Free Usage Tier, there are no charges. However, if you launched a regular instance, as soon as your instance starts to boot, you are billed for each hour or partial hour that the instance is kept running, even if the instance is idle. You will stop incurring charges for a regular instance as soon as the instance status changes to shutting down or terminated.
COMSOL on EC2 instance
C O N N E C T I N G U S I N G T H E R E M O T E A C C E S S M E T H O D
The COMSOL Desktop GUI needs secure connections for logging in and transferring files. On Windows, PuTTY is one tool that provides ssh and scp for this purpose. The procedure is described below. For Linux and Macintosh see Using the Remote Access Functionality in COMSOL, using Linux.
1 Install and configure PuTTY and generate keys to connect to the remote instance as described here: http://docs.amazonwebservices.com/AWSEC2/latest/ UserGuide/putty.html.
2 Shut down the connection. Restart PuTTY, and extend the settings above with specifying the tunnel ports for the COMSOL license manager. Click Connections, SSH and then Tunnels.
3 Specify Source port: 1718, Destination: my_lic_server:1718, and click the Remote radio button. Click Add. Here, my_lic_server is the name or ip address of your on-premise COMSOL license manager.
4 Repeat the same procedure for port 1719 and click Add. The result is shown below
5 Go to Session and click Save.
6 Click Open to open the connection to the remote instance. In this new PuTTY terminal you can do file management and administration while working on COMSOL jobs.
Now start COMSOL locally and use the remote access functionality in the Cluster Computing and Cluster Sweep study node.
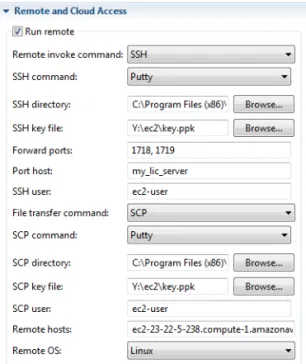
To do the following, first click the Show button ( ) in the Model Builder and select Show Advanced Study Options from the menu. Then right-click a Study node and add a Cluster Computing or Cluster Sweep node. In the Remote and Cloud Access section of the Cluster settings window, enter or select these options:
• Select the Run remote check box and choose SSH from the Remote invoke command list.
• Set SSH command to PuTTY.
• Set the SSH Directory to your local PuTTY installation, for example C:\Program Files (x86)\PuTTY
• The SSH key file is the path to your key .ppk file that you created with PuTTYgen.
• Use Forward ports to list the ports to forward for the license manager. Use comma separation, for example 1718, 1719. The Port host is the name of the local license server, for example my_lic_server.
• Set SSH User: ec2-user
• From the File transfer command list select SCP and from the SCP command list select PuTTY. Set SCP directory to the same as SSH Directory above. The SCP key file is the same as SSH key file above. SCP user is the same as SSH user above.
• Cluster Computing (Study) and Cluster Sweep in the COMSOL Multiphysics Reference Guide
• Remote Computing Preferences in the COMSOL Multiphysics User’s Guide
• In Remote hosts, enter the address to the Amazon computer, for example ec2-23-22-5-238.compute-1.amazonaws.com. Note that you can have several hosts listed, which is useful if you are running a Cluster Sweep, for example.
• Under Remote OS select Linux from the list.
Figure 1-8: An example of Remote and Cloud Access settings section. In the Batch Settings section set the following properties:
• Cluster type: Not distributed (if not).
• Select the Specify external COMSOL batch directory path check box and specify /home/ec2-user/Private
• Select the Specify external COMSOL installation directory path check box and specify /home/ec2-user/Private/comsol43a
Figure 1-9: An example of the Batch Settings section.
To save this as a default configuration, click the Save button at the top of the Cluster Computing settings window. Click the Compute button ( ) to start the computation.
C O N N E C T I N G U S I N G T H E C L I E N T - S E R V E R M E T H O D
This method is only described for reference. The previously described method,
Connecting Using the Remote Access Method is recommended before the
client-server method, due to the relative slowness of the GUI for low- to mid-range internet connections.
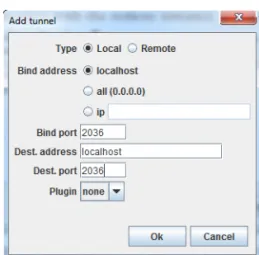
Set up the COMSOL AMI with the Java SSH as described in Installing COMSOL on the AMI. Open port 2036 for the client-server connection:
1 Select menu Tunnels>Setup, then Add...
2 Enter:
- Type: Local
- Bind address: localhost
- Bind port: 2036
- Destination: localhost
3 Click OK and Dismiss.
Figure 1-10: Port forwarding for the client-server connection.
4 In the remote shell, start a COMSOL server: comsol43a/bin/comsol server
Enter a username and a password for the client-server connection.
5 Now open a COMSOL Desktop locally and select File>Client-Server>Connect to server. Specify Server: localhost, Port: 2036. Enter the username and password just specified when the COMSOL server was started.
Connecting to an EC2 Instance from Linux and Macintosh without
Java
1 On the local Linux or Macintosh computer, use the chmod command to make sure the private key file is not publicly viewable. You cannot use the key if it is not protected. For example, if the file key is johns_key.pem, then enter:
chmod 400 johns_key.pem
2 In the Navigation area on the EC2 Dashboard, click Instances.
3 Right-click the instance and click Connect.
4 Click Connect using a standalone SSH client. AWS™ automatically detects the public DNS address of the instance and the key pair name you launched the instance with.
5 Copy the example command provided in the EC2 console.
Figure 1-11: Find the instance in the dashboard. Right-click the instance and select “Connect>Connect using and standalone SSH client” to get the command line needed to connect to the instance.
Something similar to the following displays:
Most Linux and Macintosh machines include an SSH client by default. If you do not have one, refer to the OpenSSH project, which provides a free implementation of the full suite of SSH tools. For more information, go to http://www.openssh.org.
ssh -i johns_key.pem [email protected]
D E F I N E V A R I A B L E S
To make these procedures easier, define some variables.
• Set the user:
export EC2USER=ec2-user
The default user name for a Linux AMI is always ec2-user.
• Set the address (example):
export EC2COMPUTER=ec2-23-22-243-20.compute-1.amazonaws.com Depending on the local shell, you may need to use setenv instead of export in these commands.
L O G G I N G I N T O T H E I N S T A N C E A N D C R E A T I N G A P R I V A T E D I R E C T O R Y
1 Log in to the instance using the variable names: ssh -i johns_key.pem $EC2USER@$EC2COMPUTER
2 Answer yes to the security question.
3 When you are logged in to the remote shell, it is likely you will want to work privately, so it is good practice to create a Private directory:
mkdir Private chmod 700 Private
T R A N S F E R I N G F I L E S T O T H E R E M O T E I N S T A N C E F R O M L I N U X A N D M A C I N T O S H
1 Upload a small test model for later use, found in models/COMSOL_Multiphysics/ Equation-Based_Models/point_source.mph available in your local COMSOL installation.
Enter on your local computer:
scp -i johns_key.pem \
<root>/models/COMSOL_Multiphysics/Equation-Based_Models/point_source.mph \ $EC2USER@${EC2COMPUTER}:~/Private/
Where <root> is your local COMSOL installation path, for example
Don’t have a local COMSOL installation? You can download it from
2 On the remote shell, make sure the file was transferred: ls ~/Private
V E R I F Y I N G A L O C A L C O M S O L I N S T A L L A T I O N O N L I N U X
You need to test your local COMSOL license server before proceeding.
If you have access to a graphical display, start the COMSOL Desktop. It should start without error messages. From the menu Options>Licenses, verify that the license manager delivers all the add-on products expected based on your COMSOL configuration.
If you only have access to a Linux terminal without graphics, then:
1 Log in to a local Linux computer.
2 Copy the point_source.mph file to a local Linux working directory.
point_source.mph is a small mph file included in the COMSOL Model Library. It is in the COMSOL installation directory under
models/COMSOL_Multiphysics/Equation-Based_Models/point_source.mph
3 After copying the file, enter:
comsol batch -inputfile point_source.mph -outputfile point_out.mph A log message on standard output should report the solving and saving of the file without error messages.
I N S T A L L I N G A N D T E S T I N G C O M S O L O N T H E E C 2 I N S T A N C E
Now you can proceed with the installation of COMSOL Multiphysics in the remote instance. You have already tested SSH and SCP to communicate with the remote instance. However, for the remote COMSOL installation to operate you need to also open up the appropriate encrypted tunnel ports back to your on-premise license manager from the EC2 instance. Before continuing, make sure you have tested the on-premise license manager as described in the section Connecting to an EC2 Instance from Linux and Macintosh without Java.
Don’t have a local COMSOL installation? You can download it from
1 Use SSH to forward the ports for SERVER and VENDOR from the on-premise COMSOL license server to the remote server. Therefore, exit the remote connection and reconnect:
exit
ssh -i johns_key.pem -R 1718:my_lic_server:1718 \ -R 1719:my_lic_server:1719 $EC2USER@$EC2COMPUTER
Here, my_lic_server is the name of your on-premise license server.
2 Install COMSOL: cd ~/Private
/usr/local/comsol43a_dvd/setup ami Answer the following questions:
- Enter the installation directory: (press enter for default: /home/ec2-user/Private/comsol43a)
- Accept the license agreement (press the space bar to flip the pages until the last one, and answer yes to the question if you agree).
- Enter the path to the license file: (press enter for default: 1718@localhost) Continue with the installation by answering yes.
If you have problems with this step, go to the Troubleshooting section.
The installer installs the modules specified by your license, excluding the Model Library and documentation. A new comsol43a directory is created in your Private directory, containing the COMSOL Multiphysics installation.
3 Run the previously uploaded point_source.mph model in the remote shell:
cd ~/Private
comsol43a/bin/comsol batch -inputfile point_source.mph -outputfile out.mph
If everything works correctly, a log message on standard output displays a brief report of the solving and saving of a model without any error messages.
If you have problems with this step, go to the Troubleshooting section.
Copying a Custom COMSOL Version to the EC2 Cloud
If you work on Windows, you have to upload the entire COMSOL DVD to the EC2 instance and then make a Linux installation, then add the line:
MKL_DYNAMIC=FALSE to ~/.bashrc
This is, however, both time consuming and costly due to Amazon transfer charges. It is recommended that a local Linux installation is made and only the parts that are needed are uploaded for the computations:
1 Install COMSOL locally, then find the installation directory and make a zipped copy. If the COMSOL root is /usr/local/comsol43a, enter:
cd /usr/local
zip -r ~/comsol.zip comsol43a -x comsol43a/doc/\* comsol43a/models/\*
2 Copy the zipped COMSOL installation from the local computer to the remote computer:
scp -i johns_key.pem ~/comsol.zip \ $EC2USER@${EC2COMPUTER}:~/Private/
3 Also copy the small example mph file:
scp -i johns_key.pem point_source.mph \ $EC2USER@${EC2COMPUTER}:~/Private/
4 On the remote computer, unzip the file: cd ~/Private
unzip -q comsol.zip
5 Add the line: “export MKL_DYNAMIC=FALSE” to the file .bashrc in the remote shell by the command:
echo export MKL_DYNAMIC=FALSE >> ~/.bashrc
If you want to use another COMSOL version than those available in the EC2 Marketplace (see Setup and Provisioning), or if you use the Starcluster utility, you need to upload the entire COMSOL installation to Amazon yourself. It is suggested that you create a .zip file of the local COMSOL installation and transfer it to the remote instance. To make the zip file as small as possible, skip the models and doc directories, which are located in the COMSOL installation root directory. There may be transfer costs involved in copying data to and from the instance.
Creating a Cloud Cluster Using the Starcluster Utility on Linux
The StarCluster tool simplifies the creation of a cluster on Amazon and can be used to run COMSOL in cluster mode. Follow the instruction on the Starcluster site to install Starcluster on your local computer.
1 Install StarCluster according to the web page.
2 Set up the StarCluster config file by giving the command starcluster help and choosing the Create config file option.
3 When editing the config file, make sure that the NODE_IMAGE_ID= setting corresponds to the x86_64 64-bit Amazon machine image.
4 For added security it is recommended that you uncomment PERMISSIONS and that PERMISSIONS=ssh is set. Also, uncomment the [permission ssh] section setting and set CIDR_IP to your IP-address.
5 Fill out the fields in the AWS Credentials and Connection Settings section. The values for WS_ACCESS_KEY_ID and AWS_SECRET_ACCESS_KEY can be found in the User>Security Credentials section of the EC2 dashboard.
6 Use the command starcluster createkey to create a key with the same name and filename as in the config file.
Continue by installing COMSOL on the preconfigured smallcluster example cluster using the starcluster command. Either use spot instances or pay the full computer price. Note that you may lose your nodes after some time if you bid too low.
1 To find out the spot history enter:
starcluster spothistory m1.small -d 5
2 Start the cluster with:
StarCluster is an open source cluster-computing toolkit for Amazon’s Elastic Compute Cloud (EC2). StarCluster has been designed to automate and simplify the process of building, configuring, and managing clusters of virtual machines on Amazon’s EC2 cloud. StarCluster allows anyone to easily create a cluster computing environment in the cloud suited for distributed and parallel computing applications and systems. It is maintained by the MIT star project, and can be found at http:// star.mit.edu/cluster.
{optional --bid {your bid here}} For example:
starcluster start -c smallcluster smallcomsol --bid 0.20
This command also lists the address of the master node. You should now see the two instances on the EC2 dashboard, under Instances. Make sure to select the right Region.
Also, when the cluster is started you can list it with: starcluster lc
This lists information including, for example:
Cluster nodes:
master running i-e7789c9a ec2-184-72-201-244.compute-1.amazonaws.com node001 running i-5549ad28 ec2-54-242-55-117.compute-1.amazonaws.com (spot sir-e098c414)
Total nodes: 2
3 Now set the following:
export EC2USER=sgeadmin
export EC2COMPUTER=ec2-184-72-201-244.compute-1.amazonaws.c
U P L O A D C O M S O L T O T H E C L U S T E R A N D T E S T I T
1 Create a Private directory
ssh -i ~/.ssh/mykey.rsa $EC2USER@$EC2COMPUTER
Answer yes to the security question. When you are logged in to the remote shell: mkdir Private
chmod 700 Private
2 Upload COMSOL to the cluster. Remember the key name you just generated for the cluster. The command could look like:
scp -i ~/.ssh/mykey.rsa comsol.zip $EC2USER@${EC2COMPUTER}:~/Private
3 In order to test the cluster you need to have access to the license server from all nodes when you log into the master.
On your local computer, enter:
starcluster sshmaster smallcomsol \
"echo GatewayPorts yes >> /etc/ssh/sshd_config"
Use the comsol.zip you created in the step Copying a Custom COMSOL Version to the EC2 Cloud.
starcluster sshmaster smallcomsol "service ssh restart"
This tells the master that it should forward the ports from the remote cluster nodes.
4 Log in to the master node (see also Copying a Custom COMSOL Version to the EC2 Cloud):
ssh -i ~/.ssh/mykey.rsa -R 1718:my_lic_server:1718 \ -R 1719:my_lic_server:1719 $EC2USER@$EC2COMPUTER
Prepare the license file for the cluster, which is the same procedure as Copying a Custom COMSOL Version to the EC2 Cloud. Then change localhost to master in the license.dat file on the remote master. See example below:
SERVER master ANY 1718 USE_SERVER
VENDOR LMCOMSOL port=1719
5 COMSOL is ready to be tested on the master node. First upload a small test model, for example, the point_source.mph file (see Copying a Custom COMSOL Version to the EC2 Cloud).
6 Enter the bin directory in the remote COMSOL installation and enter the following:
./comsol batch -inputfile ~/Private/point_source.mph
COMSOL should now open normally. Solving and saving the model should work without any error messages.
R U N N I N G C O M S O L I N D I S T R I B U T E D M O D E
You can now run COMSOL in distributed mode on the cluster.
1 Enter the names of the hosts in a hostfile: cat > ~/hostfile
master node001
2 Press the return key and press Ctrl+D.
3 Since the cluster is not backed by Infiniband, the following command tells COMSOL to use tcp instead.
comsol -nn 2 -f ~/hostfile -mpifabrics tcp batch -inputfile \ ~/Private/point_source.mph
COMSOL should now start up on both master and node001 and be able to perform the simulation.
You are now prepared to start a larger cluster and run COMSOL on it using the same technique.
Using the Remote Access Functionality in COMSOL, using Linux
Once a remote instance or cluster is created, the local COMSOL Desktop can be used to initiate simulations on Amazon. This is done through the remote access
functionality in the Cluster Computing and Cluster Sweep study node.
To do the following, first click the Show button ( ) in the Model Builder and select Show Advanced Study Options from the menu. Then right-click a Study node and add a Cluster Computing or Cluster Sweep node. In the Remote and Cloud Access section of the Cluster settings window, enter or select these options as shown:
• Check boxes to Run remote and set Remote invoke command to SSH.
• Set SSH command to SSH (or PuTTY or User) and possibly set SSH directory if needed.
• The SSH key file is the path to your key file.
• You can use Forward ports to list the ports to forward and the name of the Port host in order to forward the license request. As an alternative you can have an SSH connection running that forwards the ports. See Copying a Custom COMSOL Version to the EC2 Cloud.
Remember to terminate the cluster once you are done, since you are billed until it is stopped or terminated.
The remote access functionality requires COMSOL 4.3a or later.
• Cluster Computing (Study) and Cluster Sweep in the COMSOL Multiphysics Reference Guide
• Remote Computing Preferences in the COMSOL Multiphysics User’s Guide
• Set the File transfer command to SCP and set SCP command to SCP (or PuTTY or User), and possibly SCP directory if needed. The SCP key file is the path to your key file.
• In Remote hosts, name the address to the Amazon computer. Note that you can have several hosts listed, which is useful if you are running a Cluster Sweep for example.
• Under Remote OS set Linux or possibly Native if you are running Linux.
Figure 1-12: Cluster settings in the user interface, Remote and Cloud Access section.
• Under Batch settings enable the Specify external COMSOL batch directory path and Specify external COMSOL installation directory path settings and set the paths to the remote COMSOL installation directory and the directory where you want to save your work in (for example, Private). Depending on whether you are running a
cluster simulation or a simple batch job, set Cluster type to General or Not distributed. For a cluster you must also point to the Host file.
• For the Starcluster functionality, open Options>Preferences>Cluster Computing and enter the following in Postpend command: and click Save.
-mpifabrics tcp
Figure 1-13: Cluster settings in the user interface, Batch Settings section.
You are now ready to compute the solution by clicking the Compute ( ) button. Click the Save as default button to save these settings for future use.
Cluster Computing Preferences in the COMSOL Multiphysics User’s Guide
Finish your session by entering starcluster terminate smallcomsol in your local Linux shell. Alternatively, go to the EC2 console and right click each node and select Terminate.
Troubleshooting
• Problem 1: The installation of COMSOL on the remote instance stalls or gives error messages after specifying license manager 1718@localhost.
- Solution 1: Your COMSOL system administrator has changed the default ports 1718 and 1719 in the COMSOL license server. Change the port forwarding to the new port numbers, see further Preparing the COMSOL License
Management.
- Solution 2: You have set the incorrect license server name in the port forwarding step Preparing the COMSOL License Management. Double check the server name with your COMSOL license administrator.
- Solution 3: Try creating a license file manually on the remote instance:
Providing you use default ports, the license.dat file for the EC2 instance should contain only the three lines:
SERVER localhost ANY 1718 USE_SERVER
VENDOR LMCOMSOL port=1719
You can create this file in the remote shell (see Figure 1-4) with the following commands
cd ~/Private cat > license.dat
SERVER localhost ANY 1718 USE_SERVER
VENDOR LMCOMSOL port=1719
then press Ctrl+D. You can also use the nano editor in the remote shell to create the file, or create it locally and transfer it to the remote instance as described in
Transfering Files. Now reinstall COMSOL in the remote instance, and point to the license.dat file when prompted for license information.
• Problem 2: When verifying the remote COMSOL installation, error messages are shown.
- The ports forwarding to the license server is incorrect. See solution to Problem 1 above.