Symantec™ Endpoint Protection Evaluation Guide
The software described in this book is furnished under a license agreement and may be used only in accordance with the terms of the agreement.Documentation version 11.00.02.00.00
Legal Notice
Copyright © 2008 Symantec Corporation. All rights reserved.
Symantec, the Symantec Logo, LiveUpdate, Sygate, Symantec AntiVirus, Bloodhound, Confidence Online, Digital Immune System, Norton, and TruScan are trademarks or registered trademarks of Symantec Corporation or its affiliates in the U.S. and other countries. Other names may be trademarks of their respective owners.
This Symantec product may contain third party software for which Symantec is required to provide attribution to the third party (“Third Party Programs”). Some of the Third Party Programs are available under open source or free software licenses. The License Agreement accompanying the Software does not alter any rights or obligations you may have under those open source or free software licenses. Please see the Third Party Legal Notice Appendix to this Documentation or TPIP ReadMe File accompanying this Symantec product for more information on the Third Party Programs.
The product described in this document is distributed under licenses restricting its use, copying, distribution, and decompilation/reverse engineering. No part of this document may be reproduced in any form by any means without prior written authorization of Symantec Corporation and its licensors, if any.
THE DOCUMENTATION IS PROVIDED "AS IS" AND ALL EXPRESS OR IMPLIED CONDITIONS, REPRESENTATIONS AND WARRANTIES, INCLUDING ANY IMPLIED WARRANTY OF MERCHANTABILITY, FITNESS FOR A PARTICULAR PURPOSE OR NON-INFRINGEMENT, ARE DISCLAIMED, EXCEPT TO THE EXTENT THAT SUCH DISCLAIMERS ARE HELD TO BE LEGALLY INVALID. SYMANTEC CORPORATION SHALL NOT BE LIABLE FOR INCIDENTAL OR CONSEQUENTIAL DAMAGES IN CONNECTION WITH THE FURNISHING,
PERFORMANCE, OR USE OF THIS DOCUMENTATION. THE INFORMATION CONTAINED IN THIS DOCUMENTATION IS SUBJECT TO CHANGE WITHOUT NOTICE.
The Licensed Software and Documentation are deemed to be commercial computer software as defined in FAR 12.212 and subject to restricted rights as defined in FAR Section 52.227-19 "Commercial Computer Software - Restricted Rights" and DFARS 227.7202, "Rights in Commercial Computer Software or Commercial Computer Software Documentation", as applicable, and any successor regulations. Any use, modification, reproduction release, performance, display or disclosure of the Licensed Software and Documentation by the U.S. Government shall be solely in accordance with the terms of this Agreement.
http://www.symantec.com
Printed in the United States of America. 10 9 8 7 6 5 4 3 2 1
Technical Support
Symantec Technical Support maintains support centers globally. Technical Support’s primary role is to respond to specific queries about product features and functionality. The Technical Support group also creates content for our online Knowledge Base. The Technical Support group works collaboratively with the other functional areas within Symantec to answer your questions in a timely fashion. For example, the Technical Support group works with Product Engineering and Symantec Security Response to provide alerting services and virus definition updates.
Symantec’s maintenance offerings include the following:
■ A range of support options that give you the flexibility to select the right amount of service for any size organization
■ Telephone and Web-based support that provides rapid response and up-to-the-minute information
■ Upgrade assurance that delivers automatic software upgrade protection ■ Global support that is available 24 hours a day, 7 days a week
■ Advanced features, including Account Management Services
For information about Symantec’s Maintenance Programs, you can visit our Web site at the following URL:
www.symantec.com/techsupp/
Contacting Technical Support
Customers with a current maintenance agreement may access Technical Support information at the following URL:
www.symantec.com/techsupp/
Before contacting Technical Support, make sure you have satisfied the system requirements that are listed in your product documentation. Also, you should be at the computer on which the problem occurred, in case it is necessary to replicate the problem.
When you contact Technical Support, please have the following information available:
■ Product release level ■ Hardware information
■ Available memory, disk space, and NIC information ■ Operating system
■ Router, gateway, and IP address information ■ Problem description:
■ Error messages and log files
■ Troubleshooting that was performed before contacting Symantec ■ Recent software configuration changes and network changes
Licensing and registration
If your Symantec product requires registration or a license key, access our technical support Web page at the following URL:
www.symantec.com/techsupp/
Customer service
Customer service information is available at the following URL: www.symantec.com/techsupp/
Customer Service is available to assist with the following types of issues: ■ Questions regarding product licensing or serialization
■ Product registration updates, such as address or name changes
■ General product information (features, language availability, local dealers) ■ Latest information about product updates and upgrades
■ Information about upgrade assurance and maintenance contracts ■ Information about the Symantec Buying Programs
■ Advice about Symantec's technical support options ■ Nontechnical presales questions
Maintenance agreement resources
If you want to contact Symantec regarding an existing maintenance agreement, please contact the maintenance agreement administration team for your region as follows:
[email protected] Asia-Pacific and Japan
[email protected] Europe, Middle-East, and Africa
[email protected] North America and Latin America
Additional enterprise services
Symantec offers a comprehensive set of services that allow you to maximize your investment in Symantec products and to develop your knowledge, expertise, and global insight, which enable you to manage your business risks proactively. Enterprise services that are available include the following:
These solutions provide early warning of cyber attacks, comprehensive threat analysis, and countermeasures to prevent attacks before they occur. Symantec Early Warning Solutions
These services remove the burden of managing and monitoring security devices and events, ensuring rapid response to real threats.
Managed Security Services
Symantec Consulting Services provide on-site technical expertise from Symantec and its trusted partners. Symantec Consulting Services offer a variety of prepackaged and customizable options that include assessment, design, implementation, monitoring, and management capabilities. Each is focused on establishing and maintaining the integrity and availability of your IT resources. Consulting Services
Educational Services provide a full array of technical training, security education, security certification, and awareness communication programs. Educational Services
To access more information about Enterprise services, please visit our Web site at the following URL:
www.symantec.com
Technical Support
... 4Chapter 1
Introducing Symantec Endpoint Protection
... 11Introduction to Symantec Endpoint Protection ... 11
About Symantec Endpoint Protection ... 12
About Network Threat Protection ... 13
About Proactive Threat Protection ... 14
About Antivirus and Antispyware Threat Protection ... 14
About Symantec ... 15
Chapter 2
Installing Symantec Endpoint Protection
... 17System installation requirements ... 17
Symantec Endpoint Protection Manager, Console, and database ... 17
Symantec Endpoint Protection Manager and Console ... 19
Symantec Endpoint Protection Console ... 20
Symantec Endpoint Protection ... 22
Installation process overview ... 23
About Desktop firewalls and communications ports ... 24
Installing and configuring Symantec Endpoint Protection Manager ... 27
Installing Symantec Endpoint Protection Manager with an embedded database ... 30
Installing Symantec Endpoint Protection Manager with a Microsoft SQL database ... 30
Logging on to the Symantec Endpoint Protection Manager Console ... 42
Chapter 3
Configuring your product after installation
... 43Setting up the organizational structure and updating content ... 43
Adding a group ... 44
About importing the organizational structure ... 45
Adding clients as users or as computers ... 45
Adding an administrator account ... 48
About LiveUpdate Policies ... 49
Configuring a LiveUpdate Settings Policy ... 50
Configuring a LiveUpdate Content Policy ... 51
Chapter 4
Creating policies
... 53About policies ... 53
Evaluating policies ... 55
Adding a shared policy ... 56
Assigning a shared policy ... 57
Updating the policy file manually ... 58
Verifying that policies have been updated ... 58
Setting up and testing an Antivirus and Antispyware Policy ... 59
About Antivirus and Antispyware Policies ... 60
About the preconfigured Antivirus and Antispyware Policies ... 61
Adding scheduled scans to an Antivirus and Antispyware Policy ... 62
Configuring actions for known virus and security risk detections ... 63
About notification messages on infected computers ... 64
Customizing and displaying notifications on infected computers ... 65
Testing to see that the Antivirus and Antispyware Policy works ... 67
About TruScan proactive threat scans ... 67
About using the Symantec default settings ... 68
About the processes that TruScan proactive threat scans detect ... 69
About managing false positives detected by TruScan proactive threat scans ... 70
About the processes that TruScan proactive threat scans ignore ... 72
Understanding TruScan proactive threat detections ... 73
Setting up and testing a Firewall Policy ... 76
About firewall rules ... 77
Creating a Firewall Policy to allow or block an application ... 78
Testing the Firewall Policy ... 79
Setting up and testing a custom IPS library ... 80
About custom IPS signatures ... 80
About creating custom IPS signatures to detect an attempt to download MP3 files ... 82
Creating custom IPS signatures ... 84
Contents 8
Testing the custom IPS signature ... 88
Setting up and testing an Application and Device Control Policy ... 89
Enabling a default application control rule set ... 90
Creating a new application control rule set and adding a new rule to the set ... 91
About device control ... 99
About hardware devices ... 100
Obtaining a class ID or device ID ... 101
Adding a hardware device to the Hardware Devices list ... 101
Configuring device control for an Application and Device Control Policy ... 102
Chapter 5
Creating client installation packages
... 105Creating client installation packages ... 105
About client installation packages ... 106
Configuring installation package features ... 106
Configuring client installation package settings ... 107
Exporting client installation packages ... 107
Deploying client software with the Push Deployment Wizard ... 109
Chapter 6
Configuring Host Integrity for endpoint
compliance
... 111Setting up and testing a Host Integrity Policy ... 111
Adding Host Integrity requirements ... 113
Adding a predefined firewall requirement ... 115
Adding a custom requirement that checks whether the client computer runs an antivirus software package ... 116
Testing to see if the Host Integrity Policy works ... 117
Running a Host Integrity check ... 118
Viewing the Network Access Control logs ... 118
Configuring peer-to-peer authentication ... 119
Chapter 7
Using logs and reports to monitor security
... 121About logs and reports ... 121
About the Symantec Endpoint Protection Home page ... 122
About logs ... 127
About log types, contents, and commands ... 128
Viewing logs ... 133
Displaying event details in logs ... 135
Viewing logs from other sites ... 135
Using notifications ... 139
Viewing and filtering administrator notification information ... 139
Threshold guidelines for administrator notifications ... 140
Creating administrator notifications ... 141
About editing existing notifications ... 145
Creating quick reports ... 145
Contents 10
Introducing Symantec
Endpoint Protection
This chapter includes the following topics: ■ Introduction to Symantec Endpoint Protection ■ About Symantec Endpoint Protection
■ About Symantec
Introduction to Symantec Endpoint Protection
Symantec Endpoint Protection provides a single, integrated security solution that protects against the sophisticated attacks that evade traditional security measures. Symantec Endpoint Protection proactively secures endpoints against known and unknown threats by combining antivirus technology with advanced threat prevention.
In a single unit, managed from a single management console, it contains the following essential security technologies:
■ Antivirus and antispyware ■ Desktop firewall
■ Intrusion prevention system (IPS) ■ Application control and device control
It offers proven world-class protection in a single package to reduce overhead, time, and costs. Companies can efficiently manage security and gain the confidence that their assets and business are protected.
Symantec Endpoint Protection offers the following benefits:
1
Chapter
■ Provides better protection at the client level.
Multiple integrated security technologies provide better protection for all clients in a corporate network that includes remote users and laptops, with multiple integrated security technologies.
■ Simplifies the management.
Multiple security components are managed centrally. Central management provides administrators with a comprehensive security view for the client and simplifies overall security management. An integrated solution with centralized management and response allows customers to see a more comprehensive view of the client level. This solution responds quickly to outbreaks by retrieving and deploying integrated updates from a centralized management console.
■ Enables a quicker response time.
Central management of integrated antivirus and antispyware, firewall, and intrusion prevention gives administrators the ability to respond quickly against multiple types of security threats.
■ Reduces the support costs.
All security components at the client level are from a single security vendor, which is less expensive than managing several security products from multiple vendors. Since all components are from a single vendor and can be installed, updated, and reported on from same place, Symantec Endpoint Protection eliminates cross-vendor interoperability issues.
Symantec Endpoint Protection is available through the Symantec network of corporate resellers and national distributors.
About Symantec Endpoint Protection
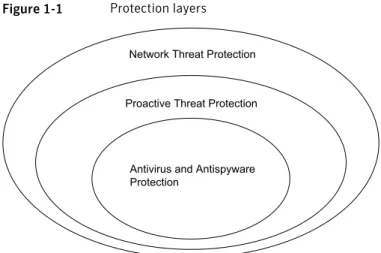
Symantec Endpoint Protection protects endpoint computing devices from virus threats and risks, and provides three layers of protection to your endpoint computing devices. The layers are Network Threat Protection, Proactive Threat Protection, and Antivirus and Antispyware Protection.
Introducing Symantec Endpoint Protection
About Symantec Endpoint Protection
Figure 1-1 Protection layers
Network Threat Protection
Proactive Threat Protection
Antivirus and Antispyware Protection
Network Threat Protection blocks threats from your computer by using rules and signatures. Proactive Threat Protection identifies and mitigates the threats that are based on the threat's behavior. Antivirus and Antispyware Protection identifies and mitigates the threats that try to or have gained access to your computers by using the signatures that Symantec creates.
About Network Threat Protection
Network Threat Protection consists of firewall and intrusion prevention software to protect your endpoint computing devices. The firewall supports the rules that are written for both specific ports and specific applications, and uses stateful inspection of all network traffic. Therefore, for all network traffic that is client-initiated, you only have to create an outbound rule to support that traffic. Stateful inspection automatically permits the return traffic that responds to the outbound traffic.
The firewall provides full support for TCP, UDP, ICMP, and all IP protocols such as ICMP and RSVP. The firewall also supports Ethernet and Token Ring protocols, and can block protocol drivers such as VMware and WinPcap. The firewall can automatically recognize legitimate DNS, DHCP, and WINS traffic, so you can check a check box to permit this traffic without writing rules.
Note:Symantec assumes that you construct your firewall rules such that all traffic that is not permitted is denied. The firewall does not support IPv6.
The intrusion prevention engine supports checking for port scans and
denial-of-service attacks, and protects against buffer overflow attacks. This engine also supports the automatic blocking of malicious traffic from infected computers.
The intrusion detection engine supports deep packet inspection, regular expressions, and lets you create custom signatures.
About Proactive Threat Protection
Proactive Threat Protection identifies threats, such as worms, viruses, Trojan horses, and programs that log keystrokes based on the behavior of processes on the computer. TruScan proactive threat scans identify these threats by their actions and characteristics, not by traditional security signatures. Proactive threat scans analyze the threat's behavior against hundreds of detection modules to determine whether the active processes are safe or malicious. This technology can immediately detect and mitigate the unknown threats by their behavior without traditional signatures or patches.
On supported 32-bit operating systems, Proactive Threat Protection also lets you control read, write, and execute access to hardware devices, files, and registry keys. If necessary, you can refine the control to specific, supported operating systems. You can also block peripheral devices by class ID such as USB, Bluetooth, infrared, FireWire, serial, parallel, SCSI, and PCMCIA.
About Antivirus and Antispyware Threat Protection
Antivirus and Antispyware Threat Protection prevents infections on computers by scanning the boot sector, memory, and files for viruses, spyware, and security risks. Antivirus and Antispyware Threat Protection uses the virus and the security risk signatures that are found in virus definitions files. This protection also protects your computers by blocking security risks before they can install if doing so would not leave the computer in an unstable state.
Antivirus and Antispyware Threat Protection includes Auto-Protect, which detects viruses and security risks when they try to access memory or install themselves. Auto-Protect also scans for security risks such as adware and spyware. When it finds security risks, it quarantines the infected files, or removes and repairs the side effects of the security risks. You can also disable scanning for security risks in Auto-Protect. Auto-Protect can repair complicated risks, such as sheathed user mode risks (rootkits). Auto-Protect can also repair the persistent security risks that are difficult to remove or that reinstall themselves.
Antivirus and Antispyware Threat Protection also includes Auto-Protect scanning for Internet email programs by monitoring all POP3 and SMTP traffic. You can configure Antivirus and Antispyware Threat Protection to scan incoming messages for threats and security risks, as well as outgoing messages for known heuristics. Scanning outgoing email helps to prevent the spread of threats such as worms that can use email clients to replicate across a network.
Introducing Symantec Endpoint Protection
About Symantec Endpoint Protection
Note:Auto-Protect for Web-based Internet email programs is blocked from installation on server-based operating systems. For example, you cannot install this feature on Windows Server 2003.
About Symantec
Symantec is a global leader in infrastructure software. Symantec enables businesses and consumers to have confidence in a connected world. The company helps customers protect their infrastructure, information, and interactions by delivering software and the services that address risks to security, availability, compliance, and performance. Headquartered in Cupertino, Calif., Symantec has operations in more than 40 countries. More information is available at the following URL:
Introducing Symantec Endpoint Protection
About Symantec
Installing Symantec
Endpoint Protection
This chapter includes the following topics: ■ System installation requirements ■ Installation process overview
■ About Desktop firewalls and communications ports
■ Installing and configuring Symantec Endpoint Protection Manager ■ Logging on to the Symantec Endpoint Protection Manager Console
System installation requirements
Symantec software requires specific protocols, operating systems and service packs, software, and hardware. All computers to which you install Symantec software should meet or exceed the recommended system requirements for the operating system that is used.
Note:Installation to or from the directory names that contain double-byte characters is not supported.
Symantec Endpoint Protection Manager, Console, and database
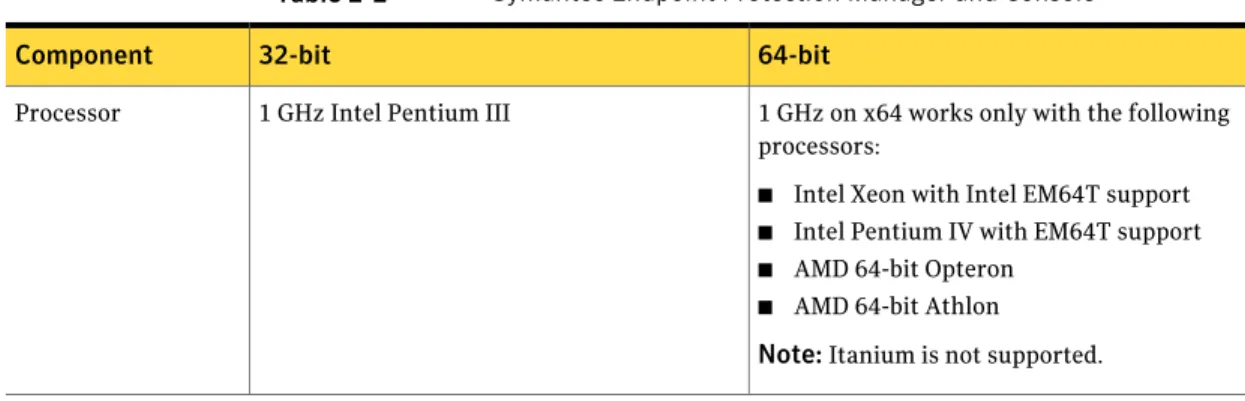
Table 2-1lists the minimum requirements for the computers on which to install the Symantec Endpoint Protection Manager and Console, and the database.
2
Chapter
Table 2-1 Symantec Endpoint Protection Manager, Console, and database 64-bit
32-bit Component
1 GHz on x64 works only with the following processors:
■ Intel Xeon with Intel EM64T support
■ Intel Pentium IV with EM64T support
■ AMD 64-bit Opteron
■ AMD 64-bit Athlon
Note:Itanium is not supported. 1 GHz Intel Pentium III
Processor
The following operating systems are supported:
■ Windows XP Professional x64 Edition with Service Pack 1 or later
■ Windows Server 2003 Standard x64 Edition/Enterprise x64 Edition/Datacenter x64 Edition with Service Pack 1 or later
■ Windows Compute Cluster Server 2003
■ Windows Storage Server 2003
Note:If you use Microsoft Clustering services for the Symantec Endpoint Protection Manager server, you must install the Symantec Endpoint Protection Manager on the local volume.
The following operating systems are supported:
■ Windows 2000 Server/Advanced Server/Datacenter Server/Small Business Server with Service Pack 3 or later
■ Windows XP Professional with Service Pack 1 or later
Note:Windows XP supports a limited number of concurrent users if the clients are in "push" mode. Use "pull" mode on Windows XP servers for up to 100 clients. For more information, search for Symantec
Endpoint Protection Manager 11.x communication troubleshooting on the
Symantec Support Web Site.
■ Windows Server 2003 Standard Edition/Enterprise Edition/Datacenter Edition/Storage Edition/Web Edition/ Small Business Server
Operating system
1 GB RAM minimum (2-4 GB recommended) 1 GB RAM minimum (2-4 GB recommended)
Memory
4 GB for the server, plus an additional 4 GB for the database
4 GB for the server, plus an additional 4 GB for the database
Hard disk
Super VGA (1,024x768) or higher resolution video adapter and monitor
Super VGA (1,024x768) or higher resolution video adapter and monitor
Display
Installing Symantec Endpoint Protection
System installation requirements
Table 2-1 Symantec Endpoint Protection Manager, Console, and database
(continued)
64-bit 32-bit
Component
The Symantec Endpoint Protection Manager includes an embedded database.
You may also choose to use one of the following versions of Microsoft SQL Server:
■ Microsoft SQL Server 2000 with Service Pack 3 or later
■ Microsoft SQL Server 2005
Note:Microsoft SQL Server is optional. The Symantec Endpoint Protection Manager
includes an embedded database. You may also choose to use one of the following versions of Microsoft SQL Server:
■ Microsoft SQL Server 2000 with Service Pack 3 or later
■ Microsoft SQL Server 2005
Note:Microsoft SQL Server is optional. Database
The following other requirements must be met:
■ Internet Information Services server 5.0 or later with World Wide Web services enabled
■ Internet Explorer 6.0 or later
■ Static IP address (recommended) The following other requirements must be
met:
■ Internet Information Services server 5.0 or later with World Wide Web services enabled
■ Internet Explorer 6.0 or later
■ Static IP address (recommended) Other requirements
Symantec Endpoint Protection Manager and Console
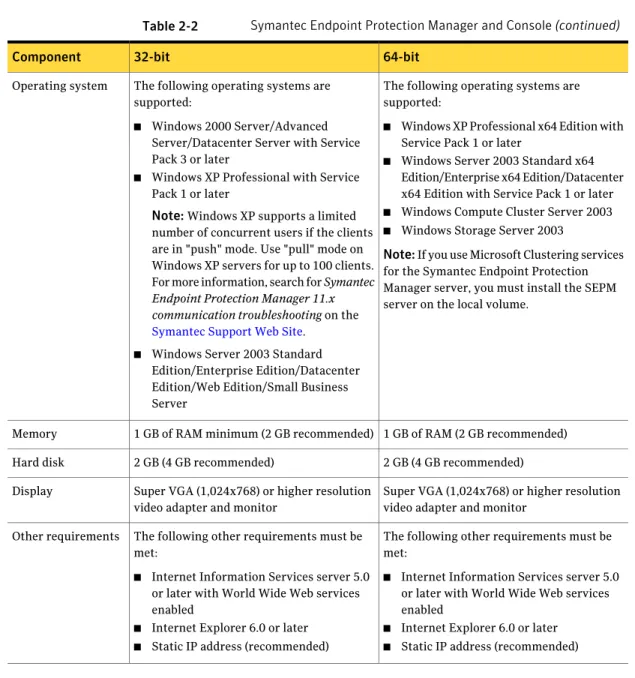
Table 2-2lists the minimum requirements for the computers on which to install the Symantec Endpoint Protection Manager and Console.
Table 2-2 Symantec Endpoint Protection Manager and Console 64-bit
32-bit Component
1 GHz on x64 works only with the following processors:
■ Intel Xeon with Intel EM64T support
■ Intel Pentium IV with EM64T support
■ AMD 64-bit Opteron
■ AMD 64-bit Athlon
Note:Itanium is not supported. 1 GHz Intel Pentium III
Table 2-2 Symantec Endpoint Protection Manager and Console (continued) 64-bit
32-bit Component
The following operating systems are supported:
■ Windows XP Professional x64 Edition with Service Pack 1 or later
■ Windows Server 2003 Standard x64 Edition/Enterprise x64 Edition/Datacenter x64 Edition with Service Pack 1 or later
■ Windows Compute Cluster Server 2003
■ Windows Storage Server 2003
Note:If you use Microsoft Clustering services for the Symantec Endpoint Protection Manager server, you must install the SEPM server on the local volume.
The following operating systems are supported:
■ Windows 2000 Server/Advanced Server/Datacenter Server with Service Pack 3 or later
■ Windows XP Professional with Service Pack 1 or later
Note:Windows XP supports a limited number of concurrent users if the clients are in "push" mode. Use "pull" mode on Windows XP servers for up to 100 clients. For more information, search for Symantec
Endpoint Protection Manager 11.x communication troubleshooting on the
Symantec Support Web Site.
■ Windows Server 2003 Standard Edition/Enterprise Edition/Datacenter Edition/Web Edition/Small Business Server
Operating system
1 GB of RAM (2 GB recommended) 1 GB of RAM minimum (2 GB recommended)
Memory
2 GB (4 GB recommended) 2 GB (4 GB recommended)
Hard disk
Super VGA (1,024x768) or higher resolution video adapter and monitor
Super VGA (1,024x768) or higher resolution video adapter and monitor
Display
The following other requirements must be met:
■ Internet Information Services server 5.0 or later with World Wide Web services enabled
■ Internet Explorer 6.0 or later
■ Static IP address (recommended) The following other requirements must be
met:
■ Internet Information Services server 5.0 or later with World Wide Web services enabled
■ Internet Explorer 6.0 or later
■ Static IP address (recommended) Other requirements
Symantec Endpoint Protection Console
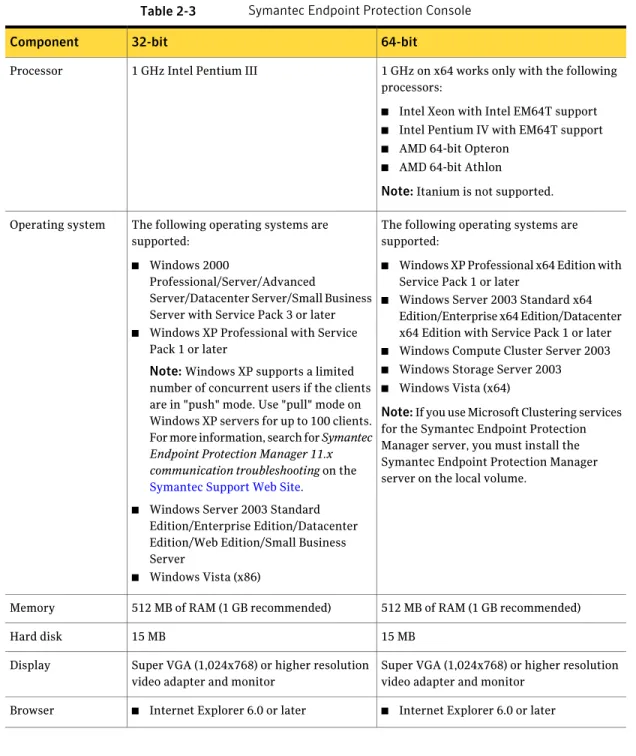
Table 2-3lists the minimum requirements for the computers on which to install the Symantec Endpoint Protection Console.
Installing Symantec Endpoint Protection
System installation requirements
Table 2-3 Symantec Endpoint Protection Console 64-bit
32-bit Component
1 GHz on x64 works only with the following processors:
■ Intel Xeon with Intel EM64T support
■ Intel Pentium IV with EM64T support
■ AMD 64-bit Opteron
■ AMD 64-bit Athlon
Note:Itanium is not supported. 1 GHz Intel Pentium III
Processor
The following operating systems are supported:
■ Windows XP Professional x64 Edition with Service Pack 1 or later
■ Windows Server 2003 Standard x64 Edition/Enterprise x64 Edition/Datacenter x64 Edition with Service Pack 1 or later
■ Windows Compute Cluster Server 2003
■ Windows Storage Server 2003
■ Windows Vista (x64)
Note:If you use Microsoft Clustering services for the Symantec Endpoint Protection Manager server, you must install the Symantec Endpoint Protection Manager server on the local volume.
The following operating systems are supported:
■ Windows 2000
Professional/Server/Advanced
Server/Datacenter Server/Small Business Server with Service Pack 3 or later
■ Windows XP Professional with Service Pack 1 or later
Note:Windows XP supports a limited number of concurrent users if the clients are in "push" mode. Use "pull" mode on Windows XP servers for up to 100 clients. For more information, search for Symantec
Endpoint Protection Manager 11.x communication troubleshooting on the
Symantec Support Web Site.
■ Windows Server 2003 Standard Edition/Enterprise Edition/Datacenter Edition/Web Edition/Small Business Server
■ Windows Vista (x86) Operating system
512 MB of RAM (1 GB recommended) 512 MB of RAM (1 GB recommended)
Memory
15 MB 15 MB
Hard disk
Super VGA (1,024x768) or higher resolution video adapter and monitor
Super VGA (1,024x768) or higher resolution video adapter and monitor
Display
■ Internet Explorer 6.0 or later
■ Internet Explorer 6.0 or later Browser
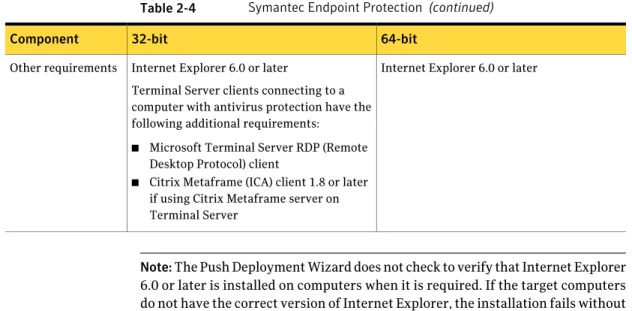
Symantec Endpoint Protection
Table 2-4lists the minimum requirements for the computers on which to install Symantec Endpoint Protection.
Table 2-4 Symantec Endpoint Protection 64-bit 32-bit
Component
1 GHz on x64 only with the following processors:
■ Intel Xeon with Intel EM64T support
■ Intel Pentium IV with EM64T support
■ AMD 64-bit Opteron
■ AMD 64-bit Athlon
Note:Itanium is not supported. 400 MHz Intel Pentium III (1 GHz for
Windows Vista) Processor
The following operating systems are supported:
■ Windows XP Professional x64 Edition
■ Windows Server 2003 x64 Edition
■ Windows Compute Cluster Server 2003
■ Windows Storage Server 2003
■ Windows Vista Home Basic x64 Edition/Home Premium x64
Edition/Business x64 Edition/Enterprise x64 Edition/Ultimate x64 Edition
■ Windows Server 2008 Standard x64 Edition/Enterprise x64 Edition/ Datacenter x64 Edition/Web x64 Edition (Core and Full)
Note:If you use Microsoft Clustering Services, you must install the client on the local volume.
The following operating systems are supported:
■ Windows 2000
Professional/Server/Advanced
Server/Datacenter Server/Small Business Server with Service Pack 3 or later
■ Windows XP Home Edition/Professional Edition/Tablet PC Edition/Media Center Edition
■ Windows Server 2003 Standard Edition/ Enterprise Edition/Datacenter
Edition/Web Edition/Small Business Server
■ Windows Vista (x86) Home Basic Edition/Home Premium Edition/Business Edition/Enterprise Edition/Ultimate Edition
■ Windows Server 2008 Standard Edition/Enterprise Edition/ Datacenter Edition/Web Edition (Core and Full) Operating system
256 MB of RAM 256 MB of RAM
Memory
700 MB 600 MB
Hard disk
Super VGA (1,024x768) or higher-resolution video adapter and monitor
Super VGA (1,024x768) or higher-resolution video adapter and monitor
Display
Installing Symantec Endpoint Protection
System installation requirements
Table 2-4 Symantec Endpoint Protection (continued) 64-bit
32-bit Component
Internet Explorer 6.0 or later Internet Explorer 6.0 or later
Terminal Server clients connecting to a computer with antivirus protection have the following additional requirements:
■ Microsoft Terminal Server RDP (Remote Desktop Protocol) client
■ Citrix Metaframe (ICA) client 1.8 or later if using Citrix Metaframe server on Terminal Server
Other requirements
Note:The Push Deployment Wizard does not check to verify that Internet Explorer 6.0 or later is installed on computers when it is required. If the target computers do not have the correct version of Internet Explorer, the installation fails without informing you.
Installation process overview
The Installation Guide for Symantec Endpoint Protection and Symantec Network Access Control contains detailed information about each procedure in the installation process.
Table 2-5summarizes the process to install Symantec Endpoint Protection. Table 2-5 Installation overview
Description Procedure
Decide on the computer to which you want to install the software and the type of database that you want to use. Then, run the installation program from the CD. The program first installs the manager software. It then installs and configures the database.
See“Installing and configuring Symantec Endpoint Protection Manager”on page 27. Install Symantec Endpoint
Table 2-5 Installation overview (continued) Description
Procedure
For your test environment you can create and install default client software packages. Those clients are assigned to the Temporary group and use the default policies. If there are a large number of computers in your production environment, you may want to create custom security policies first. You can then create custom client installation packages before deploying to the clients.
At the end of the database configuration, you are asked if you want to run the Migration and Deployment Wizard. This wizard creates and then pushes out a default client software installation package.
See“Creating client installation packages”on page 105. Create a client install
package
Decide how you want to deploy the client software. You can deploy the client software in several different ways. For ease of use, you can use the Migration and Deployment Wizard after you install the manager to deploy the default protection. Alternately, you can use the Migration and Deployment Wizard from the Start menu at any time. Deploy the client software
To log on, you can use the Start menu and the admin user name, with the password that you set during installation.
See“Logging on to the Symantec Endpoint Protection Manager Console”on page 42. Log on to Symantec Endpoint
Protection Manager console
On the Clients page, the group that you created when you installed appears under View Clients.
Locate your group in the console
You need to configure LiveUpdate properties for the site you have installed. See“About LiveUpdate Policies”on page 49.
Configure LiveUpdate for site updates
After you configure the site, you need to configure a LiveUpdate Settings Policy and a LiveUpdate Content Policy for your clients.
See“About LiveUpdate Policies”on page 49. Configure LiveUpdate for
client updates
At a minimum, you should configure and test an Antivirus and Antispyware Policy for your clients. You may also want to configure a Firewall Policy and policies for the other types of protection.
See“Evaluating policies”on page 55. Configure security policies
and test Symantec Endpoint Protection
About Desktop firewalls and communications ports
If your servers and clients run firewall software, you must open certain ports so that communication between the management servers and clients is possible. Alternatively, you can permit the application Rtvscan.exe on all computers toInstalling Symantec Endpoint Protection
About Desktop firewalls and communications ports
send and receive traffic through your firewalls. Also, remote server and client installation tools require that TCP port 139 be opened.
Note: Management servers and clients use the default ephemeral port range for TCP (1024 to 65535) for network communications. The ephemeral port range that is used, however, rarely exceeds 5,000. The ephmeral port range is configurable for most operating systems. Most firewalls use stateful inspection when filtering TCP traffic, so incoming TCP responses are automatically allowed and routed back to the original requester. Therefore you do not have to open the ephemeral TCP ports when you configure your firewall software.
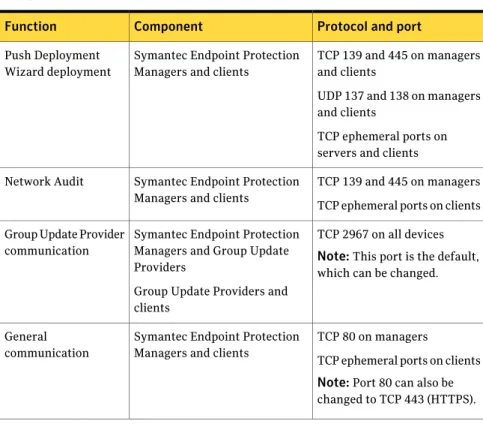
Table 2-6lists the network protocols and ports that management servers and clients require for communicating and network installations.
Table 2-6 Ports for client and server installation and communication Protocol and port Component
Function
TCP 139 and 445 on managers and clients
UDP 137 and 138 on managers and clients
TCP ephemeral ports on servers and clients Symantec Endpoint Protection
Managers and clients Push Deployment
Wizard deployment
TCP 139 and 445 on managers TCP ephemeral ports on clients Symantec Endpoint Protection
Managers and clients Network Audit
TCP 2967 on all devices Note:This port is the default, which can be changed. Symantec Endpoint Protection
Managers and Group Update Providers
Group Update Providers and clients
Group Update Provider communication
TCP 80 on managers
TCP ephemeral ports on clients Note:Port 80 can also be changed to TCP 443 (HTTPS). Symantec Endpoint Protection
Managers and clients General
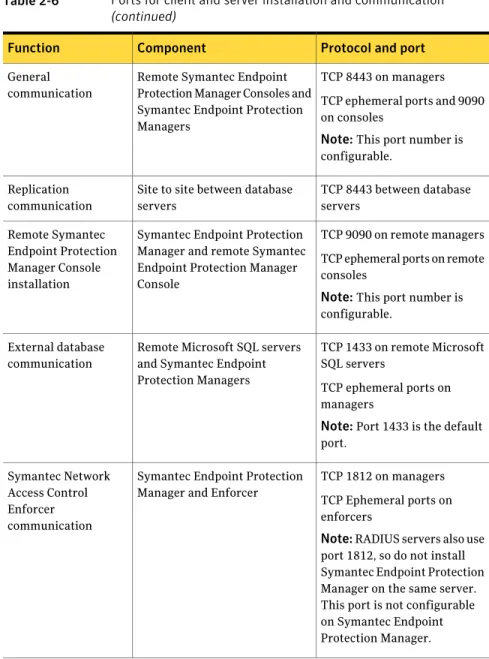
Table 2-6 Ports for client and server installation and communication
(continued)
Protocol and port Component
Function
TCP 8443 on managers TCP ephemeral ports and 9090 on consoles
Note:This port number is configurable.
Remote Symantec Endpoint Protection Manager Consoles and Symantec Endpoint Protection Managers
General communication
TCP 8443 between database servers
Site to site between database servers
Replication communication
TCP 9090 on remote managers TCP ephemeral ports on remote consoles
Note:This port number is configurable.
Symantec Endpoint Protection Manager and remote Symantec Endpoint Protection Manager Console
Remote Symantec Endpoint Protection Manager Console installation
TCP 1433 on remote Microsoft SQL servers
TCP ephemeral ports on managers
Note:Port 1433 is the default port.
Remote Microsoft SQL servers and Symantec Endpoint Protection Managers External database
communication
TCP 1812 on managers TCP Ephemeral ports on enforcers
Note:RADIUS servers also use port 1812, so do not install Symantec Endpoint Protection Manager on the same server. This port is not configurable on Symantec Endpoint Protection Manager. Symantec Endpoint Protection
Manager and Enforcer Symantec Network
Access Control Enforcer communication
Installing Symantec Endpoint Protection
About Desktop firewalls and communications ports
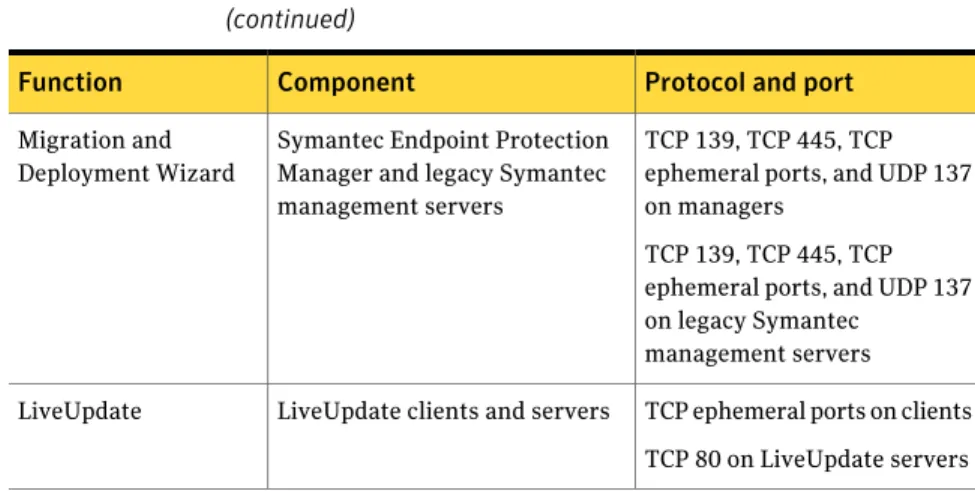
Table 2-6 Ports for client and server installation and communication
(continued)
Protocol and port Component
Function
TCP 139, TCP 445, TCP ephemeral ports, and UDP 137 on managers
TCP 139, TCP 445, TCP ephemeral ports, and UDP 137 on legacy Symantec
management servers Symantec Endpoint Protection
Manager and legacy Symantec management servers
Migration and Deployment Wizard
TCP ephemeral ports on clients TCP 80 on LiveUpdate servers LiveUpdate clients and servers
LiveUpdate
Installing and configuring Symantec Endpoint
Protection Manager
Installing management software for the first time is divided into two parts. The first part installs Symantec Endpoint Protection Manager. The second part installs and configures the Symantec Endpoint Protection Manager database. In the first, you can accept all defaults. In the second part, you must select the type of configuration you want for the Symantec Endpoint Protection Manager, Simple or Advanced, based on the number of clients the server supports. The Simple configuration, intended for a server that supports less than 100 clients,
automatically creates an embedded database and uses the default values for most settings with minimal input from you. The Advanced configuration, intended for administrators in larger environments, lets you specify settings specific to your environment.
Note:Management software does not include Symantec Endpoint Protection or any other client software that is managed.
To install Symantec Endpoint Protection Manager
1
Insert the installation CD and start the installation if it does not start automatically.2
In the Welcome panel do one of the following:■ To install for Symantec Endpoint Protection, click Install Symantec
■ To install for Symantec Network Access Control, click Install Symantec
Network Access Control, and then click Install Symantec Endpoint Protection Manager on the next panel.
3
In the Welcome panel, click Next.4
In the License Agreement panel, check I accept the terms in the licenseagreement, and then click Next.
5
In the Destination Folder panel, accept or change the installation directory.6
Do one of the following:■ To let the Symantec Endpoint Protection Manager IIS Web server run with other Web servers on this computer, check Use the default Web site, and then click Next.
■ To configure the Symantec Endpoint Protection Manager IIS Web as the only Web server on this computer, check Create a custom Web site, and then click Next.
7
In the Ready to Install panel, click Install.8
When the installation finishes and the Install Wizard Complete panel appears, click Finish.Wait for the Management Server Configuration Wizard panel to appear, which can take up to 15 additional seconds. Perform the steps in the following section appropriate to the configuration type you selected, Simple or Advanced.
Installing Symantec Endpoint Protection
Installing and configuring Symantec Endpoint Protection Manager
To configure Symantec Endpoint Protection Manager in Simple Mode
1
In the Management Server Configuration Wizard panel select Simple, and then click Next.A system check is performed to determine if the system meets the minimal requirements for available memory and drive space. If it does not, a warning dialog is displayed indicating that the server may not perform as expected with the resources available. You can choose to continue or cancel the configuration.
2
Specify and confirm a password (of 6 or more characters). Optionally, provide an email address.The password specified is used for the Symantec Endpoint Protection Manager admin account, as well as the encryption password necessary for disaster recovery. After installation, the encryption password does not change, even if the password for the admin account is changed.
Document this password when you install Symantec Endpoint Protection in your production environment. You need it for disaster recovery purposes and for adding optional Enforcer hardware.
Symantec Endpoint Protection Manager sends warning and notification messages to the email address that you provide.
3
Click Next.4
The Configuration Summary panel displays the values that are used to install Symantec Endpoint Protection Manager. You can print a copy of the settings to maintain for your records, or click Next to start the installation.To configure Symantec Endpoint Protection Manager in Advanced Mode
1
In the Management Server Configuration Wizard panel select Advanced, and then click Next.2
Select the number of clients you plan to have managed by this server, and then click Next.A system check is performed to determine if the system meets the minimal requirements for available memory and drive space. If it does not, a warning dialog is displayed indicating that the server may not perform as expected with the resources available. You can choose to continue or cancel the configuration.
3
In the Site Type panel, check Install my first Site, and then click Next.4
In the Server Information panel, accept or change the default values for the following boxes, and then click Next:■ Server port ■ Web console port ■ Server data folder
5
In the Site Name panel, in the Site name box, enter your site name, and then click Next.6
In the Encryption Password panel, type a value in both boxes, and then clickNext.
Document this password when you install Symantec Endpoint Protection in your production environment. You need it for disaster recovery purposes and for adding optional Enforcer hardware.
7
In the Database Server Choice panel, check Embedded Database, and then click Next.8
On the admin user panel, in the Password boxes, type a password for the admin account to log on to the console. Optionally, provide an email address. Symantec Endpoint Protection Manager sends warning and notification messages to the email address specified.When the installation finishes, you have the option of deploying client software with the Migration and Deployment Wizard. If you do not deploy client software at this time, refer to the Client Installation chapter for details on how to install client software. Log on to the console with the user name and password that you entered here.
9
Click Next.Installing Symantec Endpoint Protection Manager with an embedded
database
Installing with the embedded database is the easiest way to install Symantec Endpoint Protection Manager. The embedded database supports up to 5,000 clients. After you install Symantec Endpoint Protection Manager and become comfortable with administration tasks, you must secure your cryptographic files in case you need to recover from a disaster. You must also document the encryption password that you enter during Symantec Endpoint Protection Manager configuration.
Installing Symantec Endpoint Protection Manager with a Microsoft
SQL database
You can install the Symantec Endpoint Protection Manager on the same computer that runs Microsoft SQL Server 2000/2005 and then create a database on the local
Installing Symantec Endpoint Protection
Installing and configuring Symantec Endpoint Protection Manager
SQL server. You can also install the Symantec Endpoint Protection Manager on a computer that does not run Microsoft SQL Server 2000/2005 and then create a database on the remote SQL server. In both cases, you must properly install and configure Microsoft SQL Server components on all computers.
Note:Microsoft SQL Server 2000 is supported on English-language Windows operating systems only.
Preparing Microsoft SQL Server 2000/2005 for database
creation
Before you create the database, Symantec recommends that you install a new instance of SQL Server that conforms to Symantec installation and configuration requirements. You can install a database in an older, existing instance, but the instance must be configured properly or your database installation fails. For example, if the authentication configuration is not set to Mixed Mode, your installation fails or does not function properly. If you select a case-sensitive SQL collation your installation fails.
Warning:Symantec Endpoint Protection Manager authenticates to Microsoft SQL Server with a clear text database owner user name and password. If you install to and communicate with a remote Microsoft SQL Server, any computer in the communications path can potentially capture this user name and password with a packet capture utility. To maximize the security posture of remote Microsoft SQL Server communications, collocate both servers in a secure subnet.
A secure subnet isolates network communications between servers to that subnet only. A secure subnet is typically located behind a network device that performs network address translation (NAT). Many of the modern inexpensive routers that perform DHCP address assignments also perform NAT. A secure subnet is also physically secure so that only authorized personnel have physical access to the network devices on that subnet.
Microsoft SQL Server 2000 installation and configuration requirements
The installation and configuration requirements affect all Microsoft SQL Server 2000 installations, both local and remote. To create a database on a remote SQL server, you must also install the SQL Server Client Components on the server that runs the Symantec Endpoint Protection Manager.
Microsoft SQL Server 2000 installation requirements
When you install the instance of Microsoft SQL Server 2000, select the following non-default features:
■ Do not accept the default instance name. Use SEPM or some other name. By default, a database named Sem5 is created in this instance when you install the Symantec Endpoint Protection Manager. The default instance is supported, which is unnamed, but can lead to confusion if you install multiple instances on one computer.
■ Set authentication configuration to Mixed Mode (Windows authentication and SQL Server authentication).
■ Set the sa password when you set Mixed Mode authentication. You type this password when you install the Symantec Endpoint Protection Manager.
Note:When you install the instance of Microsoft SQL Server, do not select a case-sensitive SQL collation. The database does not support case-sensitivity.
Microsoft SQL Server 2000 configuration requirements
After you install the instance of Microsoft SQL Server 2000, you must do the following:
■ Apply SQL Server Service Pack 4, and select to authenticate using SQL server credentials.
■ In Enterprise Manager, register the instance, right-click the instance, and edit the registration properties to use SQL server authentication.
■ After editing, when prompted, disconnect from the server. ■ Right-click the instance and connect to the server.
■ Use the SQL Server Network Utility to verify that TCP/IP is an enabled protocol. If the protocol is not enabled, enable the protocol.
■ Verify that SQL Server Agent is running, and start it if it is not running.
Installing and configuring Microsoft SQL Server 2000 client components
You install and configure Microsoft SQL Server 2000 Client Components on the computer that runs or will run the Symantec Endpoint Protection Manager.
Installing Symantec Endpoint Protection
Installing and configuring Symantec Endpoint Protection Manager
To install Microsoft SQL Server 2000 client components
1
Start the Microsoft SQL Server 2000 installation CD and begin the installation process.2
In the Installation Definition window, click Client Tools Only.3
Complete the installation.To configure Microsoft SQL Server 2000 client components
1
Click Start > Programs > Microsoft SQL Server > Client Network Utility.2
In the SQL Server Client Network Utility dialog box, on the General tab, verify that TCP/IP is an enabled protocol. If it is not an enabled protocol, enable the protocol.3
Right-click TCP/IP, and then click Properties.4
In the TCP/IP dialog box, in the Default Port box, type the port number that matches the port that is used by the Microsoft SQL Server 2000 instance. The default port is typically 1433. You specify this port number when you create the database.5
Click OK, and then exit the SQL Server Client Network Utility.Microsoft SQL Server 2005 installation and configuration requirements
The installation and configuration requirements affect all Microsoft SQL Server 2005 installations, both local and remote. If you create a database on a remote SQL server, you must also install the SQL Server Client Components on the server that runs the Symantec Endpoint Protection Manager.
Microsoft SQL Server 2005 installation requirements
When you install the instance of Microsoft SQL Server 2005 you must select the following non-default features:
■ Do not accept the default instance name. Use SEPM or some other name. By default, a database named Sem5 is created in this instance when you install the Symantec Endpoint Protection Manager. The default instance is supported, which is unnamed, but can lead to confusion if you install multiple instances on one computer.
■ Set authentication configuration to Mixed Mode (Windows authentication and SQL Server authentication).
■ Set the sa password when you set Mixed Mode authentication. You type this password when you install the Symantec Endpoint Protection Manager. ■ When you configure Service Accounts, select to start the SQL Server Browser
Note:When you install the instance of Microsoft SQL Server, do not select a case-sensitive SQL collation. The database does not support case-sensitivity.
Microsoft SQL Server 2005 configuration requirements
After you install the instance of Microsoft SQL Server 2005, apply SQL Server 2005 Service Pack 2, and select to authenticate using SQL server credentials. Then, use the SQL Server Configuration Manager to do the following:
■ Display the protocols for the SQL Server 2005 Network Configuration. ■ Display the protocol properties for TCP/IP and enable TCP/IP.
■ Display the IP addresses for TCP/IP and enable the IP1 and IP2 addresses. ■ Set the TCP/IP port numbers for IP1, IP2, and PALL.
The Symantec Endpoint Protection Manager database does not support dynamic ports. As a result, set TCP Dynamic Ports to blank, and specify a TCP Port number. The default is typically 1433. You specify this port number when you create the database.
■ Restart the SQL Server service.
If you did not select to start the SQL Browser during installation, your remote installation fails. If you did not make this selection during installation, use the SQL Server Surface Area Configuration utility to do the following:
■ Display the Surface Area Configuration for Services and Connections information.
■ Enable the SQL Server Browser service.
If this service is not enabled, client computers cannot communicate with the server.
■ Verify that Local and Remote Connections are enabled by using TCP/IP only. Named Pipes are not required.
Installing and configuring Microsoft SQL Server 2005 client components
You install Microsoft SQL Server 2005 client components on the computer that runs the Symantec Endpoint Protection Manager.
Note:You must install the client components on a computer that runs Windows Server 2003. The client component installation requires MDAC 2.8 Service Pack 1 or higher, Windows Installer 3.1, and Internet Explorer 6.0 Service Pack 1 or higher.
Installing Symantec Endpoint Protection
Installing and configuring Symantec Endpoint Protection Manager
To install Microsoft SQL Server 2005 client components
1
Start the Microsoft SQL Server 2005 installation CD and begin the installation process.2
In the Start window, click Server components, tools, Books Online, andsamples.
3
Continue the installation until you are prompted to select the components to install.4
In the Components to Install dialog box, click Advanced.5
In the left pane, click and expand Client Components.6
Click Client Components, and then select Will be installed on local harddrive.
7
Click the following Client Component features: Connectivity Components and Management Tools, and then select Will be installed on local hard drive.8
Complete the installation.To configure Microsoft SQL Server 2005 client components
1
Click Start > Programs > Microsoft SQL Server 2005 > Configuration Tools> SQL Server Configuration Manager.
2
Under SQL Native Client Configuration, click Client Protocols, right-clickTCP/IP, and then click Properties.
3
In the Default Port box, type the port number that matches the port that is used by the Microsoft SQL Server 2005 instance.The default port is typically 1433. You specify this port number when you create the database.
4
Click Apply > OK.SQL Server requirements for installing Symantec Endpoint
Protection Manager
If you install Symantec Endpoint Protection Manager with a Microsoft SQL Server database, there are specific configuration requirements for SQL Server. You can install Symantec Endpoint Protection Manager with either a local database or a remote database.
Table 2-7describes the SQL Server configuration settings that Symantec Endpoint Protection Manager requires.
Table 2-7 SQL server configuration requirements
Symantec Endpoint Protection Manager installation requirement
Configuration setting
Do not use the default name. Create a name such as SEPM.
By default, a database named Sem5 is created in the SQL Server instance when you install the Symantec Endpoint Protection Manager. The default instance is unnamed. It is supported, but can cause confusion if you install multiple instances on one computer. Instance name
Mixed Mode Authentication configuration
Set this password when you set Mixed Mode authentication.
sa password
SQL Server authentication Authentication
TCP/IP Enabled protocol
Enable IP1 and IP2 IP addresses for TCP/IP (SQL Server 2005
only)
Set TCP Dynamic Ports to blank, and specify a TCP Port number. The default is typically 1433. You specify this port number when you create the database.
The Symantec Endpoint Protection Manager database does not support dynamic ports. TCP/IP port numbers for IP1, IP2, and PALL
(SQL Server 2005 only)
Must be started. SQL Server Browser service (SQL Server 2005
only)
If your database is located on a remote server, you must also install SQL Server client components on the computer that runs Symantec Endpoint Protection Manager.
During Symantec Endpoint Protection Manager installation, you make decisions about what database values to set. You should make these decisions before you start the installation.
Table 2-8lists and describes these values and settings.
Installing Symantec Endpoint Protection
Installing and configuring Symantec Endpoint Protection Manager
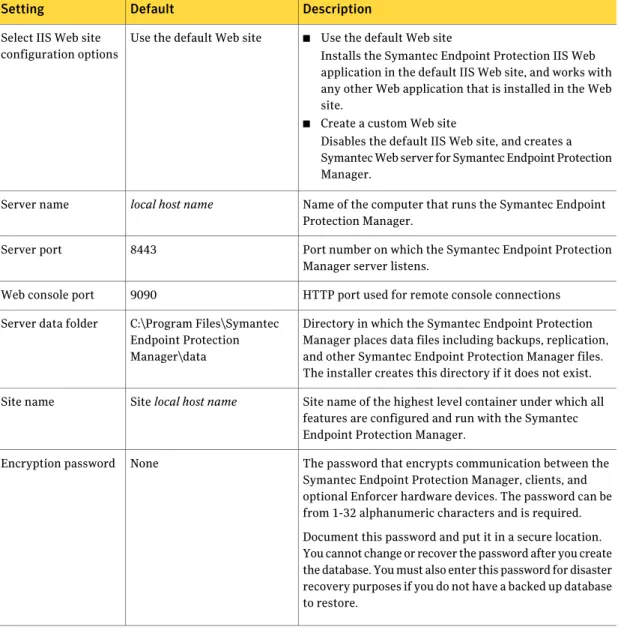
Table 2-8 Settings for installing Symantec Endpoint Protection Manager with a SQL Server database
Description Default
Setting
■ Use the default Web site
Installs the Symantec Endpoint Protection IIS Web application in the default IIS Web site, and works with any other Web application that is installed in the Web site.
■ Create a custom Web site
Disables the default IIS Web site, and creates a Symantec Web server for Symantec Endpoint Protection Manager.
Use the default Web site Select IIS Web site
configuration options
Name of the computer that runs the Symantec Endpoint Protection Manager.
local host name
Server name
Port number on which the Symantec Endpoint Protection Manager server listens.
8443 Server port
HTTP port used for remote console connections 9090
Web console port
Directory in which the Symantec Endpoint Protection Manager places data files including backups, replication, and other Symantec Endpoint Protection Manager files. The installer creates this directory if it does not exist. C:\Program Files\Symantec
Endpoint Protection Manager\data Server data folder
Site name of the highest level container under which all features are configured and run with the Symantec Endpoint Protection Manager.
Site local host name Site name
The password that encrypts communication between the Symantec Endpoint Protection Manager, clients, and optional Enforcer hardware devices. The password can be from 1-32 alphanumeric characters and is required. Document this password and put it in a secure location. You cannot change or recover the password after you create the database. You must also enter this password for disaster recovery purposes if you do not have a backed up database to restore.
None Encryption password
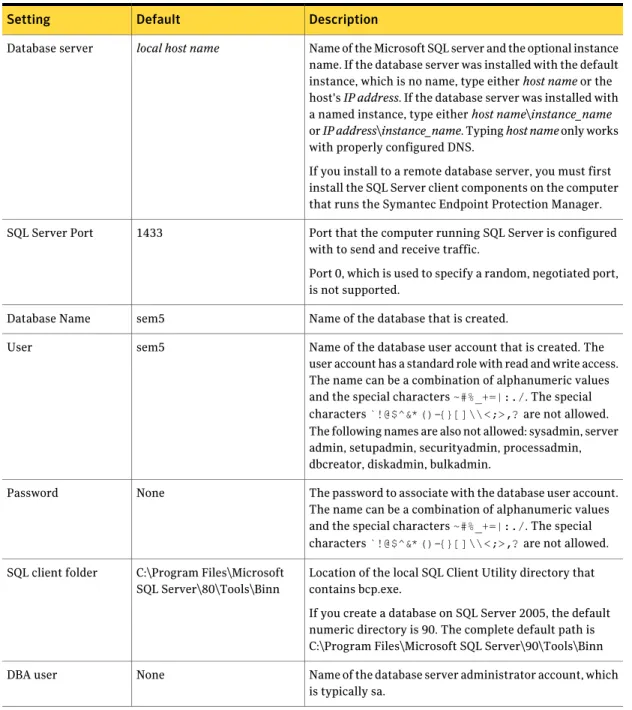
Table 2-8 Settings for installing Symantec Endpoint Protection Manager with a SQL Server database (continued)
Description Default
Setting
Name of the Microsoft SQL server and the optional instance name. If the database server was installed with the default instance, which is no name, type either host name or the host's IP address. If the database server was installed with a named instance, type either host name\instance_name or IP address\instance_name. Typing host name only works with properly configured DNS.
If you install to a remote database server, you must first install the SQL Server client components on the computer that runs the Symantec Endpoint Protection Manager.
local host name
Database server
Port that the computer running SQL Server is configured with to send and receive traffic.
Port 0, which is used to specify a random, negotiated port, is not supported.
1433 SQL Server Port
Name of the database that is created. sem5
Database Name
Name of the database user account that is created. The user account has a standard role with read and write access. The name can be a combination of alphanumeric values and the special characters~#%_+=|:./. The special characters`!@$^&*()-{}[]\\<;>,?are not allowed. The following names are also not allowed: sysadmin, server admin, setupadmin, securityadmin, processadmin, dbcreator, diskadmin, bulkadmin.
sem5 User
The password to associate with the database user account. The name can be a combination of alphanumeric values and the special characters~#%_+=|:./. The special characters`!@$^&*()-{}[]\\<;>,?are not allowed. None
Password
Location of the local SQL Client Utility directory that contains bcp.exe.
If you create a database on SQL Server 2005, the default numeric directory is 90. The complete default path is C:\Program Files\Microsoft SQL Server\90\Tools\Binn C:\Program Files\Microsoft
SQL Server\80\Tools\Binn SQL client folder
Name of the database server administrator account, which is typically sa.
None DBA user
Installing Symantec Endpoint Protection
Installing and configuring Symantec Endpoint Protection Manager
Table 2-8 Settings for installing Symantec Endpoint Protection Manager with a SQL Server database (continued)
Description Default
Setting
Name of the password that is associated with the database user account.
None DBA password
Location of the SQL Server data directory. If you install to a remote server, the volume identifier must match the identifier on the remote server. If you are installing to a named instance on SQL Server 2000, the instance name is appended to MSSQL with a dollar sign as in
\MSSQL$instance name\Data. If you are installing to a named instance on SQL Server 2005, the instance name is appended to MSSQL with a dot numeric identifier as in \MSSQL.1\MSSQL\Data.
Note:Clicking Default displays the correct installation directory, if you entered the database server and instance name correctly. If you click Default and the correct installation directory does not appear, your database creation fails.
Automatically detected after clicking Default
SQL Server 2000: C:\Program Files\Microsoft SQL Server\MSSQL\Data SQL Server 2005: C:\Program Files\Microsoft SQL
Server\MSSQL.1\MSSQL\Data Database data folder
Name of the default user name that is used to log on to the Symantec Endpoint Protection Manager Console for the first time.
(not changeable) admin
Admin User Name
The password specified during server configuration to use with the admin user name.
None Admin Password
Installing Symantec Endpoint Protection Manager with a SQL
Server database
You can install the Symantec Endpoint Protection Manager on the same computer that runs Microsoft SQL Server and then create a database on the local SQL server. You can also install the Symantec Endpoint Protection Manager on a computer that does not run SQL Server and then create a database on a remote computer running SQL Server. In either scenario, make sure that the appropriate SQL Server components are properly configured on each computer.
See“SQL Server requirements for installing Symantec Endpoint Protection Manager”on page 35.
Note:If you create a new database, SQL Server automatically manages your database with the simple recovery model and enables Auto Shrink.
To install the Symantec Endpoint Protection Manager
1
Insert the installation CD, and start the installation.2
In the Welcome panel, do one of the following:■ To install for Symantec Endpoint Protection, click Install Symantec
Endpoint Protection Manager.
■ To install for Symantec Network Access Control, click Install Symantec
Network Access Control, and then click Install Symantec Endpoint Protection Manager.
3
Click through the panels, until the Destination Folder panel appears.4
In the Destination Folder panel, accept or change the default installation directory.5
Do one of the following:■ To let the Symantec Endpoint Protection Manager IIS Web server run with other Web sites on this computer, check Use the default Web site, and then click Next.
■ To configure the Symantec Endpoint Protection Manager IIS Web as the only Web server on this computer, check Create a custom Web site, and then click Next.
6
On the Ready to Install the Program panel, click Install.7
When the installation finishes and the Installation Wizard Complete panel appears, click Finish.The Server Configuration Wizard panel can take up to 15 seconds to appear. If you are prompted to restart the computer, restart the computer. When you log on, the Server Configuration Wizard panel appears automatically. To create an SQL database
1
In the Management Server Configuration Wizard panel, select Advanced, and then click Next.2
Select the number of clients that you want the server to manage, and then click Next.3
Check Install my first site, and then click Next.4
In the Server Information panel, accept or change the default values for the following boxes, and then click Next:Installing Symantec Endpoint Protection
Installing and configuring Symantec Endpoint Protection Manager
■ Server name ■ Server port ■ Web console port ■ Server data folder
5
In the Site Information panel, in the Site name box, accept or change the default name, and then click Next.6
In the Create Encryption Password panel, in the Create encryption password boxes, type a password, and then click Next.Document this password and put it in a safe and secure location. You cannot change or recover the password after you create the database. You must also enter this password for disaster recovery purposes if you do not have a backed up database to restore.
7
In the Database type selection panel, check Microsoft SQL Server, and then click Next.8
In the Define New Database panel, do one of the following: ■ If the database does not exist, check Create a new database(recommended).
■ If the database does exist, check Use an existing database.
An existing database must define file groups PRIMARY, FG_CONTENT, FG_LOGINFO, FG_RPTINFO, and FG_INDEX. The user account for database access must have privileges db_ddladmin, db_datareader, and db_datawriter. If these requirements are not met, your installation fails. A best practice is to define a new database.
9
Click Next.10
In the Microsoft SQL Server Information panel, type your values for the following boxes, and then click Next:■ Database server
If you created a new instance, the format is servername_or_IPaddress\instance_name. ■ SQL server port
■ Database name ■ User
■ Password
■ SQL Client folder
■ DBA user (only when creating a new database) ■ DBA password (only when creating a new database) ■ Database data folder
11
Specify and confirm a password for the Symantec Endpoint Protection Manager admin account. Optionally, provide an administrator email address.12
Click Next.13
In the Warning dialog prompt, read and understand the warning information about clear text communications, and then click OK.14
In the Configuration Completed panel, do one of the following:■ To deploy client software with the Migration and Deployment Wizard, click Yes.
■ To log on to the Symantec Endpoint Protection Manager Console first, and then deploy client software, click No.
Refer to the Client Installation chapter for details on how to deploy client software.
After you install Symantec Endpoint Protection Manager and become comfortable with administration tasks, you should secure your cryptographic files in case you need to recover from a disaster. You should also document your encryption password that you enter during Symantec Endpoint Protection Manager installation.
Logging on to the Symantec Endpoint Protection
Manager Console
The Symantec Endpoint Protection Manager Console lets you perform administrative tasks such as managing clients and policies.
To log on to the Symantec Endpoint Protection Manager Console
1
Click Start > Programs > Symantec Endpoint Protection Manager > SymantecEndpoint Protection Manager Console.
2
In the Symantec Endpoint Protection Manager logon prompt, in the User name box, type admin.3
In the Password box, type the admin password that you created during installation, and then click Log On.Installing Symantec Endpoint Protection
Logging on to the Symantec Endpoint Protection Manager Console