3329
ISSN: 2278 – 7798 All Rights Reserved © 2014 IJSETRBuilding a TCP/IP Web Server System to
Acquire and Control Data Using ARM 9
Mr.Deshpande Aniket*, Prof.Anil Wanare
M E Student, Dept .of ETC, Dhole Patil College of Engineering, University of pune*.
Professor, Dept of ETC, DYPSOE, Lohegaon ,Pune.
Abstract-The internet enabled devices for remote control and remote monitoring are becoming popular now days, the use of Ethernet for the connectivity for the appliances is increasing, so the challenges for the embedded designers are to add more functionality without increasing the cost and size of the product.
This paper presents the approach for developing an automation system that can remote monitor and remote control the appliances through the use of embedded web server with SoC platform via home area network or internet.
The system can control the fan motor light & other electrical appliances also acquire & monitor sensors data to know the temperature & humidity. Advantages are low cost, light weight & reliable.
Key words: Arm9, BOA web server, TCP/IP, CGI.
I. INTRODUCTION:
Focusing on the autonomy of the people over the age of 65 having the disabilities, this paper represents a web server to monitor and control data in home area network. Now a day’s internet enabled devices are becoming very popular, on the same technology we are going to implement TCP/IP web server system which acquires and monitors the data and provides control over the devices [6].
Needs of high speed, bandwidth, economy, compatibility, are satisfied by the Web server system using TCP/IP. For this, interface design is the main issue, web pages provide the interface to the embedded server system.HTML (hypertext-markup-language) pages and web server software is the need of embedded system [6].
TCP/IP allows the different computing devices to access the web page which provides greater security, the user can browse web page from different area using the home area network/internet.
The purposed system provides control over, Control of home appliances. Measuring of sensors data
Monitoring of live status of devices.
Fig1: Embedded Web server for monitoring and control Home area network
II .RELATED WORK:
It is noticed that, works on home automation for people disabilities are specific, usually on single type. This wok focuses on elderlies, visually impaired people, hearing impaired, people with motor impairment & cognitive disabilities ([5]-[7]).
The project assistive housing focuses on elderly comfort uses television set and remote for home automation. To improve legibility& accessibility large icons along with captions were used,. in that numbers are used as a shortcuts to interact with user & navigation is avoided [7].
III. PROPOSED METHODOLOGY:
3.1 Hardware Details:
Its hardware details are Samsung S3C2440 with ARM920T RISC technology which is 32 bit also provides an Ethernet controller DM9000 and audio codec UDA1341TS which are useful for this paper [19]. Ethernet controller: The DM9000 is a fully integrated and cost-effective single chip fast Ethernet MAC controller with a general processor interface, a 10/100M PHY and 4k Dword SRAM. It is designed with low power and high performance process [19].
3330
ISSN: 2278 – 7798 All Rights Reserved © 2014 IJSETRThe DM9000 supports 8-bit, 16-bit and 32-bit micro processor interface to internal memory access for different processors. The DM9000 also supports IEEE802.3X full- duplex flow control.Enhanced ARM architecture MMU to support WinCE, EPOC 32 and Linux [19].
Fig2: showing S3C2440.
Instruction cache, data cache, writes buffer and Physical address TAG RAM to reduce the effect of main memory bandwidth and latency on performance. Camera with 20 pins The mini2440 is a practical low‐ cost ARM9 Single Board Computer (SBC) with a very high performance/cost ratio. With the Samsung S3C2440 microprocessor and the use of professional layout and quality peripheral chips, it is very robust. The Mini2440 uses a four layer board design with gold immersion processing, and has high quality equal length bus routing in timing critical areas. The production environment and quality control are the same as those of modern high speed motherboards [16].
A. Relays:
A relay is an electrically controllable switch widely used in industrial controls, automobiles and appliances.
The relay allows the isolation of two separate sections of a system with two different voltage sources i.e., a small amount of voltage/current on one side can handle a large amount of voltage/current on the other side but there is no chance that these two voltages mix up [21].
B.LM35:
The LM35 series are precision integrated-circuit temperature sensors, whose output voltage is linearly proportional to the Celsius (Centigrade) temperature. The LM35 thus has an advantage over linear temperature sensors calibrated in ° Kelvin, as the user is not required to subtract a large constant voltage
from its output to obtain convenient Centigrade scaling. The LM35 does not require any external calibration or trimming to provide typical accuracies of ±1⁄4°C at room temperature and ±3⁄4°C over a full −55 to +150°C temperature range. Low cost is assured by trimming and calibration at the wafer level. The LM35’s low output impedance, linear output, and precise inherent calibration make interfacing to readout or control circuitry especially easy. It can be used with single power supplies, or with plus and minus supplies. As it draws only 60 μA from its supply, it has very low self-heating, less than 0.1°C in still air. The LM35 is rated to operate over a −55° to +150°C temperature range [21].
3.2. Software:
Software design needs development of cross compiler, boot loader, embedded web server Linux platform on the basis of OS.
Linux is open source code OS .the kernel of Linux is configured to run the proposed embedded hardware platform. First download the image of the Linux Kernel is and configure it. Also install the device drivers for USB to serial interface, provide the TCP/IP protocol support. For Ethernet select the DM9000.Establish the file system. This will establish the Linux platform.
Set up the BOA server. Boa is an open-source, small-footprint web server that is suitable for embedded applications. Download version of BOA from http://www.boa.org/ and cross-compile for embedded Linux platform will be done to use in our application. Make a web directory for cgi.bin and html pages [20].
Common Gateway Interface (CGI) is a standard method used to generate dynamic content on web pages and web applications. CGI, when implemented on a web server provides an interface between the web server and programs that generate the web content. These programs are known as CGI scripts or simply CGIs. Using this script will interface the ARM processor GPIO pins with web server page [9].
It is based on CGI program and HTTP server .For front end program is html to communicate with server. Here HTTP and SSL protocols are used combined called as HTTPS.CGI based program reduces the source code. CGI program provides remote monitoring, control and security [9] .CGI program is designed on C and Linux platform.
IV. WORKDONE AND RESULTS:
The first software we need on our ubuntu system in minicom.Minicom is just like hyperterminal.Install minicom first sudo apt-get install minicom which is just like hyper terminal [19].
Now connect mini2440 to our system two connection one from the serial port and next from the Type B USB plug must be made to the system. On the
3331
ISSN: 2278 – 7798 All Rights Reserved © 2014 IJSETRfriendly arm board the NAND/NOR switch must be placed in the NOR position [19].
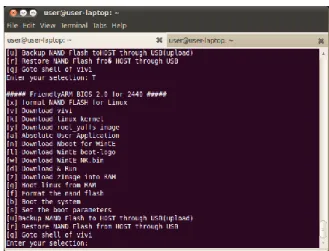
Now invoke minicom from terminal using command sudo minicom usually you will get something like this as shown in fig3on your terminal. Before that we need a hyper terminal.
We need USB to serial converter. The problem is you need to configure minicom the port etc use the command dmesg.This command lists several other messages also so you have to closely observe to which port the board is connected. Here serial to USB converter is used .So the port detected for mine is ttyUSB0 if you connected it to serial port itself it will be different.
Fig 3: Process of setting hyper terminal on minicom
Fig4: process of invoking minicom
4.1 Setting up the Supervivi and kernel in MINICOM
Download usbpush from
http://www.friendlyarm.net/dl.php?file=usbpush.zip Remaining Files Loaded into Mini2440 can be found in provided CD / images folder.
Push the image files from our system to mini2440 target. When we extract we can see one more usbpush folder inside that folder there will be a usbpush binary file give executable permission to that binary file . sudo chmod +x usbpush/usbpush/usbpush
So you will get the boot loader using command. sudo minicom
Fig 5: Downloading supervivi and installing Now the next step is to load supervivi to target board using usbpush. Supervivi is the boot loader. Only after this you should push file from the host system. If the push is successful then it will be back to the boot loader.
So supervivi is successfully installed. Next is zImage, Kernel images generated by the kernel build process are either uncompressed “Image” files or compressed zImage files. Here we select zImage W35 because MINI2440 with 3.5″ display.
After this step the basic Linux kernel image will be loaded into memory.
Now we need to Download the root yaffs image.YAFFS (Flash File System) is now in its second generation and provides a fast robust file system for NAND and NOR Flash.
Now select the boot to boot the system.This willprovide you prompt of friendly arm.
3332
ISSN: 2278 – 7798 All Rights Reserved © 2014 IJSETRFig6:Showing the prompt for friendly ARM 4.2 Configuring ARM GCC:
Then come to your Home Folder there type sudo
gedit .bashrc.
In this file at the bottom paste the path of the folder by doing “pwd” at the stored file ..for example ...below bold is the path u got from pwd cmd done in where u saved the folder.
export
PATH=/usr/local/toolschain/4.4.3/bin/:$PATH export CROSS_COMPILE= arm-none-linux-gnueabi-
After this restart the system, then open a terminal and type “arm-linux-gcc –v”, then u should received the output of gcc version .If so u have successfully installed arm gcc.
4.2 Running a C program on MINI2440: Create a simple Hello World program in C. This is the program
#include<stdio.h> int main(){
printf ("Hello World\n"); }
Save it as hello.c .Now compiling it for our target or mini2440.open terminal and change directory to the folder where c program is present and issue this command.
arm-linux-gcc hello.c -o hello
The arm-linux-gcc command was present bcoz we setup the toolchain early. Now a binary hello will be present in the folder. Use file command to know the type of the binary it will suitable for ARM.
Move the binary to mini2440 using pen drive or sdcard.To see the output execute the binary like this. ./hello
Sample Front End Design Program:
<html>
<head>
<title> Building a TCP/IP Web Server System To Acquire and Control Data Using ARM9
</title>
<h1 text=red > <center > Building a TCP/IP Web Server System to Acquire and Control Data Using ARM9
<br> <center > Login Page </head>
<h4>
<body bgcolor=lightblue text=black> <form name=f1 method=get action="4"> <center> Enter username(MAX 16 char's): <input type=text name=0>
<br>
<center> Enter Password: (MAX 8 char's): <input type=password name=1>
<br>
<input type=submit value=Login> </form>
</body> </html> <html> <head>
<title> Building Tcp/Ip web server system usingARM9 </title>
3333
ISSN: 2278 – 7798 All Rights Reserved © 2014 IJSETRFig 8: Directory containing files of Firmware
To control the Mini2440 through IP Connection.. the html and CGI files format files are used. CGI - Common gate interface on.cgi and off.cgi has the script to assign, change direction and value index.html has the details of how to operate from a button. Two communication paths are created one for transmitting data from server to CGI program which converts commands to executable files after execution relay is turned on and also another path from CGI to server for monitoring.
For Home area we are using router so we need to set up router configuration with arm s3c2440 using hyper terminal. HyperTerminal is used for PC communication with board
Set the boards IP: IP=192.168.1.230 Mask=255.255.255.0 Gateway=192.168.0.1 DNS=192.168.0.1 MAC=08:90:90:90:90:90
Fig9: Front end design to access devices
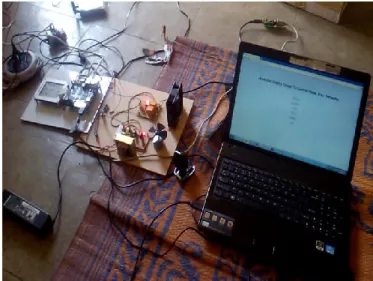
Fig10: showing the complete set up
Fig11:Turn on of load
3334
ISSN: 2278 – 7798 All Rights Reserved © 2014 IJSETRV. CONCLUSION AND FUTURESCOPE:
This paper presents how to build web server using ARM9 & TCP/IP protocol to control home appliances. This paper proposed an economical Ethernet based web server to monitor & control home area network that controls the home appliances & receives data from sensors. The data can be transmitted over a static IP address, to view and control the device anywhere in the world over the internet.
References
[1] A. S. Tanenbaum. "Computer Networks, Fourth Edition", Prentice Hall, inc., 2008.
[2] W. Stallings. "Network Security Essentials: Applications and Standards, 3rd cdn", Prentice Hall, Inc., 2007.
[3] M. J. Rochkind. "Advanced UNIX
Programming, Second Edition",Addison-Wesley, 2006.
[4] D. Robinson, K. Coar. "The Common Gateway Interface (CGI) Vrsion 1.1" ,
http://www.ietf.org/rfe/rfe3875.txt, 2004. [5] L. C. P. Costa, N. S. Almeida, M. K. Zuffo,
“Accessible display design to control home area networks.” IEEE International Conf. in
Consumer Electron. Proceed., pp.426-427, Jan. 2013.
.[6]“Implementation of a Embedded Web Controller based on TCP/IP Protocol for Home Automation System” Chao- Huang Wei1 Bui Quang Hoa2 Yu-Ning Wang3Department of Electrical Engineering, Southern Taiwan University No. 1, Nan-Tai St., Yung-Kang/Tainan, Taiwan 710, R.O.C.
[7] M. Ghorbel, F. Arab, M. Monhtari, “Assistive housing: case study in a residence for elderly people.” IEEE Second International Conf. on Pervasive Computing Technologies for Healthcare, pp.140-143, Jan.- Feb. 2008. [8] X. H. B. Le, M. D. Mascolo, A. Gouin, N.
Noury, “Health smart home -towards an assistant tool for automatic assessment of the dependence of elders.” Proc. of the Annual International Conf. of the IEEE Eng. In
[9] Bo Qu , Zhongxue Yang, “Design of Embedded Secure CGI Daemon” Software Engineering and Service Science (ICSESS), 2012 IEEE 3rd International Conference.
[10] Reed switch, Wikipedia,
http://en.wikipedia.org/wiki/Reed_switch
[11] SHT1x / SHT7x Relative Humidity & Temperature Sensor System, SENSIRION AG,Mar. 2003. www.sensirion.com
[12] C. Suh and Y.-B. Ko, Design and Implementation of Intelligent Home Control Systems based on Active Sensor Networks, IEEE Transactions on Consumer Electronics, Vol. 54, No. 3, pp. 1177-1183, Aug. 2008.
[13] H.B. Lee, L.J. Park, S.W. Park, T.Y. Chung, and J.H. Moon, Interactive Remote Control of Legacy Home Appliances through a Virtually Wired Sensor Network, IEEE Transactions on Consumer Electronics, Vol. 56, No. 4, pp. 2214-2248, Nov. 2010.
[14] Sensirion SHT11 Sensor Module Precision Temperature and Humidity Measurement, Parallax, Inc. Jul. 2003.
[15] G.J. Pottie and W.J. Kaiser, Principles of Embedded Networked Systems Design, Cambridge University Press, Aug. 2005.
[16] L. C. P. Costa, I. K. Ficheman, A. G. D. Correa, R. D. Lopes, M. K.Zuffo, “Accessibility in digital television: designing remote controls.” IEEE Trans. Consumer Electron. vol.. 58, no.2,
pp.605-611, May 2012.
[17] X. H. B. Le, M. D. Mascolo, A. Gouin, N. Noury, “ Health smart home -towards an assistant tool for automatic assessment of the dependence of elders.” Proc. of the Annual International Conf. of the IEEE Eng. In Medicine and Bio. Soc., pp. 3806-3809, Aug. 2007. [18] E. Mainardi, “Design of a portable
touchscreeninterface for powerline domotic systems.” IEEE Autom. Science and Eng., pp. 680-684, Aug. 2008.
[19] www.friendlyarm.com. [20] http://www.boa.org/ [21] http://en.wikipedia.org