Security Reporter
Startup Guide
Version 4.2
for Sidewinder G2
®
version
Copyright
© 2006 Secure Computing Corporation. All rights reserved. No part of this publication may be reproduced, transmitted, transcribed, stored in a retrieval system, or translated into any language in any form or by any means without the written permission of Secure Computing Corporation.
Trademarks
Secure Computing, SafeWord, Sidewinder, Sidewinder G2, SmartFilter, Type Enforcement, SofToken, Enterprise Strong, Mobile Pass, G2 Firewall, PremierAccess, SecureSupport, SecureOS, Bess and Strikeback are trademarks of Secure Computing Corporation, registered in the U.S. Patent and Trademark Office and in other countries. G2 Enterprise Manager, SmartReporter, On-Box, Application Defenses, RemoteAccess, and Sentian are trademarks of Secure Computing
Corporation. All other trademarks, tradenames, service marks, service names, product names, and images mentioned and/or used herein belong to their respective owners.
Software License Agreement
The following is a copy of the Software License Agreement as shown in the software:
CAREFULLY READ THE FOLLOWING TERMS AND CONDITIONS BEFORE LOADING THE SOFTWARE. BY CLICKING “I ACCEPT” BELOW, OR BY INSTALLING, COPYING, OR OTHERWISE USING THE SOFTWARE, YOU ARE SIGNING THIS AGREEMENT, THEREBY BECOMING BOUND BY ITS TERMS. IF YOU DO NOT AGREE WITH THIS AGREEMENT, THEN CLICK “I DO NOT ACCEPT” BELOW AND RETURN ALL COPIES OF THE SOFTWARE AND DOCUMENTATION TO SECURE COMPUTING CORPORATION (“SECURE COMPUTING”) OR THE RESELLER FROM WHOM YOU OBTAINED THE SOFTWARE.
If this Software is being installed by a third party (for example, a value-added reseller, consultant, employee, or agent), such third party represents that it has the authority to bind the person or entity for whom the Software is being installed, and that its acceptance of this Agreement in the manner set forth above does bind such person or entity.
1. Grant of License. Secure Computing grants to you, and you accept, a non-exclusive, and non-transferable license (without right to sub-license) to use the Software Products as defined herein on a single machine.
2. Software Products. “Software Product(s)” means (i) the machine-readable object-code versions of the Software of Secure Computing contained in the media (the “Software”), (ii) the published user manuals and documentation that are made available for the Software (the “Documentation”) and (iii) any updates or revisions of the Software or Documentation that you may receive (the “Update”). Under no circumstances will you receive any source code of the Software. Software Products provided for use as “backup” in the event of failure of a primary unit may be used only to replace the primary unit after a failure in fact occurs. They may not be used to provide any capability in addition to the functioning primary system that they backup.
3. Limitation of Use. You may not: 1) copy, except to make one copy of the Software solely for back-up or archival purposes; 2) transfer, distribute, rent, lease or sublicense all or any portion of the Software Product to any third party; 3) translate, modify, adapt, decompile, disassemble, or reverse engineer any Software Product in whole or in part; or 4) modify or prepare derivative works of the Software Products. You agree to keep confidential and use your best efforts to prevent and protect the contents of the Software Product from unauthorized disclosure or use. Secure Computing reserves all rights that are not expressly granted to you.
4. Limited Warranty and Remedies. Secure Computing warrants that the medium/media on which its Software is recorded is/are free from defects in material and workmanship under normal use and service for a period of ninety (90) days from the date of shipment to you.
Software Product, including all computer programs and documentation, and erasing any copies residing on computer equipment. This Agreement also will automatically terminate if you do not comply with any terms or conditions of this Agreement. Upon such termination you agree to destroy the Software Product and erase all copies residing on computer equipment.
7. Ownership. This Software is licensed (not sold) to you. All intellectual property rights including trademarks, service marks, patents, copyrights, trade secrets, and other proprietary rights in or related to the Software Products are and will remain the property of Secure Computing or its licensors, whether or not specifically recognized or protected under local law. You will not remove any product identification, copyright notices, or other legends set forth on the Software Product.
8. Export Restrictions. You agree to comply with all applicable United States export control laws and regulations, including without limitation, the laws and regulations administered by the United States Department of Commerce and the United States Department of State.
9. U.S. Government Rights. Software Products furnished to the U.S. Government are provided on these commercial terms and conditions as set forth in DFARS 227.7202-1(a).
10. Entire Agreement. This Agreement is our offer to license the Software Product to you exclusively on the terms set forth in this Agreement, and is subject to the condition that you accept these terms in their entirety. If you have submitted (or hereafter submit) different, additional, or other alternative terms to Secure Computing or any reseller or authorized dealer, whether through a purchase order or otherwise, we object to and reject those terms. Without limiting the generality of the foregoing, to the extent that you have submitted a purchase order for the Software Product, any shipment to you of the Software Product is not an acceptance of your purchase order, but rather is a counteroffer subject to your acceptance of this Agreement without any objections or modifications by you. To the extent that we are deemed to have formed a contract with you related to the Software Product prior to your acceptance of this Agreement, this Agreement shall govern and shall be deemed to be a modification of any prior terms in their entirety.
11. General. Any waiver of or modification to the terms of this Agreement will not be effective unless executed in writing and signed by Secure Computing. If any provision of this Agreement is held to be unenforceable, in whole or in part, such holding shall not affect the validity of the other provisions of this Agreement. You may not assign this License or any associated transactions without the written consent of Secure Computing. This License shall be governed by and construed in accordance with the laws of California, without regard to its conflicts of laws provisions.
Technical Support information
Secure Computing works closely with our reseller partners to offer the best worldwide Technical Support services. Your Secure Computing reseller is the first line of support when you have questions about our products and services; however, if you require additional assistance, contact us directly.
• To contact Secure Computing Technical Support directly, telephone +1.800.700.8328 or +1.651.628.1500. If you prefer, send an e-mail to [email protected].
• To inquire about obtaining a support contract, refer to our “Contact Secure” Web page for the latest information at www.securecomputing.com.
• To use the Secure KnowledgeBase, go to www.securecomputing.com/goto/kb. Enter your company ID.
Customer Advocate information
To suggest enhancements in a product or service, or to request assistance in resolving a problem, please contact a Customer Advocate at +1.877.851.9080. If you prefer, send an e-mail to [email protected].
Technical Publications information
If you have comments or suggestions you would like to make regarding this document or any other Secure Computing document, please send an e-mail to [email protected].
Printing history
Date Part number Software release
May 2006 86-0945695-A Sidewinder G2 Security Reporter, Version 4.2
C
HAPTER1
About Sidewinder G2 Security Reporter . . . .1
Welcome to Sidewinder G2 Security Reporter . . . 2
G2SR overview . . . 3
Resources . . . 4
C
HAPTER2
Preparing for Installation . . . .5
Installation requirements . . . 6
G2SR requirements . . . 6
Syslog server requirements . . . 7
Preparing your installation responses . . . 7
Installation type . . . .7
Authentication method . . . 7
Web site installation type . . . 8
C
HAPTER3
Installing Sidewinder G2 Security Reporter . . . .9
Installing the software . . . 10
Download the Security Reporter software . . . 10
Install G2SR . . . 11
Install the syslog server . . . 16
Uninstalling the software . . . 18
C
HAPTER4
Configuring the Servers . . . .19
Configuring the syslog server . . . 20
General tab . . . 20
Advanced tab . . . 21
A
PPENDIXA
Configuration Settings for Windows 2003/XP . . . 31
Configuring Windows 2003 computers . . . 32
Add an ISAPI filter . . . 33
Enable SSL ports on IIS . . . 34
Configure IIS 6.0 for G2SR to allow Web service extensions . . . 44
Configure IIS to allow all .cgi extensions . . . 46
Configure IIS to provide exception for MIME Type extensions . . . . 48
Configure IIS to remove the application mapping for .ext files . . . 49
Enable ActiveX Controls and Plug-ins . . . 50
Configuring Windows XP computers . . . 52
Add program exceptions . . . 52
Add a port exception . . . 53
A
PPENDIXB
Troubleshooting the Setup . . . 55
Checking G2SR . . . 56
Verify the device . . . 56
Verify Event Manager activity . . . 58
1
C
HAPTER
In this chapter...
Welcome to Sidewinder G2 Security Reporter...2
G2SR overview ...3
Resources ...4
About Sidewinder G2
Security Reporter
Welcome to
Sidewinder G2
Security
Reporter
Use this startup guide to lead you through the tasks necessary to install and configure Sidewinder G2® Security Reporter™ (G2SR). This guide covers the following topics:
•
Overview of G2SR (see “G2SR overview” on page 3)•
Pre-installation requirements and planning•
Downloading and installing the G2SR and syslog server software•
Configuring the syslog server and Sidewinder G2 to transfer audit dataChapter 1: About Sidewinder G2 Security Reporter G2SR overview
G2SR overview
Sidewinder G2 Security Reporter (G2SR) is a security event analysis andreporting solution for the Sidewinder G2 Security Appliance. It converts syslog messages from Sidewinder G2s into reports telling you what is being kept out of your network, what is attacking your network, and what is being let into your network.
How it works
1 Sidewinder G2 is configured to send its log files in the Sidewinder Export Format (SEF) to a syslog server.
2 The syslog server binds to the specified port and collects syslog data, which is streamed from single or multiple devices. (Sidewinder G2 uses only UDP port 514, which is selected by default.)
You can use the Event Manager to view audit events in real time.
3 The syslog server transfers delta log files to the G2SR server in compressed format (GZIP files).
These files are created depending on the delta frequency. For example, if the delta interval is set to 30 minutes, the G2SR syslog server creates a delta file every 30 minutes.
• A delta is an extract of an original log file that contains only data that has been logged since the last update.
• Once the data is added to the delta, it is removed from the original log.
4 G2SR converts the files into reports.
Figure 1: Network architecture Syslog server Profile Manager Event Manager Alert Manager Reports Alerts
Resources
This guide is intended for installation and initial configuration. Comprehensive documentation and support for G2SR are available from a number of sources:Resource Description
Online help Extensive online help is available for all G2SR modules by clicking the question mark icon on the top right-hand corner of each screen.
Technical Support Telephone: +1.800.700.8328 or +1.651.628.1500
e-mail: [email protected]
To inquire about obtaining a support contract, refer to our “Contact Secure” Web page for the latest information at
www.securecomputing.com.
Sidewinder G2 Administration Guide
For information about G2SR functioning with Sidewinder G2, see these sections of the “Auditing and Reporting” chapter:
• “Logging application messages using syslog” • “Generating reports using Sidewinder G2 Security
Reporter”
Knowledge Base Supplemental information, including helpful troubleshooting tips and commands. The Knowledge Base is located at
2
C
HAPTER
In this chapter...
Installation requirements ...6
G2SR requirements...6
Syslog server requirements ...7
Preparing your installation responses ...7
Installation
requirements
This section lists the requirements for a successful G2SR and syslog server installation.
G2SR requirements
Listed below are the rights, system, and license requirements needed to install G2SR.
• Sidewinder G2 version
Sidewinder G2 running at v6.1.0.05 or higher.
• Administrator rights
You must have administrator rights on the machine to which you are install-ing G2SR.
• Minimum system requirements
– Processor — Pentium 4 – 2.4 gigahertz (GHz) – Disk Space — 10 gigabyte (GB)
– RAM — 1GB
– Operating System — Windows® NT/2000/XP/2003 – Java 2 Runtime Environment JRE v1.5_04 and above – IIS, Netscape, or Apache
– Internet Explorer 6.0 or any DOM-compatible Web browser with Shockwave Flash plug-in
• Recommended system requirements
– Processor — Pentium 4 – 2.4 GHz or higher – Disk Space — 20 GB or higher
– RAM — 2 GB or higher
– Operating System — Windows Server 2000 or 2003 – Java 2 Runtime Environment JRE v1.5_04 and above – Fast IO
Chapter 2: Preparing for Installation Preparing your installation responses
Syslog server requirements
Listed below are the rights and system requirements needed to install the syslog server.
Note: The syslog server software can be installed on the same machine as the G2SR software, or on any machine in the network.
• Administrator rights
You must have administrator rights to the machine the syslog server is being installed on.
• Minimum system requirements
– Processor — Pentium III – Disk Space — 10 MB – RAM — 128 MB
– Operating System — Windows® NT/2000/XP/2003
Preparing your
installation
responses
This section helps you prepare the information you will need to install G2SR using the installation wizard. The installation wizard asks these questions when you run the program.
Installation type
You will be prompted to install G2SR in Standalone or Distributed mode. Distributed mode is not currently available for Sidewinder G2. Select
Standalone.
Authentication method
You will be prompted to select one of three authentication methods:
Web site installation type
You will be prompted to install G2SR as a Web site or virtual directory on IIS, or on the G2SR Apache server.
Note: Windows XP allows you to run only one Web site at a time. We recommend that you select Create a new virtual directory on IIS if you are already running a Web site.
z Create a new website on IIS
This is the default option and recommended for increased security. G2SR is installed as a website on IIS and runs on port 8216.
z Create a new virtual directory on IIS
Select this option if you have IIS on your machine but do not want to install G2SR as a Web site. A directory named Sidewinder G2 Security Reporter
is created under the default Web site and the program runs as a virtual directory.
Note:Windows XP allows you to run only one Web site at a time. We recommend that you select Create a new virtual directory on IIS if you are already running a Web site.
z Install Sidewinder G2 Security Reporter Apache Server This is the default option if IIS is not installed on your machine. The default port is 9216.
3
C
HAPTER
In this chapter...
Installing the software...10
Download the Security Reporter software ...10
Install G2SR ...11
Install the syslog server ...16
Uninstalling the software ...18
Installing Sidewinder G2
Security Reporter
Installing the
software
Perform these procedures to install Sidewinder G2 Security Reporter on your machine. G2SR is installed in two parts:
1 Download the software from the Secure Computing Web site.
2 Install the G2SR and syslog software on the appropriate machines.
Download the Security Reporter software
1 Point a browser to www.securecomputing.com/goto/g2sr/download.
2 Right-click the appropriate installation platform and save the file: • G2SR Server Software (G2SR including Syslog server) — Use this
platform if you are going to install the G2SR server software and the syslog server on the same machine.
• G2SR Syslog Server Software — Use this platform if you are going to install the syslog server on a machine separate from the G2SR server software.
3 Double-click the downloaded file(s) to begin the installation procedure. • See “Install G2SR” on page 11 for instructions.
• See “Install the syslog server” on page 16 for instructions. Note:The installation process can be stopped at any time by clicking the Cancel button. The installation directory and all files contained therein are automatically removed after you cancel the installation process.
Chapter 3: Installing Sidewinder G2 Security Reporter Installing the software
Install G2SR
Table 1: G2SR installation sequenceG2SR installation sequence Actions
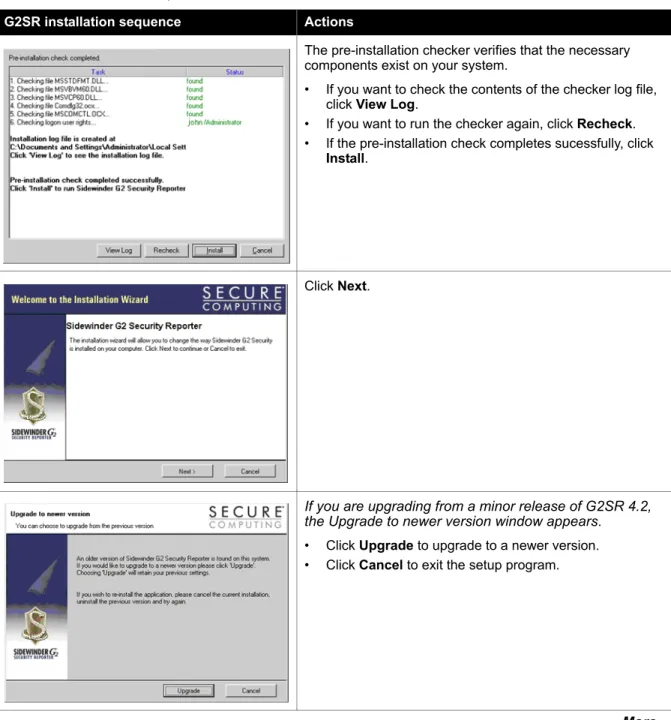
The pre-installation checker verifies that the necessary components exist on your system.
• If you want to check the contents of the checker log file, click View Log.
• If you want to run the checker again, click Recheck. • If the pre-installation check completes sucessfully, click
Install.
Click Next.
If you are upgrading from a minor release of G2SR 4.2, the Upgrade to newer version window appears.
• Click Upgrade to upgrade to a newer version. • Click Cancel to exit the setup program.
Select the License Agreement check box and click Next.
1 Select Standalone.
Note: Distributed mode is not currently available for Sidewinder G2.
2 Click Next.
Specify the location where you want G2SR installed. • To accept the defaults, click Next.
• To choose a different location, type the directory path in the fields or click Change... and navigate to the desired directory, then click Next.
Chapter 3: Installing Sidewinder G2 Security Reporter Installing the software
1 Select an authentication method:
• Use Sidewinder G2 Security Reporter User Management
• Use Windows system authentication
• Use Active Directory/LDAP User Management 2 Click Next.
If you selected G2SR User Management, the Security Reporter Authentication window appears.
1 Type the password you will use to access G2SR, then verify the password.
2 Click Next.
If you selected Active Directory/LDAP User Management, the Active Directory Server Details window appears.
1 Enter the name of your Active Directory Server. The Base DN, User DN, and Group DN fields fill in automatically.
2 Click Create Groups. Enter the user name and password of the Active Directory administrator, then click OK.
1 Select a Web site installation type:
Note: Windows XP allows you to run only one Web site at a time. We recommend that you select Create a new virtual directory on IIS if you are already running a Web site. • Create a new website on IIS — This is the default
option and recommended for increased security. A default name and port are automatically entered. If desired, type a new name and/or port in the fields. • Create a new virtual directory on IIS — Select this
option if you have IIS on your machine but do not want to install G2SR as a Web site.
– Select a default Web site from the drop-down list. The directory name is automatically entered. – If you want a different name, type it in the
Directory Name field.
• Install Sidewinder G2 Security Reporter Apache Server — This is the default option if IIS is not installed on your machine. If you want to change the default port number, type a new number in the Port field.
2 Click Next.
If the following messages appear: • Would you like setup to automatically modify the CGI timeout settings of IIS?: Click Yes.
• Click ‘OK’ to view the instructions on how to configure your IIS: Click Cancel.
After you have completed installation, configuration, and licensing tasks, see Appendix A, Configuration Settings for Windows 2003/XP, for instructions on configuring IIS. Review the Summary information to verify your installation settings.
• If you want to make changes, click Back. • If you are satisfied with the settings, click Next.
Chapter 3: Installing Sidewinder G2 Security Reporter Installing the software
Click Finish.
If you are installing the syslog server on the same machine as the G2SR server software, a syslog server recommendation message appears.
Click Yes to install the syslog server now, or click No and install the syslog server at another time.
See “Install the syslog server” on page 16 for instructions. Note: If G2SR is installed on a Windows 2003 or Windows XP computer, you must perform additional configuration tasks for G2SR to work properly. See Appendix A, Configuration Settings for Windows 2003/XP.
Install the syslog server
If you are installing the syslog server on a machine separate from the G2SR server software, start the installation by double-clicking the G2SRsyslog icon you downloaded from the Secure Computing Web site.
Table 2: Syslog server installation sequence
Syslog server installation sequence Actions
Click Next.
1 Type the name or IP address of the machine where G2SR is installed, or click the [...] button and browse to the machine.
2 Click Next.
Review the connectivity check:
Chapter 3: Installing Sidewinder G2 Security Reporter Installing the software
Select an installation location:
• To accept the default location, click Next.
• To choose a different location, type the directory path in the field or click the [...] button and browse to the desired directory, then click Next.
Review the summary of installation options you selected. • If you want to make changes, click Back.
• If you are satisfied with the options, click Finish.
When the installation is complete, a message appears stating that a configuration dialog will now open.
Click OK.
See “Configuring the syslog server” on page 20 for instructions.
Uninstalling the
software
If you need to remove the software from your computer, perform the following steps:
1 Click Start > Settings > Control Panel.
2 Open Add/Remove Programs.
3 Select the application you want to remove, then click Add/Remove: • Sidewinder G2 Security Reporter v4.2
• Sidewinder G2 Security ReporterSyslog Server
4
C
HAPTER
In this chapter...
Configuring the syslog server...20
General tab...20
Advanced tab...21
Configuring Sidewinder G2 ...22
Configure Sidewinder G2 to send data via syslog server ...22
Configure Sidewinder G2 to send data via FTP server ...23
Configuring the
syslog server
The syslog server Configuration window appears after the syslog server installation is complete. Use the information below to configure the syslog server. Click OK when you are finished.
(You can also access the Configuration window by clicking Start > Programs > Secure Computing > Sidewinder G2 Security Reporter v4.2 >
Configure Syslog Server.)
Note: This documentation is for Sidewinder G2 reporting. Additional features that appear in the GUI are not supported by Secure Computing.
General tab
Use this tab to customize target location and frequencies.
•
Name/IP — Type the name or IP address of the machine where G2SR is installed, or click the [...] button and browse to the machine.•
Enable Raw Logging — Select this option to store log files collected by the G2SR syslog server. If you leave this check box clear, logs are not stored on the syslog server, but forwarded to the G2SR server.•
Delete raw log files — Select this option to delete raw log files collected by the syslog server that are older than a specified time frame. Use the drop-down list to select from 2 days up to 3 years.•
Compress log files bigger than — You can specify the size limit of the raw log file collected by the syslog server. All log files exceeding this size will be compressed into zip format.Figure 2: Syslog Server Configuration window: General tab
Chapter 4: Configuring the Servers Configuring the syslog server
Advanced tab
G2SR lets you use the Event Manager to monitor events streamed in real time. The Advanced tab’s Enable Monitoring section allows you to select which events to stream based on priority. G2SR will display all the selected priority’s event and all events with a higher priority. For example, selecting Critical would display emergency, alert, and critical events.
Use the Enable Monitoring section to select the lowest priority that will be streamed to the Event Viewer:
1 Select Stream.
2 Select the appropriate event priority from the drop-down list.
Figure 3: Syslog Server Configuration window: Advanced tab
Configuring
Sidewinder G2
Sidewinder G2 must be configured to send audit data to G2SR via a syslog server or an FTP server. Instructions for both methods are below.
Note: If you intend to view reports on SmartFilter activity, make sure that rules using the HTTP proxy have their audit level set to Informational.
Configure Sidewinder G2 to send data via syslog server
1 Using a command line session, log into the Sidewinder G2 and type the following command to switch to the Admn role:
srole
2 Specify what type of audit logging will be sent to the syslog server:
a Use a file editor to open the /etc/sidewinder/auditd.conf file.
b Add the following line to the auditd.conf file:
syslog (facility filters[“filter”] sef)
where
• facility = information associated with a syslog message. You can use
local0 through local7 as names for the facility; they are predefined in syslogd. In the next step, make sure to use the same facility you entered in this step.
• filter = name of sacap filter to use in the output. Output all audit information by using [“NULL”].
c Save the changes and close the file.
3 Specify where the syslog server should send syslog messages:
a Use a file editor to open the /etc/syslog.conf file.
b Add the following line to the syslog.conf file, then save the changes: facility.* @x.x.x.x
where facility matches the facility in step 2 and x.x.x.x is the syslog server’s IP address.
Chapter 4: Configuring the Servers Configuring Sidewinder G2
Configure Sidewinder G2 to send data via FTP server
Note: G2SR does not include an FTP server. The Windows server hosting G2SR must have an FTP server installed and enabled.
1 Using a command line session, log into the Sidewinder G2 and type the following command to switch to the Admn role:
srole
2 To configure the export utility, enter the following command on one line:
cf export add type=sef name=entry_name
host=hostname user=username password=password
targetdir=destination localfile=local_file_path where:
• entry_name = the name you want to apply to this configuration entry • hostname = the host name or IP address to which you are exporting the
files
• username = the user name that will be used for FTP authentication • password = the password that will be used for FTP authentication to the
destination host
• destination = the directory on the destination host on which you want the export files placed
• local_file_path = (generic files only) the location of the generic file
3 To export all files that are currently configured and ready to be exported, enter the following command:
cf export ftp
Tip: To export the current files and previously exported files, enter cf export all.
4 [Optional] To enable a cron job to automatically determine which configured export files need to be exported, and format and export those files once every 24 hours (at 2:20 a.m. in most cases), enter the following command:
cf export enable
To disable the automatic cron job process, enter the following command:
5
C
HAPTER
In this chapter...
Activating the license...26
Export the system identifier ...26
Import the license and signature keys ...28
Adding a device to the license...29
Additional tasks ...30
Activating the
license
Perform this procedure to activate your permanent license for G2SR. The license must be activated to continue using G2SR.
•
Secure Computing mails you an activation certificate when you purchase your permanent G2SR license. Perform this procedure after you receive that certificate.•
This procedure must be performed on the computer that G2SR is installed on. If you move G2SR to a new computer or replace the network interface card used when licensing, you must re-license the new computer.•
When the licensing process is complete, all your trial-licensed devices migrate to the new permanent license.The licensing process is in two steps:
1 Export the system identifier.
2 Import the license and signature keys.
Export the system identifier
Note: Locate the serial number on a sticker at the bottom of the activation certificate. You will need the serial number for this procedure. The serial number format is REXX-XXXX-XXXX-XXXX.
1 Start G2SR and log in: Click Start > Programs > Secure Computing > Sidewinder G2 Security Reporter v4.2 > Browse Sidewinder G2 Security Reporter.
2 Click License Manager.
3 Click the Options tab.
4 Click Export Identifier.
Figure 4: License Manager window -Options tab
Chapter 5: Licensing G2SR Activating the license
6 Copy the system identifier file to a location that is accessible to an e-mail client.
7 Send an e-mail to [email protected]. Include the following information:
• Attachment — G2SRSystemIdentifier.txt file
• Subject — Sidewinder G2 Security Reporter Activation Request
• Product serial number (located on a sticker at the bottom of the activation certificate)
• Company name • Contact name • Address • E-mail • Phone
You will receive an e-mail with your license and signature keys. If your e-mail is submitted during normal workweek hours, you should receive the reply e-mail the same day.
When you receive your license and signature keys, proceed with “Import the license and signature keys” on page 28.
Import the license and signature keys
Perform this procedure after you have received an e-mail with your license and signature keys.
1 Start G2SR and log in: Click Start > Programs > Secure Computing > Sidewinder G2 Security Reporter v4.2 > Browse Sidewinder G2 Security Reporter.
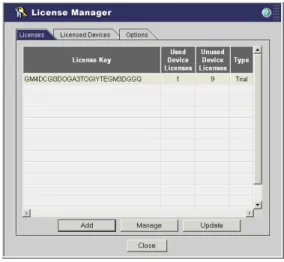
2 Click License Manager. The License Manager window appears.
3 Click the Licenses tab.
Figure 5: License Manager window -Licenses tab
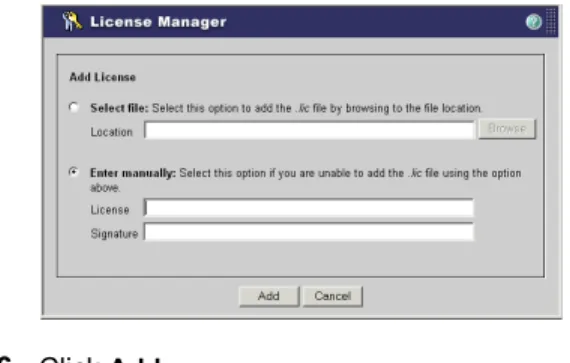
4 Click Add. The Add License window appears.
5 Select Enter manually, and enter the license and signature keys in the appropriate fields.
Figure 6: Add license window
Chapter 5: Licensing G2SR Adding a device to the license
Adding a device
to the license
Perform this procedure to add devices to the activated license.
Note: If you had a trial license, any device associated with that trial license is migrated to the permanent license when the permanent license is activated.
1 Start G2SR and log in: Click Start > Programs > Secure Computing > Sidewinder G2 Security Reporter v4.2 > Browse Sidewinder G2 Security Reporter.
2 Click License Manager. The License Manager window appears.
3 Click the Licenses tab.
Figure 7: License Manager window -Licenses tab
4 Click Manage. The Manage License window appears.
Figure 8: Manage License window
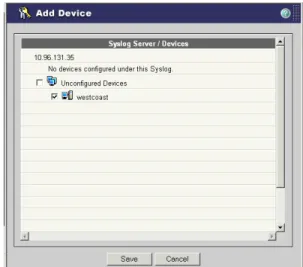
Figure 9: Add Device window
6 Select the device(s) you want associated with this license.
• Sidewinder G2s that you configured earlier to send data via the syslog server appear under Unconfigured Devices.
• If you had trial-licensed devices, they migrated to the new permanent license when you activated that license.
7 Click Save.
8 Click Close, then click Close again.
Additional tasks
For more startup and usage tasks, see the following:•
Windows 2003/Windows XP configurations — If G2SR is installed on a Windows 2003 or Windows XP computer, you must perform additional configuration tasks for G2SR to work properly. See Appendix A, Configuration Settings for Windows 2003/XP on page 31.•
Troubleshooting — If G2SR is not receiving syslog data and generating reports after completing the startup tasks, verify that your G2SR and Sidewinder G2 have been configured correctly. See Appendix B,A
A
PPENDIX
In this appendix...
Configuring Windows 2003 computers...32
Add an ISAPI filter ...33
Enable SSL ports on IIS ...34
Configure IIS 6.0 for G2SR to allow Web service extensions....44
Configure IIS to allow all .cgi extensions ...46
Configure IIS to provide exception for MIME Type extensions..48
Configure IIS to remove the application mapping for .ext files ..49
Enable ActiveX Controls and Plug-ins...50
Configuring Windows XP computers...52
Add program exceptions...52
Add a port exception...53
Configuration Settings
for Windows 2003/XP
Configuring
Windows 2003
computers
Perform these procedures if:
•
You installed G2SR on a Windows 2003 computer, and•
During installation, you chose to create a new Web site on IIS.Internet Information Services (IIS) are software services that support Web site creation, configuration, and management, along with other Internet functions. You must make configuration changes in IIS to allow G2SR to work on your Windows 2003 computer.
To configure IIS, open the IIS Manager:
Click Start > Settings > Administrative Tools > IIS Manager. The Internet Information Services (IIS) Manager window appears.
Figure 10: IIS Manager window
Chapter A: Configuration Settings for Windows 2003/XP Configuring Windows 2003 computers
Add an ISAPI filter
From the IIS Manager:
1 In the left pane, expand Web Sites.
2 In the left pane, right-click Sidewinder G2 Security Reporter and select
Properties from the pop-up menu. The Properties window appears.
3 Click the ISAPI Filters tab.
Figure 11: G2SR Properties window
4 Click Add.
Figure 12: Add/Edit Filter Properties window
Enable SSL ports on IIS
Perform these procedures to create a certificate to allow secure
communication between your server and a client. You will do the following:
•
Request a certificate•
Move the certificate request and rename the text file•
Import and install the certificateRequest the certificate From the IIS Manager:
1 In the left pane, expand Web Sites.
2 In the left pane, right-click Sidewinder G2 Security Reporter and select
Properties from the pop-up menu. The Properties window appears.
3 Click the Directory Security tab.
Figure 13: G2SR Properties window -Directory Security tab
Chapter A: Configuration Settings for Windows 2003/XP Configuring Windows 2003 computers
Table 3: Web Server Certificate Wizard sequence
Web Server Certificate Wizard sequence Actions
Click Next.
1 Select Create a new certificate.
2 Click Next.
1 Select Prepare the request now, but send it later.
1 Type a name for the certificate.
2 Click Next.
1 Type your organization’s name and unit.
2 Click Next.
1 Type the common name for your site.
2 Click Next.
Chapter A: Configuration Settings for Windows 2003/XP Configuring Windows 2003 computers
1 Select and type the appropriate geographical information.
2 Click Next.
1 Click Browse... and navigate C:\Program Files\Secure Computing\Sidewinder G2 Security Reporter 4.2\G2SR\.
2 Name the file G2SR.cer.
3 Click Save.
4 Click Next.
1 Review the summary information.
If you want to change something, click Back and navigate to the appropriate wizard window.
2 When you are satisfied with the information, click Next.
3 Click Finish.
Generate the certificate
1 Click Start > Programs > Secure Computing > Sidewinder G2 Security Reporter v4.2 > Create SSL Certificate.
Continue with Table 4, “Create SSL Certificate Wizard sequence,” for details.
Table 4: Create SSL Certificate Wizard sequence
SSL Certificate Wizard sequence Actions
Click Next.
1 Type a password that will be used to generate the certificate.
Chapter A: Configuration Settings for Windows 2003/XP Configuring Windows 2003 computers
Click Next.
Type y to answer each question.
Click Next.
Click Next.
Click Finish.
Chapter A: Configuration Settings for Windows 2003/XP Configuring Windows 2003 computers Import the certificate
From the IIS Manager:
1 In the left pane, expand Web Sites.
2 In the left pane, right-click Sidewinder G2 Security Reporter and select
Properties from the pop-up menu. The Properties window appears.
3 Click the Directory Security tab.
Figure 14: G2SR Properties window -Directory Security tab
4 Click Server Certificate.... The Web Server Certificate Wizard Welcome window appears.
Continue with Table 5, “Web Server Certificate Wizard - Pending request sequence,” for details.
Table 5: Web Server Certificate Wizard - Pending request sequence
Certificate Wizard sequence Actions
1 Select Process the pending request and install the certificate.
2 Click Next.
1 Click Browse... and navigate to the G2SR.cer file. Select the file and click Open.
2 Click Next.
1 Review the summary information.
If you want to change something, click Back and navigate to the appropriate wizard window.
Chapter A: Configuration Settings for Windows 2003/XP Configuring Windows 2003 computers
Click Finish.
Configure IIS 6.0 for G2SR to allow Web service
extensions
From the IIS Manager:
1 In the left pane, expand Web Sites.
2 In the left pane, right-click Sidewinder G2 Security Reporter and select
Properties from the pop-up menu. The Properties window appears.
3 Click the Directory Security tab.
Figure 15: G2SR Properties window -Directory Security tab
4 In the Authentication and access control section, click Edit.... The Authentication Methods window appears.
Chapter A: Configuration Settings for Windows 2003/XP Configuring Windows 2003 computers
Figure 16: Authentication Methods window
5 Enter or select the following information: • Select Enable anonymous access.
• User name — To fill in the IUSR machine name, click Browse..., type
IUSR, then click Check Names and click OK. This should complete the name of the current machine.
• Password — This field is populated automatically with the IUSR machine password when you click OK.
6 Click OK.
7 Click OK. You return to the IIS Manager window.
Figure 17: IIS Manager window
Figure 18: New Web Service Extension window
9 Enter or select the following information: • Extension name — G2SR
• Required files — • Click Add....
• In the Add File window, click Browse... and navigate to C:\Program Files\Secure Computing\Sidewinder G2 Security Reporter\G2SR. • Select perl.exe, then click OK. Make sure the view is *.*.
Note:This is the default. If you installed G2SR in a different directory, navigate to that directory.
• Select Set extension status to Allowed.
10Click OK.
Configure IIS to allow all .cgi extensions
If you are installing Security Reporter on a Windows 2003 machine, make sure that all unknown .cgi extensions are allowed.
Chapter A: Configuration Settings for Windows 2003/XP Configuring Windows 2003 computers
Figure 19: IIS Manager window
Configure IIS to provide exception for MIME Type
extensions
From the IIS Manager:
1 In the left pane, expand Web Sites.
2 In the left pane, right-click Sidewinder G2 Security Reporter and select
Properties from the pop-up menu. The Properties window appears.
3 Click the HTTP Headers tab.
Figure 20: G2SR Properties window - HTTP Headers tab
4 Click MIME Types.... The MIME Types window appears.
5 Click New....
6 Enter the following information: • Extension — .ext
• MIME type — text\plain
Chapter A: Configuration Settings for Windows 2003/XP Configuring Windows 2003 computers
Configure IIS to remove the application mapping for .ext
files
1 Open IIS:
a Click Start > Settings > Control Panel.
b Double-click Administrative Tools.
c Double-click IIS Manager. The IIS Manager window appears.
2 In the left pane, expand the tree and select the appropriate application. In the right pane, right-click Sidewinder G2 Security Reporter and select
Properties from the pop-up menu. The Properties window appears.
3 Click the appropriate tab that appears for your setup:
• Home Directory • Virtual Directory • Directory
4 In the Application settings section, click Configuration.
5 Click the Mappings tab.
6 Click Remove.
7 Click OK.
Enable ActiveX Controls and Plug-ins
An enhanced security feature on Windows 2003 computers can prevent the proper display of some Web sites. Perform this procedure to resolve this issue.
1 Start Internet Explorer.
2 From the Tools menu, select Internet Options.... The Internet Options window appears.
3 Click the Security tab.
Figure 22: Internet Options window - Security tab
Chapter A: Configuration Settings for Windows 2003/XP Configuring Windows 2003 computers
5 In the Add this Web site to the zone field, enter the following sites. Click
Add after each entry.
• http://fpdownload.macromedia.com • http://www.macromedia.com • http://sdc.shockwave.com
Figure 23: Trusted sites window
6 Click Close.
Configuring
Windows XP
computers
Perform these procedures if you use Windows Firewall with Service Pack 2 on a Windows XP computer. Stricter Firewall rules block external applications, and you must change the Firewall settings to allow applications necessary to run G2SR.
Add program exceptions
Perform this procedure to allow communication with the Apache server and syslog server.
Note: You should also perform this procedure for other related executable files that relate to your setup.
1 Open the Windows Firewall window:
a Click Start > Settings > Network Connections. The Network Connections window appears.
b In the left pane, click Change Windows Firewall settings. The Windows Firewall window appears.
2 Click the Exceptions tab.
3 Click Add Program.... The Add a Program window appears.
4 Click Browse... and navigate to:
C:\Programs\Secure Computing\Sidewinder G2 Security Reporter 4.2\G2SR
5 Select ApacheServer.exe, then click Open.
6 Click OK. The Apache server appears on Exceptions tab list. Verify that it is checked.
7 Click Add Program.... The Add a Program window appears.
8 Click Browse... and navigate to:
Chapter A: Configuration Settings for Windows 2003/XP Configuring Windows XP computers
Add a port exception
Perform this procedure to open a port through Windows Firewall.
1 Open the Windows Firewall window:
a Click Start > Settings > Network Connections. The Network Connections window appears.
b In the left pane, click Change Windows Firewall settings. The Windows Firewall window appears.
2 Click the Exceptions tab.
3 Click Add Port.... The Add a Port window appears.
4 Make the following entries and selections: • Name — G2SR
• Port — 514
• UDP
5 Click OK.
B
A
PPENDIX
In this appendix...
Checking G2SR...56
Verify the device ...56
Verify Event Manager activity ...58
Other tests ...59
Troubleshooting the
Setup
Follow these steps to verify that your G2SR and Sidewinder G2 have been configured correctly to monitor and report network traffic.
Checking G2SR
Check G2SR setup and activity to verify that devices are properly configured and licensed to monitor and report network traffic.Verify the device
1 Start G2SR and log in: Click Start > Programs > Secure Computing > Sidewinder G2 Security Reporter v4.2 > Browse Sidewinder G2 Security Reporter.
2 Click Device Manager.
3 Click the Devices tab.
4 Verify the following:
• Your Sidewinder G2 has been added as a device. • Your Sidewinder G2 is licensed.
• A check mark appears in the Monitor column. • All other Sidewinder G2 information is correct.
Figure 24: Device Manager window -Devices tab
Chapter B: Troubleshooting the Setup Checking G2SR Solutions
•
If the Sidewinder G2 is not listed in the Device column, click Add Deviceand add it.
•
If the License column says No, add the device to the license:a Click License Manager.
b Click the Licenses tab.
c Click Manage.
d Click Add Device.
e Select the device you want associated with this license.
Figure 25: Add Device window
f Click Save.
g Click Close, then click Close again.
•
If the Monitor column does not have a check mark, the device is not working properly. Continue with “Verify Event Manager activity” on page 58.Verify Event Manager activity
Note: It takes about 30 minutes from the time of initial setup for data to start appearing in your reports.
Click Event Manager and verify that events are appearing.
Figure 26: Events Manager window
•
If events from the Sidewinder G2 appear, the G2SR setup is configured correctly.Chapter B: Troubleshooting the Setup Checking G2SR
Other tests
Try these additional steps to test your G2SR setup. Create a network probe
Events might not appear in the Event Manager because audit events of Warning level or higher are not occurring. Perform this procedure to create a network probe that will appear in the Event Manager if G2SR and the Sidewinder G2 are configured correctly.
1 Open a Windows command prompt.
2 Type telnetX.X.X.Xport# and press Enter.
• X.X.X.X — The IP address of your Sidewinder G2
• port# — A port number that the Sidewinder G2 is not listening on Example: telnet 1.2.3.4 9876
• If the network probe appears in the Event Manager, your G2SR setup is configured correctly.
Verify syslog log files
On the computer that G2SR is installed on, check the syslog log files. The syslog files are stored by default in:
C:\Program Files\ Secure Computing\G2SRsyslog\Syslog\FWASyslogs\G2-IP\ A file with the current date that is growing in size indicates that G2SR is receiving logs from the Sidewinder G2.
Perform a tcpdump
On the Sidewinder G2, perform a tcpdump for UDP 514 traffic on the interface where the syslog server is located.
Example: tcpdump -npi em0 udp and port 514