Parallels
Parallels Operations
Automation 2.9
Linux Platform Deployment Guide
Revision 6.44 (22 July, 2009)
ISBN: N/A Parallels 660 SW 39th Street Suite 205 Renton, Washington 98057 USA Phone: +1 (425) 282 6400 Fax: +1 (425) 282 6444 © Copyright 2009, Parallels, Inc. All rights reserved
Distribution of this work or derivative of this work in any form is prohibited unless prior written permission is obtained from the copyright holder.
{ Patented technology protected by U.S.Patents 7,328,225; 7,325,017; 7,293,033; 7,099,948; 7,076,633.
Patents pending in the U.S.}
Product and service names mentioned herein are the trademarks of their respective owners. Parallels Operations Automation is a registered trademark of Parallels.
3
Contents
Preface
5
Documentation Conventions... 5 Typographical Conventions ... 5 Feedback ... 7Installing Linux-based POA Management Node
8
Installation Preconditions... 8Creating and Configuring VPS (for POA on VPS) ... 11
Installing POA Management Node ... 12
First Login to POA ... 15
Installing License Key... 16
Deploying POA Management Node in Virtuozzo Failover Cluster
18
Deploying Linux-based POA Management Node in Virtuozzo Failover Cluster ... 19Description ... 19
Deployment Scheme ... 19
Network Interfaces and IP Addresses ... 20
Hardware Requirements ... 21
Deploying Virtuozzo Failover Cluster ... 22
Installing POA Management Node ... 22
Deploying Native Repositories
23
Description ... 23Deploying System Native Repository ... 24
Deploying External Native Repository ... 25
Deploying POA UI on Linux
27
Creating UI Server ... 28Creating Attribute ... 28
Preparing Node for UI Server ... 28
Installing POA Packages ... 31
Marking UI Server as Ready to Provide ... 31
Restarting Java on UI Server ... 32
Creating Branding Server ... 32
Creating Attribute ... 32
Preparing Node for Apache Web Server ... 32
Installing POA Packages ... 38
Creating Brand ... 38
Creating 'Physical Hosting (Apache)' Resource Type ... 38
Creating 'Branding Access Points' Resource Type ... 40
Creating Website ... 41
Creating Brand ... 42
PBA Online Store Publishing Automation ... 44
Deploying Branding
50
Deploying Linux-based DNS Servers
51
Installing DNS Server on VPS ... 53
Installing DNS Server on Hardware Node ... 54
Deploying Privacy Proxy
55
Hardware Requirements for Privacy Proxy Server on Linux ... 55Installing POA Packages ... 56
Deploying Request Tracker
57
Installing Request Tracker Service ... 57Installation Requirements for Request Tracker Service ... 57
Configuring Request Tracking ... 58
Adjusting Permissions for Request Tracker Users ... 59
Registering Request Tracker in POA ... 59
Common Operations
60
Creating Attributes ... 60Adding Attribute to Host ... 61
Registering Linux-based Hardware Nodes ... 62
Prerequisites ... 62
Creating 'Hardware Nodes' Resource Type ... 62
Creating 'Traffic' Resource Type ... 63
Obtaining Host Initial Data File ... 64
Generating Hardware Node Distribution... 64
Installing POA Agent ... 64
Registering Linux-based VPS Hardware Nodes ... 66
Prerequisites ... 66
Creating 'Traffic' Resource Type ... 67
Creating 'VPS Hardware Nodes' Resource Type ... 68
Creating 'Shared VPSs BackNet IPs' IP Pool ... 69
Synchronizing VPS Hardware Node with World Time ... 70
Registering VPS Hardware Node in POA... 71
Creating VPS ... 71
Installing RPM on Host ... 73
Installing PPM Packages ... 73
Adding a Package ... 74
Installing a Package on the Host ... 78
Index
83
In This Chapter
Documentation Conventions ... 5 Typographical Conventions ... 5 Feedback ... 7
Documentation Conventions
Before you start using this guide, it is important to understand the documentation conventions used in it.
Typographical Conventions
The following kinds of formatting in the text identify special information.
Formatting convention Type of Information Example
Special Bold Items you must select, such
as menu options, command buttons, or items in a list.
Go to the QoS tab.
Titles of chapters, sections, and subsections.
Read the Basic Administration chapter. Italics Used to emphasize the
importance of a point, to introduce a term or to designate a command line placeholder, which is to be replaced with a real name or value.
The system supports the so called wildcard character search.
C
H A P T E R1
Preface
Important An important note provides
information that is essential to the completion of a task. Users can disregard
information in a note and still complete a task, but they should not disregard an important note.
Important: The device drivers installed automatically during Setup are required by your system. If you remove one of these drivers, your system may not work properly.
Note A note with the heading ―Note‖ indicates neutral or
positive information that emphasizes or supplements important points of the main text. A note supplies
information that may apply only in special cases—for example, memory limitations, equipment configurations, or details that apply to specific versions of a program.
Note: If Windows prompts you for a network password at startup, your network is already set up and you can skip this section.
Monospace The names of commands, files, and directories.
The license file is located in the
httpdocs/common/licenses
directory. Preformatted On-screen computer output
in your command-line sessions; source code in XML, C++, or other programming languages.
# ls –al /files
total 14470
Preformatted Bold What you type, contrasted with on-screen computer output.
# cd /root/rpms/php
<> The value enclosed in angle brackets is variable, i.e. depending on the context it can take this or that value.
Go to unpacked OS directory: # cd <POA_DIST>/rpms/<OS
CAPITALS Names of keys on the keyboard.
SHIFT, CTRL, ALT KEY+KEY Key combinations for which
the user must press and hold down one key and then press another.
Preface 7
Feedback
If you have found a mistake in this guide, or if you have suggestions or ideas on how to improve this guide, please send your feedback using the online form at
http://www.parallels.com/en/support/usersdoc/. Please include in your report the guide's title, chapter and section titles, and the fragment of text in which you have found an error.
Any Parallels Operations Automation software deployment starts with the installation of the Management Node (MN), a POA system core. After you install the MN and log on to it, you can add all the other system components via POA User Interface (UI). This chapter
informs you on POA installation requirements and procedures. POA MN can be installed on one of the following types of hosts: Virtual Private Server
Physical Server
In This Chapter
Installation Preconditions ...8
Creating and Configuring VPS (for POA on VPS) ...11
Installing POA Management Node ...12
First Login to POA...15
Installing License Key ...16
Installation Preconditions
Before installing POA software, make sure that the following preconditions are met: The physical server designated to be the POA MN meets the following requirements:
Server Names LINMN
Description POA Management Node on Linux. Server runs the POA management software.
Density 50,000 accounts Quantity 1 OS RHEL 5 (x86 or x64) CentOS 5 (x86 or x64) RHES 4 (x86 or x64) CentOS 4 (x86 or x64)
Software To be installed by the Customer:
OS only
C
H A P T E R2
Installing Linux-based POA Management
Node
Installing Linux-based POA Management Node 9
Supported
Virtualization Parallels Virtuozzo Containers (PVC) 3.x/4.0 for Linux
CPU 2 core (3GHz or higher)
RAM 4GB
Disks Array 1:
OS and software - 3 x 72GB, SCSI, RAID 5 (hardware impl.)
Disk Partitioning Array 1:
/ 5GB - for OS
2 x RAM size (8GB) - swap
/usr - 20GB - for software
/var - remaining space - for POA system database and logs
At least one external DNS server is configured.
SMTP server with the open relay for MN is configured.
If you are installing POA on Physical Server, the following supplementary preconditions must be met:
1 The target server is assigned a BackNet IP Address (it is assigned during configuring the server for MN installation).
2 Hostname for the server is configured in the /etc/hosts file.
3 Resolver DNS servers are specified in the /etc/resolv.conf file in the format: nameserver RESOLVER_DNS_SERVER_IP_ADDRESS
RESOLVER_DNS_SERVER_IP_ADDRESS - is an IP address of resolver DNS server. If you have several DNS server, specify all of them in that file. It will look like:
nameserver RESOLVER_DNS_SERVER_IP_ADDRESS nameserver RESOLVER_DNS_SERVER_IP_ADDRESS nameserver RESOLVER_DNS_SERVER_IP_ADDRESS
Important: Hostname of the MN must explicitly contain the "dot" symbol. For example,
host.com.
If you are installing POA on VPS, you need Parallels Virtuozzo Containers 3.0/4.0 or higher with the required OS Template installed. For the Parallels Virtuozzo Containers installation instructions, refer to the Parallels Virtuozzo Containers Installation guide. If you install RHEL5 or CentOS5 on the Management Node, you should disable the SELinux service on it (by default, this service is enabled). To do it, perform the following actions:
1 Log on to this Hardware Node with root privileges.
2 Open the file /etc/sysconfig/selinux and set SELINUX=disabled.
Installing Linux-based POA Management Node 11
Creating and Configuring VPS (for POA on VPS)
Note: If you are installing POA MN on a physical server, please skip this instruction.
1 Deliver POA_DISTRIB/doc/VZconfigs/ve-managementnode.conf-sample file into the /root/ directory of the VPS Hardware Node where MN VPS will be created.
2 Log in to VPS Hardware Node via SSH under root user's credentials.
3 Copy the file ve-managementnode.conf-sample into the directory
/etc/sysconfig/vz-scripts:
# cp /root/ve-managementnode.conf-sample /etc/sysconfig/vz-scripts/
4 Create a VPS:
If EZ Template is used:
# vzctl create <MN_VPS_ID> --ostemplate <template_name> --config managementnode
If Standard Template is used:
# vzctl create <MN_VPS_ID> --pkgset <template_name>/<template_version> --config managementnode
where:
<MN_VPS_ID> is the unique numeric identifier of the MN VPS. You can enter any number from 2 to 99.
<template_name> is the name of Parallels Virtuozzo Containers OS Template. <template_version> is the version of Parallels Virtuozzo Containers OS
Template.
5 Start the created VPS: vzctl start <MN_VPS_ID>
6 Add an IP address to the VPS:
# vzctl set <MN_VPS_ID> --save –-ipadd <IP address>
where <IP address> is the internal IP address to be used for MN VPS.
7 Add a hostname to the VPS:
# vzctl set <MN_VPS_ID> --save –-hostname <hostname> where <hostname> is the name of the MN host.
Note: You need to use a FQDN for the hostname of the VPS MN. For example, "mn.host.com".
8 Set the DNS server for the VPS:
# vzctl set <MN_VPS_ID> --save –-nameserver <dns server>
where <dns server> is the IP address of the DNS server you are going to use for the system.
# vzctl set <MN_VPS_ID> --save --userpasswd root:<passwd> where <passwd> is the root password for accessing VPS.
10 Deliver POA distribution into the /root directory of MN VPS.
Note: If the ability to reboot the Management Node from PCP is required, the VPS Hardware Node should be configured according to the instructions of Parallels Virtuozzo
Containers for Linux User's Guide, Advanced Tasks > Rebooting Container.
Installing POA Management Node
1 Deliver POA distribution into the /root/ directory of the Hardware Node where MN will be created.
2 Go to the directory where the POA distribution package is located.
3 Run the following command: ./install
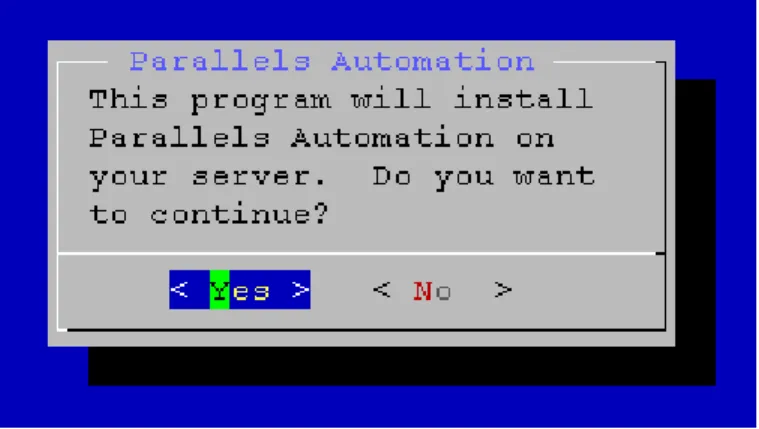
The first Wizard screen appears.
Figure 1: POA Management Node Installation Wizard 1 Click Yes to continue.
4 You are be offered to read the License agreement:
Installing Linux-based POA Management Node 13
Click OK. The License agreement will be displayed.
5 Read the offered License agreement. You can use PageUp and PageDown keys to browse through the document. When you are done with reading, press ENTER to continue.
6 At the next screen select Yes and click ENTER if you agree to the terms of the license.
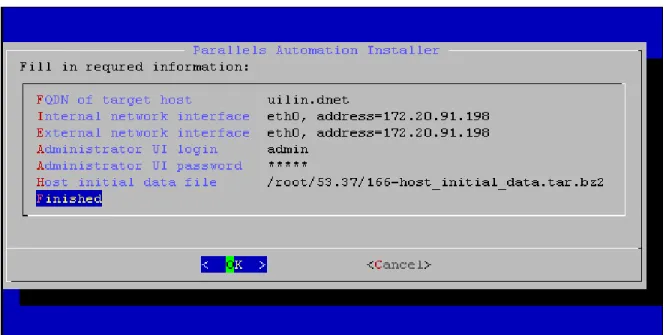
7 Specify certain information to properly configure the POA Management Node. The parameters are displayed in the form of a menu. To enter a specific piece of information, select the number of the parameter in the list and press ENTER. Use TAB to move around the fields. You will be prompted to enter or choose the appropriate value.
Note: Certain parameters already contain information by default. Although all
parameters can be modified, you are strongly advised to use the default settings where available.
FQDN of target host - MN hostname is placed by default.
Important: MN hostname must explicitly contain the "dot" symbol (for example,
host.com).
Internal network interface - The system will offer you the list of currently available network interfaces. Select the BackNet interface and the BackNet IP address. These interface and IP address will be used to communicate with POA
components/agents installed on other hosts.
External network interface - Enter the network interface with BackNet IP address, BackNet IP address and mask parameter of where the POA services will be
installed. For example, eth0|address=10.63.52.36|netmask=255.255.0.0. Path to license file - Shows the path to the POA license file (by default,
<POA_DIST>/util/default.license).
Administrator UI login - You will have to use this name for the first login to POA UI. Administrator UI password - This password will be used for the first login to POA UI. Administrator email address - Enter the E-mail address, which will be used for sending
system notifications.
SMTP server address - Enter the name of the E-mail server to be used for sending notification messages. In case if you don't have the configured mail server yet, indicate the local IP address here: the notification mails would go to the root user. From field for notifications - Type in the text to be displayed in the 'FROM' field in the
messages the system sends.
System DB hostname - By default, the MN hostname is offered. This database server will be used for storing all POA internal data.
System DB port - The port to access POA System DB.
When all the necessary information is provided, highlight the Finished item and press
8 At the next step define the hosting type you wish to provide inside POA. The packages associated with them will be installed. You can choose All components option, if you need to install all the listed components. In this case, you don't need to select items in the list one by one.
Figure 3: POA Management Node Installation Wizard 3 Click OK to start the installation.
Note: If some RPMs are missing, the message will appear to inform you about the missing RPMs. You need to install the missing RPMs, and then pass the Wizard once again up to the current step. This time, you will have only to click OK on the Wizard pages, as all the parameters will have the values you specified at the first attempt to pass the Wizard.
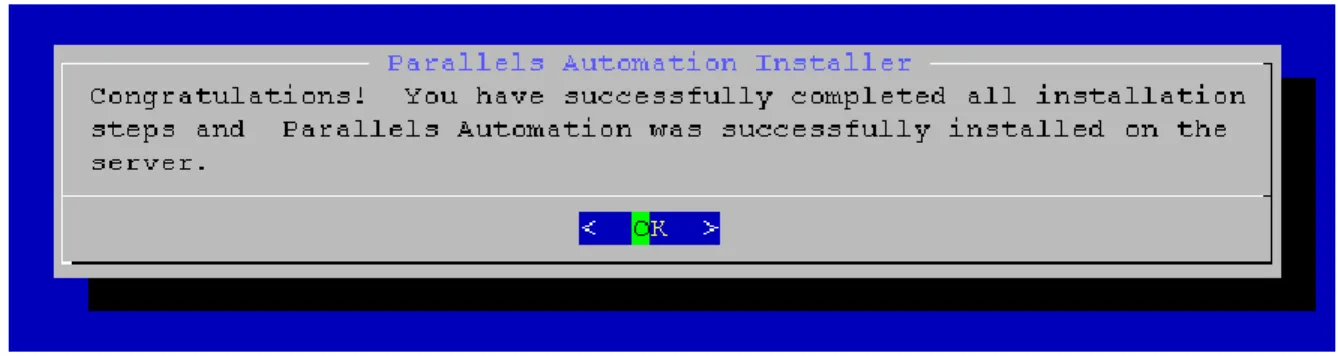
9 When the installation completes, you will see the congratulation note stating that the installation has finished successfully. Click OK.
Installing Linux-based POA Management Node 15
Now you can log in to POA user interface.
First Login to POA
POA Control Panel opens only after you log in to it using your credentials. If this is your first login after the Management Node installation, perform the following steps:
1 Open your browser.
2 In the Address field, input the URL like: http://backnet_ip:8080,
where backnet_ip is a proper BackNet IP address.
3 When the login screen appears, type your username and password into the corresponding fields.
If POA is provided with the language packs, the Language field is available where you can select the language you wish the text in POA Control Panel to be displayed in.
Figure 4: Login to POA
Installing License Key
In POA, a license is a file that contains information on resource limits and their expiration periods, which affect POA functionality usage.
By default, the trial license is used, which is installed from the POA distribution package automatically. To obtain the real license, you must send the request to the vendor. It is possible to add several licenses which are differentiated by the restrictions to the POA functionality they define.
Note: All the licenses are created for the particular POA installation and are not valid for the others except for the trial licenses – they are valid for any POA installation, though they are very limited.
1 If you have installed Parallels Operations Automation on VPS, your request needs to include the Hardware ID - the unique identifier of the VPS Hardware Node where MN VPS is located. To obtain the Hardware ID, do the following:
Note: Physical Hardware Node does not require the Hardware ID. For the Linux-based MN VPS:
1. Log in to the MN VPS via SSH as the root user. 2. Execute the following command:
# cat /proc/vz/hwid For the Windows-based MN VPS:
1. Log in to the VPS Hardware Node where MN VPS is located via RDP as the
Administrator user.
2. Go to Start > Run, type the cmd in the Open field and click on the OK button. The
Command Prompt window opens. 3. Execute the following command: # vzkeygen
You will receive the string like:
D5BF.E590.E547.B87E.FDDC.50BD.5718.4C9F
Note: This ID will be used to generate the license that will be valid exceptionally for the configuration of the actual MN VPS. Thus, if you decide to migrate your MN to some other physical server or make a hardware upgrade of the existing one in the future, POA might not run. To avoid such situation, you are strongly recommended to notify your vendor in advance about the planned hardware upgrade or replacement.
1 In POA, go to Top > System Director > License Manager. You will see the page containing active license information and the list of available licenses (if there are any).
Installing Linux-based POA Management Node 17
3 Into the Local path field, input the local path to the license file, or use the Browse button to show the way to the license key at local computer.
4 Click on the Submit button. The new license will be shown in the list and become available for activation.
5 Click on the just added license in the list. You will be taken into the license information page, where you will see the following information:
ID – license unique number.
Status– license current condition (Active, Not active, Invalid). Description– general license overview.
Signature– string that identifies this particular license. Product name – name of POA.
Product version – version of POA. Company name – vendor of POA.
Resource Limits - table form that shows the availability expiration dates and the amount of resource units provided by a license.
If the license is not active, you will see the Activate button.
6 Click on the Activate button. The license key will be immediately replaced with the new key you have activated.
Now, the functionality provided by the system as well as proper limitations will be set according to the properties defined by the new license key.
Note: You can delete any license in the list simply by checking it in the corresponding checkbox and clicking the Delete button. However, you cannot delete the active license, but replace it with another one from the current list of licenses. In the list of licenses, there can be only one active license; the rest are considered inactive.
In This Chapter
Deploying Linux-based POA Management Node in Virtuozzo Failover Cluster . 19
C
H A P T E R3
Deploying POA Management Node in
Virtuozzo Failover Cluster
Deploying POA Management Node in Virtuozzo Failover Cluster 19
Deploying Linux-based POA Management Node
in Virtuozzo Failover Cluster
Description
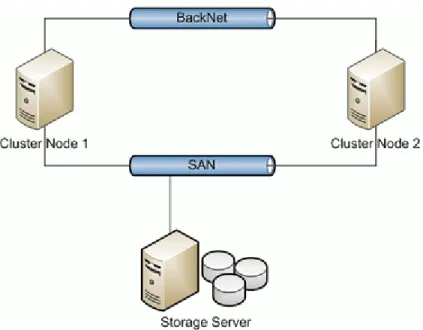
POA Management Node can be deployed in cluster configuration with the use of Virtuozzo Failover Cluster. Such cluster configuration provides High Availability for POA
Management Node and represents the following:
Two hosts (or cluster node) are combined in a cluster with the use of the Red Hat Cluster Suite.
Both hosts are attached to a shared storage (SAN). This shared storage is intended to store PVC data, such as OS/Application Templates, VPSs' private areas, VPSs' backups.
PVC for Linux 4.0 is installed on both hosts.
Management Node VPS is created and Management Node is installed.
Shared storage, IP Address for PVC management, and the vz service are represented as cluster resources. One cluster node (active cluster node) owns appropriate cluster
resources. It means that on the active cluster node shared storage is mounted, IP Address for PVC Management is configured, the vz service is active, Management Node VPS is started. Another cluster node is a standby cluster node (or passive cluster node). If one cluster node fails by certain reason, for example, due to hardware failure, it will be fenced and another cluster node will become an owner of cluster resources.
Figure 5: Failover Cluster Deployment Scheme for Linux
Network Interfaces and IP Addresses
It is required to configure Network Interface Cards (NICs) and IP Addresses on the cluster nodes in the following way:
First cluster node
BackNet NIC
Cluster Node BackNet IP Address SAN Connectivity NIC (optional)
SAN Connectivity Network IP Address
Second cluster node
BackNet NIC
Cluster Node BackNet IP Address SAN Connectivity NIC (optional)
SAN Connectivity Network IP Address
BackNet NICs and Cluster Node BackNet IP Addresses are used for the following purposes:
Accessing cluster node via SSH. Cluster services communication.
Deploying POA Management Node in Virtuozzo Failover Cluster 21
SAN Connectivity NICs and SAN Connectivity Network IP Addresses are used for access to shared storage via SAN Connectivity Network from cluster nodes. This network is optional, the BackNet network can be used for access to shared storage (shared storage should be available in the BackNet network in this case). But, it is recommended to use a separate network for access to shared storage in order to separate traffic between shared storage and cluster nodes, and minimize the load on the BackNet network.
Additionally, the following BackNet IP Addresses should be prepared:
PVC Management IP Address - this IP Address is used for PVC management purposes.
Management Node VPS IP Address - this IP Address is used by Management Node VPS.
Hardware Requirements
Both cluster nodes should meet the following hardware requirements: Server Names LINMNCL01, LINMNCL02
Description Virtuozzo Failover Cluster Node. It runs POA Management Node VPS.
Density 50,000 accounts
Quantity 2
OS RHEL 5 (x86 or x64)
CentOS 5 (x86 or x64)
Software To be installed by the Customer:
OS
Supported
Virtualization Parallels Virtuozzo Containers (PVC) 4.0 for Linux
CPU 2 core (3GHz or higher)
RAM 4GB
Disks Array 1:
OS and software - 2 x 36, SCSI RAID 1 Array 2:
PVC data - SAN, 3 x 72GB
/ - remaining space - for OS and software
2 x RAM size (8GB) - swap Array 2:
/vz (mount point) - for PVC data
NICs BackNet
SAN Connectivity (optional)
Deploying Virtuozzo Failover Cluster
Two-nodes Virtuozzo Failover Cluster should be deployed. Instructions are provided in the
Deploying RHCS Clusters in Virtuozzo-Based Systems document, in the Deploying Virtuozzo
Failover Cluster section.
Note: It is recommended to use the Conga web-based cluster management interface to build a cluster. It does not require the X Window System installed on the cluster nodes.
Installing POA Management Node
Create the Management Node VPS and install the Management Node. Instructions on how to do this are provided in the Installing Linux-based POA Management Node (on page 8) section.
This section describes on how to deploy the System and External Native Repositories.
In This Chapter
Description ... 23 Deploying System Native Repository... 24 Deploying External Native Repository ... 25
Description
Native Repository stores and indexes native packages (RPMs in our case) in such a way that the YUM (Yellow dog Updater, Modified) package manager can effectively and automatically update and install/remove these packages by resolving package dependencies.
POA uses the Native Repositories to automatically install the required RPM packages on the Linux-based Hardware Node during the POA Packages installation. Thus, if it is planned to use the Linux-based Hardware Nodes for POA services installation, create the following Native Repositories for target OS:
System Native Repository - It contains the POA-specific RPMs. To obtain the instructions on how to create a System Native Repository, refer to the Deploying System Native Repository section (on page 24).
External Native Repository - It contains the standard RPMs, which are included to the OS distribution package. To obtain the instructions on how to create an External Native Repository, refer to the Deploying External Native Repository section (on page 25).
Note: Native Repository deployment is not required if the Linux-based VPSs will be used for services installation.
C
H A P T E R4
Deploying System Native Repository
To create a System Native Repository, follow these instructions:1 In POA CP, go to Top > Deployment Director > Applications Manager > Native repositories.
2 Click on the Add New Repository button.
3 Specify the repository general parameters:
a Select the System option.
b In the Repository Platform drop-down list, select the required platform.
Figure 6: Selecting "System" Option Click on the Next button.
4 Select a host for a system repository by clicking on its name.
5 Click Finish.
6 Into the just created native repository, upload the RPMs from the os/<OS name>/<OS version>/RPMS directory.
To add a RPM package to the System Native Repository, follow these steps:
1 Obtain the RPM. RPMs that are shipped with POA distribution available by the following path:
POA_DISTRIBUTION_DIRECTORY/os/OS_TYPE/OS_VERSION/RPMS/
where
Deploying Native Repositories 25
OS_TYPE - Type of Operating System, for example: RHES. OS_VERSION - Version of Operating System.
2 In POA CP, go to Top > Deployment Director > Applications Manager > Native Repositories. The list of existing Native Repositories opens.
Figure 7: IP Address of System Native Repository Host
3 Obtain the IP Address of the host where the target System Native Repository resides.
4 Deliver the RPM package to the host where the target System Native Repository resides to the
POA_INSTALLATION_DIRECTORY/sysvhosts/ppmmirror/data/OS_TYPE/OS_V ERSION/YUM/ directory.
Where:
POA_INSTALLATION_DIRECTORY - Directory where POA is installed. Typically,
POA_INSTALLATION_DIRECTORY is the /usr/local/pem/. OS_TYPE - Type of Operating System, for example: RHES. OS_VERSION - Version of Operating System.
5 In POA CP, go to Top > Deployment Director > Applications Manager > Native Repositories. The list of existing Native Repositories opens.
6 Select the checkbox opposite the target System Native Repository and click on the
Reindex button. Pop-up window appears with the following text: "You are ready to perform reindex operation for selected repositories. Do you really want to proceed?".
7 Click on the OK button to proceed. The Status of the target System Native Repository becomes Needs reindex.
When the Status of target the System Native Repository becomes Ready, repository is ready to use.
Deploying External Native Repository
To register an External Native Repository in POA, follow these instructions:
1 In POA CP, go to Top > Deployment Director > Applications Manager > Native repositories.
2 Click on the Add New Repository button.
a Select the External option.
b In the Repository Platform drop-down list, select the required platform.
Figure 8: Selecting "External" Option Click on the Next button.
4 Specify the URL for the existing external repository.
After the Management Node is installed, POA UI can be opened by entering the following URL into the address field of a browser:
http://Management_Node_IP_address:8080
However, it is not recommended to run UI on Management Node. You should deploy UI on a separate, ready to provide server, deploy Branding Server, and create a Brand for the access to this UI Server. Everybody who opens POA Control Panel via the Brand will physically use the separate UI Server, not the Management Node.
To deploy POA Control Panel using Linux-based servers, perform the following steps:
1 Create a separate, ready to provide UI Server. This server should be attached to BackNet only.
2 Create a Branding Server. This server is an Apache Web Server, which is attached to BackNet and FrontNet. It acts as proxy and delivers requests to UI Server.
3 Create Brand to access POA Control Panel.
4 Create certificate for the Brand.
In This Chapter
Creating UI Server ...28 Creating Branding Server...32 Creating Brand ...38 PBA Online Store Publishing Automation ...44 Creating Certificate for Brand ...48
C
H A P T E R5
Creating UI Server
Creating Attribute
Create the attribute with the name ui node. For the instructions, refer to the Creating Attributes section (on page 60).
Preparing Node for UI Server
For POA UI server, you need a computer that meets the following requirements: Server Names LINUI
Description POA UI Server on Linux.
This server is responsible for running the POA user interface.
Multiple UI servers can be used for scalability. Also it is possible to have a separate UI Server for each brand.
Density 20,000 accounts Quantity 1 OS RHES 4 (x86) CentOS 4 (x86) RHEL 5 (x86 or x64) CentOS 5 (x86 or x64)
Software To be installed by the Customer:
OS only
Supported
Virtualization Parallels Virtuozzo Containers (PVC) 3.x/4.0 for Linux
CPU 2 core (3GHz or higher)
RAM 4GB
Disks Array 1:
OS and software - 2 x 80GB, SATA, RAID 1 (software impl.)
Disk Partitioning Array 1:
2 x RAM size (8GB) - swap
/ - remaining space - for OS and software
Deploying POA UI on Linux 29
You can install UI server on a Hardware Node, or on a VPS. For either case, refer to the corresponding topic below.
Important! Firewall on the UI Server must allow TCP connections to port 8080 from Branding server.
UI Server on Hardware Node
1 Register a Hardware Node that meets the above requirements. Please find instructions in the Registering Linux-Based Hardware Nodes section (see page 66).
2 Install the following RPM packages on the Hardware Node: For RHES 4 and CentOS 4:
cronolog
jre For RHEL 5 and CentOS 5: cronolog
jre
libxslt
Refer to the Installing RPM Packages on Hardware Nodes section (on page 73).
3 Add the ui node attribute to the Hardware Node. Please find instructions in the Adding Attribute to Host section (see page 61).
UI Server on VPS
1 Create the Resource Type based on the VPS Hardware nodes Resource Class:
a In POA Control Panel, go to Top > Service Director > Provisioning Manager > Resource
Types.
b Click on the Add New Resource Type button.
c In the list of Resource Classes, click VPS Hardware nodes.
d Specify the name (for example, "VPS Hardware nodes") and description of the new Resource Type. Click Next to continue.
e Specify the activation parameters for the Resource Type:
Specify the number of dedicated VPSs by entering this number into the Number of Dedicated VPS field.
Enter "5" into the Maximum of simultaneous migrations per Hardware Node field. Click Next.
f Click Finish.
2 Create the Resource Type based on the Virtual Private Servers (Shared) Resource Class:
a In POA Control Panel, go to Top > Service Director > Provisioning Manager > Resource
Types.
b Click on the Add New Resource Type button.
c In the list of Resource Classes, click Virtual Private Servers (Shared).
d Specify the name (for example, "UI VPS") and description of the new Resource Type. In the Platforms drop-down list, select the newest platform. Click Next.
Note: If you have only one platform, the Platforms drop-down list will be unavailable.
e Select the required PVC Template type (EZ or Standard). Click Next.
f Specify OS Template for VPSs based on the Resource Type being created. Click
Next to continue.
g Specify network parameters for VPSs based on the Resource Type being created: Select IP Pools from which the IPs for VPSs will be taken.
Type the IP address of the DNS server you are going to use for VPSs. Click Next to continue.
h Select the following Application Templates: For RHEL 5 and CentOS 5:
.pa-ui
.pa-pleskd
For RHES 4 and CentOS 4: vzpem-ui
Deploying POA UI on Linux 31
vzpem-pleskd
Click Next to continue.
i In the Based on option group, select One of the VPS sample configurations. Click Next to continue.
j In the Sample configuration option group, select Basic. Click Next to continue.
k Specify CPU, Disk Quota, UBC parameters. Click Next to continue.
l In the list of available attributes, select ui node. Click Next to continue.
m Click Finish.
3 Register the VPS Hardware Node in POA. Refer to the Registering Linux-based VPS Hardware Nodes section (on page 66).
4 Add the ui node attribute to the just registered VPS Hardware Node. Refer to the Adding Attribute to Host section (on page 61).
5 Create the VPS to be used as UI server. Refer to the Creating VPS section (on page 71).
6 Add the ui node attribute to the VPS. Refer to the Adding Attribute to Host section (on page 61).
Installing POA Packages
Install the following packages on the UI server:
1 em-gui (type: other). Several packages will be installed as the em-gui (type: other) package.
2 Install the skin packages that you want to use for the UI server brand. Refer to the Installing PPM Packages section (on page 73) for the step-by-step instructions.
Marking UI Server as Ready to Provide
If you plan to bind a brand to your UI server, you need to mark this server as ready to provide.
1 Click on the name of the (VPS) Hardware Node. The Summary tab opens.
2 Click the Mark as ready to provide link. As a result, the Marked as ready to provide indicator located on the left side of the General box becomes green saying Yes.
Restarting Java on UI Server
In order to have your new UI server working, restart Java:
1 Log on to the created UI server via SSH.
2 Execute the following command: # /etc/init.d/pemui stop # /etc/init.d/pemui start
Creating Branding Server
Creating Attribute
Create the attribute with the name web. For the instructions, refer to the Creating Attributes section (on page 60).
Preparing Node for Apache Web Server
For Apache Web server, you need a computer that meets the following requirements: Server Names LINBR
Description Branding Server on Linux. It hosts websites, which are used for branding
purposes. Density 1 Quantity OS RHES 4 (x86) CentOS 4 (x86) RHEL 5 (x86 or x64) CentOS 5 (x86 or x64)
Software To be installed by the Customer:
OS only
Supported
Virtualization Parallels Virtuozzo Containers (PVC) 3.x/4.0 for Linux
CPU 2 core (3GHz or higher)
RAM 4GB
Deploying POA UI on Linux 33
OS and software - 3 x 146GB, SCSI, RAID 5 (hardware impl.)
Disk Partitioning Array 1:
/ 4GB - for OS
2 x RAM size (8GB) - swap
/usr - remaining space - for software and data
NICs FrontNet, BackNet
You can install Apache Web server on a Hardware Node, or on a VPS. For either case, refer to the corresponding topic below.
Apache Web Server on Hardware Node
1 Register a Hardware Node that meets the above requirements. Refer to the Registering Linux-based Hardware Node section (on page 62).
2 Install the following RPM packages on the Hardware Node: mod_cband mod_frontpage mod_init_crypto mod_limitipconn pem-suexec perl-BerkeleyDB php4 php4-curl php4-domxml php4-gd php4-imap php4-ldap php4-mbstring php4-mcrypt php4-mhash php4-mysql php4-ncurses php4-odbc php4-pear php4-pear-HTTP-Request php4-pgsql php4-snmp php4-xmlrpc libc-client libmcrypt libmhash webalizer db1 MySQL4-client MySQL-shared-compat
Deploying POA UI on Linux 35 MySQL-python mx perl-DBD-MySQL perl-DBD-Pg postgresql-libs mod_ssl frontpage proftpd php5-cgi httpd vixie-cron perl curl
Refer to the Installing RPM on Host section (on page 73).
3 Add the web attribute to the Hardware Node. Refer to the Adding Attribute to Host section (on page 61).
4 Mark the Hardware Node as ready to provide:
a Click on the name of the Hardware Node. The Summary tab opens.
b Click the Mark as ready to provide link. As a result, the Marked as ready to provide indicator located on the left side of the General box becomes green saying Yes.
Apache Web Server on VPS
1 Create the Resource Type based on the Virtual Private Servers (Shared) Resource Class:
a In POA Control Panel, go to Top > Service Director > Provisioning Manager > Resource
Types.
b Click on the Add New Resource Type button.
c In the list of Resource Classes, click Virtual Private Servers (Shared).
d Specify the name (for example, "Web VPS") and description of the new Resource Type. In the Platforms drop-down list, select the newest platform. Click Next.
Note: If you have only one platform, the Platforms drop-down list will be unavailable.
e Select the required PVC Template type (EZ or Standard). Click Next.
f Specify OS Template for VPSs based on the Resource Type being created. Click
Next to continue.
g Specify network parameters for VPSs based on the Resource Type being created: Select IP Pools from which the IPs for VPSs will be taken.
Type the IP address of the DNS server you are going to use for VPSs. Click Next to continue.
h Select the following Application Templates: For RHEL 5 and CentOS 5:
.mod_ssl .pa-apache-httpd .pa-frontpage .pa-mysql-client .pa-pgsql-client .pa-php .pa-php5-cgi .pa-proftpd .pa-webalizer
For RHES 4 and CentOS 4: mod_ssl vzpem-apache-httpd vzpem-frontpage vzpem-mysql-client vzpem-pgsql-client vzpem-php
Deploying POA UI on Linux 37
vzpem-php5-cgi
vzpem-proftpd
vzpem-webalizer
Click Next to continue.
i In the Based on option group, select One of the VPS sample configurations. Click Next to continue.
j In the Sample configuration option group, select Basic. Click Next to continue.
k Specify CPU, Disk Quota, UBC parameters. Click Next to continue.
l In the list of available attributes, select web. Click Next to continue.
m Click Finish.
2 Register the VPS Hardware Node in POA. Refer to the Registering Linux-based VPS Hardware Nodes section (on page 66).
3 Add the web attribute to the just registered VPS Hardware Node. Refer to the Adding Attribute to Host section (on page 61).
4 Create the VPS to be used as Web server. Refer to the Creating VPS section (on page 71).
5 Mark the VPS Hardware Node as ready to provide:
a Click on the name of the VPS Hardware Node. The Summary tab opens.
b Click the Mark as ready to provide link. As a result, the Marked as ready to provide indicator located on the left side of the General box becomes green saying Yes.
Installing POA Packages
Refer to the Installing PPM Packages section (on page 73), install the following packages:
1 On the Management Node, install the apache (type: sc) service controller.
2 On the UI server, install the apache (type: cp) package.
3 On the Apache Web server, install the packages: webve (type: other)
static_ui_content
packages for skins
Note: You need to install here the same skin packages as you installed on the UI server.
Creating Brand
You cannot build your own brands until:
Brand-related POA packages (SC and CP) are installed on the POA MN and on the ready to provide UI servers.
Appropriate Resource Types are created in POA.
For details, see the Deploying Branding section (on page 50).
Creating 'Physical Hosting (Apache)' Resource Type
1 In POA Control Panel, go to Top > Service Director > Provisioning Manager > Resource
Types.
2 Click on the Add New Resource Type button.
3 Select the Physical Hosting (Apache) Resource Class.
4 Specify the Name and Description of the new Resource Type. Click Next to continue.
5 Specify the following activation parameters:
Web prefix for Customer Domains. Specify the prefix to be used to create additional DNS records for the domains and subdomains of your Customers.
Assign exclusive IP during provisioning (Yes:1, No:0). Set this activation parameter to 1 if you want the system to provision websites on exclusive IP addresses.
Instant Access URL prefix template. Specify the prefix template for the instant access domain name. See the Instant Access URL Prefix Template topic (on page 40) for detailed information.
Deploying POA UI on Linux 39
Default Domain's Identifier. Specify the identifier of your domain that is used to build instant access domain names.
Note: This identifier is used in case a webspace is created either through
OpenAPI or through a non-branded CP only. If the webspace is created through a branded CP, the branded domain name is used.
Web prefix for Provider Domains. Specify the prefix to be used to create additional DNS records for domains and subdomains.
Web inodes usage hard limit. Enter the number of files a subscriber will be able to create.
Web inodes usage soft limit. Enter the number of files a subscriber will be able to create before the overusage notification is sent.
Web disk space usage hard limit. Enter the value of diskspace a subscriber will be able to use.
Web disk space usage soft limit. Enter the value of diskspace a subscriber will be able to create before the overusage notification is sent.
Limit of simultaneous requests per Virtual Host. Specify how many computers will be able to connect to the webspace simultaneously.
Click Next to continue.
6 Select the web attribute. Click Next to continue.
Instant Access URL Prefix Template
The Instant Access URL prefix template consists of:
Symbols: [0-9 A-Z a-z]. Every new Instant Access URL will begin with the symbols you put at the beginning of the prefix template.
Properties: ${domain_name} or ${subscription_id}. The domain name may be subject to conversion, by specifying :suffix after the property name: ${domain_name:suffix}. If the domain name includes a specified suffix, the name will be used in Instant Access URL without this suffix.
Special property ${unique}. It should be always included into a prefix template for the sake of prefix uniqueness. This property will expand into nothing for the first (auto-unique) prefix and into –1, -2, -3, and so forth for subsequent prefixes that are assigned to different home directories.
Here are some examples of Instant Access URL prefix templates:
${domain_name}${unique}. For example, if the domain name is customer.domain.com, the Instant Access URL for the first Web hosting provisioned with the domain will be
customer-domain-com, for the second - customer-domain-com-1, and so on (customer-domain-com-2, customer-domain-com-3, …).
${domain_name:.info}${unique}. For example, if the domain name is
customer.domain.info, the Instant Access URL for the first Web hosting
provisioned with the domain will be customer-domain, for the second Web hosting -
customer-domain-1, and so on.
d${subscription_id}${unique}. For example, Subscription identifier 1000123 will expand into d1000123 for the first Web hosting provisioned by this Subscription, into
d1000123-1 - for the second Web hosting, and so on.
Creating 'Branding Access Points' Resource Type
1 In POA Control Panel, go to Top > Service Director > Provisioning Manager > Resource
Types.
2 Click on the Add New Resource Type button.
3 Select the Branding access points Resource Class.
4 Specify the Name and Description of the new Resource Type. Click Next to continue.
5 Select the ui node attribute. Click Next to continue.
Deploying POA UI on Linux 41
Creating Website
1 In POA Control Panel, click the Hosting CP link. The POA Customer's Control Panel opens.
2 Go to Hosting > Configuration & Administration > Domain Overview > Domain Administration.
3 Start creating a new domain. For this purpose, click on one of the following buttons: Register New Domain
Transfer Existing Domain
Add existing domain registered elsewhere
4 Enter the general parameters for a new domain:
Into the Domain field, type the name you wish to assign to your domain.
Select the Zone management ability option if you want to get the ability of managing DNS zone for your domain. This includes the possibility to add and change zone records and tune zone time settings.
In the Web Hosting area, select Website. In parentheses after Website, the web server type is indicated: Apache or Microsoft IIS.
Click Next.
5 In the Webspace group box, select the Create new webspace option. Into the Location field, type the path to the directory on the Apache Web server where your website will be located. Click Next.
6 In the IP Address Type drop-down list, select Exclusive. Click to select the SSL support check box. Click Next.
7 Select resources for traffic and diskspace. Click Next.
Creating Brand
1 In POA Control Panel, go to Marketing Director > Branding Manager > Brands.
2 Click on the Add New Brand button to launch the Wizard for website branding.
3 Select the Existing domain option, and select the just created website from the Domain
choice drop-down list. Click Next to continue.
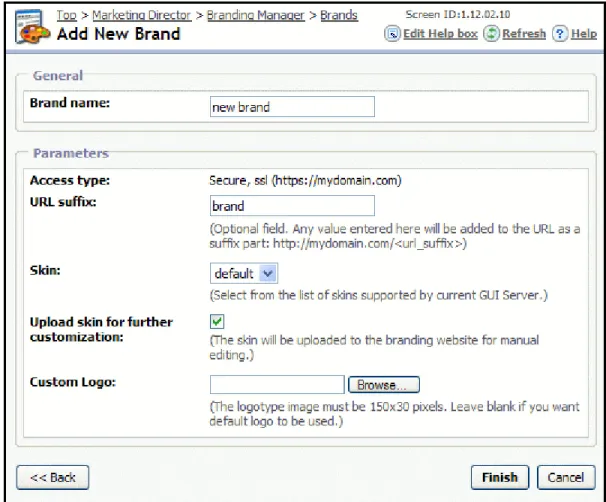
4 Provide the necessary information as indicated below:
In the Brand name field, type any name you find appropriate for distinguishing this brand among other brands.
In the URL suffix field, type a suffix that will be added to your domain.
For example, if you choose x for path suffix of your domain www.mydomain.com, your access point to Control Panel will be www.mydomain.com/x/. Without the suffix, the domain and the access point to Control Panel will be inaccessible. This branded domain will be used for access to POA Control Panel.
In the Skin drop-down list, select the skin you want to give to your website interface. Select the Upload skin for further customization check box if you wish to upload the
skin to the branding website for manual editing.
In the Custom Logo field provide the location of the logotype file that will be attached to your website. If you leave the field blank, the default logo will be used.
Deploying POA UI on Linux 43
Figure 9: Adding New Brand
PBA Online Store Publishing Automation
Parallels Business Automation (PBA) provides Online Store for Provider’s and for
Resellers’ Accounts. PBA Online Store is a web-based tool that allows you to sell hosting services online. Also, there is an ability for Providers and Resellers to have multiple Online Stores per an Account in PBA. Every Online Store can be fully customized to suit the needs of a store owner. Customization allows you to change the layout, style, colors, content, localization, and ordering process.
Parallels Operations Automation (POA) integrated with PBA allows you to enable an access to the PBA Online Store during the Brand creating/modifying in POA. You can create an access point, which will be used to access POA/PBA Control Panels and PBA Online Store. For example, a Brand is created on the base of example-brand.com Domain. In this example, POA/PBA Control Panels are accessible through
brand.com/controlpanel/ URL and PBA Online Store is accessible through https://example-brand.com/onlinestore/ URL.
Note: PBA supports Online Store publishing automation starting from 4.3.4 version. To enable an access to PBA Online Store during Brand creation, perform the following steps:
1 In POA Control Panel, go to Top > Marketing Director > Branding Manager > Brands. The list of existing Brands opens.
2 Click on the Add New Brand button. The Add New Brand wizard starts.
3 Pass through the Add New Brand wizard till the last step (process of Brand creating is described in the Provider's Guide > Marketing Operations > Branding in Parallels Operations
Automation > Branding Domains Hosted in POA > Branding Website section).
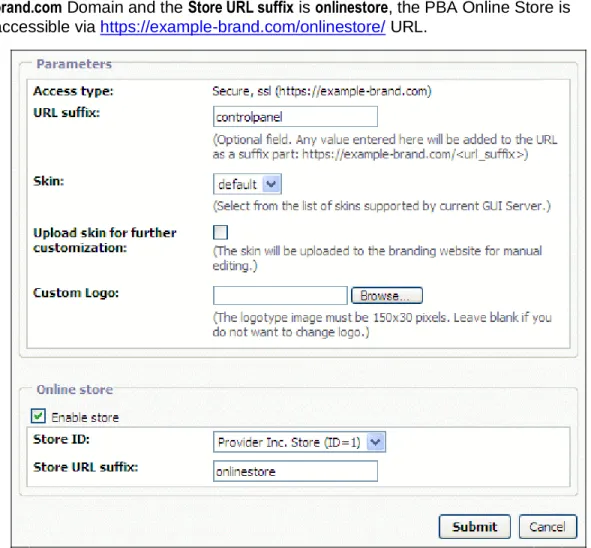
4 Specify parameters in the Parameters area:
a Fill out the URL suffix field. For example, if your Brand is based on the
example-brand.com Domain and the URL suffix is controlpanel, POA/PBA Control Panels are accessible via https://example-brand.com/controlpanel/ URL.
b Select a skin and upload a Custom Logo, if required.
5 Select the Enable store checkbox in the Online store area.
6 There is the Store ID drop-down list. This list contains your existing PBA Online Stores. Select the required Online Store.
Note: Your Account should has the Online Store(s) created, configured, and synchronized in PBA. To obtain instructions on how to manage PBA Online Stores, refer to the PBA Online Store guide, the Managing Online Store section.
Deploying POA UI on Linux 45
7 Fill out the Store URL suffix field. The value of this field is used to define the suffix of PBA Online Store access URL. For example, if your Brand is based on the
example-brand.com Domain and the Store URL suffix is onlinestore, the PBA Online Store is accessible via https://example-brand.com/onlinestore/ URL.
Figure 10: PBA Online Store Parameters
8 Click on the Finish button.
Note: You can update values of the Store ID and the Store URL suffix parameters by editing the Brand, if required.
To enable an access to PBA Online Store for existing Brand, perform the following steps:
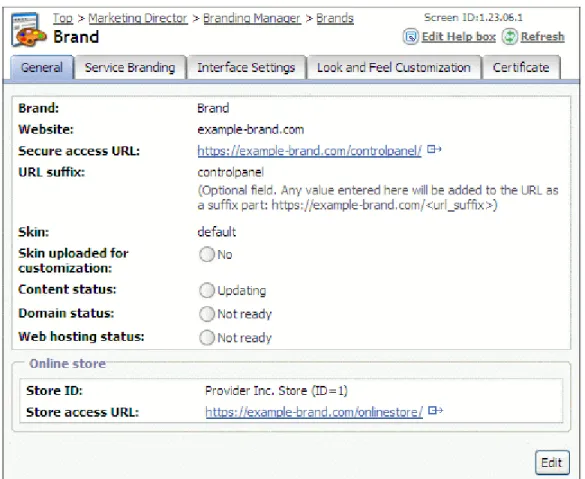
1 In POA Control Panel, go to Top > Marketing Director > Branding Manager > Brands. The list of existing Brands opens.
Figure 11: Brand - General Tab
3 Click on the Edit button. The General tab of the selected Brand appears in editing mode.
4 Select the Enable store checkbox in the Online store area.
5 There is the Store ID drop-down list. This list contains your existing PBA Online Stores. Select the required Online Store.
Note: Your Account should has the Online Store(s) installed in PBA. To obtain instructions on how to manage PBA Online Stores, refer to the PBA Online Store guide, the Managing Online Store section.
6 Fill out the Store URL suffix field. The value of this field is used to define suffix of PBA Online Store access URL. For example, if your Brand is based on the
example-brand.com Domain and the Store URL suffix is onlinestore, the PBA Online Store is accessible via https://example-brand.com/onlinestore/ URL.
7 Click on the Finish button.
Note: You can update values of the Store ID and the Store URL suffix parameters by editing the Brand, if required.
You can disable an access to PBA Online Store for the Brand. To do this, perform the following steps:
Deploying POA UI on Linux 47
1 In POA Control Panel, go to Top > Marketing Director > Branding Manager > Brands. The list of existing Brands opens.
2 Click on the Brand. The General tab of the selected Brand appears.
3 Click on the Edit button. The General tab of the selected Brand appears in editing mode.
4 Clear the Enable store checkbox in the Online store area.
Creating Certificate for Brand
1 In POA Control Panel, go to Top > Personal Info > Certificates. Click on the Self-signed link in the main window.
2 Click the Self-signed link in the Certificates area.
3 Fill out the following fields:
Bits - Select the level of encryption of your SSL.
Key type - For asynchronous encryption and signing, keys are needed. For generating your certificate you can choose between the RSA and DSA keys. Country - Select a country from the drop-down list.
State/Province - Specify a state or a province. Location (City) - Specify a location (city).
Organization name - Enter an appropriate organization name.
Organization Unit name - Type an appropriate department/division of your organization.
Domain name - Enter the branded domain name. This will be the only domain name to be used to access the Control Panel without receiving a certificate warning in the browser.
E-mail - Specify your e-mail address.
Valid from / Valid to - Define the period during which the self-signed certificate will be valid for using it.
Store in user repository - RSA private keys and certificates are stored in the user repository automatically. You must clean the checkbox if you do not want to store them.
Click on the Submit button.
4 On the displayed page you can see two different text sections: Certificate and Private
Key.
In the Certificate form you can see the certificate you have just generated. Click the
Store button to immediately store the generated certificate to the repository, or the
Download button to download the certificate to your local computer.
In the Private Key form below the private key is displayed. Do not lose it. You will need this key during the certificate installation process. Losing it is likely to result in the need to generate another certificate. You can store the key to the repository immediately by clicking the Store button or download it to your local computer by clicking the Download button. Your self-signed certificate will be immediately generated and added to the repository.
Note: The Store button is hidden if the Store in user repository option was checked during the private keys/certificates generating.
Deploying POA UI on Linux 49
5 After performing the corresponding operations, click OK.
All your generated keys or obtained by a Certificate Authority certificates are stored in the user repository. When creating your self-signed certificate, you can store it immediately or add any certificate to the user repository later on by clicking the Store button.
Branding is creating an immediately recognizable identity. It is intended to identify and distinguish the product or service from competing products or services. Studies have shown that the majority of e-commerce buyers make their purchase decisions based on recognizing a familiar brand.
Brand is the symbolic embodiment of all the information connected with a company, product or service. A brand typically includes a name, logo, and other visual elements such as images, fonts, color schemes, or symbols.
In POA, both providers and resellers can create their own brands. Furthermore, resellers can hide all provider's addresses or use their domains instead of provider's domains in paths to services. To enable the branding functionality, install the following POA packages:
BrandingManager (type: sc) - on the POA Management Node. branding (type: cp) - on the ready to provide UI server.
Refer to Installing PPM Packages (on page 73) to know how to install packages. Now, you are ready to perform the follow-up operations: creating Resource Type,
providing resellers with branding, creating brands. See details in the POA Provider's Guide, in
Marketing Operations > Branding in POA > Creating Service Template for Branding.
C
H A P T E R6
The main purpose of a Domain Name System (DNS) server is to translate domain names to IP addresses, and vice versa. A DNS server is also used to determine the mail server for a given domain name.
Of course, you can use an external DNS server. But if you want a DNS server to be managed via POA, you need to install your own DNS server. This section explains how to deploy DNS hosting on a Linux server, and to provide it with POA support.
It is strongly recommended that DNS servers be placed on different Hardware Nodes inside VPSs. You need at least two DNS servers each one installed on a computer that meets the following requirements:
Server Names LINDNS01, LINDNS02
Description DNS Server on Linux
Density 60,000 DNS zones / 300,000 DNS resource records per server
Quantity Minimum 2 are required.
Can be deployed as a VPS on one of the Multi-Purpose servers - see below.
OS RHES 4 (x86)
CentOS 4 (x86)
RHEL 5 (x86 or x64)
CentOS 5 (x86 or x64)
Software To be installed by the Customer:
OS only
Supported
Virtualization Parallels Virtuozzo Containers (PVC) 3.x/4.0 for Linux
CPU 2 core (3GHz or higher)
RAM 2GB
Disks Array 1:
OS and software - 2 x 36GB, SCSI, RAID 1
Disk Partitioning Array 1:
/ - 4GB - for OS and software
2 x RAM size (4GB) - swap
/var - remaining space - for DNS zone files
NICs FrontNet, BackNet
C
H A P T E R7
Note: You can deploy DNS server as a VPS on one of the Multi-Purpose servers.
In This Chapter
Installing DNS Server on VPS ... 53 Installing DNS Server on Hardware Node... 54
Deploying Linux-based DNS Servers 53
Installing DNS Server on VPS
1 Create the attribute dns node. Refer to the Creating Attributes section (on page 60).
2 Create the Resource Type based on the VPS Hardware nodes Resource Class if it is not yet created.
3 Create the Resource Type based on the Virtual Private Servers (Shared) Resource Class:
a In POA Control Panel, go to Top > Service Director > Provisioning Manager > Resource
Types.
b Click on the Add New Resource Type button.
c In the list of Resource Classes, click Virtual Private Servers (Shared).
d Specify the name (for example, DNS VPS) and description of the new Resource Type. In the Platforms drop-down list, select the newest platform. Click Next.
Note: If you have only one platform, the Platforms drop-down list will be unavailable.
e Select the Standard template package type. Click Next.
f Specify OS Template for VPSs based on the Resource Type being created. Click
Next to continue.
g Specify network parameters for VPSs based on the Resource Type being created: Select IP Pool from which the FrontNet IPs for VPSs will be taken.
Type the IP address of the DNS server you are going to use for VPSs. Click Next to continue.
h Select the vzpem-pleskd-as4 Application Templates. Click Next to continue.
i In the Based on option group, select One of the VPS sample configurations. Click Next to continue.
j In the Sample configuration option group, select Basic. Click Next to continue.
k Specify CPU, Disk Quota, UBC parameters. Click Next to continue.
l In the list of available attributes, select dns node. Click Next to continue.
m Click Finish.
4 Register the VPS Hardware Node in POA. Refer to the Registering Linux-based VPS Hardware Nodes section (on page 66).
5 Add the dns node attribute to the just registered VPS Hardware Node. Refer to the Adding Attribute to Host section (on page 61).
6 Create the VPS to be used as DNS Server. Refer to the Creating VPS section (on page 71). While creating the VPS, select DNS VPS as the Resource Type to base your DNS VPS on.
7 Install the package bind9 (type: service) on the DNS server VPS. Refer to the Installing PPM Packages section (on page 73).