NIS-Elements Viewer
User's Guide
Publication date 10.09.2013
v. 4.20.00
Laboratory Imaging, s. r. o., Za Drahou 171/17, CZ - 102 00 Praha 10
No part of this publication may be reproduced or transmitted except with the written permission
of Laboratory Imaging, s. r. o.
Information within this publication is subject to change without notice. Changes, technical
inaccuracies and typographical errors will be corrected in subsequent editions.
Table of Contents
1. Abilities ... 1
2. Installation ... 3
3. Observing a file ... 5
3.1. Viewing modes ... 5
3.2. Image window toolbar tools ... 6
3.3. Control Bar ... 6
3.4. LUTs Tools ... 8
4. Command Reference ... 11
4.1. File Menu ... 11
4.2. Help Menu ... 12
4.3. Window Menu ... 12
1. Abilities
NIS-Elements Viewer is a software created to open and view all file formats created by NIS-Elements:
Features
Image Sequence Playback
You can play the ND2 image sequence as a movie or browse it frame by frame.
Views
Four different views are available:Main View,
Slices View,Volume View,Tiled View.
Note
Availability of the Slices, Tiles and Volume Views depends on the document's dimen-sions.
Attachments
Attachment files can be opened by clicking the icon from the toolbar or inside the image context menu.
Show Binary
When active, this function turns on the binary layer previously saved in NIS-Elements.
Exporting
All images of an ND2 data-set can be saved as a TIF, Multi-Page TIFF, ND2 or JPEG2000 file. See
[File > Export ND Document...].
LUTs Adjusting
A non-destructive contrast enhancement of the image can be applied using either the LUTs tool bar or the LUTs window. The parameters can be adjusted manually or automatically. Please see
[3.4 LUTs Tools].
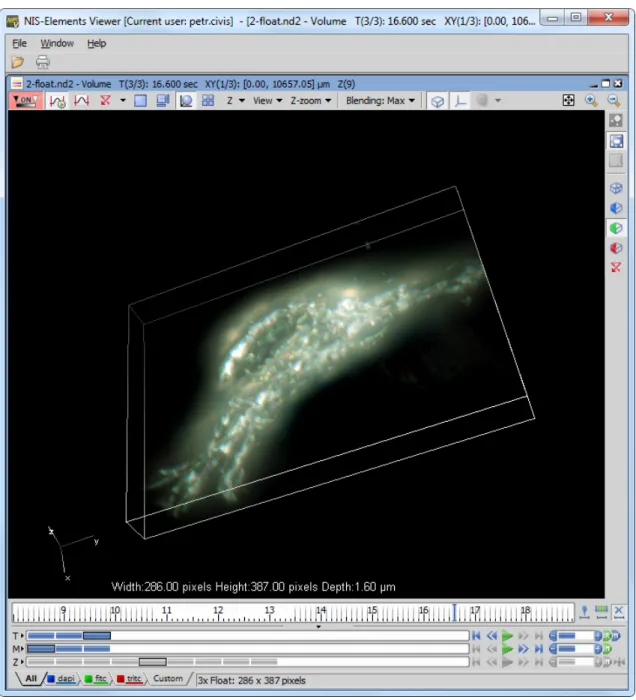
Figure 1.1. Volume View within NIS-Elements Viewer
2. Installation
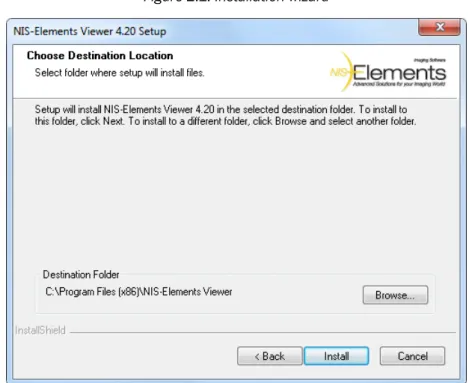
• Run theNIS_Viewer_x.exesetup file. The installation wizard appears. • Follow the instructions of the wizard.
• Click Finish .
Figure 2.1. Installation wizard
3. Observing a file
• Run the [Start > Programs > NIS-Elements Viewer > Viewer] command.
• Call the[File > Open]or the[File > Open Report]command and select the file to open.
Figure 3.1. Open dialog window
• Choose from different[3.1 Viewing modes]and enhance your image with[3.4 LUTs Tools].
3.1. Viewing modes
Depending on the dimensions contained in the ND2 file, you can display other views of the data set. These viewing modes can be switched by four icons on the left of the main tool bar.
Split Components
Turns ON a special view, where color channels of the image are displayed separately (tiled).
Main View
When you open an ND2 file, it opens in this view.
Slices
This view displays orthogonal XY, XZ, and YZ pro-jections of the image sequence (Requires Z or T dimension).
Tiles
This view displays frames of the selected dimen-sion arranged one next to other (Requires Z, T or XY dimension).
Volume
This view creates a 3D model of the acquired ob-ject (Requires Z dimension).
3.2. Image window toolbar
tools
Besides the view modes described above, following tools are also available:
Open Attachment
Clicking this icon opens the attachment file in an associated program. If the association is missing, user is offered to save the document to a local drive. Attachments can also be opened/saved by clickingOpen Attachment.../Save Attachment As...
inside the image context menu.
Fit to screen
Adjusts zoom to view the whole image within the NIS-Elements Viewer screen.
Best Fit
Adjusts zoom to fit the NIS-Elements Viewer image window in one direction but to fill the screen.
1:1 Zoom
Adjust zoom so that one pixel of the image matches one pixel of monitor.
Zoom In
Increases magnification of the image.
Zoom Out
Decreases magnification of the image.
Custom zoom
Custom zoom value can be selected from the combo box.
Show Scale
Places a scale bar into the current image.
3.3. Control Bar
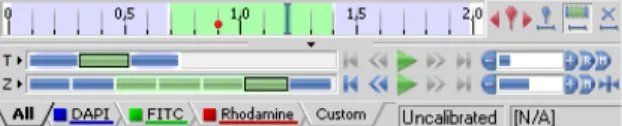
When an ND2 file is opened, its structure is pictured at the bottom of the image window. There is a time line with all captured images indicated by gray markers. The blue-highlighted marker indicates the currently observed image. Below the time line, loops of each dimension are indicated by rectangles. In case the multi-channel dimension is included and the number of channels does not exceed 10, the channels are in-dicated by the color tabs at the very bottom of the im-age window.
Browse the nd2 file by clicking inside the time line. You can also display a single loop by selecting the corresponding blue rectangle. There are some ex-amples, how the nd2 file control bar can look like in different cases:
Figure 3.2. A T/Z/multi-channel image with some loops selected.
Figure 3.3. A T/Z/multi-channel image containing 11 channels and the time line hidden
Figure 3.4. An HDR multi-exposure image
Playing Controls
Play Sequence
Plays all images of the dimension at selected speed. If a selection is applied, only the selected images will be included in the playback.
Stop Playing
Stops playing the sequence at the last displayed frame.
Previous Position
Displays the previous frame of the dimension.
Next Position
Displays the next image of the dimension.
Decrease/Increase Playing Speed
Changes the playback speed by one step down/up
Real Time Playing Speed
Sets the playing speed to real-time (as the image was captured).
Maximum Playing Speed for Every Frame
Sets the playing speed to maximum while the display of every frame is guaranteed (when the speed is set to maximum by the + button, some frames are usually omitted when playing the se-quence depending on your graphic card).
Home Position
Displays the frame of the Z dimension that was set as “home” during the acquisition.
Event and Selection Controls
Insert Default User Event
This button inserts an event marker to the current frame.
Move to Previous/Next User event
Click these arrows to browse through the frames where user events occur.
User Event Selection
This button selects frames of the ND2 file accord-ing to theEvent Playing Rangesettings - right click this button and pick theEvent Selection Range
command from the context menu to view/modify them. A simple window appears. Define the num-ber of frames/seconds which will be selected around each event.
Range Selection
Clicking this button selects a user defined range of frames. The selection is done by mouse. A range can be selected by mouse while holding the
Shift key down. Single frames can be added/re-moved while holding the Ctrl key down. Right-click the navigation bar to invoke the context menu. A selection can be adjusted, deleted, or the nd2 file can be cropped.
Note
ND2 files may contain extremely large number of frames so it may be helpful to omit some of the frames from the selec-tion. Right click the Range Selection but-ton and a context menu appears. It en-ables you to select every 2nd, 5th, 10th, 20th, 50th, 100th frame. The Select All Frames option selects the whole range of frames as if you have selected the first and the last time phase with the Shift
key down, but preserves the Select Every... setting.
Disable Selection
Press this button to de-select all frames of the nd2 file.
Tips
• Right-click the selection to invoke a context menu. The selection can be adjusted, deleted, or the nd2 file can be cropped.
• Detailed info about dimensions will be displayed after you click the leftmost button of the control bar (T>, Z>, ...).
• Place the cursor over one of the dimensions. A tool-tip which displays statistics of the dimension ap-pears.
Playing options
Right click the speed bar to display the following con-text menu and select the playing mode.
Backwardselects the direction of playing the image sequence. When you check theStop on Eventsoption and then press the Play Sequencebutton, a dialog window appears once the first user event is reached. The dialog window displays information about the reached user event. Use theContinuebutton to contin-ue playing to the next event, or press theStopbutton to stop the playback at the current frame. Within the window, you can also select theDo not ask again in this session (Always stop)option, the playing will stop automatically on every user event but the window will not appear.Repeatcommand sets the repetitive infin-ite playback.Fast Advancecommand corresponds to the Maximum Playing Speed for Every Frame button described above.Real Timecommand corresponds to the Real Time Playing Speed button described above.
3.4. LUTs Tools
LUT (look-up table) is a useful tool for image color and brightness modifications. You can use LUTs to en-hance images for observation purposes so the color modifications will be non-destructive to the image data. LUTs settings are saved along with the image file. Adjust LUTs settings within the central tool bar.
Figure 3.6. LUT's Control Panel
Enable/Disable LUTs
This button applies LUTs to the current image.
Keep Auto Scale
Press this button to run the auto scale procedure permanently (on each frame). When you turn this button OFF, the settings remain as if theAuto Scalebutton was pressed only once.
Auto Scale
This button adjusts the slider positions of all channel parameters automatically with the purpose to enhance the image reasonably.
Reset
Discard all LUTs settings and turn LUTs OFF by pressing this button.
Show LUTs Window
Show the window with LUTs settings.
4. Command Reference
4.1. File Menu
File > Exit Exits the program.
File > Export ND Document...
This command opens the export dialog window with following options:
Export Options
File folder
Select the folder to where the images will be saved.
File type
Select the image format from the menu.
File prefix
Specify the prefix which will be used to name all files of the sequence. Dimension names and numbers will be appended to this prefix.
Index order
You can specify the order of dimensions. Select the This will influence the naming of the images.
Apply LUTs
Select this box to apply the current LUTs settings to the images.
Note
Image data in the final format will be modified according to the current LUTs settings.
Insert Overlays
This option merges all visible layers (binary, an-notations,...) and inserts it to the underlying image data. If this option is used, the images are always exported as RGB images.
Use Point Names
XY point names are used if this function is checked.
Channels
Specify in which way will the exported image use the channel information from the source file.
TIF Compatibility Options
Specify the bit depth of the exported image.
File > Image Properties
Displays the Image Information window with Image Fields, Recorded Data, Experiment and Events metadata. It is also possible to open this window from the brief information label.
File > Open
You can load one or more images to the application. TheOpen Imagedialog-box appears. Multiple files se-lection can be performed holding theCtrlor theShift
key.
Information button
Image properties of the selected file can be dis-played by pressing this button (in the top right corner).
File name
Typing in this edit box, you are offered files that matches the already-typed characters pattern.
Files of type
Select an image format orAll Images. Only the files of the selected format will be displayed in the upper window.
Note
Time Step Definition: Some ND2 files do not have the time step defined properly. When you are opening such ND2 document, a dialog window appears, where the proper time step between the frames shall be defined.
File > Open Report Opens a report (*.rpt) file.
File > Print
This command displays the defaultPrintwindow which enables you to select a printer and send the current image to it.
File > Recent Files
Displays a pop-up menu containing the list of recently opened files.
File > Recent Folders
Displays a pop-up menu containing the list of recently opened folders.
4.2. Help Menu
Help > About
Opens a window with information about the currently used version of NIS-Elements Viewer.
Help > Contents
Opens the NIS-Elements Viewer help file.
Help > How To Buy
This command is an Internet link to the site with more information about NIS-Elements. The address is ht-tp://www.nis-elements.com/howtobuy.html
[http://www.nis-elements.com/howtobuy.html]
Help > Search
Opens the search tab of the help file.
4.3. Window Menu
Window > Cascade
All opened images will be aligned in a cascade.
Window > Close Closes the current view.
Window > Close All Closes all opened images.
Window > Close All but Current
Closes all images except the currently selected one.
Window > Next
Switches to the next opened image.
Window > Previous
Switches to the previous opened image.
Window > Show LUTs Window
Displays the LUTs Control Panel. See[3.4 LUTs Tools].
Window > Tile Horizontally
All opened images will be tiled horizontally.
Window > Tile Vertically
All opened images will be tiled vertically.