User Manual
II Copyright © 2004-2015 Foxit Software Incorporated. All Rights Reserved.
No part of this document can be reproduced, transferred, distributed or stored in any format without the prior written permission of Foxit.
Anti-Grain Geometry - Version 2.4
Copyright (C) 2002-2004 Maxim Shemanarev (http://www.antigrain.com)
Permission to copy, use, modify, sell and distribute this software is granted provided this copyright notice appears in all copies. This software is provided "as is" without express or implied warranty, and with no claim as to its suitability for any purpose.
User Manual
Contents
Contents ... III
Chapter 1 – Introduction ... 1
Foxit Reader Overview ... 1
Foxit Reader Add-ons ... 1
Foxit Plug-In Platform ... 3
Chapter 2 – Getting Started ... 7
Installing Foxit Reader ... 7
Updating Foxit Reader ... 13
Uninstalling Foxit Reader ... 14
Toolbar Modes ... 14
Work Area ... 19
Setting Preferences & Viewing Properties ... 28
About Navigation Pane ... 40
Customizing Shortcut Keys... 41
Switching UI Languages ... 42
Chapter 3 – Viewing PDFs ... 43
Opening & Saving & Closing PDFs ... 43
Viewing Documents ... 47
Finding Text ... 62
Playing a Movie or a Sound Clip ... 64
Working with Asian Languages in PDFs ... 64
Thumbnails Preview in Windows ... 65
Chapter 4 – Working on PDFs ... 66
Select & Copy ... 66
Working with Layers ... 68
Measuring the Objects ... 69
Switching between Basic Tools ... 74
Using Rulers & Guides ... 74
Undoing and Redoing ... 76
Sharing Documents ... 76
Creating PDFs ... 85
Signing PDFs ... 90
Stamping PDFs ... 97
Managing Security ... 101
Chapter 5 – Comments ... 127
About the Annotation Tools... 127
Selecting Tools to Add Comments ... 127
Using the Select Text Tool ... 131
Using the Drawing Tools... 131
User Manual
IV
Working on Comments ... 140
PDF Review ... 149
Chapter 6 – Form ... 152
Filling in PDF Forms ... 153
Commenting on Forms ... 155
Importing & Exporting Form Data ... 155
Chapter 7 – Data Import & Export ... 156
Importing & Exporting Comments Data ... 156
Importing & Exporting Form Data ... 157
Generate 2D Barcode ... 160
Verify Signatures on XFA Forms ... 161
Chapter 8 – Advanced Editing on PDFs ... 162
Creating Bookmarks ... 162
Adding Links ... 166
Attaching Files ... 170
Adding Images ... 174
Adding Audio & Video ... 181
Chapter 9 – Printing ... 186
Printing a PDF Document ... 186
Print Dialog ... 188
Setting Foxit Reader PDF Printer Properties ... 191
Chapter 10 – Appendices ... 194
Keyboard Shortcuts ... 194
Command Lines ... 197
User Manual
Chapter 1 – Introduction
Foxit Reader Overview
Welcome to Foxit Reader-- your right choice to view and print PDF documents!
Foxit offers two versions of Foxit Reader (Desktop and Enterprise). Foxit Reader (Desktop Version) is a free PDF document viewer and printer. Foxit Reader (Enterprise Version) is developed on the basis of Foxit Reader (Desktop Version), but it extends the usability and performance of desktop version. Compared with Foxit Reader (Desktop Version), Foxit Reader (Enterprise Version) covers more advanced features, such as RMS Protection, GPO Control, XML Control, etc. This User Manual generally introduces the features and functions of Foxit Reader (Desktop Version), for more information on Enterprise Version, please refer to the attached “Foxit Enterprise Deployment and Configuration”.
Foxit Reader (Desktop Version), hereafter referred to as Foxit Reader, is a free PDF document viewer and printer. It launches quickly and is easy to install. Just unzip the downloaded zip file, run “Foxit Reader Setup” and then follow the installation guides to complete installation. In addition to the basic PDF viewing functions, Foxit Reader also includes various advanced features, such as adding annotations, saving a PDF document as a text file, copying text from the text viewer and digital signature validation.
Foxit Reader Add-ons
Foxit Reader provides separate add-ons for you to download on demand. These add-ons fall into critical add-ons and advanced add-ons, which can be updated by the Update Manager, and it can also be downloaded from our website (http://www.foxitsoftware.com/pdf/reader/addons.php). The former one is free while the latter provides additional features for a fee.
Critical Add-ons
Critical add-ons are free. They are essential components for proper display and execution. For example, if you open a PDF document containing Chinese characters, Foxit Reader will ask if you want to download the Eastern Asian Language Support. If you choose Cancel, you can read this file, but some characters will not be displayed correctly.
Free Critical Add-ons in Foxit Reader
Name Function Description Size Remark
User Manual
2 Decoder JPEG2000 or JBIG2 formats. If you don't install this
module, images in those formats cannot be displayed.
Free
Eastern Asian Language
Support
This module is used for displaying Eastern Asian Language in a PDF file. Eastern Asian Language can't be displayed properly without it.
2.08MB Download Free
GDI+ Module
This is a redistributable module from Microsoft which provides better display quality for graphics. You can still view the PDF file without this module in lower graphic quality. Installing this module will not affect any other applications on your system.
764KB Download Free
JavaScript Support
This add-on is used to execute JavaScript in many interactive forms. If you don't install this add-on, you still can fill in such forms, but you wouldn't be able to perform some automated tasks like field value verification and recalculation.
1.05MB Download Free
NOTE: To manually install a critical add-on, please extract it to the same directory where you install Foxit Reader.
See also “Updating Foxit Reader”.
Advanced Add-ons
Advanced add-ons have many specific capabilities.
Advanced Add-ons in Foxit Reader
Name Function Description Size Remark
Foxit Toolbar for Browser
This add-on is a free toolbar for IE or Firefox that delivers up-to-date Foxit news and upgrades straight to your Internet browser, enabling the user to search the web anytime anywhere, giving easy access to various useful goodies and gadgets.
1.01MB Download Free
Firefox Plugins
Foxit Firefox Plugin installs a simple Foxit Reader into the Firefox web browser, this free add-on allows users to display, view, edit and print PDF documents in the browser.
1.32MB Download Free
Spell Checker When you fill out an English form or use
typewriter to insert any English text, this 1.29MB
Download
User Manual
tool will try to find any spelling errors and highlight them with squiggly lines. If you right click on the misspelled words, you will see a list of suggested words. Click here to download the dictionary.
RMS Plug-in
RMS Plug-in provides seamless integration with Microsoft Windows Server environment to protect PDF documents and manage policy templates. With this plug-in, you can restrict user’s access to documents to safeguard digital information from unauthorized use. Foxit Reader (Enterprise Version) provides two versions of RMS Plug-in, i.e. RMS Plug-in V1.0 for OS Windows XP and later, and RMS Plug-in V3.0 for OS Windows Vista SP2 and later. You can change between the two versions as required easily and quickly through GPO editing.
V1.0:1.41MB V3.0:1.25MB
Integrated in the package.
Desktop Version: Feature is free, with watermark
displayed in PDFs. Enterprise Version: Free trial for 30 days, without watermark
displayed in PDFs.
Tips:
1. Instructions on installation of .fzip package below
To manually install a critical or an advanced add-on, please run Foxit Reader, and then go to HELP > Install Update > browse and choose the related downloaded package, and then click the Open button. When you're done, click Done to finish the installation.
2. How to install the dictionary for Foxit Spell Checker?
After you download the dictionary and unzip it, please save the unzipped folder named “lex” to the same installation folder of Foxit Reader, which could be placed in “C:\Program Files\Foxit Software\Foxit Reader”.
Foxit Plug-In Platform
For flexible and convenient management of plugins, Foxit Reader offers a Plug-in Platform, in which you can view the plug-in status, learn the information about the plugins installed, as well as manage the plug-ins as needed.
To open Foxit Plug-in Platform, please choose Help > Product > About Foxit Plug-Ins , and Foxit Plug-in Platform will show up as below.
User Manual
4 Foxit Plug-in Platform
Plug-in Status
Certified: Shows whether the signature of the plug-in is valid or not. Loaded: Shows whether the plug-in has been loaded successfully or not.
Plug-in Information
In addition to plug-in status, you can learn more information about the plug-in installed, including the name, date, description and legal copyright.
To learn the details of a plug-in, please click More under the general description of the plug-in in the Foxit Plug-in Platform. Then a dialog box showing the details of the plug-in will pop up (as shown below).
User Manual
Detailed Information about Foxit Updater Plugin Plug-in Management
Within Foxit Plug-in Platform, you can manage the plug-ins as needed, including installing, enabling, disabling and uninstalling plug-ins.
Installing a Plug-in
To install a plug-in, please follow the steps below:
Select Help > Product > About Foxit Plug-Ins to open Foxit Plug-In Platform; Click Install Plugin > choose the plug-in file (in .xml format) > click Open.
Then Foxit Reader will verify whether the signature of the plug-in to be installed is valid or not. If it is valid, Foxit Reader will load the plug-in directly; if not, a prompt message will pop up (as shown below), and the installation will be terminated.
Note: The .xml and .fpi files of a plug-in to be installed should be placed in the same folder, otherwise, installation will fail.
User Manual
6 Disabling a Plug-in
To disable a plug-in, please follow the steps below:
Select Help > Product > About Foxit Plug-Ins to open Foxit Plug-in Platform.
Select the plug-in you want to disable, and click the Disable button to disable it.
Enabling a plug-in
To enable a plug-in, please follow the steps below:
Select Help > Product > About Foxit Plug-Ins to open Foxit Plug-in Platform.
Select the plug-in to be enabled, and click the Undo Disable button to enable it.
Uninstalling a plug-in
To uninstall a plug-in, please follow the steps below:
Select Help > Product > About Foxit Plug-Ins to open Foxit Plug-in Platform.
Select the plug-in to be uninstalled, and click the Uninstall button to uninstall it.
Note:
1. All the operations to the plug-ins will take effect after you restart Foxit Reader.
2. Foxit Reader includes plug-ins that are necessary for the realization of its functionalities or are necessarily required for maintenance. To ensure normal operation, you are not allowed to disable or uninstall these plug-ins (such as Foxit Updater plugin, Foxit Plug-in Platform plugin, etc.)
User Manual
Chapter 2 – Getting Started
This section gives you an overview of Foxit Reader, including installation, upgrading and uninstallation, as well as work area and toolbar modes.
Installing Foxit Reader
Windows System Requirements
Foxit Reader runs successfully on the following systems. If your computer does not meet these requirements, you may not be able to use Foxit Reader.
Operating Systems
Windows Vista® Home Basic, Home Premium, Business, Ultimate, or Enterprise with or without Service Pack 1 (32-bit & 64-bit)
Windows 7(32-bit & 64-bit) Windows 8.x Full Version Windows Embedded Standard 7
Microsoft Office® 2007 or later version (required for some PDF creation features) Citrix XenApp® 6
For users utilizing the Active Directory Rights Management Service and SharePoint integration capability, Windows 7 or Windows Vista with Service Pack2 (SP2) is required.
Recommended Minimum Hardware for Better Performance
1.3 GHz or faster processor
512 MB RAM (Recommended: 1 GB RAM or greater) 1 GB of available hard drive space
1024x768 screen resolution
How to Install?
Please visit Foxit’s website (http://www.foxitsoftware.com/downloads/) to download the latest version of Foxit Reader for free.
If you download the “FoxitReader7.1_setup.exe” file to your computer, please do the following: Double-click the installation file and you will see the Install Wizard pop up. Click Next to continue.
User Manual
8
In order to install Foxit Reader on your system, you are required to accept the terms and conditions of Foxit’s License Agreement. Please read the Agreement carefully and then check I accept the agreement and click Next to continue. If you cannot accept it, please click Cancel to exit the installation.
Foxit Reader will be installed under the default path: C:\Program Files \Foxit Software\Foxit Reader. If you want to change the location, please click Browse and set the installation path.
User Manual
Choose to select standard or custom installation. And you can choose the optional components.
If you choose custom installation, you will be given a chance to select the additional tasks you would like to perform while installing Foxit Reader.
User Manual
10
If you want to set Safe Reading Mode during installation, please check the Enable Safe Reading Mode.
User Manual
Finally, a message will appear to inform you the successful installation. Click Finish to complete the installation.
Command-line Installation
The Foxit Reader properties are:
---
User Manual
12
list of features which the installation of Foxit Reader will make available locally. Foxit Reader installer defines the following features:
pdfviewer - Foxit PDF Viewer and its components.
ffaddin -Plugin which is used for opening PDF files in Mozilla Firefox, Opera, Safari, and Chrome browsers. This feature requires pdfviewer to be installed.
ffSpeckllCheck - Spell check tool which is used for searching any misspelled words in typewriter or form filler mode and suggesting the correct spellings. This feature requires pdfviewer to be installed.
InstallPrint - Foxit Reader Creator installs a virtual printer on your system. You can use Creator to convert any printable documents into high-quality PDFs conveniently and efficiently. This feature requires pdfviewer to be installed.
InstallPrint\WordAddin - MS word toolbar add-in to create PDFs by just one click. This feature requires InstallPrint to be installed.
InstallPrint\ExcelAddin - MS Excel toolbar add-in to create PDFs by just one click. This feature requires InstallPrint to be installed.
InstallPrint\PPTAddin - MS PPT toolbar add-in to create PDFs by just one click. This feature requires InstallPrint to be installed.
ffse -- Plugins for Windows Explorer and Windows shell. These extensions allow viewing PDF thumbnails in Windows Explorer, previewing PDF files in Windows Vista and Office 2007. This feature requires pdfviewer feature to be installed.
/DIR Specifies the folder where products will be installed.
/TASKS <list of features> The value of the /TASKS property is a comma delimited list of features which the installation of Foxit Reader will make available locally. Foxit Reader installer defines the following features:
desktopicon - Installer will place a shortcut for the installed application on Desktop.
startmenufolder - Installer will create program menu group for installed application and its components.
Quicklaunchicon - Installer will place a shortcut for the installed application on the Quick Launch Toolbar.
User Manual
reader.
DisplayInBrowser - Foxit Reader will be configured to open PDF files inside browsers.
setDefaultCreator - Installer will install Foxit Reader Creator and set it as the system’s default printer.
/force Forces to install Foxit Reader.
/clean Removes all of Reader’s registry data and related files.
Command-line Examples:
1. Silently install the application (no user interaction) to folder "C:\Program Files\Foxit Software", install ffse component and create desktop icon only:
"Foxit Reader" /COMPONENTS="ffse" /TASKS=" desktopicon" /DIR=” C:\Program Files\Foxit Software” /verysilent
Updating Foxit Reader
Foxit files and add-ons can be updated in several ways. Some updates are available if you open a PDF document that triggers the updating process. For example, if you open a file that contains Chinese characters, Foxit Reader will ask if you want to download the Eastern Asian Language Support. Other updates are available only from the HELP tab, where you have to manually install them. However, all updates can be downloaded directly from Foxit website.
Updating from the HELP Tab
1. Choose HELP > Check for Update.
2. Select updates from the column on the left, and click Add to move them to the right column. Or click Add All Add-ons to select all the available updates. Only the updates and components appropriate for your product will be listed.
3. Click Next. Foxit Reader will download and install the update automatically. When finished, click OK to exit Foxit Reader Update Manager.
Use Foxit Updater
1. Choose FILE> Preferences > Updater.
2. Check the appropriate option according to your requirements.
Automatically install updates: the system will automatically download and replace the original files in the installation folder when there is a new version.
User Manual
14
(recommended): the system will automatically download and display a message informing you of the upgrade and allowing you to choose to upgrade to the new version. This option is checked by default.
Do not download or install updates automatically: never download or install updates automatically.
3. Click OK.
Updating From Foxit Website
1. Click to visit http://www.foxitsoftware.com/pdf/reader/addons.php. 2. Select and download the add-ons you want to update.
3. Extract them to the same directory where you install Foxit Reader. 4. Re-run the Foxit Reader program to implement the update files.
Note: You can save the customization and settings and apply them in the new version after upgrading.
Uninstalling Foxit Reader
How to Uninstall?
Please do one of the following:
Click Start > Programs > Foxit Reader > Uninstall.
Click Start > Settings > Control Panel > Add or Remove Program and select Foxit Reader to uninstall.
Double click the file uninstall.exe under Foxit Reader installation directory drive.
Note: A short survey window will pop up when you uninstalls Foxit Reader, to collect suggestions for improvement.
Toolbar Modes
Foxit Reader offers two toolbar modes: Classic Toolbar Mode and Ribbon Mode, in order to provide users with different experience during PDF viewing.
User Manual
Classic Mode
Classic Mode was commonly applied in earlier versions of Foxit Reader. In Classic Toolbar Mode, tools are arranged under menus. You can get tools from corresponding menu by clicking the menu. It is quite simple and clean, only occupying little space and saving more space for document viewing.
Fig. 1 Classic Toolbar Mode Overview
Ribbon Mode
Foxit has integrated the collective tools in the ribbon interface and created a new way of working, namely Ribbon Mode. Ribbon Mode is one of the big improvements you will find in Foxit Reader. It is developed based on Microsoft Office 2013 (Office 15), to provide you with a familiar and intuitive user experience. In this mode, tools are arranged by groups and tasks. Below are some highlights of the new interface.
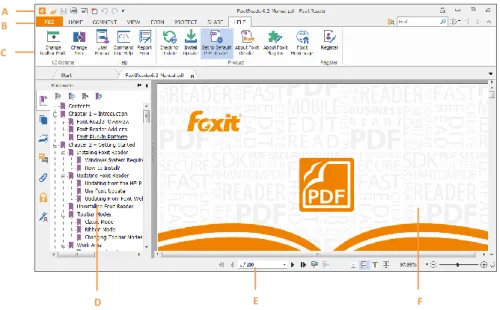
Fig. 2 User Interface in Ribbon Mode
A. Quick Access Toolbar B. Tab C. Group and Command D. Navigation Pane (Bookmark Panel displayed) E. Status bar F. Document Pane
As shown above, Foxit Reader generally contains three toolbars in Ribbon Mode, i.e. Quick Access Toolbar, Tab Bar and Group and Command Bar.
Quick Access Bar: shows the basic tools, such as Open, Save, Print, etc. You can add or
A A B C
User Manual
16
replace the tools so as to ensure that the commonly used ones are close at hand.
Tab Bar: shows the major tabs of Foxit Reader, being classified as FILE, HOME, COMMENT, VIEW, FORM, PROTECT, SHARE and HELP.
Group and Command Bar: categorizes the tools by groups according to the function of the tools.
About Tab Bar
FILE Tab (FILE Page)FILE Page gives you quick access to many of Reader’s most important tasks, including Open, Create, Save, Save as, Close and Print. From this page, you can also view the properties of Reader, set preferences and access a list of the most recent documents you have been working on. Foxit Reader offers a full page view based on Microsoft® Word® 2013 UI for FILE options, allowing you to view relevant content on the same page instead of a pop-up window(as shown below). This new feature is more intuitive and provides you with a familiar user experience.
Fig. 3 FILE Page HOME Tab
Under the HOME tab are PDF signature tools, View tools, Comment tools, PDF creation tools and Insert tools.
User Manual
Fig. 4 HOME Tab COMMENT Tab
COMMENT tab generally provides commenting tools (including Text Markup tools, Typewriter tools, Drawing tools and comment management tools), measurement tools and stamp tools.
Fig. 5 COMMENT Tab VIEW Tab
Under the VIEW tab, you can get the “Go to destination” tools, viewing mode tools (including Read Mode, Reserve View, Text Viewer), Magnification tools, Read Out Loud tools, Page Display tools and View Setting tools.
Fig. 6 VIEW Tab FORM Tab
You may find Form Data under FORM tab, with which, you can import & export forms, reset forms, email forms and combine forms to a sheet.
User Manual
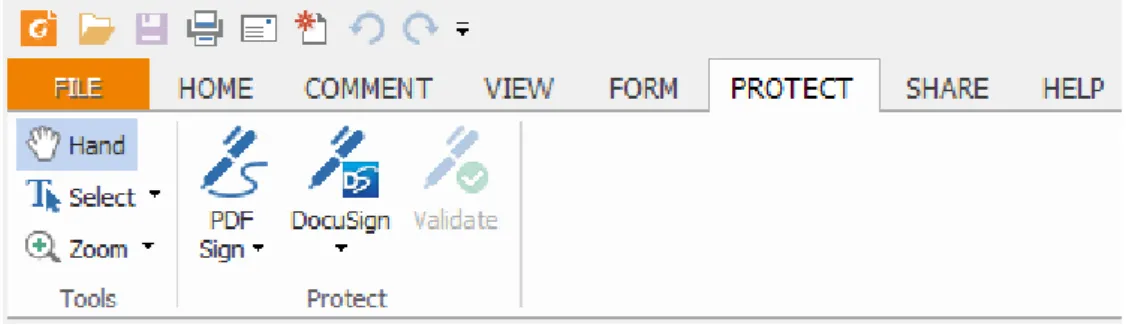
18 PROTECT Tab
PROTECT tab includes Signature tool and signature validation tool. You can digitally sign document or validate the signature with these tools.
Fig. 8 PROTECT Tab SHARE Tab
Under the SHARE tab, you can find tools to share documents to Evernote, Facebook or send them via Email. Besides, SharePoint service tools and Review Tracker are under this tab as well.
Fig. 9 SHARE Tab HELP Tab
The HELP tab contains Help tools which enable you to report error, get User Manual and the Command Line instruction. Also, under this tab, you can check for update, set Foxit Reader as the default PDF Reader, learn more about Foxit and check the plug-in installed.
User Manual
Changing Toolbar Modes
To change from Classic Toolbar Mode to Ribbon Mode, please choose View > UI Options >
Change Toolbar Mode > Ribbon Mode > OK.
To change from Ribbon Mode to Classic Toolbar Mode, please do one of the following:
Choose FILE > Change Toolbar Mode > Classic Toolbar Mode.
(Alternatively) Choose HELP > UI Options > Change Toolbar Mode > Classic Toolbar Mode.
Note: The feature can be effective after restarting Foxit Reader.
Work Area
Foxit Reader opens in two different ways: on its own (as a standalone application) and in a web browser. The associated work areas slightly differ.
User Manual
20
The Foxit Reader work area includes a document pane that displays PDFs and a navigation pane on the left side that helps you browse through the current PDF. Toolbars near the top and bottom of the window provide other controls that you can use to work with PDFs, including toolbar pane, tab bar and status bar.
The Work Area for PDFs Open in the Application
Double-click the Foxit Reader icon on the desktop to start this program.
Choose FILE > Open, navigate to and select any PDF on your computer, and click Open.
User Interface in Ribbon Mode
A. Quick Access Toolbar B. Tab C. Group and Command D. Navigation Pane (Bookmark Panel displayed) E. Status bar F. Document Pane
The Work Area for PDFs Open in a Web Browser
Open a web browser application.
Select a PDF anywhere on the Internet and click the link.
The PDF will be opened by Foxit Reader directly in the web browser.
A A B C
User Manual
PDF Open in a Web Browser
A. Web browser application menu bar and buttons B. Foxit Reader toolbars
C. Navigation Pane (Bookmark panel displayed) D. Document pane
Setting the Skin
This feature offers five skins so that you could change the appearance of the software. To set the appearance of Foxit Reader, please do one of the following:
Choose FILE > Change Skin > click the skin as desired.
A B
User Manual
22 (Optional) Choose HELP > UI Options > Change Skin > click the skin as desired.
Customizing the Work Area
As you get acquainted with Foxit Reader, you can set up your Reader work environment. The more you learn about its potential, the more you can take advantage of its features, tools, and options.
There is much more to the application than you see at first glance. Foxit Reader has hidden tools and preferences that can enhance your experience and give you greater control over how your work area is arranged and displayed.
There are two modes available in Foxit Reader: Classic Toolbar Mode and Ribbon Mode, two of which differ a bit in User Interface. Therefore, work area customization varies accordingly.
Customizing Working Area in Classic Toolbar Mode
In Classic Toolbar Mode, you can choose to show or hide Menu Bar and toolbars. Also, locking and moving toolbars is accessible in this mode. Please refer to the introductions below for details.
About Menu Bar
Generally speaking, it is a good idea to keep the menu bar visible so that it is available as you work. However, some users prefer to have as much space in Foxit Reader as possible. To get rid of Reader menus temporarily, you should click View > uncheck Menu Bar.
You can temporarily display the Menu Bar again by right-clicking the toolbar and checking Menu Bar.
About Toolbars
Foxit Reader enables you to change the appearance of the tools to suit your needs and working style. You can add and delete buttons on the existing toolbars so that only the commands you use most often will be displayed. To learn more about it, read the explanation below.
Toolbars open by default
User Manual
D. Find toolbar E. View toolbar F. Create PDF toolbar G. Comments toolbarAny toolbars can float or be docked. Docked toolbars appear in the toolbar area. Floating toolbars appear as independent palettes that you can move anywhere in the work area.
1. Showing or Hiding Toolbars
To hide all toolbars, choose View > Toolbars > Hide Toolbars, or press the hotkey F8 on your keyboard.
To show all toolbars, choose View > Toolbars > Show Toolbars, or press the hotkey F8 on your keyboard.
To open a toolbar, choose View > Toolbars > [toolbar name].
To hide a toolbar, please do one of the following: A. Right-click the toolbar area or choose View >Toolbars, and uncheck the toolbar you want to hide. B. Drag the toolbar you want to delete from its grabber bar to the document pane, click the
Close button at the top right corner of its title bar to hide it.
To change the visibility of several toolbars, please go to View > UI options > Customize Toolbars, and then select and deselect the toolbars. A checkmark next to the toolbar name indicates that the toolbar is currently visible.
2. Locking Toolbars
You can lock toolbars to prevent them from being moved. This feature is quite practical to prevent you from accidently dragging a menu out of place.
To lock or unlock the toolbars, please right-click the toolbar, select Toolbars Setting and choose
Lock/Unlock All Toolbars.
3. Moving Toolbars
To rearrange the docked toolbars, use the toolbar grabber bars to drag them from one position to another.
To float a docked toolbar, drag it by its grabber bar from the toolbar area.
To move a floating toolbar, drag it by its title bar to another location in the work area.
To dock a floating toolbar, double-click its title bar or drag it by its title bar to the toolbar area.
To move all floating toolbars to the toolbar area, choose View > Toolbars > Reset Toolbars.
Note: To move a toolbar, drag the grabber bar at the left edge of the toolbar.
User Manual
24
In Ribbon Mode, tools are grouped by tasks. In this mode, Foxit Reader generally divides the toolbars into Quick Access Bar, Tab Bar and Group and Command Bar.
About Toolbars
Generally, the toolbars in Ribbon Mode include Quick Access Toolbar and Search Toolbar.
A: Basic Toolbar B: Search Toolbar
1. Adding Quick Access Toolbar
Quick Access Toolbar displays all your bookmarked tools. You can add tools that will let you view and search content easily to your Quick Access Toolbar. This is another way for you to arrange and manage all the tools.
To add quick access toolbar, please follow the steps bellow:
Click on the Quick Access Toolbar, and select More Commands shown as below.
A
User Manual
Select the tools or separators you preferred to be shown on Quick Access Toolbar and add them to the Quick Access Toolbar list. Click Up or Down to arrange the tool order and then click OK.
To return toolbars to default configuration, please click on the Quick Access Toolbar, choose
More Commands and click Reset on the pop-up context or press Alt+F8.
2. Working with Toolbar in Ribbon Mode
To collapse/expand a toolbar classified by the toolbar tab, please click or at the upper right corner.
If you want to use a tool after collapsing the toolbar, you can click the tab and then choose the tool in the group. When using the selected tool on PDFs, the toolbar will be collapsed again automatically.
Customizing the Ribbon
The Ribbon is designed to help you find the commands in an easy and convenient way. From Version 7.0, Foxit Reader give you the capability to personalize and fine-tune the Ribbon in the way you want. With this feature, you can customize the default Ribbon, and create custom tabs or groups with your favorite commands.
To customize the Ribbon, you can right click the Ribbon, choose Customize the Ribbon from the context menu to bring out the Customize Tools dialog box first, and then follow the steps below.
User Manual
26 Context Menu
Customize Tools Dialog Box Create a new tab
To create a new tab, please do one of the following:
Select the tab after which you want to add the new tab, and then click New Tab.
(Alternatively) Right click the tab after which you want to add the new tab, and then choose
New Tab from the context menu.
Add a new group to a tab
To add a new group to a tab, please do one of the following:
Select the tab to which you want to add the group, and then click New Group.
(Alternatively) Right click the tab to which you want to add the group, and then choose New Group from the context menu.
User Manual
Select the tab or group to be renamed, and click Rename. (Alternatively) Right click the tab or group to be renamed, and choose Rename from the context menu.
In the Rename dialog box, input the new name and click OK.
Add commands to a group
Select the group under which you want to add a command.
Choose the command category and the desired command from the Choose command from
list.
Click Add to add the selected command to the desired group.
Remove a tab, group or command
To remove a tab, group or command, please do one of the following:
Select the tab, group or command to be removed, and click Remove.
(Alternatively) Right click the tab, group or command to be removed, and choose Delete
from the context menu.
Reorder the tabs or groups
User Manual
28 Select the tab or group you want to reorder, then click the Up or Down arrow
to moveaccordingly.
(Alternatively) Right click the tab or group you want to reorder, and then select Move Item Up or Move Item Down to moveaccordingly.
Reset the Ribbon
Click Reset in the Customize Tools dialog box to reset the Ribbon to the default settings.
Import a customized Ribbon Click Import.
In the Open dialog box, select the Ribbon customization file (.xml file), and click Open.
Note: After importing a Ribbon customization file, you will lose all the arrangements you have customized previously. If you want to revert to the customization you currently have, it is easier to export the customized Ribbon before importing any customization.
Export a customized Ribbon
Click Export.
In the Save As dialog box, specify the file name and path and click Save.
Note:
1. After customization, you need to click OK in the Customize Ribbon tab to save and apply your customizations to the Ribbon.
2. To help you distinguish a default tab or group from the customized ones, the custom tabs or groups in the Customize the Ribbon list are tabbed with “(Custom)” after the name (like this:
), but the word “(Custom)” will not appear in the Ribbon.
3. The commands in the default group under a default tab are displayed in grey, and they cannot be renamed, reordered or removed.
4. You cannot remove default tabs in Foxit Reader.
Setting Preferences & Viewing Properties
Setting Preferences
User Manual
Although Foxit Reader is customizable, some of the customizable features may be difficult to find. After reading this section, you will find out how useful having your own preferences can be, and how simple it is to set up your own preferences.
To set preferences in Foxit Reader, please choose FILE > Preferences.
Note: You can use the arrow keys or Tab key to switch between different preference settings.
Accessibility
Document Colors Options
A. Replace Document Colors: Check to activate other options to change the document colors. B. Use Windows Color Scheme: Sets document colors according to the color scheme of your Windows preferences.
C. Custom Color: Changes the color of Page Background and Document Text.
D. Only change the content in black/white color: Changes only the black/white text and leaves the colored text unchanged.
Commenting
A. Pop-up Opacity: Sets the opacity of popup notes for annotation tools. B. Pencil Setting: Sets Pencil preference while making comments.
C. Editing: Sets the text direction for text comments, including left to right and right to left.
Create PDF
Create PDF feature allows users to set the Page Size of PDF to be created. A. Fixed Size: Sets the size and direction of PDF through drop-down list.
B. Custom: Customizes the Page Size of PDF to be created. You can select the units first and then set the width and height of page as needed.
C. Allow to pop up alert when creating to PDF: Check this option to show message when converting PDFs in Microsoft Office by the Foxit Reader PDF add-in.
Documents
The Document of the Preferences dialog provides several ways to browse PDF documents.
Open Settings
1. Allow Multiple Instances: Creates a new Foxit Reader window when double-clicked to open a PDF file.
2. Allow document to hide the menu bar/toolbars: Opens PDF file without menu bar and toolbars. This option is checked by default.
User Manual
30
operation when opening a PDF which has been defined to be opened in full screen mode. 4. In Web Browser, display PDF in Read mode by default: Opens a PDF in Read Mode
automatically in web browser.
5. In Foxit Reader, please choose the mode for displaying PDF file: Display the PDFs in Read Mode or Full Screen Mode or normal way automatically when opening PDFs with Foxit Reader.
Prompt Messages
1. Show the prompt message before closing all tabs: When you close a window with multiple tabs, Foxit Reader will ask you to confirm your choice. This prevents you from accidentally closing the whole window when you intend to close only the current tab.
2. Automatically save document as E-mail attachment: Automatically save the changes you made to a document and attach the modified document to your email system for sending.
Measurement Units
Sets unit of page dimensions given in the status bar and print dialog.
PDF/A View mode
Sets to view documents in PDF/A view mode (i.e. read-only mode) to prevent modifications to the documents.
1. Never: Never open documents in PDF/A view mode.
2. Only for PDF/A documents: Switch to read-only mode automatically when a PDF/A document is opened.
File Associations
This option allows you to set the default PDF Viewer.
Make Foxit Reader the default PDF Viewer:
Advanced
1.Include browser when setting default PDF viewer: check this option to set Foxit Reader as the default PDF viewer in browser.
2.Include preview when setting default PDF viewer: check this option to set Foxit Reader as the default PDF viewer in preview.
3.Include thumbnail when setting default PDF viewer: check this option to set Foxit Reader as the default PDF viewer in thumbnail view.
4.Use Foxit Reader to open embedded Acrobat files and embedded Foxit PhantomPDF PDF files in Microsoft Office: check this option to set Foxit Reader as the default PDF viewer in
User Manual
Microsoft Office for opening embedded Acrobat files and Foxit PhantomPDF PDF files.
Make Default PDF Viewer: Makes Foxit Reader as default PDF viewer. Foxit Reader will be set as the default PDF viewer according to your setting in Advanced item. For example, if you check “Include browser when setting default PDF viewer” in Advanced item, and click
Make Default PDF Viewer to activate the setting, then PDF files will be displayed by default with Foxit Reader in your Windows system as well as your browser.
Restore File Associations: Restores settings in File Associations.
Always perform check when starting Foxit Reader: If the default PDF viewer is not Foxit Reader, a message box will appear for the options to set it as your default viewer every time you run Foxit Reader.
Forms
The form tab enables you to set the preferences of the interactive form display.
Always hide document message bar: You can decide whether to show or hide the document message bar that appears below the toolbar area when opening an interactive PDF form. Highlight all fields: You can either highlight all fields or choose to highlight required fields as needed. You also can click the color panes next to change the highlight color.
Enable Autocomplete: When filling an interactive PDF form, this feature auto-fills the field by predicting input based on the first few keystrokes typed based on any previously entered words.
Email: You can edit the email title and contents which will be sent with the PDF form.
Full Screen
Full Screen Navigation
A. Select to show Scroll bar, Status bar, Tab bar or Navigation Panels in Full Screen mode. B. Show Exit Button – Check or uncheck this option to show or hide Exit Button in Full
Screen mode.
C. One page at a time – Displays a single page at a time in Full Screen mode.
D. Left click to go forward one page; right click to go back one page -- Lets you page through a PDF document by clicking the mouse. You can also page through a document by pressing Space, Shift + Space, or the arrow keys.
Full Screen Appearance
Background – Click the color pane and choose the color you like to be the background color in Full Screen mode.
User Manual
32
Full Screen Transitions
Foxit Reader supports page transition in Full Screen mode. There are 11 transition types: Split, Blinds, Box, Wipe, Dissolve, Glitter, Fly, Push, Cover, Uncover and Fade. Also, you could set the direction for the transition
.
A. Ignore all transitions: Check to ignore page transition in Full Screen mode.
B. Default transition –Choose page transition for one document in the drop-down window. C. Direction - Set the direction for the transition.
General
The General Preferences setting provides options on Toolbar Settings, Snapshot Selection, Text Link, Tab Bar, etc.
Basic Tools
A. Use fixed resolution for snapshots - Sets the resolution used to copy the image captured with the Snapshot tool. Automatically uses 72 pixels as default resolution.
B. Create links from URLs - Detects the text links in PDF documents and change the non-clickable links into clickable ones.
C. Minimize to system tray - You can save space on your task bar by minimizing the Foxit Reader to system tray. Check it to minimize Foxit Reader to system tray when you click the Minimize button.
D. Screen word-capturing - Check it to turn on this function that enables you to use your mouse to capture words inside a PDF file and have it translated if you are using dictionary software.
E. Make Hand Tool select text - Check it to enable hand tool to become text selection tool when moving it to the selectable content.
Tab Bar
Max tab size – Allows you to specify a maximum tab size.
Menu & Status Bar
A. Menu Exclusive Row – This option is checked by default.
B. Auto-hide Status Bar – Hides the status bar when opening a PDF, and enables it to float at the bottom of the page only when the cursor is moved to the bottom.
Application Startup
A. Show Start Page: Check it to show the start page when running Foxit Reader.
User Manual
HistoryHistory
A. Restore last section when application starts: Determines whether documents start automatically with the last viewed section.
B. Restore last view settings when reopening: Determines whether documents open automatically with the last viewed settings.
C. Maximum number of documents in history list: Sets the maximum number of PDF documents you read in history list. The default is 50 PDF documents.
D. Maximum number of documents in Recent Documents list: Sets the maximum number of PDF documents you read recently in FILE page. The default is 4 PDF documents.
Note: Foxit Reader allows users to set “maximum number of documents in history list” and “maximum number of documents in Recent Documents list” to 0.
Identity
Shows the identity of your application, including Login Name, Name, Title, Organization Name, Organization Unit, and Email Address. The identify information is quite useful in PDF reviews. It will help other review participants recognize your comments easily. The Login Name is set by default (using the username of the current operation system) and cannot be changed. Except for Login Name, you can change or complete your identity information in Identify Preferences.
Languages
Foxit Reader provides the commonly used languages to meet customers’ needs to the upmost. Usually, Foxit Reader will automatically choose the language applied to your OS as its default during your installation. But changing languages after installation is supportable.
To change language after installation, please follow the steps below: Choose FILE > Preferences > Languages.
Select Choose custom language.
Select the language in either Official Language or Translated by Community.
Click the website in the pop-up window to download the language package and Foxit Reader will automatically install the language.
Click OK in the Preferences dialog box, and then choose Restart in the pop-up window to apply the language.
User Manual
34 Page Display
The Page Display panel of the Preferences dialog box includes the following options: Default Layout and Zoom
A. Navigation tab: specifies the panel to be displayed in the opening view. a) Use Initial View: minimizes the Navigation panel and hides all panels. b) Page Only: displays Pages panel by default in opening view.
c) Bookmarks Panel and Page: displays Bookmarks panel by default in opening view. d) Pages Panel and Page: displays Pages panel by default in opening view.
e) Attachments Panel and Page: displays Attachments panel by default in opening view.
f) Layers Panel and Page: displays Layers panel by default in opening view. B. Default page layout: You can view PDFs in following layouts:
a) Single Page -- Displays one page at a time, with no portion on other pages visible. b) Continuous -- Displays pages in a continuous vertical column that is one page wide. c) Facing -- Displays each two-page spread with no portion of other pages visible. d) Continuous Facing -- Displays facing pages side by side in a continuous vertical
column.
See also “Changing the Page layout”.
C. Zoom: Sets the magnification level for PDF documents when they are first opened. This value overrides document settings. The default uses the settings of the PDF document. D. Custom Facing: The Default Facing for page layout is 2 pages. You can check the Custom
Facing box and set the facing layout to your own preference.
E. Custom Margin: Sets the margins between different pages with Facing or Continuous Facing page layout. The default is a margin of 8 pixels.
Rendering
A. Smooth Text: Optimally adjusts text display that best suits your monitor. Page Content
A. Display transparency grid: Displays a grid behind transparent objects. B. Use logical page numbers: Open PDFs with the logical page numbers.
C. Forbid the change of the current Zoom factor during execution of ‘Go to Destination’ actions (these actions can be launched from bookmarks): Check to forbid user to change the current Zoom factor during execution of ‘Go to Destination’.
See also “Changing the Magnification Level of a Document”.
User Manual
Convert PDF Sign signature to Black & White: check this option to sign PDFs in black & white color.
Printer
Print Texts as graphics (ignore font substitution) – Sets the text font as graphics and printout fonts are exactly the same as the text fonts. Automatically allows quick print where Printer Font is substituted.
Batch Print
A. Show print settings before printing document: Check it to show the Print dialog box before printing a document.
B. Require confirmation when printing multiple documents: Check it to show the confirmation message before starting batch printing.
Reading
Page Vs Document
This preference determines how much of a document is delivered to a screen reader at a time. If a PDF isn’t tagged, Foxit Reader may analyze the document and attempt to infer its structure, which can take a long time for a long document. You may want to set Foxit Reader to deliver only the currently visible page so that it analyzes only a small piece of the document at a time. This consideration will vary depending on the size and complexity of the document and on the features of the screen reader.
A. Only read the currently visible pages - This option is usually best when using a screen magnifier. It improves performance by eliminating the need for the software to process parts of the document that aren’t visible. When Foxit Reader sends only the currently visible pages of a PDF to the memory buffer, the assistive technology has access to those pages only. It cannot go to another page until the next page is visible and Foxit Reader has sent the page information to the memory buffer. Therefore, if this option is selected, you must use the navigation features of Foxit Reader, not those of the assistive technology, to navigate from page to page in the document. You should also set the Default Page Display option in preferences to Single Page if you choose to have Reader send only the currently visible pages to the assistive technology.
B. Read the entire document - This option can be best if you use a screen reader that has its own navigation and search tools and that is more familiar to you than the tools in Foxit Reader.
User Manual
36
default and is usually best if you use a screen reader with long or complex PDFs. It allows Foxit Reader to deliver an entire small document but revert to page-by-page delivery for large documents.
Minimum number of pages in a large document
When the “For large documents, only read the currently visible pages” option is selected, it allows you to set this minimum value.
Reviewing
Automatically Check for New Comments:
Set the time interval to automatically check for new comments during shared review. By default, Foxit Reader will check for new comments every five minutes during shared review.
Shared Review Options
A. Show welcome dialog when opening file: Check it to show the welcome dialog when opening a shared review. In the welcome dialog, you can view the general information for the shared review, including the initiator, deadline, review server and so on.
B. Show server connection warning when opening file: Check it to show the server connection warning when opening a shared review.
C. Remind before review expiration: If you check this option, a prompt message will pop up before the shared review expires.
Review option
A. Show prompt messages for Shared Review: Determines whether to show prompt message for Shared Review when publishing comments in a shared review that contains several comments from other reviewers that have not yet been published to the command server. You can take ownership of these comments and publish them on behalf of the reviewers. B. Show prompt messages for Email Review: Check this option to show prompt messages during
email review.
Send Messages
A. Use Auto-Complete List to suggest names when typing in the To and Cc line: Checking this option will enable Auto-Complete feature, which recognizes and suggests contacts based on the previously entered email addresses when you send back your comments during a shared review by email.
User Manual
Auto-Complete memory.
Signature
Verify signatures when the document is opened.
Speech
Volume: Sets the reading volume of Read out Loud.
Use default voice: Check it to read content with default language, or you can select the required one from the combo box.
Use default speech attribute: Check it to read with default pitch and rate, or you can uncheck it and then set pitch and rate in the combo box as needed.
Read comments: Check it to enable the application to read out the comments when executing Read out Loud.
Spelling
Enable spell check: Check Enable spell check to avoid spelling error.
Tablet
Enable Pressure Sensitive: Enable pressure sensitive so that you can add free-form annotations with PSI in PDFs by supported touchscreen devices.
Trust Manager
Please refer to“Trust Manager”. Updater
Automatically install updates: The system will automatically download and replace the original files in the installation folder when there is a new version.
Automatically download updates, but let me choose when to install them (recommended): The system will automatically download and display a message informing you of the upgrade and allow you to choose to upgrade to the new version. This option is checked by default. Do not download or install updates automatically: Never download or install updates automatically.
Viewing Properties
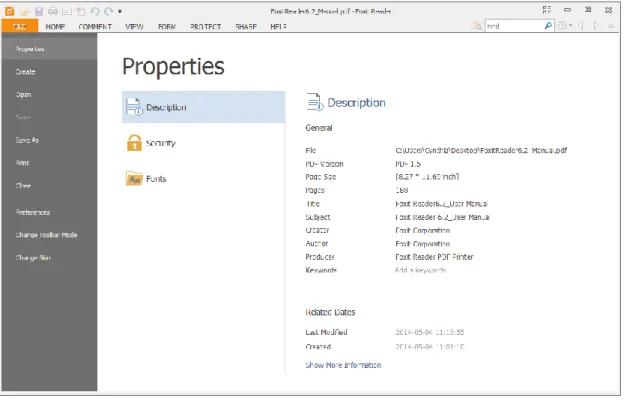
The Properties window provides information about the document, including the document’s location, title, subject, author, fonts used, security settings, etc. This window also displays attributes set by other programs.
User Manual
38
To view the PDF properties, please choose FILE > Properties. You can acquire all relevant information as follows:
Description Tab of Properties Window
Description
This tab shows some basic information about the document. The title, author, subject, and keywords may have been set by the person who created the document in the source application.
General
File—The location of the document.
PDF Version—The standard version of the document.
PDF Size—The size of the document.
Pages—Total number of pages of the document.
Title -- A general or descriptive heading of the document.
Subject -- The principal idea and point of the document.
Author -- The writer of the document.
Creator -- The application that produced the original document.
Producer -- The application or driver that converted the original document into a PDF document.
Keywords -- The words that are used to reveal the internal structure of an author's reasoning.
User Manual
Last Modified -- The date and time the document was last modified. Created -- The date and time the document was created.
Show More Description
This option will show you more description about the document properties, including general information, security, details and previous versions.
Security
The Security tab describes what changes and functionality are allowed within the PDF. If a password, certificate, or security policy has been applied to the document, the method is listed here. Changing security setting is not allowed in Foxit Reader.
Security Tab of Properties Window
Fonts
The Fonts tab lists the fonts and the font types used in the original document, as well as the encoding used to display the original fonts.
User Manual
40 Fonts Tab of Properties Window
About Navigation Pane
The navigation pane, located next to the document pane, can display different navigation panels, including Layer panel, Attachments panel, Pages panel, Comments panel, Bookmarks panel, Security Settings panel and Digital Signature panel. Please note that the navigation pane is unavailable when Foxit is open but empty (no PDF is open).
The buttons on the left side of the navigation pane provides easy access to various panels, such as the Bookmarks panel button
,
the Pages panel button,
and the Layers panel .To show the navigation pane, choose VIEW > View Setting > Navigation Panels > Show Navigation Panels, or use keyboard shortcut F4.
To open a navigation panel, you can either click its button on the left side of the navigation pane, or choose VIEW > View Setting > Navigation Panels > [navigation panel name]. To close the navigation pane, choose VIEW > View Setting > Navigation Panels > Hide Navigation Panels, or use keyboard shortcut F4, or right click on title of the navigation panel and select Hide Navigation Panels.
Tip: To show or hide the navigation pane, you can also click on the button at the top right corner of the navigation pane.
User Manual
Adjusting the Navigation Pane
Like the toolbars, the navigation panels can be docked in the navigation pane or they can float anywhere in the work area of Foxit Reader. You can choose to hide or close the panels that you don't need and open the ones you do. What’s more, you can also adjust the width of the navigation pane easily.
1. Viewing a Panel in the Navigation Pane
By default, all the panels dock in the navigation pane with a set of panel buttons appearing on the left side of the work area.
Do one of the following:
Select the button for the panel on the left side of the navigation pane. Choose VIEW > View Setting > Navigation Panels > [panel name].
2. Changing the Display Area for Navigation Pane
To change the view area of the navigation pane, drag its right border to adjust the width. To minimize the navigation pane, click on the button at the top right corner of the navigation pane.
To expand the navigation pane, click at its top right corner and the navigation pane will be expanded to occupy the whole pane of Foxit Reader.
3. Docking or Floating a Navigation Panel
To float a navigation panel, drag the panel button into the document pane. To move a panel, drag it by its panel button to another location.
To dock a floating panel, double-click its title bar.
To group two floating panels, drag the title bar of one panel into the other floating panel.
Customizing Shortcut Keys
People’s habits using the keyboard are different and the familiarity to the buttons on a keyboard is distinct. The intellectualized Foxit Reader allows you to customize the shortcut keys according to your habit, which enables you to use the shortcuts more conveniently than before.
To customize toolbars, please follow the steps below:
Click on Quick Access Toolbar > select More Commands. In the popup Customize Tools
User Manual
42
Choose the tool’s category in the Categories list and the action in the Command list.
Input the appropriate shortcut with your keyboard. Click Assign to apply the shortcut. If you want to change the shortcut, just input the new one to replace it directly. The Reset All
button can recover the default setting.
Note:The shortcut keys that have already being used cannot be reassigned. A message under the input tab will show you whether the shortcut key has been used by another command.
Switching UI Languages
To change the UI language of Foxit Reader, please go to FILE > Preferences > Languages.
Use system locale language—Makes the system locale language the UI language. Choose the custom language—Selects your localized UI language from the list.
Choose language provided by the community—Selects the language translated by volunteers on Foxit multi-language translation system.
When switching UI language, you may meet one of the following cases:
If the UI language package exists on your computer, the UI will be switched in a flash into the language you selected.
If you don’t have the UI language package on your computer but available on Foxit server, a prompt message will pop up asking you whether or not to download the language kits. If the UI language package is unavailable on Foxit server, a prompt message will pop up giving you a notice that you can get the UI language package on our website. In addition, you can also help us to do some translation so that we can localize Foxit Reader into your own language. To visit our multi-language translation system, please click here.
User Manual
Chapter 3 – Viewing PDFs
Once the Foxit Reader is properly installed, you can open and view PDF files easily. When you have a PDF open, you can also adjust the view of the document, find text in it, email to others, etc.
Opening & Saving & Closing PDFs
Opening Documents
You can open and view PDFs in Foxit Reader from the desktop, or in a web browser.
Opening a PDF document in Foxit Reader
Start in the Start Page to Foxit Reader WindowWhen you open Foxit Reader, a Start Page will be opened by default, which introduces some product information of Foxit.
If you do not want to show the start page, please go to FILE > Preferences > General >
Application Startup > uncheck Show Start Page.
Opening a PDF Document in Foxit Reader
Do one of the following:
Choose FILE > Open, or click the Open button on the Quick Access Toolbar. In the
Open dialog box, select the file and click Open. PDF documents are usually identified with .pdf extension.
Drag and drop the PDF file into the Foxit Reader window.
Note: You can open more than one PDF document within the same Foxit Reader application. When you open more than one file at a time, you can navigate the PDF files easily by clicking the corresponding tabs. If you only open one PDF, the tab will not be shown.
Opening a PDF Document from Desktop or within Other Applications
If you set Foxit Reader as your default viewer for PDF files, you are able to launch and open PDF files in the following applications:
User Manual
44
open the document.
Web Application: You can open a PDF document by clicking on the PDF file link in your web browser.
File System: Double-click the PDF file icon in your file system.
Note: You can see the size of the opened document at the bottom right corner of the window. For example . To set the unit of page dimensions, please refer to “Measurement Units”.
Opening a Secured PDF Document
If you receive a PDF that is protected by security features, you may need a password to open the document. Some protected documents have other restrictions that prevent you from printing, editing, copying, etc.
When opening a protected PDF, you will be prompted to enter the password.
When trying to copy or edit a secured PDF, you will find that the related functions or tools are disabled and grayed out.
Opening a PDF/A File
PDF/A is a specialized portable document format for the digital preservation of electronic documents. You may receive such PDF/A files that require favorable preservation of contents over an extended period of time as well as consistent and predictable retrieving and rendering in the far future. In view of this, Foxit Reader adds a PDF/A identification system, and supports to disable editing such files.
When opening a PDF/A file, Foxit Reader will switch to PDF/A view mode by default, with a message bar showing PDF/A file notification under the toolbar (as shown below). Under such mode, you can only read the file, and modification is not allowed.