170 West Tasman Drive San Jose, CA 95134-1706 USA
http://www.cisco.com Cisco Systems, Inc.
Corporate Headquarters Tel: 800 553-NETS (6387) 408 526-4000 Fax:408 526-4100
Cisco Secure VPN Client
Solutions Guide
For Cisco Secure VPN Client Version 1.0 or Later
THE SPECIFICATIONS AND INFORMATION REGARDING THE PRODUCTS IN THIS MANUAL ARE SUBJECT TO CHANGE WITHOUT NOTICE. ALL STATEMENTS, INFORMATION, AND RECOMMENDATIONS IN THIS MANUAL ARE BELIEVED TO BE ACCURATE BUT ARE PRESENTED WITHOUT WARRANTY OF ANY KIND, EXPRESS OR IMPLIED. USERS MUST TAKE FULL RESPONSIBILITY FOR THEIR APPLICATION OF ANY PRODUCTS.
THE SOFTWARE LICENSE AND LIMITED WARRANTY FOR THE ACCOMPANYING PRODUCT ARE SET FORTH IN THE INFORMATION PACKET THAT SHIPPED WITH THE PRODUCT AND ARE INCORPORATED HEREIN BY THIS REFERENCE. IF YOU ARE UNABLE TO LOCATE THE SOFTWARE LICENSE OR LIMITED WARRANTY, CONTACT YOUR CISCO REPRESENTATIVE FOR A COPY.
The Cisco implementation of TCP header compression is an adaptation of a program developed by the University of California, Berkeley (UCB) as part of UCB’s public domain version of the UNIX operating system. All rights reserved. Copyright © 1981, Regents of the University of California.
NOTWITHSTANDING ANY OTHER WARRANTY HEREIN, ALL DOCUMENT FILES AND SOFTWARE OF THESE SUPPLIERS ARE PROVIDED “AS IS” WITH ALL FAULTS. CISCO AND THE ABOVE-NAMED SUPPLIERS DISCLAIM ALL WARRANTIES, EXPRESSED OR IMPLIED, INCLUDING, WITHOUT LIMITATION, THOSE OF MERCHANTABILITY, FITNESS FOR A PARTICULAR PURPOSE AND
NONINFRINGEMENT OR ARISING FROM A COURSE OF DEALING, USAGE, OR TRADE PRACTICE.
IN NO EVENT SHALL CISCO OR ITS SUPPLIERS BE LIABLE FOR ANY INDIRECT, SPECIAL, CONSEQUENTIAL, OR INCIDENTAL DAMAGES, INCLUDING, WITHOUT LIMITATION, LOST PROFITS OR LOSS OR DAMAGE TO DATA ARISING OUT OF THE USE OR INABILITY TO USE THIS MANUAL, EVEN IF CISCO OR ITS SUPPLIERS HAVE BEEN ADVISED OF THE POSSIBILITY OF SUCH DAMAGES. Access Registrar, AccessPath, Any to Any, AtmDirector, CCDA, CCDE, CCDP, CCIE, CCNA, CCNP, CCSI, CD-PAC, the Cisco logo, Cisco Certified Internetwork Expert logo, CiscoLink, the Cisco Management Connection logo, the Cisco NetWorks logo, the Cisco Powered Network logo, Cisco Systems Capital, the Cisco Systems Capital logo, Cisco Systems Networking Academy, the Cisco Systems Networking Academy logo, the Cisco Technologies logo, ConnectWay, Fast Step, FireRunner, GigaStack, IGX, Internet Quotient, Kernel Proxy, MGX, Natural Network Viewer, NetSonar, Network Registrar, Packet, PIX, Point and Click Internetworking, Policy Builder, Precept, Secure Script, ServiceWay, SlideCast, SMARTnet, The Cell, TrafficDirector, TransPath, ViewRunner, VisionWay, VlanDirector, Workgroup Director, and Workgroup Stack are trademarks; Changing the Way We Work, Live, Play, and Learn, Empowering the Internet Generation, The Internet Economy, and The New Internet Economy are service marks; and ASIST, BPX, Catalyst, Cisco, Cisco IOS, the Cisco IOS logo, Cisco Systems, the Cisco Systems logo, the Cisco Systems Cisco Press logo, Enterprise/Solver, EtherChannel, EtherSwitch, FastHub, FastLink, FastPAD, FastSwitch, GeoTel, IOS, IP/TV, IPX, LightStream, LightSwitch, MICA, NetRanger, Post-Routing, Pre-Routing, Registrar, StrataView Plus, Stratm, TeleRouter, and VCO are registered trademarks of Cisco Systems, Inc. and/or its affiliates in the U.S. and certain other countries. All other trademarks mentioned in this document are the property of their respective owners. The use of the word partner does not imply a partnership relationship between Cisco and any of its resellers. (9909R)
Cisco Secure VPN Client Solutions Guide
Copyright © 1999, Cisco Systems, Inc. All rights reserved.
C O N T E N T S
Preface
viiAudience
viiDocument Organization
viiiBusiness Cases Presented in This Solutions Guide
viiiNew and Changed Information
ixRelated Documentation
ixConventions
xiiiCisco Connection Online
xivDocumentation CD-ROM
xvC H A P T E R1
Overview of Virtual Private Networks and Cisco Secure VPN Client
1-1What is a Virtual Private Network?
1-1Types of Virtual Private Networks
1-2Access VPNs
1-2Intranet VPN
1-3Extranet VPN
1-3What is the Cisco Secure VPN Client?
1-4Generating a Public/Private Key
1-5Getting a Digital Certificate
1-5Establishing a Security Policy
1-5Interoperability with Cisco Routers
1-5Recommended Cisco Routers
1-6Cisco Routers with IP Security Protocol
1-6Supported Configurations
1-7Static or Dynamic Client IP Addresses with Pre-shared Keys
1-7Static or Dynamic Client IP Addresses with Digital Certificates
1-7Dynamic Client IP Addressing with IKE Mode Configuration
1-7System Requirements
1-8Client-side Requirements (Software)
1-8Server-side Requirements (Hardware and Software)
1-8Benefits
1-9Pre-shared Keys versus Digital Certificates
1-9Static versus Dynamic IP Addresses on the Client
1-11Cisco Secure VPN Client versus Other VPN Solutions
1-11 C H A P T E R2Using Pre-shared Keys: A Business Case
13C H A P T E R3
Using Digital Certificates: Business Case Introduction
3-1Benefits of Using Digital Certificates
3-1Business Case Description
3-1The Challenge
3-2The Risk
3-2The Solution
3-2Supported Digital Certificates
3-6Related Documentation
3-6C H A P T E R4
Using Entrust Digital Certificates: A Business Case
4-1Benefits of Using Entrust Digital Certificates
4-1Configuring and Verifying
4-1Configuring Entrust Digital Certifications
4-1Configuring the Cisco Secure VPN Client
4-2Task 1Importing the Root CA Certificate
4-3Task 2Creating Public and Private Key Pair
4-5Task 3Requesting Client Certificate from Entrust CA Server
4-7Task 4Submitting the Certification Request to the Entrust Server
4-8Task 5Importing Your Signed Entrust Digital Certificate
4-14Task 6Configuring Other Connections for Security Policy
4-16Task 7Configuring A New Connection for Security Policy
4-18Task 8Specifying Identity Using RSA Signature
4-20Task 9Specifying Encryption and Authentication Methods for Authentication, Phase 1
4-22Task 10Specifying Encryption and Authentication Methods for Key Exchange, Phase 2
4-24Task 11Saving Your Configuration
4-25Configuring the Cisco Router
4-26Task 1Configuring the Domain Name, Host Name, and Name Server
4-26Task 2Configuring ISAKMP Policy and Defining IPSec Transform Set
4-26Task 3Defining Crypto Dynamic Map and IKE Crypto Map to the Client
4-27Contents
Task 4Defining the CA, Enrolling Your Certificate, and Requesting Certificate
Signature
4-28Task 5Applying the Crypto Map to the Interface
4-29Verifying Entrust Digital Certifications
4-30Task 1Viewing and Verifying Using Certificate Manager
4-30Task 2Issuing Show Commands on Cisco Router
4-31Related Documentation
4-32C H A P T E R5
Using VeriSign Digital Certificates: A Business Case
5-1Benefits of Using VeriSign Digital Certificates
5-1Configuring, Verifying, and Troubleshooting
5-1Configuring VeriSign Digital Certifications
5-1Configuring the Cisco Secure VPN Client
5-2Task 1Importing the Root CA Certificate
5-3Task 2Creating Public and Private Key Pair
5-5Task 3Requesting Client Certificate from VeriSign CA Server
5-7Task 4Submitting the Certification Request to the VeriSign CA Server
5-8Task 5Importing Your Signed VeriSign Digital Certificate
5-12Task 6Configuring Other Connections for Security Policy
5-14Task 7Configuring A New Connection for Security Policy
5-16Task 8Specifying Identity Using RSA Signature
5-18Task 9Specifying Encryption and Authentication Methods for Authentication, Phase 1
5-20Task 10Specifying Encryption and Authentication Methods for Key Exchange, Phase 2
5-22Task 11Saving Your Configuration
5-23Configuring the Cisco Router
5-24Task 1Configuring the Domain Name, Host Name, and Name Server
5-24Task 2Configuring ISAKMP Policy and Defining IPSec Transform Sets
5-24Task 3Defining Crypto Dynamic Map and IKE Crypto Map to the Client
5-25Task 4Defining the CA, Enrolling Your Certificate, and Requesting Certificate
Signature
5-26Task 5Applying Crypto Map to the Interface
5-27Verifying VeriSign Digital Certifications
5-28Task 1Viewing and Verifying Using Certificate Manager
5-28Task 2Issuing Show Commands on Cisco Router
5-29Related Documentation
5-30C H A P T E R6
Using Internet Key Exchange Mode Configuration: A Business Case
6-1Benefit of Using Internet Key Exchange Mode Configuration
6-1Business Case Description
6-1The Challenge
6-2The Risk
6-2The Solution
6-2Configuring and Verifying
6-3Configuring Internet Key Exchange Mode Configuration
6-3Configuring the Cisco Secure VPN Client
6-3Configuring the Cisco Router
6-3Task 1Configuring the Domain Name, Host Name, and Name Server
6-3Task 2Defining the Pool of IP Addresses
6-4Task 3Defining the Crypto Maps That Attempt Client Configuration
6-4Verifying IKE Mode Configuration
6-4Related Documentation
6-5 G L O S S A R YPreface
This guide describes Cisco-supported configurations for IP-based multi-service extranet Virtual Private Networks (VPNs) for an IP Security Protocol (IPSec) tunnel between a PC (with Cisco Secure VPN Client software installed) and a Cisco router.
This guide does not cover every available feature; it is not intended to be a comprehensive VPN configuration guide. Instead, this guide simply describes the Cisco-supported configurations for VPNs using the Cisco Secure VPN Client.
The extranet business scenarios introduced in this guide include specific tasks and configuration examples. The examples are the recommended methods for configuring the specified tasks. Although they are typically the easiest or the most straightforward method, they are not the only methods of configuring the tasks.
This preface contains the following sections:
Audience
Document Organization
Business Cases Presented in This Solutions Guide
New and Changed Information
Related Documentation
Conventions
Cisco Connection Online
Documentation CD-ROM
Audience
This solutions guide is intended primarily for the following audiences:
Network administrators who are responsible for defining network security policies and distributing them to the end users within your organization
System administrators who are responsible for installing and configuring internetworking equipment, are familiar with the fundamentals of router-based internetworking, and who are familiar with Cisco IOS software and Cisco products
System administrators who are familiar with the fundamentals of router-based internetworking and who are responsible for installing and configuring internetworking equipment, but who might not be familiar with the specifics of Cisco products or the routing protocols supported by Cisco
Document Organization
The major elements of this guide are as follows:
Business Cases Presented in This Solutions Guide
Each chapter in this solutions guide documents a business case. The Cisco Secure VPN Client Solutions Guide contains the following business cases:
Using Pre-shared Keys: A Business Case
Using Digital Certificates: Business Case Introduction
Using Entrust Digital Certificates: A Business Case
Using VeriSign Digital Certificates: A Business Case
Using Internet Key Exchange Mode Configuration: A Business Case
Chapter Title Description
Chapter 1 Overview of Virtual Private Networks and Cisco Secure VPN Client
Provides a physical overview of different types of VPNs, client-specific details, and related documentation.
Chapter 2 Using Pre-shared Keys: A Business Case Shows how pre-shared keys are generated for a secure IPSec tunnel between the Cisco Secure VPN Client and a Cisco router. Chapter 3 Using Digital Certificates: Business Case
Introduction
Shows how a digital certificate is set up and maintained for a secure IPSec tunnel between the Cisco Secure VPN Client and a Cisco router.
Chapter 4 Using Entrust Digital Certificates: A Business Case
Shows how an Entrust digital certificate is set up and maintained for a secure IPSec tunnel between the Cisco Secure VPN Client and a Cisco router.
Chapter 5 Using VeriSign Digital Certificates: A Business Case
Shows how a VerisSign digital certificate is set up and maintained for a secure IPSec tunnel between the Cisco Secure VPN Client and a Cisco router.
Chapter 6 Using Internet Key Exchange Mode Configuration: A Business Case
Provides an example of setting up a secure IKE connection between a Cisco Secure VPN Client and a Cisco router with Cisco IOS IPSec support.
None Glossary Provides a list of terms and definitions related to the VPN configurations in this guide.
None Index Provides a list of terms found throughout this guide.
New and Changed Information
New and Changed Information
Although the Cisco Secure VPN Client supports pre-shared keys, documentation for this configuration is not currently available in this guide. Documentation for pre-shared keys will be available in a later release.
Related Documentation
This document is not a comprehensive guide to all VPNs. The following aspects of VPN configuration are not covered in this guide:
NAS-initiated VPNs
Intranet VPNs
Cisco router or access server installation and configuration
For more information on Cisco VPN products that are outside the scope of this document, refer to the following Cisco technical documents:
For detailed information on configuring access VPNs using the L2F tunneling protocol, refer to the
Access VPN Solutions Using Tunneling TechnologySolutions Guide.
For installation and VPN configuration information for the Cisco 7100 series routers, refer to the
Cisco 7100 Hardware Installation Guideand the Cisco 7100 VPN Configuration Guide.
For installation and configuration details for the Cisco 1700 series routers, refer to the Cisco 1720 Router Hardware Installation Guideand Cisco 1700 Router Software Configuration Guide. For a listing of other Cisco technical documentation currently available on VPN networks, refer to the following table.
Document Title1 Customer Order Number Path Cisco Secure VPN Client Documentation
Cisco Secure VPN Client
Quick Start Guide
Release Notes
Solutions Guide
DOC-786898
DOC-786929
OL-0259
Hardware and Software Documentation:
CCO>Service & Support>Technical
Documents>Documentation Home Page>Cisco Product Documentation>Internet Service Unit Documentation>Cisco Secure VPN Client
Internetworking Solutions Guides Documentation
Access VPN Solutions Using Tunneling Technology
OL-0293 Hardware and Software Documentation:
CCO2>Service & Support>Technical
Documents>Documentation Home Page>Technology Information>Internetworking Solutions
Guides>Access VPN Solutions Using Tunneling Technology
Cisco IOS Release 12.0 Documentation
Security Configuration Guide DOC-785843 Software Documentation:
CCO>Service & Support>Technical
Documents>Documentation Home Page>Cisco Product Documentation>Cisco IOS Software
Configuration>Cisco IOS Release 12.0>Configuration Guide and Command References>Security
Configuration Guide
Security Command Reference DOC-785845 Software Documentation:
CCO>Service & Support>Technical
Documents>Documentation Home Page>Cisco Product Documentation>Cisco IOS Software
Configuration>Cisco IOS Release 12.0>Configuration Guide and Command References>Security Command Reference
New Feature Documentation See Path.3 Software Documentation:
CCO>Service & Support>Technical
Documents>Documentation Home Page>Cisco Product Documentation>Cisco IOS Software
Configuration>Cisco IOS Release 12.0>New Feature Documentation
Related Documentation
Cisco 1700 Series Routers
Cisco 1720 Router
Quick Start Guide
Hardware Installation Guide
Software Configuration Guide
Release Notes
Reg. Comp. and Safety Information
Configuration Notes DOC-785406 DOC-785405 DOC-785407 See Path.3 DOC-783088 DOC-786739 DOC-785977
Hardware and Software Documentation:
CCO>Service & Support>Technical
Documents>Documentation Home Page>Cisco Product Documentation>Access Servers and Access Routers>Modular Access Routers>Cisco 1720 Router Release Notes Documentation:
CCO>Service & Support>Technical
Documents>Documentation Home Page>Cisco Product Documentation>Cisco IOS Software Configuration>Cisco IOS Release 12.0>Release Notes>Cisco 1700 Series Routers>Cisco 1720 Routers
Cisco 1750 Router
VOIP Quick Start Guide
Hardware Installation Guide
VOIP Configuration Guide
Release Notes
Reg. Comp. and Safety Information
DOC-786582
DOC-786169
OL-01392
See Path.3
DOC-783088
Hardware and Software Documentation:
CCO>Service & Support>Technical
Documents>Documentation Home Page>Cisco Product Documentation>Access Servers and Access Routers>Modular Access Routers>Cisco 1750 Router Release Notes Documentation:
CCO>Service & Support>Technical
Documents>Documentation Home Page>Cisco Product Documentation>Cisco IOS Software Configuration>Cisco IOS Release 12.0>Release Notes>Cisco 1700 Series Routers>Cisco 1750 Routers
Cisco 7000 Family Routers
Cisco 7100 Router
Quick Start Guide
Installation and Configuration Guide
VPN Configuration Guide
Reg. Comp. and Safety Information
Release Notes for Release 12.0 XE
Port and Service Adapters
Field Replaceable Units
DOC-786343 DOC-786341 DOC-786342 DOC-786345 DOC-786019 See Path.3 See Path.3
Hardware and Software Documentation:
CCO>Service & Support>Technical
Documents>Documentation Home Page>Cisco Product Documentation>Core/High-End Routers>Cisco 7100
Release Notes Documentation:
CCO>Service & Support>Technical
Documents>Documentation Home Page>Cisco Product Documentation>Cisco IOS Software Configuration>Cisco IOS Release 12.0>Release Notes>Cisco 7000 Family Routers>Cisco 7000 Family - Release Notes for Cisco Release 12.0 XE
Cisco 2600 Series Routers
Cisco 2600 Router
Quick Start Guides
Hardware Installation Guide
Software Configuration Guide
Network Module Hardware Installation Guide
WAN Interface Cards Hardware Installation Guide
Analog Modem Firmware
Digital Modem Portware
Reg. Comp. and Safety Information
Configuration Notes
International Regulatory Compliance Information for Telecommunications Equipment
Release Notes for Release 12.0 T
See Path.3 DOC-785037 DOC-785173 DOC-785047 DOC-785046 See Path.3 See Path.3 DOC-785148 See Path.3 DOC-786655 DOC-786136
Hardware and Software Documentation:
CCO>Service & Support>Technical
Documents>Documentation Home Page>Cisco Product Documentation>Access Servers and Access Routers>Modular Access Routers>Cisco 2600 Series Release Notes Documentation:
CCO>Service & Support>Technical
Documents>Documentation Home Page>Cisco Product Documentation>Cisco IOS Software Configuration>Cisco IOS Release 12.0>Release Notes>Cisco 2600 Series Routers>Cisco 2600 Series - Release Notes for Release 12.0 T
Cisco 3600 Series Routers
Cisco 3600 Router
Quick Start Guide
Hardware Installation Guide
Software Configuration Guide
VOIP Software Configuration Guide
Network Module Hardware Installation Guide
WAN Interface Cards Hardware Installation Guide
Analog Modem Firmware
Digital Modem Portware
Reg. Comp. and Safety Information
Configuration Notes
International Regulatory Compliance Information for Telecommunications Equipment
Release Notes for Release 12.0 T
DOC-786343 DOC-785921 DOC-785173 DOC-786046 DOC-785047 DOC-78-5046 See Path.3 See Path.3 DOC-783020 See Path.3 DOC-786655 DOC-786046
Hardware and Software Documentation:
CCO>Service & Support>Technical
Documents>Documentation Home Page>Cisco Product Documentation>Access Servers and Access Routers>Modular Access Routers>Cisco 3600 Series Release Notes Documentation:
CCO>Service & Support>Technical
Documents>Documentation Home Page>Cisco Product Documentation>Cisco IOS Software Configuration>Cisco IOS Release 12.0>Release Notes>Cisco 3600 Series Routers>Cisco 3600 Series - Release Notes for Release 12.0 T
Conventions
Conventions
Command descriptions use the following conventions:
Cisco IOS Router Documentation Modular Access Routers
Access Servers
Core/High-End Routers
See Path.3
See Path.3 See Path.3
Modular Access Routers Documentation: CCO>Service & Support>Technical
Documents>Documentation Home Page>Cisco Product Documentation>Access Servers and Access
Routers>Modular Access Routers Access Servers Documentation: CCO>Service & Support>Technical
Documents>Documentation Home Page>Cisco Product Documentation>Access Servers and Access
Routers>Access Servers
Core/High-End Routers Documentation: CCO>Service & Support>Technical
Documents>Documentation Home Page>Cisco Product Documentation>Core/High-End Routers>
1. If you are viewing this guide online, the hyperlinks in this column are subject to change without notice. If this occurs, refer to the Path column. 2. Cisco Connection Online (CCO) is located at http://www.cisco.com. For more information, see “Cisco Connection Online.”
3. In the Path column, refer to the CCO path for a listing of the available publications.
Document Title1 Customer Order Number Path
Convention Description
Click
Screen1>Screen2>
Screen3
Means use your mouse to navigate through a series of screens or menu items.
boldface font Commands, keywords, menus, menu items, and options are in
boldface.
italic font Arguments for which you supply values are in italics. [ ] Elements in square brackets are optional.
{x | y | z} Alternative keywords are grouped in braces and separated by vertical bars.
[x | y | z] Optional alternative keywords are grouped in brackets and separated by vertical bars.
string A nonquoted set of characters. Do not use quotation marks around the string or the string will include the quotation marks.
screen font Terminal sessions and information the system displays are in
Cisco Connection Online
Cisco Connection Online (CCO) is Cisco Systems’ primary, real-time support channel. Maintenance customers and partners can self-register on CCO to obtain additional information and services. Available 24 hours a day, 7 days a week, CCO provides a wealth of standard and value-added services to Cisco’s customers and business partners. CCO services include product information,product documentation, software updates, release notes, technical tips, the Bug Navigator, configuration notes, brochures, descriptions of service offerings, and download access to public and authorized files. CCO serves a wide variety of users through two interfaces that are updated and enhanced
simultaneously: a character-based version and a multimedia version that resides on the World Wide Web (WWW). The character-based CCO supports Zmodem, Kermit, Xmodem, FTP, and Internet e-mail, and it is excellent for quick access to information over lower bandwidths. The WWW version of CCO provides richly formatted documents with photographs, figures, graphics, and video, as well as hyperlinks to related information.
You can access CCO in the following ways:
WWW: http://www.cisco.com
WWW: http://www-europe.cisco.com
WWW: http://www-china.cisco.com
Telnet: cco.cisco.com
Modem: From North America, 408 526-8070; from Europe, 33 1 64 46 40 82. Use the following terminal settings: VT100 emulation; databits: 8; parity: none; stop bits: 1; and connection rates up to 28.8 kbps.
For a copy of CCO’s Frequently Asked Questions (FAQ), contact [email protected]. For additional information, contact [email protected].
boldface screen
font
Information you must type is in boldface screen font. italic screen font Arguments for which you supply values are in italic screen
font.
^ The symbol ^ represents the key labeled Control—for example, the key combination ^D in a screen display means hold down the Control key while you press the D key. < > Nonprinting characters, such as passwords, are in angle
brackets.
[ ] Default responses to system prompts are in square brackets. !, # An exclamation point ( ! ) or a pound sign ( # ) at the
beginning of a line of code indicates a comment line.
Note
Means reader take note. Notes contain helpful suggestions or references to material not covered in the publication.
Documentation CD-ROM
Note If you are a network administrator and need personal technical assistance with a Cisco product that is under warranty or covered by a maintenance contract, contact Cisco’s Technical Assistance Center (TAC) at 800 553-2447, 408 526-7209, or [email protected]. To obtain general information about Cisco Systems, Cisco products, or upgrades, contact 800 553-6387, 408 526-7208, or [email protected].
Documentation CD-ROM
Cisco documentation and additional literature are available in a CD-ROM package, which ships with your product. The Documentation CD-ROM, a member of the Cisco Connection Family, is updated monthly. Therefore, it might be more current than printed documentation. To order additional copies of the Documentation CD-ROM, contact your local sales representative or call customer service. The CD-ROM package is available as a single package or as an annual subscription. You can also access Cisco documentation on the World Wide Web at http://www.cisco.com, http://www-china.cisco.com, or http://www-europe.cisco.com.
If you are reading Cisco product documentation on the World Wide Web, you can submit comments electronically. Click Feedback in the toolbar and select Documentation. After you complete the form, click Submit to send it to Cisco. We appreciate your comments.
C H A P T E R
1
Overview of Virtual Private Networks and Cisco
Secure VPN Client
The Cisco Secure VPN Client is a software component in either an extranet Virtual Private Network (VPN) or a client-initiated access VPN. VPNs allow for private data to be encrypted and transmitted securely over a public network. With the Cisco Secure VPN Client, you can establish an encrypted tunnel between a client and a router using static or dynamic IP addresses.
This technology overview contains the following sections:
What is a Virtual Private Network?
Types of Virtual Private Networks
What is the Cisco Secure VPN Client?
Interoperability with Cisco Routers
System Requirements
Benefits
What is a Virtual Private Network?
A Virtual Private Network (VPN) is a network that extends remote access to users over a shared infrastructure. VPNs maintain the same security, prioritizing, manageability, and reliability as a private network. They are the most cost-effective method of establishing a point-to-point connection between remote users and an enterprise customer's network. VPNs based on IP meet business customers' requirements to extend intranets to remote offices, mobile users, and telecommuters. Further, they can enable extranet links to business partners, suppliers, and key customers for greater customer satisfaction and reduced business costs.
Types of Virtual Private Networks
The three basic types of VPNs, discussed in this section, are access VPNs, intranet VPNs, and extranet VPNs.
Access VPNs—Provide secure connections for remote access for individuals (for example, mobile users or telecommuters), a corporate intranet, or an extranet over a shared service provider network with the same policies as a private network. For more information, refer to “Access VPNs.”
Intranet VPNs—Connect corporate headquarters, remote offices, and branch offices over a shared infrastructure using dedicated connections. Businesses enjoy the same policies as a private network, including security, quality of service (QoS), manageability, and reliability. For more information, refer to “Intranet VPN.”
Extranet VPNs—Link customers, suppliers, partners, or communities of interest to a corporate intranet over a shared infrastructure using dedicated connections. For more information, refer to “Extranet VPN.”
Access VPNs
There are two types of access VPNs, network access server (NAS)-initiated and client-initiated.
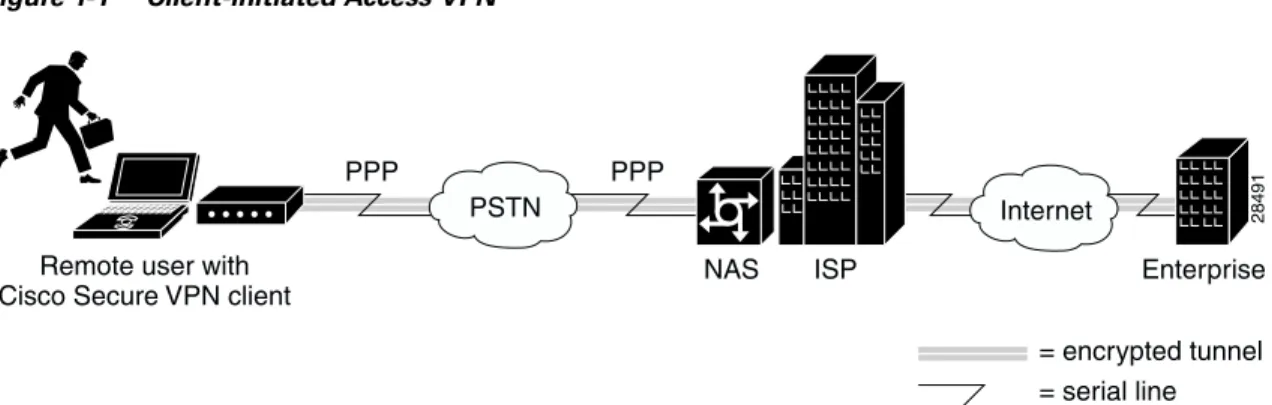
Client-initiated—Remote users use clients to establish an encrypted IP tunnel across the Internet service provider’s (ISP) shared network to the enterprise customer's network. The main advantage of client-initiated VPNs over NAS-initiated VPNs is that they use encrypted tunneling to secure the connection between the client and the ISP over the PSTN.
Figure 1-1 shows the Cisco Secure VPN Client in a client-initiated access VPN topology. The client establishes a PPP connection with the ISP’s NAS, an IKE Mode Configuration session occurs, then an encrypted tunnel is established over the PSTN. Client-initiated access VPNs with the Cisco Secure VPN Client are covered in Chapter 6, “Using Internet Key Exchange Mode Configuration: A Business Case.”
Figure 1-1 Client-initiated Access VPN
NAS-initiated—Remote users dial in to the ISP’s NAS. The NAS establishes an encrypted tunnel to the enterprise's private network. NAS-initiated VPNs allow users to connect to multiple networks by using multiple tunnels, and do not require the client to maintain the tunnel-creating software. NAS-initiated VPNs do not encrypt the connection between the client and the ISP, but rely on the security of the PSTN.
Figure 1-2 shows a NAS-initiated access VPN topology. Because the Cisco Secure VPN Client is not required for a NAS-initiated access VPN solution, it is not a component of this network. The disadvantage of NAS-initiated access VPNs is that the PSTN is not secured.
28491
= encrypted tunnel = serial line
PSTN Internet
PPP
Remote user with Cisco Secure VPN client
NAS ISP Enterprise PPP
Types of Virtual Private Networks
Figure 1-2 NAS-initiated Access VPN
Intranet VPN
An intranet is a network for business that is internal to a company. It delivers the most current information and services available to a company’s networked employees. Intranets offer a common, platform-independent interface, which is less costly to implement than a client/server application. Intranets also increase employees’ productivity by allowing for a reliable connection to consistent information. Intranet VPNs are used to allow the the same security and connectivity for a corporate headquarters, a remote office, and a branch office as you would have with a private network.
Figure 1-3 shows an intranet VPN topology. Because the Cisco Secure VPN Client acts as the client component in a client/server application, with the router functioning as a server, it is not commonly used in an intranet VPN scenario. Also, the Cisco Secure VPN Client is not necessary for secure encryption over an intranet between two routers–an IPSec tunnel will suffice. It is, however, possible for the client to negotiate a more strict transform set than the router-to-router transform set, depending on the level of security required between the host and destination.
For information on creating an intranet VPN, refer to the “Intranet VPN Scenario” chapter of the
Cisco 7100 VPN Configuration Guide.
Figure 1-3 Intranet VPN
Extranet VPN
An extranet is an intranet that extends limited access to customers, suppliers, and partners. Extranets differ from intranets in that they allow access to users outside of the enterprise. By allowing greater access to the resources that are available to customers, suppliers, and partners, companies with extranet
28492
= encrypted tunnel = serial line
PSTN Internet
PPP
Remote user NAS ISP Enterprise PPP 28493 Internet Corporate headquarters Remote office = encrypted tunnel = serial line
Figure 1-4 shows the Cisco Secure VPN Client in an extranet VPN topology. Using digital certificates, clients establish a secure tunnel over the Internet to the enterprise. A certification authority (CA) issues a digital certificate to each client for device authentication. Telecommuters, remote users, extranet partners, and remote offices are checked for authentication, then authorized to access information relevant to their function. While the telecommuters might use static IP addresses, the remote users might use dynamic IP addresses. Extranet VPNs with the Cisco Secure VPN Client begin coverage in Chapter 3, “Using Digital Certificates: Business Case Introduction.”
Note While this solutions guide uses digital certificates to describe an extranet VPN scenario, it is possible to use digital certificates for device authentication in all types of VPNs. Client-initiated access VPNs, intranet VPNs, and extranet VPNs all support digital certificates.
Figure 1-4 Extranet VPNs
What is the Cisco Secure VPN Client?
Cisco Secure VPN Client is a software component that allows a desktop user to create an encrypted tunnel using IPSec and/or IKE to a remote site for an end-to-end, extranet VPN solution. IP Security Protocol (IPSec) encryption technology is an IETF-based effort that is accepted industry-wide. Internet Key Exchange (IKE) is a hybrid protocol which implements the Oakley key exchange and Skeme key exchange inside the Internet Security Association and Key Management Protocol (ISAKMP)
framework. (ISAKMP, Oakley, and Skeme are security protocols implemented by IKE.) IPSec can be configured without IKE, but IKE enhances IPSec by providing additional features, flexibility, and ease
28494 = encrypted tunnel = serial line Internet Enterprise CA server Remote office
Extranet partner with Cisco Secure VPN client CA
Remote users with Cisco Secure VPN client
Telecommuters with Cisco Secure VPN client
Interoperability with Cisco Routers
of configuration for the IPSec standard. Cisco IOS routers use IPSec to establish secure, encrypted tunnels between Cisco routers. The Cisco Secure VPN Client software allows you to perform the following tasks directly from your desktop:
Generating a Public/Private Key
Getting a Digital Certificate
Establishing a Security Policy
This creates a secure client-to-server communication over a Layer 3 IP network, such as the Internet. In this solutions guide, the Cisco IOS IPSec-enabled router acts as a server, while the Cisco Secure VPN Client performs tasks as a client.
Generating a Public/Private Key
Using IKE, you can configure the Cisco Secure VPN Client to use the public/private key system for encryption. The public/private key system is a method of encrypting and decrypting Internet traffic for a secure connection without prior notification. Public/private key technology uses an encryption algorithm (such as DES) and an encryption key, which two parties—a recipient and a sender—use to pass data between one another. The recipient holds the private key, while the public key belongs to the certification authority (CA) or directory server for distribution.
Getting a Digital Certificate
With IPSec, you can configure the Cisco Secure VPN Client to use digital certificates for authentication. To verify a sender’s identity, the CA issues a digital certificate, an electronic file that the CA approves by signing once the sender’s identity is verified. Once the sender has the issuing CA’s digital certificate (as well as the sender’s digital certificate), the sender should establish a security policy.
Establishing a Security Policy
A security policy provides information about how to verify a user’s identity, ensure integrity to prevent tampering with data, and actively auditing for intrusion detection. Every corporate network should have a security policy that determines how the network is maintained for authenticated users and monitored for unauthorized access.
Interoperability with Cisco Routers
This guide covers the current Cisco-supported configurations between the Cisco Secure VPN Client and Cisco routers. For the configurations in this guide, Cisco recommends using VPN-based routers; however, Cisco Secure VPN Client is interoperable with all Cisco routers that support IPSec. This section contains the following topics:
Recommended Cisco Routers
Cisco Routers with IP Security Protocol
Recommended Cisco Routers
For optimum interoperability, Cisco recommends using the following VPN-based routers when setting up a network with Cisco Secure VPN Client:
Cisco 7100 VPN routers for large enterprises
Cisco 2600 or Cisco 3600 series routers for medium-sized businesses
Cisco 1720 VPN routers for small offices
Cisco Routers with IP Security Protocol
All Cisco routers that support Cisco IOS IPSec are interoperable with Cisco Secure VPN Client. These Cisco routers are as follows:
Cisco 1600 series routers
Cisco 1740 series routers
Cisco 2500 series routers
Cisco 2600 series routers
Cisco 3600 series routers
Cisco 4000 (Cisco 4000, 4000-M, 4500, 4500-M, 4700, 4700-M) series routers
Cisco 7100 series routers
Cisco 7200 series routers
Cisco 7500 series routers
Interoperability with Cisco Routers
Supported Configurations
Currently, Cisco supports usage of the Cisco Secure VPN Client with the IPSec and IKE security protocols. For interoperability between the Cisco Secure VPN Client and Cisco routers, Cisco supports the following configurations:
Static or Dynamic Client IP Addresses with Pre-shared Keys
Static or Dynamic Client IP Addresses with Digital Certificates
Dynamic Client IP Addressing with IKE Mode Configuration
For a comparative listing of the advantages and disadvantages of using pre-shared keys and digital certificates for your configuration, see “Pre-shared Keys versus Digital Certificates.”
Static or Dynamic Client IP Addresses with Pre-shared Keys
Using predefined, static IP addresses for the Cisco Secure VPN Client, you can generate pre-shared keys for a secure tunnel between the client and a Cisco router. Pre-shared keys are simple to implement, yet are not as scalable as digital certificates. For this reason, pre-shared keys are recommended for smaller networks (up to 10 clients).
For dynamic IP addressing for pre-shared keys, refer to “Dynamic Client IP Addressing with IKE Mode Configuration.”
Static or Dynamic Client IP Addresses with Digital Certificates
Using predefined IP addresses for the Cisco Secure VPN Client, you can request that a certification authority (CA) assign to you a digital certificate. Digital certificates offer more scalability than pre-shared keys, and are usually implemented on larger networks (more than 10 clients).
As of this publication, the Cisco Secure VPN Client is supported with Cisco routers using Entrust and VeriSign digital certificates.
For dynamic IP addressing, refer to “Dynamic Client IP Addressing with IKE Mode Configuration.”
Dynamic Client IP Addressing with IKE Mode Configuration
IKE Mode Configuration occurs before an IPSec tunnel is established. This feature allows the Cisco router to dynamically assign an IP address to the client. After IKE Mode Configuration, either pre-shared keys or digital certificates can be used to authenticate the peer to establish an encrypted tunnel.
System Requirements
To perform the tasks outlined in this solutions guide, you will require the following materials:
Client-side Requirements (Software)
Server-side Requirements (Hardware and Software)
Client-side Requirements (Software)
These client-side requirements are needed to install and operate the Cisco Secure VPN Client:
PC-compatible Computer—Pentium processor or equivalent
Operating System—One of the following operating systems:
` Microsoft Windows 98
` Microsoft Windows 95
` Microsoft Windows NT 4.0 (with Service Pack 3 or 4)
Minimum RAM—Depending on your operating system:
` 16 MB RAM for Windows 95
` 32 MB RAM for Windows 98
` 32 MB RAM for Windows NT 4.0
Available Hard Disk Space—Approximately 9 MB
Software Installation—CD-ROM drive
Interoperability Requirements—Cisco IOS Release 12.0(4)XE and later releases
Communications Protocol—Native Microsoft TCP/IP
Dial-up Connections—Modem, internal or external, non-encrypting, or Native Microsoft PPP dialer
Network Connections—Ethernet
Server-side Requirements (Hardware and Software)
These server-side requirements are needed to install and operate the Cisco router for interoperability with a Cisco Secure VPN Client:
One of the following Cisco routers:
` A Cisco 1700 series router (Recommended for small networks)
` A Cisco 2600 or Cisco 3600 series router (Recommended for medium-sized networks)
` A Cisco 7100 VPN router (Recommended for large networks)
` Any Cisco IOS router (See “Cisco Routers with IP Security Protocol.”)
Depending on the Cisco router selected, one of the following Cisco IOS IPSec software images:
` For a Cisco 1700 series router or a Cisco 7100 VPN router, a supporting Cisco IOS IPSec software image from Cisco IOS Release 12.0(4)XE or later releases, including
Release 12.0(5)T
` For all other Cisco IOS routers, a supporting Cisco IOS IPSec software image from Cisco IOS Release 12.0(5)T or later releases
Benefits
Benefits
Choosing a VPN network design that best fits the needs of your business is essential. This section lists the following benefits:
Client-initiated versus NAS-initiated Access VPNs
Pre-shared Keys versus Digital Certificates
Static versus Dynamic IP Addresses on the Client
Cisco Secure VPN Client versus Other VPN Solutions
Client-initiated versus NAS-initiated Access VPNs
Table 1-1 outlines the advantages and disadvantages of the two access VPNs, client-initiated and NAS-initiated.
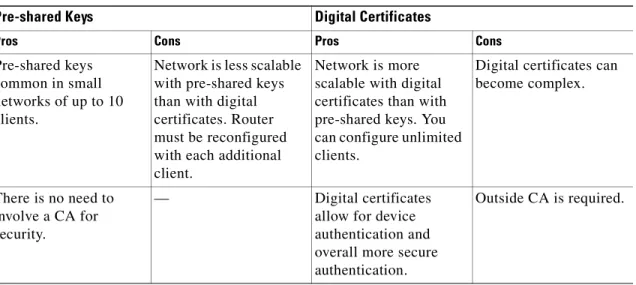
Pre-shared Keys versus Digital Certificates
Table 1-2 outlines the advantages and disadvantages of pre-shared keys and digital certificates.
Table 1-1 Client-initiated versus NAS-initiated
Client-initiated NAS-initiated
Pros Cons Pros Cons
Encryption guarantees a secure tunnel between client and server.
Some client maintenance is required. No client maintenance is required. No encryption occurs over the PSTN. Network is more
scalable with digital certificates than with pre-shared keys. You can configure unlimited clients.
Network is less scalable with pre-shared keys than with digital certificates. Router must be reconfigured with each additional client.
Scalable to larger networks.
—
Client creates a VPN over PSTN and Internet using IPSec.
— NAS creates a VPN over Internet using L2F.
Table 1-2 Pre-shared Keys and Digital Certificates
Pre-shared Keys Digital Certificates
Pros Cons Pros Cons
Pre-shared keys common in small networks of up to 10 clients.
Network is less scalable with pre-shared keys than with digital certificates. Router must be reconfigured with each additional client.
Network is more scalable with digital certificates than with pre-shared keys. You can configure unlimited clients.
Digital certificates can become complex.
There is no need to involve a CA for security.
— Digital certificates allow for device authentication and overall more secure authentication.
Benefits
Static versus Dynamic IP Addresses on the Client
A static IP address is a unique IP address that is assigned to a client for an extended period of time, to be used by only that client. A dynamic IP address is an IP address that is temporarily assigned as part of a login session, to be returned to an IP pool at the end of the session. Use dynamic IP addresses to allocate your IP addresses. Do not use dynamic IP addresses if you have network address translation (NAT) or firewalling installed on the router into which the client dials. Remote users with dynamic IP addresses require dynamic crypto maps on the router at the enterprise.
Cisco Secure VPN Client versus Other VPN Solutions
The Cisco Secure VPN Client is preferable over access VPNs with tunneling protocol such as L2F because of its ability to secure transmissions over the PSTN. When using pre-shared keys, it is the simplest method of security for encrypted tunneling between a remote user and a router. Cisco Secure VPN Client is also scalable to large networks when used with digital certificates.
C H A P T E R
2
Using Pre-shared Keys: A Business Case
Documentation for pre-shared keys will be available in a later release of this guide. For more information, refer to “New and Changed Information” in the preface.
C H A P T E R
3
Using Digital Certificates: Business Case
Introduction
This chapter describes how Cisco Secure VPN Client interoperates with a Cisco router using digital certificates. Using IPSec, digital certificates allow devices to be automatically authenticated to each other without the manual key exchanges required by Cisco Encryption Technology.
Benefits of Using Digital Certificates
Business Case Description
Supported Digital Certificates
Related Documentation
Note Throughout this chapter, there are numerous configuration examples and sample configuration outputs that include unusable IP addresses. Be sure to use your own IP addresses when configuring your client and Cisco router.
Benefits of Using Digital Certificates
The benefits of digital certificates over pre-shared keys are as follows:
Digital certificates are scaleable, which means that they can support a large enterprise network.
Digital certificates authenticate devices.
Digital certificates are more complex than pre-shared keys, but offer a more secure method of authentication.
Business Case Description
The following business scenario is an example of one case in which you might employ the Cisco Secure VPN Client with a Cisco router.
The Challenge
The Risk
The Challenge
A large enterprise is represented by over 5,000 employees. Many of the sales employees alternate working environments between the main campus, small branch offices, and remote clients. The engineering development team works primarly at the main campus, and occasionally telecommute from home. The sales force works remotely giving product demonstration and information to customers, the engineering team adds new and improved functionality to the existing products. The sales force requires immediate access to the latest enhancements to the products. The sales force needs secure data transactions between their remote location and the main campus. Also, the telecommuting engineers require a secure connection between their home and the main campus.
The Risk
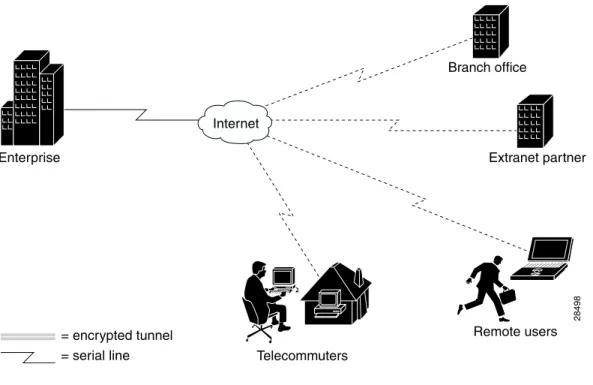
Figure 3-1 shows what happens when data that is secure within a large enterprise network gets transmitted over an insecure, public network such as the Internet. The data may remain secure (represented by the solid flow of data in the figure) inside the enterprise network; but once it is outside the firewall, the data is vulnerable to attack (as represented by the dashed flow of data). A third-party can intercept the data for the purpose of trading your company secrets for profit, replacing confidential documents with false data, or manipulating the existing data.
Figure 3-1 Security Risk of Transmitting Data over an Unprotected, Public Network
The Solution
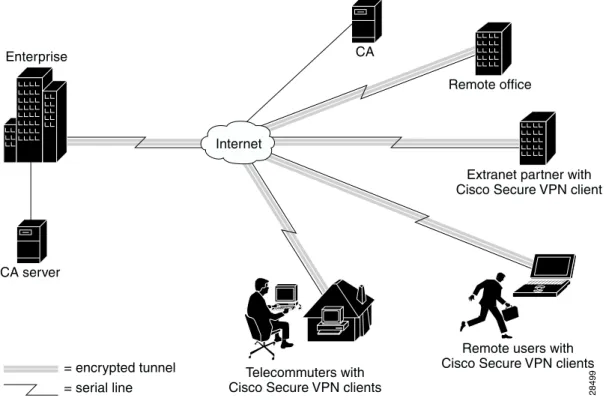
Figure 3-2 shows what happens when data is transmitted using Cisco Secure VPN Client and a Cisco router to establish a secure, encrypted tunnel through which the data travels (as represented by the tunnel in the figure). From the enterprise network to the remote user, the data remains secure within the client-initated encrypting tunnel. This solution demonstrates the Cisco Secure VPN Client and its interaction with a Cisco router to provide a secure, encrypted tunnel for data transmission.
28498 = encrypted tunnel = serial line Internet Enterprise Branch office Extranet partner Remote users Telecommuters
Business Case Description
Figure 3-2 Digital CertificatesSecure Data Transmission Using Cisco Secure VPN Client
28499 = encrypted tunnel = serial line Internet Enterprise CA server Remote office
Extranet partner with Cisco Secure VPN client CA
Remote users with Cisco Secure VPN clients Telecommuters with
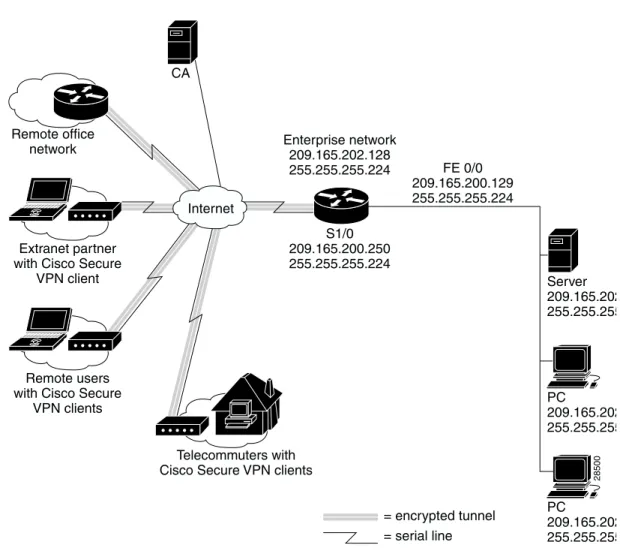
Figure 3-3 shows the physical elements of the scenario. The Internet is the main medium through which data communications occur.
Figure 3-3 Physical ElementsDigital Certificates with the Cisco Secure VPN Client
The telecommuters, remote users, and extranet partners have pre-configured Cisco Secure VPN Clients. For a more secure solution, the remote office might have nested tunnels configured on its client for more secure transform sets than a router-to-router transform set, although the client is not required for an Intranet-based VPN.
The large enterprise uses the Cisco 7140-2T3 as a gateway router. The Cisco 7140-2T3 router has two-high speed synchronous serial T3 interfaces, two Fast Ethernet 10/100BaseT autosensing interfaces.
Cisco 7000 family routers are supported in the following Cisco IOS Releases:
Cisco IOS Release 12.0(4)XE and later releases
Cisco IOS Release 12.0(5)T and later releases
These releases support the Cisco IOS Firewall feature set. The Cisco IOS Firewall feature set provides encryption services within the large enterprise.
Remote office network
CA
Extranet partner with Cisco Secure
VPN client
Telecommuters with Cisco Secure VPN clients
28500
Internet
Remote users with Cisco Secure
VPN clients S1/0 209.165.200.250 255.255.255.224 PC 209.165.202 255.255.255 PC 209.165.202 255.255.255 Server 209.165.202 255.255.255 Enterprise network 209.165.202.128 255.255.255.224 FE 0/0 209.165.200.129 255.255.255.224 = encrypted tunnel = serial line
Business Case Description
Note Any model of the Cisco 7100, with compatible interfaces and hardware modules, will work in this scenario. For Cisco 7100 documentation, see “Related Documentation.” Also, any Cisco IOS router that supports IPSec will work instead of a Cisco 7100. For a list of supported routers, see the “System Requirements” section in Chapter 1 of this guide. For Cisco IOS router documentation, see “Related Documentation.”
The responsbilities of the different components of this VPN are as follows:
Remote User, Telecommuter and Extranet Partner—Purchase digital certificates from the
certification authority (CA). Configures clients with IP adddresses set up by system administrator.
System Administrator at Enterprise—Purchases, installs, and configures Cisco Secure VPN Client on remote users PCs. Assigns static or dynamic IP address on the clients or through the VPN router. Purchases and configures digital certificates for the enterprise Cisco router. Installs the server.
CA Administrator at CA—Purchases, installs, and configures CA server. Generates digital certificates for clients on CA server. Provides system administrators with root CA certificate.
ISP—Supplies clients with static IP addresses. Purchases, configures, and maintains the NAS. The NAS is the point-of-presence (POP) used to forward PPP sessions to the enterprise customer’s network. Supports and maintains in-house modem pools. Maintains an authentication,
authorization, and accounting (AAA) server that authenticates the IP tunnel endpoint and domain name assigned to the enterprise customer’s gateway. Maintains an edge router that connects the ISP’s network to the enterprise customer’s network.
Note This guide is not intended to provide ISP configuration as it is outside the scope of configuring a client-to-router connection. For information on how to secure tunnels between an ISP and an enterprise, refer to the Access VPN Solutions Using Tunneling TechnologySolutions Guide.
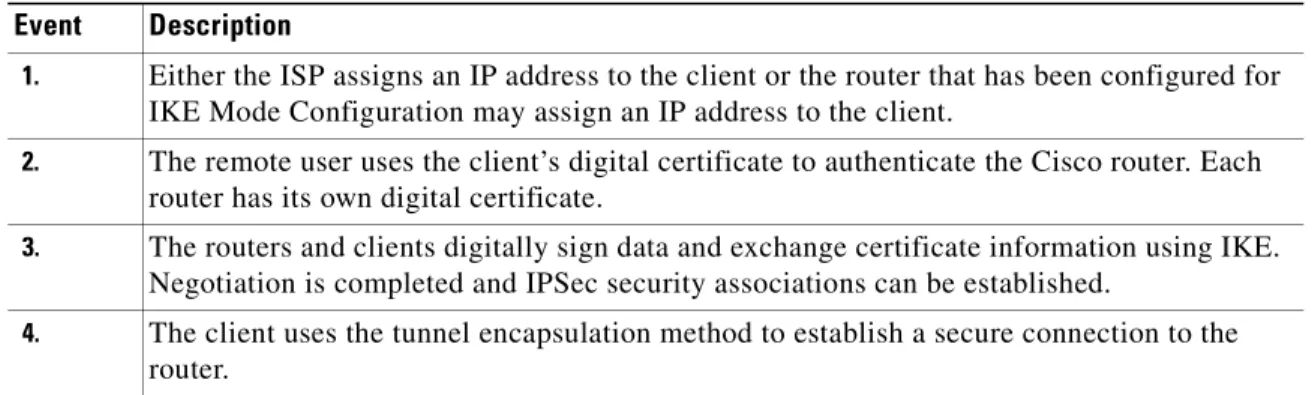
Table 3-1 provides a functional description of the sequence of events that take place when establishing a client-initiatied VPN using digital certificates.
Table 3-1 Protocol Negotiation and Security Association Sequence
Event Description
1. Either the ISP assigns an IP address to the client or the router that has been configured for IKE Mode Configuration may assign an IP address to the client.
2. The remote user uses the client’s digital certificate to authenticate the Cisco router. Each router has its own digital certificate.
3. The routers and clients digitally sign data and exchange certificate information using IKE. Negotiation is completed and IPSec security associations can be established.
4. The client uses the tunnel encapsulation method to establish a secure connection to the router.
Supported Digital Certificates
This guide contains a separate chapter for each type of digital certificate supported by Cisco for use with the Cisco Secure VPN Client. You may configure a secure tunnel between the Cisco Secure VPN Client and a Cisco router by following the procedures in the following chapters:
Chapter 4, “Using Entrust Digital Certificates: A Business Case”
Chapter 5, “Using VeriSign Digital Certificates: A Business Case”
Note Cisco Secure VPN Client may be interoperable with other digital certificates, however, Cisco does not currently support these and you would have to do your own
troubleshooting. Cisco recommends using the Cisco-supported digital certificates, as they have been thoroughly tested and have been deemed deployable for customers.
Related Documentation
For more information on configuring the Cisco Secure VPN Client and digital certificates on a Cisco router, refer to Table 3-2.
Table 3-2 Related Documenation for Digital Certification
Document Title1 Customer Order Number Path Cisco Secure VPN Client Documentation
Cisco Secure VPN Client
Quick Start Guide
Release Notes
Solutions Guide
DOC-786898
DOC-786929
OL-0259
Hardware and Software Documentation:
CCO>Service & Support>Technical
Documents>Documentation Home Page>Cisco Product Documentation>Internet Service Unit Documentation>Cisco Secure VPN Client
Internetworking Solutions Guides Documentation
Access VPN Solutions Using Tunneling Technology
OL-0293 Hardware and Software Documentation:
CCO2>Service & Support>Technical
Documents>Documentation Home Page>Technology Information>Internetworking Solutions
Guides>Access VPN Solutions Using Tunneling Technology
Related Documentation
Cisco IOS Release 12.0 Documentation
Security Configuration Guide
“Configuring IPSec Network Security”
“Configuring Certification Authority Interoperability” DOC-785843 See Path.3 See Path.3 Software Documentation:
CCO>Service & Support>Technical
Documents>Documentation Home Page>Cisco Product Documentation>Cisco IOS Software
Configuration>Cisco IOS Release 12.0>Configuration Guide and Command References>Security
Configuration Guide
Security Command Reference
“IPSec Network Security Commands” “Certification Authority Interoperability Commands” DOC-785845 See Path.3 See Path.3 Software Documentation:
CCO>Service & Support>Technical
Documents>Documentation Home Page>Cisco Product Documentation>Cisco IOS Software
Configuration>Cisco IOS Release 12.0>Configuration Guide and Command References>Security Command Reference
New Feature Documentation See Path.3 Software Documentation:
CCO>Service & Support>Technical
Documents>Documentation Home Page>Cisco Product Documentation>Cisco IOS Software
Configuration>Cisco IOS Release 12.0>New Feature Documentation
Cisco 7000 Family Routers
Cisco 7100 Router
Quick Start Guide
Installation and Configuration Guide
VPN Configuration Guide
Reg. Comp. and Safety Information
Release Notes for Release 12.0 XE
Port and Service Adapters
Field Replaceable Units
DOC-786343 DOC-786341 DOC-786342 DOC-786345 DOC-786019 See Path.3 See Path.3
Hardware and Software Documentation:
CCO>Service & Support>Technical
Documents>Documentation Home Page>Cisco Product Documentation>Core/High-End Routers>Cisco 7100
Release Notes Documentation:
CCO>Service & Support>Technical
Documents>Documentation Home Page>Cisco Product Documentation>Cisco IOS Software Configuration>Cisco IOS Release 12.0>Release Notes>Cisco 7000 Family Routers>Cisco 7000 Family - Release Notes for Cisco Release 12.0 XE
Table 3-2 Related Documenation for Digital Certification (continued)
Cisco IOS Router Documentation Modular Access Routers
Access Servers
Core/High-End Routers
See Path.3 See Path.3
See Path.3
Modular Access Routers Documentation: CCO>Service & Support>Technical
Documents>Documentation Home Page>Cisco Product Documentation>Access Servers and Access
Routers>Modular Access Routers Access Servers Documentation: CCO>Service & Support>Technical
Documents>Documentation Home Page>Cisco Product Documentation>Access Servers and Access
Routers>Access Servers
Core/High-End Routers Documentation: CCO>Service & Support>Technical
Documents>Documentation Home Page>Cisco Product Documentation>Core/High-End Routers>
1. If you are viewing this guide online, the hyperlinks in this column are subject to change without notice. If this occurs, refer to the Path column. 2. Cisco Connection Online (CCO) is located at http://www.cisco.com. For more information, see “Cisco Connection Online.”
3. In the Path column, refer to the CCO path for a listing of the available publications.
Table 3-2 Related Documenation for Digital Certification (continued)
C H A P T E R
4
Using Entrust Digital Certificates: A Business
Case
This chapter describes how Cisco Secure VPN Client interoperates with a Cisco router using Entrust digital certificates. Using IPSec, digital certificates allow devices to be automatically authenticated to each other without the manual key exchanges required by Cisco Encryption Technology.
Benefits of Using Entrust Digital Certificates
Configuring and Verifying
Related Documentation
Benefits of Using Entrust Digital Certificates
For of the benefits of using digital certificates, refer to the “Benefits of Using Digital Certificates” section in Chapter 3, “Using Digital Certificates: Business Case Introduction.”
Configuring and Verifying
Configuring Entrust Digital Certifications
Verifying Entrust Digital Certifications
Configuring Entrust Digital Certifications
Configuring Entrust digital certificates for a secure IPSec tunnel between a remote client and a Cisco router involves the following tasks:
Configuring the Cisco Secure VPN Client
Figure 4-1 Physical ElementsEntrust Configuration Topology
\
Configuring the Cisco Secure VPN Client
Configuring the Cisco Secure VPN Client requires the following tasks:
Task 1—Importing the Root CA Certificate
Task 2—Creating Public and Private Key Pair
Task 3—Requesting Client Certificate from Entrust CA Server
Task 4—Submitting the Certification Request to the Entrust Server
Task 5—Importing Your Signed Entrust Digital Certificate
Task 6—Configuring Other Connections for Security Policy
Task 7—Configuring A New Connection for Security Policy
Task 8—Specifying Identity Using RSA Signature
Task 9—Specifying Encryption and Authentication Methods for Authentication, Phase 1
Task 10—Specifying Encryption and Authentication Methods for Key Exchange, Phase 2
Task 11—Saving Your Configuration
28501
Internet
Entrust.com
Remote user with Cisco Secure
VPN client 209.165.201.1 255.255.255.224 S1/0 209.165.200.250 255.255.255.224 PC 209.165.202.150 255.255.255.224 PC 209.165.202.140 255.255.255.224 Server 209.165.202.130 255.255.255.224 Enterprise network 209.165.202.128 255.255.255.224 FE 0/0 209.165.202.129 255.255.255.224 = encrypted tunnel = serial line
Configuring and Verifying
Task 1Importing the Root CA Certificate
Task 1Importing the Root CA Certificate
Command Purpose
Step 1 Click Start>Programs>SafeNet/Soft-PK>Certificate Manager. The SafeNet/Soft-PK Certificate Manager dialog box appears.
Open the Certificate Manager. The Certificate Manager allows you to request, import, and store the digital certificates that you receive from the certification authority (CA).
Step 2 a. Click the CA Certificates tab.
b. Click Import Certificate.
Use the CA Certificates folder to retrieve, import, view, verify, configure, export, or delete the certificates you receive from the CA.
Step 3 The Import Certificate (and Keys) dialog box appears.
a. In the Import Certificate (and Keys) dialog box, enter the following information:
Under Import Options, select the No Keys to Import option.
Obtain the root CA file from the system administrator, who should also supply you with the URL for IPSec CSR enrollment. The system administrator gets the root CA file and URL from the CA Administrator.
Rename the root CA file with a “.cer” filename extension.
b. Under Certificate, click Browse.
Import your CA root file certificate. There are three reasons to import a certificate rather than retrieving it:
You decide not to request a personal certificate online, and you need to reimport the certificate file your CA returned to you.
You want to import a CA certificate that was downloaded directly from the CA’s web site.
In the following events:
` Your computer crashes.
` Your files are corrupted.
` You need to copy your certificate from one computer to another.
` You are upgrading client software.
` You would need the certificate file you or your network administrator exported from My Certificates or CA Certificates as a backup.
Step 4 The Open dialog box appears.
a. In the Files of Type list, click Base64 encoded certificate files.
b. Locate the root CA file (the “.cer” file).
c. Click Open.
Open the root CA file for importing to the CA Certificates folder.
Task 1Importing the Root CA Certificate
Configuring and Verifying
Task 2Creating Public and Private Key Pair
Step 5 The Import Certificate (and Keys) dialog box appears.
a. Click Import.
b. Add the certificate to the Root Store.
Add the CA root file to your list of CA Certificates.
Task 2Creating Public and Private Key Pair
Command Purpose
Step 1 a. In the Certificate Manager dialog box, click the My Certificates tab.
b. Click Request Certificate.
Use the My Certificates folder to retrieve, import, view, verify, configure, export, or delete your personal certificate.
Note You must have your root CA certificate before requesting a personal certificate. Otherwise, only a file-based request is possible.
Task 1Importing the Root CA Certificate
Step 2 The Online Certificate Request dialog box appears.
a. In the Online Certificate Request dialog box, fill in the following section:
Under Subject Information, fill in the following fields:
In the Name field, enter the name of the certificate owner.
In the Department field, enter the department for which this certificate will be configured.
In the Company field, enter the company for which this certificate will be configured.
In the State field, enter the state in which this certificate request was created.
In the Country field, enter the country in which this certificate was created.
In the Email field, enter the email account of the person associated with this certificate request.
In the Domain Name field, enter the name of the domain for your business.
In the IP Address field, do not enter anything.
In the Request File section, perform the following tasks:
In the Filename field, enter the filename of the certificate request or click Browse to locate the certificate request on your hard drive.
b. Click OK. The client will generate public/private key pairs.
Enroll online for your personal certificate.
You can configure a certificate request for online or file-based enrollment.
To configure an online enrollment, you must click the CA Certificate tab in the Certificate Manager dialog box, and retrieve a CA certificate first.
Note This information binds your identity to a public key that others will look for in a public key directory. Entering inaccurate or misleading information defeats the purpose of using public key.
Task 2Creating Public and Private Key Pair
Configuring and Verifying
Task 3Requesting Client Certificate from Entrust CA Server
Task 3Requesting Client Certificate from Entrust CA Server
Command Purpose
a. In the Certificate Manager dialog box, click the My Certificates tab.
b. Click Request Certificate.
Task 4Submitting the Certification Request to the Entrust Server
Task 4Submitting the Certification Request to the Entrust Server
Command Purpose
Step 1 a. Open your browser.
b. Navigate to the Enrollment URL provided by your CA Administrator. For example:
http://www.entrust.net/customer/enrollment.htm
This web page consists of seven steps to securing an Entrust.site certificate.
Choose Contact People
Print and Submit the Letter of Authentication
Confirm Proof of Right
Confirm Ownership of Domain Name
Submit CSR and Enter Server Information
Confirm Request Information
Make Payment
Print out and read the Enrollment Guide provided by Entrust before buying your digital certificate.