Nios II IDE Help System
101 Innovation Drive San Jose, CA 95134 www.altera.com
Nios II IDE Version: 9.0 Document Version: 1.7 Document Date: March 2009
Table Of Contents
About This Document...1
Welcome to the Nios II IDE...3
What's New in the Nios II IDE ...7
Tutorials ... 10
About Tutorials... 10
Creating a Nios II C/C++ Application Project ... 11
Building the Project... 13
Running the Project ... 14
Debugging the Project ... 17
Editing the Project Properties ... 26
Creating Projects... 29
About Nios II IDE Projects... 29
About the Nios II IDE Managed-Make Build Environment ... 31
Creating a New Project ... 37
Importing, Exporting, and Sharing Projects and Files ... 41
Indexing and Searching Project Contents ... 45
Configuring Projects... 46
About Project Properties ... 46
Configuring Project Properties ... 47
Choosing and Configuring an Operating System ... 48
Choosing and Configuring Software Packages ... 50
Configuring Project Dependencies ... 51
Editing Code ... 53
About Editing Code ... 53
Building Projects ... 54
About Building Projects... 54
Building a Project ... 55
Running and Debugging Projects ... 56
About Running and Debugging Projects... 56
Configuring the FPGA ... 59
Running and Debugging on Hardware ... 61
Running and Debugging on the ISS ... 63
Running on the ModelSim Simulator ... 65
Running and Debugging Multiprocessor Collections ... 66
Viewing Execution Trace ... 68
Viewing Disassembly... 70
Profiling Execution Performance... 72
Profiling C Code... 73
Storing Firmware on the Target Board ... 75
About Storing Firmware... 75
Programming Flash ... 76
Features and Terms Reference ... 79
Advanced Debugging Features by FS2 ... 79
C-to-Hardware Acceleration (C2H) Compiler ... 80
Hardware Abstraction Layer (HAL) ... 81
Hardware Simulation with ModelSim... 82
Hardware Target ... 83
Host-Based File System ... 84
Instruction Set Simulator (ISS)... 86
MicroC/OS-II RTOS ... 88
Multiprocessor Nios II Systems ... 89
NicheStack TCP/IP Stack - Nios II Edition ... 90
Run/Debug Configuration... 92
Valid Project Names ... 93
Zip Read-Only File System ... 94
GUI Reference ... 95
Flash Programmer Dialog Box... 95
Import Wizard... 98
New Project Wizard... 99
New Project Wizard ... 99
New Nios II C/C++ Application (New Project Wizard) ... 100
New Nios II System Library (New Project Wizard) ... 102
New Nios II C/C++ Library (New Project Wizard)... 103
New Nios II User-Makefile C/C++ Application (New Project Wizard)... 104
Nios II C/C++ Perspective ... 105
Nios II C/C++ Perspective... 105
Preferences Dialog Box... 106
Preferences Dialog Box ... 106
Nios II Page (Preferences Dialog Box) ... 107
New Projects Page (Preferences Dialog Box) ... 108
Trace Page (Preferences Dialog Box)... 109
Profiling Perspective... 110
Profiling Perspective ... 110
Project Properties Dialog Box... 111
Properties Dialog Box ... 111
Associated System Library Page (Properties Dialog Box) ... 113
C/C++ Build Page (Properties Dialog Box) ... 115
C/C++ Documentation Page (Properties Dialog Box) ... 118
Properties Dialog Box ... 119
Project References Page (Properties Dialog Box)... 121
System Library Page (Properties Dialog Box)... 122
RTOS Options Dialog Box (System Library Properties Page)... 126
Software Components Dialog Box (System Library Properties Page) ... 127
Run/Debug Dialog Box ... 128
Run/Debug Dialog Box... 128
Common Tab (Run/Debug Dialog Box) ... 130
Debugger Tab (Run/Debug Dialog Box) ... 131
ISS Settings Tab (Run/Debug Dialog Box) ... 133
Launch ModelSim Tab (Run Dialog Box) ... 135
Main Tab (Run/Debug Dialog Box) ... 136
Source Tab (Run/Debug Dialog Box)... 138
Target Connection Tab (Run/Debug Dialog Box) ... 139
Views... 140
Call Hierarchy View (Profiling Perspective) ... 140
Disassembly View (Debug Perspective) ... 141
Editor View (Profiling Perspective) ... 142
Nios II C/C++ Projects View (Nios II C/C++ Perspective) ... 143
Samples - Function Total View (Profiling Perspective) ... 147
Samples - Line By Line View (Profiling Perspective)... 148
Trace View (Debug Perspective) ... 149
Workspace Launcher Dialog Box ... 150
About This Document
This document provides complete reference for the Nios II integrated development
environment (IDE), including details of the Nios II embedded design suite (EDS) design flows and tutorials on using the IDE. This document is based on the HTML content of the Nios II IDE help system. Altera provides this content as a PDF file to make it accessible as a stand-alone document outside of the Nios II IDE.
The content for this document was developed as an interactive help system. However, the PDF file does not provide complete interactive functionality. Use the following guidelines to find related documentation listed in individual topics:
Related Nios II IDE Help Topics are included in this PDF file.
Related Eclipse Workbench User Guide Help Topics are available at http://help.eclipse.org/help32.
Related C/C++ Development (CDT) User Guide Help Topics are available at http://www.eclipse.org/cdt.
Related Topics on the Web provide specific URLs to locate the documents on the Internet.
How to Contact Altera
For the most up-to-date information about Altera products, refer to the following table.
Contact Contact Method Address
Technical support Website www.altera.com/support
Technical training Website
www.altera.com/training [email protected]
Product literature Website www.altera.com/literature
Altera literature services Email [email protected]
Non-technical support (General) (Software Licensing)
Email Email
[email protected] [email protected]
Note: You can also contact your local Altera sales office or sales representative.
Altera logo, specific device designations, and all other words and logos that are identified as trademarks and/or service marks are, unless noted otherwise, the trademarks and service marks of Altera Corporation in the U.S. and other countries. All other product or service names are the property of their respective holders. Altera products are protected under numerous U.S. and foreign patents and pending applications, maskwork rights, and copyrights. Altera warrants performance of its semiconductor products to current specifications in accordance with Altera’s standard warranty, but reserves the right to make changes to any products and services at any time without notice. Altera assumes no responsibility or liability arising out of the application or use of any information, product, or service described herein except as expressly agreed to in writing by Altera. Altera customers are advised to obtain the latest version of device specifications before relying on any published information and before placing orders for products or services.
Welcome to the Nios II IDE
The Nios II integrated development environment (IDE) is a graphical software development tool for the Nios II family of embedded processors.
The Nios II IDE provides a consistent development platform that works for all Nios II
processor systems. You can accomplish all software development tasks within the Nios II IDE, including editing, building, debugging, and profiling programs. The IDE allows you to create single-threaded programs as well as complex applications based on a real-time operating system (RTOS) and middleware libraries available from Altera and third-party vendors . The IDE also allows you to import and debug projects you created from the Nios II command shell with the Nios II software build tools, such as the Nios II BSP generator.
Design Flow:
There are two typical design flows involving the Nios II IDE. You can work entirely within the IDE, or you can work with the Nios II software build tools in the Nios II command shell and then import your work into the IDE for debugging. Depending on your particular design, not all design flow steps are required for either flow. You can return to a previous step at any point in the process.
In the IDE-only design flow, the IDE creates and manages the makefiles for you. This design flow is best for users who require only limited control over the build process and do not require customized scripting. The IDE-only design flow includes the following steps:
Create a project
Configure the project properties Edit the C/C++ application code Build the C/C++ application project Run and debug the project
Profile execution performance
Store the project firmware on a target board
In the Nios II software build tools design flow, you import projects into the IDE (primarily for debugging) that were created with the Nios II software build tools outside of the IDE. This design flow is best for users who require more control over the build process, need customized scripting, and don't want the IDE to manage the makefiles.
The Nios II command line design flow includes the following steps: Create and configure software projects on the command line
Import the command line projects Edit the C/C++ application code Build the C/C++ application project Run and debug the project
Profile execution performance
Store the project firmware on a target board
Refer to the Related Topics for more information about using the Nios II software build tools on the command line, and the two Nios II design flows.
Note:The two design flows are not interchangeable. Once you have committed to using one design flow, there is no way to switch to using the other design flow.
Getting Started with the IDE:
Refer to the following help topics and cheat sheets to help you start using the Nios II IDE quickly.
Quick-Start Tutorial
This cheat sheet guides you through the process of creating, compiling, and running a new project on a Nios development board.
To start the Nios II Quick-Start Tutorial, do the following: 1. On the Help menu, click Cheat Sheets.
2. Expand Altera Nios II.
3. Click Nios II IDE Quick-Start Tutorial. 4. Click OK.
Software Development Tutorial
This tutorial guides you through the complete software development process in detail. You compile, run, debug, set breakpoints, edit project properties, and more.
Nios II IDE Tour Cheat Sheet
This cheat sheet introduces you to the significant features of the IDE. To start the Nios II IDE Tour cheat sheet, do the following:
1. On the Help menu, click Cheat Sheets. 2. Expand Altera Nios II.
3. Click Nios II IDE Tour. 4. Click OK.
Workbench, Perspectives, and Views:
The Nios II IDE is based on the Eclipse IDE framework and the Eclipse C/C++
Development Toolkit (CDT) plug-ins. The Nios II IDE inherits much of its behavior from Eclipse, including the concepts of workbench, perspectives, and views.
The Eclipse graphical interface is called the workbench. Each Eclipse workbench window contains one or more perspectives. Each perspective provides a set of capabilities aimed at accomplishing a specific type of task. For example, the Nios II C/C++ perspective provides facilities for editing and compiling Nios II C/C++ projects. Perspectives in the workbench comprise one or more views. Views help you to organize and navigate the information in your workbench. For example, the Registers view in the Debug perspective allows you to inspect and edit the values of processor registers while debugging a project.
The Nios II IDE primarily uses the Nios II C/C++ perspective, the Nios II C/C++ Projects view, and the CDT Debug perspective. The Nios II IDE also provides a profiling
perspective.
Projects and Workspaces:
Nios II IDE projects are groups of files treated as a unit, containing source code,
need to create, build, run, and debug within the Nios II IDE. You can do C/C++ source code and file searches on your projects by creating a project index.
The Nios II IDE stores your projects in a directory called a workspace. You can define one or more workspaces, as well as select the workspace to use for the current IDE session using the Workspace Launcher dialog box.
Customizing Nios II IDE Preferences:
The Nios II IDE provides preferences to customize the IDE. The Eclipse IDE framework offers user preference pages for all the Eclipse C/C++ Development Toolkit (CDT) plug-ins. User preference pages let you define and control the look, feel, and behavior of your workbench. Some preference pages are part of the standard Eclipse environment and other preference pages are specific to the Nios II IDE.
The following topics describe Nios II IDE preferences pages that affect how the Nios II IDE builds, stores, runs, and debugs projects.
Nios II Page (Preferences Dialog Box) New Projects Page (Preferences Dialog Box) Trace page (Preferences Dialog Box)
Getting Help
The Nios II IDE provides an extensive help system that covers all aspects of the Nios II IDE. This topic you are reading now is part of the IDE help system.
There are two ways to open the help system:
Click Help Contents on the IDE Help menu to launch the help system, then click Nios II IDE Help in the Contents pane. You can browse through topics in the Contents pane, or use the Search box to search for a specific term across all help topics. You can also press F1 on Windows and Shift-F1 on Linux systems at any point in the IDE to display context sensitive help. A simple description appears either in a tool-tip or in the Help view, depending on your Help preference settings. If Altera-specific help is available, you will see a Nios II Help link. Click the link to jump to the topic in the help system.
Note: The Nios II IDE help system might not function properly on browsers older than Firefox 1.0.7, Internet Explorer 6.0, Mozilla 1.7.12, Netscape Navigator 8.1, and Opera 8.5.1. In some older browsers, expandable text indicated by does not work. Click
Show All in the upper-right corner to expand all text in the topic.
In addition to Altera-specific content, the Nios II IDE help system includes the Eclipse
Workbench User Guide and the CDT C/C++ Development User Guide. Altera-specific content
overrides any information found in the Eclipse or CDT user guides. Specifically, Eclipse and CDT help topics relating to creating, building, and debugging projects are invalid. See the Nios II IDE Help topics instead.
The help browser only works while the Nios II IDE is running. If the browser stays open after you close the IDE, the navigation stops working.
Related Nios II IDE Help Topics
Related Eclipse and CDT Help Topics Workbench User Guide > Concepts > Help
C/C++ Development User Guide > Concepts > Perspectives available to C/C++ developers
Workbench User Guide > Tasks > Working with perspectives Workbench User Guide > Reference > Preferences
C/C++ Development User Guide > Reference > C/C++ preferences Related Topics on the Web
Nios II literature web page at www.altera.com/literature/lit-nio2.jsp—Contains all documentation related to the Nios II processor.
What's New in the Nios II IDE
Note: No significant enhancements have been made to the Nios II Integrated
Development Environment v8.0 release. Refer to the Nios II Embedded Design Suite Release Notes and Errata for a list of addressed errata. For information about converting your IDE projects to Nios II software build tools projects, refer to the Porting IDE Projects
to the Software Build Tools Flow appendix of the Nios II Software Developer's Handbook.
What's New in the Nios II IDE v8.0:
Below are the most significant changes to the Nios II IDE for the v8.0 release.
Feature Description
Software examples distributed on the Web
Certain software examples, distributed with the Nios II IDE through v7.2, are distributed on the Web starting in v8.0. The Web-available software examples are as follows:
Example Name Location
Zip File System Nios Community Wiki
MicroC/OS-II Message Box Nios Community Wiki
Hello LED Nios Community Wiki
Host File System Nios Community Wiki
Dhrystone www.altera.com
MicroC/OS-II Tutorial www.altera.com
Tightly Coupled Memory www.altera.com
Custom Instruction Tutorial www.altera.com
Lightweight IP software package no longer supported
Use the NicheStack TCP/IP Stack.
What's New in the Nios II IDE v7.2:
Feature Description
Centralized links to
altera-provided components
The Nios II EDS version 7.2 has only one link in the workspace to the source code for altera-provided device drivers and software packages. The redundant links formerly referenced from within each separate system library project are now consolidated into one altera.components project, available in the Nios II C/C++
Projects view after creating or building a project that references the shared source code.
Improved project creation speed
The New Project wizard now creates projects much more quickly than previous Nios II IDE versions.
Improved debugging experience
Previous issues with breakpoint invalidation and ambiguity have been resolved.
Delete disabled
for linked files The delete commands have been disabled in the Nios II C/C++ Projects view for all linked files in the altera.components project. It is possible to delete the entire project, but it will be automatically recreated the next time any build process needs the linked files.
Lauterbach instruction set simulator
Information about the Lauterbach instruction set simulator is now available from within the Nios II IDE. The context-sensitive right-click menu in Nios II C/C++ Projects view includes a Run As, Lauterbach Instruction Set Simulator command that directs you to specific information on the Lauterbach website.
What's New in the Nios II IDE v7.1:
Below are the most significant changes to the Nios II IDE for the v7.1 release.
Two design flows
The Nios II embedded design suite (EDS) version 7.1 offers two design flows involving the Nios II IDE. You can work entirely within the IDE, or you can work with the new Nios II software build tools in the Nios II command shell and then import your work into the IDE for debugging. The two design flows are not interchangeable. Once you have committed to using one design flow, there is no way to switch to using the other design flow.
Refer to the Nios II Software Developer's Handbook at
www.altera.com/literature/hb/nios2/n2sw_nii5v2.pdf for more information about the two Nios II EDS design flows.
Importing Nios II software build tools projects
The Nios II EDS version 7.1 contains a new set of software build tools that enable you to create C/C++ applications and board support packages (BSP) from the Nios II command shell. You can then import Nios II software build projects into the IDE for debugging.
Imported C/C++ applications become user-managed (standard Eclipse) make projects in the IDE. You can edit, build, run and debug these C/C++ applications just like you would other Nios II user-makefile C/C++ application projects.
You can also import the BSP created by the Nios II BSP generator and other supporting source code (like newlib) so source code is available to the IDE debugger and C/C++ search. There is no IDE-managed
association between the imported C/C++ application and the BSP (like there is between Nios II C/C++ application projects and Nios II system library projects). The C/C++ application's makefile associates the application and the BSP.
Refer to the Nios II Software Developer's Handbook at
www.altera.com/literature/hb/nios2/n2sw_nii5v2.pdf for more information about the Nios II software build tools.
Improved standard CDT support
Nios II C/C++ application projects and Nios II system library projects now make use of the standard CDT C/C++ Include Paths and Symbols, C/C++ Make Project, and C/C++ Project Paths properties. The IDE now finds include files and symbols from the Outline view during project development and offers improved source code discovery during debugging.
Refer to the Related Topics in Properties dialog box for more information about these properties.
Tutorials
About Tutorials
The Nios II IDE provides tutorials so beginning Nios II developers can become familiar with the development environment, user interface, and software development process. The following sections describe tutorials available in the Nios II IDE. The Altera website also provides tutorials that Nios II developers might find useful.
Quick-Start Tutorial:
This tutorial guides you through the process of creating a new project, compiling it, and running it on a Nios development board. You will create a new Nios II C/C++ application project, and compile a hello world program.
To start the Nios II quick-start tutorial, do the following: 1. On the Help menu, click Cheat Sheets.
2. Expand Altera Nios II.
3. Click Nios II Quick-Start Tutorial. 4. Click OK.
Software Development Tutorial:
This tutorial provides the information you need to create, build, and debug a Nios II C/C++ application and its associated Nios II system library. The tutorial steps you through running and debugging Nios II software on a target board or the instruction set
simulator. It also explains various options available for configuring your project. The tutorial is part of this help system and contains the following topics:
Creating a Nios II C/C++ Application Project—Create a Nios II C/C++ application project containing your application code and corresponding build settings.
Building the Project—Build your Nios II C/C++ application project.
Running the Project—Set up a run/debug configuration and run your application code on a target board or the instruction set simulator.
Debugging the Project—Debug your code, set breakpoints, step though your code, and view memory contents.
Editing the Project Properties—Edit your application project and system library properties.
Use the links near the bottom of each tutorial page to advance to the next and previous tutorial pages.
Related Topics on the Web
Nios II Hardware Development Tutorial at
www.altera.com/literature/tt/tt_nios2_hardware_tutorial.pdf
Literature: Nios II Processor at www.altera.com/literature/lit-nio2.jsp—Contains links to several tutorials and other "how to" information.
Creating a Nios II C/C++ Application Project
A Nios II C/C++ application project contains your program code and corresponding build settings. In this tutorial you create a Nios II C/C++ application project for the full featured hardware design provided in the Nios II Embedded Design Suite (EDS). The example C program exercises the visible output devices on a Nios development board, such as the LEDs and LCD screen.
Follow the steps below to create a Nios II C/C++ application project using the New Project wizard.
1. Look for the highlighted Nios II C/C++ button on the perspective's tab to verify that you are using the Nios II C/C++ perspective. If you are not using the Nios II C/C++ perspective, point to Open Perspective on the Window menu, and then either click Nios II C/C++, or click Other... and then double-click Nios II C/C++.
2. On the File menu, point to New, and then click Nios II C/C++ Application. The New Project wizard appears.
3. Type tutorial as the name of the project in the Name box.
4. Allow the IDE to use the default location for the Nios II C/C++ application project by leaving Specify Location off. The default path appears in the Location box when you select the SOPC Builder system file in the following steps. And the name of the project directory is the project name, tutorial.
Note: When off, the Nios II IDE creates the new project directory in the default location specified in the New Projects page. At installation, the default location is the <SOPC Builder system path>/software directory. Altera recommends using this location because it keeps software files in proximity to the system hardware files. Turning on Specify Location allows you to specify an alternative project location in the Location box.
5. Click Browse next to the SOPC Builder System box, and browse to the following directory:
<Nios II EDS install path>/examples/verilog/<Nios development
board>/full_featured
6. Select the SOPC Builder system file (.ptf) in this directory (e.g.
NiosII_cycloneII_2c35_full_featured_sopc.ptf) and click Open. You return to the New Project wizard, with data appearing in the SOPC Builder System and CPU boxes.
Note: The SOPC Builder system file describes the processors, memories, and peripherals contained in a Nios II hardware system. SOPC Builder generates the file, and the Nios II IDE uses it when building projects, downloading code, and communicating with the target hardware. For designs targeting custom hardware, obtain an SOPC Builder system from the hardware designer.
Note: If your SOPC Builder system has more than one Nios II processor, you can select a specific processor for the project in the CPU box. Since the full_featured example design contains only one processor (named "cpu"), only one processor is available in the list.
7. Select the Count Binary project template in the Select Project Template list. The Count Binary example continuously sends a counting pattern to the LEDs, the seven segment display, and the LCD display on the Nios development board.
Note: Each template is a collection of software files and project settings that serve as a base for the new project. The Nios II IDE automatically copies the source files into the new project's directory. You can add your own source code to the project later.
8. Click Finish to exit the wizard. The New Project wizard closes, and you return to the Nios II IDE workbench.
Note: The New Project wizard actually creates multiple projects when you click Finish:
- The Nios II C/C++ application project tutorial contains your source code. - The Nios II system library project tutorial_syslib serves as a board support package for the target hardware. It contains compiled drivers and library files for the selected SOPC Builder system.
- The altera.components project contains links to source code for the compiled drivers.
In the IDE workbench you can browse the software files in a project using the Nios II C/C++ Projects view in the left-hand pane of the IDE. Double-clicking a file in the Nios II C/C++ Projects view opens the file in the IDE editor.
Now, you are ready to build your Nios II C/C++ application project.
Next: Building the Project
Related Nios II IDE Help Topics
Importing and Exporting Files and Projects—Contains details on importing C files into the Nios II IDE.
Related Eclipse and CDT Help Topics
C/C++ Development User Guide > Tasks > Writing code—Describes how to customize and use the C/C++ editor.
Related Topics on the Web
Building the Project
Building a project in the Nios II IDE compiles and links all the source code associated with the project and the system library project. The result of building is an executable file (.elf) that you can run or debug.
Use the following methods to build the project:
Right-click on the project in the Nios II C/C++ Projects view, and click Build Project. Note: Make sure you build the application project tutorial, not the system library
tutorial_syslib. Building the system library does not create an executable file.
When building a project, the Nios II IDE first builds all other projects that the current project references. Therefore, the system library project is usually built first. Building a project the first time might take a few minutes while the Nios II IDE builds the system library.
Subsequent builds are faster.
In the IDE workbench, the Console view displays messages generated by the GCC tool-chain during compilation. The Problems view displays any warnings or errors. (In this example, there are no errors.)
Note: If building the project generates warnings or errors, the Problems view appears automatically. You can double-click each row to jump to the line of code that caused the warning/error.
Note: The information displayed in the Console and Problems views depends on the project selected in the Nios II C/C++ Projects view. If you accidentally select a different project, you will see unexpected (or no) text in the Console and Problems views.
After successfully building the project, you can download and run the application on your development board. Refer to Running the Project for instructions. To debug your application on the board, refer to Debugging the Project.
Next: Running the Project
Previous: Creating a Nios II C/C++ Application Project
Related Nios II IDE Help Topics
Nios II C/C++ Projects View (Nios II C/C++ Perspective)—Contains details on options available by right-clicking in the Nios II C/C++ Projects view.
Running the Project
Running a project in the Nios II IDE executes the project code so you can analyze the output. You can run a project on these different targets using the Nios II IDE:
Nios II hardware
Nios II instruction set simulator (ISS) ModelSim hardware simulator
This tutorial discusses running on a Nios development board (i.e., a Nios II hardware target) and on the ISS.
Running has the following basic steps.
To configure the hardware:
Note: This step is not necessary for the ISS.
When targeting Nios II hardware, you must configure the FPGA on the development board with your project's associated SOPC Builder system. The factory-programmed SOPC Builder system (i.e. the FPGA hardware design) on the Nios development board is different than your project's SOPC Builder system. Therefore, your executable code will not run unless you configure the FPGA with the expected SOPC Builder system.
Note: You only need to configure the FPGA when you reset the board or if the SOPC Builder system file changes. Normally, you configure the FPGA once after you apply power to the board, and the configuration persists through the duration of the Nios II IDE session.
To configure the FPGA, perform the following steps:
1. Click the tutorial project in the Nios II C/C++ Projects view.
2. Perform one of the following actions to launch the Quartus II Programmer. The Quartus II Programmer is a tool for configuring Altera FPGAs via a JTAG download cable, such as the USB Blaster.
o
On Windows, click Quartus II Programmer... on the Tools menu.o
On Linux, launch the Quartus II software, and click Programmer on theTools menu.
3. Click Add File... in the Quartus II Programmer to browse to the SRAM object file (.sof) for your project. The Select Programming File dialog box appears. 4. Browse to <Nios II EDS install path>/examples/verilog/<Nios development
board>/full_featured, which is the location of the full_featured example
hardware design that corresponds to your Nios development board.
5. Click the file NiosII_cycloneII_2c35_full_featured.sof, then click Open. You return to the Quartus II Programmer.
6. Turn on the Program/Configure checkbox for the target device.
7. Click Start. When the progress meter progresses to 100%, configuration is complete.
Note: If Start is not enabled, click Hardware Setup to configure your Altera download cable.
8. Close or minimize the Quartus II Programmer and return to the Nios II IDE.
Note: If you are targeting a board other than the Nios development board, you need to configure the Quartus II programmer differently, as specified by the board designer. You can save the Quartus II configuration settings to a chain descriptor file (.cdf), eliminating the need to configure the Quartus II programmer every time you configure the device.
The board is now configured, and ready to run the project's executable code.
To run the project:
You can run your project on your target hardware, or on the ISS. Running on Hardware
After configuring the target hardware, perform these steps to download and run the executable code:
1. Right-click the tutorial project in the Nios II C/C++ Projects view.
2. Point to Run As, and then click Nios II Hardware. After a moment, the board's LEDs, seven-segment display, and LCD screen count from 0x00 to 0xff, pause, and then repeat.
The Console view in the IDE also displays the following: **************************
* Hello from Nios II! * * Counting from 00 to ff * **************************
00, 01, 02, 03, 04, 05, 06, 07, 08, 09, 0a, 0b, 0c, 0d, 0e, 0f, 10, 11, 12, 13, 14, 15, 16, 17, 18, 19, 1a, 1b, 1c, 1d, 1e, 1f, Congratulations! The program is running on your development board.
Note: If nothing displays on the LCD screen, disconnect the CompactFlash card, and repeat the steps. The CompactFlash and LCD screen share lines on the Nios
development board, sometimes causing conflicts.
When targeting Nios II hardware, the Run As command does the following: 1. Creates a default run/debug configuration for the target board.
Note: This step usually completes automatically without user intervention. If it cannot (the most common cause is that you have multiple JTAG download cables installed), the IDE displays an error message, and you must manually set up a run configuration.
2. Builds the project. If the project is not up-to-date, then the IDE builds it first to generate an up-to-date executable file.
3. Establishes communication with the target board, and verifies that the expected SOPC Builder system is configured in the FPGA. If the FPGA is not configured properly, you should repeat the steps to configure the hardware.
4. Downloads the executable file (.elf) to memory on the target board. 5. Instructs the Nios II processor to begin executing the code.
After using the Run As command once, to run again click Run on the toolbar.
Running on the ISS
To run using the ISS, perform these steps to run the executable code: 1. Right-click the tutorial project in the Nios II C/C++ Projects view.
2. Point to Run As, and then click Nios II Instruction Set Simulator. After a moment, output displays in the Console view. The count output appears very slowly because there are delay loops (usleep function calls) in the code. The ISS does not model the LED, seven-segment display, or LCD peripherals. Only the console output displays in the Console view.
To analyze the output:
Program output appears on the development board and in the Console view of the Nios II IDE. The Console view maintains a terminal I/O connection with a communication device connected to the Nios II processor in the SOPC Builder system, such as a JTAG UART. When the Nios II program writes to stdout or stderr, the Console view displays the text. The Console view can also accept character input from the host keyboard, which is sent to the processor and read as stdin. (The count_binary.c program does not read any input, so typing in the Console view when running this project has no effect.)
To terminate the terminal connection to the target, click Terminate in the Console view. Terminating only disconnects the host from the target; the target processor continues executing.
After successfully running the project, you are ready to learn how to use the debugger in the next section of the tutorial.
Next: Debugging the Project
Previous: Building the Project
Related Nios II IDE Help Topics
About Running and Debugging Projects
Instruction Set Simulator (ISS)—Contains details on the capabilities and limitations of the ISS.
Nios II C/C++ Projects View (Nios II C/C++ Perspective)—Contains details on options available by right-clicking in the Nios II C/C++ Projects view.
Related Topics on the Web
AN 351: Simulating Nios II Embedded Processor Designs at
Debugging the Project
The Nios II IDE contains an integrated debugger that allows you to debug your program on Nios II hardware or on the instruction set simulator (ISS) . This topic introduces the main features of the debugger. The tutorial assumes you are working with a Nios II hardware target. The process is the same for debugging on the ISS, with the exception of steps that involve the target hardware.
Note: When debugging on Nios II hardware, the FPGA on the development board must be configured with your project's associated SOPC Builder system. If you configured the FPGA before running your project in the previous tutorial step, you do not have to reconfigure the FPGA again unless you reset the board or remove power. If you need to configure the FPGA, follow the steps to configure the hardware in the Running the Project
tutorial topic.
These sections describe how to control the flow of a debug session.
To display line numbers next to each line of code in the editor: 1. Click Preferences on the Window menu.
2. Expand General. 3. Expand Editors. 4. Click Text Editors.
5. Turn on Show line numbers. 6. Click OK.
To download executable code and start the debugger:
1. Right-click the tutorial project in the Nios II C/C++ Projects view, point to Debug
As, and then click Nios II Hardware.
2. If the Confirm Perspective Switch dialog box appears, click Yes.
After a moment, you see the main() function of the Count Binary design in the editor. There is a blue arrow next to the first line of code, as shown below, indicating that execution is stopped on this line. Note that the exact line numbers might vary on your screen.
Notice that the perspective of the Nios II IDE changed from the Nios II C/C++ development perspective to the Debug perspective. A perspective is a different
configuration of the Nios II IDE workbench. Refer to Related Topics for more information about perspectives. You can switch between perspectives anytime by pointing to Open Perspective on the Window menu or by clicking on the shortcut buttons near the upper-right of the Nios II IDE window.
When targeting Nios II hardware, the Debug As command does the following: 1. Creates a default run/debug configuration for the target board.
Note: This step usually completes automatically without user intervention. If it cannot, the IDE displays an error message and you must manually set up a run/debug configuration. The most common reason for manual intervention is having multiple JTAG download cables installed. In this case you need to select one manually.
2. Builds the project. If the project is not up-to-date, then the IDE builds it first to generate an up-to-date executable file.
3. Establishes communication with the target board, and verifies that the expected SOPC Builder system is configured in the FPGA.
4. Downloads the executable file (.elf) to memory on the target board. 5. Sets a breakpoint at main().
6. Instructs the Nios II processor to begin executing the code.
After using the Debug As command once, you can click Debug on the toolbar to start the debugger again.
To resume and suspend execution:
Click Resume in the Debug view to resume execution. You can also resume execution by pressing F8.
Click Suspend in the Debug view to suspend execution. If the processor suspends outside the scope of the current file, the IDE opens the source file corresponding to the current program counter.
Click Terminate in the Debug view to end the debug session and disconnect from the target.
Note: The Debug buttons are context sensitive, depending on the currently highlighted selection in the Debug view. Make sure you select an item under Nios II Elf
Refer to Related Topics for more information about the Debug view.
If you accidentally terminate the debug session, or the download cable connection is interrupted, you can easily start a new debugging session by clicking Debug on the toolbar.
To step through the C/C++ code line by line:
Click Step Into. If executing a line of code that calls a function, the debugger steps into the function. Otherwise it executes the line of code and suspends on the next line in the current function. You can also step into a function by pressing F5. Click Step Over. If executing a line of code that calls a function, the debugger executes the entire called function and suspends on the next line in the current function. Otherwise it executes the line of code and suspends on the next line in the current function. You can also step over a line of code by pressing F6. Click Step Return. The debugger finishes executing the current function, returns to the calling function, and suspends on the next line in the calling function. You can also step return from a function by pressing F7.
To use breakpoints and watchpoints:
You can set breakpoints on specific lines of code, remove breakpoints, or disable them temporarily. Enabled breakpoints suspend execution when the processor reaches that line of code.
To set a breakpoint for this example:
1. If the processor is running, select Thread [0] (Running) in the Debug view and click Suspend. You can only add breakpoints while the processor is suspended. 2. Click the count_binary.c tab in the editor.
3. On the Edit menu, click Find/Replace....
4. Type count == 0xff in the Find box, then click Find. The editor displays the appropriate line of code.
5. Click Close in the Find/Replace dialog box.
6. Double-click in the margin next to the line if( count == 0xff ) to set a
breakpoint. You can also right-click the margin and click Toggle Breakpoint. The breakpoint symbol appears in the margin, as shown below.
Note: You must click in the margin to the left of the line of code. Clicking within the editor does not affect breakpoints.
7. Click Resume in the Debug view. The processor resumes and then suspends just before executing the line of code with the breakpoint. The editor displays an arrow in the margin next to the suspended line of code. It might take a moment for the program to execute to the breakpoint. Resume again to iterate through the loop another time.
To remove a breakpoint:
Double-click the breakpoint symbol in the margin. You can also right-click the breakpoint symbol, and then click Toggle Breakpoint.
To disable a breakpoint:
Right-click the breakpoint symbol, and then click Disable Breakpoint. Disabling temporarily prevents a breakpoint from suspending the processor while leaving it in place for future reference.
To use Breakpoints view:
1. Click the Breakpoints tab in the upper-right pane of the Debug perspective to display the Breakpoints view. This view displays the location and status of all breakpoints you have previously set on specific lines in the code every time the processor hits a breakpoint or suspends. Values that have changed since the last time the processor suspended display in red.
2. Right-click a breakpoint in the list, and then click Enable, Disable, or Remove to change the status of the breakpoint.
The Breakpoints view also displays watchpoints. Refer to Related Topics for more information about debugging with watchpoints.
Several default views in the Debug perspective help you to organize, navigate, and analyze your project during a debug session. The Nios II IDE updates each view every time the processor hits a breakpoint or suspends. Values that have changed since the last time the processor suspended display in red.
To view disassembly:
When the processor suspends, Disassembly view automatically appears. You can also open the Disassembly view from the Window menu by pointing to Show View, and clicking Disassembly. This view displays the assembly language instructions interleaved with the C/C++ source code.
Click Instruction Stepping Mode in the Debug view toolbar to allow single stepping through the individual assembly instructions. Stepping through assembly code advances the instruction pointer in the Disassembly view. Because multiple assembly instructions represent a single line of C/C++ code, the instruction pointer might not advance in the C/C++ Editor view with each step through the assembly instructions.
Click Instruction Stepping Mode a second time to return to single stepping in the Editor view at the C/C++ statement level.
Note: If you do not have the source code for a function, stepping through the code automatically uses Disassembly view regardless of whether instruction stepping mode is on or off.
To view stack trace:
The Debug view displays the program execution stack and dynamically updates it as you step through code. Any time the processor suspends, the Debug view displays the name of the suspended function, and the sequence of function calls that led up to the current program counter. This view provides a snapshot of your current position within the program execution.
Refer to Related Topics for more information about the Debug view.
To view execution trace:
On the Window menu, point to Show View, and then click Trace. When executing a program on a Nios II hardware target, the Trace view displays the exact execution trace of the program running in hardware. This view provides a snapshot of the specific code that executed to arrive at the current position.
To track variables:
Click the Variables tab in the upper-right pane of the Debug perspective to display the Variables view. You can also point to Show View on the Window menu, and then click Variables.
Local Variables
The Variables view automatically displays all variables local to the scope where the processor is suspended. Use the Variables view to track and change variable values on-the-fly during a debug session. This is useful to test your program's response to specific conditions, or to force a loop index to skip over a loop.
The Variables view is context sensitive, depending on the currently selected function in the Debug view's stack trace display. Selecting different functions allows you to see the variables (and their current values) defined at each level of the stack trace.
Note: Hovering the mouse over a variable in the source code displays the variable's value as a tool-tip. This is often the easiest way to see the value of a variable in the current scope.
To change the value of a variable, right-click the variable name and then click Change Value.... This opens the Set Value dialog box, which allows you to specify a new value for the variable.
You can also selectively display global variables, which are variables defined outside the scope of all functions, but are available from within any function. In the count_binary.c example, to track the global variable count in the Variables view, do the following:
1. If the processor is running, click Thread [0] (Running) in the Debug view, and click Suspend.
2. Right-click in the Variables view and then click Add Global Variables..., or click Add Global Variables on the Variables view toolbar.
3. Scroll down and turn on count.
4. Click OK. The variable count and its current value appears in the Variables view. Because count is declared as a char type, it displays in ASCII format by default in the Variables view.
Now, every time execution suspends, the Variables view displays the value for the variable count.
Variables Display Format
You can change the display format of variable values appearing in the Variables view in two ways. For example, to change the display format of a single variable to hexadecimal, do the following:
Right-click the variable, point to Format, and then click Hexadecimal. The format of the value changes.
To change the display format of all variables to hexadecimal, do the following: 1. On the Window menu, click Preferences.
2. Expand C/C++, Debug.
3. Select Hexadecimal in the Default variable format list. 4. Click OK.
The format of the values for local variables changes the next time you resume
execution. The format of the values for global variables changes the next time you restart the debug session.
Refer to Related Topics for more information about variables.
To track watch expressions:
Click the Expressions tab in the upper-right pane of the Debug perspective to display the Expressions view. You can also point to Show View on the Window menu, and then click Expressions. This view displays user-specified C expressions evaluated at the current scope. When the processor suspends, the Expressions view evaluates each of the expressions, and displays the value.
In the count_binary.c example, to track the arbitrary expression count==5 in the Expressions view, do the following:
1. If necessary, use a breakpoint to stop execution on the line if( count == 0xff ), as described in the breakpoints section of this topic.
2. Highlight the expression count == 0xff in the code.
3. Right-click and then click Add Watch Expression.... The Add Watch
Expression dialog box appears with the Expression to watch box automatically filled in with the selected text: count==0xff.
4. Change Expression to watch to count==5.
5. Click OK. The expression appears in the Expressions view in the upper-right window.
Now, every time execution suspends at a breakpoint, the Expressions view evaluates the expression count==5. If execution suspends when count equals 5, then count==5 evaluates true, signified by the expression count==5=1.
You can assign IDE preferences to show expressions values in a different format, such as hexadecimal, as described in the variables section of this topic. However, you must restart the debug session to force the format to change. Refer to Related Topics for more
information about expressions.
Note: FS/2 must be disabled in the Debug dialog box in order for native watchpoints to work.
To view and edit registers:
Click the Registers tab in the upper-right pane of the Debug perspective to display the Registers view. You can also point to Show View on the Window menu, and then click Registers. This view displays the contents of registers.
To edit the contents of a particular register, right-click it in the Registers view and click Change Value....
Note: Altera recommends that you do not manually edit register values, because it could cause your program to behave unpredictably.
You can assign IDE preferences to show register values in a different format, such as hexadecimal, as described in the variables section of this topic. However, you must restart the debug session to force the format to change. Refer to Related Topics for more
information about registers.
Click the Memory tab in the upper-right pane of the Debug perspective to display the Memory view. You can also point to Show View on the Window menu, and then click Memory. This view displays the contents of memory.
The Memory view allows you to track multiple locations in memory without having to continually type in addresses by hand. You can track constants and expressions, which allows you to search for a memory location by symbolic name.
The following steps demonstrate various uses of the Memory view:
1. If the processor is running, click Thread [0] (Running) in the Debug view, and then click Suspend.
2. In the Memory view, click Add Memory Monitor. 3. Type 0x00 and click Ok. Note the contents.
4. Right-click in the memory contents area, and click Format....
5. Select Column Size, and then click 2. Note how the display changes. 6. Click Add Memory Monitor a second time.
7. Type &count and click Ok. This displays memory contents at the location where variable count is stored.
8. Click on the highlighted values in the memory contents area and highlight just the two digits representing the eight bit value for count.
9. Type a value, such as 66, and press Enter. Note the memory contents in the Memory view and the value of count in the Variables view change.
10. Click Add Rendering at the upper-right of the view.
11. Click ASCII and then click Ok. Note the additional tab displaying memory contents in ASCII format.
Note: If the memory region displayed is located in read-only memory, the Nios II IDE does not respond to attempts to edit the memory content.
Refer to Related Topics for more information about memory.
Next: Editing the Project Properties
Previous: Running the Project
Related Nios II IDE Help Topics
About Running and Debugging Projects
Instruction Set Simulator (ISS)—Contains details on the capabilities and limitations of the ISS.
Advanced Debugging Features by FS2
Related Eclipse and CDT Help Topics
C/C++ Development User Guide > Reference > C/C++ Views and Editors > Debug view > Debug view
C/C++ Development User Guide > Tasks > Running and Debugging > Adding expressions
C/C++ Development User Guide > Tasks > Running and Debugging > Debugging a program > Adding watchpoints
memory
C/C++ Development User Guide > Tasks > Running and Debugging > Working with registers
C/C++ Development User Guide > Tasks > Running and Debugging > Working with variables
Editing the Project Properties
A project's Properties dialog box controls how the program interacts with the system hardware and how the Nios II IDE builds the application. Settings available vary for each project type. Due to the way the Nios II IDE separates and associates Nios II C/C++ application projects and Nios II system library projects, settings in a Nios II system library project can significantly impact the Nios II C/C++ application project.
To view and modify Nios II C/C++ application project properties:
Right-click on the project in the Nios II C/C++ Projects view and click Properties.The Nios II IDE automatically sets most Nios II C/C++ application properties correctly for you.
To view and modify system library properties associated with a Nios II C/C++ application project:
Right-click a Nios II C/C++ application project, and then click System Library Properties.
Alternatively, you can right-click the Nios II system library project directly, and then click System Library Properties. System library properties specify how your program interacts with the underlying hardware.
To reduce code footprint by editing system library properties:
This example reduces the code size of your executable program by adjusting the system library properties. A significant reduction in code size is possible beyond the reduction shown here, and the system library properties control more than code footprint. This section simply demonstrates one way that editing system library properties can impact your system.
First, rebuild the project and determine the original code size. Perform the following steps: 1. If a debug session is still running, click Terminate in the Debug view to
disconnect from the target.
2. Click the Nios II C/C++ perspective button on the perspective's tab near the upper-right corner of the window. The Nios II C/C++ perspective appears. 3. Click the tutorial project in the Nios II C/C++ Projects view, and then click
Clean.... on the Project menu. The Clean dialog box appears. 4. Select Clean projects selected below.
5. Scroll down to confirm tutorial is turned on. 6. Turn off Start a build immediately. 7. Click OK.
8. Right-click the tutorial project in the Nios II C/C++ Projects view, and click Build Project.
When the build completes, you can see the size of the resulting executable code, displayed in the Console view:
Info: (tutorial_project.elf) 78 KBytes program size (code + initialized data).
Note: The program size you see might differ depending on your target SOPC Builder system.
Next, change the system library settings to reduce code size. Perform the following steps: 1. Right-click the tutorial project in the Nios II C/C++ Project view, and click
System Library Properties. The Properties dialog box appears.
2. Click System Library in the left-hand pane. The System Library page appears. 3. Turn off Clean exit (flush buffers)—This option affects how the program
behaves after main() returns. This example program, similar to most embedded programs, never returns from main(). Therefore, the program has no need for any post-main() code.
4. Turn on Reduced device drivers—This option causes each device driver in the system library to link in a reduced foot-print version of its driver, if it has one. In this example, the JTAG UART switches to a smaller, polled-operation driver (by default it is interrupt-driven), which executes slower but has a smaller code foot-print. The LCD driver's response to this option is to include no driver, and therefore the LCD will stop functioning.
5. Click OK to accept these settings. You return to the Nios II IDE workbench. 6. Right-click the tutorial project in the Nios II C/C++ Projects view, and click Build
Project. 7.
When the build completes, you can see the size of the resulting executable code, displayed in the Console view:
Info: (tutorial_project.elf) 53 KBytes program size (code + initialized data).
Note: The program size you see might differ depending on your target SOPC Builder system.
Congratulations! You have completed the Software Development Tutorial.
You can learn more about the Nios II IDE in the Nios II IDE Help, and by reading the Nios II documentation located at <Nios II EDS install path>/documents/index.htm. On Windows, you can click Start, point to Programs, Altera, Nios II EDS <version>, and then click Nios II <version> Documentation.
Previous: Debugging the Project
Related Nios II IDE Help Topics
Properties Dialog Box
Related Topics on the Web
Nios II Software Developer's Handbook at
www.altera.com/literature/hb/nios2/n2sw_nii5v2.pdf—Contains details on writing programs for the Nios II processor.
Creating Projects
About Nios II IDE Projects
An individual Nios II IDE project is a group of files treated as a unit, containing source code, makefiles, binaries, and other related files. The Nios II IDE provides the following project types. A typical executable program consists of two or more individual projects working in conjunction. The most common combination is a Nios II C/C++ application project that depends on a Nios II system library project.
Nios II C/C++ application project:
A Nios II C/C++ application project contains a C/C++ program, usually including a project's main() function. Building a Nios II C/C++ application project results in an executable file (.elf) that you can run on target hardware, the Nios II instruction set simulator (ISS), and the ModelSim hardware simulator. A Nios II C/C++ application project depends on a single system library project and might reference functions in a Nios II C/C++ library project.
A Nios II C/C++ application project is a Nios II IDE managed-make project. The Nios II IDE creates the necessary makefiles and manages the project for you.
Nios II system library project:
A Nios II system library project serves as an interface to the target hardware. A Nios II system library project contains all settings that affect how a program interacts with the target, including the hardware abstraction layer (HAL) code. Nios II C/C++ application projects depend on a Nios II system library project, making the application code portable to other Nios II systems. Multiple Nios II C/C++ applications can share a single Nios II system library.
A Nios II system library project contains automatically-generated code based on
hardware-specific information provided by the hardware designer, generated during the normal hardware development flow. SOPC Builder generates the following files, which the Nios II IDE uses to create, build, and run projects.
The SOPC Builder system file (.ptf)—This file contains the description of the Nios II processor system, including processor cores, memories, and peripherals. The Nios II IDE uses this file to create and build projects.
The SRAM object file (.sof)—This binary file contains the hardware image of the SOPC Builder system for the target FPGA. The Nios II IDE uses this file to run projects. After downloading the .sof file to the board, the FPGA behaves as specified by the hardware design, which in this case, includes a Nios II processor system.
After building a Nios II system library project, source code for the device drivers for the project is linked to the altera.components project found in the Nios II C/C++ Projects view. The compiled object files reside under the system library project Debug or Release obj directory.
A Nios II C/C++ library project can contain reusable, general purpose functions that multiple Nios II C/C++ application projects can share. A library containing common arithmetical functions is one example. Building a Nios II C/C++ library project results in a .a library file. The Nios II IDE manages these library projects for you. Nios II C/C++ library projects typically do not have dependencies on a Nios II system library project. You can reference Nios II C/C++ library projects from Nios II C/C++ application projects or from other Nios II C/C++ library projects.
Nios II user-makefile C/C++ application project:
Using a Nios II user-makefile C/C++ application project gives you total control over the build process. However, creating and managing the makefile is your responsibility. The Nios II user-makefile C/C++ application project can contain any files required by the makefile, and the result of building the project is whatever you specify in the makefile. A Nios II user-makefile C/C++ application project is nearly the same as a standard make project in the Eclipse C/C++ Development Toolkit (CDT). The main difference is that Nios II user-makefile C/C++ applications use the Nios II toolchain for compiling the code, whereas the CDT requires you to define the toolchain yourself.
The altera.components project:
After creating or building a Nios II project, the source code for the newlib C library, device drivers and software packages is linked to the altera.components project found in the Nios II C/C++ Projects view. These links allow the Editor view to display shared code, so you can set breakpoints in the code during debug.
The altera.components project is created automatically any time the Nios II IDE identifies the need for the shared source code. If you alter or delete any files in this project, the effect is global to all projects in the Nios II EDS installation. If you happen to delete the altera.components project folder, it is automatically recreated.
Project properties control how the project builds and functions. Project dependencies allow a project to reference other projects that reside in your workspace.
Related Nios II IDE Help Topics
About the Nios II IDE Managed-Make Build Environment Creating a New Project
Related Topics on the Web
Nios II literature web page
Nios II Hardware Development Tutorial at
About the Nios II IDE Managed-Make Build Environment
This topic describes the Nios II IDE build environment for building programs based on the Nios II hardware abstraction layer (HAL) system library. If you are a typical user, the Nios II IDE completely manages the build environment for you, relieving you of the need to
understand the inner workings of this managed-make environment.
Internally, the Nios II IDE uses a standard GNU GCC compiler tool chain to compile projects. The Nios II IDE managed make environment translates your settings and actions in the GUI into variables and rules in makefiles. The Nios II IDE manages the contents of the makefiles associated with a project so that you do not need to know anything about makefiles. The Nios II IDE provides a helpful interface for building complex embedded programs, but there is no hidden magic to how the Nios II IDE builds projects; in the end, executable software files are generated by running make.
The Nios II IDE manages the complex task of building software for the Nios II soft-core processor architecture, which can change from project to project. You might find it useful to understand how the Nios II IDE manipulates makefiles if you need to separate the process of building your project from the graphical user interface.
This topic assumes that you are familiar with:
Using the IDE to build projects and browse through project source files
HAL development concepts described in the Nios II Software Developer's Handbook Makefile usage and syntax
The GCC compiler toolchain
For a full understanding of the inner workings of the build environment, opening and reading the makefiles is as important as the information contained in this topic. Examples of all of the makefiles discussed in this topic are located in the directory of any existing project created with the Nios II IDE, or in the directory where the Nios II Embedded Design Suite (EDS) is installed.
The following sections provide more details about the Nios II IDE managed-make build environment.
HAL-Based Projects:
An executable program based on the HAL is constructed using two projects:
A Nios II system library project—The Nios II system library project is used to build a library which contains all of the system-specific device drivers, and HAL system routines. This library is automatically configured to match the associated SOPC Builder system hardware.
A Nios II C/C++ application project—The application project builds the user's application software, and links it with a Nios II system library project.
The Nios II IDE manages the build process for both of these classes of project using the makefiles described in this document.
Configuration information is communicated to the build process using the following files: SOPC Builder system file (.ptf)—The SOPC Builder system describes the hardware configuration, and is generated by SOPC Builder. Every Nios II system library is associated to exactly one SOPC Builder system.
.stf file—The .stf file describes a project's software configuration, and is
generated by the Nios II IDE. For application projects, application.stf identifies the project's associated system library. For system libraries, system.stf contains the information captured through the System Library properties page in the IDE. .cdtbuild file—The .cdtbuild file describes a project’s tool chain options, and is generated by the Nios II IDE. The .cdtbuild file contains the information captured through the C/C++ Build properties page in the IDE.
The .ptf, .stf, and .cdtbuild files are machine-generated files. You should not edit them by hand.
HAL Source Code:
HAL source code is provided in a distributed form, meaning that the source is distributed through a number of components. There is no single directory that contains all of the source used to build the HAL system library. Which components are used to build the system library is dependent on the system configuration (i.e. the SOPC Builder system and .stf files).
Software components provided with the Nios II Embedded Design Suite (EDS) are located in the <Nios II EDS install path>/components directories. Peripheral components are located in the <Altera complete design suite install path>/ip/sopc_builder_ip directories.
All system libraries are built using the altera_hal component, which provides the core HAL functionality, and the processor component, altera_nios2, which contains processor-specific definitions for accessing the hardware. Additional components might also be included which provide device drivers, operating system extension, and/or additional system software (e.g. file systems).
Each component provides a makefile fragment, component.mk, which described the source files it provides, and how they should be built into the system. This is described in more detail below.
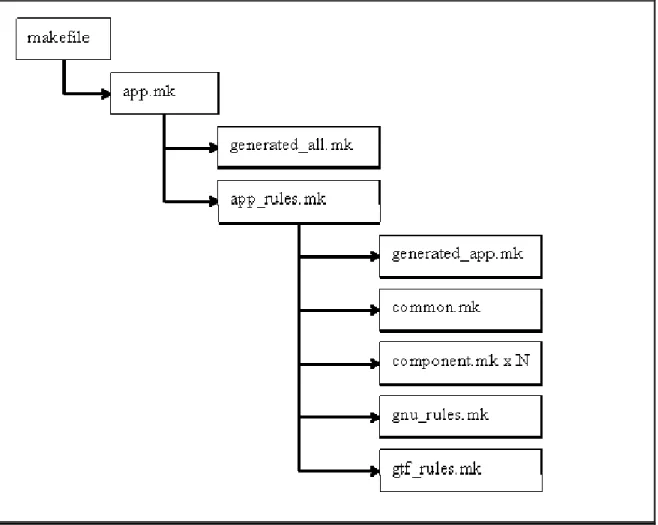
Makefile Overview:
The HAL build system locates the source code supplied by the components using the SOPC Builder system, and information supplied by the user through the Nios II IDE. This is achieved using a number of individual makefiles. At the top level of the build process are the makefiles generated by the Nios II IDE. These include makefile fragments supplied with the altera_hal component. These fragments define the source code to build, and the rules which are to be applied. Figure 1 and Figure 2 below illustrate which files are
included into the top level makefile for application projects and system library projects.